
On January 17th, 2017, Intel released version 10.1.1.42 of their Chipset Device Software.
It is a common misconception that people refer to Intel Software Installation Utility, or also known as Intel Chipset Device Software, as chipset driver or chipset drivers. Because technically speaking, Intel’s INF updates are not drivers, but they do help update important files which will tell Windows how to use Intel integrated hardware. So, there is no harm keep calling them Intel Chipset Drivers.
Download Intel Chipset Device Software
Note: If you are not having problems with your hardware, for example, your display image is not showing correctly, or that you are having trouble listening through your speakers, then the update is not necessary for you.
But if you really want the update, just make sure you have made a backup of your system and go for it. Intel chipset driver rarely cause problems.
To download Intel Chipset Drivers, just go directly to Intel:
Intel Chipset Device Software (INF Update Utility)
Choose from the left side of the pane the correct version for your operating system. Then just follow the instructions on screen to continue.
Note: If you are not sure if this is the right driver or software for your component, just run Driver Easy to automatically detect any possible driver updates.
Driver Easy is a very easy-to-use program that tells you if you need to update your device drivers, and will later prompt you to install after it helps you download them.

It helps you save tons of time and energy to search for and download the missing or outdated drivers for your computer.
If you are looking for more advanced features and an incredible speed to download all the drivers need in just minutes, you must have a try at the professional version of Driver Easy. If it turns out that you don’t find the pro version satisfying enough, just ask for a refund 30 days within the purchase, and we will help you take care of it, guarantee!
What’s with the waiting, come on and have a try at Driver Easy now!
9
9 people found this helpful
Available in other languages
Wir bieten Ihnen zwei üblichen Methoden zum Aktualisieren Ihres Intel Chipsatz Treiber unter Windows 10, 7 und 8.1 an.
Si vous avez besoin de mettre à jour vos pilotes de Chipset Intel, vous pouvez lire cet article pour voir comment faire.
Easily download the latest Intel chipset driver on your Windows PC without any problem using the best ways explained below.
Chipset drivers play an important role, and Intel is a pioneer in building them. Chipsets control communications between components in your system. Therefore, keeping them updated is recommended to keep up with system performance and improve it. This post will explain how to get the latest chipset driver on our Windows 11/10/ and other versions of the Windows operating system.
What should you do before updating chipset drivers?
Before you update the chipset driver, check the motherboard to confirm the motherboard model number and serial number. You will need it to update the drivers for Chipset.
To find the motherboard model number follow these steps:
1. Press Windows + R to open the Run window.
2. Type cmd and press Enter key.

3. In the Command Prompt window type – wmic baseboard get product,manufacturer,version,serialnumber, and press the Enter key.

Note: There are no spaces between the modifiers. You just need to enter a comma between them, as explained above.
4. You will now get the information about the motherboard.
The Easiest Method to Update Intel Chipset Drivers
This post will discuss the different methods to update Intel Chipset drivers. However, users prefer and recommend the method use Advanced Driver Updater. This driver updating tool is capable of automatically finding missing and outdated drivers. Moreover, it even shows the latest and most compatible updates for them. The process of using Advanced Driver Updater is simple, and all types of users can use it. You can download the software by clicking the button below.
Read Also- How to Download Intel Iris Xe Graphics Driver
Best Ways to Update Intel Chipset Driver on Windows 11,10,8.1,8,7
Method 1: Updating Intel Chipset INF Driver via Device Manager
This is the manual way to update the Intel Chipset driver on Windows. To use it, follow these steps –
1. Press Windows + X > Device Manager.
2. Double-click the System devices in the Device Manager window and expand it.
3. Look for Intel Chipset driver and right-click > Update driver.
4. Select Search automatically for drivers from the new window.

Wait for Windows to look for an available driver update. If available, it will be automatically downloaded and installed. Restart the PC as the process finishes, and that’s it.
However, you will get the message that the best driver is running in most cases. In such a situation, we suggest going to the manufacturer’s website to confirm.
Must Read- How to Download & Update Intel HD Graphics 620 Driver
Method 2: Update the Intel Chipset Driver via Intel’s Website
Another way to download the latest Intel Chipset driver is to visit the official website of Intel. Follow the steps to learn the process:
1. Visit the Intel website.
2. Click on the Download Center button.

3. Select Chipsets from the list of options.

4. Select the Chipset specification & click on the download button.

5. Wait for the file to be downloaded.
6. When done, double-click on the setup file & follow the instructions on the screen to install the driver update.
7. Restart the PC and use the system; you should not face any problems.
The above two methods are manual and time-consuming. If you are short on time, you can go with the automatic method explained below.
See This- How To Download And Update Intel Bluetooth Driver For Windows 10
Method 3: Update Intel Chipset Drivers Automatically With Advanced Driver Updater
For updating drivers, Advanced Driver Updater is the most efficient method. Using this risk-free utility, you can automatically update drivers, schedule driver scanning, and update the driver using either the trial or paid version.
Using the trial version, you can update single drivers, while the registered version allows you to update all corrupt drivers in a go. It also offers a 60-day money-back guarantee.
To use the tool, follow these steps:
1. Download and install Advanced Driver Updater.
2. Run the tool and click Start Scan Now.

3. Wait for the scanning to finish.
4. Check scan results. If using the trial version, click the Update driver next to the chipset driver. However, click Update All to update all outdated drivers using the registered version.

5. Restart PC to apply changes, and that’s it. You will have an outdated Intel chipset driver updated in just a few clicks.
See Also- How To Fix Windows 11 Bluetooth Not Working Problem
FAQ- About How to Update Intel Chipset Drivers
Wrap Up :
Above, we explained manual and automatic ways to update the Intel chipset driver. You can use any at your convenience. However, if you are looking for a secure and reliable way to update drivers go with Advanced Driver Updater. This amazing driver updating tool will not disappoint you.
We hope you enjoyed the tutorial; please share your thoughts in the comments. If you have any product-related queries, please email support@systweak.com.
Если вы видите это сообщение, значит, произошла проблема с загрузкой файлов в стилей (CSS) нашего сайта. Попробуйте сбросить кэш браузера (Ctrl+F5).
Если это не поможет, а вы находитесь в регионе, где возможны ограничения интернет-трафика с российских серверов — воспользуйтесь VPN.
|
зачем нужен этот драйвер? intel chipset driver — это совокупность драйверов, предназначенных для обслуживания чипсетов компании Intel. Они их наделали много, поэтому весь пакет драйверов довольно велик, но при их установке проблем нет, так как устанавливаются только те, которые установщик обнаружит на материнской плате. Спокойно запускаете такой пакет, желательно последней версии, скачанный с сайта Intel, и ждете окончания установки. Удалять старые драйвера нет необходимости. автор вопроса выбрал этот ответ лучшим silve 11 лет назад Типовые, стандартные драйвера от Intel для материнских плат на чипсетах Intel. При установке этих драйверов задействуются такие устройства и компоненты на материнских платах как мосты, контроллеры жестких дисков, контроллеры шины, таймеры и другие системные устройства. Обычно устанавливаются самыми первыми для включения системных устройств, уже после них ставятся драйвера на видео, звук, сетевые карты и пр. Знаете ответ? |
Contents:
- Intel Chipset Driver Overview
- What is Chipset?
- What Chipset DO I Have?
- How to Update Intel Chipset Driver?
- How to Check Intel Chipset Driver Version I Installed on Windows 10?
Intel Chipset Driver Overview:
Chipset is basic and important hardware in the motherboard. And the chipset driver is also necessary when you reinstall a system or rebuild a computer. Updating the chipset driver is not necessary, but when you reinstall a Windows system, you should better update it. This article will talk about Intel chipset and how to update the Intel chipset drivers. What is worth noting is that Intel Chipset Device software will also be utilized to get Intel Chipset driver updated for Windows 10.
What is the chipset?
Chipset is the core component of the motherboard. If the CPU is the heart of the entire computer system, the chipset will be the torso of the entire body. For the motherboard, the chipset almost determines the function of the motherboard, which affects the performance of the whole computer system. It is the soul of the motherboard.
What Chipset DO I Have?
Is there a way to identify my chipset? Many people may in doubt. Actually, there are two ways you can find the result.
Go to Device Manager, expand the IDE ATA/ATAPI controllers and you will see the chipset brand such as Intel, AMD, VIA, NVIDIA, etc. So this is the chipset brand you have.
Expand the system devices, it will list several chipset name adapters and maybe there is a southbridge on Intel ie x58, p55, h55, etc. Or you will see chipset for System and Graphics Controller, or Processor to AGP Controller.
You can use the CPU-Z software to help you recognize your motherboard chipset type.
Download CPU-Z, install and run it on your computer.
In the Mainboard tab, you will see the chipset brand and southbridge.
Now you have known the chipset type for your laptop. If necessary, go ahead to update Windows 10 Intel Chipset drivers.
How to Update Intel Chipset Drivers on Windows 10?
After you know the Intel chipset version, you can download the latest version of Intel chipset driver. Here are 3 ways you can update it on Windows 10. You can choose one way as you like.
Methods:
1: Update Intel Chipset Driver Automatically
2: Download Intel Chipset Software Installation Utility
3: Update Intel Chipset driver From Intel Site
Solution 1: Update Intel Chipset Driver Automatically
When you go to device manager and want to find the chipset items to update it, but it is different from other devices, there is no chipset adapter item. So it is hard to identify which one is chipset driver.
Actually, you can update the driver software including chipset driver automatically by the tool of Driver Booster.
Driver Booster is a suitable Intel Chipset driver finder, downloader, and updater. Using it, your computer hardware such as motherboard chipset drivers can be scanned easily. Then it will recommend you all the latest version of drivers, and remind you if you want to update them.
For using this software, you need to Download Driver Booster at first. Then double-click the setup file to install it with the following guideline.
1. Hit the Scan. Driver Booster will scan all your hardware devices and check all drivers.

2. In the search result, find out IDE, ATA/ATAPI Controllers and then decide to Update the Intel chipset driver.
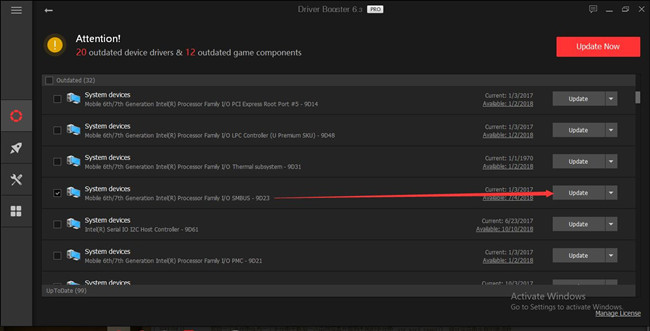
Here you may also need to locate System devices to see if there are any Intel chipset related drivers here, like Intel SMBus 2.0 driver.
After the Intel chipset drivers downloaded, Driver Booster will automatically install the Intel drivers for Windows 10.
Now you have your Intel chipset driver updated quickly and automatically.
Solution 2: Download Intel Chipset Software Installation Utility
Because chipset is a relatively complex device, and Intel wants to provide the better users services, so they released a tool – Intel Chipset Software Installation, Intel users can use the software to update the Intel chipset driver automatically as Intel Chipset drivers are overwritten with Intel Chipset Device Software.
1. Enter the Intel page to download INF Update Utility.
2. In the download page, you will see the Intel latest chipset version file is Chipset_10.1.1.42_Public.zip, it was released on 1/17/2017.
3. Download Chipset_10.1.1.42_Public.zip. You should agree with the agreement. The zip file contains three files: exe, mup.xml, and WixLicenseNote.txt. You can also download the SetupChipset.exe file.
4. Extract the file and double-click the SetupChipset.exe file to install the latest Intel chipset driver.
5. From the Installation guide, click Next.

6. Click Install to start to install the newest version of chipset driver.
7. Click Finish. Now your Chipset driver is updated.
That is how you can use Intel Chipset device utility to update the chipset drivers for Windows 10.
Solution 3: Update Intel Chipset driver From Intel Site
If you are using a brand laptop or desktop and want to download and update the chipset driver, there is also an easy way to do it. You do not need to know what brand is the chipset device.
Go to the laptop or desktop manufacturer’s website, input your computer model and choose the Windows 10 version, there will list all the device drivers: video adapter, network adapter, network interface card, of course, the chipset drivers.
1. Navigate to the Intel official site.
2. And then search in the search box your Intel chipset model.

If you have no idea about what Intel Chipset you are using, refer to the parts below.
3. Then download and install Intel Chipset drivers all by yourself.
For a computer savvy, you may think of updating chipset driver for Windows 10 as a simple matter. If not, just try Driver Booster or Intel Chipset device software to get the Intel chipset drivers more easily.
How to Check Intel Chipset Driver Version I Installed on Windows 10?
What the chipset driver version I installed for my computer? Before you update the chipset, you may want to know what Intel chipset version you have. There is an easy way you can find it.
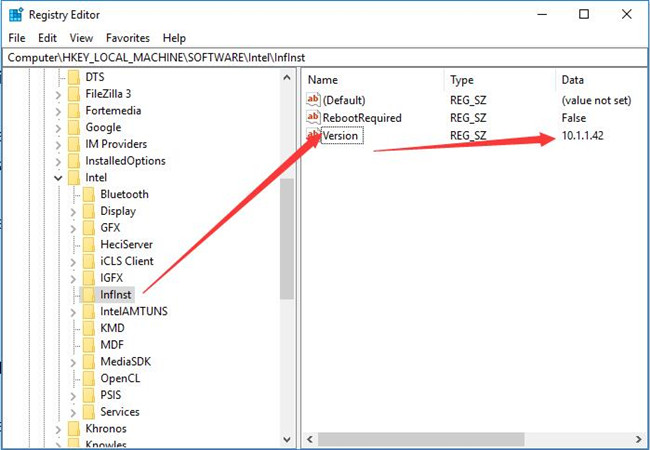
1. Type regedit in the search box to run the Registry Editor.
2. Locate at here: HKEY_LOCAL_MACHINE\SOFTWARE\Intel\InfInst.
3. In the Inflnst folder, there is a version file and you will see the version data is 10.1.1.42, it is your current Intel chipset driver version.
So you can download the latest version of chipset driver and install it fast. Wish you can get more knowledge about chipset from this article.
More Articles:
How to Find Intel Graphic Card Models on Your Computer
How to Download Intel HD Graphic Drivers on Windows 10, 8, 7