
Из журнала событий Windows можно получить логи установки, обновления и удаления программ, а также определить конкретного пользователя, который запустил установку или удаление приложения.
Для просмотра журнала установки приложений:
- Откройте консоль журнала событий Event Viewer (
eventvwr.msc
) - Перейдите в раздел Windows Logs -> Application
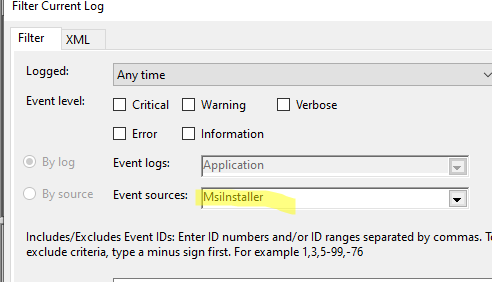
- Щелкните правой кнопкой по журналу и включите фильтр (Filter current log)
- В качестве источника событий выберите
MsiInstaller
.
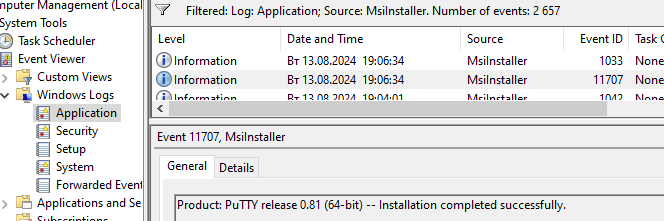
События с EventID 11707 содержат информацию об успешной установке программы (
Installation completed successfully
).
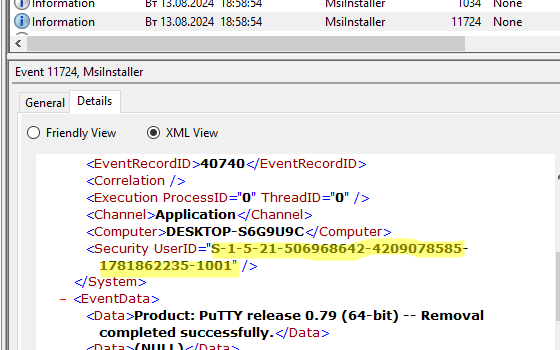
EventID 11724 – события успешного удаления пакета (
Removal completed successfully
).
В этом журнале будут фиксироваться только события установки приложений, упакованных в MSI/MSP пакеты (или в EXE файлы, которые фактически запускают установку MSI пакета с помощью
msiexec.exe
). Для установки MSI пакетов используется служба установки Windows Installer (
msiserver
), которая позволяет выполнить корректную установку удаление или откат установки приложения. Некоторые приложения, распространяемые через EXE файлы не используют службу msiserver и соответственно не пишут такие события. - Если вы хотите определить, какой конкретно пользователь удалил или установил программу, перейдите на вкладку Details в свойствах события. Переключитесь в режим XML view. SID пользователя указан в значении атрибута Security UserID. Скопируйте его.

- Чтобы конвертировать SID пользователя в имя учетной записи, выполните команду:
wmic useraccount where sid='S-1-5-21-506968642-4209078585-1781862235-1001' get name
Команда вернет имя пользователя, который инициировал установку или удаление программы.

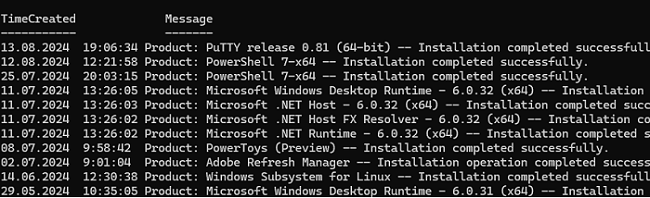
Если нужно извлечь события установки/удаления программ из журнала событий с помощью PoweShell, воспользуйтесь командлетом Get-WinEvent. Например, вывести журнал успешных установок программ:
Get-WinEvent -FilterHashtable @{LogName="Application";ID=11707;ProviderName='MsiInstaller'} | Select TimeCreated,Message
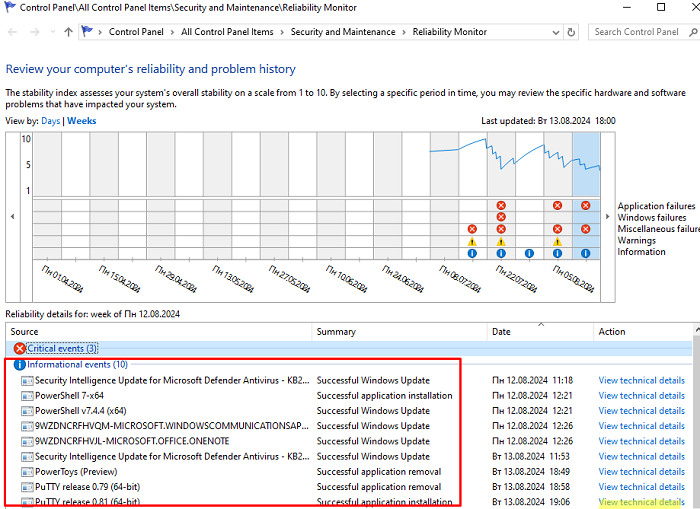
В Windows есть еще более удобный инструмент, который позволяет в одном окне показать историю установки/удаления/обновления программ, включай приложения Microsoft Store, а также историю установки обновлений Windows. Речь о Мониторе стабильности системы (Reliability Monitor).
Reliability Monitor – это отдельный апплет в классической панели управления Windows, который в графическом виде отображает индекс стабильности системы и подробные сведения о событиях, которые могли повлиять на стабильность ОС (сбои в программах, установка/удаление приложений и прочее).
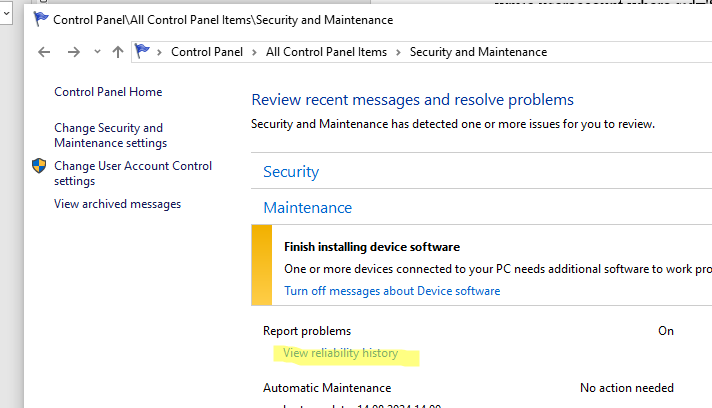
Чтобы открыть Reliability Monitor, перейдите в панель управления -> Security and Maintenance, нажмите на ссылку View reliability history в разделе Maintenance (или просто выполните команду (
perfmon /rel
).
Здесь в разрезе по дням/неделям можно посмотреть какие обновления, программы и UWP приложения устанавливались или удалялись. Подробную информацию о событии можно получить, нажав на кнопку View technical retails.
Для построения отчетов об установке/удалении приложений из монитора стабильности можно использовать PowerShell. Следующий скрипт выведет в графическую таблицу Out-GridView все события установки, удаления и обновления программ, Windows Updates, APPX/MSIX на компьютере за последние
7
дней.
$DaysAgo = (Get-Date).AddDays(-7)
$RealiabilityFilter= "TimeGenerated > '$DaysAgo' and (SourceName='Microsoft-Windows-WindowsUpdateClient' or SourceName='MsiInstaller')"
Get-CimInstance -ClassName Win32_ReliabilityRecords -filter $RealiabilityFilter|Select TimeGenerated,ProductName,User,message |Out-GridView
С помощью встроенных фильтров Out-GridView можно отфильтровать все связанные события по конкретному приложению, определенному событию или пользователю.

When you attempt to install/uninstall software, an app, an update, a hotfix et al on your Windows 11 or Windows 10 computer and the operation fails, you may receive the Windows Installer error prompt with the message stating Error opening installation log file. This post provides practical suggestions that can help you resolve the error on your system.

Error opening installation log file. Verify that the specified location exists and is writable.
What is an Install Log file?
As the name implies, the install log file contains records of all actions performed by the setup program and by other executable files related to the installation of a particular program or software on your Windows 11/10 computer. The installation log file can be particularly helpful if you encounter errors during the installation process as the file can be reviewed or analyzed to determine the best troubleshooting steps to take — to take advantage of this, you need to make sure that Windows Installer logging is enabled.
There are several reasons why you may encounter this issue which include the following:
- Windows Installer Logging is enabled.
- The Windows Installer engine can’t properly write the uninstallation log file.
- Timing issue when the Setup program (Setup.exe) runs, locking the log file in exclusive mode.
If you get the Error opening installation log file message when you attempt to perform an install or uninstall operation on your Windows 11/10 computer, then the recommended suggestions we have presented below should help you resolve the issue with ease.
- Restart the Explorer.exe process
- Temporarily disable antivirus software (if applicable)
- Manually delete the program installation log file
- General fix for Install/Uninstall issues on PC
- Resolve TMP and TEMP directories conflict issues
- Re-register/Reset Windows Installer service
Let’s see in brief detail how these suggestions apply! Before you proceed, we suggest you run an SFC scan to make sure there are no issues with the system files that might be the culprit.
1] Restart the Explorer.exe process

Restarting the Explorer.exe process is a known fix to the Error opening the installation log file when you attempt to uninstall any software via the Programs and Features applet in Control Panel. In this case, the error is triggered because Windows Installer attempts to write to the location specified below.
C:\Windows\System32
When the Windows Installer writes to the location, it addresses it as a file – but the proper behavior would be to write to the following location and file name:
C:\Users\<username>\AppData\Local\Temp\MSIxxxxxx.log
Read: Windows Installer not working properly
2] Temporarily disable antivirus software (if applicable)
During our investigation as relates to the issue, we discovered that this issue is known to occur on a computer that has certain antivirus software programs installed and enabled. In this scenario, the Setup program starts Msiexec.exe and tries to write to the log file before the program exits. However, some antivirus software may cause the log file closure to be delayed as the antivirus software is scanning files which consequently may cause Msiexec.exe to receive a sharing violation when it tries to access the Setup.log file.
So, in this case, to see if you can resolve or rather work around the issue, you can temporarily disable your security software, then try installing/uninstalling the software throwing the error. If successful, then you can re-enable your antivirus solution. If not, continue with the next fix.
3] Manually delete the program installation log file
For this fix, you can try to manually remove the INSTALL log file from the application’s directory – sometimes a log file is already present with the proper file names and if the Windows Installer doesn’t replace the existing installation log file, you may encounter the error. To manually delete the program installation log file, simply navigate to the program installation folder on your local disk and cut/paste the file named INSTALL.txt to some other directory (like the Desktop). If afterward, you’re still unable to install or uninstall the program as the case may be, you can proceed with the next fix.
Read: Fix Installer encountered an error
4] General fix for Install/Uninstall issues on PC
You can see if any of the suggestions contained in the post Cannot install or uninstall programs in Windows 11/10 helps you resolve the issue. In addition, you can run the program native uninstaller in case the error occurs when you try to uninstall a program.
When you uninstall a program natively in Windows via the Settings app or Control Panel, it might not always launch the application’s native uninstaller application. You can find the application’s uninstaller named uninstall.exe file usually located in the program installation directory — you need to run the executable file and follow the on-screen instructions. Ensure you’re logged in as admin on the computer or run the executable file with admin privilege by right-clicking the file and then selecting Run as administrator from the context menu.
Apart from the program uninstaller, you can use any of the third-party Uninstaller Software for Windows 11/10 to clean uninstall any program by removing all residual files.
5] Resolve TMP and TEMP directories conflict issues
This error may occur if the TMP and TEMP directories of the file are different as the Windows Installer will write to TMP but when it will try to read them using the attribute of TEMP. So, in this case, you can attempt to resolve the TMP and TEMP directories conflict by referring to the values of both in the same direction. To perform this task, do the following:
- Open Command Prompt in admin mode.
- In the command prompt, run the command below.
set TEMP+%tmp%
Exit the CMD prompt once the command executes and then check if the issue is resolved. Otherwise, continue with the next suggestion.
Read: Error writing a temporary file, Make sure your temp folder is valid
6] Re-register/Reset Windows Installer service

This solution requires you to re-register the Windows Installer service. At the command prompt, type the following, and then press Enter after each line:
%windir%\system32\msiexec.exe /unregister

%windir%\system32\msiexec.exe /regserver

%windir%\syswow64\msiexec.exe /unregister

%windir%\syswow64\msiexec.exe /regserver
If re-registering the Windows Installer service fails to resolve the issue, it’s likely the Windows Installer registry settings are corrupted or configured incorrectly.
In this case, you can reset the Windows Installer service settings in the Windows registry. Since this is a registry operation, it is recommended that you back up the registry or create a system restore point as necessary precautionary measures. Once done, you can proceed as follows:
- Download the Reset_msiserver zip file from our servers.
- Unzip the archive package.
- Double-click the Reset_msiserver.reg file to merge it to the Windows Registry.
- If prompted, click on Run > Yes (UAC) > Yes > OK to approve the merge.
- You can now delete the .reg file if you like.
We hope this helps.
How do I find installation logs?
You can find and view the Windows Setup event logs via Event Viewer > Windows Logs > System. In the Actions pane, click Open Saved Log and then locate the Setup. etl file. By default, this file is available in the %WINDIR%\Panther directory. To open and read a log file in Windows, since .log is a plain text extension, you can use any text editing software like Notepad, Notepad++, Microsoft Word, etc. Many advanced users prefer Notepad++ because of its built-in features that make log reading easier.
Now read: There is a problem with this Windows Installer package.
Windows upgrades used to be something you only had to worry about every few years. But in the Windows 10 era, each twice-yearly feature update is essentially a full upgrade.
When an upgrade or feature update fails, Windows Setup typically doesn’t provide any obvious indication of the underlying problem. But it does keep detailed records of every activity as it works, and if you know how to read setup log files, you can often pinpoint the issue.
These log files are typically saved in a compressed folder called Panther. (The exact location of the Panther folder when an upgrade fails depends on what stage Setup was in when the failure occurred.) If Setup fails and rolls back to the previous Windows version, the log files are stored in a folder called $windows.~bt\Sources\Rollback.
Reading raw log files requires expert skills and specialized tools. A much simpler option is to use a new diagnostic utility, SetupDiag.exe, which is designed specifically to read log files and generate a report identifying the most likely problems.
You’ll find full instructions for using SetupDiag at this page, which also includes a download link.
Copy SetupDiag.exe to its own folder and double-click to identify setup problems on the current PC. The program is smart enough to look in locations where log files are commonly saved, so you don’t need to specify any command-line switches for the tool.
If you’re diagnosing a problem on a different PC, copy the folders containing the log files to a local folder. Then run SetupDiag using the /Mode:Offline switch and the /LogsPath:<folder> parameter, replacing <folder> with the name of the location where you copied the log files.
The output for SetupDiag is a plain text file that is saved in the same folder as the program file. You can open the results file in any text editor, including Notepad, to examine its output and figure out what to do next.
PREVIOUS AND RELATED CONTENT
Need more details about the right way to do a clean Windows 10 install? See these previous articles:
FAQ
Windows 10 tip: Create a recovery drive
If your Windows 10 PC is operating perfectly right now, great. Take advantage of the opportunity to create a recovery drive so you have a way to perform repairs if something ever goes wrong.
After Windows 10 upgrade, do these seven things immediately
You’ve just upgraded to the most recent version of Windows 10. Before you get back to work, use this checklist to ensure that your privacy and security settings are correct and that you’ve cut annoyances to a bare minimum.
How to install, reinstall, upgrade and activate Windows 10
Here’s everything you need to know before you repair, reinstall, or upgrade Windows 10, including details about activation and product keys.
Windows 10 tip: Repair your Windows 10 installation
Performing a clean install or a reset means you have to reinstall apps and desktop programs and start over with settings and preferences. If you suspect Windows has become damaged, there’s a less drastic solution: Run Setup to repair Windows. Here’s how.
Editorial standards

There are several log files that capture different aspects of the Windows 10 installation process, depending on the specific information you’re looking for. Here are the most relevant ones:
Main installer log:
- Name: setuperr.log
- Location:
C:\Windows\Temp\systemsetupinfo.txt
This log contains detailed information about the setup process, including any errors encountered. It’s a good starting point for general troubleshooting.
Additional logs:
- setupapi.dev.log: Contains detailed information about device driver installation during setup.
- setuperr.txt: A more user-friendly version of the setuperr.log, summarizing potential issues.
- CBS.log: Logs information about servicing and component updates during setup.
- DISM.log: Logs information about Deployment Image Servicing and Management tool actions.
These additional logs are located in the same directory as the setuperr.log.
Finding and viewing the logs:
- Press Windows key + R to open the Run dialog.
- Type
%temp%\systemsetupinfo.txtand press Enter. This will open thesetuperr.login a text editor. - For other logs, simply replace
setuperr.logwith the desired log name within the same directory.
Viewing logs with Event Viewer:
Alternatively, you can use Event Viewer to view a consolidated view of various logs, including those related to Windows installation.
- Press Windows key + R and type
eventvwr. - Expand Windows Logs and select Setup.
- Right-click on any relevant log and choose Open.
Remember, analyzing these logs may require technical knowledge to interpret the information they contain. If you encounter difficulties, consider seeking help from IT professionals or using online resources based on specific error messages you find in the logs.
How to Enable Windows Installer Logging on Windows 11/10
When it comes to troubleshooting issues that arise during software installation on Windows 11 and 10, one of the most effective tools at your disposal is Windows Installer logging. By enabling detailed logging for the Windows Installer, you can capture crucial installation details that will help you identify and resolve problems when they occur. This guide will explore how to enable Windows Installer logging on Windows 11 and 10, along with insights into its benefits, methods for analysis, and helpful tips to use the log files effectively.
Understanding Windows Installer Logging
Windows Installer logging serves as a diagnostic tool that records the installation process of software using the Windows Installer technology. The log captures detailed information about each installation step, documenting successes and failures, making it an invaluable resource for system administrators and users alike.
When an installation fails or behaves unexpectedly, the log file can provide concrete evidence of what went wrong, offering insight into components that failed to install, missing files, or conflicts with existing applications. This is especially important for resolving complex installation issues for software that relies on system prerequisites or additional components.
Why Enable Logging?
- Troubleshooting: It aids in diagnosing installation issues, providing clear evidence of what transpired during the installation process.
- Error Analysis: You can pinpoint specific errors or conflicts, making it easier to devise appropriate solutions.
- Compatibility Issues: The logs may reveal issues related to compatibility between software versions or system requirements.
- Performance Monitoring: They can also help trace the time taken for various phases of the installation, enabling better performance monitoring in future installations.
Enabling Windows Installer Logging on Windows 10 and Windows 11
Windows Installer logging can be enabled through several methods, including the use of the Command Prompt, Windows Registry Editor, or Group Policy Editor. The following sections will guide you through each method in detail.
Method 1: Using Command Prompt
The easiest method for enabling Windows Installer logging is to use the Command Prompt. Follow these steps:
-
Open Command Prompt as Administrator:
- Click on the Start Menu.
- Type “cmd” or “Command Prompt” in the search bar.
- Right-click on «Command Prompt» and select «Run as administrator.»
-
Modify Windows Installer Logging Settings:
-
In the Command Prompt window, type the following command:
msiexec /L*v "C:path_to_your_loginstall.log" -
Replace
C:path_to_your_loginstall.logwith your desired file path and name for the log file.
-
-
Install Your Application:
- Now that logging is enabled; proceed to install the application you’re troubleshooting. The log file will capture everything from the installation process.
-
Review the Log:
- After installation, navigate to the specified path to find the log file. Open it using a text editor like Notepad or any text viewer of your choice. Make sure to examine the entries for any warnings or errors.
Method 2: Using Windows Registry Editor
Another approach to enable logging for Windows Installer is through the Windows Registry. This method may be more suitable for users who want to enable logging permanently. Follow these steps:
-
Open the Registry Editor:
- Press
Win + Rto open the Run dialog. - Type
regeditand press Enter.
- Press
-
Navigate to the Installer Key:
-
In the Registry Editor, navigate to the following path:
HKEY_LOCAL_MACHINESOFTWAREPoliciesMicrosoftWindowsInstaller -
If the «Installer» key does not exist, you may need to create it. Right-click on the «Windows» key, select “New” > “Key”, and name it «Installer».
-
-
Create the Logging Value:
-
Right-click on the «Installer» key, select “New” > “String Value”, and name it “Logging”.
-
Double-click on “Logging” and enter
voicewarmupas the value. The components can denote different aspects of the installation process:v: Verbose output (detailed logging)o: Log to a filei: Log the installatione: Log all error messagesw: Log warningsr: Log database readsu: Log user requestsm: Log all transacted actions
-
You can also include other parameters based on your needs (for example:
vandefor verbose logging with errors).
-
-
Exit Registry Editor:
- Close the Registry Editor once you’ve made the changes.
-
Restart Your Computer:
- For the changes to take effect, restart your computer.
-
Install Your Application:
- When you proceed with your software installation, logs will be generated in the
%temp%folder with the namemsi.log.
- When you proceed with your software installation, logs will be generated in the
Method 3: Using Group Policy Editor (For Professional Editions)
If you’re using Windows 10 Pro, Enterprise, or Education editions, you can use the Group Policy Editor to enable Windows Installer logging.
-
Open the Group Policy Editor:
- Press
Win + Rto open the Run dialog. - Type
gpedit.mscand press Enter.
- Press
-
Navigate to the Installer Policy:
-
In the Group Policy Editor, navigate to:
Computer Configuration > Administrative Templates > Windows Components > Windows Installer
-
-
Edit the Logging Policy:
- Locate the setting named “Logging”. Double-click it to open the configuration window.
- Select “Enabled” and in the options section, specify the desired logging options (similar to the options available in the Registry).
-
Apply and Exit:
- Click Apply, then OK to save the changes.
- Close the Group Policy Editor.
-
Install Your Application:
- Just like before, when you install an application, detailed logs will be generated as specified.
Analyzing the Log File
Once you have generated a log file, the next step involves analyzing it to troubleshoot your installation issues. Here are some essential tips for text interpretation:
-
Word Search for Keywords: Use find tools to search for keywords such as «error,» «fail,» or «warning» to quickly find problem areas.
-
Review Installation Success: The logs will clearly state when actions succeed or fail. Look for entries signifying success or failure explicitly.
-
Identify Component Failures: Details of which components failed can be crucial. Typically, you’ll find lines that indicate where the failure occurred.
-
Check for Return Values: Most log entries will have return values indicating the success or failure of specific actions as per Windows Installer’s protocol.
-
Understand timing and sequence: Evaluate the sequence in which actions occur and how long they take, as this could point to performance bottlenecks or delays.
Additional Tips and Best Practices
-
Regular Cleanup: Log files can become large and overwhelming, so it’s a good practice to review and clean them periodically, especially if disk space is a concern.
-
Use a Text Analysis Tool: Consider using text analysis tools or scripts to parse through the logs more effectively if you’re working with extensive logs.
-
Backup the Registry Before Editing: Always back up the Registry before making any changes. You can do this by exporting the respective keys.
-
Understand the Context: Log files are context-sensitive—understanding the software being installed can often give clues as to why certain components might be failing.
-
Seek Help: If after reviewing the logs you are still unable to resolve the issue, consider searching online forums, support websites, or reaching out to software vendors for assistance.
Conclusion
Enabling Windows Installer logging on Windows 11 and 10 can significantly improve your ability to diagnose installation issues effectively. By following the above methods, you can easily turn on logging controls that will provide insight into the installation processes occur on your computers. Always remember to analyze logs intelligently, utilizing easy search techniques and taking note of key failure points, which are vital for troubleshooting.
By mastering the use of Windows Installer logs, you can mitigate installation problems more efficiently, creating a smoother, less frustrating experience in managing software installations. Ultimately, having these detailed logs enables users and administrators to direct their troubleshooting efforts effectively, reducing downtime and creating a more productive user experience.