
Last Updated :
25 Apr, 2022
YAML is a data serialization format that enables interaction with scripts. It is generally used to create configuration files, as it prioritizes human readability, and is therefore preferred over JSON. PyYAML is a tool that parses and emits YAML for Python. It has many useful features, like an API for low-level event-based parsing and emitting and full Unicode support, etc. It supports YAML tags and some python specific tags that allow representing Python arbitrary objects. In this article, we will learn how to install PyYAML in Windows.
Prerequisites
A Windows computer with installations of:
- Python 3.5+
- PIP
Steps to Install PyYAML
To install PyYAML in Windows follow the following steps:
Step 1: Open Windows Terminal as Administrator.
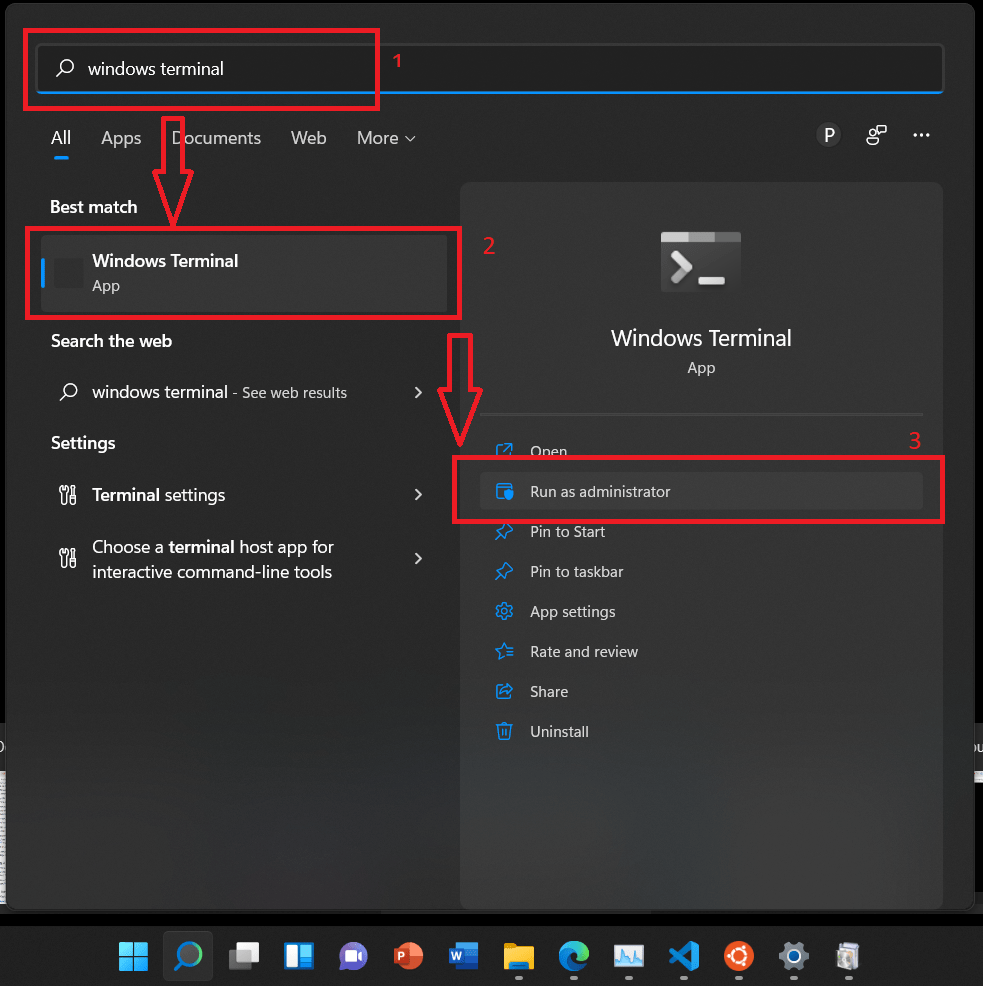
Step 2: Now, in the windows terminal write the following command to check if Python 3.5 + is installed or not.
python –version
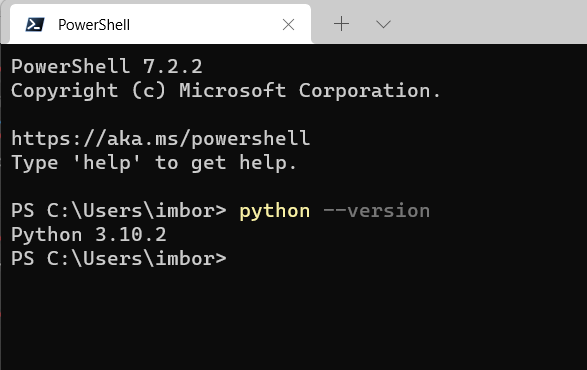
The output should be of the form: Python 3.x.y, where x > 5. If you get a different output, the correct version of Python is not installed in your system. So now you can install the latest version of Python in your system.
Step 3: Check if pip is installed or not. PIP is a tool that enables developers to install python packages (like PyYAML). Typically, PIP is automatically installed with Python. To verify if PIP is installed in the system, open the Windows Terminal with the steps mentioned prior, and type the following command:
pip –version
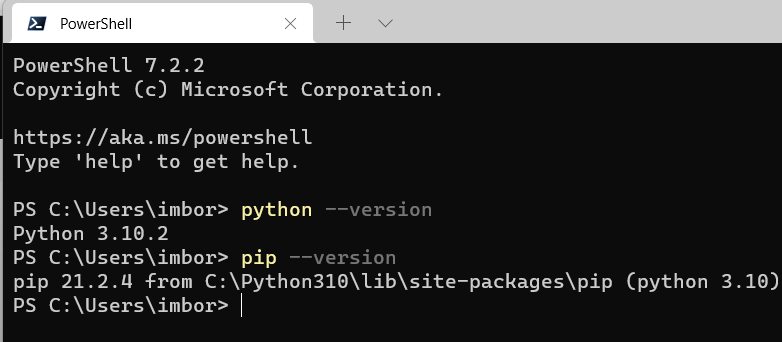
If the output is not of the following format:
pip x.y.z from <location>
Then, PIP is not installed on your system. So now you can install PIP in your system.
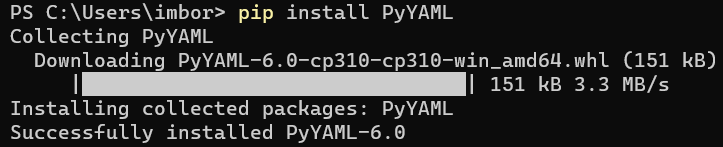
Step 4: Installing PyYAML. Open the Windows Terminal as outlined before, and type the following command:
pip install PyYAML
Verifying the installation of PyYAML
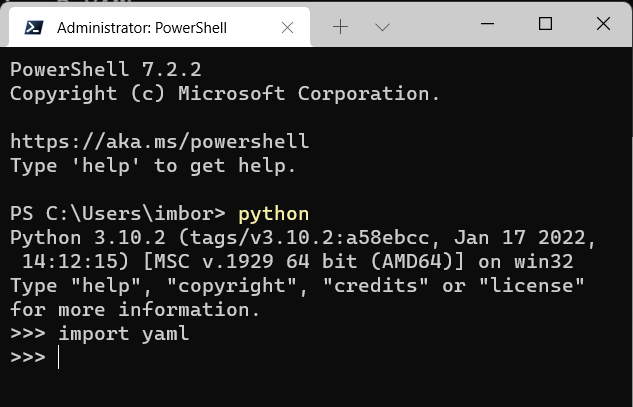
Now, open the Windows Terminal again, open the Python Shell, and try importing the PyYAML shell to verify whether the PyYAML is properly installed or not. If you import PyYAML with any error then that means PyYAML is installed properly in your system.
python
>>> import yaml
PyYAML
PyYAML is a YAML parser and emitter for Python.
Overview
YAML is a data serialization format designed for human readability and interaction with scripting languages.
PyYAML is a YAML parser and emitter for the Python programming language.
PyYAML features
- a complete YAML 1.1 parser. In particular, PyYAML can parse all examples from the specification. The parsing algorithm is simple enough to be a reference for YAML parser implementors.
- Unicode support including UTF-8/UTF-16 input/output and *
- low-level event-based parser and emitter API (like SAX).
- high-level API for serializing and deserializing native Python objects (like DOM or pickle).
- support for all types from the YAML types repository. A simple extension API is provided.
- both pure-Python and fast LibYAML-based parsers and emitters.
- relatively sensible error messages.
Requirements
PyYAML requires Python 2.7 or Python 3.5+.
Download and Installation
The current stable release of PyYAML: 5.3.
Download links:
- TAR.GZ package: http://pyyaml.org/download/pyyaml/PyYAML-5.3.1.tar.gz
- Windows installers (32-bit):
- http://pyyaml.org/download/pyyaml/PyYAML-5.3.1-cp27-cp27m-win32.whl (for Python 2.7)
- http://pyyaml.org/download/pyyaml/PyYAML-5.3.1-cp35-cp35m-win32.whl (for Python 3.5)
- http://pyyaml.org/download/pyyaml/PyYAML-5.3.1-cp36-cp36m-win32.whl (for Python 3.6)
- http://pyyaml.org/download/pyyaml/PyYAML-5.3.1-cp37-cp37m-win32.whl (for Python 3.7)
- http://pyyaml.org/download/pyyaml/PyYAML-5.3.1-cp38-cp38m-win32.whl (for Python 3.8)
- Windows installers (64-bit):
- http://pyyaml.org/download/pyyaml/PyYAML-5.3.1-cp27-cp27m-win_amd64.whl (for Python 2.7)
- http://pyyaml.org/download/pyyaml/PyYAML-5.3.1-cp35-cp35m-win_amd64.whl (for Python 3.5)
- http://pyyaml.org/download/pyyaml/PyYAML-5.3.1-cp36-cp36m-win_amd64.whl (for Python 3.6)
- http://pyyaml.org/download/pyyaml/PyYAML-5.3.1-cp37-cp37m-win_amd64.whl (for Python 3.7)
- http://pyyaml.org/download/pyyaml/PyYAML-5.3.1-cp38-cp38m-win_amd64.whl (for Python 3.8)
Unpack the archive and install the package by executing
$ python setup.py installIf you want to use LibYAML bindings, you need to download and install LibYAML. Then you may install the bindings by executing
$ python setup.py --with-libyaml installThe source distribution includes a comprehensive test suite. To run the tests, type
$ python setup.py testDocumentation
Quick example (see documentation for loading multiple documents):
>>> import yaml

>>> print yaml.load("""
... name: Vorlin Laruknuzum
... sex: Male
... class: Priest
... title: Acolyte
... hp: [32, 71]
... sp: [1, 13]
... gold: 423
... inventory:
... - a Holy Book of Prayers (Words of Wisdom)
... - an Azure Potion of Cure Light Wounds
... - a Silver Wand of Wonder
... """)

{'name': 'Vorlin Laruknuzum', 'gold': 423, 'title': 'Acolyte', 'hp': [32, 71],
'sp': [1, 13], 'sex': 'Male', 'inventory': ['a Holy Book of Prayers (Words of Wisdom)',
'an Azure Potion of Cure Light Wounds', 'a Siver Wand of Wonder'], 'class': 'Priest'}

>>> print yaml.dump({'name': "The Cloak 'Colluin'", 'depth': 5, 'rarity': 45,
... 'weight': 10, 'cost': 50000, 'flags': ['INT', 'WIS', 'SPEED', 'STEALTH']})

name: The Cloak 'Colluin'
rarity: 45
flags: [INT, WIS, SPEED, STEALTH]
weight: 10
cost: 50000
depth: 5
For more details, please check PyYAML Documentation.
History
5.3.1 (2020-03-18)
- #386 – Prevents arbitrary code execution during python/object/new constructor
5.3 (2020-01-06)
- #290 – Use
isinstead of equality for comparing withNone - #270 – fix typos and stylistic nit
- #309 – Fix up small typo
- #161 – Fix handling of slots
- #358 – Allow calling
add_multi_constructorwith None - #285 – Add use of
safe_load()function in README - #351 – Fix reader for Unicode code points over 0xFFFF
- #360 – Enable certain unicode tests when maxunicode not > 0xffff
- #359 – Use
full_loadin yaml-highlight example - #244 – Document that PyYAML is implemented with Cython
- #329 – Fix for Python 3.10
- #310 – increase size of index, line, and column fields
- #260 – remove some unused imports
- #163 – Create timezone-aware datetimes when parsed as such
- #363 – Add tests for timezone
5.2 (2019-12-02)
- Repair incompatibilities introduced with 5.1. The default Loader was changed, but several methods like add_constructor still used the old default #279 – A more flexible fix for custom tag constructors #287 – Change default loader for yaml.add_constructor #305 – Change default loader for add_implicit_resolver, add_path_resolver
- Make FullLoader safer by removing python/object/apply from the default FullLoader #347 – Move constructor for object/apply to UnsafeConstructor
- Fix bug introduced in 5.1 where quoting went wrong on systems with sys.maxunicode <= 0xffff #276 – Fix logic for quoting special characters
- Other PRs: #280 – Update CHANGES for 5.1
5.1 (2019-03-13)
- Incompatible changes:
- #257 – Deprecate yaml.load and add FullLoader and UnsafeLoader classes
- #256 – Make default_flow_style=False
- Features:
- #158 – Support escaped slash in double quotes “/”
- #45 – Allow colon in a plain scalar in a flow context
- #63 – Adding support to Unicode characters over codepoint 0xffff
- #254 – Allow to turn off sorting keys in Dumper
- Bugfixes:
- #129 – Remove call to
ordin lib3 emitter code - Other:
- #35 – Some modernization of the test running
- #42 – Install tox in a virtualenv
- #48 – Fix typos
- #55 – Improve RepresenterError creation
- #59 – Resolves #57, update readme issues link
- #60 – Document and test Python 3.6 support
- #61 – Use Travis CI built in pip cache support
- #62 – Remove tox workaround for Travis CI
- #75 – add 3.12 changelog
- #76 – Fallback to Pure Python if Compilation fails
- #84 – Drop unsupported Python 3.3
- #102 – Include license file in the generated wheel package
- #105 – Removed Python 2.6 & 3.3 support
- #111 – Remove commented out Psyco code
- #149 – Test on Python 3.7-dev
- #175 – Updated link to pypi in release announcement
- #181 – Import Hashable from collections.abc
- #194 – Reverting https://github.com/yaml/pyyaml/pull/74
- #195 – Build libyaml on travis
- #196 – Force cython when building sdist
- #261 – Skip certain unicode tests when maxunicode not > 0xffff
- #263 – Windows Appveyor build
3.13 (2018-07-05)
- Rebuild wheels using latest Cython for Python 3.7 support.
3.12 (2016-08-28)
- Wheel packages for Windows binaries.
- Adding an implicit resolver to a derived loader should not affect the base loader (fixes issue #57).
- Uniform representation for OrderedDict across different versions of Python (fixes issue #61).
- Fixed comparison to None warning (closes issue #64).
3.11 (2014-03-26)
- Source and binary distributions are rebuilt against the latest versions of Cython and LibYAML.
3.10 (2011-05-30)
- Do not try to build LibYAML bindings on platforms other than CPython; this fixed installation under Jython (Thank to olt(at)bogosoft(dot)com).
- Clear cyclic references in the parser and the emitter (Thank to kristjan(at)ccpgames(dot)com).
- LibYAML bindings are rebuilt with the latest version of Cython.
- Dropped support for Python 2.3 and 2.4; currently supported versions are 2.5 to 3.2.
3.09 (2009-08-31)
- Fixed use of uninitialized memory when emitting anchors with LibYAML bindings (Thank to cegner(at)yahoo-inc(dot)com).
- Fixed emitting incorrect BOM characters for UTF-16 (Thank to Valentin Nechayev)
- Fixed the emitter for folded scalars not respecting the preferred line width (Thank to Ingy).
- Fixed a subtle ordering issue with emitting
%TAGdirectives (Thank to Andrey Somov). - Fixed performance regression with LibYAML bindings.
3.08 (2008-12-31)
- Python 3 support (Thank to Erick Tryzelaar).
- Use Cython instead of Pyrex to build LibYAML bindings.
- Refactored support for unicode and byte input/output streams.
3.07 (2008-12-29)
- The emitter learned to use an optional indentation indicator for block scalar; thus scalars with leading whitespaces could now be represented in a literal or folded style.
- The test suite is now included in the source distribution. To run the tests, type
python setup.py test. - Refactored the test suite: dropped
unittestin favor of a custom test appliance. - Fixed the path resolver in
CDumper. - Forced an explicit document end indicator when there is a possibility of parsing ambiguity.
- More
setup.pyimprovements: the package should be usable when any combination ofsetuptools,PyrexandLibYAMLis installed. - Windows binary packages are built against LibYAML-0.1.2.
- Minor typos and corrections. Thank to Ingy dot Net and Andrey Somov.
3.06 (2008-10-03)
- setup.py checks whether LibYAML is installed and if so, builds and installs LibYAML bindings. To force or disable installation of LibYAML bindings, use
--with-libyamlor--without-libyamlrespectively (partially fixes #34). - Building LibYAML bindings no longer requires Pyrex installed (fixed #33).
yaml.load()raises an exception if the input stream contains more than one YAML document (fixed #54).- Fixed exceptions produced by LibYAML bindings (fixed #50).
- Fixed a dot
'.'character being recognized as!!float(fixed #62). - Fixed Python 2.3 compatibility issue in constructing
!!timestampvalues. - Windows binary packages are built against the LibYAML stable branch.
- Added attributes
yaml.__version__andyaml.__with_libyaml__(fixed #85).
3.05 (2007-05-13)
- Allow for immutable subclasses of YAMLObject. Fixed #53.
- Make the encoding of the unicode->str conversion explicit; fixed #52.
- Fixed a problem when the
DOCUMENT-ENDevent is not emitted until the beginning of the next document is available. Fixed #51. Thanks edward(at)sweetbytes.net for the bug report. - Improve output of float values. Fixed #49.
- Fix the bug when the path in
add_path_resolvercontains boolean values. Fixed #43 (thanks to jstroud(at)mbi.ucla.edu for reporting and pointing to the cause). - Use the types module instead of constructing type objects by hand. Fixed #41. Thanks to v.haisman(at)sh.cvut.cz for the patch.
- Fix loss of microsecond precision in datetime.datetime constructor (fix #30). Thanks to edemaine(at)mit.edu for the bug report and the patch.
- Fixed loading an empty YAML stream.
3.04 (2006-08-20)
- Include experimental LibYAML bindings.
- Fully support recursive structures (close #5).
- Sort dictionary keys (close #23). Mapping node values are now represented as lists of pairs instead of dictionaries. Do not check for duplicate mapping keys as it didn’t work correctly anyway.
- Fix invalid output of single-quoted scalars in cases when a single quote is not escaped when preceeded by whitespaces or line breaks (close #17).
- To make porting easier, rewrite Parser not using generators.
- Fix handling of unexpected block mapping values, like {{{ : foo }}}
- Fix a bug in
Representer.represent_object:copy_reg.dispatch_tablewas not correctly handled. - Fix a bug when a block scalar is incorrectly emitted in the simple key context.
- Hold references to the objects being represented (close #22).
- Make Representer not try to guess
!!pairswhen a list is represented. - Fix timestamp constructing and representing (close #25).
- Fix the ‘N’ plain scalar being incorrectly recognized as
!!bool(close #26).
3.03 (2006-06-19)
- Fix Python 2.5 compatibility issues.
- Fix numerous bugs in the float handling.
- Fix scanning some ill-formed documents.
- Other minor fixes.
3.02 (2006-05-15)
- Fix win32 installer. Apparently bdist_wininst does not work well under Linux.
- Fix a bug in add_path_resolver.
- Add the yaml-highlight example. Try to run on a color terminal:
python yaml_hl.py <any_document.yaml.
3.01 (2006-05-07)
- Initial release. The version number reflects the codename of the project (PyYAML 3000) and differenciates it from the abandoned PyYaml module.
Copyright (c) 2017-2019 Ingy döt Net Copyright (c) 2006-2016 Kirill Simonov
The PyYAML module was written by Kirill Simonov. It is now maintained by the YAML community.
PyYAML is released under the MIT license.
PyYAML
A full-featured YAML processing framework for Python
Installation
To install, type python setup.py install.
By default, the setup.py script checks whether LibYAML is installed and if
so, builds and installs LibYAML bindings.
To skip the check and force installation of LibYAML bindings, use the option
--with-libyaml: python setup.py --with-libyaml install.
To disable the check and skip building and installing LibYAML bindings, use
--without-libyaml: python setup.py --without-libyaml install.
When LibYAML bindings are installed, you may use fast LibYAML-based parser and
emitter as follows:
>>> yaml.load(stream, Loader=yaml.CLoader)
>>> yaml.dump(data, Dumper=yaml.CDumper)
If you don’t trust the input YAML stream, you should use:
>>> yaml.safe_load(stream)
Testing
PyYAML includes a comprehensive test suite.
To run the tests, type python setup.py test.
Further Information
-
For more information, check the
PyYAML homepage. -
PyYAML tutorial and reference.
-
Discuss PyYAML with the maintainers on
Matrix at https://matrix.to/#/#pyyaml:yaml.io or
IRC #pyyaml irc.libera.chat -
Submit bug reports and feature requests to the
PyYAML bug tracker.
License
The PyYAML module was written by Kirill Simonov xi@resolvent.net.
It is currently maintained by the YAML and Python communities.
PyYAML is released under the MIT license.
See the file LICENSE for more details.
-
Method 1: Using pip to Install PyYAML
-
Method 2: Installing PyYAML in a Virtual Environment
-
Method 3: Installing PyYAML from Source
-
Conclusion
-
FAQ
YAML, which stands for “YAML Ain’t Markup Language,” is a human-readable data serialization standard that is often used for configuration files and data exchange between languages. In Python, working with YAML files is made easy through the PyYAML library. Whether you’re a seasoned developer or just starting your programming journey, knowing how to install and utilize YAML in Python can significantly enhance your productivity.
This tutorial will walk you through the steps to install YAML in Python, ensuring you have all the tools you need to work with this versatile format. Let’s dive right in!
Method 1: Using pip to Install PyYAML
The most straightforward way to install YAML in Python is by using pip, the package installer for Python. If you have Python already set up on your machine, pip will usually be installed alongside it. Here’s how to install the PyYAML library, which allows you to read and write YAML files effortlessly.
First, open your terminal or command prompt. Then, execute the following command:
Output:
Collecting PyYAML
  Downloading PyYAML-5.4.1-cp39-cp39-manylinux1_x86_64.whl (440 kB)
     |████████████████████████████████| 440 kB 2.5 MB/s
Installing collected packages: PyYAML
Successfully installed PyYAML-5.4.1
After running this command, pip will download and install the PyYAML library. You can confirm the installation by running:
Output:
Name: PyYAML
Version: 5.4.1
Summary: YAML parser and emitter for Python
Home-page: https://pyyaml.org/
Author: Kirill Simonov
Author-email: simonov@inbox.ru
License: MIT
Location: /usr/local/lib/python3.9/site-packages
Requires:
Required-by:
This command will display the version of PyYAML installed, along with some additional information about the package. Now that you have PyYAML installed, you can start working with YAML files in your Python projects.
Method 2: Installing PyYAML in a Virtual Environment
Using a virtual environment is a best practice in Python development. It allows you to create isolated spaces for your projects, ensuring that dependencies do not conflict. If you want to install YAML in Python while keeping your environment clean, follow these steps.
First, create a virtual environment by executing the following command in your terminal:
This command creates a new directory named myenv, where your virtual environment will reside. Next, activate the virtual environment:
- On Windows:
- On macOS/Linux:
source myenv/bin/activate
Once activated, your terminal prompt will change, indicating that you are now working within the virtual environment. Now, you can install PyYAML using pip:
Output:
Collecting PyYAML
  Downloading PyYAML-5.4.1-cp39-cp39-manylinux1_x86_64.whl (440 kB)
     |████████████████████████████████| 440 kB 2.5 MB/s
Installing collected packages: PyYAML
Successfully installed PyYAML-5.4.1
To verify the installation, run:
Output:
Name: PyYAML
Version: 5.4.1
Summary: YAML parser and emitter for Python
Home-page: https://pyyaml.org/
Author: Kirill Simonov
Author-email: simonov@inbox.ru
License: MIT
Location: /path/to/myenv/lib/python3.9/site-packages
Requires:
Required-by:
With PyYAML successfully installed in your virtual environment, you can start working with YAML files without worrying about affecting your global Python installation.
Method 3: Installing PyYAML from Source
If you prefer to install PyYAML directly from its source code, you can do so by cloning the repository from GitHub. This method is useful if you want to work with the latest development version or contribute to the project.
First, ensure you have Git installed on your machine. Then, open your terminal and run the following command to clone the PyYAML repository:
git clone https://github.com/yaml/pyyaml.git
This command will create a local copy of the PyYAML repository. Next, navigate into the cloned directory:
Now, you can install PyYAML using pip:
Output:
Processing /path/to/pyyaml
Building wheels for collected packages: PyYAML
  Building wheel for PyYAML (setup.py) ... done
  Created wheel for PyYAML: filename=PyYAML-5.4.1-cp39-cp39-manylinux1_x86_64.whl size=440000 sha256=abc123...
Successfully built PyYAML
Installing collected packages: PyYAML
Successfully installed PyYAML-5.4.1
To verify the installation, run:
Output:
Name: PyYAML
Version: 5.4.1
Summary: YAML parser and emitter for Python
Home-page: https://pyyaml.org/
Author: Kirill Simonov
Author-email: simonov@inbox.ru
License: MIT
Location: /path/to/your/venv/lib/python3.9/site-packages
Requires:
Required-by:
This method allows you to get the latest version of PyYAML directly from the source, giving you the opportunity to contribute to the project or customize it for your needs.
Conclusion
Installing YAML in Python is a straightforward process, whether you choose to use pip, set up a virtual environment, or clone the source code from GitHub. Each method offers its own advantages, allowing you to select the one that best fits your development style and project requirements. By following this guide, you’ll be well-equipped to work with YAML files in your Python applications, enhancing your data serialization capabilities. Happy coding!
FAQ
-
What is YAML?
YAML is a human-readable data serialization standard often used for configuration files and data exchange between languages. -
Why should I use PyYAML?
PyYAML simplifies the process of reading and writing YAML files in Python, making it easier to work with structured data. -
Can I use PyYAML in a virtual environment?
Yes, using a virtual environment is recommended to keep your projects organized and dependencies isolated. -
How can I check if PyYAML is installed?
You can use the command pip show PyYAML to display information about the installed package. -
Is it necessary to install PyYAML from source?
No, installing from pip is the most common and easiest method. However, installing from source allows you to work with the latest version.
Enjoying our tutorials? Subscribe to DelftStack on YouTube to support us in creating more high-quality video guides. Subscribe
A common error you may encounter when using Python is modulenotfounderror: no module named ‘yaml’.
This error occurs when the Python interpreter cannot detect the PyYAML library in your current environment.
You can install PyYAML in Python 3 with python3 -m pip install pyyaml.
This tutorial goes through the exact steps to troubleshoot this error for the Windows, Mac and Linux operating systems.
Table of contents
- ModuleNotFoundError: no module named ‘yaml’
- What is PyYAML?
- Always Use a Virtual Environment to Install Packages
- How to Install PyYAML on Windows Operating System
- PyYAML installation on Windows Using pip
- How to Install PyYAML on Mac Operating System using pip
- How to Install PyYAML on Linux Operating Systems
- Installing pip for Ubuntu, Debian, and Linux Mint
- Installing pip for CentOS 8 (and newer), Fedora, and Red Hat
- Installing pip for CentOS 6 and 7, and older versions of Red Hat
- Installing pip for Arch Linux and Manjaro
- Installing pip for OpenSUSE
- PyYAML installation on Linux with Pip
- How to Install PyYAML on Windows Operating System
- Installing PyYAML Using Anaconda
- Check PyYAML Version
- Summary
ModuleNotFoundError: no module named ‘yaml’
What is PyYAML?
YAML is a data serialization format designed for human readability and interaction with scripting languages. PyYAML is a YAML parser and emitter for Python.
The simplest way to install PyYAML is to use the package manager for Python called pip. The following installation instructions are for the major Python version 3.
Always Use a Virtual Environment to Install Packages
It is always best to install new libraries within a virtual environment. You should not install anything into your global Python interpreter when you develop locally. You may introduce incompatibilities between packages, or you may break your system if you install an incompatible version of a library that your operating system needs. Using a virtual environment helps compartmentalize your projects and their dependencies. Each project will have its environment with everything the code needs to run. Most ImportErrors and ModuleNotFoundErrors occur due to installing a library for one interpreter and trying to use the library with another interpreter. Using a virtual environment avoids this. In Python, you can use virtual environments and conda environments. We will go through how to install PyYAML with both.
How to Install PyYAML on Windows Operating System
First, you need to download and install Python on your PC. Ensure you select the install launcher for all users and Add Python to PATH checkboxes. The latter ensures the interpreter is in the execution path. Pip is automatically on Windows for Python versions 2.7.9+ and 3.4+.
You can check your Python version with the following command:
python3 --versionYou can install pip on Windows by downloading the installation package, opening the command line and launching the installer. You can install pip via the CMD prompt by running the following command.
python get-pip.pyYou may need to run the command prompt as administrator. Check whether the installation has been successful by typing.
pip --versionPyYAML installation on Windows Using pip
To install PyYAML, first create the virtual environment. The environment can be any name, in this we choose “env”:
virtualenv envYou can activate the environment by typing the command:
env\Scripts\activateYou will see “env” in parenthesis next to the command line prompt. You can install PyYAML within the environment by running the following command from the command prompt.
python3 -m pip install pyyamlWe use python -m pip to execute pip using the Python interpreter we specify as Python. Doing this helps avoid ImportError when we try to use a package installed with one version of Python interpreter with a different version. You can use the command which python to determine which Python interpreter you are using.
How to Install PyYAML on Mac Operating System using pip
Open a terminal by pressing command (⌘) + Space Bar to open the Spotlight search. Type in terminal and press enter. To get pip, first ensure you have installed Python3:
python3 --versionPython 3.8.8Download pip by running the following curl command:
curl https://bootstrap.pypa.io/get-pip.py -o get-pip.pyThe curl command allows you to specify a direct download link. Using the -o option sets the name of the downloaded file.
Install pip by running:
python3 get-pip.pyTo install PyYAML, first create the virtual environment:
python3 -m venv envThen activate the environment using:
source env/bin/activate You will see “env” in parenthesis next to the command line prompt. You can install PyYAML within the environment by running the following command from the command prompt.
python3 -m pip install pyyamlHow to Install PyYAML on Linux Operating Systems
All major Linux distributions have Python installed by default. However, you will need to install pip. You can install pip from the terminal, but the installation instructions depend on the Linux distribution you are using. You will need root privileges to install pip. Open a terminal and use the commands relevant to your Linux distribution to install pip.
Installing pip for Ubuntu, Debian, and Linux Mint
sudo apt install python-pip3Installing pip for CentOS 8 (and newer), Fedora, and Red Hat
sudo dnf install python-pip3Installing pip for CentOS 6 and 7, and older versions of Red Hat
sudo yum install epel-release

sudo yum install python-pip3
Installing pip for Arch Linux and Manjaro
sudo pacman -S python-pipInstalling pip for OpenSUSE
sudo zypper python3-pipPyYAML installation on Linux with Pip
To install PyYAML, first create the virtual environment:
python3 -m venv envThen activate the environment using:
source env/bin/activate You will see “env” in parenthesis next to the command line prompt. You can install PyYAML within the environment by running the following command from the command prompt.
Once you have activated your virtual environment, you can install PyYAML using:
python3 -m pip install pyyamlInstalling PyYAML Using Anaconda
First, to create a conda environment to install PyYAML.
conda create -n project python=3.6 Then activate the project container. You will see “project” in parentheses next to the command line prompt.
source activate projectNow you’re ready to install PyYAML using conda.
Anaconda is a distribution of Python and R for scientific computing and data science. You can install Anaconda by going to the installation instructions. Once you have installed Anaconda and created your conda environment, you can install PyYAML using the following command:
conda install -c anaconda pyyamlCheck PyYAML Version
Once you have successfully installed PyYAML, you can check its version. If you used pip to install PyYAML, you can use pip show from your terminal.
python3 -m pip show pyyamlName: PyYAML
Version: 5.4.1
Summary: YAML parser and emitter for PythonSecond, within your python program, you can import PyYAML and then reference the __version__ attribute:
import yaml
print(yaml.__version__)5.4.1If you used conda to install PyYAML, you could check the version using the following command:
conda list -f pyyaml# Name Version Build Channel
pyyaml 5.3.1 py36haf1e3a3_1 anacondaSummary
Congratulations on reading to the end of this tutorial. The modulenotfounderror occurs if you misspell the module name, incorrectly point to the module path or do not have the module installed in your Python environment. If you do not have the module installed in your Python environment, you can use pip to install the package. However, you must ensure you have pip installed on your system. You can also install Anaconda on your system and use the conda install command to install PyYAML.
Go to the online courses page on Python to learn more about Python for data science and machine learning.
For further reading on missing modules in Python, go to the article:
- How to Solve Python ModuleNotFoundError: no module named ‘urllib2’.
- How to Solve ModuleNotFoundError: no module named ‘plotly’.
Have fun and happy researching!
Suf
Suf is a senior advisor in data science with deep expertise in Natural Language Processing, Complex Networks, and Anomaly Detection. Formerly a postdoctoral research fellow, he applied advanced physics techniques to tackle real-world, data-heavy industry challenges. Before that, he was a particle physicist at the ATLAS Experiment of the Large Hadron Collider. Now, he’s focused on bringing more fun and curiosity to the world of science and research online.