
Download Windows Speedup Tool to fix errors and make PC run faster
We install Windows 11/10 on our PCs when we buy a new one or upgrade an old one. Some users see Select the driver to be installed during Windows installation error while trying to install Windows on their PC. In this guide, we have a few solutions that fix the issue and let you continue with the installation of Windows.
Generally, the drivers required for our PC are bundled together with Windows. They get installed automatically along with Windows. There are some instances where they don’t get detected for installation, and we see the error in selecting the driver for installation. The possible causes for the error are:
- Faulty or corrupted ISO media
- USB port malfunction
- Installation media using SATA instead of IDE
Let’s fix the issue and install Windows and its drivers normally.

When the drivers fail to get installed during installation, the issue can be fixed in the following ways.
- Change USB Port
- Change Settings in BIOS
- Format USB drive to FAT32
- Re-download the ISO
Let’s get into the details of each fix and resolve the issue.
1] Change the USB Port
The port you used to connect USB to install Windows might be a faulty one. The connection might be unstable due to that, which makes it hard to detect the required files. Change the port and plug the USB into a different port and try installing the issue. If the issue had occurred due to a faulty port, it would have been fixed by now.
2] Format the USB drive to FAT32
Sometimes the NTFS file system might not be supported by your PC. The error might have occurred due to this. Format your USB drive to FAT32 and create a bootable USB using the Media Creation tool or Rufus tool.
3] Change Settings in BIOS
Sometimes a wrong setting in BIOS might be the cause of this issue. When the machine uses Integrated Drive Electronics (IDE) and the installation media boots with Serial Advanced Technology Attachment (SATA), this error might occur. Boot into BIOS and change the storage configuration from SATA to IDE and try installing the Windows.
4] Re-download the ISO
Missing files in the ISO or corrupted files may result in this issue. You have to re-download the ISO from Microsoft and create a bootable disc or USB with that file. Then try reinstalling Windows.
This is how you can fix the Select the driver to be installed during Windows installation error.
How do I install a driver while installing Windows?
The drivers required for your PC are installed automatically along with Windows. You don’t have to do anything unless you face any issues with the installation of drivers. You can manually update the drivers if you face any issues after the installation.
How do I fix drivers for Windows installation?
If you are facing issues installing drivers during the Windows installation, you can fix them easily by changing the USB port, changing BIOS settings, and re-download ISO.
Related Read: Windows install is stuck during Installation – Different scenarios
Guru is a Communications graduate with hands-on experience with computers, cameras, and editing tools. A tech enthusiast and a movie buff who loves writing about computers, he dreams of living a life devoid of all tech and modern-day advancements in a forest.
Why does the “Windows setup select the driver to install” issue happen? Is there any way to fix it? Here, this post from MiniTool provides detailed information on this Windows installation issue. You can take a look to find out the answers.
When you are attempting to install Windows 10 on your PC by using a USB flash drive, you may fail with the “Windows setup select the driver to install” issue. Why does this issue occur and how to fix it? If you wonder about those, you can pay attention to the following content.
Reasons for Windows Setup Select the Driver to Install
The “Windows 10 setup select the driver to install” issue can be caused by various factors. And this post summarizes some common reasons for this issue as follows.
- There are certain temporary glitches and bugs.
- You connect the USB drive to an improper USB port.
- You download the incorrect ISO file.
- The ISO file you download gets corrupted or missing.
- Hard drive settings in BIOS are wrong.
After knowing the possible causes for the “select the driver to install Windows 10” issue, you may wonder how to fix this annoying issue. To help you get rid of this issue and install Windows successfully, there are several effective methods available. Let’s get down to working the problem out with the given methods.
Method 1: Remove and Then Plug the USB Drive Back in
When the “Windows 10 select the driver to install” error message shows up on your screen, the first thing you can try is to remove your USB drive and then re-insert it. It’s the simplest way that may fix this issue. To do this, follow the steps below.
Step 1: Click Cancel in the pop-up window. By doing so, you will go back to the first setup screen.
Step 2: Remove the USB flash drive you use to install Windows. Then reconnect it with your PC.
Step 3: After that, try the Windows installation again to see if the error is repaired.
Method 2: Change the USB Port
If the port you use to connect your USB drive is a faulty one, you are likely to run into the “Windows 10 setup select the driver to install” issue as well. In this case, you can try to solve this issue by simply plugging the USB drive into another different USB port that works well.
If the error persists after you change to the good USB port, you should continue with other solutions.
USB 2.0 vs 3.0: What’s the Difference and Which One Is Better
Method 3: Change BIOS Settings
As mentioned earlier, the improper BIOS settings may also lead to the “Windows setup select the driver to install Windows 10” issue from time to time. As for this, you can first try resetting BIOS to factory defaults. Here’s how to change BIOS settings.
Step 1: Reboot your PC and press & hold the BIOS hotkey as soon as possible. This will help you enter BIOS.
Tips:
Tip: The BIOS hotkeys may be different on various PCs. Normally, you can press F2 to enter BIOS for all Asus PCs; F2 or F12 for Dell PCs; F10 for HP PCs; F1 for Lenovo desktops, F2 or Fn + F2 for Lenovo laptops; F2 for Samsung PCs, etc. To get the correct hotkey for your PC, you can check your user manual or search online.
Step 2: Locate the Setup Defaults option. It might be named Load Default, Load Setup Defaults, Load Default Settings, Load BIOS Defaults or Load Optimal Defaults. Select the specific option and press Enter to open the Setup Confirmation window.
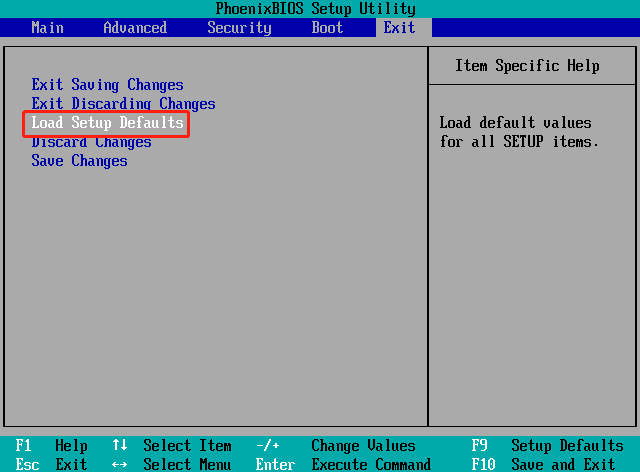
Step 3: After that, click Yes to confirm and start the resetting process.
Tips:
Tip: If the error is still here, then you can try entering BIOS again and changing the SATA mode manually. You should set the mode as IDE if the current mode is AHCI. Likewise, if the current mode is IDE, you should change to AHCI.
Method 4: Add the Needed Driver to the USB
Copying the missing needed driver to the USB drive that is used for Windows installation is another possible solution to the “Windows setup select the driver to install Windows 10” issue.
Tips:
Tip: To learn more about how to download drivers, you can pay attention to this post: How to Download and Install Drivers for Windows 10 – 5 Ways.
Step 1: Go to the official website of your computer manufacturer.
Step 2: After that, find and download the missing driver (usually the Rapid Storage driver).
Step 3: Once the download is finished, unzip the driver file.
Step 4: Copy and paste the unzipped folder to the Windows installation USB drive.
Step 5: At last, try installing Windows again and the issue may disappear.
Method 5: Re-Download the ISO
If there is something wrong with the ISO file download, your ISO may get corrupted, leading some files in it to be missing. As a result, you may experience the “Windows 10 select the driver to install” issue. To get rid of it, you’d better download the ISO file again and re-create the Windows installation USB drive manually with this file.
Tips:
Tip: You can also create a Windows installation media with Windows 10 Media Creation Tool.
This operation can be divided into three parts. Just follow them to finish creating a Windows installation USB drive and use it to install Windows.
Part 1: Format the USB Drive to FAT32
First of all, you should format the prepared USB drive to FAT32 so that it can boot either BIOS-based or UEFI-based PCs.
Microsoft Windows enables you to perform a format for the USB drive with offers useful tools, like Disk Management and diskpart. Unfortunately, sometimes certain issues may happen while using the two utilities to format the USB drive, such as Diskpart format stuck at 0 percent, Disk Management Format option greyed out, and so on.
Another drawback of formatting a USB drive with Windows built-in formatters is that they only support formatting a USB drive no larger than 32GB to FAT32. Therefore, to avoid unexpected issues and break the size limit, we highly recommend you format your USB drive with MiniTool Partition Wizard.
It’s a piece of professional disk partition software including a wide range of features related to partitions and disks. For instance, it allows you to create/format/resize/delete partitions, copy/wipe disks, check disk errors, migrate OS to SSD/HDD, etc.
With MiniTool Partition Wizard, you can format a USB drive large than 32GB to FAT32. Here’s a step-by-step guide on how to format the USB drive via this partition manager.
Step 1: Connect the USB drive used to create the Windows installation drive to your computer.
Step 2: Download and install MiniTool Partition Wizard on your PC. Then launch MiniTool Partition Wizard to enter its main interface.
MiniTool Partition Wizard FreeClick to Download100%Clean & Safe
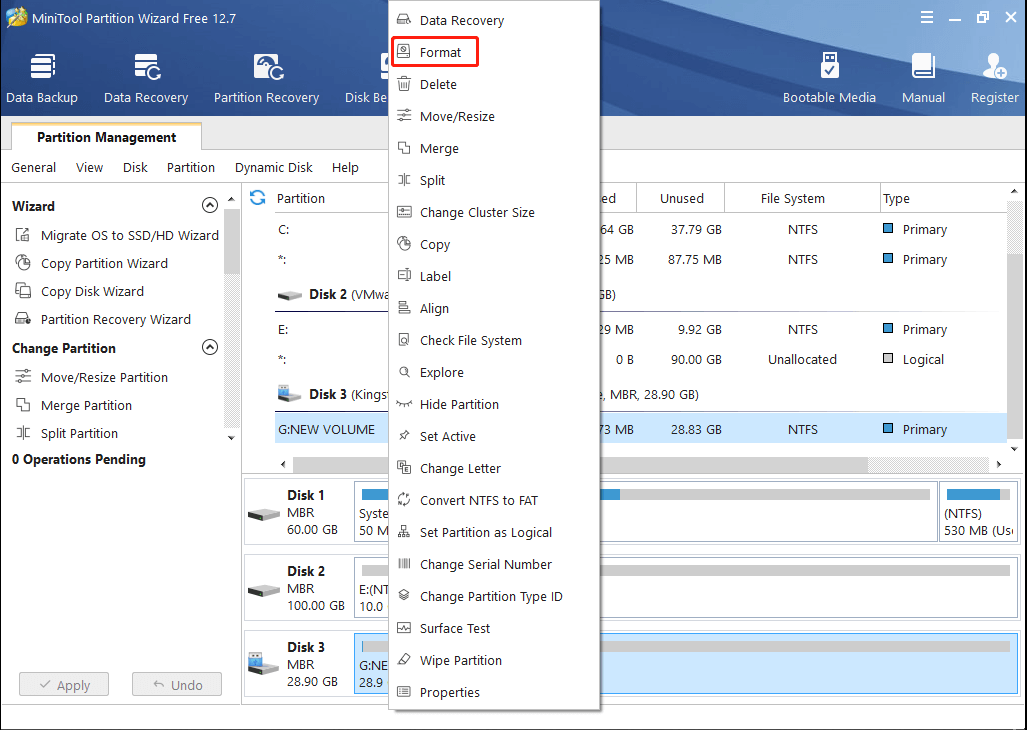
Step 3: Right-click the partition on the target USB drive and select Format. Alternatively, you can highlight the partition of the USB drive and select Format Partition from the left action pane.
Step 4: In the prompted window, select FAT32 from the drop-down menu. Then click OK.
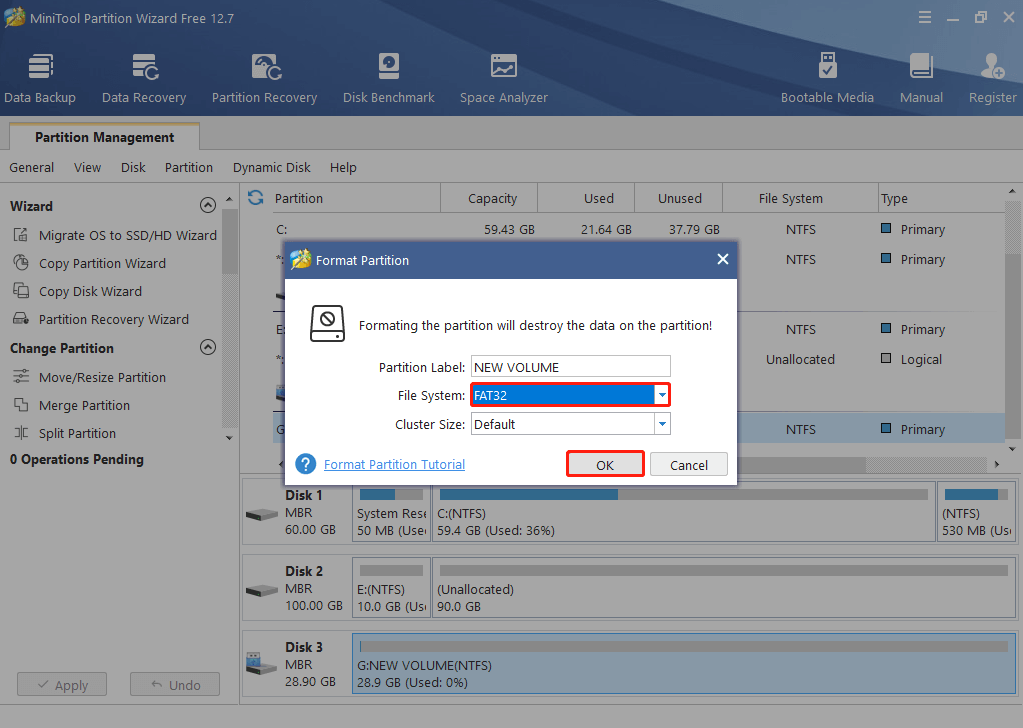
Step 5: After that, you can preview that the target partition is formatted to FAT32. Just click Apply to start the formatting process.
Part 2: Download the Windows ISO File and Copy It to the USB Drive
After getting the FAT32 USB drive, you can now download the ISO file by following the steps below.
Step 1: Go to the official Microsoft website. Then follow the on-screen instructions to select the specific version and language.
Step 2: Once done, click the 32-bit or 64-bit download link according to your situation.
Step 3: Wait until the ISO file download is completed. Then locate this file in File Explorer.
Step 4: Copy and paste the ISO file to the USB drive.
- Right-click the ISO file and select Copy.
- Right-click the empty space in the USB drive and select Paste.
Part 3: Set the USB Drive as Active
To make sure you can install Windows with the USB drive, you should set the target drive as active. The following steps tell you how to do that.
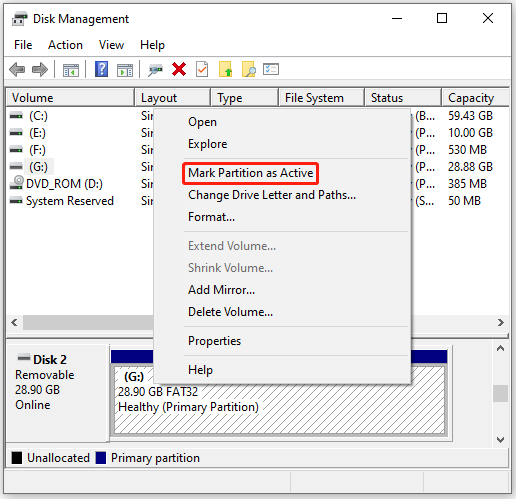
Step 1: Right-click the Start icon and select Disk Management.
Step 2: Right-click the target USB partition and select Mark Partition as Active.
Step 3: After that, you will get a Windows installation USB drive. Just use this drive to install Windows and check if the error is repaired.
Method 6: Install a Different Windows Build
If none of the above methods fix the “Windows setup select the driver to install” issue, it may indicate that some bugs may exist in the Windows build you are trying to install currently. In this case, it’s recommended that you download and install a newer Windows build.
To do this, you simply need to go to the official Microsoft website and download an available build newer than the current problematic one. Then use the newly downloaded ISO file to create a Windows installation USB drive to install Windows.
I was stuck on the “Windows setup select the driver to install” screen while installing Windows. Luckily, I eventually solved this issue and install Windows successfully with this guide. If you have the same problem, I’d like to share it with you.Click to Tweet
Bottom Line
When faced with the “Windows setup select the driver to install” issue, you can try the above methods to fix it. If you have any problems with this issue, you can leave a message in the comment area below.
For any issues related to MiniTool Partition Wizard, you can contact us via [email protected]. We’ll reply to you as soon as possible.
Readers help support Windows Report. We may get a commission if you buy through our links.
Read our disclosure page to find out how can you help Windows Report sustain the editorial team. Read more
Installing a new operating system is usually a simple and hassle-free process, but sometimes issues can occur and interfere with the procedure.
Many users reported getting the Select the driver to install message when trying to install Windows 11 on their PC. This can prevent you from enjoying the operating system, so it’s important to know how to properly fix it.
There are several reasons why this error message can occur, ranging from bad installation media to missing drivers, and in this guide, we’re going to explore them all. Join us while we try to find the best solution for this issue.
Why does the Select the driver to install error occur?
In most cases, this error occurs because you don’t have the necessary drivers in Windows installation media.
This can be the result of a damaged ISO file or a compatibility issue. If it’s caused by a compatibility problem indeed, Microsoft will most likely patch this issue with a future build of Windows.
Is the Select the driver to install error serious?
Yes, this type of error can be serious since it will interfere with the installation of your operating system. If the required driver is missing, the installation can’t access your hard drive or SSD and that is causing the problem to appear.
Such errors are always a concern, especially for less tech-savvy users, but there are a couple of ways to fix this problem on your PC.
How do I fix the Select the driver to install error in Windows 11?
1. Download the Windows 11 ISO again
- Go to the Microsoft download section.
- Select the version that you want to download.

- Now select the desired language.

- Lastly, click the download link.
- Wait for the ISO file to download.


It’s possible that your Windows 11 ISO file got damaged during the download and that caused some files to go missing, but that should be fixed by downloading the ISO file again.
Tip
Some users reported that the error message didn’t appear when trying to install a different build of Windows 11, so be sure to try that as well.
2. Change SATA Operation Mode
- While your PC boots, keep pressing Del to access BIOS.
- Navigate to the Peripherals section.
- Now set SATA Mode to AHCI.

- Save the changes and try to install Windows 11 again.

By modifying this setting, the driver won’t be required during the installation and you won’t’ get Select the driver to install message on Windows 11.
NOTE
Each motherboard BIOS is different, so check your motherboard manual to find the correct way to access BIOS and change the SATA Mode.
3. Copy the missing drivers to the installation USB
- Download the required driver. It’s usually a Rapid Storage or a chipset driver.
- Once the drivers are downloaded, extract them.
- Now look for any sys, inf, or dll files and copy them.
- Paste them to your Windows 11 USB installation media.
- Try to perform the installation again.
- If asked for drivers, select the ones that you added to the USB drive.


This issue was reported mostly on Dell devices, and the solution mentioned above worked for several users, so we assume that it will work for other PC brands.
Keep in mind that this is an advanced solution and you need to know which drivers to download and add to the installation media. For automatic scans of missing or outdated drivers, we recommend using an automated driver updating tool.
4. Check your hard drive
- Make sure that your PC is completely turned off.
- Disconnect it from the power outlet.
- Open your computer case.
- Check the SATA cables and make sure that they are tightly connected to both your drive and the motherboard.
- Up next, check the power cable that goes to your drive and ensure that is properly connected.
- Close your computer case, connect the PC to the power outlet and check if the issue is gone.
Sometimes loose connections can cause your storage device not to be detected, and lead to the Select the driver to install message when installing Windows 11.
Therefore, check your hardware and ensure that everything is connected properly. The best way to do that is with some advanced hardware diagnostic tools.
How can I make a Windows 11 bootable drive?
To create a Windows 11 bootable drive, you need to download a Windows 11 ISO from Microsoft’s website. Do not download the ISO file from third-party websites, because it might be altered.
After downloading the ISO file, simply use Rufus to create bootable media. For more step-by-step information, check our guide on how to make Windows 11 bootable USB drives.
- Fix: Device requires further installation in Windows 10/11
- Recent Windows 11 update lets you disable profanity filter in voice typing
- Microsoft wants Windows 10 users to upgrade to Windows 11 or Copilot + PCs
What are the most common Windows 11 installation errors?
One of the common errors when installing Windows 11 is the TPM device not detected error. If you’re not familiar with TPM, we suggest reading our Windows 11 and TPM guide for more information.
Even if you’re having installation issues, you should be able to solve them after reading our guide dedicated to solving Windows 11 installation problems.
Getting rid of the Select the driver to install message in Windows 11 doesn’t have to be hard, and we hope that you managed to fix this problem using our solutions.
Did you find the fix on your own? In this case, don’t hesitate to share it with us in the comments section below.
Milan Stanojevic
Windows Toubleshooting Expert
Milan has been enthusiastic about technology ever since his childhood days, and this led him to take interest in all PC-related technologies. He’s a PC enthusiast and he spends most of his time learning about computers and technology.
Before joining WindowsReport, he worked as a front-end web developer. Now, he’s one of the Troubleshooting experts in our worldwide team, specializing in Windows errors & software issues.
After I replaced the hard drive of my laptop with a faster Solid State Drive two days ago, I had to install an operating system on the device as the disk was empty.
I picked Windows 7 at first, downloaded the ISO image from Technet, used Microsoft’s Windows 7 USB/DVD Download Tool to copy it to an 8 Gigabyte USB Flash Drive and started the installation afterwards by simply plugging the drive into one of the computer’s USB ports.
Everything went fine for a while, but eventually I would run into a driver issue. Windows was telling me that a driver was missing, and that it could not find the driver on its own.
What made this particularly interesting was that there was no indication of what kind of driver the operating system was expecting.
Well, that is not entirely correct, as it told me that a CD/DVD device driver was missing. Since the laptop did not ship with an optical drive, it did not made a whole lot of sense though.
The issue was quite puzzling at first, and I went to Lenovo’s website to download drivers and updates for the device as I hoped that they would contain the necessary drivers to fix the issue.
The page listed lots of drivers, and before I started to copy them all to the Flash drive, I decided to investigate another possible solution.
Then I remembered that the Thinkpad E145 had two USB 3.0 and one USB 2.0 port. The Flash drive was plugged in one of the USB 3.0 ports, and maybe Windows was having issues because of it.
I connected the Flash drive to the USB 2.0 port on the device instead and ran the installation again. The drive was formatted again, data was copied, and the «Select the driver to be installed» message did not appear at all.
Could it really have been that simple?
Grabbing USB 3.0 drivers for the PC from the Lenovo website should fix the issue as well, as Windows 7 apparently ships without USB 3.0 driver support.
So, if you want to install Windows 7 on a device without USB 2.0 port, you need to pick up the drivers from the manufacturer of the device to continue with the installation.
There are other solutions that users have posted over the years, for instance to add USB 3.0 drivers to the installation files, which can be useful if you use the copy to install Windows 7 regularly on other devices.
What about Windows 8?
I decided to test Windows 8 to see if it would throw the error as well. Did download Windows 8.1 Pro from Technet, used the same Windows 7 USB/DVD Download Tool to copy it to the Flash drive to install it on the laptop.
Turns out that Windows 8 has the exact same issue that Windows 7 has. The operating system displayed the select the driver to be installed notification during installation from an USB 3.0 port, while the setup ran through without issues when the drive was connected to an USB 2.0 port.
You can alternatively load the USB driver by downloading it from the manufacturer’s website so that Windows can load it.
Summary
Article Name
Fix Select the driver to be installed when installing Windows
Description
The tutorial offers instructions on how to fix the «Select the driver to be installed» error when you are installing Windows on a computer.
Author
Martin Brinkmann
Publisher
Ghacks Technology News
Logo
Advertisement
,
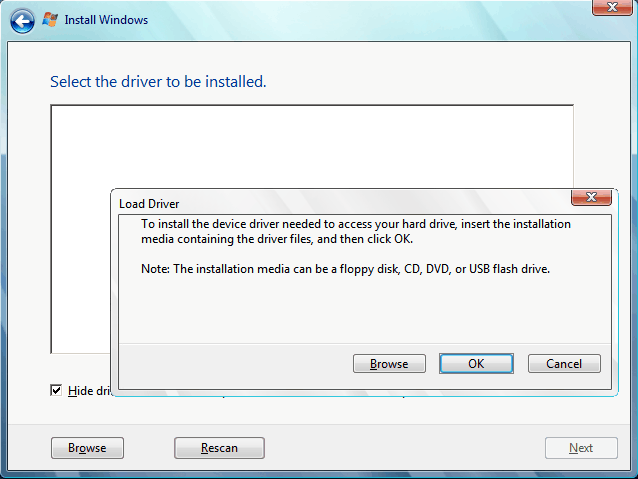
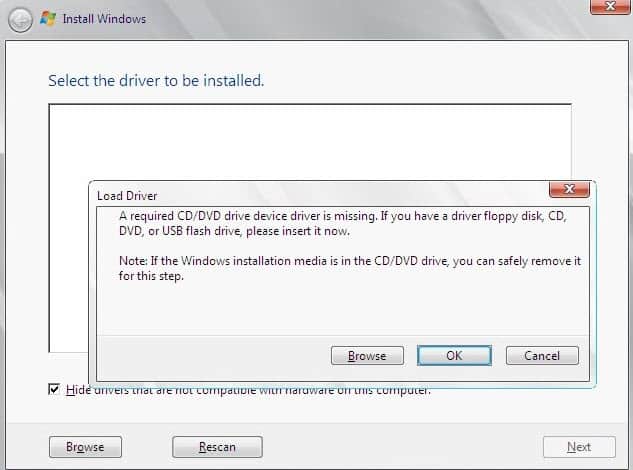
The following error may occurred while trying to install Windows OS from a USB installation disk: «Select the driver to be installed. Load Driver. A required CD/DVD drive device is missing. If you have a driver floppy disk, CD, DVD, or USB flash drive, please insert it now. Note: If the Windows installation media is in the CD/DVD drive, you can safely remove it for this step«.

The «Select the driver to installed» setup error message, is occurred during Windows 7 installation through a USB flash drive, by using a USB 3.0 port. This problem is caused because the Windows installer media doesn’t have a USB 3.0 driver to install Windows through the USB 3.0 port.
How to bypass the «Select the driver to be installed» error when you try to install Windows from USB.
In order to resolve the «Select the driver to be installed» USB Windows installation error:
Method 1. Remove and Reinsert the USB media.
1. When the «Select the driver to be installed» error, appears click Cancel. (This will bring you back to the first setup screen)
2. Remove and re-insert the USB installation media.
3. Now try to install Windows.
Method 2. install Windows from USB 2.0 Port or from DVD.
1. Shut down the computer.
2. Plug your USB flash drive that contains the Windows setup files to a USB 2.0 port on the computer and start the installation again. *
* Note: If your computer doesn’t have a USB 2.0 port then disable the USB 3.0 support in BIOS settings (if supported), or install Windows from a DVD media.
Method 3. Add USB 3.0 drivers to your Windows USB Media by using Gigabyte’s Windows USB Installation Tool.
The second method to resolve the «Select the driver to be installed» error, is to add USB 3.0 support (drivers) to your Windows 7 installation media.*
* Note: The process requires to have access to another working computer with Windows 8.1 or Windows 10 OS. Use this method if your computer doesn’t have USB 2.0 ports or if you cannot install Windows by using a Windows DVD media.
Step 1. Create a Windows USB Installation Media.
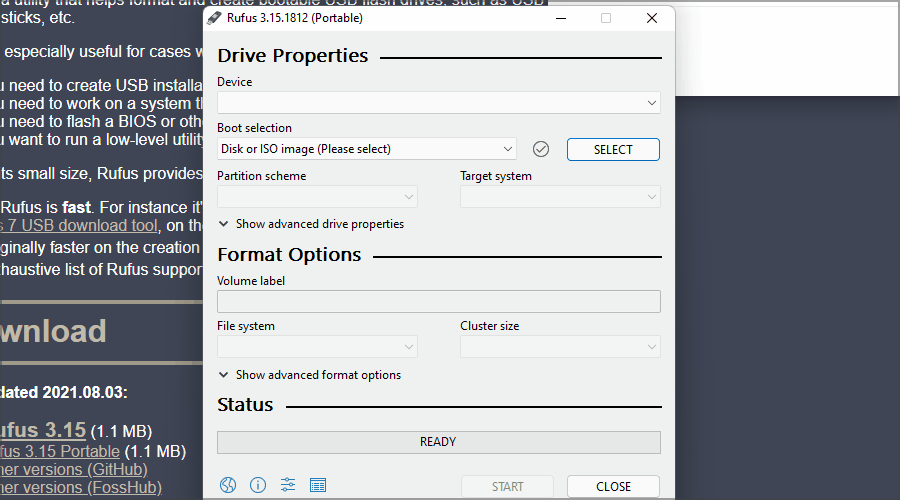
Create a Windows USB installation media by using Microsoft’s USB Creator Tool or by using the Rufus Creator utility.
Related Articles.
- How to create a Windows 10 USB installation media using Media Creation Tool.
- How to Create Windows 10 USB Installation Using RUFUS Creator Utility.
Step 2. Download the Windows USB Installation Tool.
1. Navigate to Gigabyte’s Support Site: https://www.gigabyte.com/Support/Utility
2. At the search box type «Windows USB Installation Tool» (without quotes).

3. Download the corresponding ‘Windows USB Installation Tool’ according to your motherboard series.
4. Unzip the downloaded file and then continue to next step.
Step 3. Add USB 3.0/3.1 Driver Support to Windows 7 USB.
1. Plug the Windows USB Installation Media on the computer.
2. From the extracted folder, double click to run the «WindowsImageTool.exe» application.
3. Now perform the following:
-
- Select None-Add USB drivers in Source Path.
- Choose the Windows 7 USB installation disk in the Destination Path.
- Finally click Start.
- When the process is completed click Close.

4. Eject the USB drive and use it to install Windows.
Method 4. Add USB 3.0 Support to Windows 7 by using Intel’s Windows 7* USB 3.0 Creator Utility. *
* Note: This method is no longer working because Intel has removed the ‘USB Creator utility’ from its website.
1. Download Intel’s Windows 7* USB 3.0 Creator Utility.
2. Extract the «Win7-USB3.0-Creator-V3.zip» file.
3. Plug the USB flash drive that contains the Windows installation files on the computer.
4. From the extracted «Win7-USB3.0-Creator-V3» folder, right-click at the «Installer_Creator.exe» and select Run as administrator.

5. Click Browse {…} and select the USB drive letter (that contains the Windows installation files).

6. Finally press the Create Image button and wait until the process is completed.

7. Unplug the USB disk and use it to install Windows.
That’s all folks! Did it work for you?
Please leave a comment in the comment section below or even better: like and share this blog post in the social networks to help spread the word about this.
If this article was useful for you, please consider supporting us by making a donation. Even $1 can a make a huge difference for us.
- Author
- Recent Posts
Konstantinos is the founder and administrator of Repairwin.com. Since 1995 he works and provides IT support as a computer and network expert to individuals and large companies. He is specialized in solving problems related to Windows or other Microsoft products (Windows Server, Office, Microsoft 365, etc.).