
Все способы:
- Установка Windows 10 поверх старой
- Способ 1: Установка из-под BIOS
- Способ 2: Установка из-под системы
- Способ 3: Установка второй системой
- Способ 4: Средство восстановления
- Заключение
- Вопросы и ответы: 6
При использовании компьютера с Windows 10 иногда может возникать необходимость повторной установки данной операционной системы поверх предыдущей версии. Это относится как к установке обновлений, так и к полной переустановке ОС. В рамках данной статьи мы детально рассмотрим данную процедуру.
Установка Windows 10 поверх старой
На сегодняшний день Windows 10 можно установить поверх предыдущей версии несколькими способами, которые позволяют как полностью заменить старую версию системы на новую с полным удалением файлов, так и сохранить большую часть пользовательской информации.
Читайте также: Способы переустановки ОС Windows 10
Способ 1: Установка из-под BIOS
К данному способу можно прибегнуть в тех случаях, если имеющиеся на системном диске файлы не представляют для вас большого интереса и могут быть удалены. Непосредственно сама процедура полностью идентична вне зависимости от ранее установленного дистрибутива, будь то Windows 10 или семерка. Ознакомиться с детальной инструкцией по установке с использованием флешки или диска вы можете в отдельной статье на нашем сайте.
Примечание: В некоторых случаях во время установки можно воспользоваться возможностью обновления, однако доступен этот вариант не всегда.
Подробнее: Установка Windows 10 с диска или флешки
Способ 2: Установка из-под системы
В отличие от полной переустановки системы из прошлого варианта, метод установки Windows 10 из-под существующей ОС позволит вам сохранить все пользовательские файлы и по желанию некоторые параметры со старой версии. Основным преимуществом в данном случае является возможность замены системных файлов без необходимости ввода лицензионного ключа.
Шаг 1: Подготовка
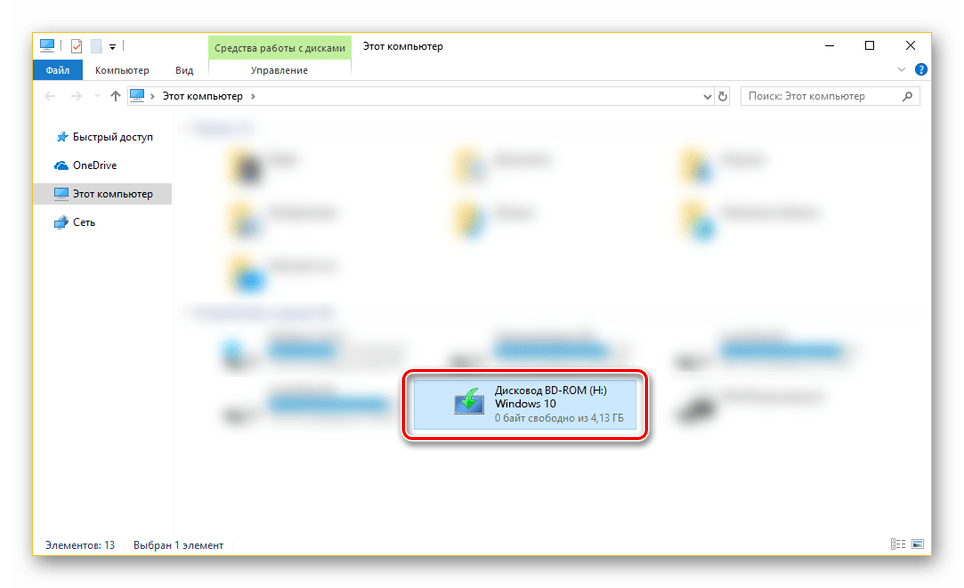
- Если в вашем распоряжении имеется ISO-образ дистрибутива Виндовс 10, выполните его монтирование, например, с помощью программы Daemon Tools. Или же при наличии флешки с данной системой подключите ее к ПК.
- При отсутствии образа нужно будет загрузить и запустить Windows 10 Media Creation. С помощью этого средства можно скачать последнюю версию ОС из официальных источников Microsoft.
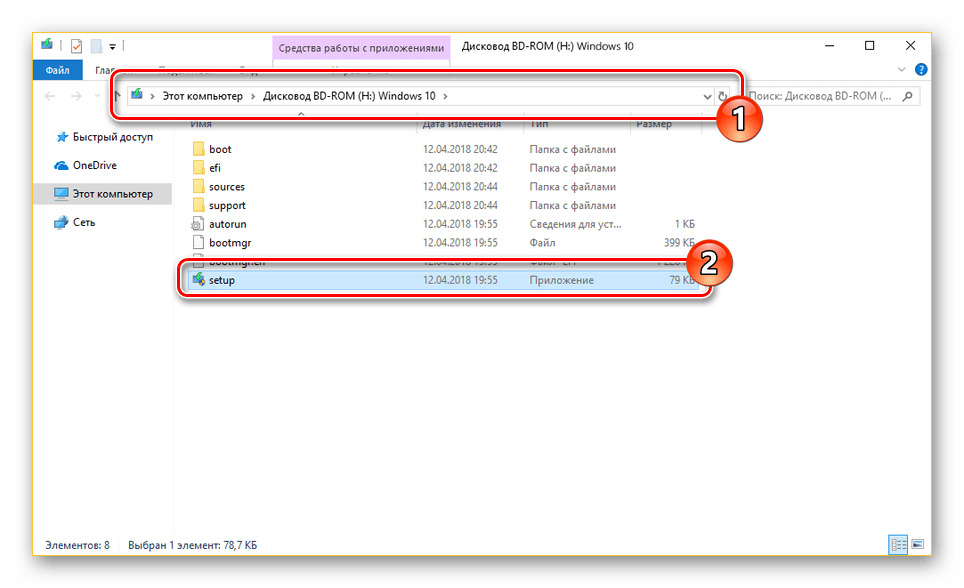
- Вне зависимости от варианта, необходимо открыть месторасположение образа с операционной системой и дважды кликнуть левой кнопкой мыши по файлу «setup».

После этого начнется процесс подготовки временных файлов, необходимых для инсталляции.
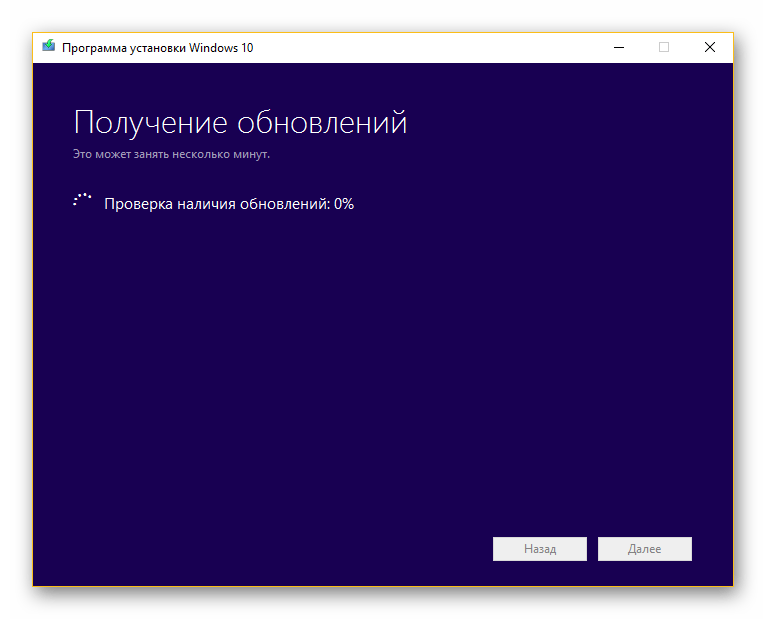
- На данном этапе у вас есть выбор: загружать последние обновления или нет. Определиться с данным вопросом вам поможет следующий этап.


Шаг 2: Обновление
В том случае, если вы предпочитаете использовать Windows 10 со всеми актуальными обновлениями, выберите пункт «Скачать и установить» с последующим нажатием «Далее».
Требуемое на инсталляцию время напрямую зависит от соединения с интернетом. Более детально об этом мы рассказали в другой статье.
Подробнее: Обновление ОС Windows 10 до последней версии
Шаг 3: Установка
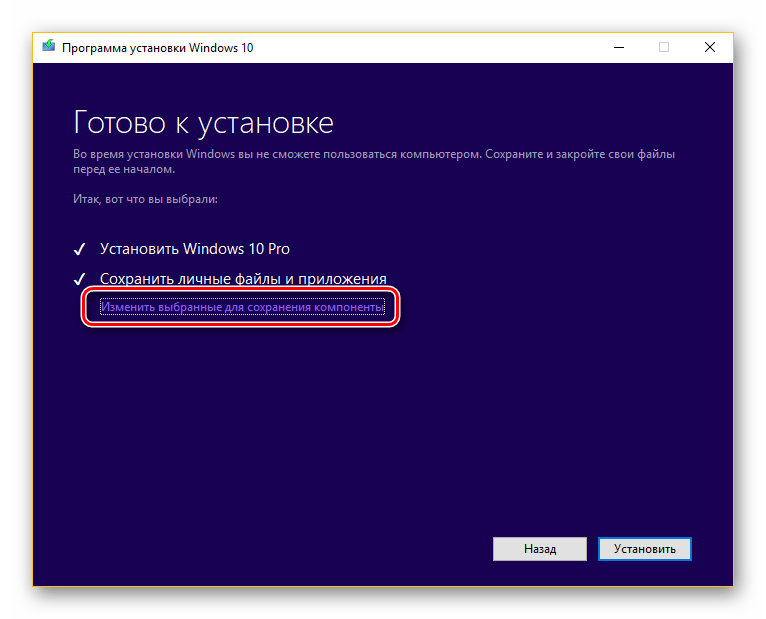
- После отказа или инсталляции обновлений вы окажетесь на странице «Готово к установке». Кликните по ссылке «Изменить выбранные для сохранения компоненты».
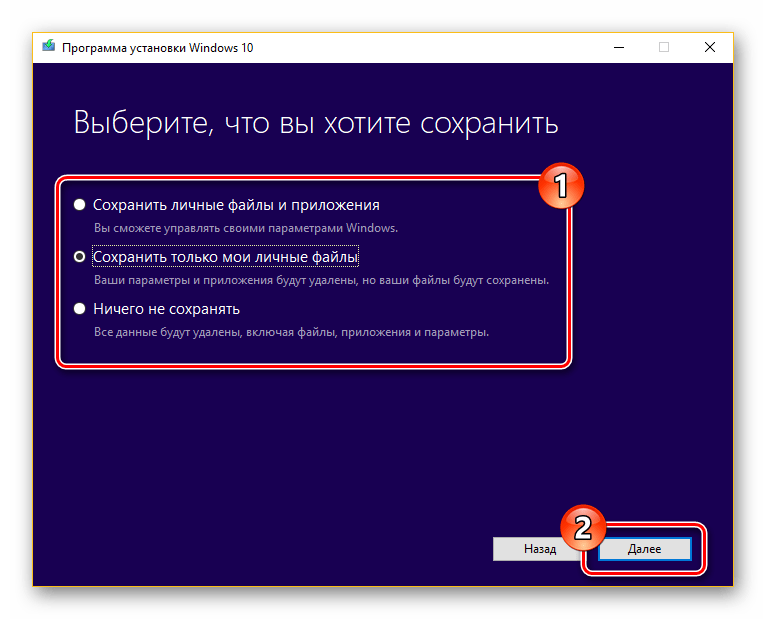
- Здесь можно отметить один из трех вариантов в зависимости от ваших требований:
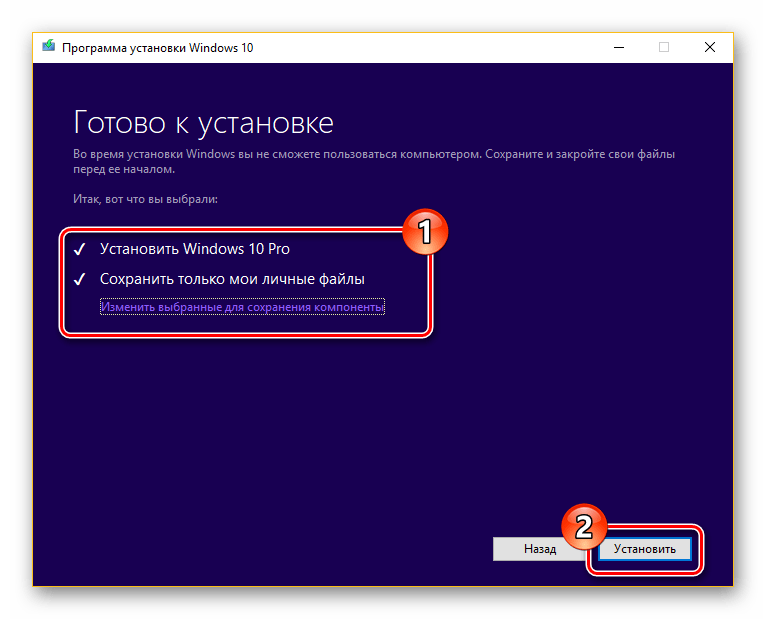
Вариант Описание Сохранить файлы и приложения Файлы, параметры и приложения будут сохранены Сохранить только личные файлы Файлы останутся, но приложения и настройки удалятся Ничего не сохранять Произойдет полное удаление по аналогии с чистой установкой ОС - Определившись с одним из вариантов, нажмите «Далее», чтобы вернуться к предыдущей странице. Для начала инсталляции Windows воспользуйтесь кнопкой «Установить».

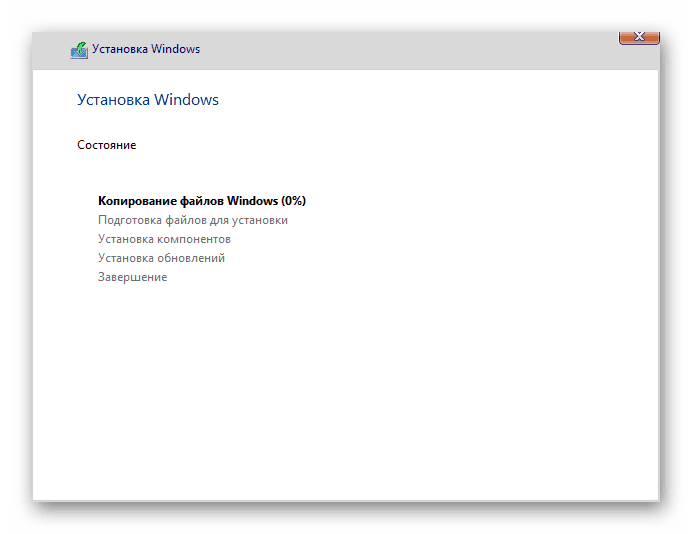
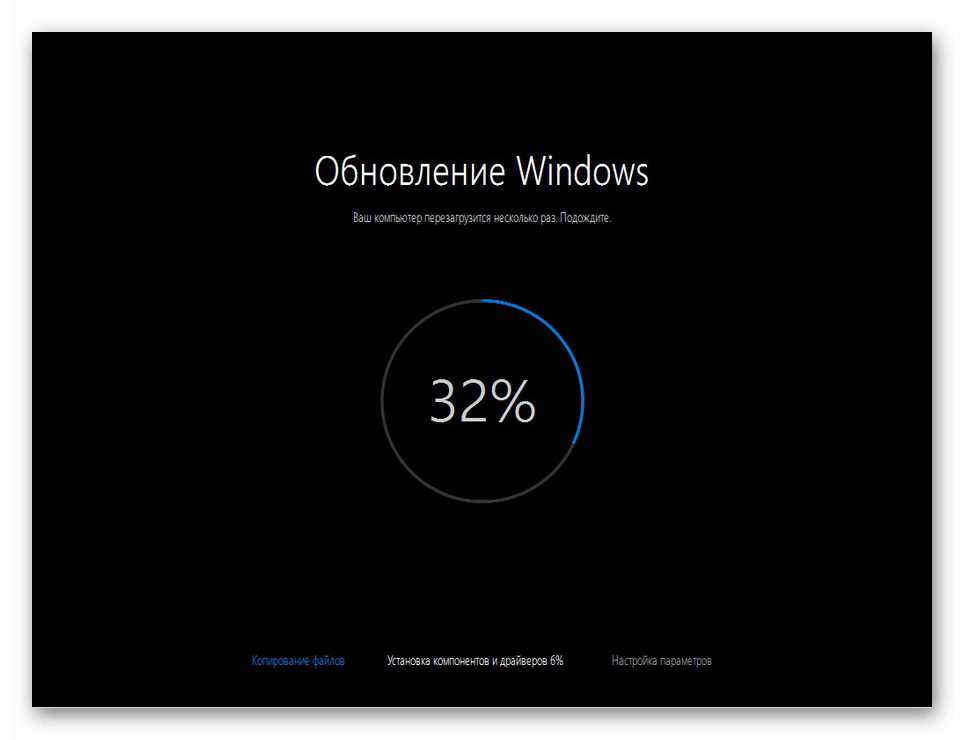
Прогресс переустановки будет отображен в центре экрана. На самопроизвольную перезагрузку ПК обращать внимание не следует.
- Когда средство установки закончит работу, вам будет предложено произвести настройку.
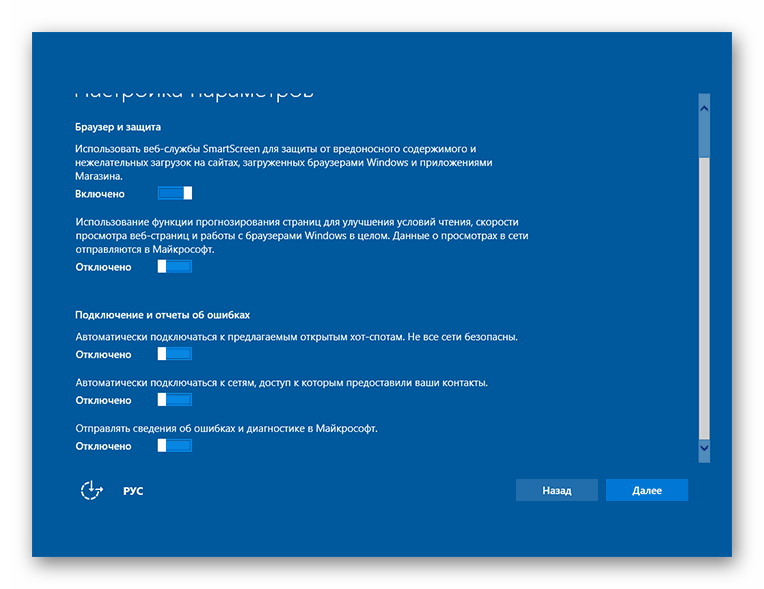
Этап настройки мы рассматривать не будем, так как во многом он идентичен установке ОС с нуля за исключением нескольких нюансов.
Способ 3: Установка второй системой
Помимо полной переустановки Windows 10 новая версия может быть установлена рядом с предыдущей. Способы реализации этого мы детально рассмотрели в соответствующей статье на нашем сайте, ознакомиться с которой вы можете по ссылке ниже.

Подробнее: Установка нескольких Windows на один компьютер
Способ 4: Средство восстановления
В прошлых разделах статьи мы рассмотрели возможные методы установки Windows 10, но в этот раз уделим внимание процедуре восстановления. Это напрямую относится к рассматриваемой теме, так как ОС Виндовс, начиная с восьмерки, может быть восстановлена путем переустановки без оригинального образа и подключения к серверам Microsoft.

Подробнее:
Как сбросить Windows 10 до заводских настроек
Как восстановить Windows 10 к исходному состоянию
Заключение
Мы постарались максимально подробно рассмотреть процедуру переустановки и обновления данной операционной системы. На случай же если вы что-то не поняли или есть чем дополнить инструкцию, обращайтесь к нам в комментариях под статьей.
Наша группа в TelegramПолезные советы и помощь
Windows 11 Dev build is out now and it’s all well and good if you want to get your hands on it as soon as physically possible. But considering that this is just the Dev build, it is not all peachy perfect. It might take some time to get adjusted to the new UI and there are many changes that we think (and hope) Microsoft will include in future preview builds and the stable Windows 11 that is coming out this holiday season.
Until then, you can install Windows 11 on your PC without having to say goodbye to its predecessor that’s been with us for 6 years now. Here’s everything you need to know to dual boot Windows 11 and Windows 10 on your PC.
Related: How To Install Windows 11 From USB
Step 1 (Optional): Create a separate drive for Windows 11
In order to install and dual boot Windows 11 on a PC that’s running another version of Windows, you have to create a separate drive that will remain assigned to Windows 11. It needs its own space (at least 64 GB) to boot and load its components to run effectively.
Although you can select any one of your drives to install Windows 11 on, it is better to create a separate drive to keep things well-demarcated and organized.
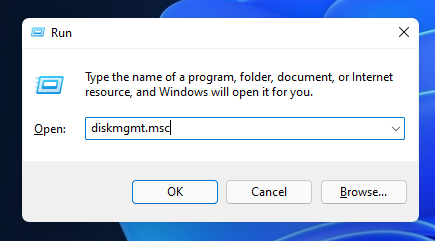
First up, press Win+R to open up the RUN box. Type diskmgmt.msc and press Enter.
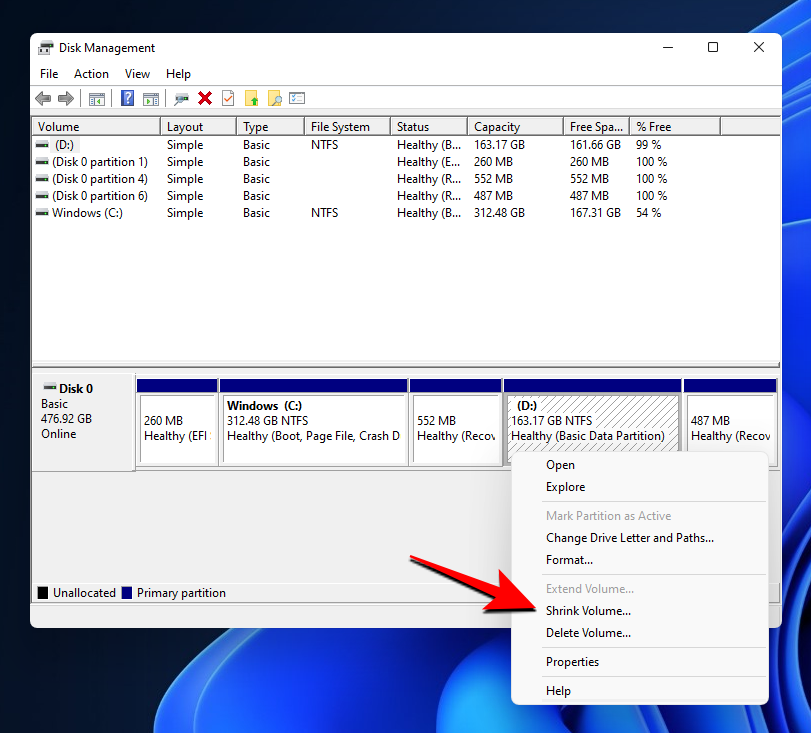
Now, we are going to create a partition for Windows 11. Right-click on a drive and select Shrink volume.
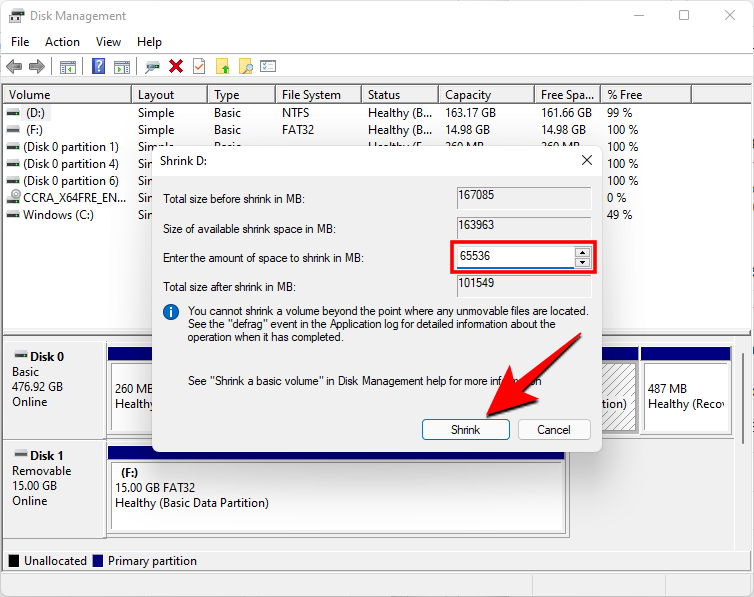
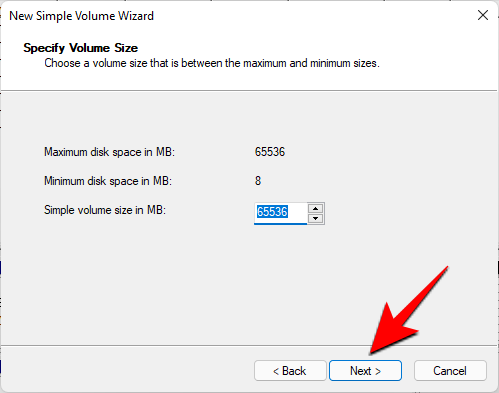
Here, you will see the space that’s available for shrinking. You need to have at least 64 GB of space so make sure you have chosen the disk that can allocate that much space, to begin with. Now Enter the amount of space to shrink in MB. Then click on Shrink.
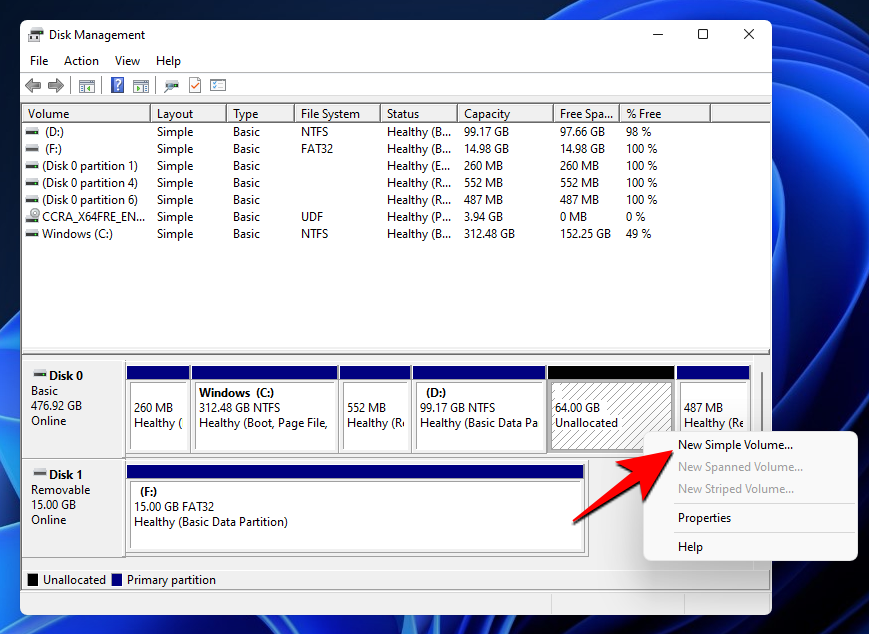
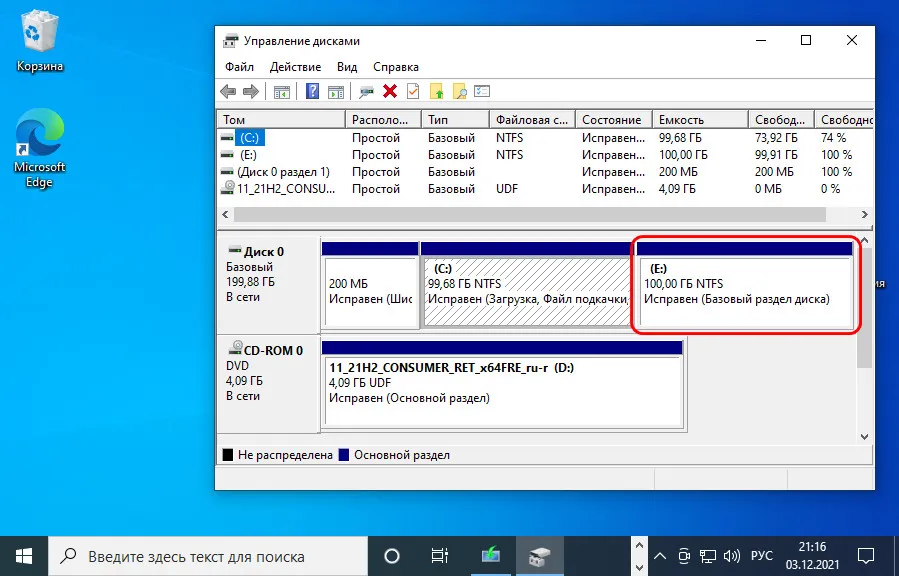
You will now see the Unallocated space appear in Disk management. Right-click on it and select New Simple Volume.
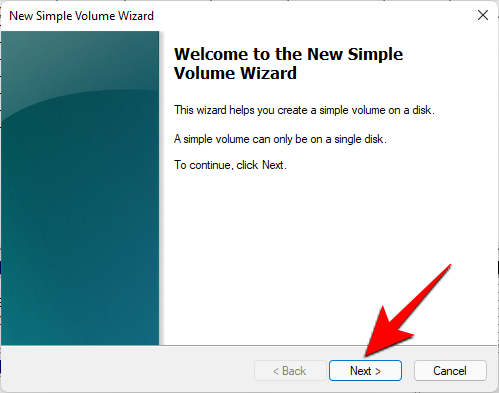
This will open up the wizard, click Next.
Click Next again.
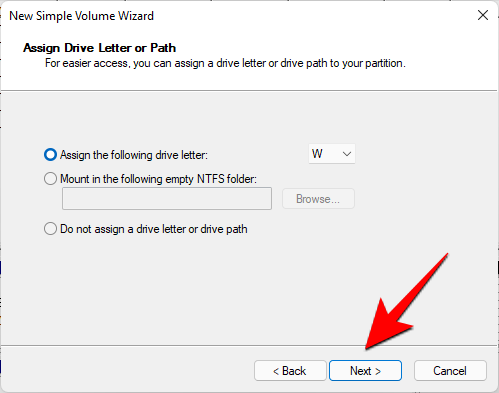
Assign the new drive a letter and click Next.
Now, give the volume a label and click Next.
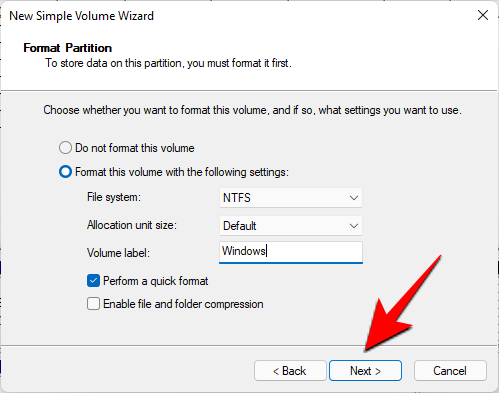
Click on Finish.
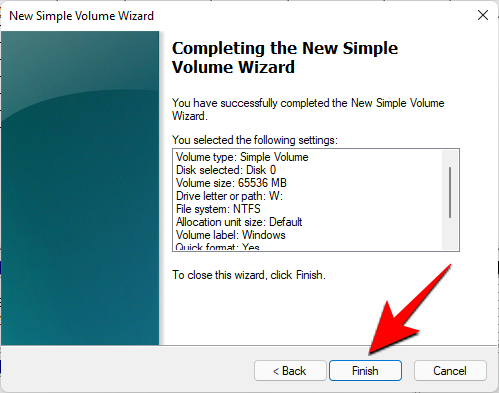
Your new separate drive is now available.
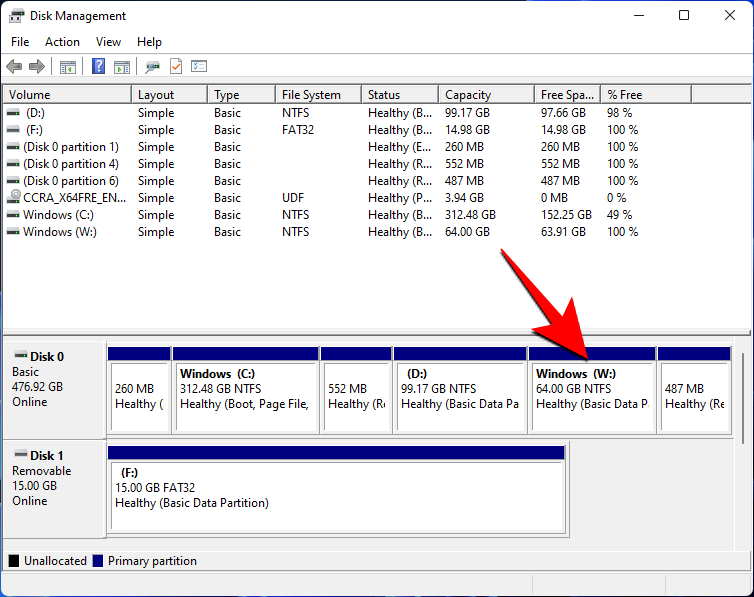
Let’s move on to installing Windows 11 on it.
Step 2: Download Windows 11 ISO file
The next (first) step is to download the Windows 11 ISO file. As the Windows 11 Dev build is currently only available to Windows Insiders via Windows updates, you will have to circumvent that process by using the UUP Dump tool to create an ISO file.
Use this guide to download the ISO file from Microsoft itself:
- How to Download Windows 11 ISO for Insider Dev Channel Build Yourself
Step 3: Create a bootable drive and install it via the Boot menu
Once you have the ISO file you will have to create a bootable drive with it in order to install Windows 11 via the Boot menu. This is because only when installing Windows via the Boot menu will you get the option to select the drive. Otherwise, Windows will assume that you’re updating your PC and automatically assign the drive.
Use this guide to create a bootable USB with Windows 11:
- How to Create a Bootable USB Drive With Windows 11 ISO From Dev Channel Insider Program
Note: Before creating a bootable pen drive, be sure to convert the USB drive to GPT partition type if it is of MBR type. Windows 11 installation requires the bootable pen drive to be of GPT type.
Step 4: Select the drive to install Windows 11
Once you have created a bootable USB, it is now time to start installing Windows 11 via the Boot menu. For this process, first up, shut down your PC. Then, turn it back on and press F8 to restart the PC into boot mode.
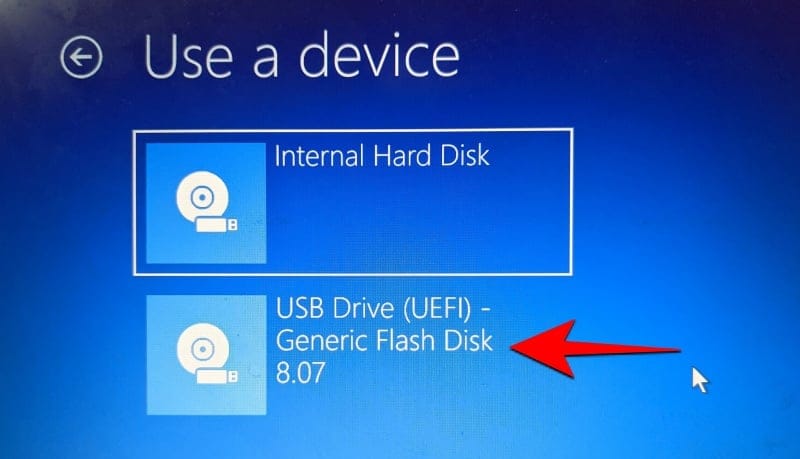
Once you’re in Boot mode, click on Use a device.
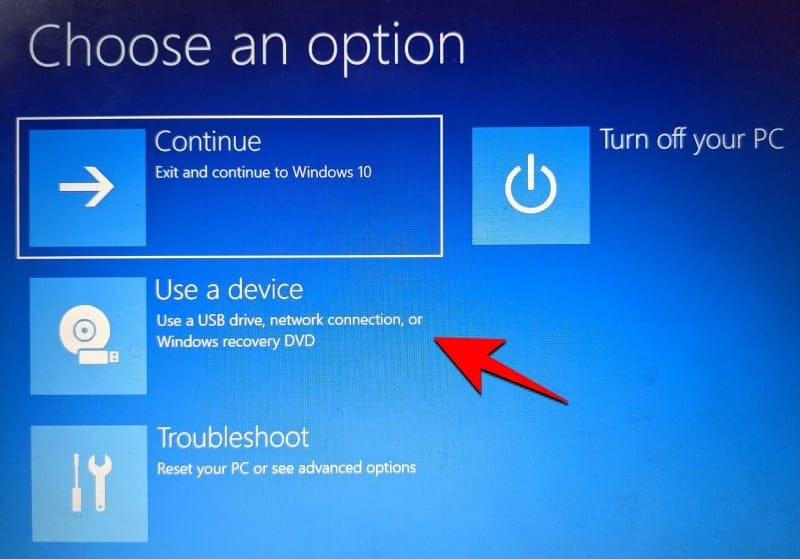
Then select your USB Drive.
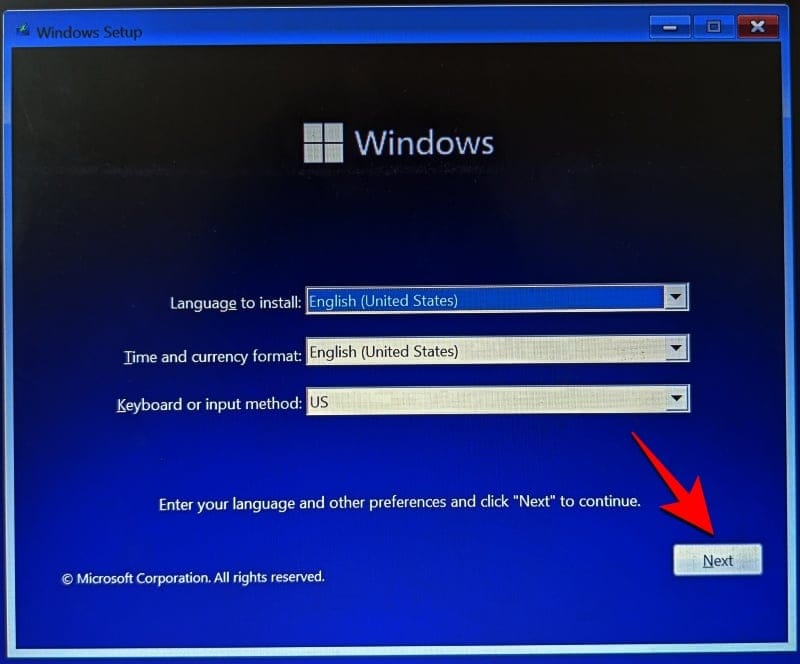
The Windows 11 setup should start. Click Next to proceed.
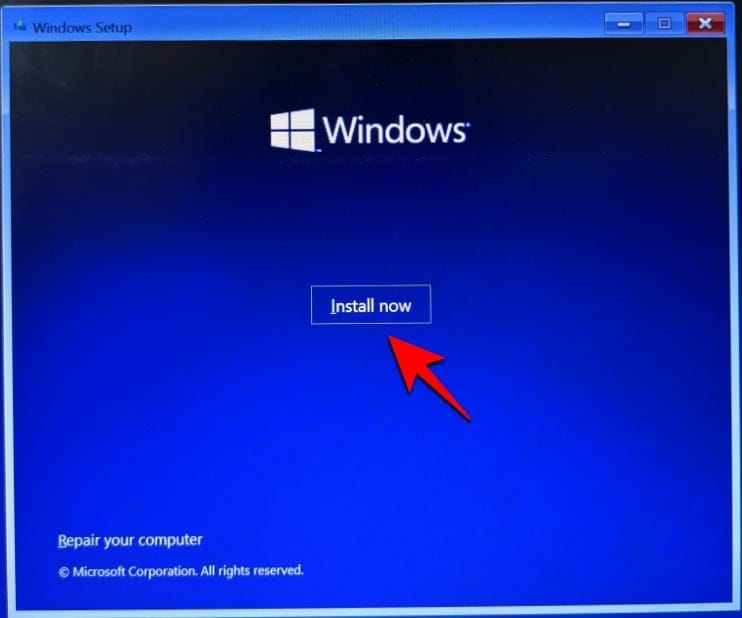
Then click on Install now.
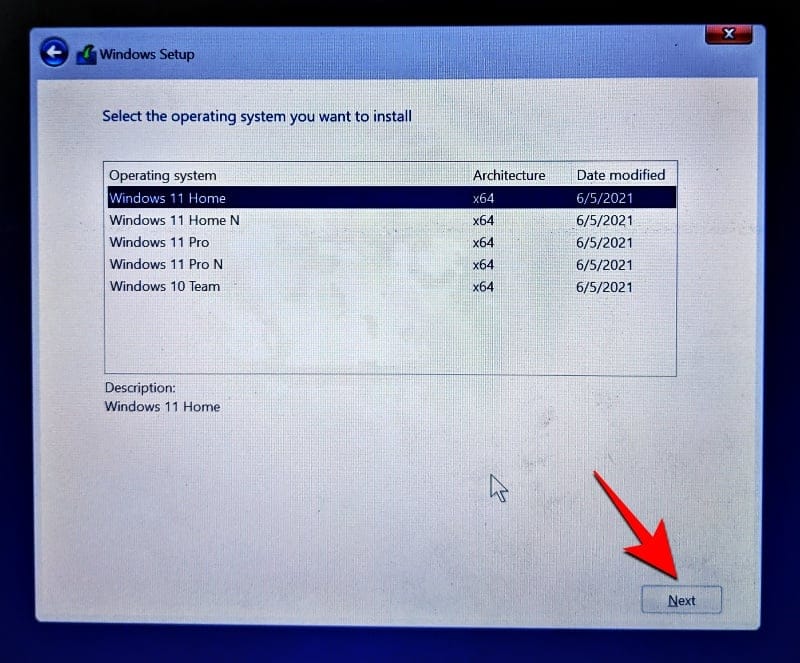
Select Windows 11 and click Next.
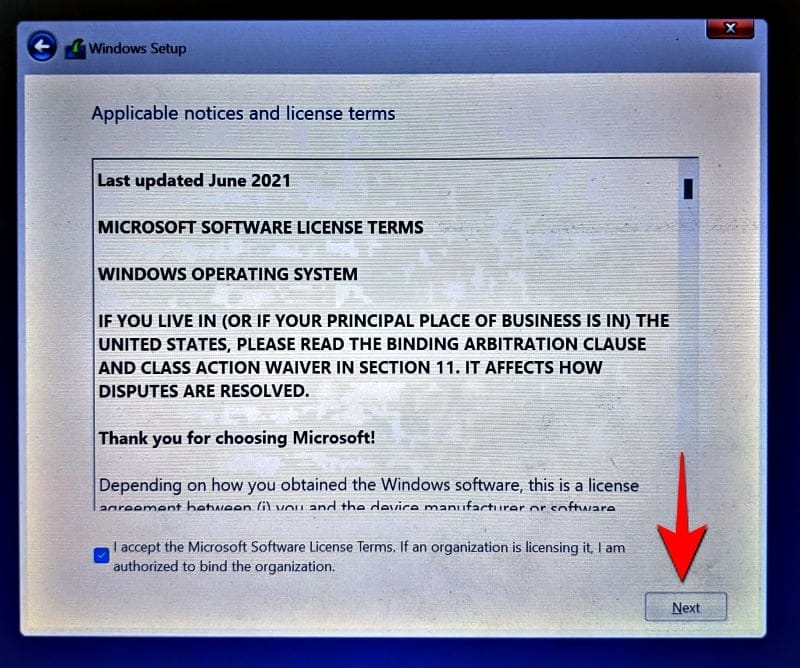
Accept the terms and conditions and click Next.
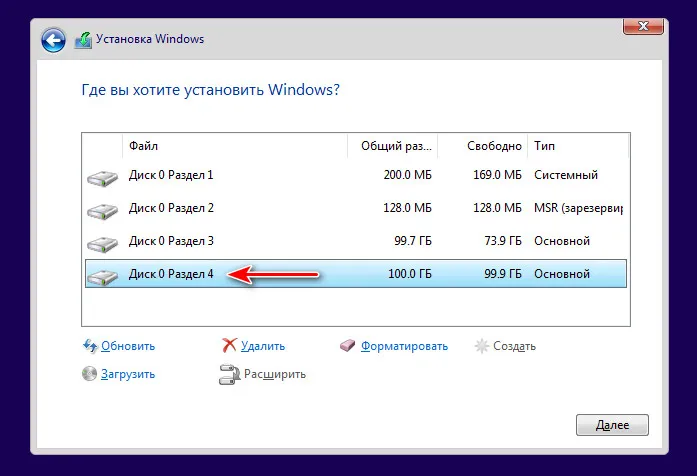
Now – this is the important bit – click on Custom: Install Windows only (advanced).

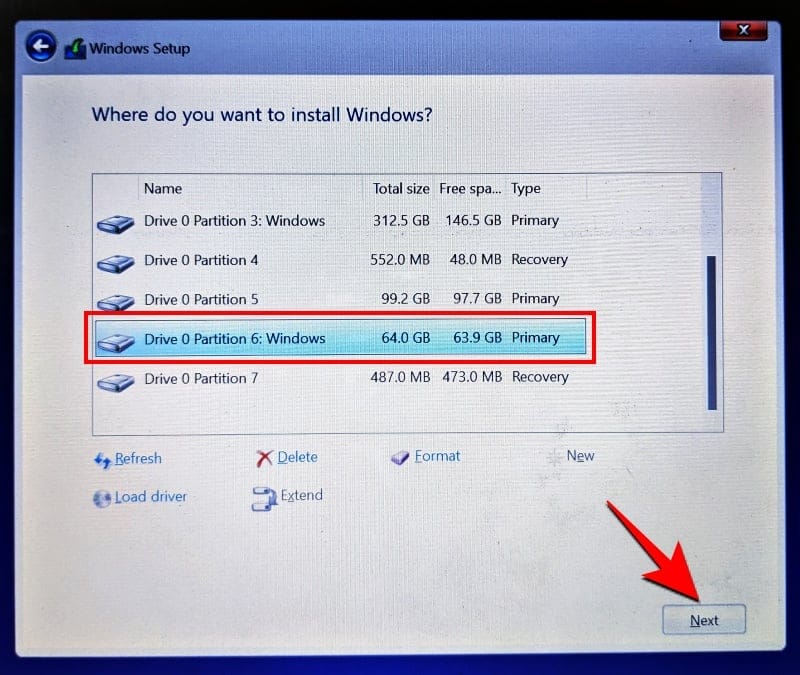
You will be asked to select the drive where you want to install Windows 11. You can select whichever drive you prefer (as long as it has a minimum available space to install Windows 11). Don’t worry, your data will remain intact. However, this drive will become the system drive and will be the main directory for all Windows 11 operations.
That is why it is better, on the whole, to install it on a separate drive. If you have created a separate drive as mentioned in Step 0.1, select this drive to install Windows 11 and click Next.
Now just follow the on-screen instructions and wait for Windows 11 to be installed. Once completed, you will have access to both Windows 10 and the newly installed Windows 11.
How to choose the default OS to boot between Windows 11 and Windows 10
Open the Settings app, and then click System. Or, click Win+X and select System.
Now, click Advanced system settings.

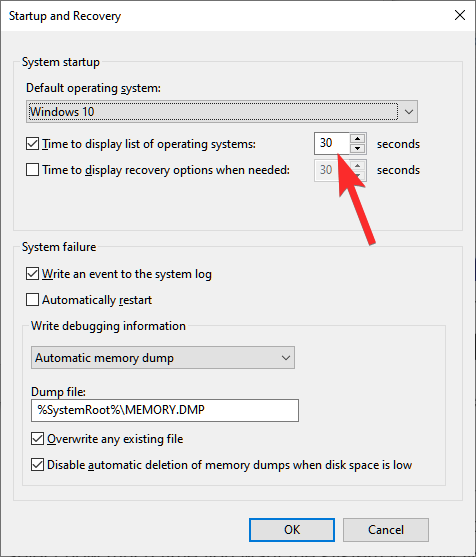
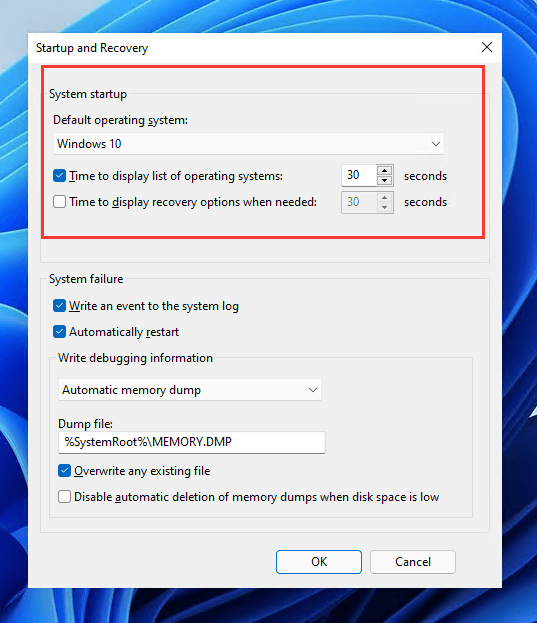
Click Settings under Startup and Recovery.
Click the dropdown menu under Default operating system.
Select the OS of your choice you want to be of default.
Select how much time you want the system to allow you to select the OS when you restart the PC before booting up with the default system you chose here.
That’s all.
How to install Windows 10 on a Windows 11 PC as dual boot
Well, you can. Use the same procedure as given above to install Windows 10 over Windows 11. You will need to download the Windows 10 ISO (get from Microsoft from here) and then use Rufus to create Windows 10 bootable pen drive.
Now, boot into EUFI/BIOS boot mode and select pen drive as your installation method. Follow the rest of the procedure as given above and you will be good to go.
Let us know if you need any help with dual booting Windows 11 on Windows 10 or vice versa.
In recent years, Microsoft has made significant strides in operating systems with Windows 11, introducing a fresh aesthetic, improved performance, and a host of new features. However, despite these enhancements, some users may prefer the familiarity or compatibility of Windows 10 for various reasons. Whether it’s due to compatibility issues with older software, preference for the classic Start menu, or simply a desire for a more straightforward user experience, reinstalling or downgrading to Windows 10 from Windows 11 is a choice many are pondering.
In this article, we will guide you through a comprehensive, step-by-step process for installing Windows 10 over Windows 11. The guidelines provided will cater to both novice and experienced users alike, ensuring a smooth transition back to Windows 10 without losing your files and data, provided you follow the instructions carefully.
Understanding the Reasons for Downgrading
Before diving into the installation process, it’s crucial to understand why one might consider downgrading from Windows 11 to Windows 10:
-
Compatibility Issues: Some users may discover that certain applications, games, or hardware peripherals do not work seamlessly with Windows 11 and are better supported by Windows 10.
-
Performance: For some older machines, Windows 10 may provide better performance and responsiveness.
-
User Preference: Windows 11 has a different interface that may not appeal to all users. The traditional taskbar and Start menu in Windows 10 might be more familiar and comfortable.
-
Learning Curve: For users who are not tech-savvy, the revamped features in Windows 11 can present a steep learning curve that hinders productivity.
-
Stability: Early adopters of Windows 11 may encounter bugs or issues that affect their workflow and would prefer the stability of Windows 10.
Prerequisites for Downgrading
Before proceeding, ensure you meet the following prerequisites:
-
Backup Your Data: Always back up your important files and data before making significant changes to your operating system. Use an external hard drive, cloud storage, or a backup service.
-
Windows 10 Installation Media: You will need Windows 10 installation media. This can be created using a USB flash drive or a DVD.
-
Product Key: If your PC originally came with Windows 10, you might not need a product key as the activation can be done automatically. However, it’s wise to have your product key handy.
-
System Requirements: Ensure your hardware meets the system requirements for Windows 10.
Step 1: Creating Windows 10 Installation Media
To install Windows 10, you need bootable installation media. This process can be accomplished using Microsoft’s Media Creation Tool.
How to Create Installation Media:
-
Download Windows 10 Media Creation Tool:
- Visit the Microsoft Download Windows 10 page.
- Click on the “Download Tool Now” button.
-
Run the Tool:
- After downloading, double-click the tool to run it.
- Accept the terms and conditions.
-
Choose Installation Media:
- In the setup window, select “Create installation media (USB flash drive, DVD, or ISO file) for another PC” and click “Next”.
-
Select Language and Edition:
- Choose the preferred language, edition (Windows 10), and architecture (32-bit or 64-bit) according to your preference and click “Next”.
-
Choose Media Type:
- Select “USB flash drive” if you want to create a bootable USB drive. Ensure you have a USB flash drive with at least 8GB of free space. If you prefer a DVD, select that option.
-
Begin the Process:
- Choose your USB drive from the list and click “Next”. The tool will download Windows 10 files and create the installation media. This may take a while depending on your internet speed.
Step 2: Preparing for Installation
Once you have created the bootable USB drive, the next step is preparation for the installation.
-
Backup Data: Again, ensure that all essential data is backed up.
-
Change Boot Order: You may need to change the boot order in your BIOS/UEFI settings to boot from the USB drive.
How to Change Boot Order:
-
Restart Your PC: As the computer boots up, press the BIOS/UEFI key (commonly F2, F10, DEL, or ESC) to enter the setup (the exact key depends on your motherboard).
-
Navigate to Boot Menu: Use the arrow keys to navigate. Find the Boot menu and select the option to change the boot order.
-
Set USB as First Boot Device: Move your USB drive to the top of the list to ensure your computer boots from it first. Save the changes and exit the BIOS/UEFI setup.
Step 3: Installing Windows 10
Once you have successfully prepared and configured your system for installation, follow these steps to install Windows 10:
-
Boot from USB: Insert your USB flash drive containing Windows 10 installation media, and restart your computer.
-
Start the Installation Process: Once your system boots up from the USB, you will see the Windows logo followed by the installation screen. Select the language, time, and keyboard settings, then click “Next”.
-
Select Install Now: Click on the “Install Now” button.
-
Product Key: If prompted, enter your Windows 10 product key. If you don’t have one, you can choose “I don’t have a product key”. Windows 10 will allow you to install without a key, although some features may be limited until activation.
-
Select Your Version: Choose the version of Windows 10 you want to install (this step may not appear if you’re using a Windows 10 key).
-
Agree to License Terms: Read and accept the Microsoft License Terms, then click “Next”.
-
Choosing Installation Type: You will then be prompted to select between “Upgrade” and “Custom”. Here, select “Custom: Install Windows only (advanced)” to proceed with a fresh installation.
Step 4: Partitioning
At this stage, you will be required to select where to install Windows 10.
-
Drive Selection: You will see a list of drives/partitions. To install Windows 10, select the partition where Windows 11 is installed, usually the primary partition (often labeled as Drive 0).
-
Delete Existing Partition: To make the transition clean, click on the partition and delete it; this will remove Windows 11 and all files associated with it. Warning: This action will erase all data on that partition, so ensure you have backed everything up.
-
Create New Partition: With the unallocated space left by deleting the old partition, select it and click on “New” to create a new partition for Windows 10. The installer will automatically create the necessary system partitions.
-
Start Installation: Select the newly created partition and click “Next” to begin the installation process.
Step 5: Complete the Installation
After the initial setup, Windows 10 will begin installing. This process could take several minutes depending on your hardware:
-
Progress Indicators: During installation, you will see several screens indicating the progress. Your computer may restart a few times.
-
Personalize Settings: Once the installation reaches the setup phase, you can configure your settings. Choose your preferences for privacy, personalization, and updates.
-
Create a User Account: You will be prompted to create a user account. You can use a Microsoft account or a local account per your preference.
-
Finish Setup: Continue following on-screen prompts to finalize your setup. Windows 10 will then finish booting into your newly installed operating system.
Step 6: Post-Installation Setup
Once Windows 10 is installed, it’s time to get your system back to a degree of normalcy:
-
Install Drivers: Visit your hardware manufacturer’s website to download any necessary drivers, including graphics, audio, and network drivers. Windows 10 usually takes care of this itself, but it’s good to ensure everything is up to date.
-
Run Windows Update: Ensure your system is updated by going to Settings > Update & Security > Windows Update and checking for updates.
-
Restore Files: After reinstalling Windows 10, you can restore files from your backup to their respective folders.
-
Install Software: Reinstall any applications and programs needed for your work or gaming requirements.
-
Custom Configuration: Customize your system settings according to your preferences, including the Start menu, taskbar, and desktop background.
Troubleshooting Common Issues
While the installation process is usually straightforward, issues may arise. Here are some common problems and their potential solutions:
-
Installation Fails or Gets Stuck: If your installation fails, ensure that your media is correctly created and not corrupted. You may want to recreate the installation media. Also, check your hardware for compatibility. If it gets stuck, waiting may help, but you may need to restart.
-
No Bootable Device Found: Ensure that the boot order in the BIOS/UEFI settings has the USB drive set to boot. If you are using a DVD, make sure it is inserted correctly.
-
Driver Issues Post-Installation: If any drivers are missing, head to Device Manager to identify the problematic drivers and download the latest versions from the manufacturer’s website.
Conclusion
Installing Windows 10 over Windows 11 can be a straightforward process if approached with careful preparation and execution. This article has outlined all the necessary steps, from creating installation media to performing the installation and subsequent setup. By following these guidelines, you can ensure a smooth transition back to Windows 10, achieving a stable and user-friendly operating environment.
As you explore Windows 10, be sure to take advantage of its features and capabilities, and always remember to keep your system updated and backed up to optimize your experience. If further issues arise during or after the installation, don’t hesitate to consult Microsoft’s support channels or community forums for additional assistance.
В этой публикации, друзья, поговорим о том, как установить Windows 11 второй операционной системой на компьютер с Windows 10. Windows 11 максимально совместима с Windows 10 и, по сути, являет лишь внешне преобразованную операционную систему. Но всё же она другая, пусть даже только внешне. А на вкус и цвет фломастеры разные: не факт, что Windows 11 вам понравится больше, чем Windows 10. Есть ещё фактор привычки к последней. И есть также фактор стабильности работы Windows 10, ибо теперь печать вечной беты носит Windows 11. Понять, какая из актуальных операционных систем Microsoft лучше конкретно для вас, можно сравнив их. Для этого не обязательно обновлять Windows 10 до Windows 11, можно установить вторую рядом с первой. Давайте посмотрим, как это сделать, и как это сделать, в частности, с переносом программ и данных в Windows 11.
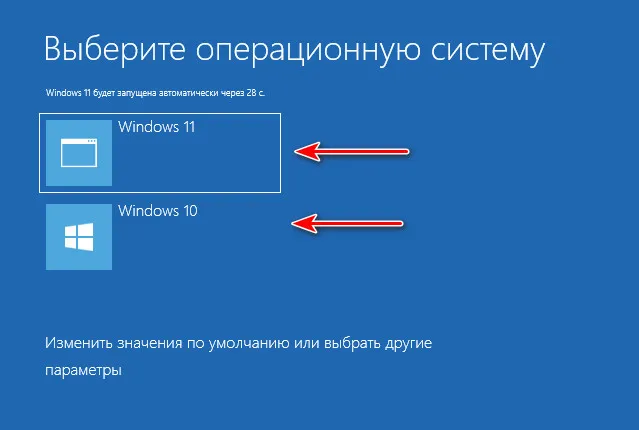
Итак, друзья, Windows 11 – операционная система с массой внешних новшеств. С виду идеально красивая, но с недостатками, самый главный из которых – жёсткие системные требования, которые делают невозможным её официальное использование на компьютерах условно старше 2017 года выпуска. Но её хоть официально, хоть неофициально можно установить практически на любой компьютер. И можно обновиться до Windows 11 с Windows 10 с сохранением программ и данных, опять же, хоть официально, хоть неофициально. Обновление до Windows 11 оставляет нам шанс откатиться к Windows 10 в течение какого-то времени. Но зачем себя ограничивать и ставить себе рамки – либо одна операционная система, либо другая. Можно установить Windows 11 рядом с Windows 10 в качестве второй операционной системы и работать с ними параллельно, продолжительно используя Windows 11, постепенно привыкая к ней, осваиваясь в ней, анализируя её плюсы и минусы. И обеспечивая себе максимально комфортный переход на неё без потери доступа к привычной Windows 10. Более того, мы можем получить Windows 11 второй системой не только чистую, установленную с нуля, а с наработанными в Windows 10 данными и программами, клонировав эту систему и обновив её до Windows 11. Имея на компьютере две Windows, при запуске компьютера будем видеть меню загрузки, где сможем выбрать, в какую операционную систему мы хотим в данный момент попасть – в Windows 10 или Windows 11.
Так как же установить Windows 11 рядом с Windows 10? Друзья, изначально установка любой Windows на одном компьютере с уже установленной Windows осуществляется как обычная установка Windows. Мы создаём установочную флешку, загружается в BIOS с этой флешки, проходим все этапы установочного процесса. И на этапе выбора места установки мы указываем не диск С, на котором у нас уже установлена первая Windows, а другой раздел диска.
В остальном же процесс установки ничем не будет отличаться. Но этот способ заморочлив тем, что надо записывать установочную флешку Windows 11. Есть способы установки Windows методом её развёртывания с использованием специальных программ, которые упрощают установку операционной системы, избавляя её от лишних установочных этапов и экономя нам время. Эти способы используют в своей работе системщики-профессионалы. И ещё средствам развёртывания Windows абсолютно по боку, отвечает ваш компьютер системным требованиям Windows 11 или нет. У них свой установочный механизм, в котором нет проверки компьютера на совместимость с Windows 11. Поэтому всё предложенное ниже, друзья, подходит для всех компьютеров — как для отвечающих требованиям Windows 11, так и для тех, которые Microsoft оставила за бортом.
Чтобы установить Windows 11 второй системой на компьютер, необходимо в первую очередь организовать для неё отдельный раздел диска. Этот раздел должен быть формально не менее 64 Гб, но если вы хотите основательно протестировать Windows 11, посмотреть, как в ней будут работать ваши программы и игры, лучше отвести под него 80-100 Гб. А если у вас игры занимают много места на диске, то, соответственно, объём раздела должен быть больше.
Если у вас есть такой раздел, уберите с него важные данные. Если нет, создайте такой раздел, отщипнув место у других разделов диска. Как это сделать, смотрим в статье «Как разделить диск в Windows 10».
Ну и давайте приступим уже к установке Windows 11 второй системой на компьютер. Для этих целей можно использовать бесплатные портативные программы Dism++ и WinNTSetup. Как с ними работать?
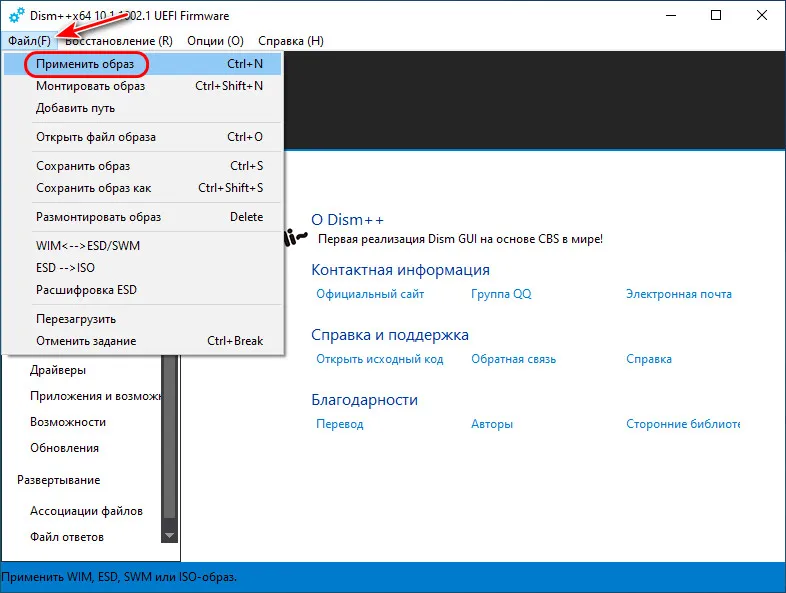
Если вы хотите установить Windows 11 в качестве второй операционной системы с нуля, нужно первым делом скачать её установочный ISO. Далее качаем программу Dism++, это многофункциональная программа по администрированию Windows и работе с её образами. В этой программе в меню «Файл» кликаем «Применить образ».
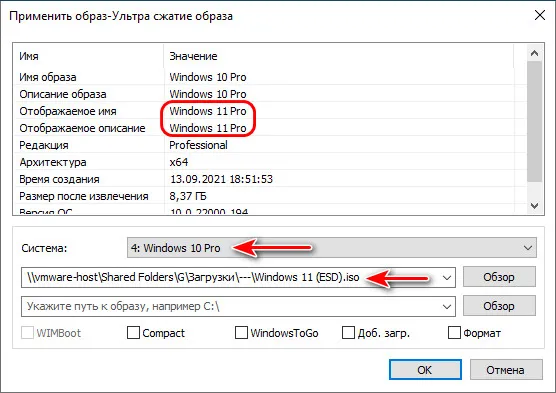
Указываем скачанный установочный ISO Windows 11 и выбираем редакцию системы. Друзья, не переживайте, что в этой программе Windows 11 где-то значится как Windows 10, Dism++ работает на примитивном уровне и где-то может видеть данные образа новой системы как «Десятки».
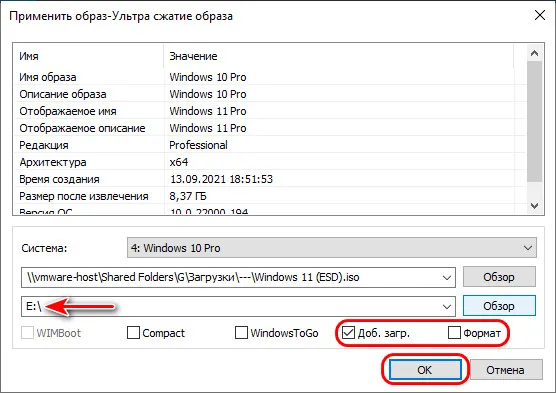
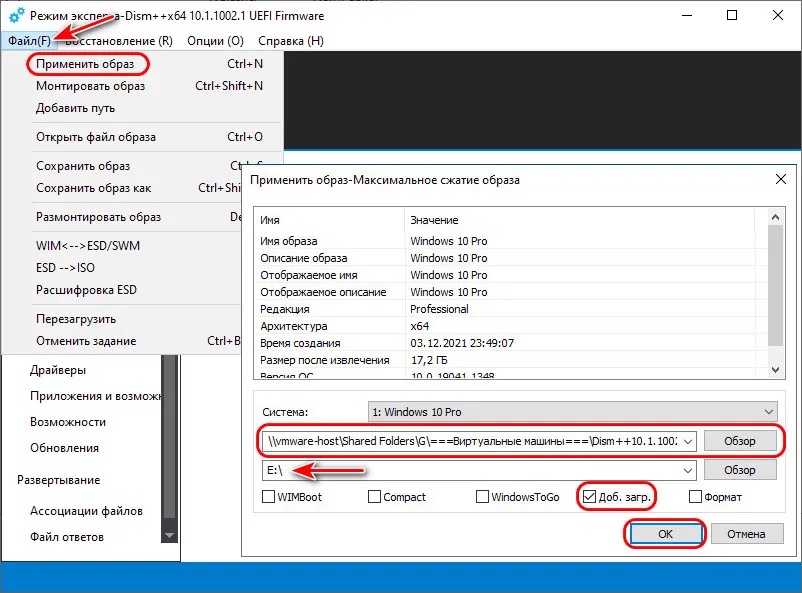
Далее указываем место установки Windows 11 – тот раздел диска, что мы подготовили. Далее если этот раздел у вас не форматировался, ставим внизу галочку «Формат». И ставим внизу галочку «Доб. загр.» для добавления Windows 11 в меню загрузчика. Жмём «Ок».
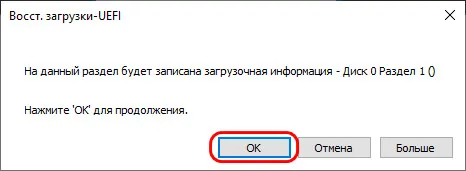
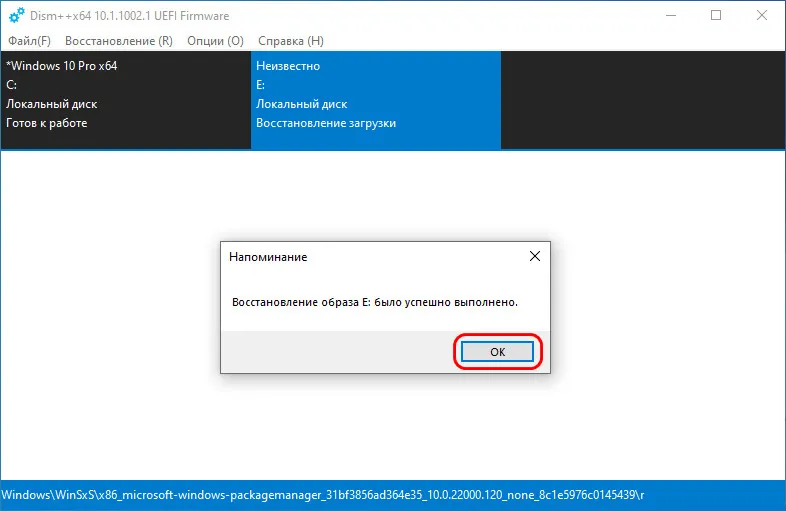
Жмём также «Ок» в сообщении о внесении загрузочной информации.
Дожидаемся развёртывания образа.
Далее перезагружаем компьютер, в меню загрузки входим в Windows 11 и проходим этапы первичной её настройки.
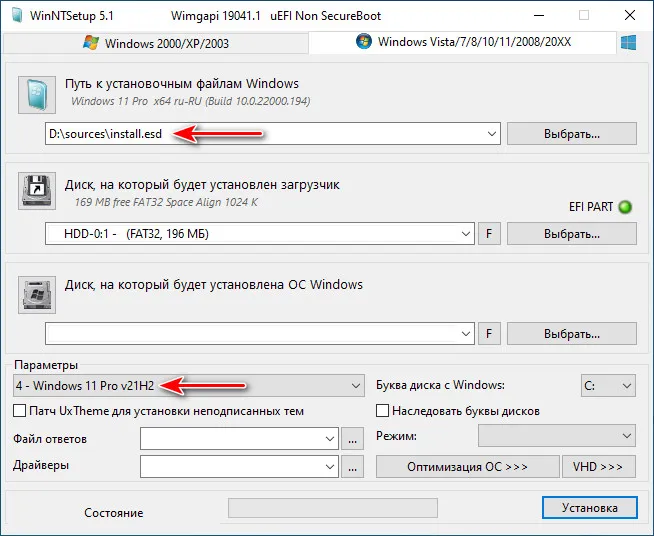
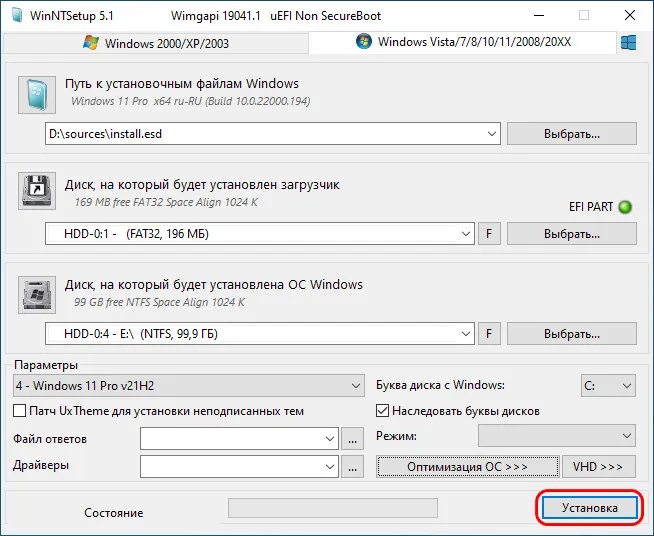
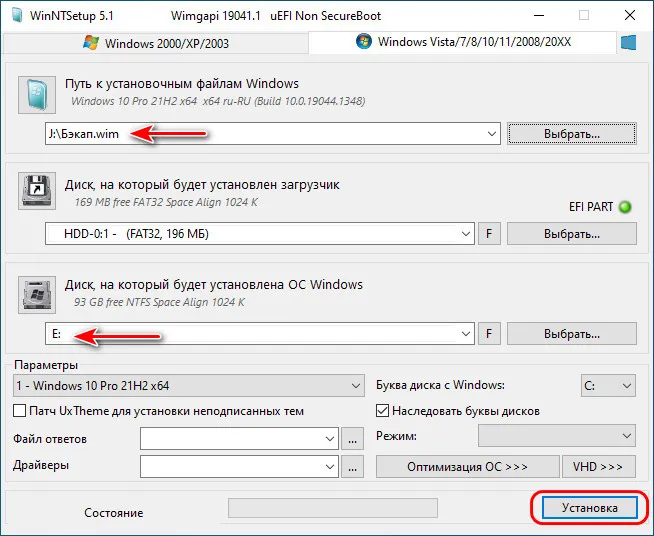
Альтернатива предыдущей программе – утилита WinNTSetup, её основной задачей является развёртывание Windows. Здесь также для установки Windows 11 в качестве второй операционной системы с нуля нужно сначала скачать её установочный ISO. Затем качаем утилиту WinNTSetup (внизу поста об утилите есть отсылка на файлохранилища, где её можно скачать). В окошке WinNTSetup первым делом указываем путь к скачанному ISO-образу Windows 11 и выбираем редакцию системы.
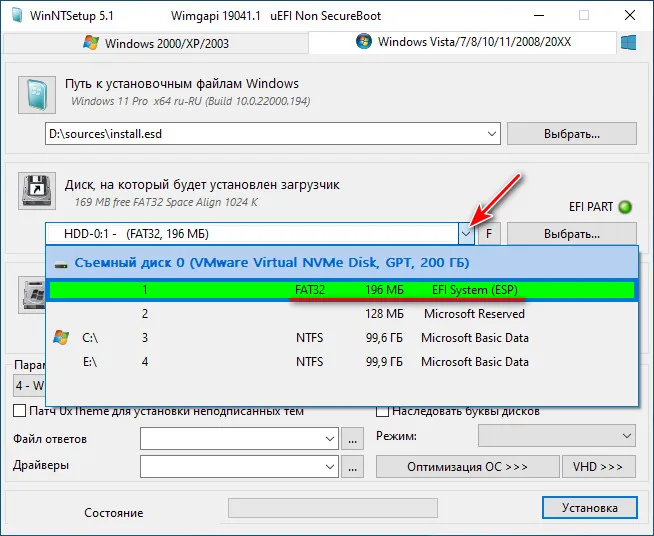
Далее, если у вас автоматически не определился загрузочный раздел, либо определился не тот, что надо (если у вас два жёстких диска с загрузчиком на каждом), открываем выпадающий список в блоке диска загрузчика и указываем тот раздел, что надо.
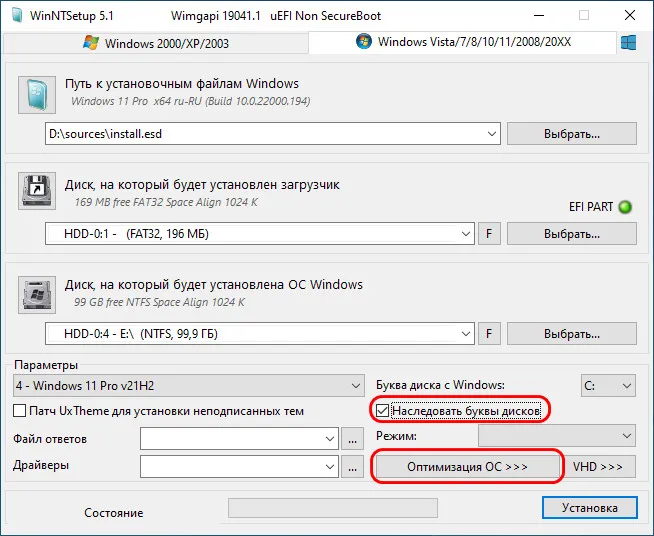
Затем указываем диск Windows 11 – тот раздел диска, что мы подготовили. Если этот раздел не форматировался, форматируем его кнопкой «F».

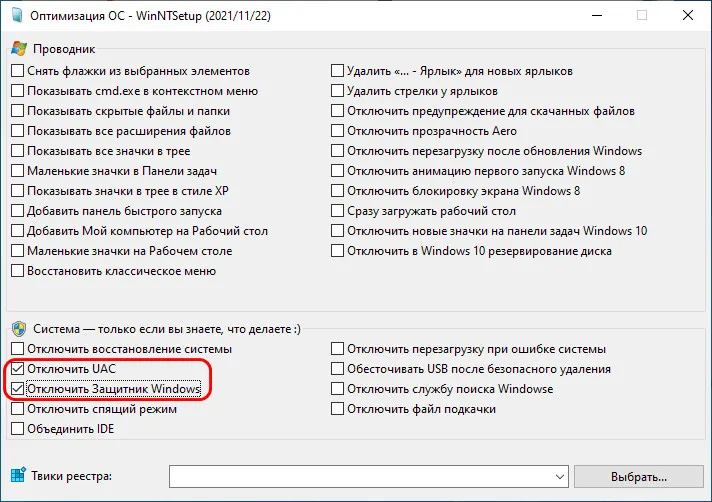
Из основных моментов это всё, но, друзья, хочу обратить ваше внимание на примечательность утилиты WinNTSetup в плане предустановочной оптимизации устанавливаемой операционной системы. У программы Dism++ это также есть, причём в ней реализован масштабный твикер по настройке и оптимизации установленных Windows, но об этом нужно говорить непременно в отдельном ключе. В WinNTSetup же всё проще, есть лишь небольшая подборка твиков. В их числе – крайне полезнейшая опция «Наследовать буквы дисков». При её включении в новой операционной системе будут такие же буквы разделов диска, как в текущей (кроме буквы системного диска С). Нам не нужно будет перенастраиваться на новые буквы или возиться с их сменой на привычные нам. И также можем заглянуть в блок твиков «Оптимизация ОС».
Не все твики здесь годные, но я, например, с удовольствием избавлю себя от рутины по отключению UAC и Горе-Защитника Windows.
Далее жмём «Установка».
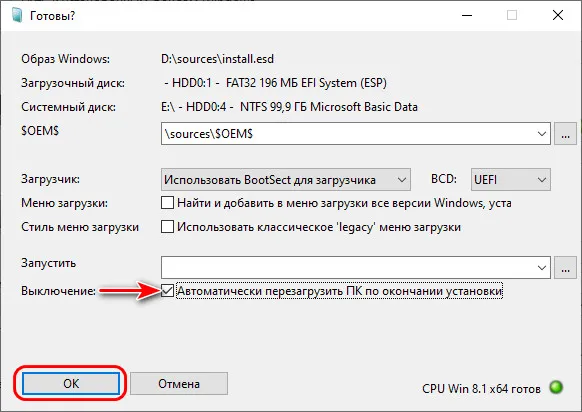
Можем установить галочку автоматической перезагрузки компьютера по окончании установки. А можем сами перезагрузиться в удобный момент после распаковки образа Windows 11. Кому как удобнее. Жмём «Ок».
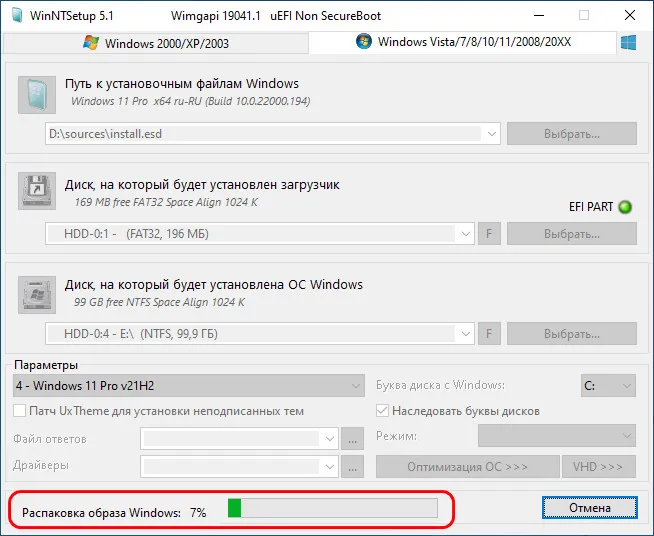
В любом случае дожидаемся развёртывания образа.
После перезагрузки в меню загрузки входим в Windows 11 и проходим этапы первичной её настройки.
Рассмотренными выше способами можно установить Windows 11 второй операционной системой с нуля. И настроить её по новой, установить по новой программы. Но также можем комплексно перенести всё своё нажитое в текущей Windows 10 добро – системные настройки, программы и их настройки, файлы в папках пользовательского профиля — в Windows 11 на другом разделе диска. И сможем протестировать новую операционную систему не в чистом её виде, т.е. как она будет работать с нуля, а как будет работать, если бы мы обновили текущую Windows 10 до Windows 11. Для этого нам нужно на подготовленный для Windows 11 раздел диска клонировать текущую Windows 10 и потом обновить систему-клон до Windows 11. Клонировать Windows на другой раздел диска можно разными способами, но раз уж мы заговорили в этой статье о программах развёртывания Windows Dism++ и WinNTSetup, давайте рассмотрим их возможности в этом плане. В обоих программах необходимо сначала сохранить образ текущей Windows 10 в файл WIM. А потом развернуть этот образ точно так, как мы развёртывали выше образ из установочного дистрибутива Windows 11.
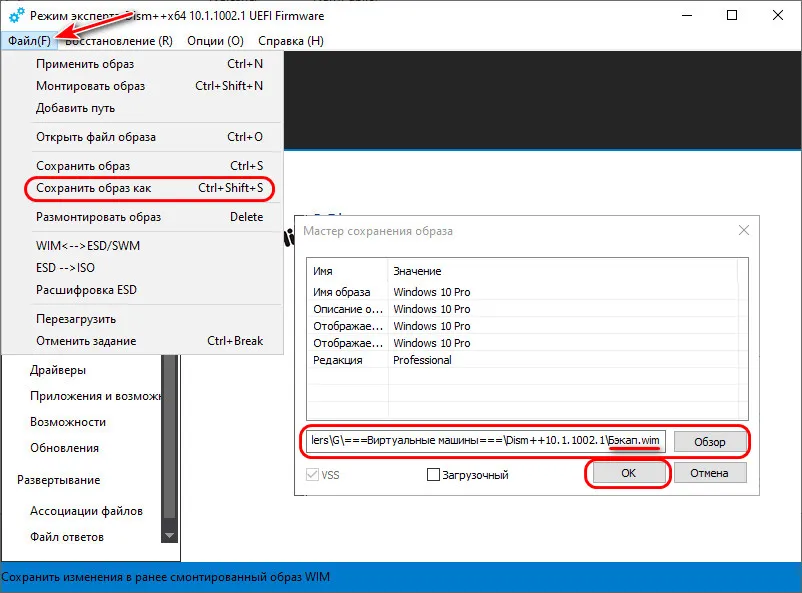
В программе Dism++ для сохранения образа Windows 10 в меню «Файл» выбираем «Сохранить образ как». Указываем путь сохранения образа в формате WIM, даём имя файлу образа. Жмём «Ок».
После сохранения образа в меню «Файл» жмём «Применить образ», указываем путь к сохранённому образу. Указываем раздел, подготовленный для Windows 11. Ставим внизу галочку «Доб. загр.». Жмём «Ок» и дожидаемся развёртывания образа.
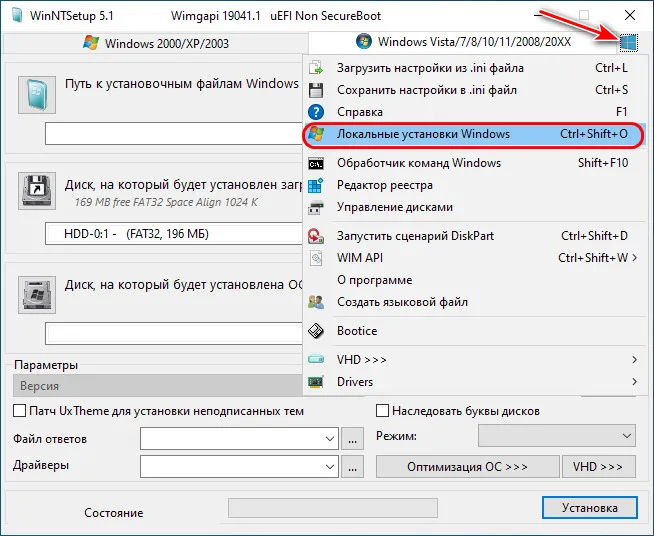
Если вы выбрали утилиту WinNTSetup, в её меню жмём «Локальная установка Windows».
Кликаем «Захват Wim».
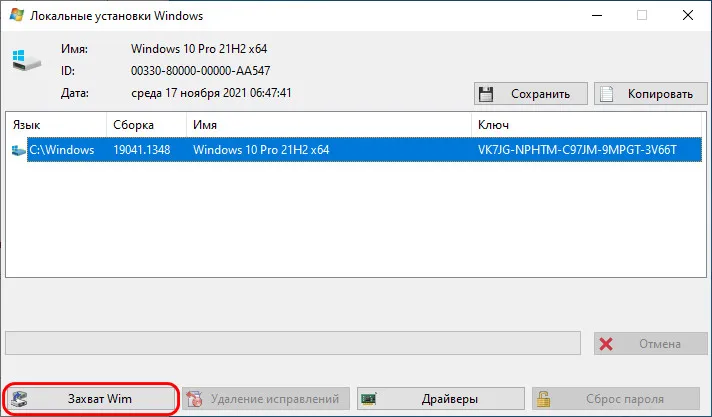
Указываем имя образа WIM и путь его сохранения. Жмём «Захват».
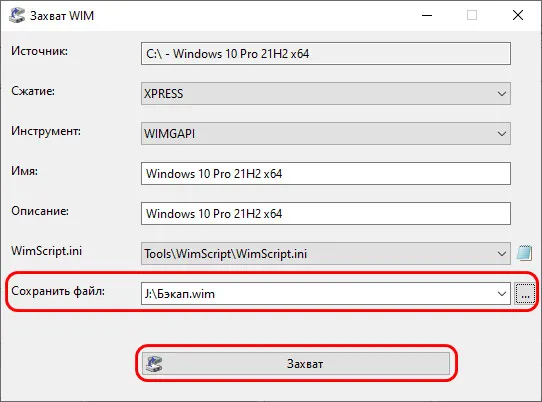
Далее развёртываем образ. Указываем этот образ в пути к установочным файлам Windows. Указываем в качестве диска установки подготовленный для Windows 11 раздел. Жмём «Установка» и дожидаемся развёртывания образа.
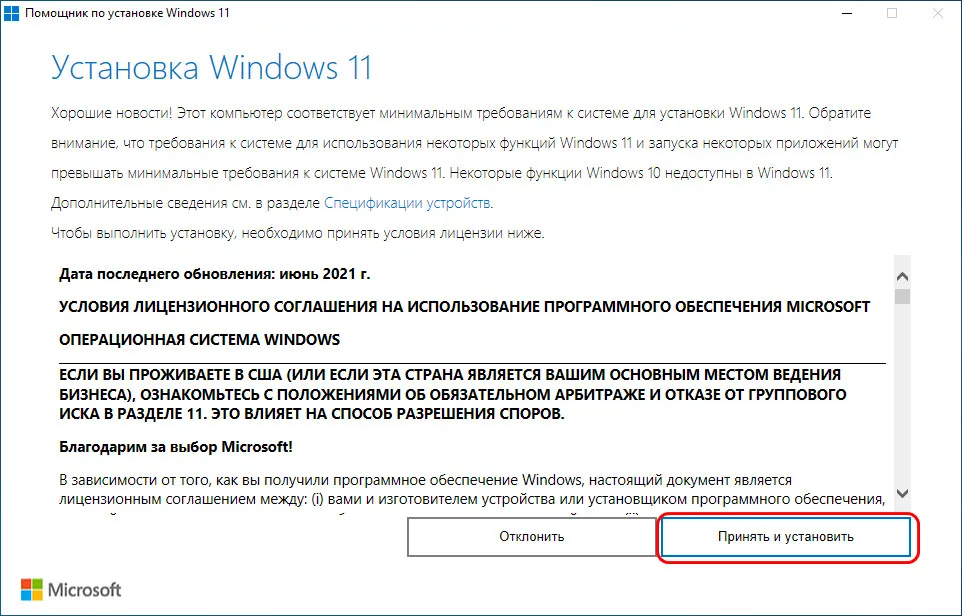
По окончании развёртывания в любом из случаев перезагружаемся, в меню загрузки входим в клонированную Windows 10 (в меню загрузки она будет значится первой). И обновляем систему-клон до Windows 11. Для этого скачиваем на сайте Microsoft утилиту Windows 11 Installation Assistant (помощник по установке Windows 11). Если у вас компьютер соответствует требованиям Windows 11, просто запускайте эту утилиту. Если не соответствует, зайдите в свойства утилиты и запустите её в режиме совместимости с Windows 7.

Далее проходим процесс обновления до Windows 11.
Детально он описан здесь.
Вот это, друзья, как установить Windows 11 рядом с Windows 10 в качестве второй операционной системы. И напоследок некоторые советы по работе с несколькими операционными системами на одном компьютере:
- В меню загрузки операционных систем используйте клавишу Tab, дабы переключиться на изменение значений и установить нужную систему для автоматического запуска и время ожидания выбора.
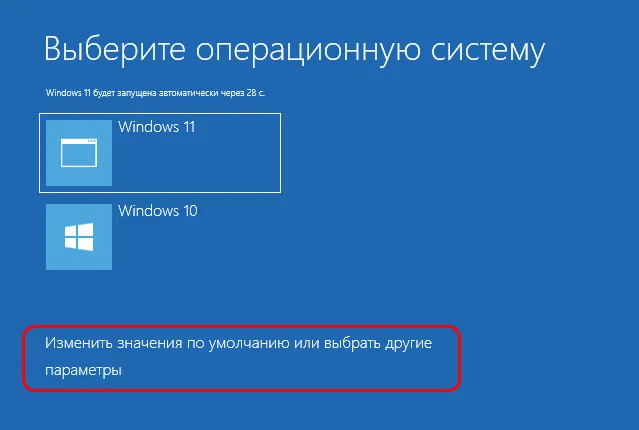
- В меню загрузки Windows 11 может значится как Windows 10, и вам будет неудобно ориентироваться в системах. Используйте бесплатную программу EasyBCD для изменения названий операционных систем в меню загрузки. Детали в статье «Как изменить название Windows в меню загрузки с помощью программы EasyBCD».
- Вы можете оперативно переключаться между операционными системами, минуя меню загрузки Windows и перезагружаясь сразу в нужную систему. Такую возможность реализует бесплатная утилита iReboot. Детали в статье «Удобное переключение между несколькими Windows с утилитой iReboot».
- По итогам тестирования Windows 11 вы сможете определить для себя, с какой операционной системой вам лучше работать – с ней или с Windows 10. Если это будет Windows 11, вы можете обновиться до неё с исходной Windows 10. Если запасная операционная система вам не нужна, Windows 11 на другом разделе диска можно удалить. Как это делается, смотрите в статье «Как удалить вторую Windows».
How to run Windows 11 while you don’t want to give up the current Windows 10, either? One solution is to dual boot Windows 11 with Windows 10.
Cannot be more excited to play both Windows 11 and Windows 10 on the same PC? Before looking further, let’s go over several practical ways to keep at least two operating systems on one computer/laptop.
1. Install Virtual Windows 11 in Windows 10: Installing Windows 11 as a virtual machine using VM software can let you surf all the Windows 11 features based on the current Windows 10 environment. Though it’s a widely adopted method, it isn’t a good one if you don’t have sufficient computer memory. Otherwise, it could run very slow, and the freezing issue happens a lot.
2. Create a Portable Windows 11 USB Drive: A bootable USB drive with Windows 11 can be used as a way to dual boot Windows 11 on a Windows 10 computer, but this is not a customizable solution. It asks for an original Windows 11 computer, which can be yours at home or at office, and a Windows To Go creator utility to make it.
3. Install Windows 11 on an Independent Hard Drive or Disk Volume: Consider a dual-boot setup. This requires a seperate hard drive, if you have one. Or, simply a disk partition with at least 25GB free space is enough (the bigger, the better), which you can use EaseUS Partition Master to easily get one.
Next, we’ll focus on how to install Windows 11 on a separate hard drive on your Windows 10 computer so you can dual boot Windows 11 with Windows 10 without affecting both systems’ performance.
How to Create a New Partition for Windows 11 Installation
Without interfering with the original Windows 10 on your computer, we’ll establish a place to house the new Windows 11 installation. If you have an empty second hard drive, just set it up for Windows 11. But if you need to install the new OS on the same hard drive with Windows 10, follow our tips to create a new partition on unallocated space with EaseUS Partition Master.
Step 1. Launch EaseUS Partition Master. To to Partition Manager, right-click on the unallocated space on your hard drive or external storage device and select «Create».
Step 2. Adjust the partition size, file system (Choose the file system based on your need), label, etc. for the new partition and click «OK» to continue.
Step 3. Click on the «Execute 1 Task(s)» button and create a new partition by clicking «Apply».
Watch the following video tutorial and learn how to create a partition in NTFS, FAT, or EXT file system.
How to Download Windows 11 Without ISO
Download the Win11 builder on your computer and then follow the steps below:
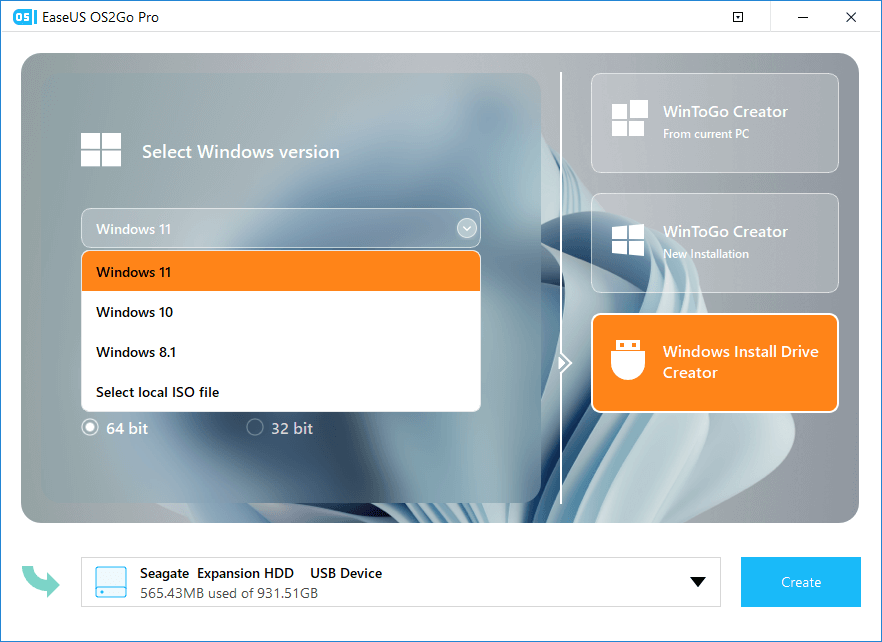
Step 1. Launch OS2Go after installation, and click Windows Install Drive Creator. The obtained system information is available on the home screen, and it keeps updating all the time. Apart from Windows 11, Win11 builder also supports you to download Windows 10/8.1.
Step 2. Connect your USB flash drive to the computer. Win11 builder will automatically detect your USB device, so all you need to do is click the Create button.
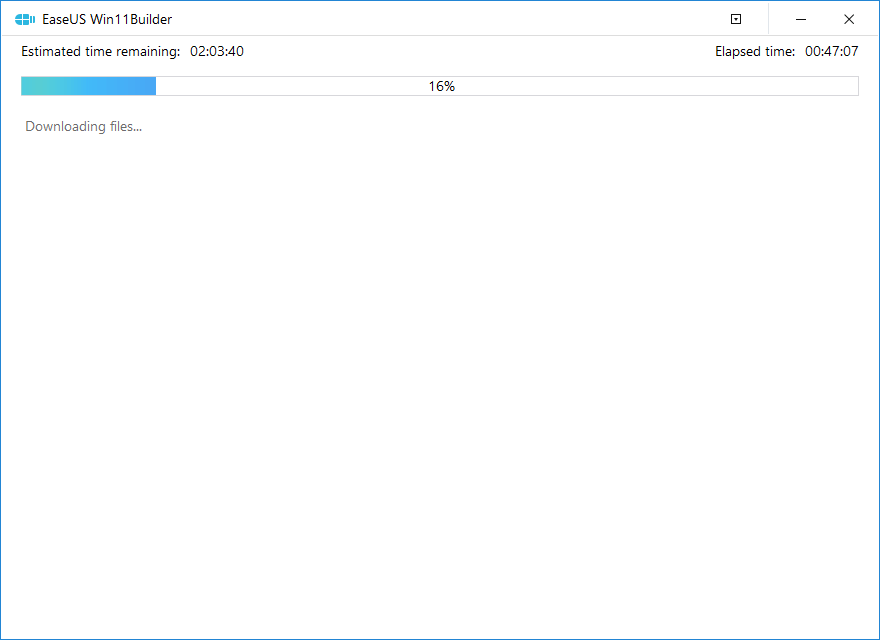
Step 3. The software will empty your USB drive data if it’s a used one. Once the downloading process begins, wait there until it finished or leave for a while to do you own job.
Step 4. After successfully downloading the Windows 11 iso image file on the USB drive, start to install Windows 11 from the bootable USB drive on your computer by following the installation wizard step by step.
How to Clean Install Windows 11 on Your Windows 10 Computer
Step 1. Insert the Windows 11 installation USB drive to your PC, reboot and press the required key to access your boot menu. Choose the USB drive as the boot priority.
Step 2. Follow the installation wizard to install Windows 11 step by step.

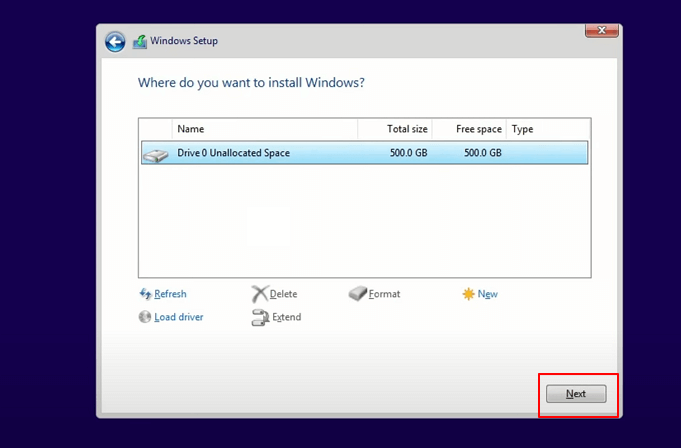
Step 3. Make sure that you choose the correct disk volume as the installation drive.
Step 4. Wait for the installing process to complete, the computer will restart automatically.
How to Set Default Operating System for Startup
When your computer has two operating system drives installed, each time you power it up you’ll need to choose an option between Windows 10 and Windows 11. If this is not convenient for you, follow the steps to set a default operating system to start.
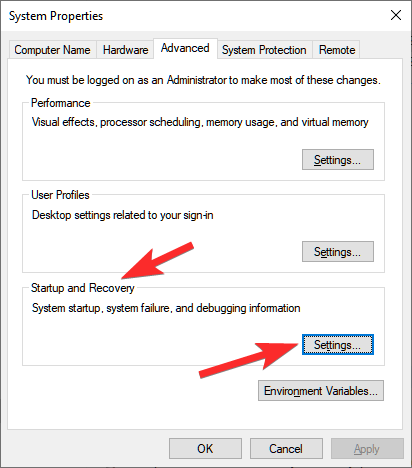
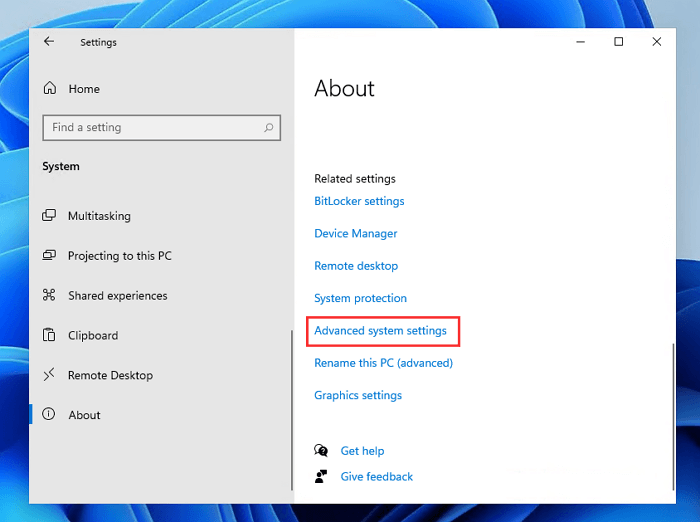
Step 1. Press Windows + I keys to bring up Settings. Go to System > About and then click the Advanced system settings link.
Step 2. Click the Settings button under the Startup and Recovery section.

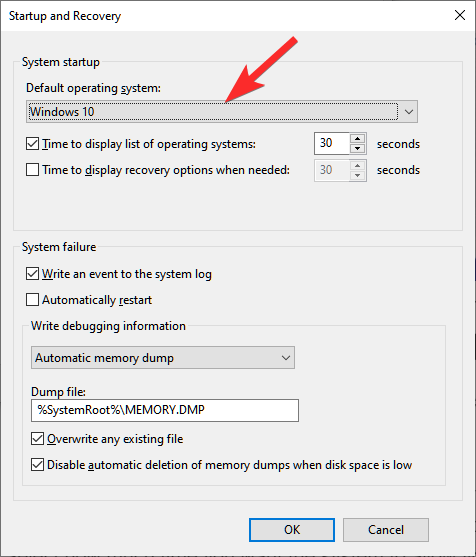
Step 3. Under the System startup section, click the drop-down menu under the Default operating system and choose the one you wish to directly boot from. The choice of Time to display list of operating systems is useful so you can choose your preferred OS in that time limit. Click OK to save the changes.
Step 4. Now start your computer, you’ll be presented with both Windows 10 and Windows 11 access. If you do not do anything there, after xx seconds the computer will boot the default OS you’ve already set.

Concluding Words
From what we discussed in this article, a dual boot setup is the most efficient and productive way to run Windows 10 and Windows 11 together, to make one PC play as two. If you get clear all the tricks of creating a new partition, downloading Windows 11 without ISO, installing Windows 11 and set the default operating system for startup, share this post to others who need help.