
As of now (Mid June 2021), there is a leaked Windows 11 ISO available on the internet. If you are a Microsoft enthusiast who wants to get hands-on experience on upcoming Operating Systems, this can be a good opportunity to install it on your computer. It is a ‘leaked’ version, so it is highly recommended to install and use on sandbox environments such as VirtualBox or VMware virtual machines.

Remember, this is a leaked version; it is not an official beta from Microsoft (by the time you read this guide, it might have changed and Microsoft would have released the official version for developers).
To experience the new interface, features and major changes in Windows 11, follow this guide to install Windows 11 on VirtualBox. This method can work on any host Operating Systems such as Windows 10, Windows 7 or macOS/Linux, provided you have the latest Oracle VirtualBox, ISO file of OS and enough hardware resources on the physical computer.
Things to Consider:
- Better to install Windows 11 as a virtual machine. If you have a spare computer which you can do anything (like format, lose data…etc) to test, then you can try on the spare computer.
- It is a leaked/early/beta version, do not try on the office or domain network.
- Make sure you can allocate enough hardware resources to Windows 11 virtual machine as per Microsoft.
- When you install the latest OS with upgraded graphics experience, you may see some lagging (especially in graphics/video) inside the virtual machine.
- If you have a normal (rotating hard) hard disk and your Windows 10 is already working on it, using the same physical hard disk for Windows 11 virtual machine will add more load on the disk. Your physical computer and guest VM will work slow. It is recommended to use the secondary hard disk or SSD for a better experience.
Things you need to have
- Latest VirtualBox
- Enough hardware resources on the host computer.
- VT (Hardware virtualization) enabled computer/BIOS. Most of the recent computers have this capability enabled. If you are using Windows 10 or Windows 8.1 as the host Operating System, VT-x is already enabled. You can read more about checking and enabling VT-x.
- The Windows 11 ISO file. I can’t point to any particular website since it is not available on Microsoft yet. You can try your luck with torrent sites or by the time you read this guide; it would be available on the Microsoft website.
Installation Steps: Latest Windows 11 on VirtualBox (any host)
1) Make sure you have the correct Windows 11 ISO file.
2) Create a new virtual machine from VirtualBox. Select Windows 10 64 but as guest OS.
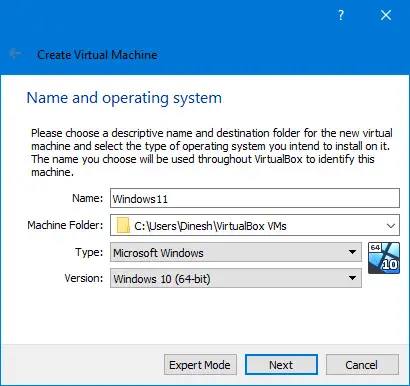
3) Configure 2GB (4GB recommended) RAM. Other settings are normal while creating VM at this point.
You do not need to modify most settings since you have selected Windows 10 as the guest OS. VirtualBox configures the appropriate settings.
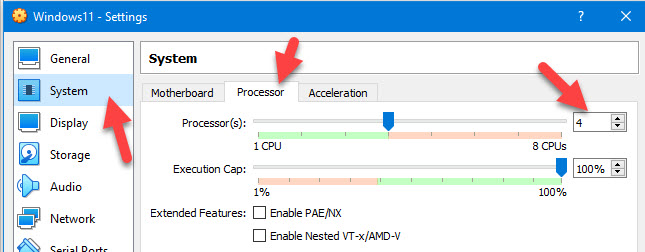
4) Open VM settings and increase the CPU cores under the System -> Processer tab. I increased to 4 CPUs in my case.
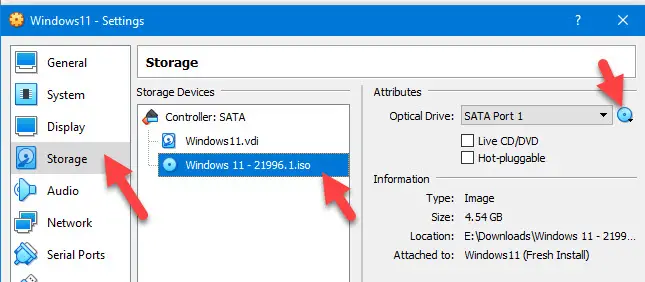
5) Click on Storage and load the downloaded ISO file.
6) Once all set, power on the virtual machine. Select the boot medium and process the installation steps.
7) When it asks for a product key, choose ‘I don’t have a product key’.
 Select ‘Windows 11 Pro’ (or relevant version for you) and click on the ‘Install Windows only’ to install a fresh copy of Windows OS.
You will land on a different style of Windows OS initial configuration Wizard.
How to Configure Windows 11 for Personal use with Local Offline Account
Follow the steps to configure Windows 11 with a local offline account if you don’t want to use your Windows live account or you do not have the Internet while configuring the virtual machine.
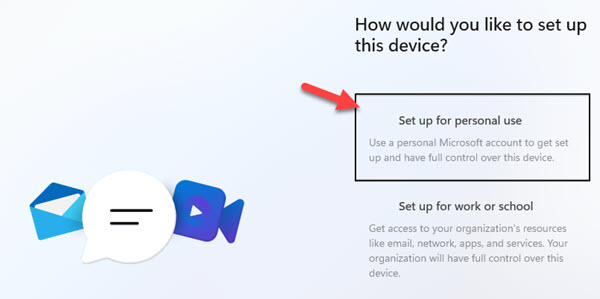
9) Select the ‘Set up for personal use’ option.
10) As we are planning to add an offline account (no email address), select the ‘Sign-in option.’
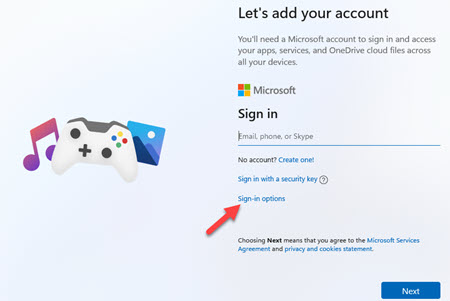
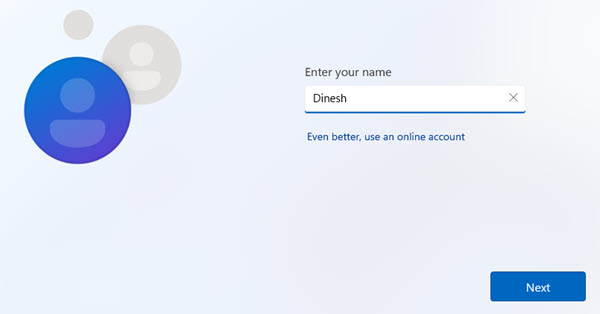
11) Select ‘Offline account’ on the next screen. This will allow you to set up a local user account and password on Windows 11.
It will take few minutes to initialize the fresh Windows 11 OS. After that, you should be able to use Windows 11 as a virtual machine on VirtualBox.
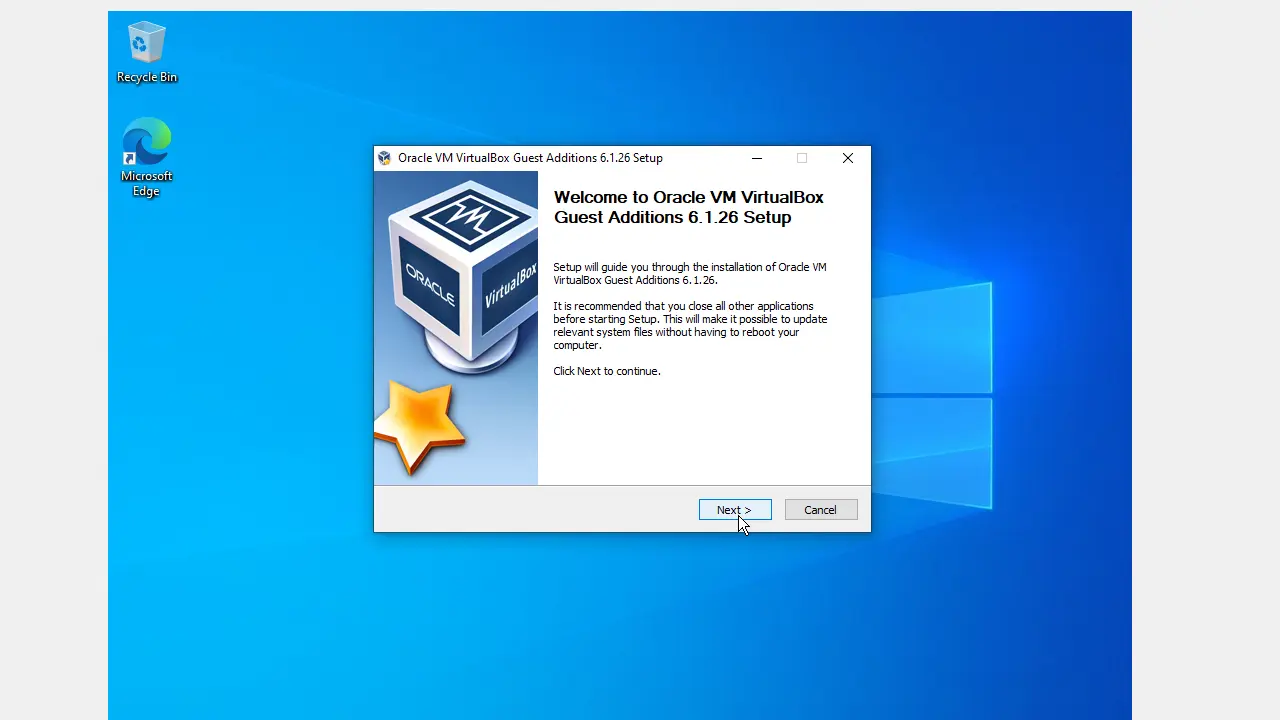
Install VirtualBox Guest Additions on Windows 11 VM
Even though Windows 11 client OS is not officially supported yet, but the current Windows OS guest additions worked well.
12) Take a snapshot before making any changes.
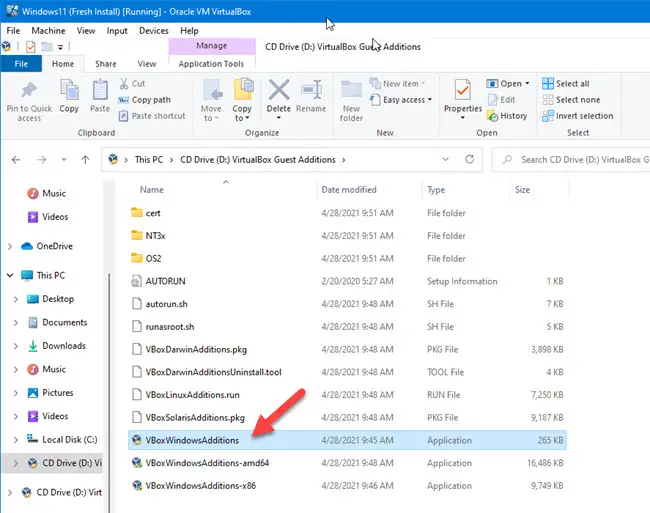
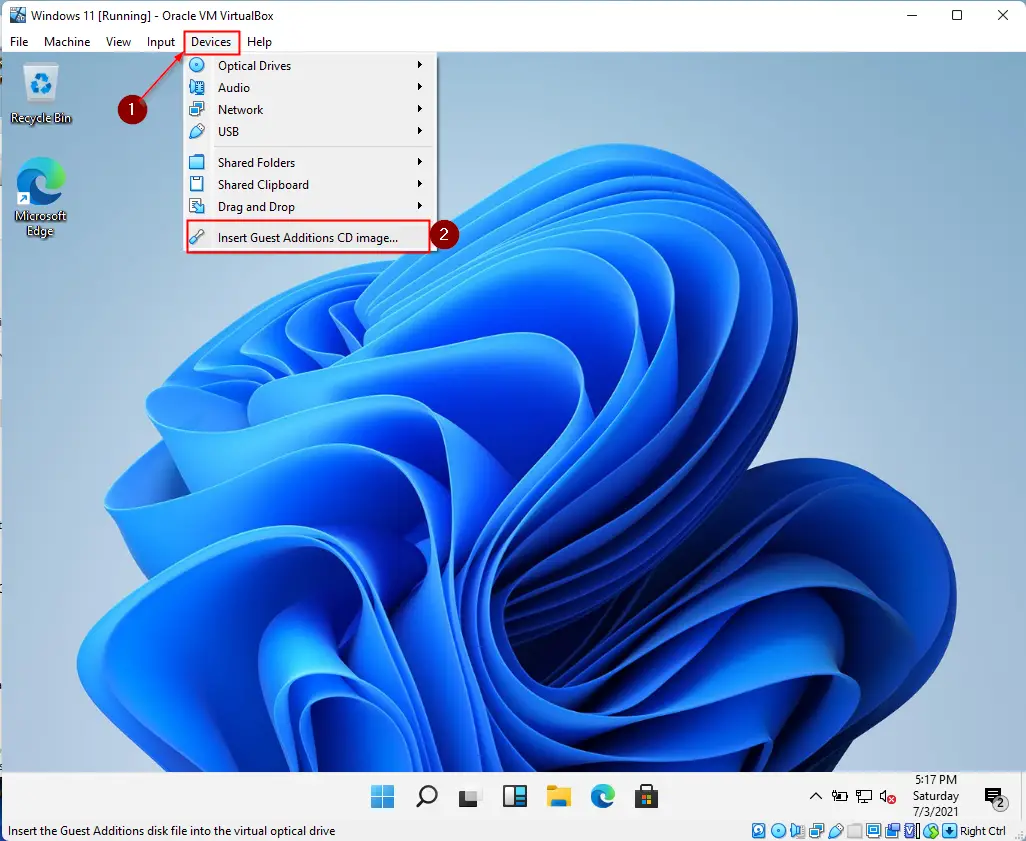
13) Click on ‘Devices’ and ‘Insert Guest Additions CD image’. This will load the built-in guest additions ISO file as a CD drive inside the VM.

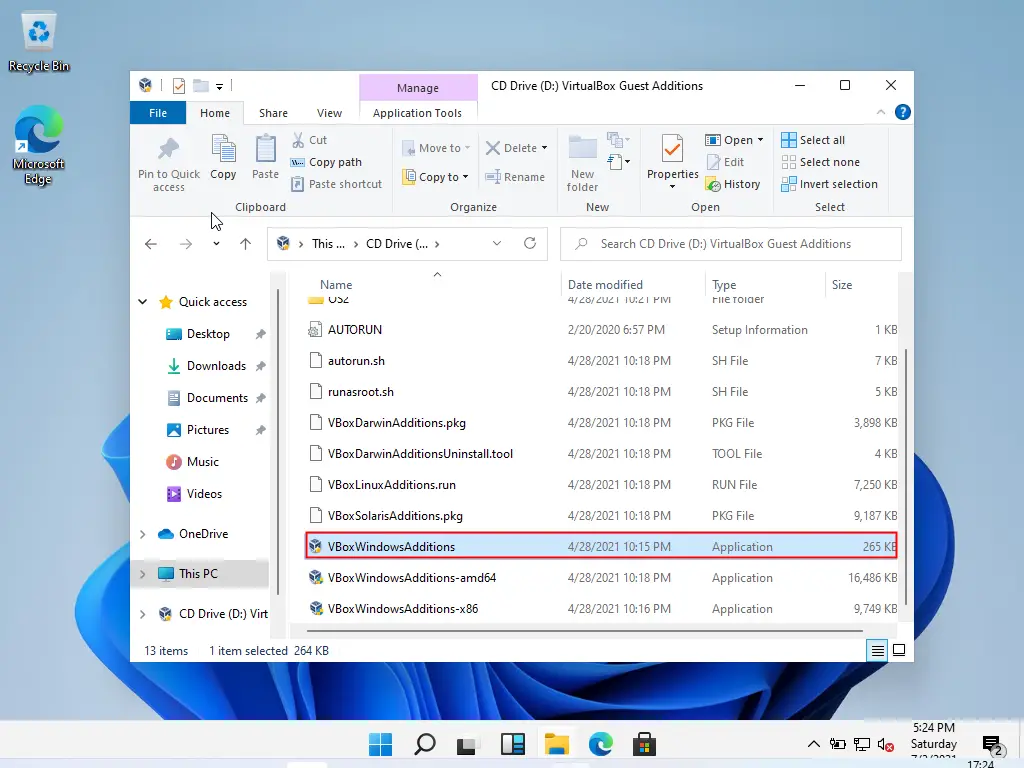
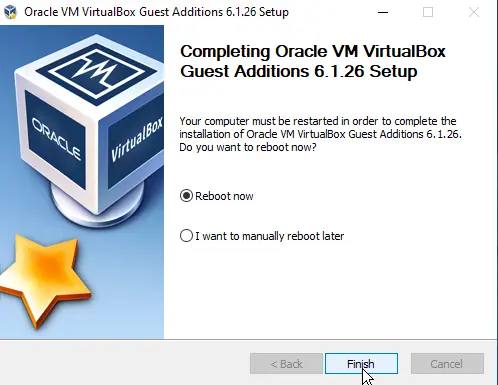
14) Double click and install the main Windows OS installation file from the mounted CD drive. Continue the installation and reboot the virtual machine.
We have successfully installed the guest additions on Windows 11 with this method.
After the reboot, you will see the improvement inside the virtual machine, its screen resolutions and mouse movements.
I suggest taking another snapshot before play around with the new OS.
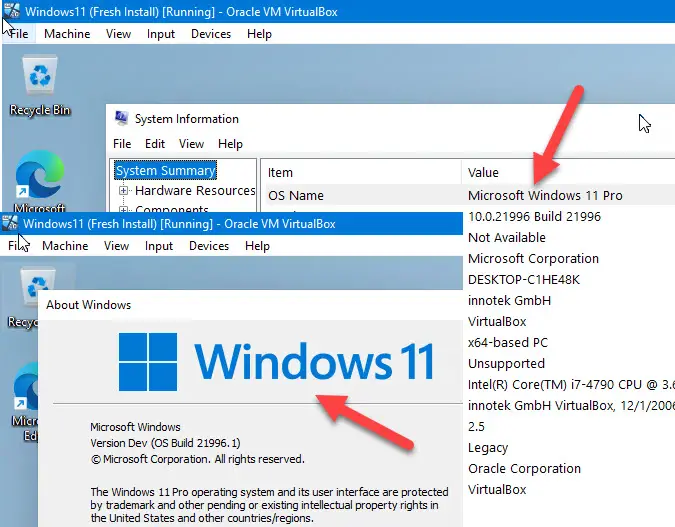
Is it really Windows 11?
As per the version information, it clearly says it is Windows 11 build. But we need to wait for the official information and release from Microsoft to confirm the originality of this OS.
Final Thoughts
Whether it is a real or leaked version, it has many similarities to Windows X. But altogether, it is a nice revamp from Windows 10. You will be thrilled to see the interface changes and animation. There are some additional features added which you can realize straight away.
VirtualBox is the best tool to test these kinds of unofficial or new Operating Systems in the market without installing and harming the working physical computer OS.
Surprisingly the current version of VirtualBox supports Windows 11 as guest OS without any issues. The guest addition installed well and relevant additional features and improvements can be seen inside the virtual machine after it.
If you have enough physical computer hardware resources, you can increase the VM configuration to maximum and enjoy the latest Windows 11 on full screen like a normal OS instead of going for duel boot.

UPDATED 8/21/2023: On VirtualBox, the “Guest Additions” package contains the drivers that allow the Windows 10 virtual machine to operate correctly in a virtualization environment. The VirtualBox Guest Additions is provided as a virtual image to optimize the guest machine with the mouse pointer and keyboard integration so you can navigate the environment and release the peripherals seamlessly.
The package also installs the virtual video drivers to improve the system performance and advanced graphics capabilities, such as hardware acceleration, multi-monitor support, and seamless transition between windows to run apps as if they were installed on the host device. Furthermore, you also get time synchronization, the ability to share the clipboard content and automated logging.
In other words, without the drivers, the virtual machine would perform slow, and many advanced features (such as the ability to change the screen resolution, control transparency, mouse support, etc.) won’t be available or work correctly.
In this guide, you will learn the steps to install the VirtualBox drivers on Windows 10.
To install the Guest Additions on a Windows 10 virtual machine, use these steps:
-
Open VirtualBox on Windows 10.
-
Right-click the virtual machine, select the Start submenu, and choose the Normal Start option.
-
Sign in to your Windows 10 account.
-
Click the Devices menu and select the “Insert Guest Additions CD image” option.

-
Open File Explorer in the virtual machine (Windows key + E).
-
Click on This PC from the left side.
-
Under the “Devices and drives” section, double-click to open the “VirtualBox Guest Additions” disc.
-
Double-click the VBoxWindowsAdditions.exe file to launch the installer.

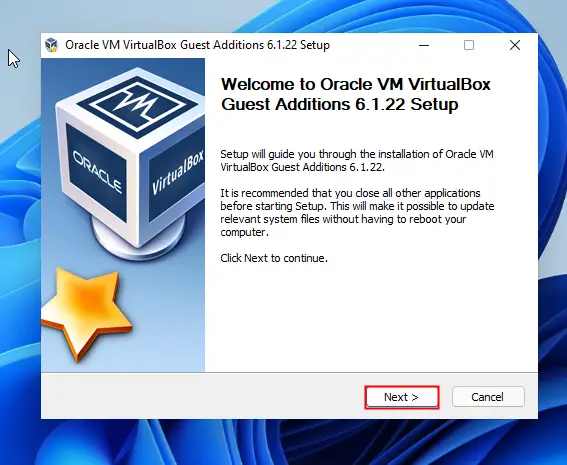
-
Click the Next button.
-
Click the Next button again.
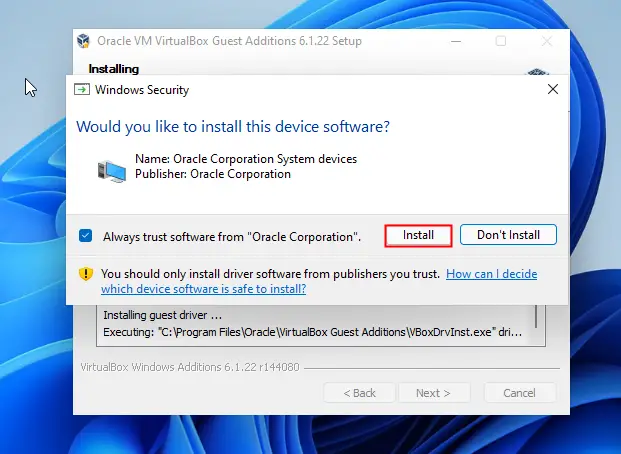
-
Click the Install button.
-
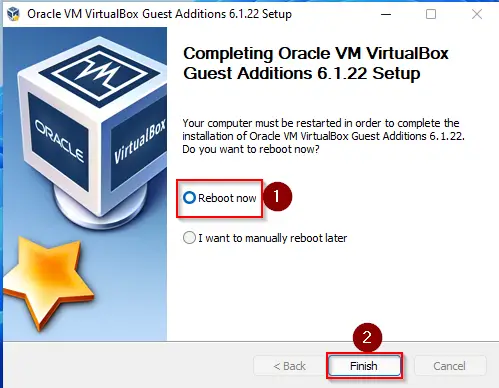
Select the Reboot now option.
-
Click the Finish button.


Once you complete the steps, the virtual drivers will install, and after the restart, Windows 10 will be able to run normally in a virtual environment.
When a new version of VirtualBox becomes available with more recent drivers, you can use the same instructions to update the Guest Additions on Windows 10. The setup will replace the virtual drivers with the versions as you run the installer.
If you cannot mount the image into that machine, the VBoxGuestAdditions.iso is located in the VirtualBox installation folder (in this path: C:\Program Files\Oracle\VirtualBox), which you can use to add the package manually.
Mauro Huculak is a
Windows How-To Expert and founder of
Pureinfotech
(est. 2010). With over 21 years as a technology writer and IT Specialist,
Mauro specializes in Windows, software, and cross-platform systems such as Linux, Android, and macOS.
Certifications:
Microsoft Certified Solutions Associate (MCSA),
Cisco Certified Network Professional (CCNP),
VMware Certified Professional (VCP),
and
CompTIA A+ and Network+.
Mauro is a recognized Microsoft MVP and has also been a long-time contributor to Windows Central.
You can follow him on
YouTube,
Threads,
BlueSky,
X (Twitter),
LinkedIn and
About.me.
Email him at [email protected].
You can install Windows 11 on a VirtualBox by bypassing Secure Boot and TPM 2.0. Once you have installed Windows 11 on a virtual machine, you need to install VirtualBox Guest Additions to run it smoothly. Guest Additions install on the guest system on your computer that includes device drivers and system applications to optimize the performance of your machine. This gearupwindows article will guide you to install Guest Additions on the latest Windows 11 operating system.
How do I install Guest Additions to Windows 11 in VirtualBox?
Follow these steps to install Guest Additions to Windows 11 in VirtualBox:-
Step 1. Launch the guest OS (Windows 11) in VirtualBox. Now, click on Devices and then Insert Guest Additions CD Image.
Step 2. Now open the File Explorer by pressing the Windows + E keys simultaneously or click on the folder icon on the taskbar to access it.
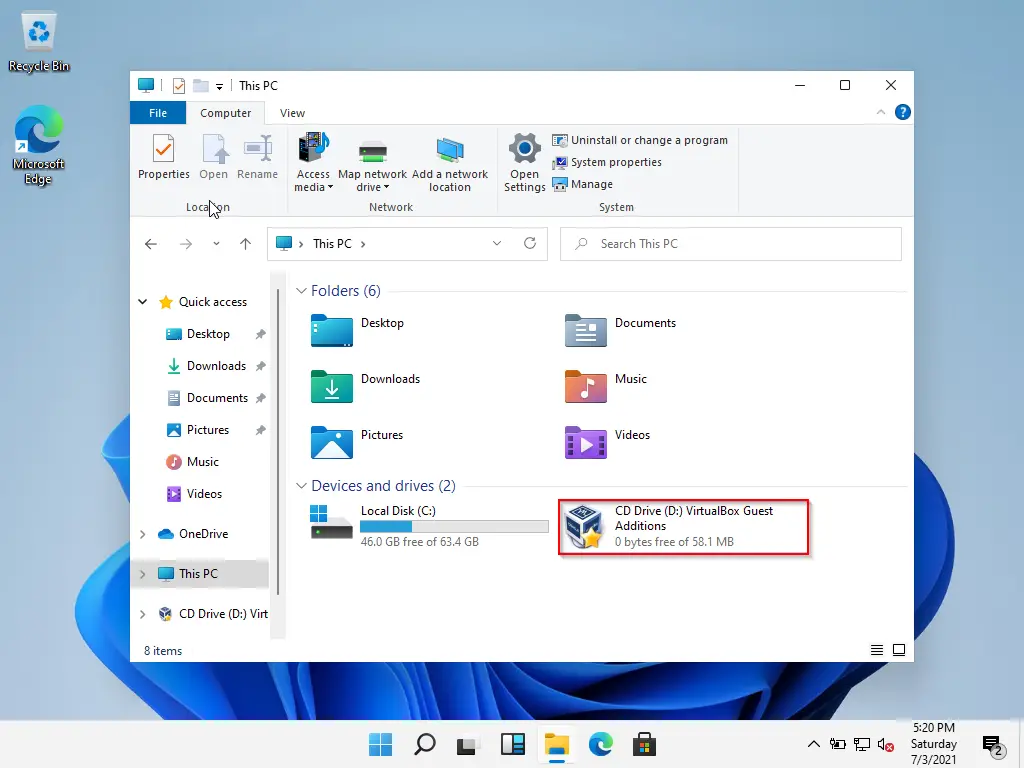
Step 3. Double-click on the CD Drive to open it. Now, locate the executable file VBoxWindowsAdditions and double-click on it to install it on your virtual Windows 11 machine.
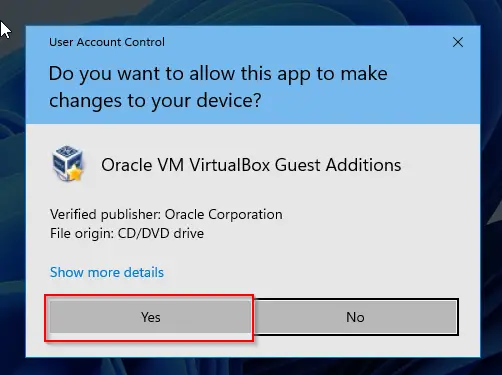
Step 4. When the User Account Control dialog appears, click the Yes button.
Step 5. Click Next to continue.
Step 6. In the upcoming window, click the Next and then Install button.
Step 7. When you are prompted with the Windows Security dialog box, click the Install button.
Step 8. Select the Reboot now option and then click the Finish button.
That’s all. Now guest Windows 11 will restart, and it should run without any issues.
Conclusion
In conclusion, installing Windows 11 on VirtualBox can be a useful tool for testing or running the latest operating system on your computer. However, to ensure smooth performance, installing VirtualBox Guest Additions is necessary. These additions optimize the performance of your virtual machine by providing necessary drivers and system applications. This guide provides easy-to-follow steps to install Guest Additions on Windows 11 running on VirtualBox. Additionally, if you want to increase or decrease the RAM in your virtual machine, check out our guide on the topic.
Also Read:
How do I Increase or Decrease the RAM in my VirtualBox Virtual Machine?
VirtualBox Guest Additions is a set of drivers and utilities that enhance the performance and integration of a Windows VM running on VirtualBox. Installing Guest Additions enables features such as better video support, seamless mouse integration, shared folders, clipboard sharing, and automatic resolution adjustment. These tools improve the interaction between the host machine and the virtual machine, making the Windows VM more user-friendly and responsive.
The installation process for Guest Additions on a Windows VM is straightforward. It involves inserting the Guest Additions CD Image, running the installer, and rebooting the virtual machine. The installer will add the necessary drivers for improved video, input devices, and shared folder capabilities, allowing for a more seamless experience between the host and guest systems.
This guide will show you how to install VirtualBox Guest Additions on a Windows VM, ensuring that the VM can take full advantage of the enhanced features provided by VirtualBox.
-
Start the Windows VM in VirtualBox.
-
Log into Windows as an administrator.
-
In the VirtualBox window, go to the top menu and click Devices, then select Insert Guest Additions CD Image.
If you do not see the prompt, open File Explorer inside the VM, navigate to the This PC section, and manually run the VBoxWindowsAdditions.exe from the mounted CD drive.
-
The installer should automatically launch. If prompted by User Account Control (UAC), click Yes to allow the installation.
-
In the Oracle VM VirtualBox Guest Additions Setup Wizard, click Next.
-
Select the installation location and click Next again.
-
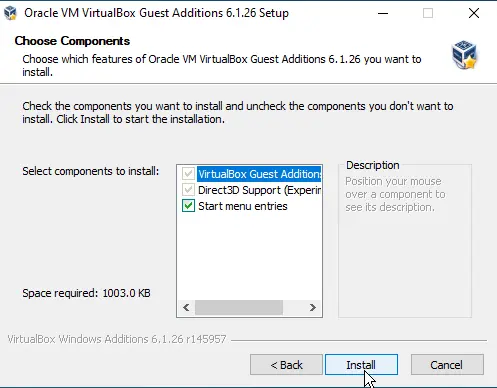
Choose whether to install Direct3D support if prompted, then click Install.
Direct3D support is optional and generally used to improve graphical performance in certain applications. It may not be necessary for all Windows VMs.
-
Wait for the installation to complete. Once done, click Finish to close the wizard.
-
Reboot the VM to apply the changes.
After the reboot, verify the installation by checking if features like shared clipboard, automatic screen resizing, and seamless mouse integration are working correctly. You can also open Device Manager inside the VM to confirm that the VirtualBox Guest Additions drivers have been installed.
CLI method to install VirtualBox Guest Additions on Windows VM
You can also install Guest Additions on a Windows VM using the command line interface (CLI) by following these steps:
-
Insert the Guest Additions ISO using the following command on the host machine:
VBoxManage controlvm "Windows VM" insertdvd /path/to/VBoxGuestAdditions.iso
-
Run the Guest Additions installer in the Windows VM by opening the command prompt inside the virtual machine and navigating to the mounted CD drive:
cd /d D:\VBoxWindowsAdditions.exe
VBoxWindowsAdditions.exe /S
-
Reboot the VM to complete the installation:
shutdown /r
Using the command line with the VirtualBox Guest Additions installer allows for unattended installation with the /S option, making it useful for automated deployment in multiple VMs.
Discuss the article:
Comment
anonymously. Login not required.
The following guide explains how to install VirtualBox Guest Additions in Windows 10 Virtual Machine.
When you first install Windows 10 in Oracle VM VirtualBox, some advanced features won’t be enabled (as well as correct screen resolution) without guest additions. The features enabled by Guest Additions are: correct screen resolution, mouse pointer integration, seamless windows, time synchronization, shared folders, and shared clipboard.
We can install VirtualBox Guest Additions in Windows 10 by performing these steps:
Access the virtual machine’s menu and go to devices and click: «Install Guest Additions CD Image…».

Go to My Computer (This PC in Windows 10) and open the Guest Additions CD drive under the Devices and drivers section.

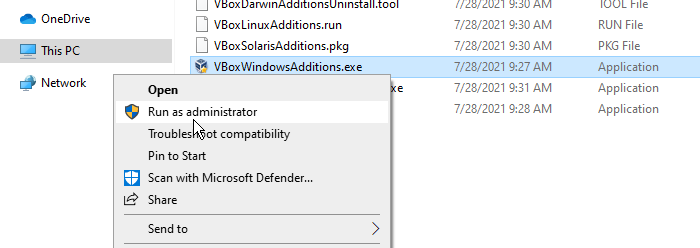
When you double-click the CD drive, the installer may start automatically. If not, right-click on VBoxWindowsAdditions and select Run as administrator.
The Guest Additions Setup Wizard will start automatically.
Click Next to continue with default settings and click on Install to begin the process. The setup wizard will begin to install VirtualBox Guest Additions on Windows 10.
To complete the installation process, we need to reboot the virtual machine. Click on Finish to reboot Windows 10 VM.
With the Guest Additions installed, you’ll be able to access advanced virtual machine features such as keyboard and mouse integration, 3D and 2D video acceleration features, Shared clipboard, Shared folders.