
This article will serve as an informative guide and give you a clear understanding of how to perform silent or interactive installs and uninstalls of the Windows Configuration Designer (Microsoft Store App) using the Powershell App Deployment Toolkit. The PowerShell App Deployment Toolkit can be used to replace your WiseScript, VBScript and Batch wrapper scripts with one versatile, re-usable and extensible tool. This tool is an absolute must for Microsoft Endpoint Manager Configuration Manager (MEMCM) / (SCCM) Administrators or anyone who is responsible for packaging and deploying software.
How to Install the Windows Configuration Designer (Microsoft Store App) Using the PowerShell App Deployment Toolkit
- Download the Powershell App Deployment Toolkit 3.8.4:
- https://github.com/PSAppDeployToolkit/PSAppDeployToolkit/releases/download/3.8.4/PSAppDeployToolkit_v3.8.4.zip
- Download the zip file to a folder created at (C:\Downloads)
- Open Windows PowerShell by Right-Clicking on Windows PowerShell and selecting Run as Administrator
- Enter the following command to remove the Zone.Identifier:
Unblock-File -Path C:\Downloads\PSAppDeployToolkit_v3.8.4.zip
- Enter the following command to extract the contents of the zip file:
Expand-Archive -Path C:\Downloads\PSAppDeployToolkit_v3.8.4.zip -DestinationPath C:\Downloads\PADT
- Enter the following commands to copy the AppDeployToolkit & Files folder to “C:\Downloads\WCDApp“:
Copy-Item -Path "C:\Downloads\PADT\Toolkit\AppDeployToolkit" -Destination "C:\Downloads\WCDApp\AppDeployToolkit" -RecurseCopy-Item -Path "C:\Downloads\PADT\Toolkit\Files" -Destination "C:\Downloads\WCDApp\Files"
You should now see the AppDeploymentToolkit folder with files & the empty Files folder at “C:\Downloads\WCDApp”
Next we’ll want to download the Windows Configuration Designer (Microsoft Store App) using PowerShell.
- Copy the PowerShell script below to “C:\Downloads” & name it Get_Store_Downloads.ps1
- Script Reference: https://flexxible.com/automating-msix-packaging-with-powershell/
#Requires -version 3
<#
.SYNOPSIS
Get links to Microsoft Store downloads and optionally download packages
.DESCRIPTION
Downloaded packages can be installed via Add-AppxPackage -Path
.PARAMETER packageFamilyName
A list of package family names to download
.PARAMETER name
A regular expression which will select the family package names for existing AppX package names that match
.PARAMETER packageTypeFilter
The types of package to download
.PARAMETER downloadFolder
The folder to download non-excluded files to. Will be created if does not exist. If not specified, files will not be downloaded
.PARAMETER ring
The release ring to download
.PARAMETER proxy
Proxy server to use
.PARAMETER excludeExtensions
List of file extensions to not download
.PARAMETER excluderegex
If download Links match this regular expression they will not be downloaded
.PARAMETER language
The language for downloading files
.PARAMETER force
Overwrite files which already exist
.PARAMETER all
Interrogate all local AppX packages rather than just those available to the user running the script (requires elevation). Use with -name
.EXAMPLE
Powershell.exe -ExecutionPolicy ByPass "&" '.\Get_Store_Downloads.ps1' -packageFamilyName Microsoft.WindowsConfigurationDesigner_8wekyb3d8bbwe -downloadFolder C:\Downloads\WCDApp\Files -excludeRegex 'arm' -force
Downloads the resources from the Microsoft Store for the Windows Configuration Designer App, excluding files for arm and arm64 architecture and save the files to C:\Downloads\WCDApp\Files
.NOTES
Modification History:
2022/03/18 @guyrleech Initial public release
2022/03/29 modified by Jason Bergner
#>
<#
Copyright © 2022 Guy Leech
Permission is hereby granted, free of charge, to any person obtaining a copy of this software and associated documentation files (the “Software”), to deal in the Software without restriction,
including without limitation the rights to use, copy, modify, merge, publish, distribute, sublicense, and/or sell copies of the Software, and to permit persons to whom the Software is furnished to do so, subject to the following conditions:
The above copyright notice and this permission notice shall be included in all copies or substantial portions of the Software.
THE SOFTWARE IS PROVIDED “AS IS”, WITHOUT WARRANTY OF ANY KIND, EXPRESS OR IMPLIED, INCLUDING BUT NOT LIMITED TO THE WARRANTIES OF MERCHANTABILITY, FITNESS FOR A PARTICULAR PURPOSE AND NONINFRINGEMENT.
IN NO EVENT SHALL THE AUTHORS OR COPYRIGHT HOLDERS BE LIABLE FOR ANY CLAIM, DAMAGES OR OTHER LIABILITY, WHETHER IN AN ACTION OF CONTRACT, TORT OR OTHERWISE, ARISING FROM, OUT OF OR IN CONNECTION WITH THE SOFTWARE OR THE USE OR OTHER DEALINGS IN THE SOFTWARE.
#>
[CmdletBinding()]
Param
(
[Parameter(Mandatory=$true,ParameterSetName='Family')]
[string[]]$packageFamilyName ,
[Parameter(Mandatory=$true,ParameterSetName='Name')]
[string]$name ,
[Parameter(Mandatory=$false,ParameterSetName='Name')]
[string]$packageTypeFilter = 'All' ,
[string]$downloadFolder ,
[ValidateSet('Slow','Retail','Fast,','RP')]
[string]$ring = 'retail' ,
[string]$proxy ,
[string[]]$excludeExtensions = ('','blockmap','eappx','eappxbundle','emsixbundle') ,
[string]$excludeRegex ,
[string]$language = 'en-US' ,
[switch]$force ,
[Parameter(Mandatory=$false,ParameterSetName='Name')]
[switch]$all
)
[hashtable]$proxyParameters = @{}
if( ! [string]::IsNullOrEmpty( $proxy ) )
{
$proxyServer = New-Object -TypeName 'System.Net.WebProxy'
$proxyServer.Address = [uri]$proxy
$proxyServer.UseDefaultCredentials = $true
[System.Net.WebRequest]::DefaultWebProxy = $proxyServer
$proxyParameters.Add( 'Proxy' , $proxy )
$proxyParameters.Add( 'ProxyUseDefaultCredentials' , $true )
Write-Verbose "Proxy set to $proxy"
}
##https://stackoverflow.com/questions/41897114/unexpected-error-occurred-running-a-simple-unauthorized-rest-query?rq=1
Add-Type -TypeDefinition @'
public class SSLHandler
{
public static System.Net.Security.RemoteCertificateValidationCallback GetSSLHandler()
{
return new System.Net.Security.RemoteCertificateValidationCallback((sender, certificate, chain, policyErrors) => { return true; });
}
}
'@
[System.Net.ServicePointManager]::ServerCertificateValidationCallback = [SSLHandler]::GetSSLHandler()
[Net.ServicePointManager]::SecurityProtocol = [Net.ServicePointManager]::SecurityProtocol -bor [System.Net.SecurityProtocolType]::Tls12
if( $PSCmdlet.ParameterSetName -eq 'Name' )
{
Import-Module -Name AppX -Verbose:$false
[array]$packages = @( Get-AppxPackage -AllUsers:$all -PackageTypeFilter $PackageTypeFilter | Where-Object PackageFamilyName -Match $name )
if( $null -eq $packages -or $packages.Count -eq 0 )
{
Throw "No existing AppX packages found matching $name"
}
$packageFamilyName = $packages | Select-Object -ExpandProperty PackageFamilyName -Unique
}
Write-Verbose -Message "Got $($packageFamilyName.Count) packages"
$webclient = $null
if( -Not [string]::IsNullOrEmpty( $downloadFolder ) )
{
if( -Not ( Test-Path -Path $downloadFolder -ErrorAction SilentlyContinue ) )
{
$null = New-Item -Path $downloadFolder -Force -ItemType Directory -ErrorAction Stop
}
if( -Not ( $webClient = New-Object -TypeName System.Net.WebClient ) )
{
Throw "Failed to create a System.Net.WebClient object"
}
}
[int]$count = 0
ForEach( $package in $packageFamilyName )
{
$count++
[string]$requestBody = "type=PackageFamilyName&url=$package&ring=$ring&lang=$language"
$response = $null
$session = $null
$response = Invoke-WebRequest -URI 'https://store.rg-adguard.net/api/GetFiles' -body $requestBody -Method Post -ContentType 'application/x-www-form-urlencoded' -SessionVariable session @proxyParameters
if( $response -and $response.PSObject.Properties[ 'links' ] -and $response.Links.Count -gt 0 )
{
##Write-Verbose -Message "$count / $($packageFamilyName.Count) : Got $($response.Links.Count) links for $requestBody"
ForEach( $link in ($response.Links | Where-Object href -match '^https?://' ))
{
[string]$extension = [System.IO.Path]::GetExtension( $link.innerText ) -replace '^\.'
if( $extension -in $excludeExtensions )
{
Write-Verbose -Message "Ignoring `"$($link.innerText)`" as extension $extension in exclude list"
}
elseif( -Not [string]::IsNullOrEmpty( $excludeRegex ) -and $link.innerText -match $excludeRegex )
{
Write-Verbose -Message "Ignoring `"$($link.innerText)`" as matches $excludeRegex"
}
else
{
$result = [pscustomobject]@{
'PackageFamilyName' = $package
'File' = $link.innertext
'Link' = $link.href
}
if( -Not [string]::IsNullOrEmpty( $downloadFolder ) )
{
[string]$destinationFile = Join-Path -Path $downloadFolder -ChildPath $link.InnerText
if( ( Test-Path -Path $destinationFile -ErrorAction SilentlyContinue) -and -Not $force )
{
Write-Warning -Message "Not downloading to `"$destinationFile`" as already exists - use -force to overwrite"
}
else
{
try
{
$webclient.DownloadFile( ( $link.href -replace '&' , '&' ) , $destinationFile )
if( $properties = Get-ItemProperty -Path $destinationFile )
{
Add-Member -InputObject $result -NotePropertyMembers @{
'Download' = $properties.FullName
'Size (KB)' = [math]::Round( $properties.Length / 1KB , 1 )
}
}
else
{
Write-Warning -Message "Unable to get file properties for $destinationFile"
}
}
catch
{
Write-Warning -Message "Problem downloading $($link.href) - $_"
}
}
}
$result
}
}
}
else
{
## <img src="../img/stop.png">The server returned an empty list.<br>Either you have not entered the link correctly, or this service does not support generation for this product.</p><script type="text/javascript">
Write-Warning -Message "No data or links returned for $requestBody - $($response.Content -split "`n`r?" , 2 -replace '\<[^\>]+\>' | Select-Object -First 1)"
}
}
- Add the following registry key to suppress the “To Allow this website to provide information personalized for you, will you allow it to put a small file (cookie) on your computer?” popup message
REG ADD "HKCU\SOFTWARE\Microsoft\Windows\CurrentVersion\Internet Settings\Zones\3" /t REG_DWORD /v 1A10 /f /d 0
- Open Windows PowerShell by Right-Clicking on Windows PowerShell and selecting Run as Administrator
- Change the directory to “C:\Downloads”
- PS C:\Downloads>
- Enter the following command to download the installation files:
Powershell.exe -ExecutionPolicy ByPass "&" '.\Get_Store_Downloads.ps1' -packageFamilyName Microsoft.WindowsConfigurationDesigner_8wekyb3d8bbwe -downloadFolder C:\Downloads\WCDApp\Files -excludeRegex 'arm' -force
- After the download completes, you should see a .msixbundle file inside the “C:\Downloads\WCDApp\Files” directory
- Copy the PowerShell script below to “C:\Downloads\WCDApp“ & name it Deploy-WCDApp.ps1
<#
.SYNOPSIS
	This script performs the installation or uninstallation of the Windows Configuration Designer Microsoft Store App.
	# LICENSE #
	PowerShell App Deployment Toolkit - Provides a set of functions to perform common application deployment tasks on Windows.
	Copyright (C) 2017 - Sean Lillis, Dan Cunningham, Muhammad Mashwani, Aman Motazedian.
	This program is free software: you can redistribute it and/or modify it under the terms of the GNU Lesser General Public License as published by the Free Software Foundation, either version 3 of the License, or any later version. This program is distributed in the hope that it will be useful, but WITHOUT ANY WARRANTY; without even the implied warranty of MERCHANTABILITY or FITNESS FOR A PARTICULAR PURPOSE. See the GNU General Public License for more details.
	You should have received a copy of the GNU Lesser General Public License along with this program. If not, see <http://www.gnu.org/licenses/>.
.DESCRIPTION
	The script is provided as a template to perform an install or uninstall of an application(s).
	The script either performs an "Install" deployment type or an "Uninstall" deployment type.
	The install deployment type is broken down into 3 main sections/phases: Pre-Install, Install, and Post-Install.
	The script dot-sources the AppDeployToolkitMain.ps1 script which contains the logic and functions required to install or uninstall an application.
.PARAMETER DeploymentType
	The type of deployment to perform. Default is: Install.
.PARAMETER DeployMode
	Specifies whether the installation should be run in Interactive, Silent, or NonInteractive mode. Default is: Interactive. Options: Interactive = Shows dialogs, Silent = No dialogs, NonInteractive = Very silent, i.e. no blocking apps. NonInteractive mode is automatically set if it is detected that the process is not user interactive.
.PARAMETER AllowRebootPassThru
	Allows the 3010 return code (requires restart) to be passed back to the parent process (e.g. SCCM) if detected from an installation. If 3010 is passed back to SCCM, a reboot prompt will be triggered.
.PARAMETER TerminalServerMode
	Changes to "user install mode" and back to "user execute mode" for installing/uninstalling applications for Remote Destkop Session Hosts/Citrix servers.
.PARAMETER DisableLogging
	Disables logging to file for the script. Default is: $false.
.EXAMPLE
    PowerShell.exe .\Deploy-WCDApp.ps1 -DeploymentType "Install" -DeployMode "NonInteractive"
.EXAMPLE
    PowerShell.exe .\Deploy-WCDApp.ps1 -DeploymentType "Install" -DeployMode "Silent"
.EXAMPLE
    PowerShell.exe .\Deploy-WCDApp.ps1 -DeploymentType "Install" -DeployMode "Interactive"
.EXAMPLE
    PowerShell.exe .\Deploy-WCDApp.ps1 -DeploymentType "Uninstall" -DeployMode "NonInteractive"
.EXAMPLE
    PowerShell.exe .\Deploy-WCDApp.ps1 -DeploymentType "Uninstall" -DeployMode "Silent"
.EXAMPLE
    PowerShell.exe .\Deploy-WCDApp.ps1 -DeploymentType "Uninstall" -DeployMode "Interactive"
.NOTES
	Toolkit Exit Code Ranges:
	60000 - 68999: Reserved for built-in exit codes in Deploy-Application.ps1, Deploy-Application.exe, and AppDeployToolkitMain.ps1
	69000 - 69999: Recommended for user customized exit codes in Deploy-Application.ps1
	70000 - 79999: Recommended for user customized exit codes in AppDeployToolkitExtensions.ps1
.LINK
	http://psappdeploytoolkit.com
#>
[CmdletBinding()]
Param (
	[Parameter(Mandatory=$false)]
	[ValidateSet('Install','Uninstall','Repair')]
	[string]$DeploymentType = 'Install',
	[Parameter(Mandatory=$false)]
	[ValidateSet('Interactive','Silent','NonInteractive')]
	[string]$DeployMode = 'Interactive',
	[Parameter(Mandatory=$false)]
	[switch]$AllowRebootPassThru = $false,
	[Parameter(Mandatory=$false)]
	[switch]$TerminalServerMode = $false,
	[Parameter(Mandatory=$false)]
	[switch]$DisableLogging = $false
)

Try {
	## Set the script execution policy for this process
	Try { Set-ExecutionPolicy -ExecutionPolicy 'ByPass' -Scope 'Process' -Force -ErrorAction 'Stop' } Catch {}

	##*===============================================
	##* VARIABLE DECLARATION
	##*===============================================
	## Variables: Application
	[string]$appVendor = ''
	[string]$appName = 'Windows Configuration Designer Microsoft Store App'
	[string]$appVersion = ''
	[string]$appArch = ''
	[string]$appLang = ''
	[string]$appRevision = ''
	[string]$appScriptVersion = '1.0.0'
	[string]$appScriptDate = 'XX/XX/20XX'
	[string]$appScriptAuthor = 'Jason Bergner'
	##*===============================================
	## Variables: Install Titles (Only set here to override defaults set by the toolkit)
	[string]$installName = ''
	[string]$installTitle = 'Windows Configuration Designer Microsoft Store App'

	##* Do not modify section below
	#region DoNotModify

	## Variables: Exit Code
	[int32]$mainExitCode = 0

	## Variables: Script
	[string]$deployAppScriptFriendlyName = 'Deploy Application'
	[version]$deployAppScriptVersion = [version]'3.8.4'
	[string]$deployAppScriptDate = '26/01/2021'
	[hashtable]$deployAppScriptParameters = $psBoundParameters

	## Variables: Environment
	If (Test-Path -LiteralPath 'variable:HostInvocation') { $InvocationInfo = $HostInvocation } Else { $InvocationInfo = $MyInvocation }
	[string]$scriptDirectory = Split-Path -Path $InvocationInfo.MyCommand.Definition -Parent

	## Dot source the required App Deploy Toolkit Functions
	Try {
		[string]$moduleAppDeployToolkitMain = "$scriptDirectory\AppDeployToolkit\AppDeployToolkitMain.ps1"
		If (-not (Test-Path -LiteralPath $moduleAppDeployToolkitMain -PathType 'Leaf')) { Throw "Module does not exist at the specified location [$moduleAppDeployToolkitMain]." }
		If ($DisableLogging) { . $moduleAppDeployToolkitMain -DisableLogging } Else { . $moduleAppDeployToolkitMain }
	}
	Catch {
		If ($mainExitCode -eq 0){ [int32]$mainExitCode = 60008 }
		Write-Error -Message "Module [$moduleAppDeployToolkitMain] failed to load: `n$($_.Exception.Message)`n `n$($_.InvocationInfo.PositionMessage)" -ErrorAction 'Continue'
		## Exit the script, returning the exit code to SCCM
		If (Test-Path -LiteralPath 'variable:HostInvocation') { $script:ExitCode = $mainExitCode; Exit } Else { Exit $mainExitCode }
	}

	#endregion
	##* Do not modify section above
	##*===============================================
	##* END VARIABLE DECLARATION
	##*===============================================

	If ($deploymentType -ine 'Uninstall' -and $deploymentType -ine 'Repair') {
		##*===============================================
		##* PRE-INSTALLATION
		##*===============================================
		[string]$installPhase = 'Pre-Installation'

		## Show Welcome Message, Close Windows Configuration Designer With a 60 Second Countdown Before Automatically Closing
		Show-InstallationWelcome -CloseApps 'ICD' -CloseAppsCountdown 60

		## Show Progress Message (with the default message)
		Show-InstallationProgress

        ## Remove Any Existing Versions of the Windows Configuration Designer Microsoft Store App
        $AppPackageNames = @(
        "Microsoft.WindowsConfigurationDesigner"
        )
        foreach ($AppName in $AppPackageNames) {
        Execute-ProcessAsUser -Path "$PSHOME\powershell.exe" -Parameters "-WindowStyle Hidden Get-AppxPackage -Name $AppName | Remove-AppxPackage" -Wait
        #Execute-ProcessAsUser -Path "$PSHOME\powershell.exe" -Parameters "-WindowStyle Hidden Get-AppxPackage -AllUsers -Name $AppName | Remove-AppxPackage -AllUsers" -Wait

        Execute-ProcessAsUser -Path "$PSHOME\powershell.exe" -Parameters "-WindowStyle Hidden Get-AppXProvisionedPackage -Online | Where-Object DisplayName -eq $AppName | Remove-AppxProvisionedPackage -Online" -Wait
        #Execute-ProcessAsUser -Path "$PSHOME\powershell.exe" -Parameters "-WindowStyle Hidden Get-AppXProvisionedPackage -Online | Where-Object DisplayName -eq $AppName | Remove-AppxProvisionedPackage -AllUsers -Online" -Wait
        }

		##*===============================================
		##* INSTALLATION
		##*===============================================
		[string]$installPhase = 'Installation'

        $BuildNumber=(Get-WmiObject Win32_OperatingSystem).BuildNumber

        If ($BuildNumber -ge '18362') {

        ## Install Windows Configuration Designer Microsoft Store App
        $MsixPath = Get-ChildItem "$dirFiles" -Include *.msixbundle -File -Recurse -ErrorAction SilentlyContinue

        ForEach ($Msix in $MsixPath) {
        Show-InstallationProgress "Installing the Windows Configuration Designer Microsoft Store App. This may take some time. Please wait..."
        Execute-ProcessAsUser -Path "$PSHOME\powershell.exe" -Parameters "-WindowStyle Hidden Add-AppxPackage ""$Msix""" -Wait
        }
        }

        If ($BuildNumber -lt '18362') {
        Write-Log -Message "The Windows Configuration Designer Microsoft Store App is only supported on Windows 10 version 1903 and later."
        }

		##*===============================================
		##* POST-INSTALLATION
		##*===============================================
		[string]$installPhase = 'Post-Installation'

	}
	ElseIf ($deploymentType -ieq 'Uninstall')
	{
		##*===============================================
		##* PRE-UNINSTALLATION
		##*===============================================
		[string]$installPhase = 'Pre-Uninstallation'

		## Show Welcome Message, Close Windows Configuration Designer With a 60 Second Countdown Before Automatically Closing
		Show-InstallationWelcome -CloseApps 'ICD' -CloseAppsCountdown 60

        ## Show Progress Message (With a Message to Indicate the Application is Being Uninstalled)
        Show-InstallationProgress -StatusMessage "Uninstalling the $installTitle. Please Wait..."


		##*===============================================
		##* UNINSTALLATION
		##*===============================================
		[string]$installPhase = 'Uninstallation'

        ## Uninstall Any Existing Versions of the Windows Configuration Designer Microsoft Store App
        $AppPackageNames = @(
        "Microsoft.WindowsConfigurationDesigner"
        )
        foreach ($AppName in $AppPackageNames) {
        #Execute-ProcessAsUser -Path "$PSHOME\powershell.exe" -Parameters "-WindowStyle Hidden Get-AppxPackage -Name $AppName | Remove-AppxPackage" -Wait
        Execute-ProcessAsUser -Path "$PSHOME\powershell.exe" -Parameters "-WindowStyle Hidden Get-AppxPackage -AllUsers -Name $AppName | Remove-AppxPackage -AllUsers" -Wait

        #Execute-ProcessAsUser -Path "$PSHOME\powershell.exe" -Parameters "-WindowStyle Hidden Get-AppXProvisionedPackage -Online | Where-Object DisplayName -eq $AppName | Remove-AppxProvisionedPackage -Online" -Wait
        Execute-ProcessAsUser -Path "$PSHOME\powershell.exe" -Parameters "-WindowStyle Hidden Get-AppXProvisionedPackage -Online | Where-Object DisplayName -eq $AppName | Remove-AppxProvisionedPackage -AllUsers -Online" -Wait
        }

        ## Add Registry Keys to Prevent Windows Apps from Reinstalling
        Write-Log -Message "Adding Registry Keys to Prevent Windows Apps from Reinstalling."

        [scriptblock]$HKCURegistrySettings = {
        Set-RegistryKey -Key 'HKCU\Software\Microsoft\Windows\CurrentVersion\ContentDeliveryManager' -Name 'ContentDeliveryAllowed' -Value 0 -Type DWord -SID $UserProfile.SID
        Set-RegistryKey -Key 'HKCU\Software\Microsoft\Windows\CurrentVersion\ContentDeliveryManager' -Name 'FeatureManagementEnabled' -Value 0 -Type DWord -SID $UserProfile.SID
        Set-RegistryKey -Key 'HKCU\Software\Microsoft\Windows\CurrentVersion\ContentDeliveryManager' -Name 'OemPreInstalledAppsEnabled' -Value 0 -Type DWord -SID $UserProfile.SID
        Set-RegistryKey -Key 'HKCU\Software\Microsoft\Windows\CurrentVersion\ContentDeliveryManager' -Name 'PreInstalledAppsEnabled' -Value 0 -Type DWord -SID $UserProfile.SID
        Set-RegistryKey -Key 'HKCU\Software\Microsoft\Windows\CurrentVersion\ContentDeliveryManager' -Name 'PreInstalledAppsEverEnabled' -Value 0 -Type DWord -SID $UserProfile.SID
        Set-RegistryKey -Key 'HKCU\Software\Microsoft\Windows\CurrentVersion\ContentDeliveryManager' -Name 'SilentInstalledAppsEnabled' -Value 0 -Type DWord -SID $UserProfile.SID
        Set-RegistryKey -Key 'HKCU\Software\Microsoft\Windows\CurrentVersion\ContentDeliveryManager' -Name 'SubscribedContent-314559Enabled' -Value 0 -Type DWord -SID $UserProfile.SID
        Set-RegistryKey -Key 'HKCU\Software\Microsoft\Windows\CurrentVersion\ContentDeliveryManager' -Name 'SubscribedContent-338387Enabled' -Value 0 -Type DWord -SID $UserProfile.SID
        Set-RegistryKey -Key 'HKCU\Software\Microsoft\Windows\CurrentVersion\ContentDeliveryManager' -Name 'SubscribedContent-338388Enabled' -Value 0 -Type DWord -SID $UserProfile.SID
        Set-RegistryKey -Key 'HKCU\Software\Microsoft\Windows\CurrentVersion\ContentDeliveryManager' -Name 'SubscribedContent-338389Enabled' -Value 0 -Type DWord -SID $UserProfile.SID
        Set-RegistryKey -Key 'HKCU\Software\Microsoft\Windows\CurrentVersion\ContentDeliveryManager' -Name 'SubscribedContent-338393Enabled' -Value 0 -Type DWord -SID $UserProfile.SID
        Set-RegistryKey -Key 'HKCU\Software\Microsoft\Windows\CurrentVersion\ContentDeliveryManager' -Name 'SubscribedContentEnabled' -Value 0 -Type DWord -SID $UserProfile.SID
        Set-RegistryKey -Key 'HKCU\Software\Microsoft\Windows\CurrentVersion\ContentDeliveryManager' -Name 'SystemPaneSuggestionsEnabled' -Value 0 -Type DWord -SID $UserProfile.SID
        }
        Invoke-HKCURegistrySettingsForAllUsers -RegistrySettings $HKCURegistrySettings -ErrorAction SilentlyContinue

        ## Add Registry Key to Disable Auto-Updating of Microsoft Store Apps
        Write-Log -Message "Adding Registry Key to Disable Auto-Updating of Microsoft Store Apps."
        Set-RegistryKey -Key 'HKLM\SOFTWARE\Policies\Microsoft\WindowsStore' -Name 'AutoDownload' -Value 2 -Type DWord

        # Add Registry Key to Prevent Suggested Applications from Returning
        Write-Log -Message "Adding Registry Key to Prevent Suggested Applications from Returning."
        Set-RegistryKey -Key 'HKLM\SOFTWARE\Policies\Microsoft\Windows\CloudContent' -Name 'DisableWindowsConsumerFeatures' -Value 1 -Type DWord

		##*===============================================
		##* POST-UNINSTALLATION
		##*===============================================
		[string]$installPhase = 'Post-Uninstallation'


	}
	ElseIf ($deploymentType -ieq 'Repair')
	{
		##*===============================================
		##* PRE-REPAIR
		##*===============================================
		[string]$installPhase = 'Pre-Repair'


		##*===============================================
		##* REPAIR
		##*===============================================
		[string]$installPhase = 'Repair'


		##*===============================================
		##* POST-REPAIR
		##*===============================================
		[string]$installPhase = 'Post-Repair'


    }
	##*===============================================
	##* END SCRIPT BODY
	##*===============================================

	## Call the Exit-Script function to perform final cleanup operations
	Exit-Script -ExitCode $mainExitCode
}
Catch {
	[int32]$mainExitCode = 60001
	[string]$mainErrorMessage = "$(Resolve-Error)"
	Write-Log -Message $mainErrorMessage -Severity 3 -Source $deployAppScriptFriendlyName
	Show-DialogBox -Text $mainErrorMessage -Icon 'Stop'
	Exit-Script -ExitCode $mainExitCode
}
Ok, all the hard work is done and now you can install or uninstall the Windows Configuration Designer (Microsoft Store App) using one single PowerShell script. Simply change the DeploymentType parameter to install or uninstall. Logging functionality is built-in automatically and you can view the log files under “C:\Windows\Logs\Software”.
Windows Configuration Designer (Microsoft Store App) NonInteractive Install (PowerShell)
NonInteractive means Very Silent, i.e. no blocking apps. This is automatically set if it is detected that the process is not running in the user session and it is not possible for anyone to provide input using a mouse or keyboard.
- Open Windows PowerShell by Right-Clicking on Windows PowerShell and selecting Run as Administrator
- Change the directory to “C:\Downloads\WCDApp”
- PS C:\Downloads\WCDApp>
- Enter the following command:
Powershell.exe -ExecutionPolicy Bypass .\Deploy-WCDApp.ps1 -DeploymentType "Install" -DeployMode "NonInteractive"
Windows Configuration Designer (Microsoft Store App) Silent Install (PowerShell)
Silent means no dialogs (progress and balloon tip notifications are suppressed).
- Open Windows PowerShell by Right-Clicking on Windows PowerShell and selecting Run as Administrator
- Change the directory to “C:\Downloads\WCDApp“
- PS C:\Downloads\WCDApp>
- Enter the following command:
Powershell.exe -ExecutionPolicy Bypass .\Deploy-WCDApp.ps1 -DeploymentType "Install" -DeployMode "Silent"
Windows Configuration Designer (Microsoft Store App) Interactive Install (PowerShell)
Interactive means the install will show dialogs including progress and balloon tip notifications.
- Open Windows PowerShell by Right-Clicking on Windows PowerShell and selecting Run as Administrator
- Change the directory to “C:\Downloads\WCDApp“
- PS C:\Downloads\WCDApp>
- Enter the following command:
Powershell.exe -ExecutionPolicy Bypass .\Deploy-WCDApp.ps1 -DeploymentType "Install" -DeployMode "Interactive"
How to Uninstall the Windows Configuration Designer (Microsoft Store App) Using the PowerShell App Deployment Toolkit
Windows Configuration Designer (Microsoft Store App) NonInteractive Uninstall (PowerShell)
NonInteractive means Very Silent, i.e. no blocking apps. This is automatically set if it is detected that the process is not running in the user session and it is not possible for anyone to provide input using a mouse or keyboard.
- Open Windows PowerShell by Right-Clicking on Windows PowerShell and selecting Run as Administrator
- Change the directory to “C:\Downloads\WCDApp“
- PS C:\Downloads\WCDApp>
- Enter the following command:
Powershell.exe -ExecutionPolicy Bypass .\Deploy-WCDApp.ps1 -DeploymentType "Uninstall" -DeployMode "NonInteractive"
Windows Configuration Designer (Microsoft Store App) Silent Uninstall (PowerShell)
Silent means no dialogs (progress and balloon tip notifications are suppressed).
- Open Windows PowerShell by Right-Clicking on Windows PowerShell and selecting Run as Administrator
- Change the directory to “C:\Downloads\WCDApp“
- PS C:\Downloads\WCDApp>
- Enter the following command:
Powershell.exe -ExecutionPolicy Bypass .\Deploy-WCDApp.ps1 -DeploymentType "Uninstall" -DeployMode "Silent"
Windows Configuration Designer (Microsoft Store App) Interactive Uninstall (PowerShell)
Interactive means the install will show dialogs including progress and balloon tip notifications.
- Open Windows PowerShell by Right-Clicking on Windows PowerShell and selecting Run as Administrator
- Change the directory to “C:\Downloads\WCDApp“
- PS C:\Downloads\WCDApp>
- Enter the following command:
Powershell.exe -ExecutionPolicy Bypass .\Deploy-WCDApp.ps1 -DeploymentType "Uninstall" -DeployMode "Interactive"
Always make sure to test everything in a development environment prior to implementing anything into production. The information in this article is provided “As Is” without warranty of any kind.
Содержание
- Install Windows Configuration Designer
- Supported platforms
- Install Windows Configuration Designer
- Current Windows Configuration Designer limitations
- Новая версия Windows 10: взгляд сисадмина
- Конфигурирование
- Конструктор Windows Configuration Designer
- Массовое подключение к Azure Active Directory
- Windows Spotlight
- Структура меню Пуск, начального экрана и панели задач
- Развёртывание
- Утилита MBR2GPT.EXE
- Безопасность
- Windows Defender Advanced Threat Protection
- Windows Defender Antivirus
- Параметры безопасности групповых политик
- Windows Hello для бизнеса
- Обновление
- Windows Update for Business
- Windows Insider for Business
- Оптимизация доставки обновлений
- Установленные ранее приложения больше не обновляются автоматически
- Управление
- Новые возможности MDM
- Управление мобильными приложениями в Windows 10
- Диагностика MDM
- Мобильные устройства в Windows 10
- Lockdown Designer
- Другие улучшения
- Полезные материалы из нашего блога и не только
- Установка конструктора конфигураций Windows Install Windows Configuration Designer
- Поддерживаемые платформы Supported platforms
- Установка конструктора конфигураций Windows Install Windows Configuration Designer
- Текущие ограничения конструктора конфигураций Windows Current Windows Configuration Designer limitations
- Создание пакета подготовки для Windows 10 Create a provisioning package for Windows 10
- Создание нового проекта Start a new project
- Настройка параметров Configure settings
- Сборка пакета Build package
Install Windows Configuration Designer
Applies to
Use the Windows Configuration Designer tool to create provisioning packages to easily configure devices running Windows 10. Windows Configuration Designer is primarily designed for use by IT departments for business and educational institutions who need to provision bring-your-own-device (BYOD) and business-supplied devices.
Supported platforms
Windows Configuration Designer can create provisioning packages for Windows 10 desktop and mobile editions, including Windows 10 IoT Core, as well as Microsoft Surface Hub and Microsoft HoloLens. You can run Windows Configuration Designer on the following operating systems:
You must run Windows Configuration Designer on Windows 10 to configure Azure Active Directory enrollment using any of the wizards.
Install Windows Configuration Designer
On devices running Windows 10, you can install the Windows Configuration Designer app from the Microsoft Store. To run Windows Configuration Designer on other operating systems or in languages other than English, install it from the Windows Assessment and Deployment Kit (ADK) for Windows 10.
If you install Windows Configuration Designer from both the ADK and Microsoft Store, the Store app will not open.
The Windows Configuration Designer App from Microsoft Store currently supports only English. For a localized version of the Windows Configuration Designer, install it from the Windows ADK.
Go to Download the Windows ADK and select Get Windows ADK for the version of Windows 10 that you want to create provisioning packages for (version 1511, 1607, or 1703).
The rest of this procedure uses Windows ADK for Windows 10, version 1703 as an example.
Save adksetup.exe and then run it.
On the Specify Location page, select an installation path and then click Next.
The estimated disk space listed on this page applies to the full Windows ADK. If you only install Windows Configuration Designer, the space requirement is approximately 32 MB.
Make a selection on the Windows Kits Privacy page, and then click Next.
Accept the License Agreement, and then click Next.
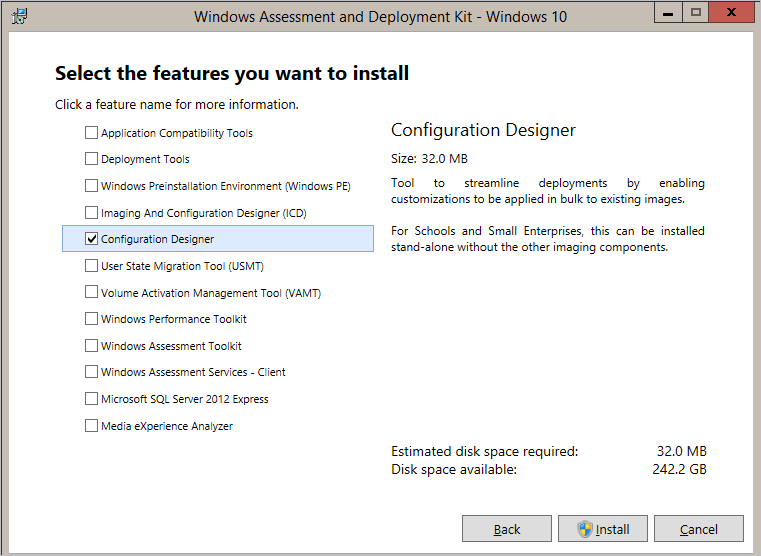
On the Select the features you want to install page, clear all selections except Configuration Designer, and then click Install.

Current Windows Configuration Designer limitations
Windows Configuration Designer will not work properly if the Group Policy setting Policies > Administrative Templates > Windows Components > Internet Explorer > Security Zones: Use only machine settings is enabled. We recommend that you run Windows Configuration Designer on a different device, rather than change the security setting.
You can only run one instance of Windows Configuration Designer on your computer at a time.
Be aware that when adding apps and drivers, all files stored in the same folder will be imported and may cause errors during the build process.
The Windows Configuration Designer UI does not support multivariant configurations. Instead, you must use the Windows Configuration Designer command-line interface to configure multivariant settings. For more information, see Create a provisioning package with multivariant settings.
While you can open multiple projects at the same time within Windows Configuration Designer, you can only build one project at a time.
If you copy a Windows Configuration Designer project from one PC to another PC, make sure that all the associated files for the deployment assets, such as apps and drivers, are copied along with the project to the same path as it was on the original PC.
Recommended: Before starting, copy all source files to the PC running Windows Configuration Designer, rather than using external sources like network shares or removable drives. This reduces the risk of interrupting the build process from a temporary network issue or from disconnecting the USB device.
Источник
Новая версия Windows 10: взгляд сисадмина
Наверняка вы уже слышали, что сегодня официально выходит Windows 10 Creators Update. В этой статье мы решили быть на шаг впереди и рассказать вам про новые фичи для сисадминов в следующем обновлении Windows 10 (1703).

Конфигурирование
Конструктор Windows Configuration Designer
Ранее этот компонент назывался Windows Imaging and Configuration Designer, ICD и использовался для создания пакетов подготовки. В этой версии он получил новое название Windows Configuration Designer. В предыдущих версиях Windows, его можно установить в составе комплекта средств для развертывания и оценки Windows ADK.
Для упрощённого создания пакетов подготовки в конструкторе Windows Configuration Designer в Windows 10 версии 1703 есть ряд новых мастеров.
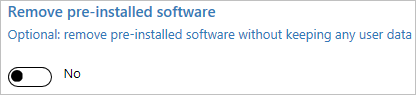
В обеих версиях мастера — для настольных компьютеров и киосков — есть возможность удалить предустановленное ПО с использованием поставщика службы конфигураций CleanPC.
Массовое подключение к Azure Active Directory
Новые мастера из состава Windows Configuration Designer позволяют создавать пакеты подготовки для присоединения устройств к Azure Active Directory. Массовое подключение к Azure Active Directory доступно в мастерах для настольных компьютеров, мобильных устройств, киосков и устройств Surface Hub.
Windows Spotlight
Добавились новые групповые политики и параметры управления мобильными устройствами (MDM):
Структура меню Пуск, начального экрана и панели задач
Наверняка вы знаете, что предприятия могут менять вид меню Пуск, начального экрана и панели задач на компьютерах под управлением Windows 10 редакций Enterprise и Education. В версии 1703 эти модификации можно применить также к редакции Pro.
Ранее нестандартную панель задач можно было развёртывать только с помощью групповых политик или пакетов подготовки. В новой версии поддержка нестандартных панелей появилась в средстве управления мобильными устройствами (MDM).
Появились новые параметры политик MDM для управления меню Пуск и структурой начального экрана и панели задач. Параметры политик MDM:
Развёртывание
Утилита MBR2GPT.EXE
MBR2GPT.EXE — новый инструмент командной строки. Он преобразует MBR-диск (Master Boot Record) в раздел GPT (GUID Partition Table), не меняя и не удаляя данные на диске. Эта утилита предназначена для использования в командной строке среды предустановки Windows (Windows PE), но её можно использовать и в полнофункциональной операционной системе Windows 10.
Формат разделов GPT более новый и позволяет создавать больше разделов большего размера. Он также обеспечивает повышенную надежность данных, поддерживает дополнительные типы разделов и повышает скорость загрузки и выключения. После преобразования системного диска из MBR в GPT следует перенастроить компьютер для загрузки в режиме UEFI, поэтому перед преобразованием системного диска надо убедиться, что ваше устройство поддерживает UEFI.
После загрузки в режиме UEFI в Windows 10 становятся доступными следующие функции безопасности: безопасная загрузка, ранний запуск антивредоносного драйвера ELAM (Early Launch Anti-malware), надежная загрузка Windows, измеряемая загрузка, Охранник устройств, Охранник учетных данных и сетевая разблокировка BitLocker.
Безопасность
Windows Defender Advanced Threat Protection
Новые возможности Windows Defender Advanced Threat Protection (ATP) для Windows 10 версии 1703. Кстати, напоминаем, что недавно делились описанием функционала ATP на Хабре.
К основным улучшениям в области обнаружения атак относятся:
Корпоративные клиенты теперь могут воспользоваться полным набором функций безопасности Windows благодаря тому, что информация об обнаружении атак средствами Windows Defender Antivirus и блоки Охранника устройств отображаются в портале Windows Defender ATP.
Добавлены другие возможности, позволяющие получить целостную картину расследований. К другим улучшениям расследования атак относятся:
При обнаружении атаки группы реагирования могут предпринимать неотложные меры по изоляции бреши в системе безопасности:
Проверка состояния работоспособности сенсоров — проверка способности конечной точки предоставлять данные сенсора и взаимодействовать со службой Windows Defender ATP, а также устранять известные неполадки.
Windows Defender Antivirus
Защитник Windows получил новое название — Windows Defender Antivirus. Его новые возможности:
Параметры безопасности групповых политик
Параметр безопасности Интерактивный вход в систему: отображать сведения о пользователе, если сеанс заблокирован (Interactive logon: Display user information when the session is locked) был обновлён и теперь работает в связке с параметром Конфиденциальность в разделе Параметры > Учетные записи > Параметры входа.
Появился новый параметр политики безопасности — Interactive logon: Don’t display username at sign-in. Этот параметр определяет, нужно ли отображать имя пользователя во время входа в систему, и работает в связке с параметром Конфиденциальность в разделе Параметры > Учетные записи > Параметры входа. Этот параметр влияет только на плитку Other user.
Windows Hello для бизнеса
Теперь забытый PIN-код можно сбросить, не удаляя корпоративные данные или приложения, управляемые средствами Microsoft Intune. Администратор может инициировать удаленный сброс PIN-кода устройств под управлением PIN через портал Intune.
На настольных ПК пользователи могут сбросить забытый PIN-код в разделе Параметры > Учетные записи > Параметры входа.
Обновление
Windows Update for Business
Функция приостановки обновления изменилась: теперь в ней требуется указывать дату начала установки. Если не сконфигурирована соответствующая политика, у пользователей теперь есть возможность отложить обновление в параметрах Windows Settings → Update & security → Windows Update → Advanced options. Также увеличилось время, на которое можно откладывать исправления, — до 35 дней.
Обновление устройств, управляемых с помощью Windows Update for Business, теперь можно откладывать на срок до 365 дней (ранее обновление можно было отложить только на 180 дней). Пользователи могут задавать в параметрах уровень готовности своей ветви и время, на которое следует отложить обновления.
Windows Insider for Business
Добавилась возможность загружать сборки предварительной версии Windows 10 Insider Preview, используя корпоративные учетные данные Azure Active Directory (AAD).
Оптимизация доставки обновлений
Изменения в новой версии позволили обеспечить полную поддержку экспресс-обновлений в System Center Configuration Manager, начиная с версии 1702 этого продукта, а также обновлений и управления продуктами сторонних производителей, в которых реализована эта функциональность. Она дополнила существующую поддержку экспресс-обновлений в Центре обновлений Windows, Центре обновлений Windows для бизнеса и WSUS.
Примечание. Указанные изменения доступны в Windows 10 версии 1607 после установки апрельского обновления 2017 года.
Политики оптимизации доставки обновлений теперь позволяют задавать дополнительные ограничения, что дает возможность лучше управлять различными сценариями обновления.
К новым политикам относятся:
Установленные ранее приложения больше не обновляются автоматически
При обновлении до Windows 10 версии 1703 поставляемые в составе Windows приложения, которые пользователь ранее удалил, не будут автоматически устанавливаться в рамках процесса обновления.
Управление
Новые возможности MDM
В новой версии появилось множество новых поставщиков услуг конфигурации (CSP) для управления Windows 10 с применением средств управления мобильными устройствами (MDM) или пакетов подготовки. Помимо прочего эти CSP-поставщики позволяют управлять несколькими сотнями самых полезных групповых политик посредством MDM.
Управление мобильными приложениями в Windows 10
Версия управления мобильными приложениями (mobile application management, MAM) для Windows — это облегченное решение для управления доступом к корпоративным данным и безопасностью на личных устройствах. Начиная с Windows 10 версии 1703, поддержка MAM встроена в Windows поверх WIP (Windows Information Protection).
Диагностика MDM
Продолжилась работа над совершенствованием средств диагностики, соответствующих требованиям современного управления. Появление автоматического ведения журнала для мобильных устройств позволило Windows автоматически фиксировать в журнале ошибки в MDM, избавляя от необходимости постоянно вести журнал на устройствах с небольшим объёмом памяти. Кроме того, появился Microsoft Message Analyzer — дополнительный инструмент, помогающий сотрудникам службы поддержки быстро обнаружить причины неполадок и, таким образом, обеспечить экономию времени и денег.
Мобильные устройства в Windows 10
Lockdown Designer
Приложение Lockdown Designer помогает сконфигурировать и создать XML-файл блокировки, который должен применяться к устройствам под управлением Windows 10, а также содержит функциональность удалённого моделирования, позволяющую определять конфигурацию плиток в меню Пуск и на начальном экране. Использовать Lockdown Designer проще, чем вручную создавать XML-файл блокировки.
Другие улучшения
Также появились следующие улучшения:
Полезные материалы из нашего блога и не только
UPD: Про обновления в Windows 10 Creators Update можно почитать в блоге компании.
Источник
Установка конструктора конфигураций Windows Install Windows Configuration Designer
Относится к: Applies to
Используйте конструктор конфигураций Windows для создания пакетов подготовки, чтобы легко настраивать устройства под управлением Windows 10. Use the Windows Configuration Designer tool to create provisioning packages to easily configure devices running Windows 10. Конструктор конфигураций Windows предназначен в первую очередь для специалистов ИТ-отдела предприятий и образовательных учреждений, которым нужно выполнять подготовку личных устройств сотрудников и устройств, предоставляемых компанией. Windows Configuration Designer is primarily designed for use by IT departments for business and educational institutions who need to provision bring-your-own-device (BYOD) and business-supplied devices.
Поддерживаемые платформы Supported platforms
Конструктор конфигураций Windows может создавать пакеты подготовки для настольных и мобильных выпусков Windows 10, включая Windows 10 IoT Базовая, а также Microsoft Surface Hub и Microsoft HoloLens. Windows Configuration Designer can create provisioning packages for Windows 10 desktop and mobile editions, including Windows 10 IoT Core, as well as Microsoft Surface Hub and Microsoft HoloLens. Можно запустить конструктор конфигураций Windows в следующих операционных системах: You can run Windows Configuration Designer on the following operating systems:
Необходимо запустить конструктор конфигураций Windows в Windows 10 для настройки регистрации Azure Active Directory с помощью любого из мастеров. You must run Windows Configuration Designer on Windows 10 to configure Azure Active Directory enrollment using any of the wizards.
Установка конструктора конфигураций Windows Install Windows Configuration Designer
На устройствах с Windows 10 можно установить приложение «Конструктор конфигураций Windows» из Microsoft Store. On devices running Windows 10, you can install the Windows Configuration Designer app from the Microsoft Store. Чтобы запустить конструктор конфигураций Windows в других операционных системах или на языках, отличных от английского, установите его из комплекта средств для развертывания и оценки Windows (ADK) для Windows 10. To run Windows Configuration Designer on other operating systems or in languages other than English, install it from the Windows Assessment and Deployment Kit (ADK) for Windows 10.
Если установить конструктор конфигураций Windows как из ADK, так и из Microsoft Store, то приложение из Store не будет открываться. If you install Windows Configuration Designer from both the ADK and Microsoft Store, the Store app will not open.
Приложение «Конструктор конфигураций Windows» из Microsoft Store в настоящее время поддерживает только английский язык. The Windows Configuration Designer App from Microsoft Store currently supports only English. Локализованные версии конструктора конфигураций Windows можно установить из комплекта Windows ADK. For a localized version of the Windows Configuration Designer, install it from the Windows ADK.
Перейдите в раздел Скачать Windows ADK и выберите Получить Windows ADK с учетом версии Windows 10, для которой требуется создать пакеты подготовки (версия 1511, 1607 или 1703). Go to Download the Windows ADK and select Get Windows ADK for the version of Windows 10 that you want to create provisioning packages for (version 1511, 1607, or 1703).
В оставшейся части этой процедуры в качестве примера используется Windows ADK для Windows 10 (версия 1703). The rest of this procedure uses Windows ADK for Windows 10, version 1703 as an example.
Сохраните файл adksetup.exe и запустите его. Save adksetup.exe and then run it.
На странице Выбор расположения выберите путь установки и нажмите кнопку Далее. On the Specify Location page, select an installation path and then click Next.
Место на диске, указанное на этой странице, необходимо для установки полного пакета Windows ADK. The estimated disk space listed on this page applies to the full Windows ADK. Если вы устанавливаете только конструктор конфигураций Windows, вам потребуется приблизительно 32МБ свободного пространства на диске. If you only install Windows Configuration Designer, the space requirement is approximately 32 MB.
Выберите необходимый пункт на странице Конфиденциальность комплектов Windows, а затем нажмите Далее. Make a selection on the Windows Kits Privacy page, and then click Next.
Примите условия Лицензионного соглашения и нажмите кнопку Далее. Accept the License Agreement, and then click Next.
На странице Выберите компоненты для установки снимите все флажки, кроме Конструктор конфигураций и нажмите кнопку Установить. On the Select the features you want to install page, clear all selections except Configuration Designer, and then click Install.
Текущие ограничения конструктора конфигураций Windows Current Windows Configuration Designer limitations
Конструктор конфигураций Windows не будет работать должным образом, если включены политики параметров групповой политики > административных шаблонов > компонентов Windows > Internet Explorer > Security Zones: использование только параметров компьютера. Windows Configuration Designer will not work properly if the Group Policy setting Policies > Administrative Templates > Windows Components > Internet Explorer > Security Zones: Use only machine settings is enabled. Рекомендуется запускать конструктор конфигураций Windows на другом устройстве, а не изменять параметры безопасности. We recommend that you run Windows Configuration Designer on a different device, rather than change the security setting.
Одновременно можно запустить только один экземпляр конструктора конфигураций Windows на компьютере. You can only run one instance of Windows Configuration Designer on your computer at a time.
Обратите внимание, что при добавлении приложений и драйверов импортируются все файлы, хранящиеся в одной папке, что может вызвать ошибки в ходе процесса построения. Be aware that when adding apps and drivers, all files stored in the same folder will be imported and may cause errors during the build process.
Пользовательский интерфейс конструктора конфигураций Windows не поддерживает многовариантные конфигурации. The Windows Configuration Designer UI does not support multivariant configurations. Вместо этого для настройки многовариантных параметров нужно использовать интерфейс командной строки конструктора конфигураций Windows. Instead, you must use the Windows Configuration Designer command-line interface to configure multivariant settings. Дополнительные сведения см. в разделе Создание пакета подготовки с многовариантными параметрами. For more information, see Create a provisioning package with multivariant settings.
Несмотря на то, что в конструкторе конфигураций Windows можно открыть несколько проектов одновременно, доступно построение только одного проекта за раз. While you can open multiple projects at the same time within Windows Configuration Designer, you can only build one project at a time.
Если вы копируете проект конструктора конфигураций WindowsICD c одного компьютера на другой, убедитесь, что все связанные файлы для ресурсов развертывания, например приложения и драйверы, копируются вместе с проектом по тому же пути, по которому они находились на исходном компьютере. If you copy a Windows Configuration Designer project from one PC to another PC, make sure that all the associated files for the deployment assets, such as apps and drivers, are copied along with the project to the same path as it was on the original PC.
Рекомендуется: перед началом скопируйте все исходные файлы на компьютер под управлением конструктора конфигураций Windows, а не во внешние источники, такие как сетевые папки или съемные носители. Recommended: Before starting, copy all source files to the PC running Windows Configuration Designer, rather than using external sources like network shares or removable drives. Это снижает риск прерывания процесса сборки из-за временных проблем с сетью или отключения устройства USB. This reduces the risk of interrupting the build process from a temporary network issue or from disconnecting the USB device.
Источник
Создание пакета подготовки для Windows 10 Create a provisioning package for Windows 10
Применимо к: Applies to
С помощью Конструктора конфигурации Windows можно создать пакет подготовка (.ppkg), содержащий параметры настройки, а затем применить пакет предварительной настройки к устройству под управлением Windows 10 или Windows 10 Mobile. You can use Windows Configuration Designer to create a provisioning package (.ppkg) that contains customization settings, and then apply the provisioning package to a device running Windows 10 or Windows 10 Mobile.
Мы рекомендуем создать учетную запись местного администратора при разработке и проверке пакета предварительной разработки. We recommend creating a local admin account when you develop and test your provisioning package. Мы также рекомендуем использовать учетную запись пользователя с наименее привилегированным доменом для пользования устройствами в домене Active Directory. We also recommend using a least privileged domain user account to join devices to the Active Directory domain.
Создание нового проекта Start a new project
Откройте конструктор конфигураций Windows. Open Windows Configuration Designer:
На экране Пуск или в меню Пуск введите конструктор конфигурации Windows, а затем выберите ярлык конструктора конфигурации Windows. From either the Start screen or Start menu search, type Windows Configuration Designer, and then select the Windows Configuration Designer shortcut.
Если установлен конструктор конфигурации Windows из ADK, перейдите к C:\Program Files (x86)\Windows Kits\10\Assessment and Deployment Kit\Imaging and Configuration Designer\x86 (на компьютере x64) или C:\Program Files\Windows Kits\10\Assessment and Deployment Kit\Imaging and Configuration Designer\x86\ICD.exe (на компьютере x86), а затем выберите ICD.exe. If you installed Windows Configuration Designer from the ADK, navigate to C:\Program Files (x86)\Windows Kits\10\Assessment and Deployment Kit\Imaging and Configuration Designer\x86 (on an x64 computer) or C:\Program Files\Windows Kits\10\Assessment and Deployment Kit\Imaging and Configuration Designer\x86\ICD.exe (on an x86 computer), and then select ICD.exe.
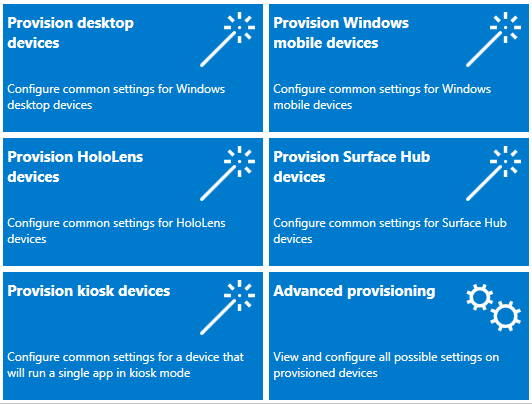
Выберите нужный вариант на странице Пуск, на которой представлено несколько вариантов создания пакета подготовки, как показано на следующем изображении. Select your desired option on the Start page, which offers multiple options for creating a provisioning package, as shown in the following image:

Следующие параметры мастера предоставляют простой интерфейс для настройки общих параметров для настольных, мобильных и киосков: The following wizard options provide a simple interface for configuring common settings for desktop, mobile, and kiosk devices:
Мастера также доступны для создания пакетов подготовки для устройств Microsoft Surface Hub и Microsoft HoloLens. Wizards are also available for creating provisioning packages for Microsoft Surface Hub and Microsoft HoloLens devices. Сводку параметров, доступных на настольных, мобильных устройствах и устройствах киосков, см. в сводке «Что можно настроить с помощью мастеров конструктора конфигурации». For a summary of the settings available in the desktop, mobile, and kiosk devices, see What you can configure using Configuration Designer wizards.
Опция Advanced provisioning открывает новый проект со всеми доступными настройками времени работы. The Advanced provisioning option opens a new project with all the runtime settings available. (В остальной части этой процедуры используется предварительная подготовка.) (The rest of this procedure uses advanced provisioning.)
Приступить к созданию проекта можно в обычном мастере, а затем перенести проект в расширенный редактор. You can start a project in the simple wizard editor and then switch the project to the advanced editor.
Введите имя для проекта и выберите Далее. Enter a name for your project, and then select Next.
Выберите параметры, которые необходимо настроить, в зависимости от типа устройства, а затем выберите Далее. Select the settings you want to configure, based on the type of device, and then select Next. В следующей таблице приведено описание параметров. The following table describes the options.
| Выпуск Windows Windows edition | Параметры, доступные для настройки Settings available for customization | Применение пакета подготовки Provisioning package can apply to |
|---|---|---|
| Все выпуски Windows All Windows editions | Общие параметры Common settings | Все устройства с Windows 10 All Windows 10 devices |
| Все выпуски Windows для настольных ПК All Windows desktop editions | Общие параметры и параметры, относящиеся к настольным устройствам Common settings and settings specific to desktop devices | Все выпуски Windows10 для настольных ПК (Домашняя, Pro, Корпоративная, Pro для образовательных учреждений, Корпоративная для образовательных учреждений) All Windows 10 desktop editions (Home, Pro, Enterprise, Pro Education, Enterprise Education) |
| Все выпуски Windows Mobile All Windows mobile editions | Общие параметры и параметры, относящиеся к мобильным устройствам Common settings and settings specific to mobile devices | Все устройства с Windows 10 Mobile All Windows 10 Mobile devices |
| Windows 10 IoT Базовая Windows 10 IoT Core | Общие параметры и параметры, относящиеся к Windows 10 IoT Базовая Common settings and settings specific to Windows 10 IoT Core | Все устройства с Windows 10 IoT Базовая All Windows 10 IoT Core devices |
| Windows 10 Holographic Windows 10 Holographic | Общие параметры и параметры, относящиеся к Windows 10 Holographic Common settings and settings specific to Windows 10 Holographic | Microsoft HoloLens Microsoft HoloLens |
| Выпуск Windows 10 для совместной работы Common to Windows 10 Team edition | Общие параметры и параметры, относящиеся к Windows 10 для совместной работы Common settings and settings specific to Windows 10 Team | Microsoft Surface Hub Microsoft Surface Hub |
На странице Импорт пакета подготовка (необязательный) можно выбрать Готово для создания проекта или просмотреть и выбрать существующий пакет подготовка для импорта в проект, а затем выбрать finish. **** On the Import a provisioning package (optional) page, you can select Finish to create your project, or browse to and select an existing provisioning package to import to your project, and then select Finish.
Функция Импорт пакета подготовки позволяет упростить создание разных пакетов подготовки, содержащих некоторые общие параметры. Import a provisioning package can make it easier to create different provisioning packages that all have certain settings in common. Например, можно создать пакет подготовка, содержащий параметры для сети организации, а затем импортировать его в другие пакеты, которые вы создаете, чтобы не нужно было повторно перенастроять эти общие параметры. For example, you could create a provisioning package that contains the settings for your organization’s network, and then import it into other packages that you create so you don’t have to reconfigure those common settings repeatedly.
Настройка параметров Configure settings
При создании проекта с помощью расширенной подготовки конструктор конфигураций Windows откроет панель Доступные настройки. For an advanced provisioning project, Windows Configuration Designer opens the Available customizations pane. Пример на следующем изображении основан на параметрах для Всех выпусков Windows для настольных ПК. The example in the following image is based on All Windows desktop editions settings.

В основе параметров в конструкторе конфигураций Windows используются поставщики служб конфигурации Windows 10 (CSP). The settings in Windows Configuration Designer are based on Windows 10 configuration service providers (CSPs). Дополнительные сведения о поставщиках служб конфигурации см. в разделе Основы работы с поставщиками служб конфигурации (CSP) для ИТ-специалистов. To learn more about CSPs, see Introduction to configuration service providers (CSPs) for IT pros.
Процесс настройки параметров является одинаковым для всех параметров. The process for configuring settings is similar for all settings. В следующей таблице приведен пример. The following table shows an example.
Дополнительные сведения о каждом конкретном параметре см. в Справочнике по параметрам подготовки Windows. For details on each specific setting, see Windows Provisioning settings reference. При выборе параметра в конструкторе конфигураций Windows также отображается раздел справки по настройке этого параметра, как показано на следующем изображении. The reference topic for a setting is also displayed in Windows Configuration Designer when you select the setting, as shown in the following image.

Сборка пакета Build package
После настройки настройки выберите экспорт ивыберите пакет предварительной настройки. After you’re done configuring your customizations, select Export, and then select Provisioning Package.
В окне Описание пакета подготовка введите следующую информацию, а затем выберите Далее: In the Describe the provisioning package window, enter the following information, and then select Next:
В окне Выбор сведений о безопасности для окна пакета подготовка можно выбрать для шифрования и/или подписывания пакета подготовка с выбранным сертификатом, а затем выбрать Далее. In the Select security details for the provisioning package window, you can select to encrypt and/or sign a provisioning package with a selected certificate, and then select Next. Оба выбора необязательны: Both selections are optional:
Необходимо настроить безопасность пакетов, только если пакет используется для подготовка устройств и когда пакет содержит конфиденциальные данные безопасности, такие как сертификаты или учетные данные, которые не должны быть скомпрометированы. You should only configure provisioning package security when the package is used for device provisioning and when the package has content with sensitive security data, such as certificates or credentials that should be prevented from being compromised. При применении зашифрованного и/или подписанного пакета подготовки во время запуска при первом включении или через пользовательский интерфейс настройки пакет может быть расшифрован, и если он подписан, стать доверенным без явного согласия пользователя. When applying an encrypted and/or signed provisioning package, either during OOBE or through the setting UI, the package can be decrypted, and if signed, be trusted without explicit user consent. ИТ-администратор может задать политики на устройстве пользователя, чтобы запретить удаление необходимых пакетов с устройства или выполнение подготовки потенциально опасных пакетов на устройстве. An IT administrator can set policy on a user device to restrict the removal of required packages from the device, or the provisioning of potentially harmful packages on the device.
Если пакет подготовки подписан доверенным поставщиком, его можно установить на устройстве без запроса на получение согласия от пользователя. If a provisioning package is signed by a trusted provisioner, it can be installed on a device without a prompt for user consent. Чтобы включить сертификаты доверенного поставщика, перед установкой доверенного пакета подготовки необходимо настроить параметр TrustedProvisioners. In order to enable trusted provider certificates, you must set the TrustedProvisioners setting prior to installing the trusted provisioning package. Это единственный способ установки пакета без согласия пользователя. This is the only way to install a package without user consent. Для обеспечения дополнительной защиты также можно настроить параметр RequireProvisioningPackageSignature, который запретит пользователям устанавливать пакеты подготовки не подписанные доверенными поставщиками. To provide additional security, you can also set RequireProvisioningPackageSignature, which prevents users from installing provisioning packages that are not signed by a trusted provisioner.
В окне Выберите, где сохранить окно пакета подготовка, укажите расположение вывода, куда необходимо, чтобы пакет подготовка был создан, а затем выберите Далее. In the Select where to save the provisioning package window, specify the output location where you want the provisioning package to go once it’s built, and then select Next. По умолчанию конструктор конфигураций Windows использует в качестве расположения выходных данных папку проекта. By default, Windows Configuration Designer uses the project folder as the output location.
В окне Сборка пакета подготовка выберите Сборка. In the Build the provisioning package window, select Build. Сборка пакета подготовки выполняется быстро. The provisioning package doesn’t take long to build. Сведения о проекте отображаются на странице сборки, а индикатор выполнения указывает состояние сборки. The project information is displayed in the build page and the progress bar indicates the build status.
Если необходимо отменить сборку, выберите Отмена. If you need to cancel the build, select Cancel. Это отменяет текущий процесс сборки, закрывает мастер и возвращает вас на страницу Настройки. This cancels the current build process, closes the wizard, and takes you back to the Customizations page.
В случае сбой сборки появится сообщение об ошибке, которое включает ссылку на папку проекта. If your build fails, an error message will appear that includes a link to the project folder. Вы можете просмотреть журналы, чтобы определить, что вызвало ошибку. You can scan the logs to determine what caused the error. После устранения проблемы попробуйте выполнить построение пакета еще раз. Once you fix the issue, try building the package again.
В случае успешного построения отобразятся пакет подготовки, выходной каталог и каталог проекта. If your build is successful, the name of the provisioning package, output directory, and project directory will be shown.
При желании вы можете выполнить построение пакета подготовки снова и выбрать другой путь для выходного пакета. If you choose, you can build the provisioning package again and pick a different path for the output package. Для этого выберите «Назад», чтобы изменить имя и путь выпускаемого пакета, а затем выберите Далее, чтобы запустить другую сборку. To do this, select Back to change the output package name and path, and then select Next to start another build.
Когда вы закончите, выберите Готово, чтобы закрыть мастер и вернуться на страницу Настройки. When you are done, select Finish to close the wizard and go back to the Customizations page.
Источник
Setting up new workstations for end-users is a time-consuming task. With the help of automation and a structured approach, the hassle of workstation deployment can be reduced. To manage your Windows workstations and computers, you will first need to install the Windows agent. In this post, we will see how you can install agents with Windows Configuration Designer and create custom settings, deploy scripts, and draft a provisioning file that can be deployed to various systems for automation purposes.
To install agents with Windows Configuration Designer correctly, follow the steps below.
- Install Windows Configuration Designer
- Create a Provision Desktop Devices project
- Configure your project
- Deploy the created package
Let us talk about them in detail.
1] Install Windows Configuration Designer
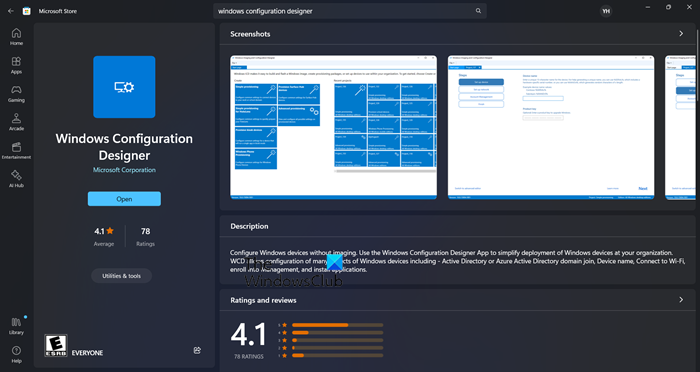
First of all, we need to install Windows Configuration Designer. It is a no-cost software tool that helps in initiating workstation deployments. It allows users to customize settings, deploy scripts, and create a provisioning file that can be distributed to multiple computers. To get this tool, either go to microsoft.com or open the Microsoft Store and search for “Windows Configuration Designer”
2] Create a Provision Desktop Devices project
After downloading Windows Configuration Designer, you need to click on Provision Desktop Device from the Create options. Now, enter the name of the project, choose a destination, and add a description if you want. Finally, click on the Finish button to start creating.
3] Configure your project
Now, let us start configuring the project.
First of all, we need to set up the device. For that, you can use the format – CompanyName-%Serial%. This will add the company name in front of the device’s service tag or serial number.
Next up, you need to set up a wireless network on this page. However, the wireless network will not always be connected before installing the agent, so disabling this feature is a good option as of now. For that, just turn off the toggle that says Set up network.
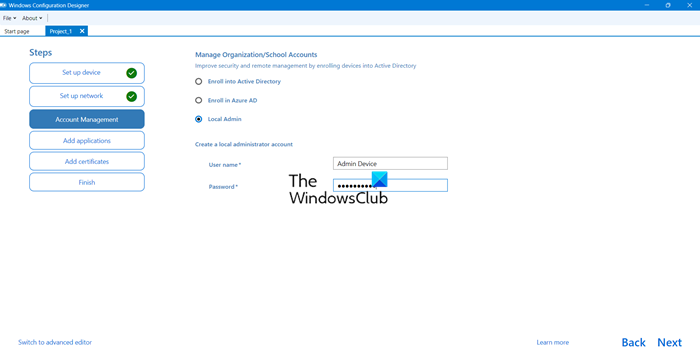
Now, you can choose to join the domain at this point, but if the devices are not connected to a network that has access to the AD domain, you can just create a local admin account and join the domain later using a script. For that, just tick the Local Admin checkbox and enter your credentials.

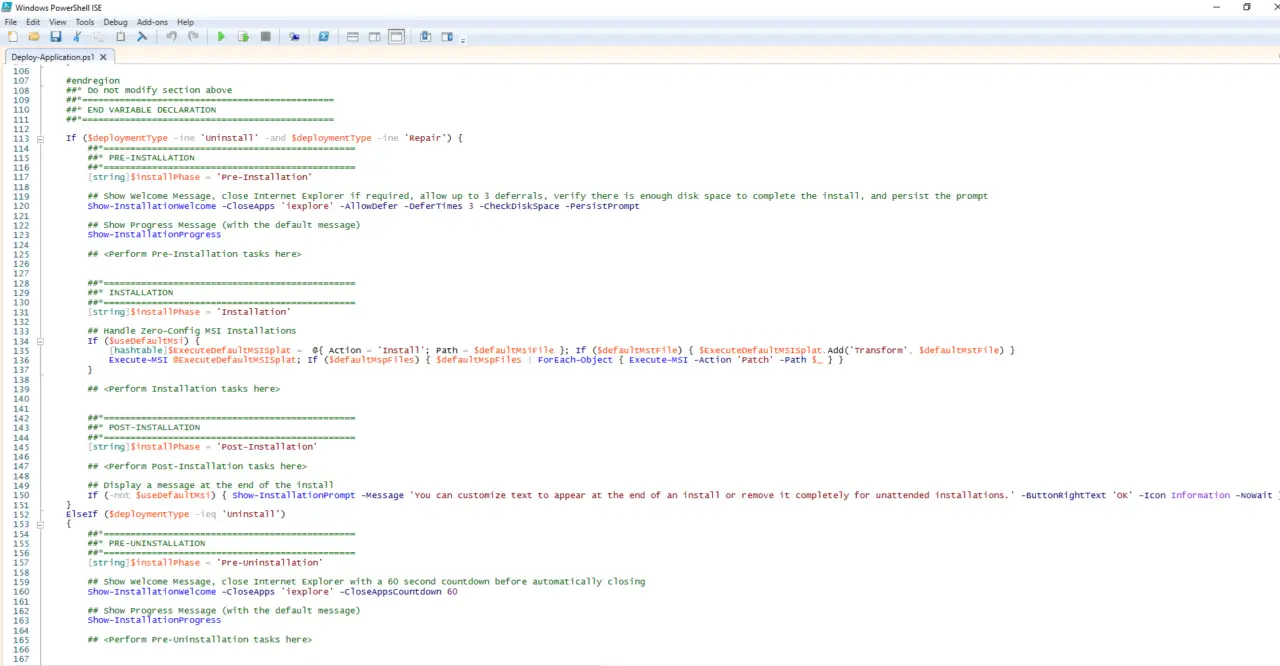
Here comes to most important part, we are required to install a script that will do the automation part. For that, we are going with PowerShell. We will go with the following script.
Note: Following is a sample of the PowerShell script that you can use, make sure to make needful changes to the script before installing it.
param(
[string]$SSID="Put Your SSID Here",
[string]$PSK="Put Your Wifi Password Here"
)

#Test to see if folder $TempFolder exists
$TempFolder = 'C:\temp'
if (Test-Path -Path $TempFolder) {
"$TempFolder exists."
} else {
"$TempFolder doesn't exist, creating now."
mkdir $TempFolder
}

#Log this script.
Start-Transcript -Append $TempFolder\Install.txt

#Create a wireless profile file
$guid = New-Guid
$HexArray = $ssid.ToCharArray() | foreach-object { [System.String]::Format("{0:X}", [System.Convert]::ToUInt32($_)) }
$HexSSID = $HexArray -join ""
@"
<?xml version="1.0"?>
<WLANProfile xmlns="http://www.microsoft.com/networking/WLAN/profile/v1">
<name>$($SSID)</name>
<SSIDConfig>
<SSID>
<hex>$($HexSSID)</hex>
<name>$($SSID)</name>
</SSID>
</SSIDConfig>
<connectionType>ESS</connectionType>
<connectionMode>auto</connectionMode>
<MSM>
<security>
<authEncryption>
<authentication>WPA2PSK</authentication>
<encryption>AES</encryption>
<useOneX>false</useOneX>
</authEncryption>
<sharedKey>
<keyType>passPhrase</keyType>
<protected>false</protected>
<keyMaterial>$($PSK)</keyMaterial>
</sharedKey>
</security>
</MSM>
<MacRandomization xmlns="http://www.microsoft.com/networking/WLAN/profile/v3">
<enableRandomization>false</enableRandomization>
<randomizationSeed>1451755948</randomizationSeed>
</MacRandomization>
</WLANProfile>
"@ | out-file "$TempFolder\$guid.SSID"

#Import the wireless profile
netsh wlan add profile filename="$TempFolder\$guid.SSID" user=all
Start-Sleep -Seconds 5

#Delete the wireless profile file
remove-item "$TempFolder\$guid.SSID" -Force

#Connect to the new Wifi network
netsh wlan connect name=$SSID

#Check for connectivity so the agent can be downloaded
$timeout = New-TimeSpan -Minutes 2
$endTime = (Get-Date).Add($timeout)
$testSite = "download URL"

while (!(Test-Connection $testSite)) {
Start-Sleep -Seconds 5
if ((Get-Date) -gt $endTime) {
$connectivity = Test-Connection -TargetName $testSite
"$connectivity"
"Timeout exceeded. Network connectivity not established"
break
}
}

#Paste the installer command for your operating system

Senv:API_KEY = "fuARsf8hj6xTgtHctGSJzW4a"; Set-ExecutionPolicy RemoteSigned - Scope Process -Force; [Net.ServicePointManager] :: SecwrityProtocol = [Net.SecurityProtocolType] :: T1s12; iwr -useb https://download URL/instalation_windows.ps1 | iex

Stop-Transcript
Create a .PS1 file by copying the script to a notepad and saving it with the said extension.
Press the + button on the add application page, then give the application a name. Browse to the .ps1 script in the Installer Path field. Next, change the Command Line Arguments field to:
powershell.exe -executionpolicy bypass -file "install_agents.ps1"
Finally, go to Add > Enter certificate if you have one or just leave it unaltered> Create.
Read: How to automate tasks with PowerShell?
4] Deploy the created package
To prepare a new computer for deployment, generate a .ppkg file and copy it to a USB stick. This file contains all the necessary information, including the .ps1 file created earlier.
When setting up a new computer, it will prompt for the language to be used. Do not answer any of the questions and simply insert the USB stick. The provisioning file will be read, and the computer will be renamed and rebooted. Additionally, an admin account will be created, the wireless network will be joined, and Level will be installed. After all these steps are completed, the device will appear in Level, and you can start deploying automation scripts to finish the workstation deployment.
That’s it!
Read: CleanPC CSP: Remove pre-installed software during provisioning
What can you do with Windows Configuration Designer?
We can use the Windows Configuration Designer tool to create provisioning packages that will allow for the hassle-free configuration of Windows client devices. This tool is primarily utilized by IT departments of business and educational institutions that require the provisioning of both bring-your-own-device (BYOD) and business-supplied devices.
Read: Microsoft Flow or Power Automate: Automation Tool and IFTTT alternative
How do I install PPKG on Windows?
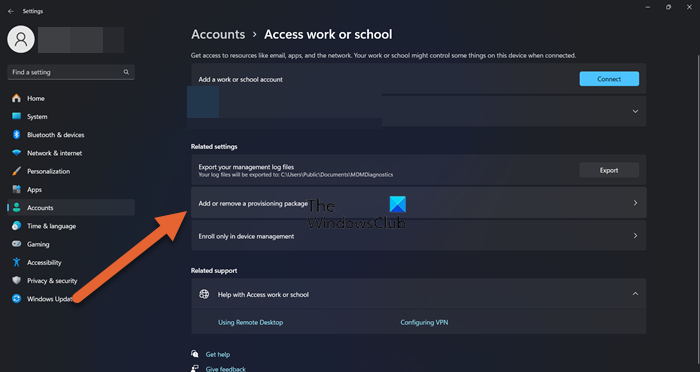
To apply a provisioning package to your device, first, insert the USB drive. Then, navigate to Settings, select Accounts, and choose Access work or school. From here, click Add or Remove a provisioning package, and select Add a package. You can then choose your preferred method, such as Removable Media. Next, select the .ppkg provisioning package that you want to apply, and click Add.
Also Read: Best free Automation software for Windows.
Download Windows Configuration Designer from the Microsoft Store (if using Windows 10) or from the Windows ADK.
Go for the advanced settings rather than one of the templates. If you want, you can start with the wizard to get the most common settings configured, but switch to advanced once you’re done.
Be sure to configure:
- Accounts > ComputerAccount – to join the PC to Active Directory.
- Downside – you can’t specify the name when running/installing the package, so unless you have a naming convention that works with the available naming options, you’ll have to manually rename and join the PC after provisioning.
- Accounts > Users to create a local administrator account.
- OOBE > Desktop > HideOobe (TRUE)
- This worked when I first tried it, but not the last time. Perhaps because there were errors installing some of my custom software….? no idea why.
- ProvisioningCommands > PrimaryContext > Command – software installations. Be sure to use the correct silent installation parameters, including for MSIs.
- For an exe: cmd /c “setup.exe” (the WCD auto-generated that & it works)
- For an msi: msiexec.exe /i “googlechromestandaloneenterprise64.msi” ALLUSERS=1 /qn /norestart /log output.log (copied from PDQ Deploy)
- Policies > Start > StartLayout – for start menu. DO NOT use Start > StartLayout – that is for Windows Mobile.
- Example: https://pastebin.com/ddkdnNet
- Configure the start layout you want on a test machine, then from PowerShell, run Export-StartLayout -Path yourstartlayout.xml
- The XML has to be escaped first. https://docs.microsoft.com/en-us/windows/configuration/customize-windows-10-start-screens-by-using-provisioning-packages-and-icd#escape
- To escape the XML: https://www.freeformatter.com/xml-escape.html
- By default, the XML is a FULL start layout. This means that the layout is set in stone; nothing can be added or changed after the fact. To set a partial layout, https://docs.microsoft.com/en-us/windows/configuration/customize-and-export-start-layout#configure-a-partial-start-layout
- Taskbar layout: https://docs.microsoft.com/en-us/windows/configuration/configure-windows-10-taskbar#sample-taskbar-configuration-added-to-start-layout-xml-file
- This section needs to be escaped and added to the bottom of the Start Layout XML, with the CustomTaskbarLayoutCollection tags right above the ending LayoutModificationTemplate tag.
- Policies > ApplicationDefaults > DefaultAssociationsConfiguration – configure default app handlers.
- https://docs.microsoft.com/en-us/windows-hardware/manufacture/desktop/export-or-import-default-application-associations
- The XML must be converted to Base64 format.
- https://www.base64encode.org/
- Important: these policies are applied before software installations. If you’re trying to set a default association for an application that isn’t installed yet (e.g. setting Adobe Reader to open PDFs and installing Reader at the same time, in the same package), this won’t work. The default associations have to be applied in a second, separate package AFTER the software is installed.
Home
> Data Center, Microsoft Infrastructure, Security, Windows Client > Installing Windows Imaging and Configuration Designer (Part 1)
The Windows Imaging and Configuration Designer (ICD) is a new tool, introduced with Windows 10.
ICD is a part of Windows Assessment and Deployment Kit for Windows 10 (ADK) and you can use Windows ICD to do the following tasks:
- View all of the configurable settings and policies for a Windows 10 image or provisioning package.
- Create Windows provisioning answer files.
- Add third-party drivers, apps, or other assets to an answer file.
- Create variants and specify the settings that apply to each variant.
- Build and flash a Windows image.
- Build a provisioning package.
Read more about ICD here
Download setup for Windows 10 ADK here
Start the installation and choose where the toolkit should be installed and if you want to send Microsoft anonymous data.


Accept the license agreement

Ensure that you select Imaging and Configuration Designer (ICD).
Note the prerequirements.

The tools are installed.


Click Close and you are ready to streamline, customize and provision Windows images.
Expect a new blog post soon.
/Jens Ole