
These are the steps I arrived at in order to install a Windows 10 Guest on an Ubuntu 18.04 host using virt-manager to install a Qemu VM with KVM acceleration and VirtIO drivers.
Prerequisites
Create a directory to work in and install the tools we will need. The virtio-win ISO image contains the drivers we will need in order to make Windows bootable.
1 |
mkdir windows |
You will also need to copy your Windows 10 installer ISO into your windows/ directory.
Disk Setup
This creates a blank image that will be attached as a virtual hard drive to the Windows instance. We use qcow2 because it supports some nice extensions above those on the raw format, like thin provisioning of storage.
1 |
qemu-img create -f qcow2 windows_10_x64.qcow2 75G |
Creating the VM
Call virt-install to create the VM.
1 |
virt-install \ |
Verify the running VMs with the virsh command:
1 |
~/windows $ virsh list |
Connecting to the VM
Now that the VM is running, you need to connect to it and install Windows. VNC to the host machine on port 5900 using the password you specified in the virt-install command. You did change that password, didn’t you?
On Mac OS you can use open to call the built in VNC client.
1 |
open vnc://<host>:5900 |
Windows Install
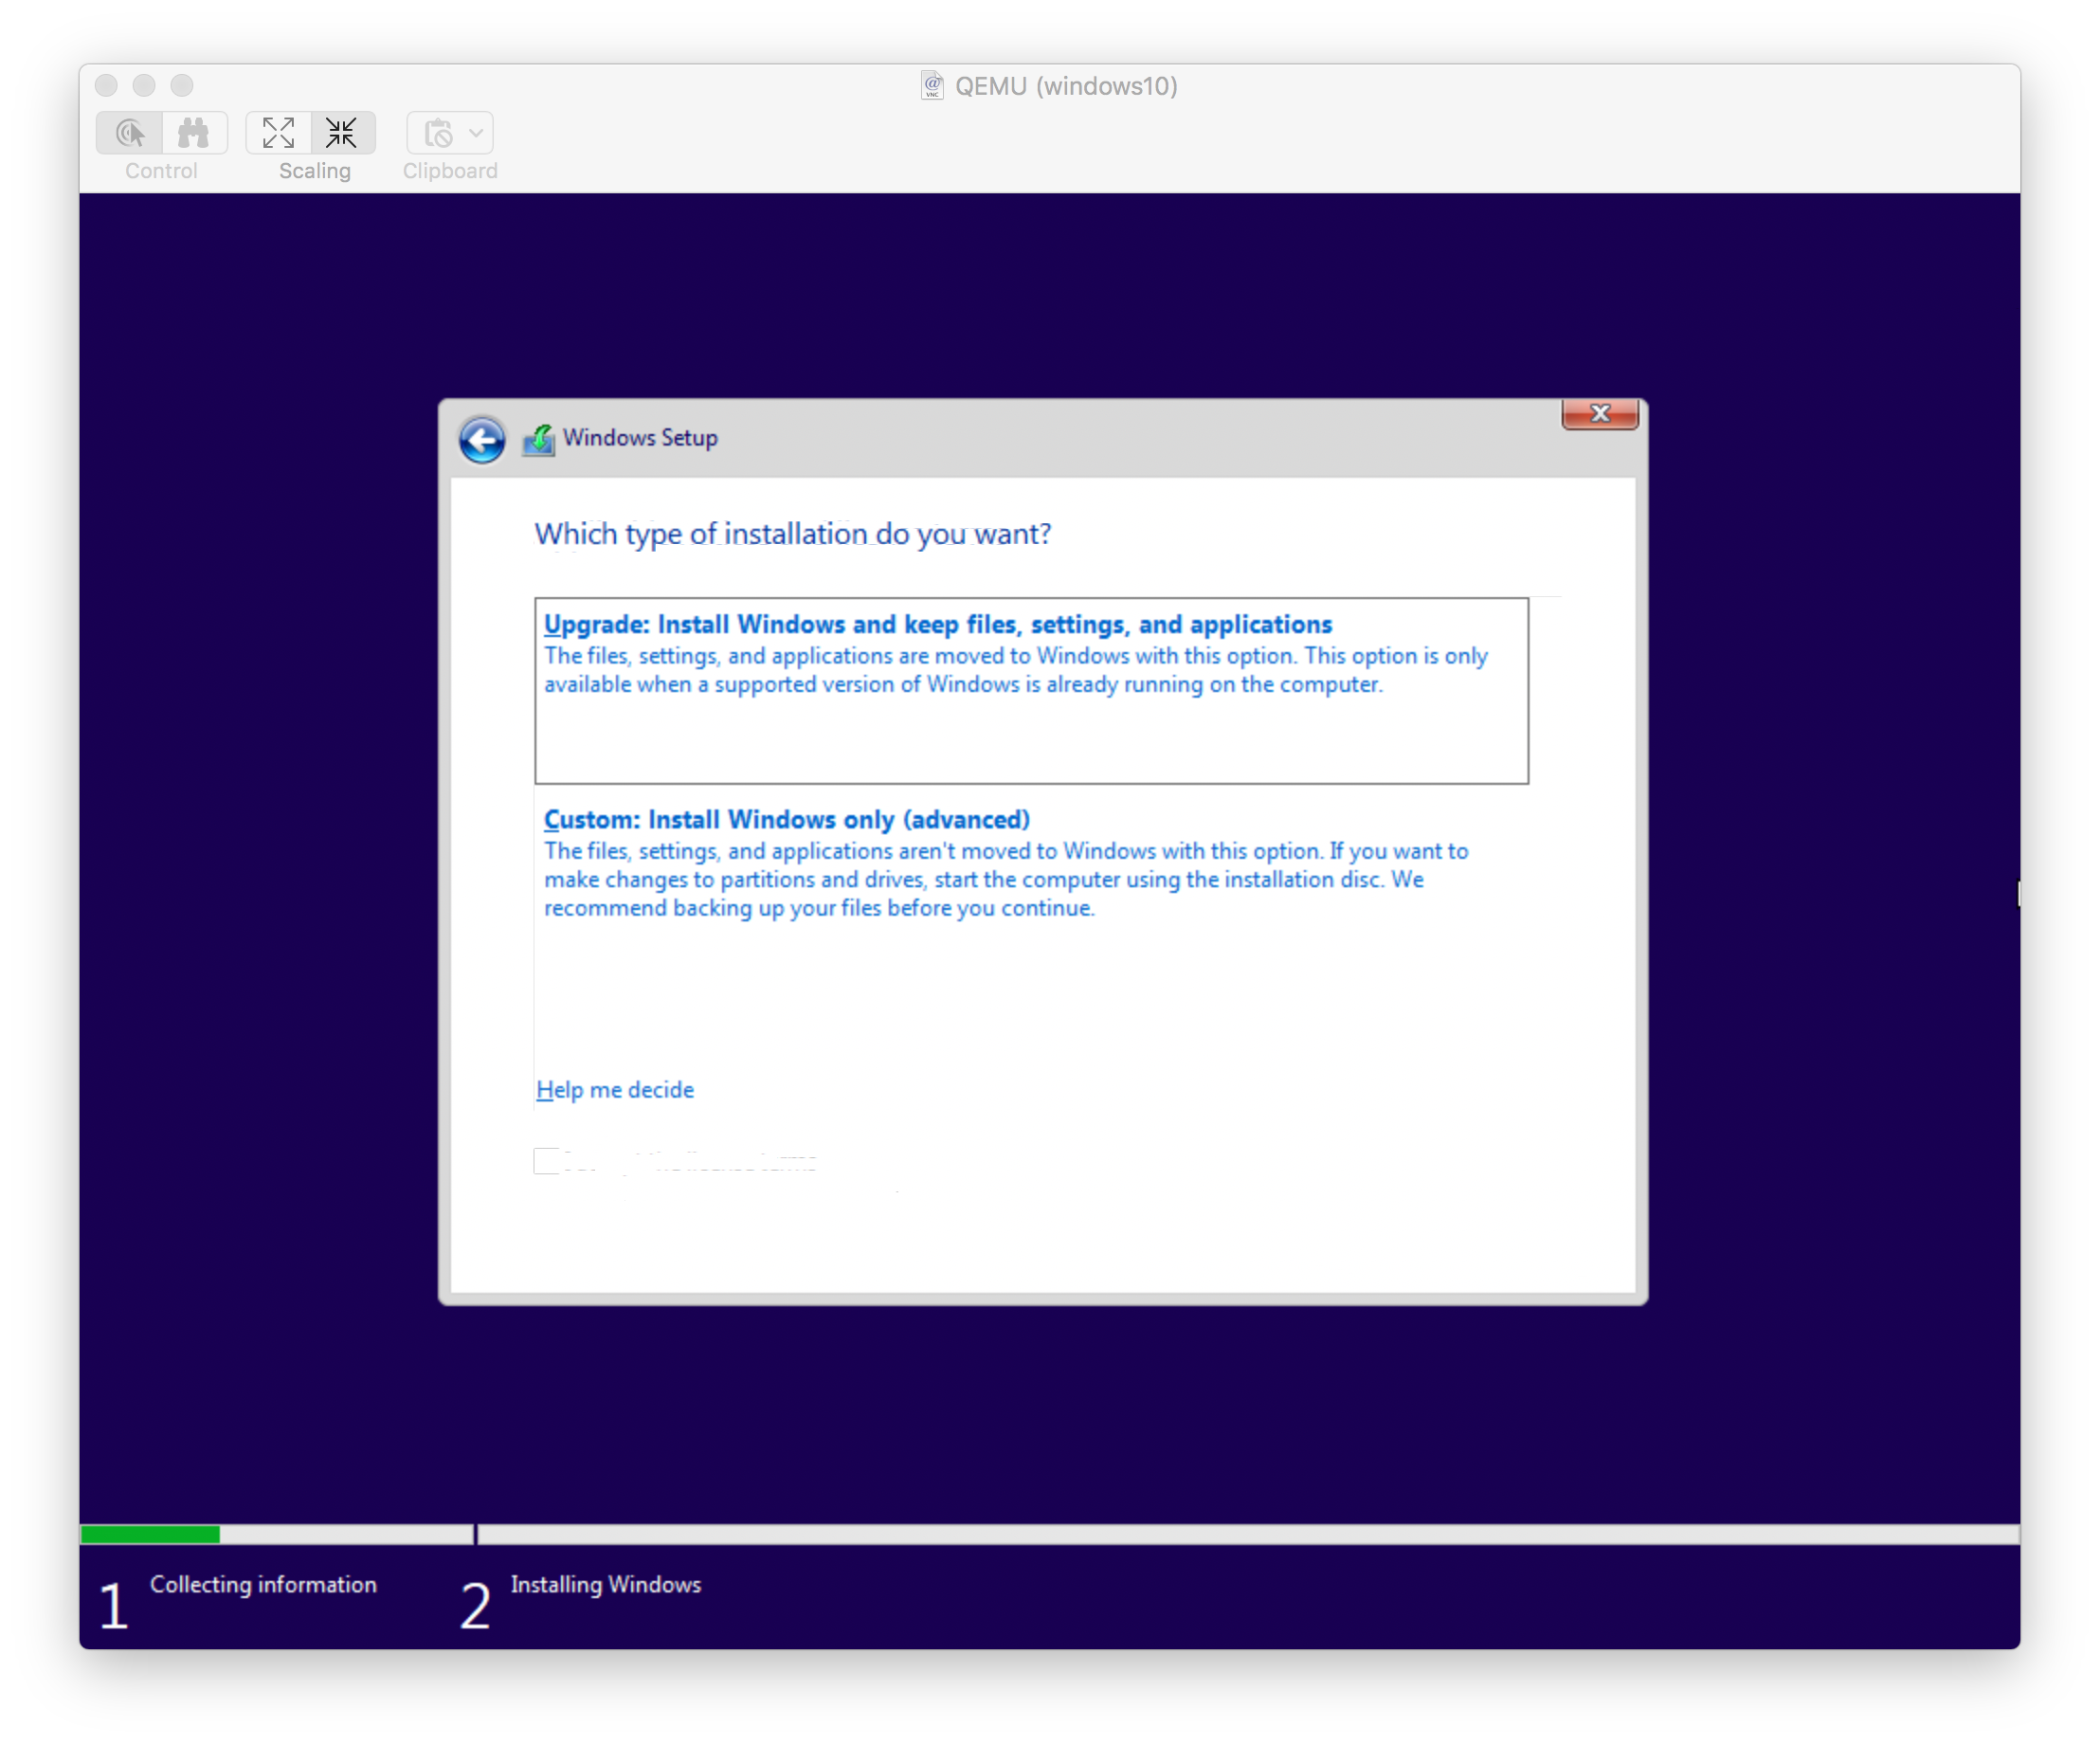
There will be a few extra steps to install Windows above and beyond a normal install. Because the accelerated VirtIO drivers required to interface with the virtual disk controller are not bundled with Windows, we need to load them into the installer before it will be able to talk to the virtual hard drive.
When asked to do an Upgrade or a Custom install, select Custom Install.
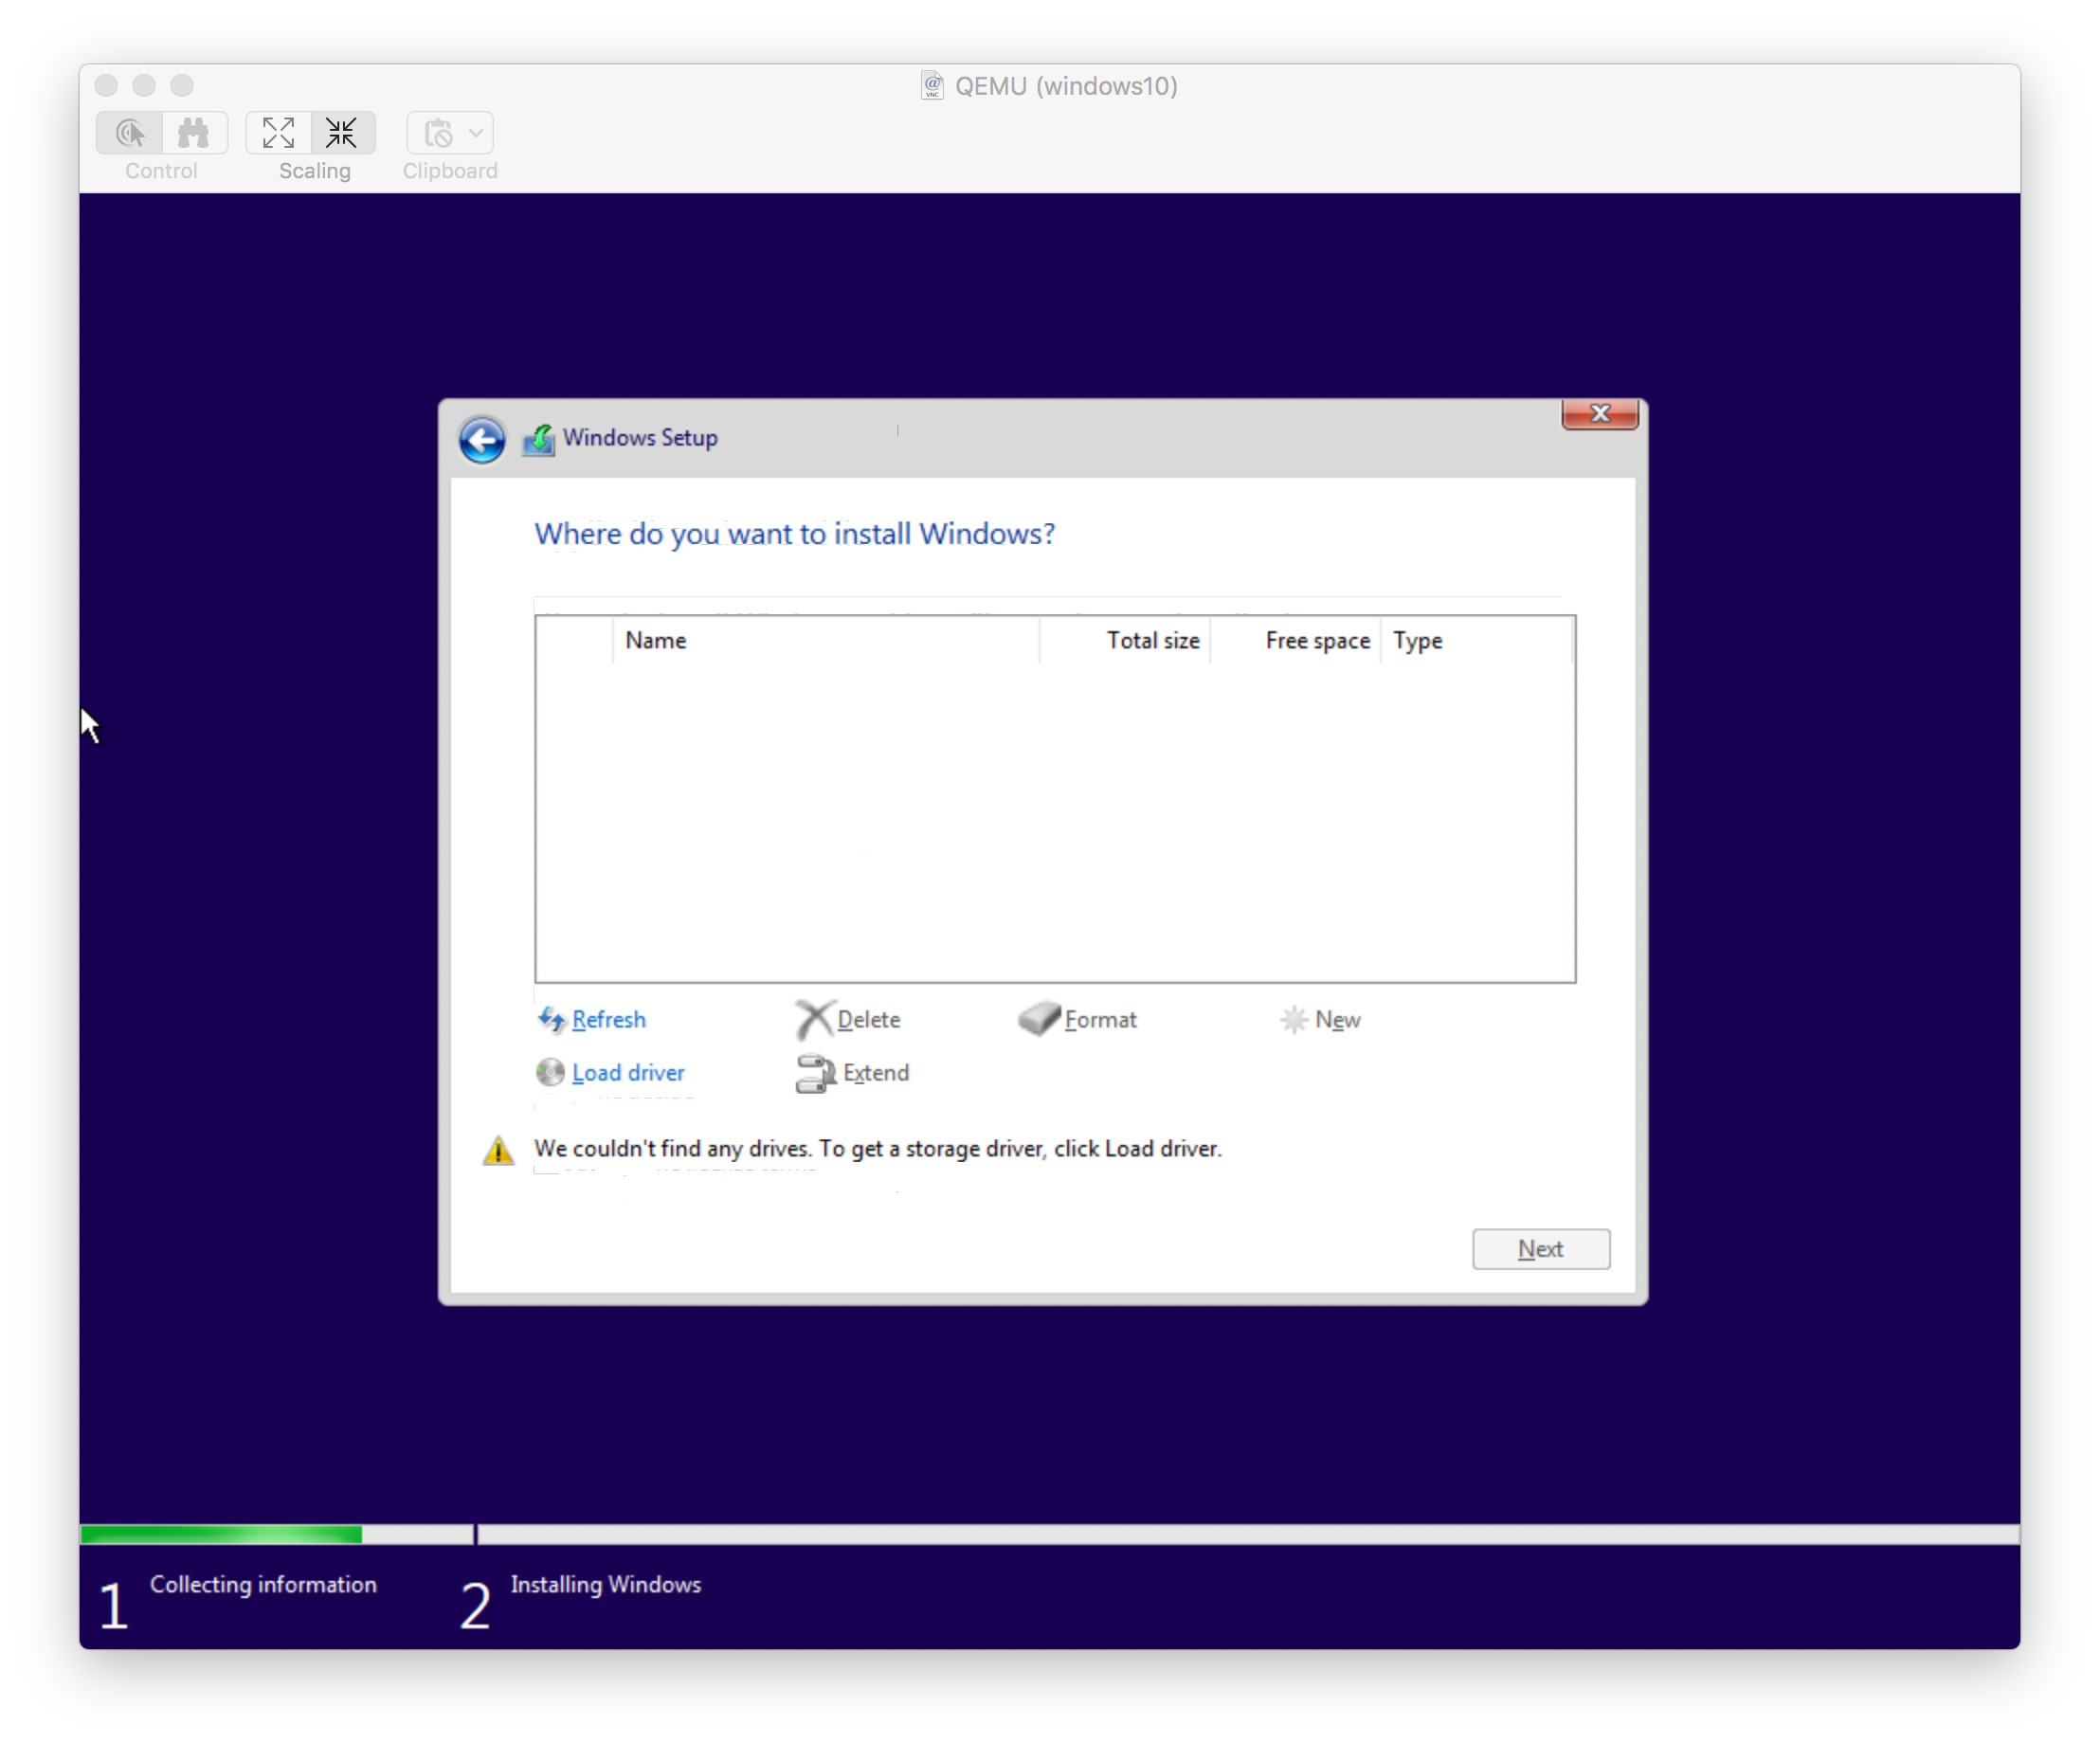
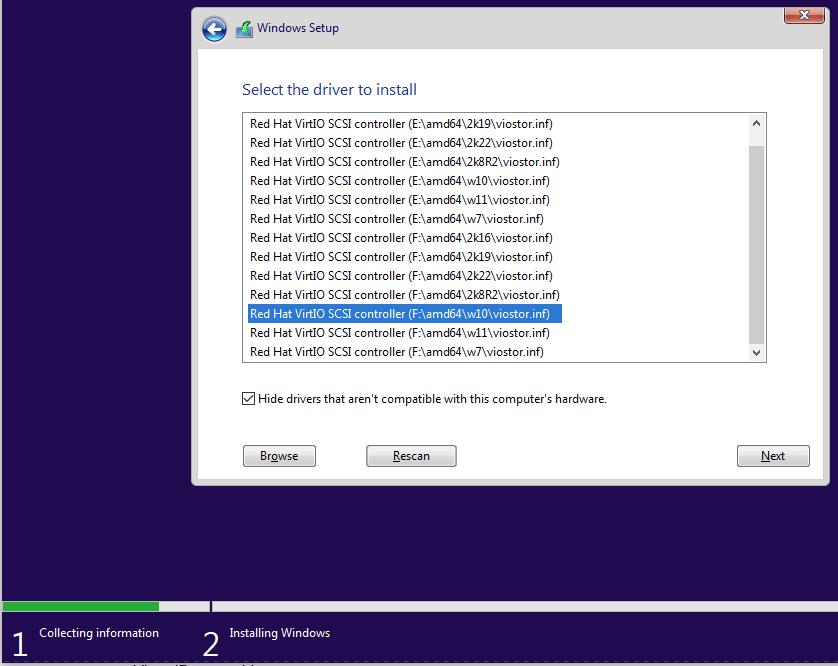
Select Load Driver to point the installer to your driver file.
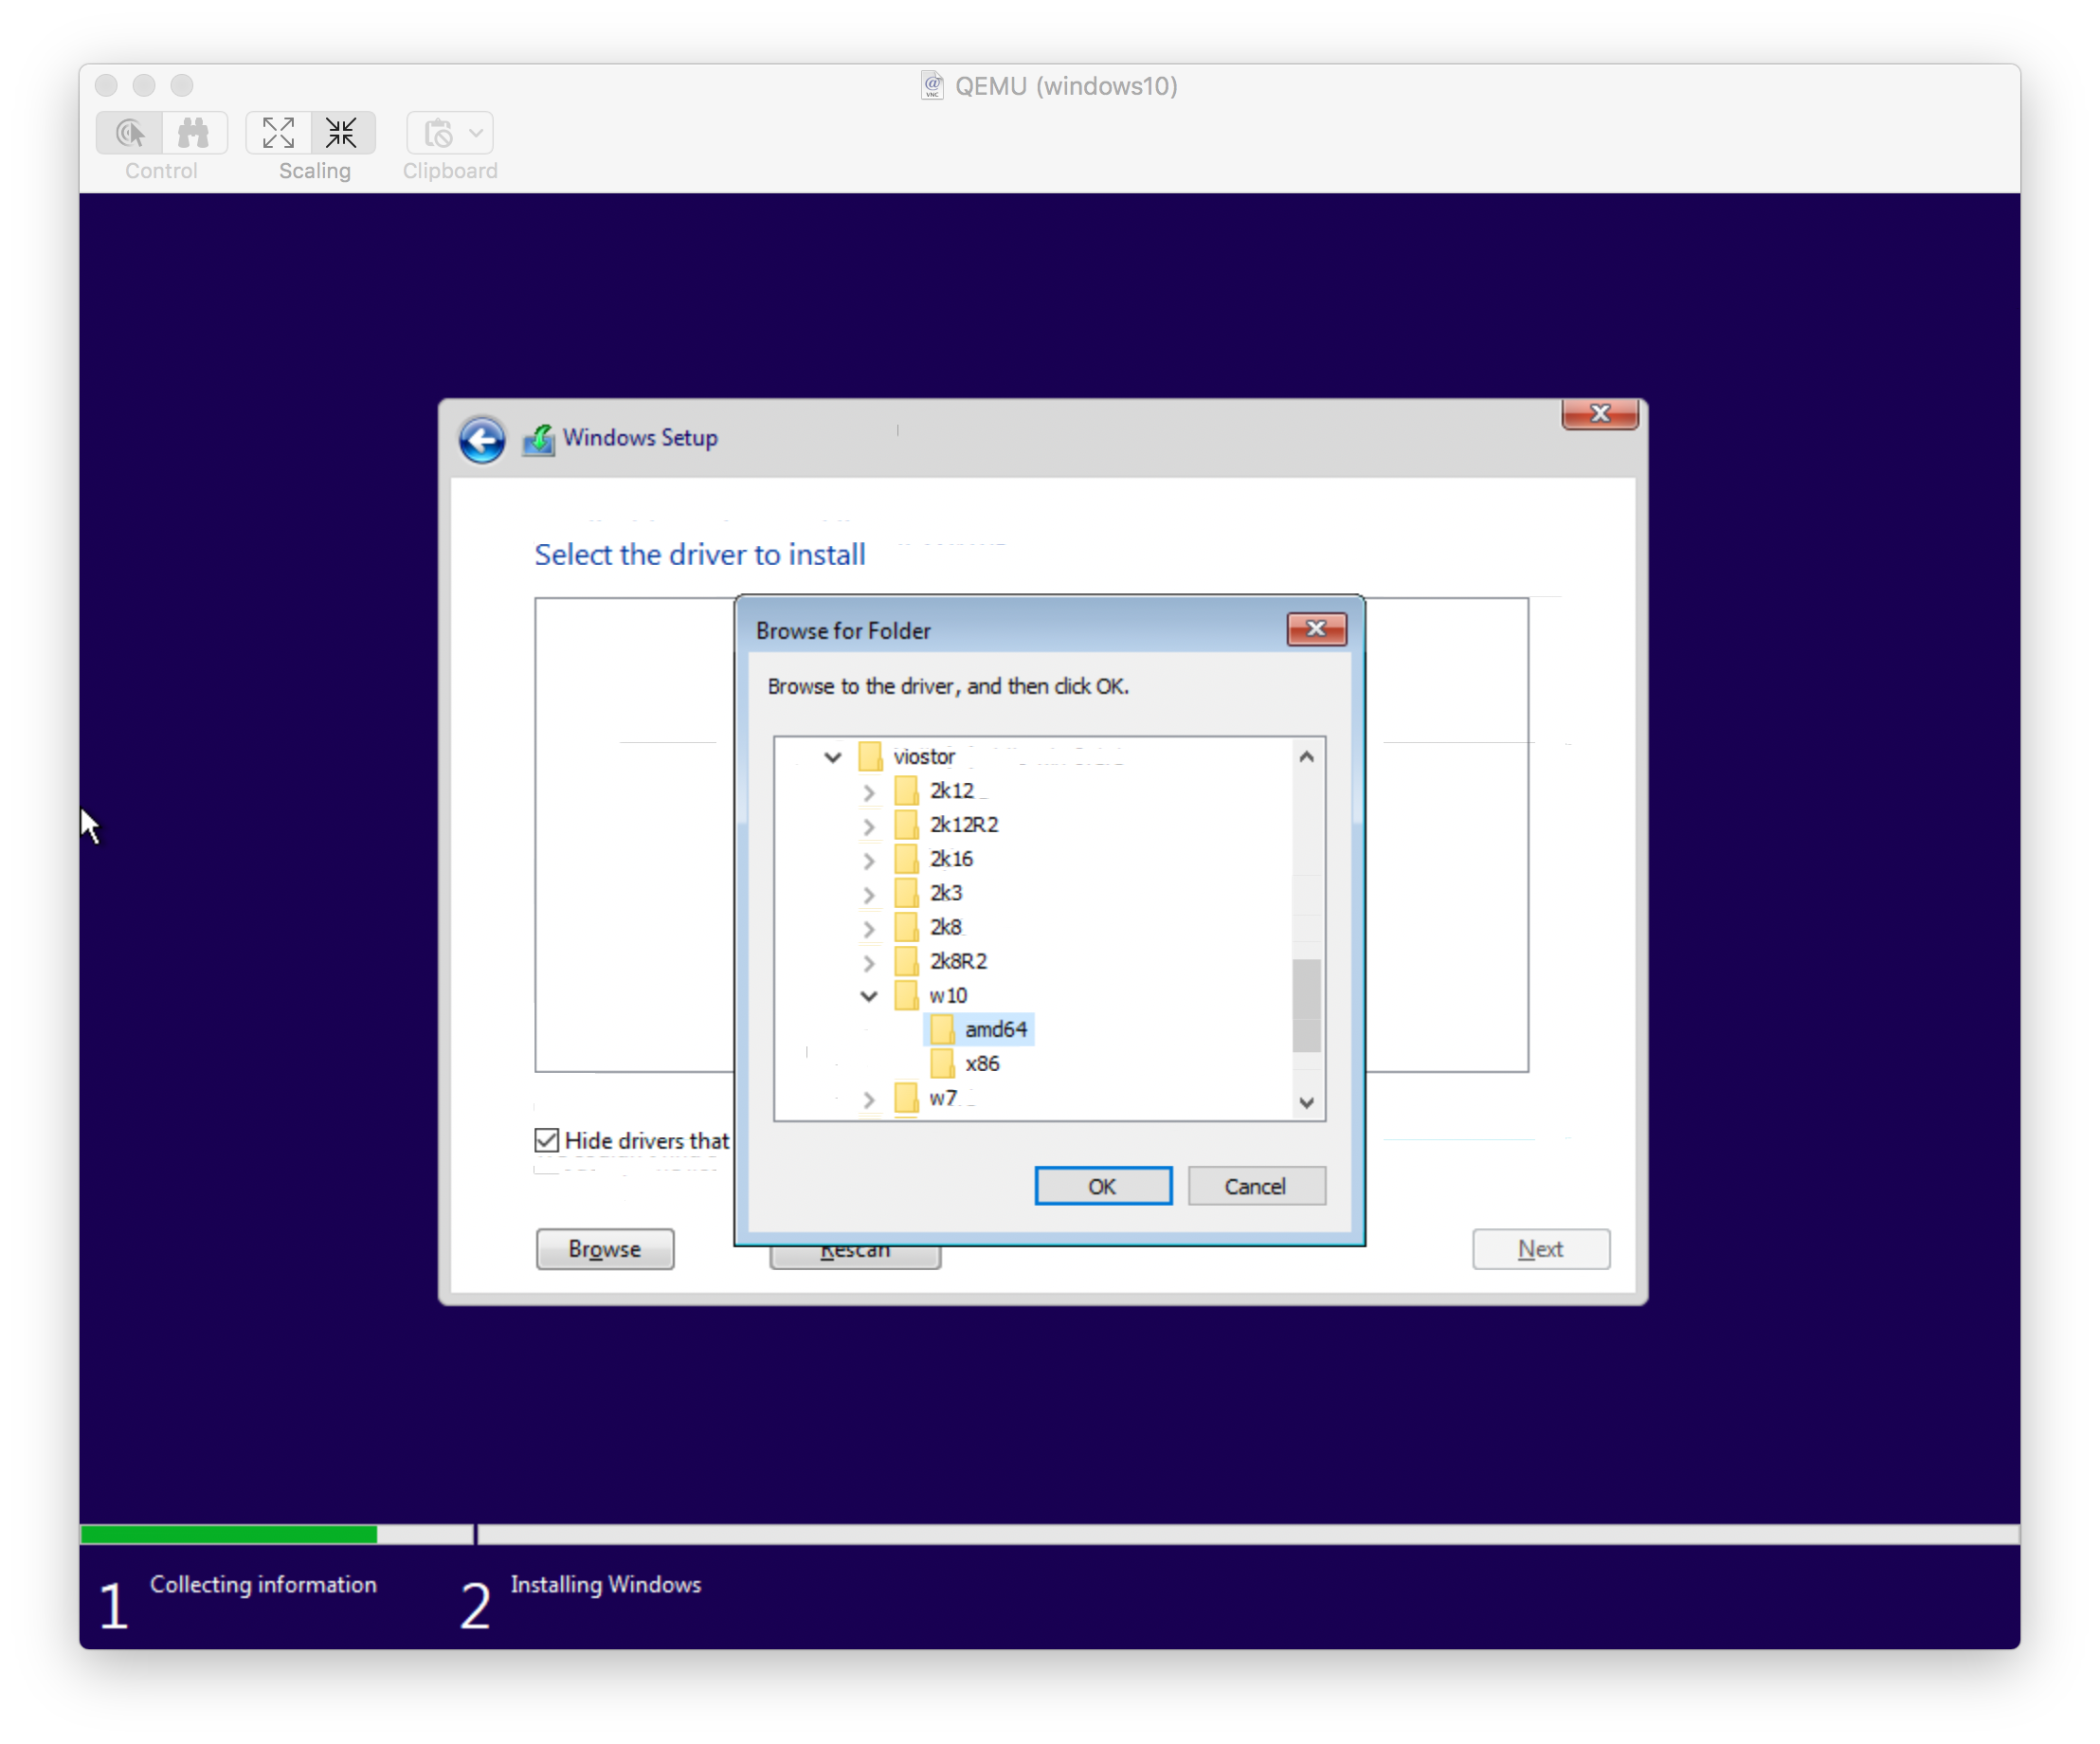
Navigate to E:\viostor\w10\amd64
There should only be one option, the VirtIO SCSI Controller.
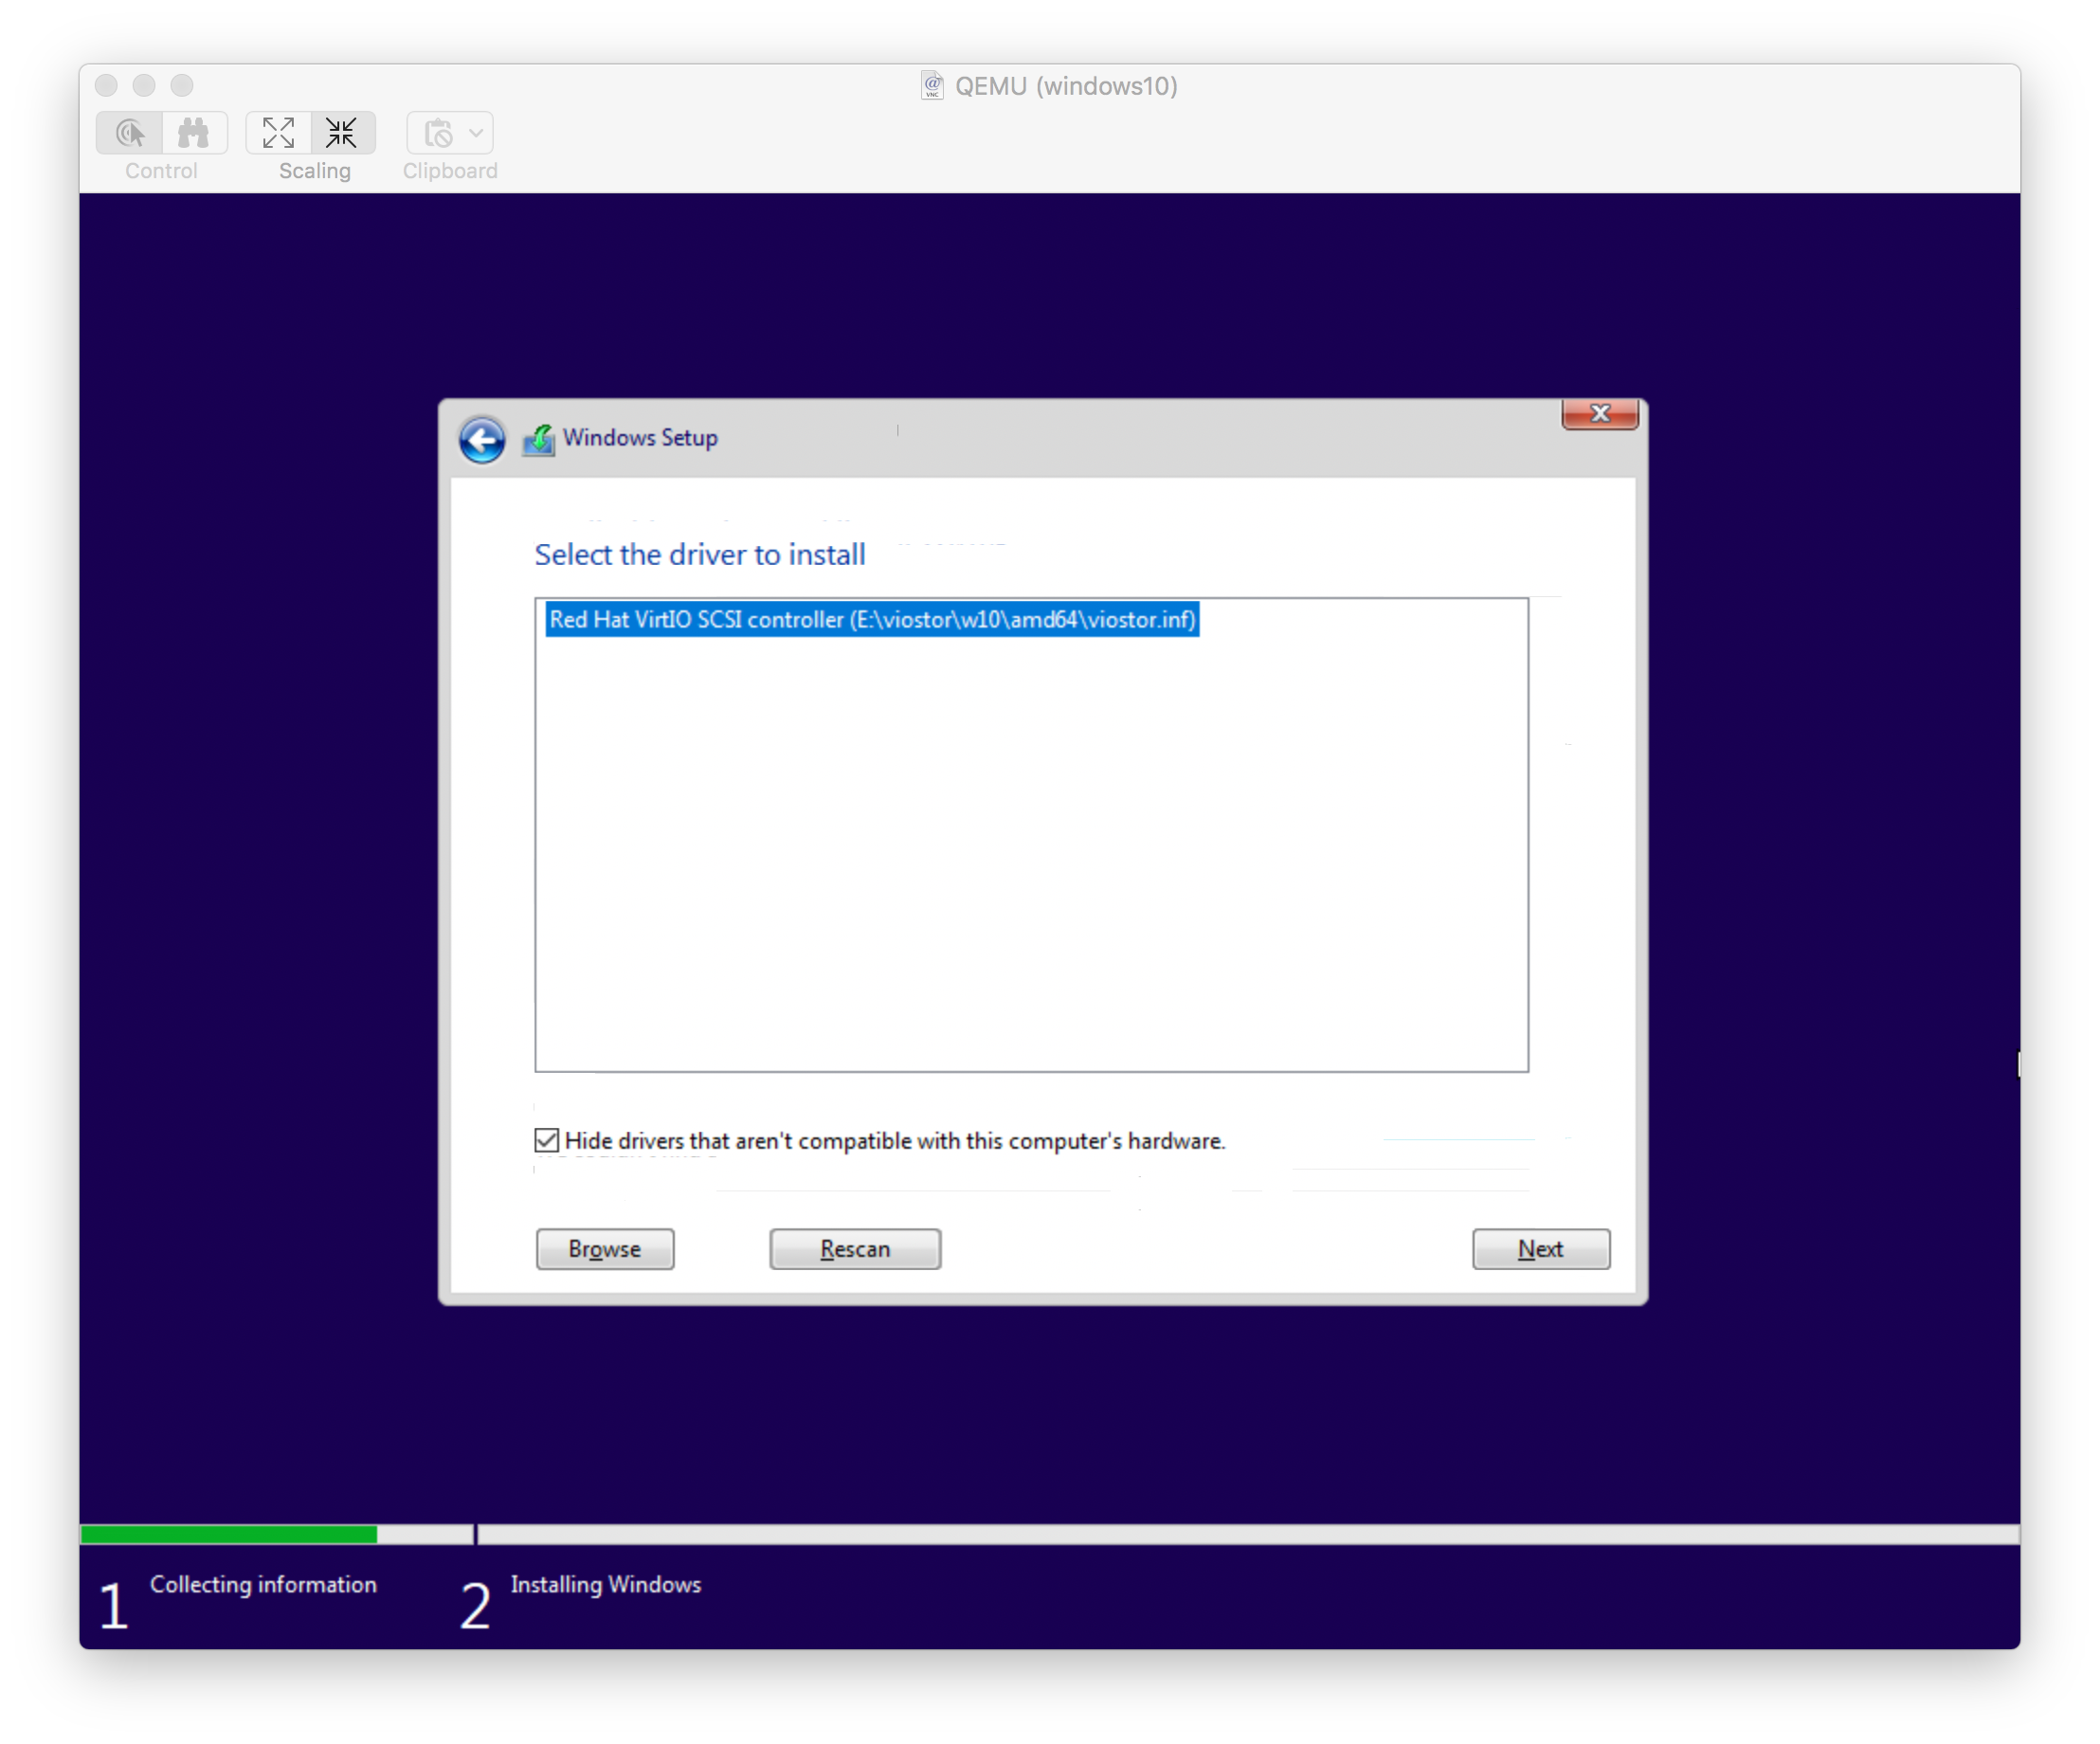
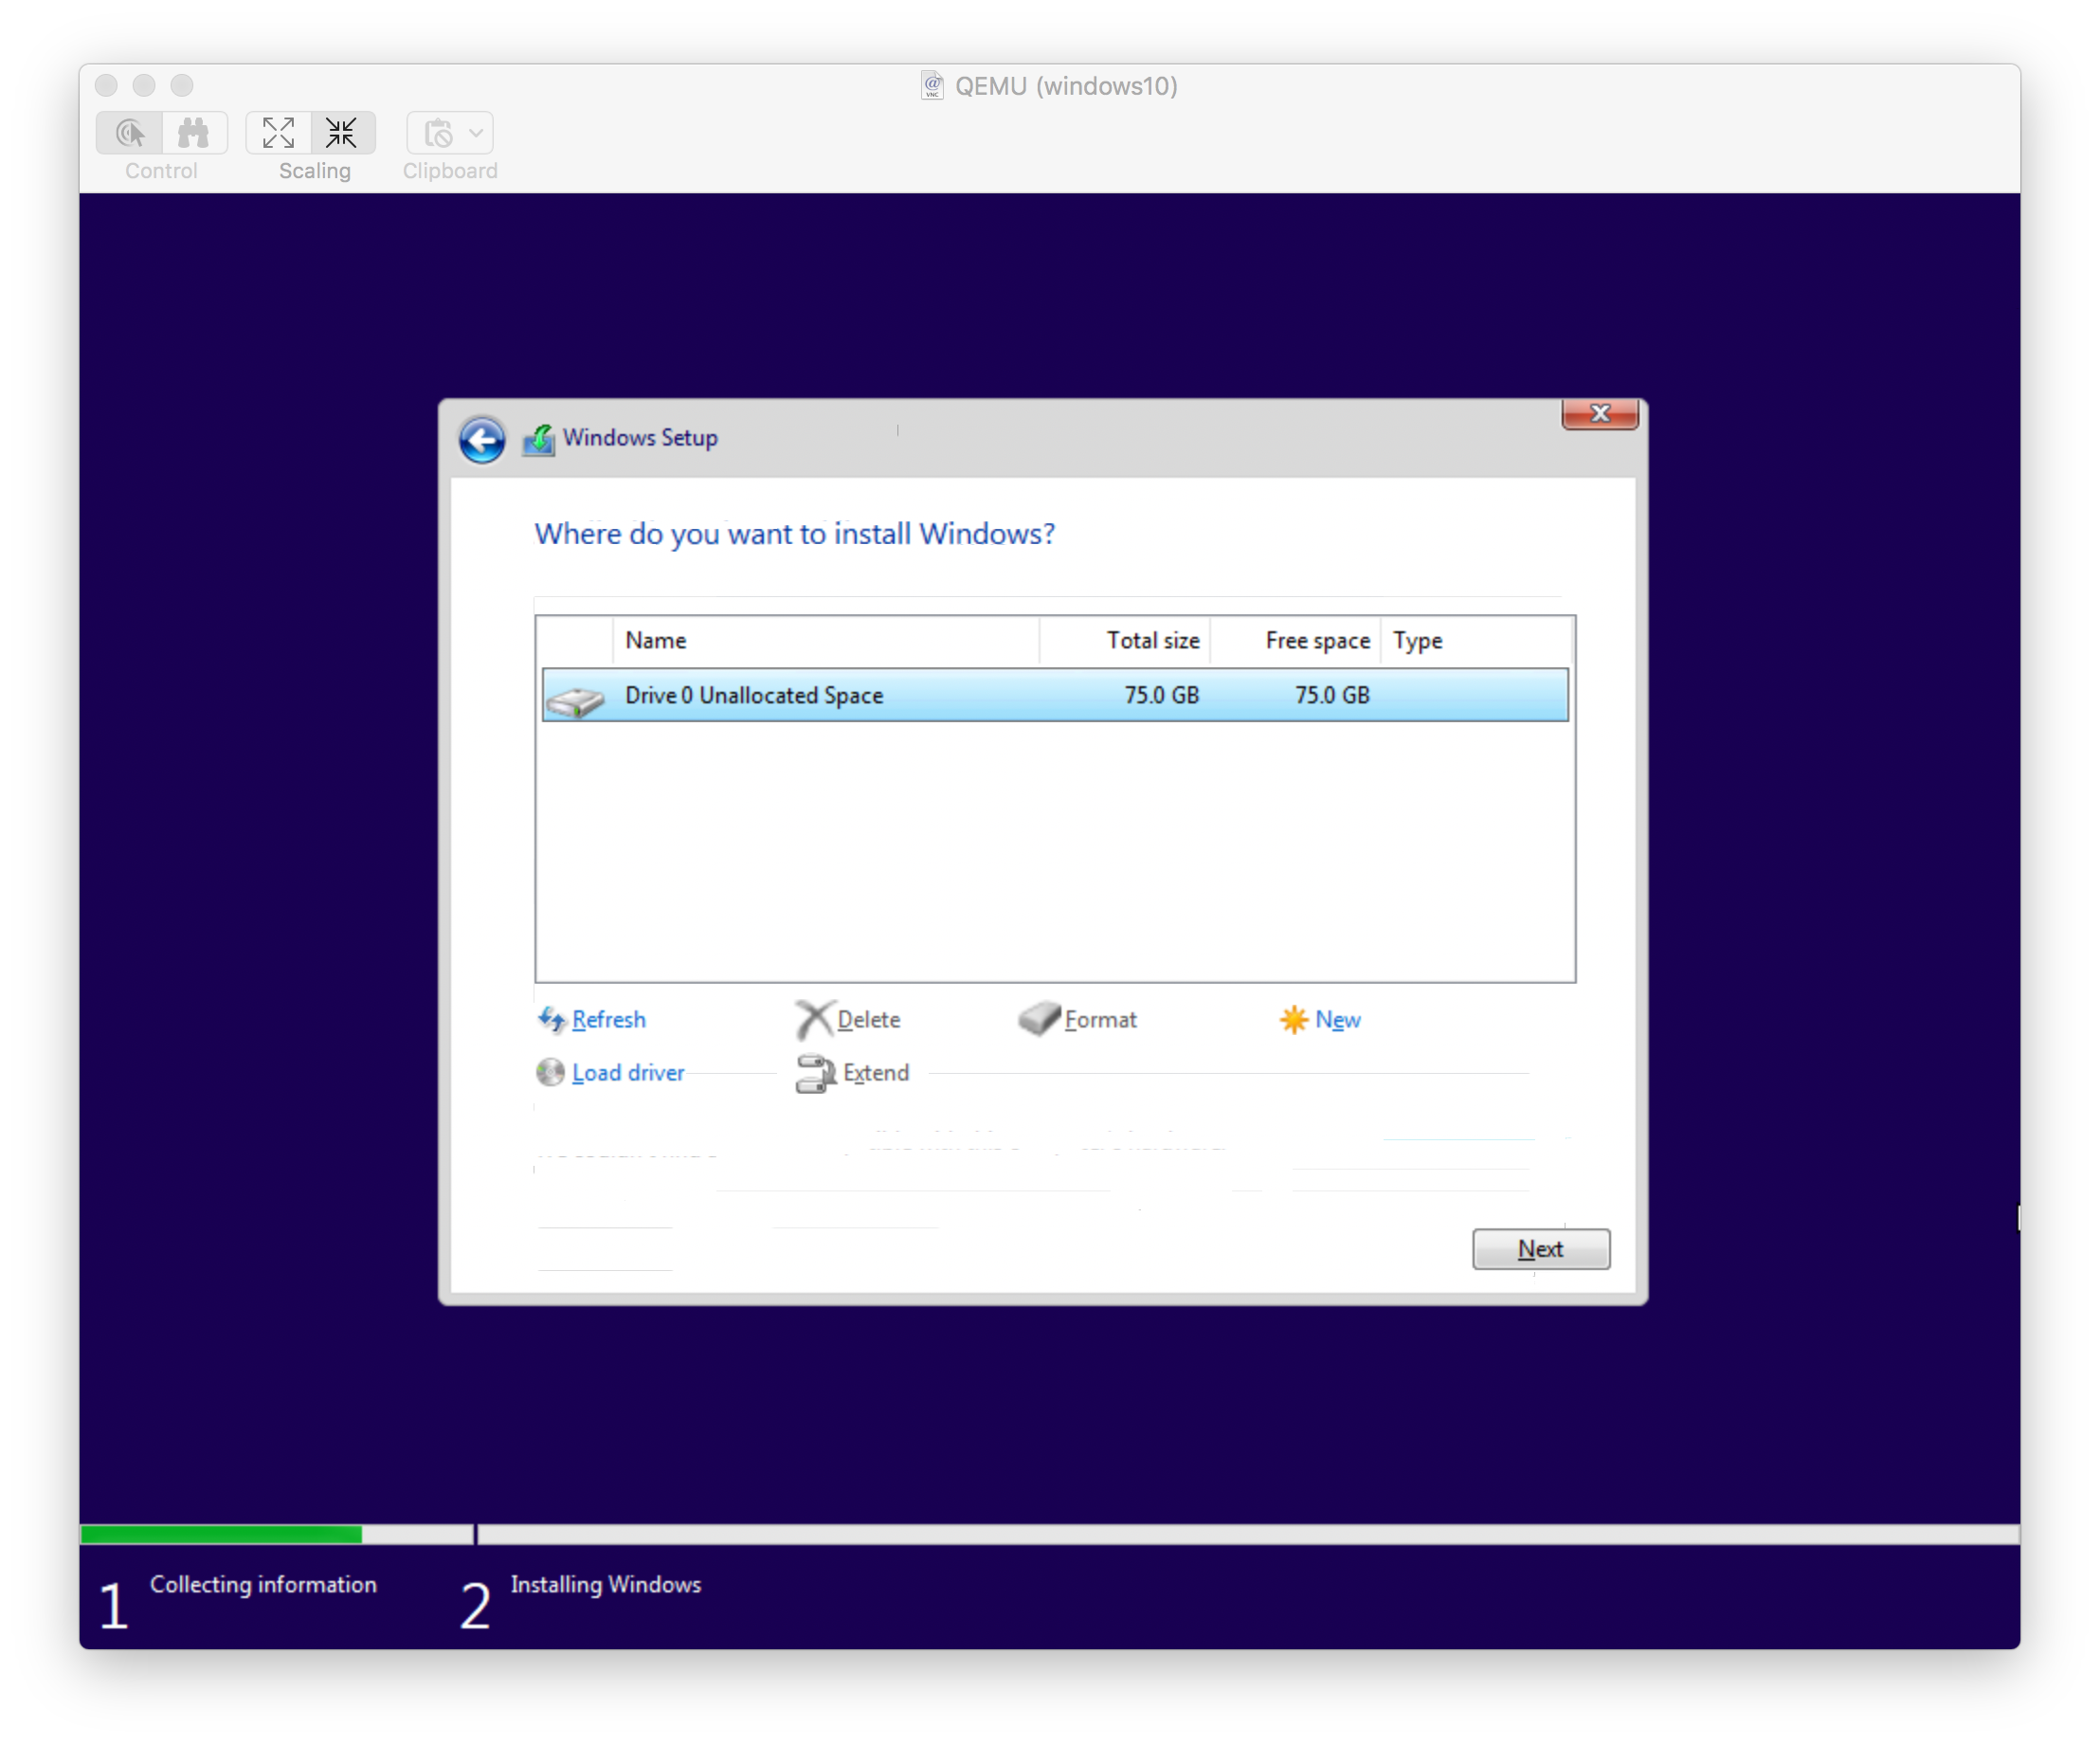
The installer should now see your virtual disk. Hit next to let Windows automatically partition it.
Next steps
Once the installer finishes and you get into Windows you may want to do a few more things
- Install the other drivers on the virtio-win ISO (network, etc…)
- Apply Updates
- Enable RDP
I’ve been faithfully running VirtualBox for my Windows 10 VMs for years… until last week. A kernel update on Pop!_OS somehow broke my Windows 10 VMs across both my machines, causing frequent crashes until the disk images finally corrupted and wouldn’t boot anymore. I took this as a sign that it’s time to finally switch over to QEmu as my go-to VM platform.
Overview
While QEmu is advertised as running faster, it isn’t quite as user friendly as VirtualBox. There are a few extra pre- and post- setup steps we need to do and a few options on how exactly you run the machine. Here’s what I’m doing in a nutshell:
- Use
virt-managerto create the disk image and install Windows 10. - Install
virtioandspice-guest-toolsdrivers to increase performance and give quality of life features like shared clipboards and automatic resolution scaling. - Make a simple shell script that I can launch from a desktop file so I can access the VM directly without opening up
virt-manager.
First, lets install everything we need on our host machine. Basically, we just need qemu, which will be our VM emulator, and virt-manager which will help us streamline the setup and management of our new VM.
sudo apt install qemu virt-manager
We’ll also need an ISO holding missing drivers for our VM. Grab the virtio-win.iso from here.
Installing Windows 10
Launch virt-manager and go ahead and create a new virtual machine. virt-manager should pop up in your applications list as Virtual Machine Manager.
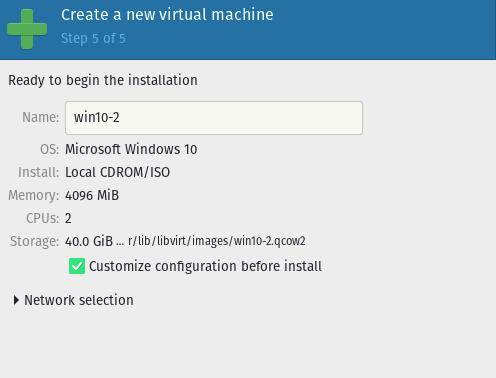
For the RAM and CPU options, I usually select half that of my host machine as I’m always worried about latent windows updates and background processes hogging all my system resources. For storage, the default option will create the new image in your default VM directory. Since I keep my VMs on a separate disk, I use create custom storage to specify where exactly this image gets created.
On the last step, make sure to select customize configuration before install. We’ll change our disk and network interface drivers to the virtio alternatives.
When the configure screen pops up, here are the changes you should make:
-
Disk 1
- Disk bus:
VirtIO
- Disk bus:
-
NIC
- Device model:
virtio
- Device model:
-
Add Hardware
- Device Type:
CDROM device - Select custom storage:
./virtio-win-0.1.217.iso
- Device Type:
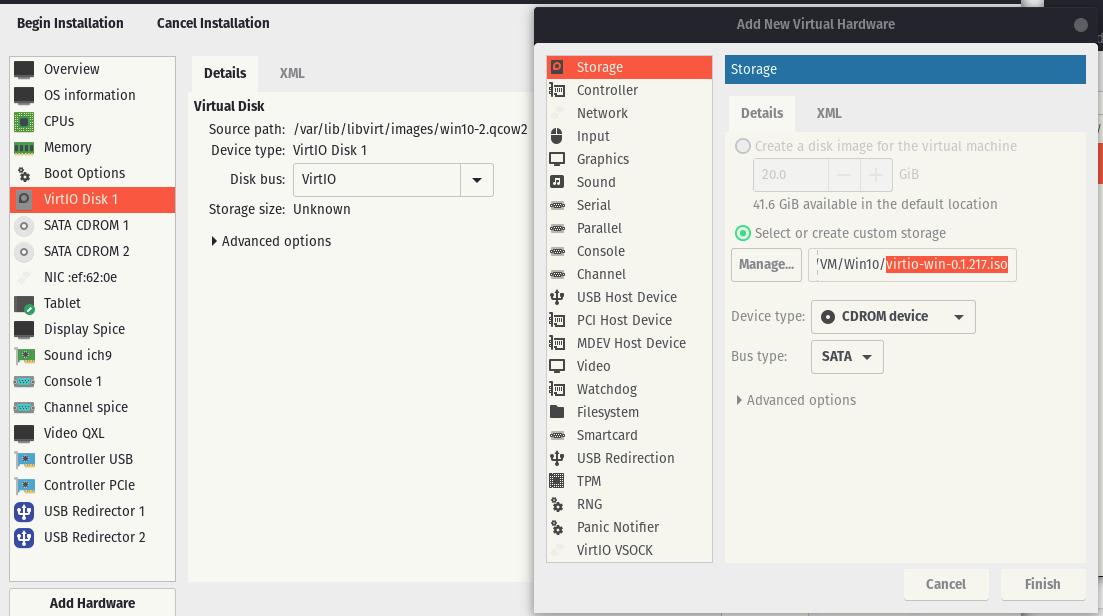
During the install process windows won’t be able to see our newly created disk image unless we load the virtio drivers during the install process. Including ./virtio-win-0.1.217.iso as a virtual CD will let you do this. Now go ahead and begin the installation.
During the windows install process, select custom install. Select load driver and go ahead and select the E:\amd\w10\viostor.inf controller from the virtio CD we added in the previous step. Now you should be able to select the new disk image as the windows install location.
Thats about it. Just finish going about the windows installation as you normally would.
Post-install Tweaks
Out-the-box, virt-manager has given us a functional — but somewhat user-unfriendly — windows 10 VM. Let’s go through some quality of life tweaks to shape this into something that resembles what VirtualBox provides.
First, you’ll notice the mouse cursor is very laggy. We need to manually update our display adapter to use the virtio drivers here. Go ahead and do this through the device manager. You’ll have to select Browse my computer for drivers when you select update, then use the same virtio CD image we used during the install process to locate the new drivers.
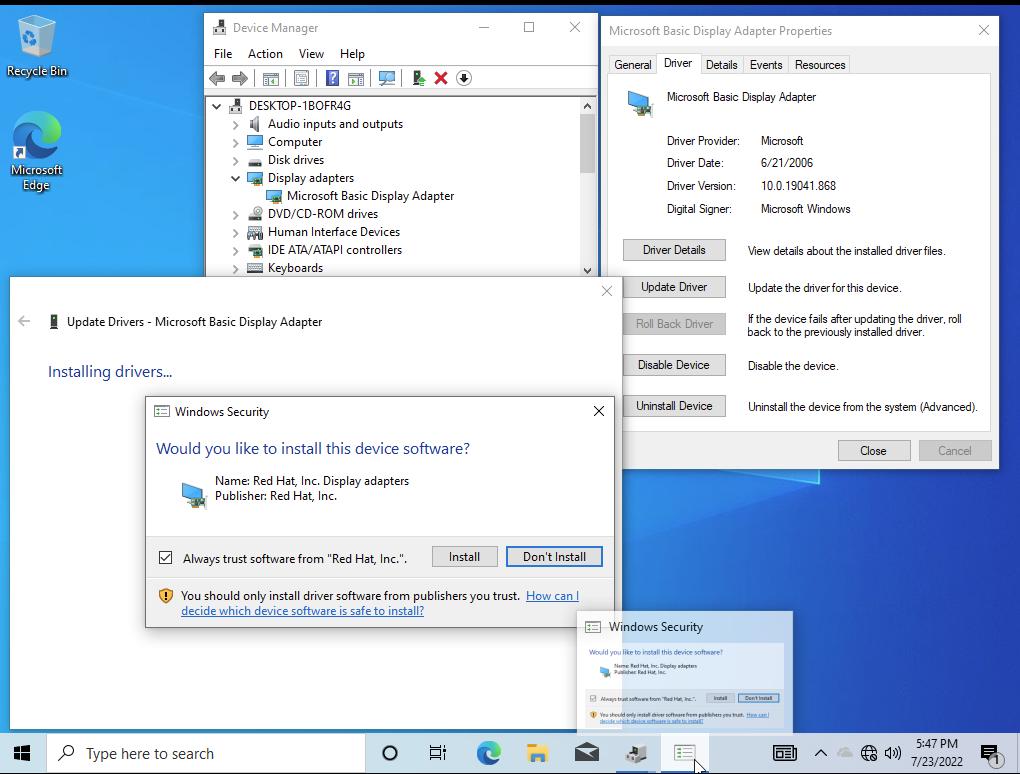
Go ahead and repeat this driver update for the Ethernet Adapter so we can activate Internet bridging.
Okay, now our VM is running smooth and the internet is up, lets install spice-guest-tools . This should give us:
- Clipboard sharing between the host and guest.
- Automatic resolution scaling when we change the VM window size.
- USB device passthough
On the VM, visit www.spice-space.org/download.html and grab spice-guest-tools. Its found under Guest > Windows binaries > Windows guest tools. Go ahead and run the installer once it’s downloaded. Immediately, clipboard sharing and resolution scaling should begin working. For resolution scaling, make sure View > Scale Display > Auto resize VM with new window is selected in the VM window. You can also select USB devices to passthrough in Virtual Machine > Redirect USB device .
Folder Sharing
The final feature — folder sharing — is a bit more intensive to setup. Unfortunately, virt-manager has no built-in support for spice-webdavd which is responsible for folder sharing. We need to instead install cockpit, a server manager, on our Ubuntu host to set this up.
# install
sudo apt install sudo apt install cockpit
# start service
sudo systemctl start cockpit cockpit.socket
# allow to start automatically on boot
sudo systemctl enable cockpit cockpit.socket
You can now access cockpit through a webrowser on your host with http://localhost:9090. Go on and log in using your user account password.
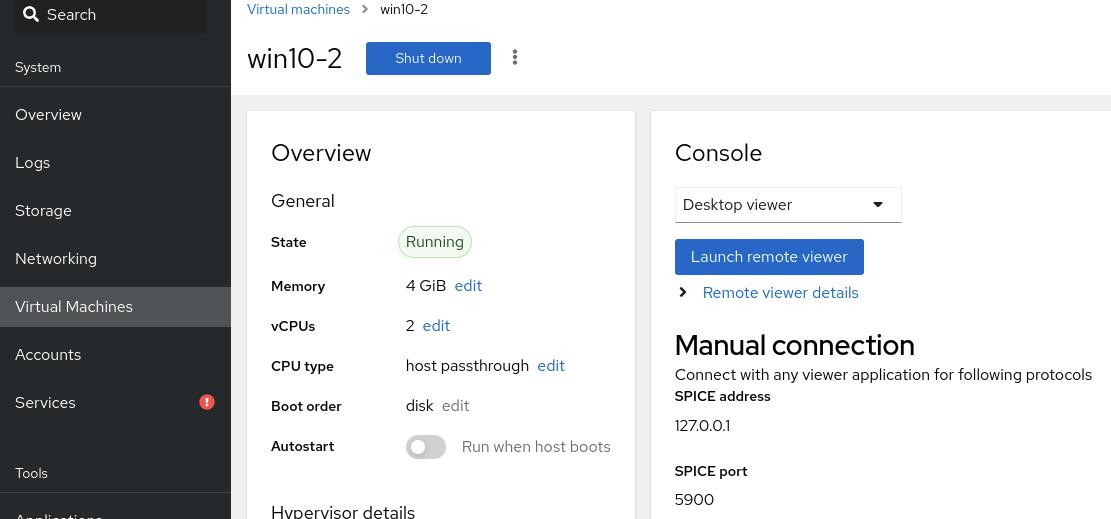
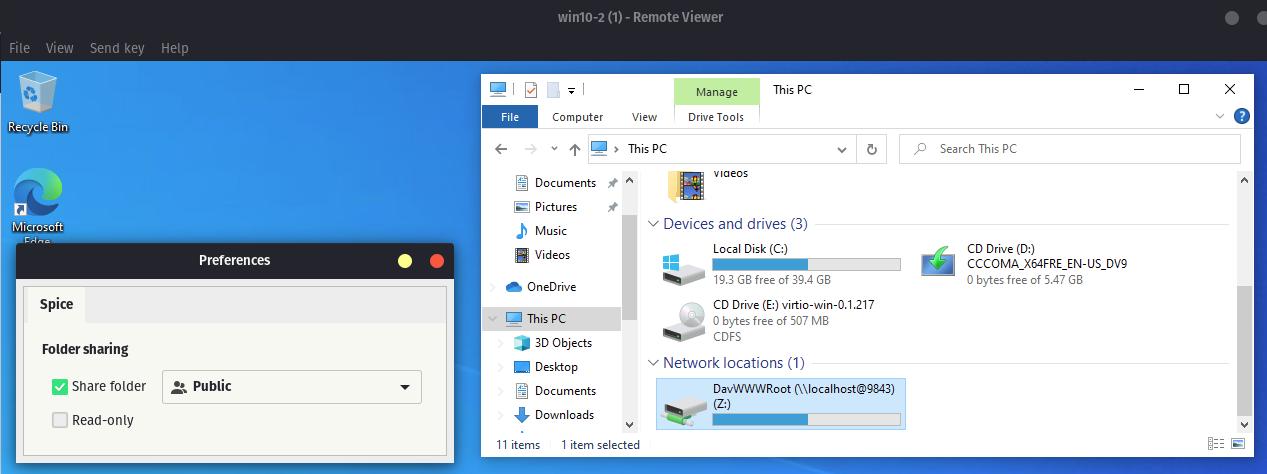
Now we need to add some hardware to our VM. Shut it down, and in virt-manager, add a new Channel with the name: org.spice-space.webdav.0. Once added, cockpit can now communicate with our VM. Go ahead and try launching the VM from cockpit. To view the running VM, select the VM, then Console > Launch Remote Viewer. A shortcut the viewer should download for you to use. And there we go, folder sharing can now be activated in your VM window options: File > Preferences > Share folder. Only a single folder can be shared at a given time, and by default, it’s your user’s public folder.
Again, on the guest windows machine, we’ll need to download the client side interface for folder sharing. At www.spice-space.org/download.html, get Guest > Windows Binaries > Spice WebDAV daemon, and grab the lasest msi installer. After the installer runs, you’ll immediately see a new network drive in your file explorer indicating the folder you marked for sharing.
By default, this folder share has a pretty restrictive file size limit for transfers. To fix this, we’ll have to use the registry editor in the windows guest to change HKEY_LOCAL_MACHINE\SYSTEM\CurrentControlSet\Services\WebClient\Parameters: FileSizeLimitInBytes to ffffffff, the largest possible value (around 4 GB). You can manually dig into the registry editor, or you can just download this reg file and run it in your guest. Do read the contents of the file before running; it’s always good practice to not blindly double click on registry editing files in windows.
Finally, folder sharing only works when using the virt-viewer client (see next section). virt-viewer has a UI for selecting the shared folder, but more importantly, it will automatically launch the spice-webdavd service. If you’ve already launched your VM in virt-manager, and then switched to virt-viewer without closing the VM, this service will have to be started manually. My solution to this is a simple BATCH file I keep in my documents folder.
net start spice-webdavd
pause
When I switch to virt-viewer, I simply right click on the above batch file and run as administrator. After the spice service starts, folder sharing will be active again.
Custom Launcher with virt-viewer
Okay, our VM is running well. Personally, I want to be able to launch it without having to touch virt-manager or cockpit. The solution is to write a short bash script which we can call from a desktop file.
The script I wrote for launching my VM, named win10, is the following:
#!/bin/bash

# Add current user to libvirt group.
# This removes sudo requirement for following command
# sudo usermod -a -G libvirt $USER

virsh --connect qemu:///system start win10 &&
  virt-viewer --connect qemu:///system win10
I save this as run.sh and I keep it in the same folder as my VM disk image.
Note, for this script to run without sudo privileges you’ll have to run the following command once: sudo usermod -a -G libvirt $USER.
This will add your user to the libvirt permissions group.
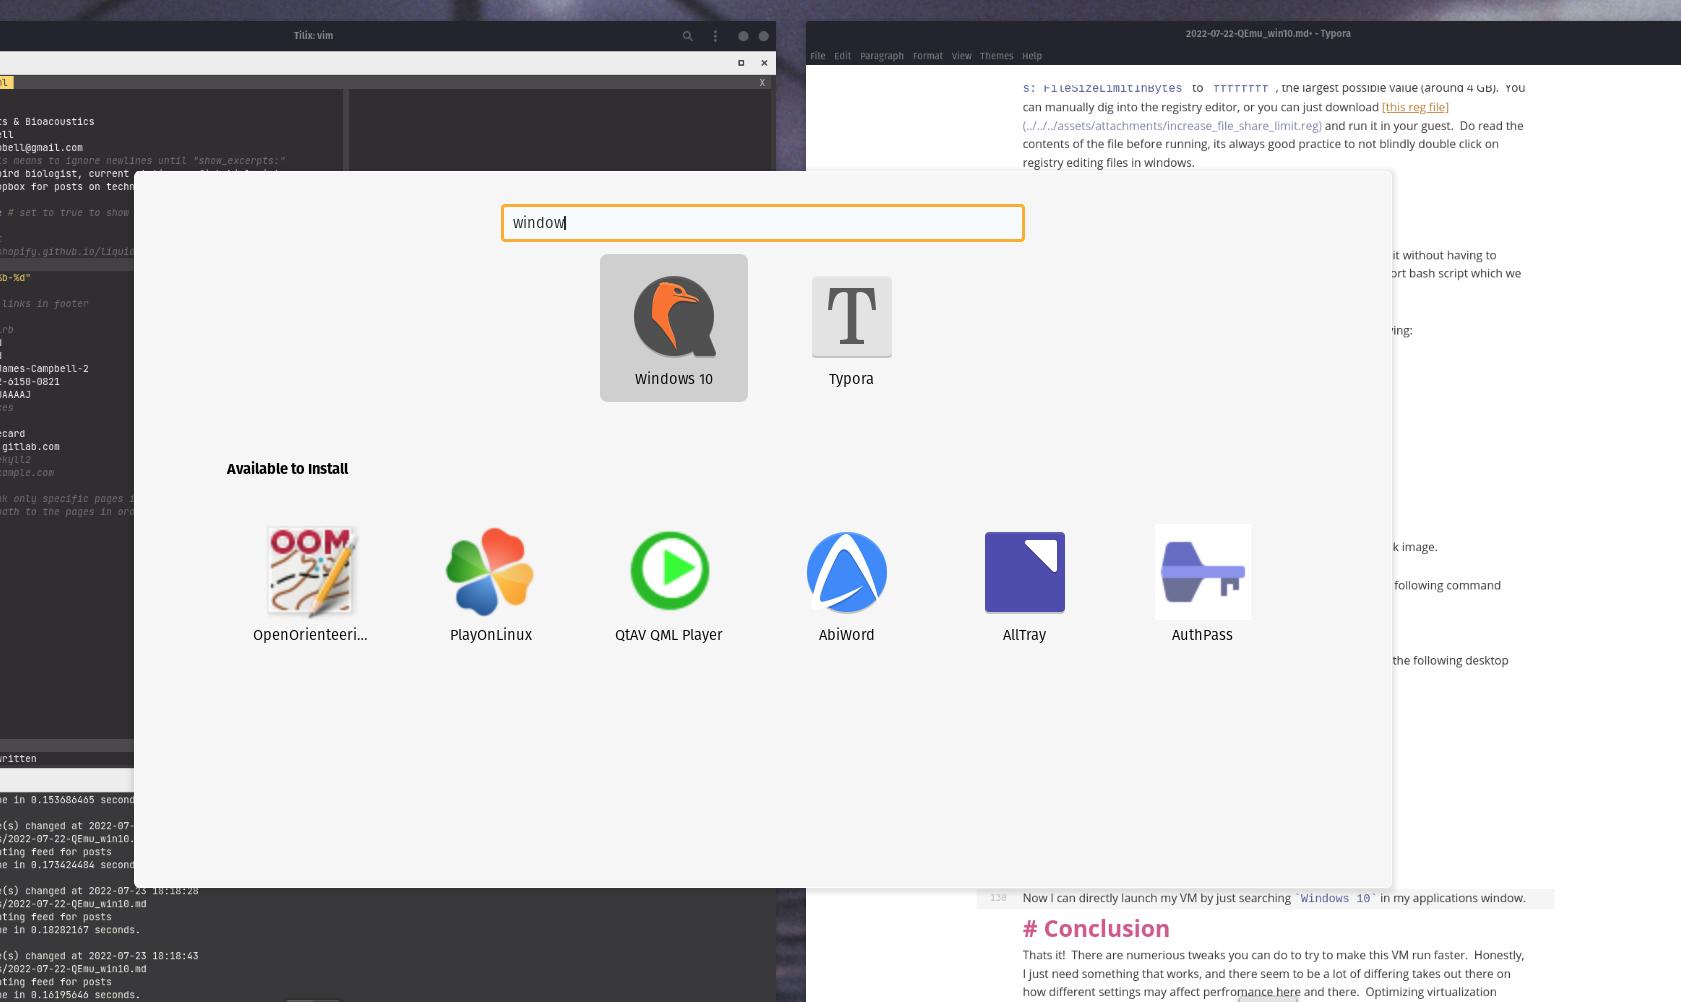
Finally, in /home/$USER/.local/share/applications/ I save the following desktop file named Windows 10.desktop.
[Desktop Entry]
Type=Application
Exec=/mnt/storage/VM/Win10/run.sh
Terminal=false
Hidden=false
Name=Windows 10
Icon=qemu
Now I can directly launch my VM by just searching Windows 10 in my applications window.
Parting Notes
Okay, I discovered some strange behavior. When I run the VM with virt-viewer (launching from my custom desktop file) there is an ever so slight input delay on my keyboard. This delay isn’t present when using virt-manager. However, virt-manager doesn’t have support for folder sharing. My current workflow is to only open virt-viewer when I need to upload some files into my VM, then use virt-manager the rest of the time. This isn’t ideal, but it’s honestly a pretty minor inconvenience.
Looking around, I couldn’t find anyone else complaining about keyboard lag in virt-viewer, so this may honestly just be a me problem.
Aside from that, that’s it! There are numerous tweaks you can do to try to make this VM run faster. Honestly, I just need something that works and there seem to be a lot of differing takes out there on how different settings may affect performance here and there. Optimizing virtualization is a pretty deep rabbit hole that I plan to stay well away from.
Here’s a guide for creating a Qemu Windows 10 VM on Linux. I like Qemu because it’s so easy to use, doesn’t require a purchase or a license and the VM is just one process. You have to figure out the correct options to use to start the VM though, but that’s what I’ll describe below.
First download Virtio drivers for Windows. They’re available at https://fedorapeople.org/groups/virt/virtio-win/direct-downloads/archive-virtio/. I downloaded the ISO image virtio-win-0.1.229.iso.
Then download the Windows 10 ISO image from Microsoft. The address for the download is https://www.microsoft.com/en-us/software-download/windows10ISO
If you’re trying to load that URL with Windows, it’ll redirect to the normal Windows 10 download page, with no options to download the ISO image. In that case install a HTTP user agent switcher, like User-Agent Switcher for Firefox. Then you will be able to load the ISO image download page.
The next step is to prepare a hard disk image file that the new VM will use as its primary storage. You can do it with these commands:
$ mkdir -p ${HOME}/.qemu/windows_10$ fallocate -l 38654705664 ${HOME}/.qemu/windows_10/windows_10.img
(or alternatively with dd)$ dd if=/dev/zero of=${HOME}/.qemu/windows_10/windows_10.img bs=1024M count=36
That will create a 36 GiB windows_10.img file. You can of course use a larger file for it, but I ran out of disk space 🙂
To see Qemu options for your hardware, you can use the following commands to list them:
$ qemu-system-x86_64 -cpu help
$ qemu-system-x86_64 -machine help
$ qemu-system-x86_64 -audio-help
Now we can start the Windows 10 installation in the Qemu VM. The command has a lot of options but I’ll describe them below:
$ qemu-system-x86_64 \
-display gtk,window-close=off \
-machine type=q35,accel=kvm \
-enable-kvm \
-cpu Skylake-Client-v4,hv_relaxed,hv_vpindex,hv_time,hv_vapic,hv_runtime,hv_synic,hv_stimer,hv_tlbflush,hv_ipi,hv_frequencies \
-smp 2 \
-m 4096 -mem-prealloc \
-vga virtio \
-device ich9-intel-hda \
-device hda-duplex,audiodev=hda \
-audiodev pa,id=hda,server=unix:/run/user/1000/pulse/native,out.frequency=44100 \
-device virtio-net,netdev=vmnic \
-netdev user,id=vmnic \
-device qemu-xhci,id=xhci \
-device usb-tablet,bus=xhci.0 \
-chardev socket,path=/tmp/qga.sock,server=on,wait=off,id=qga0 \
-device virtio-serial \
-device virtserialport,chardev=qga0,name=org.qemu.guest_agent.0 \
-object rng-random,id=rng0,filename=/dev/urandom \
-device virtio-rng-pci,max-bytes=1024,period=1000 \
-drive format=raw,file=${HOME}/.qemu/windows_10/windows_10.img \
-drive file="${HOME}/Downloads/Win10_22H2_English_x64.iso",media=cdrom \
-drive file="${HOME}/Downloads/virtio-win-0.1.229.iso",media=cdrom \
-boot menu=on
The options for the CPU (-cpu) are for a Windows 10 VM. They’re from https://gitlab.com/qemu-project/qemu/-/blob/master/docs/system/i386/hyperv.rst (Thanks to colo@libera/#linux)
The options for the audio device are:
-device ich9-intel-hda \
-device hda-duplex,audiodev=hda \
-audiodev pa,id=hda,server=unix:/run/user/1000/pulse/native,out.frequency=44100 \
This assumes that you’re using PulseAudio. If you notice audio crackling, leave full screen mode and make the Qemu VM window occupy the whole display.
The virtio network device is configured with these options:
-device virtio-net,netdev=vmnic \
-netdev user,id=vmnic \
It’ll only allow egress network traffic from the Qemu VM. You can also add the option to create a port forward from the Qemu host side into the Qemu VM, but I didn’t use it now. The option is:
-netdev user,id=vmnic,hostfwd=tcp::5222-:22 \
That will forward the port 5222/tcp from the host to port 22/tcp in the Qemu VM.
The next options are for getting better mouse pointer support in the Qemu VM:
-device qemu-xhci,id=xhci \
-device usb-tablet,bus=xhci.0 \
To allow connectivity between the Qemu host side and the Qemu VM, a process called qemu-ga will be installed and started in the Qemu VM. (Thanks to jjakob@libera/#linux). The connectivity happens through a socket on the Qemu host side, called /tmp/qga.sock. The socket will be created with these options:
-chardev socket,path=/tmp/qga.sock,server=on,wait=off,id=qga0 \
-device virtio-serial \
-device virtserialport,chardev=qga0,name=org.qemu.guest_agent.0 \
The next options are for “a paravirtualized device that is exposed as a hardware RNG device to the guest”.
You can read more about it at https://wiki.qemu.org/Features/VirtIORNG.
-object rng-random,id=rng0,filename=/dev/urandom \
-device virtio-rng-pci,max-bytes=1024,period=1000 \
The last options are for setting up the hard disk image file and virtual CD/DVD devices:
-drive format=raw,file=${HOME}/.qemu/windows_10/windows_10.img \
-drive file="${HOME}/Downloads/Win10_22H2_English_x64.iso",media=cdrom \
-drive file="${HOME}/Downloads/virtio-win-0.1.229.iso",media=cdrom \
When you run the qemu-system-x86_64 command, you will get a GUI window for the Qemu VM. Press esc to get a boot menu and select the bootable virtual CD/DVD from it with a number.
After Windows 10 has been installed into the Qemu VM hard disk image file (windows_10.img), install the Virtio Windows drivers by running virtio-win-guest-tools.exe from the Virtio-Win virtual CD/DVD drive. This will install the drivers for
“driver-name”: “VirtIO Serial Driver”
“driver-name”: “VirtIO RNG Device”
“driver-name”: “Red Hat VirtIO GPU DOD controller”
“driver-name”: “Red Hat VirtIO Ethernet Adapter”
Also the Qemu guest agent “qemu-ga” will be installed and started in the Qemu VM.
If you don’t want automatic Windows updates, set your network connection type to ‘Metered’.
Also disable computer sleep in Control Panel/Power options.
Now would also be a good time to install Open-Shell for that professional feeling 🙂
Now when you’ve finished the Windows 10 installation, shutdown the Qemu VM, and remove the following options from the qemu-system-x86_64 command:
                                                \
-drive file="${HOME}/Downloads/Win10_22H2_English_x64.iso",media=cdrom \
-drive file="${HOME}/Downloads/virtio-win-0.1.229.iso",media=cdrom \
-boot menu=on
and start up the Qemu VM again.
The last step I’ll describe is how to test the connectivity between the Qemu host and the Qemu VM through the Qemu guest agent socket. Run the following command:
$ socat unix-connect:/tmp/qga.sock readline
The command doesn’t output anything, but you can paste the following input data into the terminal and get output back from the Qemu guest agent. Paste the line with {“execute”: “”}
{"execute": "guest-info"}
{"return": {"version": "105.0.2", ...
{"execute": "guest-get-osinfo"}
{"return": {"name": "Microsoft Windows", "kernel-release": "19045", "version": "Microsoft Windows 10", "variant": "client", "pretty-name": "Windows 10 Home", "version-id": "10", "variant-id": "client", "kernel-version": "10.0", "machine": "x86_64", "id": "mswindows"}}
{"execute": "guest-get-devices"}
{"return": [{"driver-date": 1668470400000000000, "driver-name": "VirtIO Serial Driver", "driver-version": "100.92.104.22900", "id": {"device-id": 4099, "vendor-id": 6900, "type": "pci"}}, {"driver-date": 1668384000000000000, "driver-name": "VirtIO RNG Device", "driver-version": "100.92.104.22900", "id": {"device-id": 4101, "vendor-id": 6900, "type": "pci"}}, {"driver-date": 1668384000000000000, "driver-name": "Red Hat VirtIO GPU DOD controller", "driver-version": "100.92.104.22900", "id": {"device-id": 4176, "vendor-id": 6900, "type": "pci"}}, {"driver-date": 1668384000000000000, "driver-name": "Red Hat VirtIO Ethernet Adapter", "driver-version": "100.92.104.22900", "id": {"device-id": 4096, "vendor-id": 6900, "type": "pci"}}]}
List of Qemu guest agent commands:
        "name": "guest-ssh-remove-authorized-keys",
        "name": "guest-ssh-add-authorized-keys",
        "name": "guest-ssh-get-authorized-keys",
        "name": "guest-get-devices",
        "name": "guest-get-osinfo",
        "name": "guest-get-timezone",
        "name": "guest-get-users",
        "name": "guest-get-host-name",
        "name": "guest-exec",
        "name": "guest-exec-status",
        "name": "guest-get-memory-block-info",
        "name": "guest-set-memory-blocks",
        "name": "guest-get-memory-blocks",
        "name": "guest-set-user-password",
        "name": "guest-get-fsinfo",
        "name": "guest-get-disks",
        "name": "guest-set-vcpus",
        "name": "guest-get-vcpus",
        "name": "guest-network-get-interfaces",
        "name": "guest-suspend-hybrid",
        "name": "guest-suspend-ram",
        "name": "guest-suspend-disk",
        "name": "guest-fstrim",
        "name": "guest-fsfreeze-thaw",
        "name": "guest-fsfreeze-freeze-list",
        "name": "guest-fsfreeze-freeze",
        "name": "guest-fsfreeze-status",
        "name": "guest-file-flush",
        "name": "guest-file-seek",
        "name": "guest-file-write",
        "name": "guest-file-read",
        "name": "guest-file-close",
        "name": "guest-file-open",
        "name": "guest-shutdown",
        "name": "guest-info",
        "name": "guest-set-time",
        "name": "guest-get-time",
        "name": "guest-ping",
        "name": "guest-sync",
        "name": "guest-sync-delimited",
Configure the Qemu host side and Windows 10 VM for better audio experience:
Stop the Windows 10 VM.
Change Qemu host’s pipewire configuration:
# \cp -f /usr/share/pipewire/minimal.conf /etc/pipewire/pipewire.conf
Change the pipewire bitrate from 48000 to 44100:
# sed -i -e 's/\(#\{0,\}\)\(\s\{0,\}\)\(default.clock.rate\s\{0,\}=\).*/\2 \3 44100/' /etc/pipewire/pipewire.conf
# sed -i -e 's/\(#\{0,\}\)\(\s\{0,\}\)\(default.clock.allowed-rates\s\{0,\}=\).*/\2 \3 [ 44100 ]/' /etc/pipewire/pipewire.conf
Change the pipewire audio format from S32LE to S16LE:
# sed -i -e 's/\(#\{0,\}\)\(\s\{0,\}\)\(audio.format\s\{0,\}=\).*/\2 \3 \"S16\"/' /etc/pipewire/pipewire.conf
Change pipewire’s realtime settings:
# sed -i -e 's/\(#\{0,\}\)\(\s\{0,\}\)\(nice.level\s\{0,\}=\).*/\2 \3 -20/' /etc/pipewire/pipewire.conf
# sed -i -e 's/\(#\{0,\}\)\(\s\{0,\}\)\(rt.prio\s\{0,\}=\).*/\2 \3 99/' /etc/pipewire/pipewire.conf
Restart Qemu host’s pipewire:
$ systemctl --user restart wireplumber pipewire pipewire-pulse
Change Qemu host’s IRQ config:
Add the kernel parameter threadirqs, reboot the computer and find out the kernel process for your soundcard ps -ef | grep -i irq (mine are snd_hda_intel:card0 and snd_hda_intel:card1)
Start up the Windows 10 VM again.
Create a script called qemu-rt-audio.sh with the following contents:
#!/bin/sh

for i in snd_hda_intel:card0 snd_hda_intel:card1 pipewire$ pipewire-pulse qemu-system-x86_64
do
    pid=$(pgrep -f ${i})
    echo -n ${i}: chrt -p 99 ${pid}
    echo
    chrt -p 99 ${pid}
done
Run the script: sudo ./qemu-rt-audio.sh
Configure your audio in Windows 10 VM:
Control Panel
Sound
Speakers
Speakers/Properties/Enhancements/[x] Disable all enhancements
Speakers/Properties/Advanced/Default format = 16 bit, 44100 Hz (CD quality)
Test your audio with Maurice Ravel’s Bolero.
Today we are going to create an empty image using Qemu and then we are going to install Windows 10 on it. So without any further introduction let’s get to work.
Prerequisites:
- A machine with a Linux distribution.
- Qemu binary or installed.
- Basic knowledge in Linux.
- windows_10_x64 installation file.
- vnc client to connect to QEMU monitor remotely.
Steps:
Lets create a comfortable working environment:
Create a working directory called “virtualization”, then create two sub-folders
“images” “qemu-scripts”.

First we are going to create an empty image that we are going to use later to install windows 10 on it.
Run the following command:
qemu-img create -f qcow2 windows_10_x64.qcow2 500G
Lets try and understand the command:
First we use the “qemu-img” binary provided with the Qemu package, the -f flag specifies the format of the image. Qemu support many different extensions for image files, you can find more info about that here. windows_10_x64.qcow2 specifies the image name and 500G is the image size in GB.
Now you should have a file that is called windows_10_x64.qcow2.
Move the image “windows_10_x64.qcow2” to “virtualization/images”.
Move windows 10 iso to “virtualization/images”
Now we are going to create a script to run the machine with empty image “windows_10_x64.qcow2” and the windows 10 installation iso.
Create a new file called “windows_10.sh” and place it in “virtualization/qemu-scripts”. Open it using your favorite editor and insert the following:
#!/bin/bash

qemu-system-x86_64 \
 -m 4G \
 -cpu host \
 -enable-kvm \
 -drive file=../images/windows_10_x64.qcow2,if=ide,serial=111074 \
 -cdrom ../images/en_windows_10_enterprise_x64_dvd_6851151.iso \
 -vnc :0
Save the file and make it executable using the command “chmod”.
lets discuss the commands first:
qemu-system-x86_64: Refers to the Qemu binary, feel free to use your own compiled binary.
-m 4G : The machine will have 4GB of memory.
-cpu host: The qemu will use the cpu host to run qemu commands.
-enable-kvm: Enables the use of kvm by qemu, a kernel API for boosting Qemu performance.
-drive: Specifies the image that will be used when running the machine. (note that this is the image we created earlier)
-cdrom: Specifies the iso file that will show up as a cdrom in the Qemu machine.
-vnc :0: The port which will be used to connect to the machine using a vnc client. Please note that this number is usually added up to 5900 which means that to connect to this machine we should connect to the vnc port 5900 + 0 = 5900.
Now the fun begins! run the script that we have created (“windows_10.sh”) and connect to the machine using a vnc client. Connect to vnc://<IP-OF-HOST-MACHINE>:5900.
Once that you are connected windows installation should be up and ready to be installed as you can see below:

Go ahead and install windows till the end. Once you finish that you should end up with windows 10 image and a script that runs it. Now once you are done can try to add and experience with different Qemu parameters like adding a USB to a Qemu machine and so on.
Enjoy =)

Provide feedback
Saved searches
Use saved searches to filter your results more quickly
Sign up