
Driver installation
Remember to be cautious when installing or updating drivers, as improper installation or incompatible drivers can cause system instability. Make sure you have the correct driver for your hardware, and back up your data before making any significant changes to your system.
Variant 1: using the Installation Wizard
This is the best option for regular users that just want to install the drivers on their VM
-
Download Virtio-Win ISO:
- Visit the official Virtio-Win repository (https://fedorapeople.org/groups/virt/virtio-win/direct-downloads/latest-virtio/virtio-win.iso) and download the latest Virtio-Win ISO file to your host machine.
-
Attach the Virtio-Win ISO to the VM:
- Ensure your VM is powered on and running.
- In the VM management software (e.g., VirtualBox, VMware, QEMU, etc.), locate the option to attach the Virtio-Win ISO as a virtual CD/DVD drive to the VM. The specific steps may vary depending on the virtualization software you’re using.
-
Inside the VM:
- Access the VM’s desktop or file system.
-
Open File Explorer:
- Open File Explorer (Windows Explorer) within the VM.
-
Navigate to the Virtio-Win ISO:
- In File Explorer, locate and click on the virtual CD/DVD drive where the Virtio-Win ISO is mounted. It should be listed under «This PC» or «Computer.»
-
Launch the Installation Wizard:
- Inside the Virtio-Win ISO, locate the
virtio-win-guest-tools-xxx.exe(where «xxx» represents the version number) file and run it by double-clicking it. This file contains the Virtio-Win drivers and the Installation Wizard.
- Inside the Virtio-Win ISO, locate the
-
Select Components:
- The Virtio-Win Installation Wizard will launch. It will prompt you to select the components you want to install, such as network drivers, storage drivers, and balloon drivers. You can choose to install all available drivers by default or select specific components based on your requirements. Click «Install» to proceed.
-
Driver Installation:
- The Installation Wizard will begin to install the selected drivers. You will see progress bars for each driver component being installed.
-
Reboot the VM (if prompted):
- After the drivers are installed, the Installation Wizard may prompt you to reboot the VM for the changes to take effect. If prompted, save your work and restart the VM.
-
Verify Driver Installation:
- After the VM restarts, check Device Manager to ensure that the Virtio-Win drivers are correctly installed. There should be no unknown devices or driver-related errors.
Installing drivers required for Windows installation, such as hard disk drivers
-
Prepare Driver Files:
- Before you begin the Windows installation, you’ll need to have the necessary driver files for your hardware component ready. This usually includes the hard disk or storage controller drivers. Download these drivers from the manufacturer’s website.
-
Insert Windows Installation Media:
- Insert the Windows installation media (DVD or USB) into your computer and boot from it. You may need to access the BIOS/UEFI settings to set the boot order to prioritize the installation media.
-
Start the Windows Installation:
- Power on or restart your computer to initiate the Windows installation from the installation media. If it doesn’t start automatically, you may need to press a key (e.g., F2, F12, Delete) to access the boot menu and select the installation media.
-
Language and Region Settings:
- In the initial Windows setup screen, select your preferred language, time format, keyboard layout, and click «Next.»
-
Click «Install Now»:
- On the next screen, click «Install Now» to start the Windows installation.
-
Accept License Terms:
- Read and accept the Microsoft Software License Terms.
-
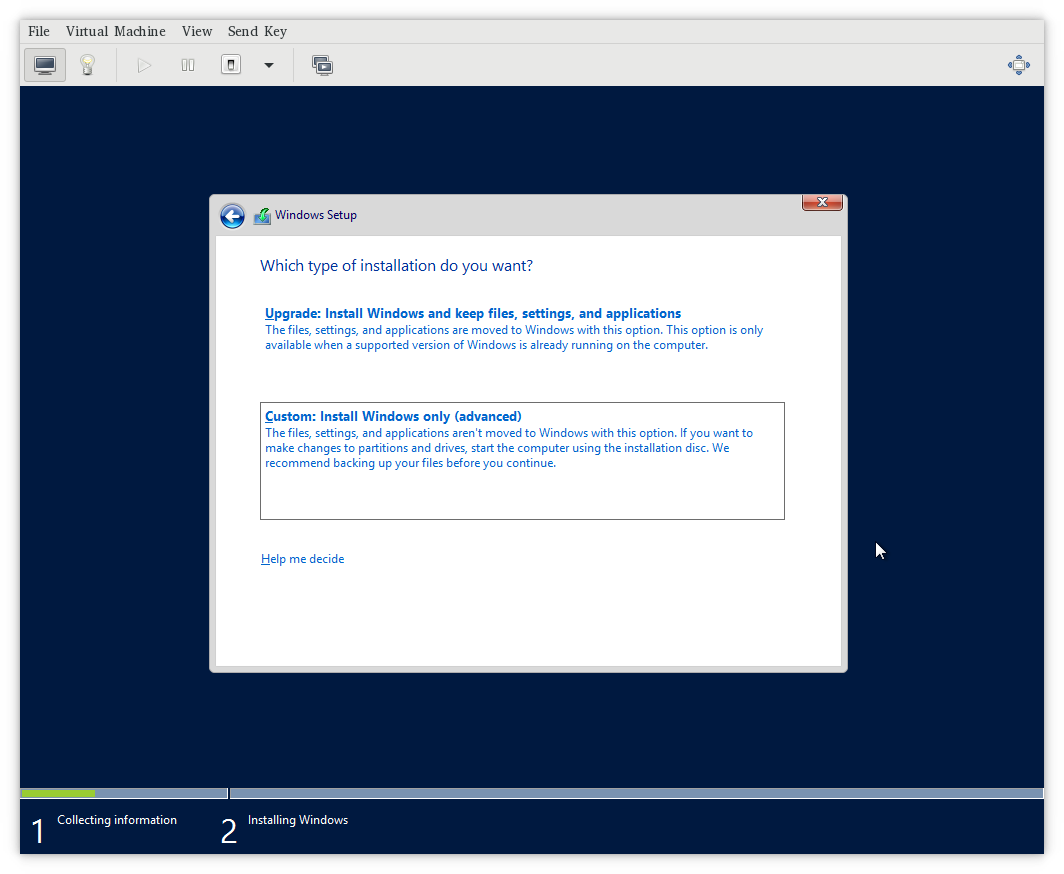
Choose Installation Type:
- Select «Custom: Install Windows only (advanced)» as you will be specifying driver installation manually.
-
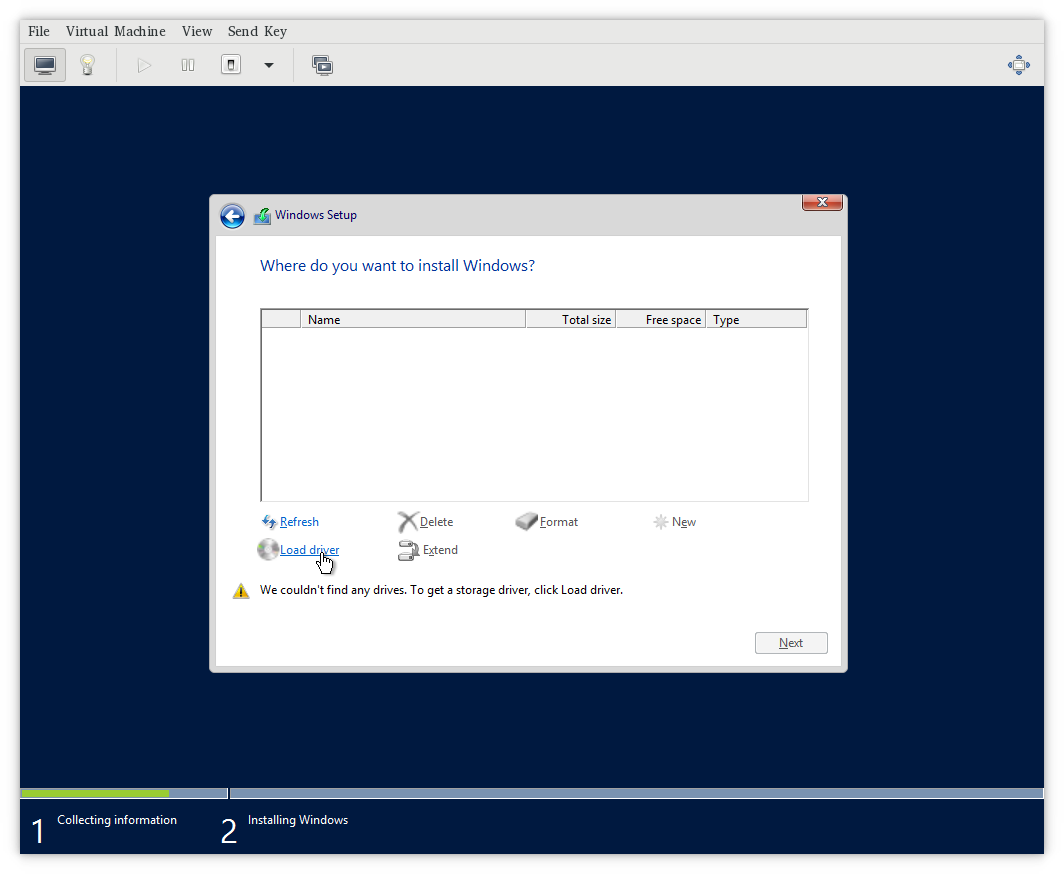
Partitioning and Drive Selection:
- In the «Where do you want to install Windows?» window, you may not see your hard disk or storage device listed if it’s not recognized. Click «Load Driver.»
-
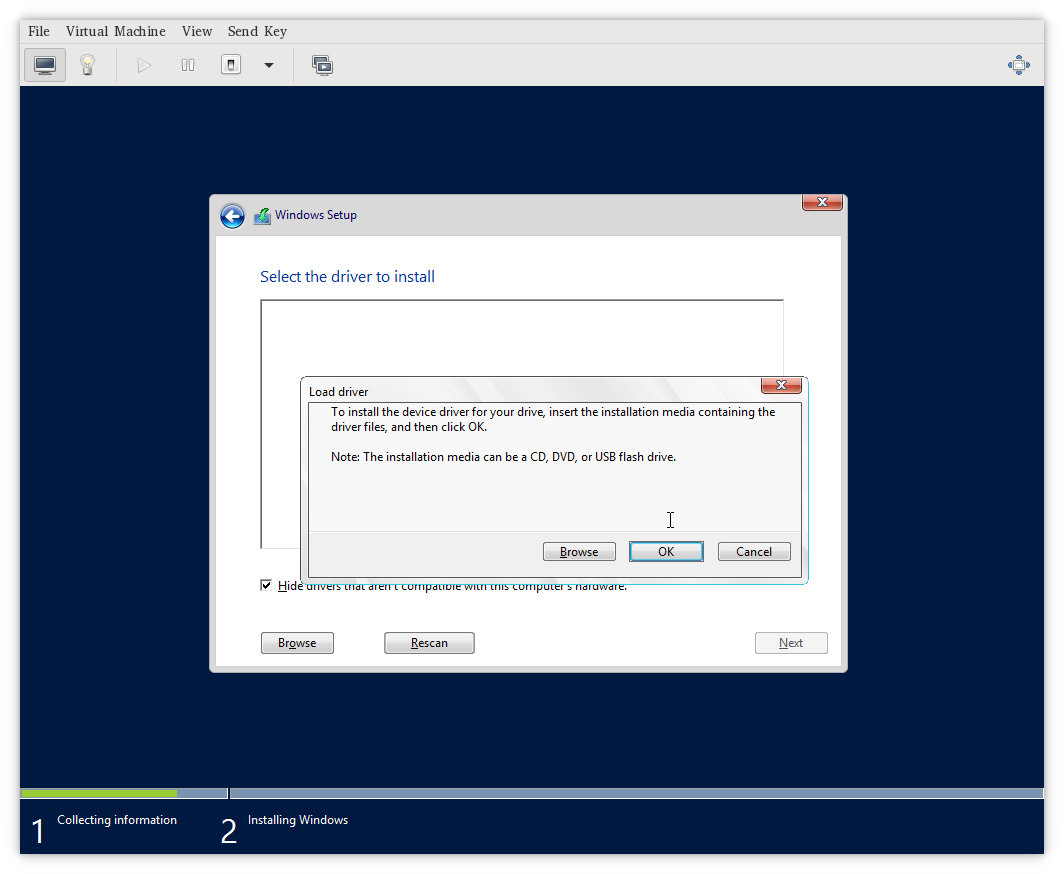
Load Drivers:
- The «Load Driver» window will open. Insert the USB flash drive or attach the Virtio-Win ISO containing the driver files you prepared earlier.
-
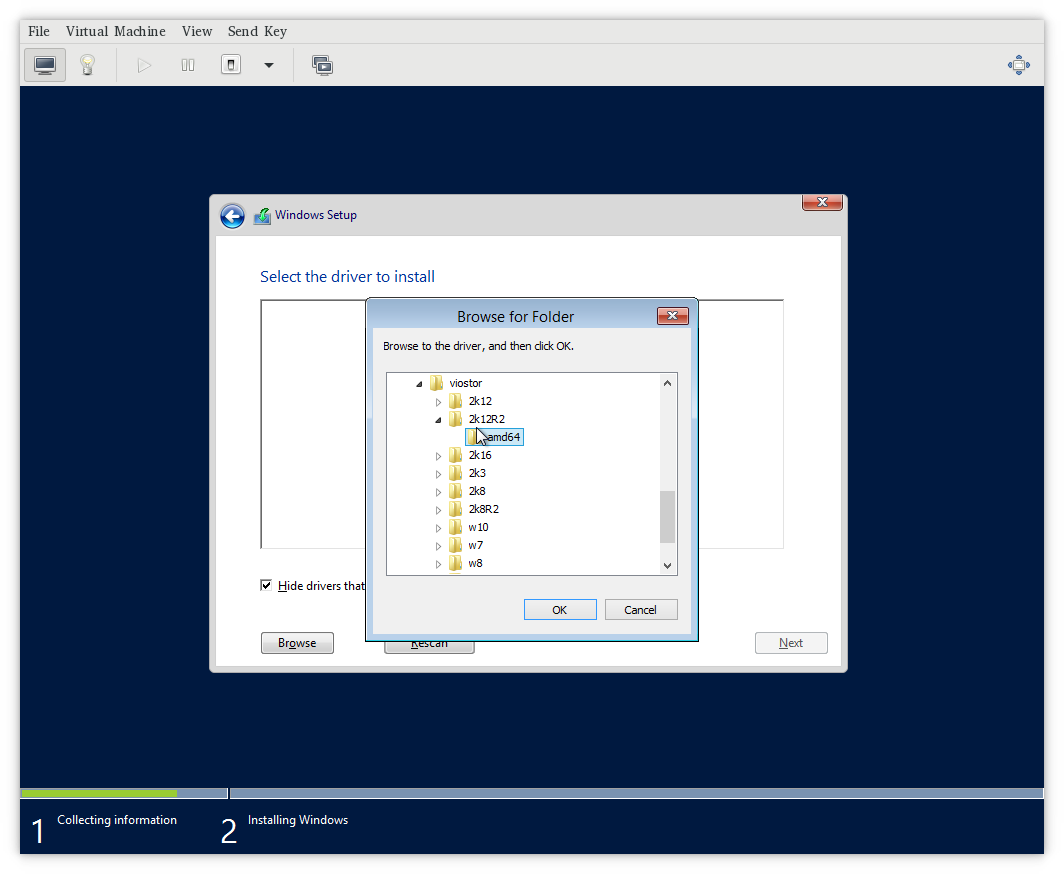
Browse for Drivers:
- Click «Browse» and navigate to the USB flash drive to find the driver files you downloaded. Select the appropriate driver and click «Next.»
-
Install the Driver:
- Windows will load the driver. Once the driver is loaded successfully, you should see your hard disk or storage device listed in the installation window.
-
Select the Drive:
- Choose your hard disk or storage device and click «Next.»
-
Complete Windows Setup:
- Continue with the Windows setup, which includes creating or signing in with a Microsoft account, setting up your preferences, and configuring your system settings.
By following these steps, you can successfully install the required drivers, such as hard disk drivers, during the Windows installation process. This ensures that your storage devices are recognized, allowing you to proceed with the installation and use your computer as intended.
Variant 2: using Device Manager
-
Plug in the Device: First, make sure the device for which you want to install the driver is connected to your computer. It should be recognized as an unknown device or have an error indicator in Device Manager.
-
Open Device Manager:
- Press the Windows key.
- Type «Device Manager» into the search bar.
- Click on «Device Manager» in the search results.
-
Locate the Device:
In Device Manager, find and expand the category that corresponds to the device you want to install a driver for. The device may appear under «Other devices» with a yellow triangle icon, indicating a problem with the driver. -
Install the Driver:
Right-click on the device with the missing driver and select «Update driver.» -
Choose How to Search for Drivers:
- Select «Search automatically for updated driver software» if you want Windows to search for the driver online. This option requires an active internet connection.
- Select «Browse my computer for drivers» if you have already downloaded the driver and have it saved on your computer. Then, click «Next.»
-
Specify the Driver Location (if needed):
If you selected «Browse my computer for drivers,» browse to the folder containing the downloaded driver files, or select the appropriate folder where the driver is located. Click «Next» to continue. -
Confirm Driver Installation:
Windows will analyze the driver package and confirm whether it’s compatible with your device. If it is, you’ll see a message confirming that the driver will be installed. Click «Install» to proceed. -
Wait for Installation:
Windows will install the driver. This may take a moment, and you may see a progress bar. -
Complete the Installation:
Once the driver installation is complete, you’ll see a message indicating the successful installation. Click «Close» or «Finish» to complete the process. -
Verify Installation:
After the installation, the device should no longer have an error indicator in Device Manager. It should be listed under the appropriate category without any warnings. -
Reboot (if necessary):
In some cases, Windows may prompt you to restart your computer to finalize the driver installation. If prompted, save your work and restart your computer.
Variant 3: via an INF (Information) file
-
Download the Correct INF File:
- Visit the manufacturer’s website or a trusted source to download the correct INF file for the driver that matches your hardware device and Windows version. Ensure that you have the latest version of the driver if available.
-
Locate the Downloaded INF File:
- Once the INF file is downloaded, locate it in your computer’s file system. It is usually in the Downloads folder unless you specified a different location during the download.
-
Right-Click on the INF File:
- Right-click on the downloaded INF file.
-
Select «Install» from the Context Menu:
- In the context menu that appears when you right-click the INF file, choose «Install.» This action will initiate the installation process.
-
Driver Installation Process:
- Windows will begin the installation process for the driver based on the information provided in the INF file. During this process, you may see a series of dialogs or prompts, depending on the driver. These prompts may ask for confirmation to install the driver.
-
Follow On-Screen Prompts:
- Follow any on-screen prompts or instructions provided during the installation. These may include agreeing to the driver’s terms and conditions, confirming the installation, or selecting installation options.
-
Complete the Installation:
- Once the installation is complete, you’ll receive a message indicating the successful installation of the driver.
-
Reboot (if necessary):
- In some cases, Windows may prompt you to restart your computer to finalize the driver installation. If prompted, save your work and restart your computer.
-
Verify Installation:
- After installation, check Device Manager to ensure the driver is listed under the appropriate category without any warnings or errors. If the device is listed correctly, the driver installation was successful.
Variant 4: using the pnputil command line utility
-
Open a Command Prompt with administrative privileges:
- Press the Windows key.
- Type «cmd» or «Command Prompt» into the search bar.
- Right-click on «Command Prompt» and select «Run as administrator.»
-
Type the following command to list all the installed drivers and their package names:
This will provide a list of installed drivers along with their published names, which you will need to identify the correct driver package.
-
Locate the INF file for the driver you want to install. INF files are typically located in the driver package folder or on the manufacturer’s website.
-
Install the driver using the
pnputilutility. Replacepath\to\driver.infwith the actual path to the INF file of the driver you want to install:pnputil /add-driver "path\to\driver.inf"If you want to specify a package name (use the published name from step 2), you can do so with the
/packageoption:pnputil /add-driver "path\to\driver.inf" /package PackageNameIf the driver package contains multiple INF files, you should specify the INF file that corresponds to the specific hardware component you want to update.
-
Windows may prompt you to confirm the installation of the driver. Confirm and proceed with the installation if prompted.
-
After a successful installation, you should see a message indicating that the driver has been added.
-
You may need to restart your computer for the changes to take effect. Use the following command to check the status of the driver installation:
This command will show a list of installed driver packages.
Introduction
VirtIO Drivers are paravirtualized drivers for kvm/Linux (see http://www.linux-kvm.org/page/Virtio). In short, they enable direct (paravirtualized) access to devices and peripherals for virtual machines using them, instead of slower, emulated, ones.
A quite extended explanation about VirtIO drivers can be found here http://www.ibm.com/developerworks/library/l-virtio.
At the moment these kind of devices are supported:
- block (disks drives), see Paravirtualized Block Drivers for Windows
- network (ethernet cards), see Paravirtualized Network Drivers for Windows
- balloon (dynamic memory management), see Dynamic Memory Management
You can maximize performances by using VirtIO drivers. The availability and status of the VirtIO drivers depends on the guest OS and platform.
Windows OS Support
Windows does not have native support for VirtIO devices included.
But, there is excellent external support through opensource drivers, which are available compiled and signed for Windows:
https://fedorapeople.org/groups/virt/virtio-win/direct-downloads/archive-virtio/?C=M;O=D
Note that this repository provides not only the most recent, but also many older versions.
Those older versions can still be useful when a Windows VM shows instability or incompatibility with a newer driver version.
The binary drivers are digitally signed by Red Hat, and will work on 32-bit and 64-bit versions of Windows
Installation
Using the ISO
You can download the latest stable or you can download the most recent build of the ISO.
Normally the drivers are pretty stable, so one should try out the most recent release first.
You can access the ISO in a VM by mounting the ISO with a virtual CD-ROM/DVD drive on that VM.
Wizard Installation
You can use an easy wizard to install all, or a selection, of VirtIO drivers.
- Open the Windows Explorer and navigate to the CD-ROM drive.
- Simply execute (double-click on) virtio-win-gt-x64
- Follow its instructions.
- (Optional) use the virtio-win-guest-tools wizard to install the QEMU Guest Agent and the SPICE agent for an improved remote-viewer experience.
- Reboot VM
Manual Installation
- Open the Windows Explorer and navigate to the CD-ROM drive.
- There you can see that the ISO consists of several directories, each having sub-directories for supported OS version (for example, 2k19, 2k12R2, w7, w8.1, w10, …).
- Balloon
- guest-agent
- NetKVM
- qxl
- vioscsi
- …
- Navigate to the desired driver directories and respective Windows Version
- Right-click on the file with type «Setup Information»
- A context menu opens, select «Install» here.
- Repeat that process for all desired drivers
- Reboot VM.
Downloading the Wizard in the VM
You can also just download the most recent virtio-win-gt-x64.msi or virtio-win-gt-x86.msi from inside the VM, if you have already network access.
Then just execute it and follow the installation process.
Troubleshooting
Try an older version of the drivers first, if that does not help ask in one of our support channels:
https://pve.proxmox.com/wiki/Get_support
Further Reading
https://docs.fedoraproject.org/en-US/quick-docs/creating-windows-virtual-machines-using-virtio-drivers/index.html
http://www.linux-kvm.org/page/WindowsGuestDrivers
The source code of those drivers can be found here: https://github.com/virtio-win/kvm-guest-drivers-windows
http://www.linux-kvm.org/page/WindowsGuestDrivers/Download_Drivers
See also
- Paravirtualized Block Drivers for Windows
- Paravirtualized Network Drivers for Windows
- Dynamic Memory Management
Purpose of this document is to explain how to install virtio drivers for
Microsoft Windows running in a fully virtualized guest.
Do I need virtio drivers?
Yes. Without the virtio drivers, you cannot use paravirtualized hardware properly. It would either not work, or will have a severe performance penalty.
For more information about VirtIO and paravirtualization, see VirtIO and paravirtualization
For more details on configuring your VirtIO driver please refer to Installing VirtIO driver on a new Windows virtual machine and Installing VirtIO driver on an existing Windows virtual machine.
Which drivers I need to install?
There are usually up to 8 possible devices that are required to run
Windows smoothly in a virtualized environment. KubeVirt currently
supports only:
-
viostor, the block driver, applies to SCSI Controller in the
Other devices group. -
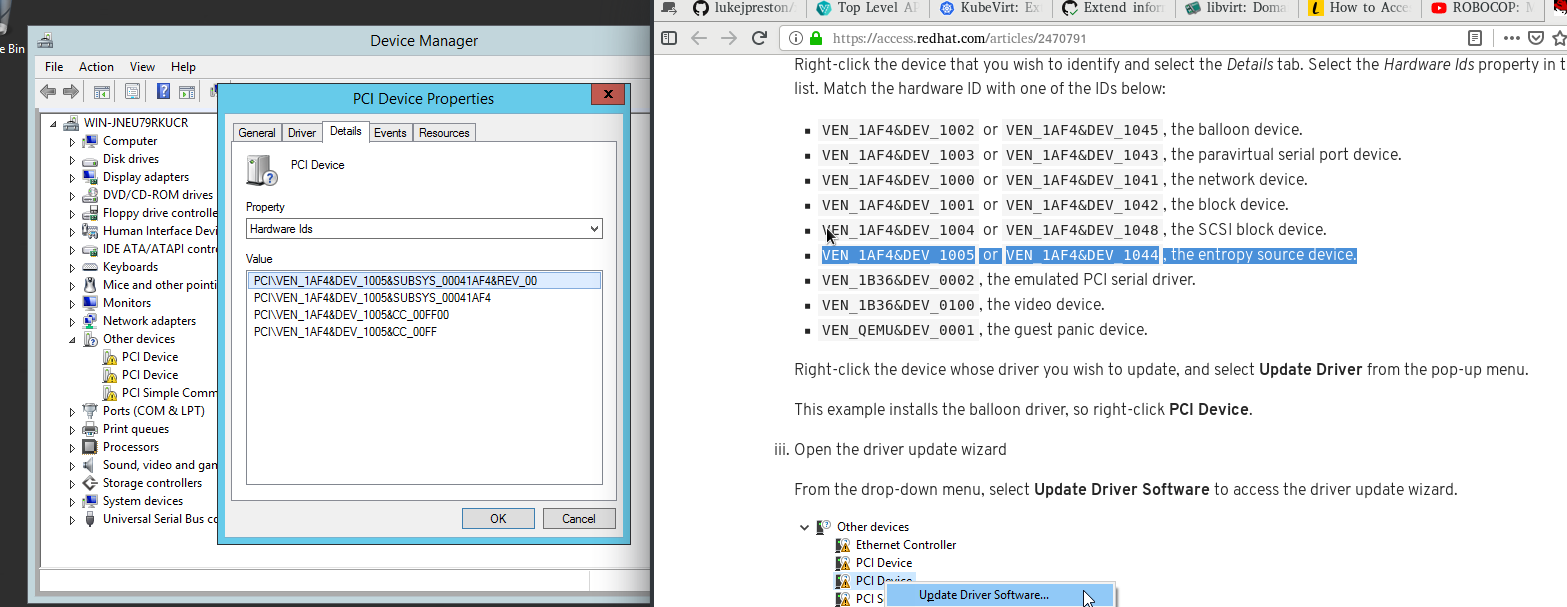
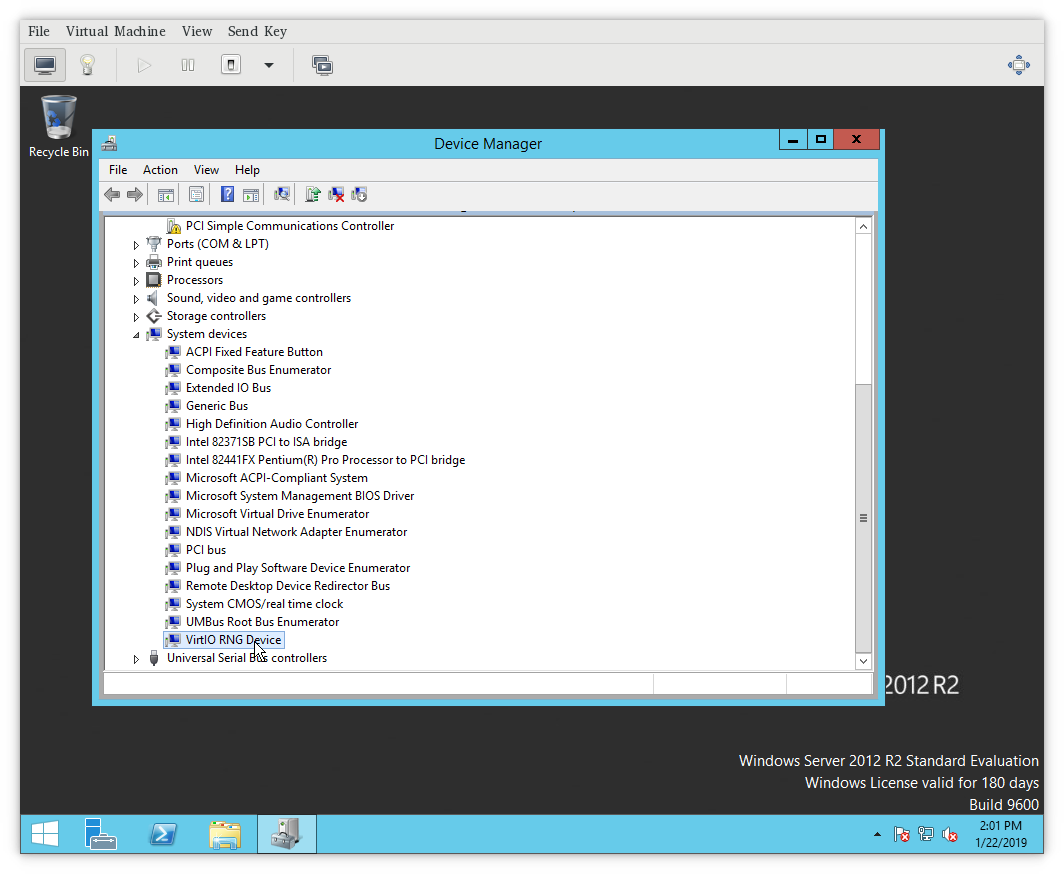
viorng, the entropy source driver, applies to PCI Device in the
Other devices group. -
NetKVM, the network driver, applies to Ethernet Controller in
the Other devices group. Available only if a virtio NIC is
configured.
Other virtio drivers, that exists and might be supported in the future:
-
Balloon, the balloon driver, applies to PCI Device in the Other
devices group -
vioserial, the paravirtual serial driver, applies to PCI Simple
Communications Controller in the Other devices group. -
vioscsi, the SCSI block driver, applies to SCSI Controller in the
Other devices group. -
qemupciserial, the emulated PCI serial driver, applies to PCI Serial
Port in the Other devices group. -
qxl, the paravirtual video driver, applied to Microsoft Basic
Display Adapter in the Display adapters group. -
pvpanic, the paravirtual panic driver, applies to Unknown device in
the Other devices group.
Note
Some drivers are required in the installation phase. When you are
installing Windows onto the virtio block storage you have to provide
an appropriate virtio driver. Namely, choose viostor driver for your
version of Microsoft Windows, eg. does not install XP driver when you
run Windows 10.Other drivers can be installed after the successful windows
installation. Again, please install only drivers matching your Windows
version.
How to install during Windows install?
To install drivers before the Windows starts its install, make sure you
have virtio-win package attached to your VirtualMachine as SATA CD-ROM.
In the Windows installation, choose advanced install and load driver.
Then please navigate to loaded Virtio CD-ROM and install one of viostor
or vioscsi, depending on whichever you have set up.
Step by step screenshots:

How to install after Windows install?
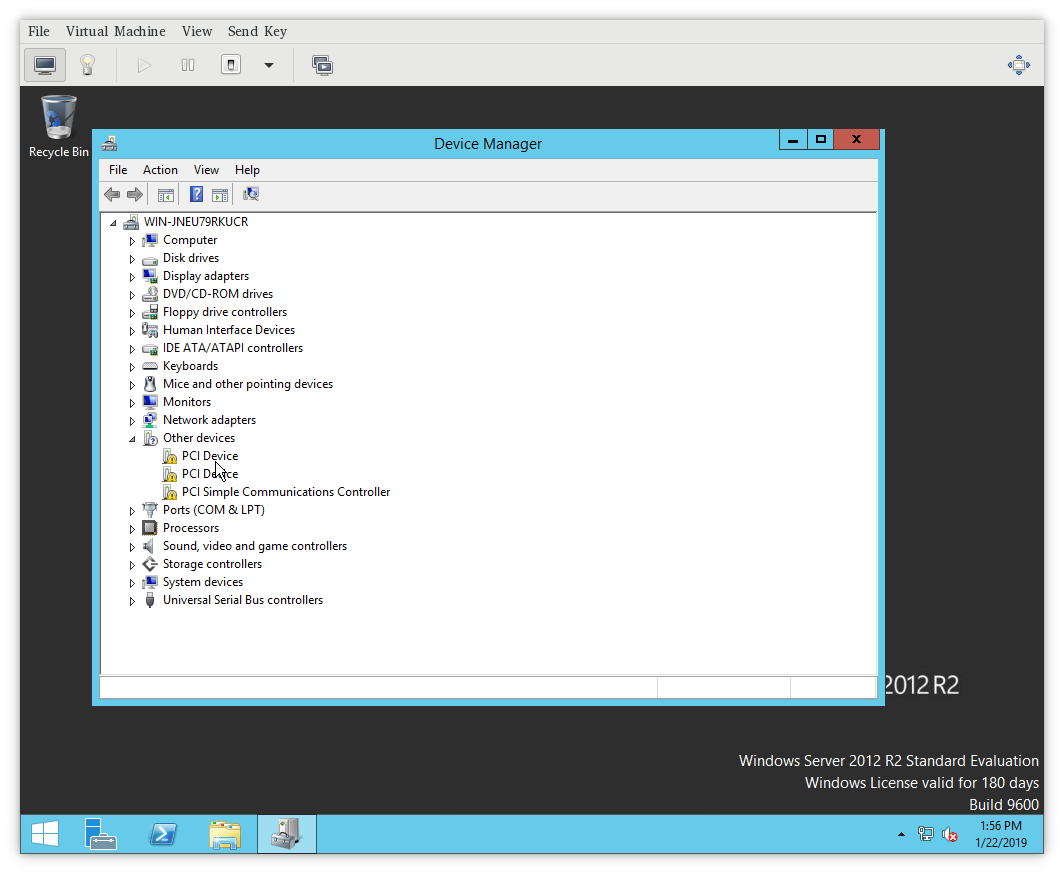
After windows install, please go to Device
Manager.
There you should see undetected devices in «available devices» section.
You can install virtio drivers one by one going through this list.
For more details on how to choose a proper driver and how to install the
driver, please refer to the Windows Guest Virtual Machines on Red Hat
Enterprise Linux 7.
How to obtain virtio drivers?
The virtio Windows drivers are distributed in a form of
containerDisk,
which can be simply mounted to the VirtualMachine. The container image,
containing the disk is located at:
https://quay.io/repository/kubevirt/virtio-container-disk?tab=tags and the image
be pulled as any other docker container:
docker pull quay.io/kubevirt/virtio-container-disk
However, pulling image manually is not required, it will be downloaded
if not present by Kubernetes when deploying VirtualMachine.
Attaching to VirtualMachine
KubeVirt distributes virtio drivers for Microsoft Windows in a form of
container disk. The package contains the virtio drivers and QEMU guest
agent. The disk was tested on Microsoft Windows Server 2012. Supported
Windows version is XP and up.
The package is intended to be used as CD-ROM attached to the virtual
machine with Microsoft Windows. It can be used as SATA CDROM during
install phase or to provide drivers in an existing Windows installation.
Attaching the virtio-win package can be done simply by adding
ContainerDisk to you VirtualMachine.
spec:
  domain:
    devices:
      disks:
        - name: virtiocontainerdisk
          # Any other disk you want to use, must go before virtioContainerDisk.
          # KubeVirt boots from disks in order ther are defined.
          # Therefore virtioContainerDisk, must be after bootable disk.
          # Other option is to choose boot order explicitly:
          #  - https://kubevirt.io/api-reference/v0.13.2/definitions.html#_v1_disk
          # NOTE: You either specify bootOrder explicitely or sort the items in
          #       disks. You can not do both at the same time.
          # bootOrder: 2
          cdrom:
            bus: sata
volumes:
  - containerDisk:
      image: quay.io/kubevirt/virtio-container-disk
    name: virtiocontainerdisk
Once you are done installing virtio drivers, you can remove virtio
container disk by simply removing the disk from yaml specification and
restarting the VirtualMachine.
virtio-win
Remember to be cautious when installing or updating drivers, as improper installation or incompatible drivers can cause system instability. Make sure you have the correct driver for your hardware, and back up your data before making any significant changes to your system.
Variant 1: using the Installation Wizard
This is the best option for regular users that just want to install the drivers on their VM
- Download Virtio-Win ISO:
- Visit the official Virtio-Win repository (https://fedorapeople.org/groups/virt/virtio-win/direct-downloads/latest-virtio/virtio-win.iso) and download the latest Virtio-Win ISO file to your host machine.
- Attach the Virtio-Win ISO to the VM:
- Ensure your VM is powered on and running.
- In the VM management software (e.g., VirtualBox, VMware, QEMU, etc.), locate the option to attach the Virtio-Win ISO as a virtual CD/DVD drive to the VM. The specific steps may vary depending on the virtualization software you’re using.
- Inside the VM:
- Access the VM’s desktop or file system.
- Open File Explorer:
- Open File Explorer (Windows Explorer) within the VM.
- Navigate to the Virtio-Win ISO:
- In File Explorer, locate and click on the virtual CD/DVD drive where the Virtio-Win ISO is mounted. It should be listed under “This PC” or “Computer.”
- Launch the Installation Wizard:
- Inside the Virtio-Win ISO, locate the
virtio-win-guest-tools-xxx.exe(where “xxx” represents the version number) file and run it by double-clicking it. This file contains the Virtio-Win drivers and the Installation Wizard.
- Inside the Virtio-Win ISO, locate the
- Select Components:
- The Virtio-Win Installation Wizard will launch. It will prompt you to select the components you want to install, such as network drivers, storage drivers, and balloon drivers. You can choose to install all available drivers by default or select specific components based on your requirements. Click “Install” to proceed.
- Driver Installation:
- The Installation Wizard will begin to install the selected drivers. You will see progress bars for each driver component being installed.
- Reboot the VM (if prompted):
- After the drivers are installed, the Installation Wizard may prompt you to reboot the VM for the changes to take effect. If prompted, save your work and restart the VM.
- Verify Driver Installation:
- After the VM restarts, check Device Manager to ensure that the Virtio-Win drivers are correctly installed. There should be no unknown devices or driver-related errors.
Installing drivers required for Windows installation, such as hard disk drivers
- Prepare Driver Files:
- Before you begin the Windows installation, you’ll need to have the necessary driver files for your hardware component ready. This usually includes the hard disk or storage controller drivers. Download these drivers from the manufacturer’s website.
- Insert Windows Installation Media:
- Insert the Windows installation media (DVD or USB) into your computer and boot from it. You may need to access the BIOS/UEFI settings to set the boot order to prioritize the installation media.
- Start the Windows Installation:
- Power on or restart your computer to initiate the Windows installation from the installation media. If it doesn’t start automatically, you may need to press a key (e.g., F2, F12, Delete) to access the boot menu and select the installation media.
- Language and Region Settings:
- In the initial Windows setup screen, select your preferred language, time format, keyboard layout, and click “Next.”
- Click “Install Now”:
- On the next screen, click “Install Now” to start the Windows installation.
- Accept License Terms:
- Read and accept the Microsoft Software License Terms.
- Choose Installation Type:
- Select “Custom: Install Windows only (advanced)” as you will be specifying driver installation manually.
- Partitioning and Drive Selection:
- In the “Where do you want to install Windows?” window, you may not see your hard disk or storage device listed if it’s not recognized. Click “Load Driver.”
- Load Drivers:
- The “Load Driver” window will open. Insert the USB flash drive or attach the Virtio-Win ISO containing the driver files you prepared earlier.
- Browse for Drivers:
- Click “Browse” and navigate to the USB flash drive to find the driver files you downloaded. Select the appropriate driver and click “Next.”
- Install the Driver:
- Windows will load the driver. Once the driver is loaded successfully, you should see your hard disk or storage device listed in the installation window.
- Select the Drive:
- Choose your hard disk or storage device and click “Next.”
- Complete Windows Setup:
- Continue with the Windows setup, which includes creating or signing in with a Microsoft account, setting up your preferences, and configuring your system settings.
By following these steps, you can successfully install the required drivers, such as hard disk drivers, during the Windows installation process. This ensures that your storage devices are recognized, allowing you to proceed with the installation and use your computer as intended.
Variant 2: using Device Manager
-
Plug in the Device: First, make sure the device for which you want to install the driver is connected to your computer. It should be recognized as an unknown device or have an error indicator in Device Manager.
- Open Device Manager:
- Press the Windows key.
- Type “Device Manager” into the search bar.
- Click on “Device Manager” in the search results.
-
Locate the Device:
In Device Manager, find and expand the category that corresponds to the device you want to install a driver for. The device may appear under “Other devices” with a yellow triangle icon, indicating a problem with the driver. -
Install the Driver:
Right-click on the device with the missing driver and select “Update driver.” - Choose How to Search for Drivers:
- Select “Search automatically for updated driver software” if you want Windows to search for the driver online. This option requires an active internet connection.
- Select “Browse my computer for drivers” if you have already downloaded the driver and have it saved on your computer. Then, click “Next.”
-
Specify the Driver Location (if needed):
If you selected “Browse my computer for drivers,” browse to the folder containing the downloaded driver files, or select the appropriate folder where the driver is located. Click “Next” to continue. -
Confirm Driver Installation:
Windows will analyze the driver package and confirm whether it’s compatible with your device. If it is, you’ll see a message confirming that the driver will be installed. Click “Install” to proceed. -
Wait for Installation:
Windows will install the driver. This may take a moment, and you may see a progress bar. -
Complete the Installation:
Once the driver installation is complete, you’ll see a message indicating the successful installation. Click “Close” or “Finish” to complete the process. -
Verify Installation:
After the installation, the device should no longer have an error indicator in Device Manager. It should be listed under the appropriate category without any warnings. - Reboot (if necessary):
In some cases, Windows may prompt you to restart your computer to finalize the driver installation. If prompted, save your work and restart your computer.
Variant 3: via an INF (Information) file
- Download the Correct INF File:
- Visit the manufacturer’s website or a trusted source to download the correct INF file for the driver that matches your hardware device and Windows version. Ensure that you have the latest version of the driver if available.
- Locate the Downloaded INF File:
- Once the INF file is downloaded, locate it in your computer’s file system. It is usually in the Downloads folder unless you specified a different location during the download.
- Right-Click on the INF File:
- Right-click on the downloaded INF file.
- Select “Install” from the Context Menu:
- In the context menu that appears when you right-click the INF file, choose “Install.” This action will initiate the installation process.
- Driver Installation Process:
- Windows will begin the installation process for the driver based on the information provided in the INF file. During this process, you may see a series of dialogs or prompts, depending on the driver. These prompts may ask for confirmation to install the driver.
- Follow On-Screen Prompts:
- Follow any on-screen prompts or instructions provided during the installation. These may include agreeing to the driver’s terms and conditions, confirming the installation, or selecting installation options.
- Complete the Installation:
- Once the installation is complete, you’ll receive a message indicating the successful installation of the driver.
- Reboot (if necessary):
- In some cases, Windows may prompt you to restart your computer to finalize the driver installation. If prompted, save your work and restart your computer.
- Verify Installation:
- After installation, check Device Manager to ensure the driver is listed under the appropriate category without any warnings or errors. If the device is listed correctly, the driver installation was successful.
Variant 4: using the pnputil command line utility
- Open a Command Prompt with administrative privileges:
- Press the Windows key.
- Type “cmd” or “Command Prompt” into the search bar.
- Right-click on “Command Prompt” and select “Run as administrator.”
- Type the following command to list all the installed drivers and their package names:
This will provide a list of installed drivers along with their published names, which you will need to identify the correct driver package.
-
Locate the INF file for the driver you want to install. INF files are typically located in the driver package folder or on the manufacturer’s website.
- Install the driver using the
pnputilutility. Replacepath\to\driver.infwith the actual path to the INF file of the driver you want to install:pnputil /add-driver "path\to\driver.inf"If you want to specify a package name (use the published name from step 2), you can do so with the
/packageoption:pnputil /add-driver "path\to\driver.inf" /package PackageNameIf the driver package contains multiple INF files, you should specify the INF file that corresponds to the specific hardware component you want to update.
-
Windows may prompt you to confirm the installation of the driver. Confirm and proceed with the installation if prompted.
-
After a successful installation, you should see a message indicating that the driver has been added.
- You may need to restart your computer for the changes to take effect. Use the following command to check the status of the driver installation:
This command will show a list of installed driver packages.
Установка драйвера VirtIO для Windows
Современную ИТ-инфраструктуру уже нельзя представить себе без виртуализации. Настолько повсеместно она используется (и не без основания). Операционные системы уже даже давно научились понимать то, что она работаю в качестве виртуальной машине, а не на физическом оборудовании. Правда, иногда в этом им приходится помогать. Например, в Proxmox для того, чтобы виртуальные машины могли использовать “нарисованный” (VirtIO) тип контроллера SCSI необходимо, чтобы была выполнена установка драйвера VirtIO для Windows. VirtIO является рекомендуемым типом контроллера SCSI, т.к. он позволяет виртуальной машине напрямую обращаться к виртуальным ресурсам, а не через эмуляцию IDE или какого-то другого протокола.
Есть несколько вариантов или сценариев установки драйвера VirtIO для Windows. Каждый из них применим к определенным случаям. Ниже вы можете ознакомиться с кратким рассказом про каждый из этих сценариев.
Вариант 1. Установка драйвера VirtIO при установке ОС
Этот сценарий применим к тем случаям, когда вы выполняете установку новой операционной системы Windows.
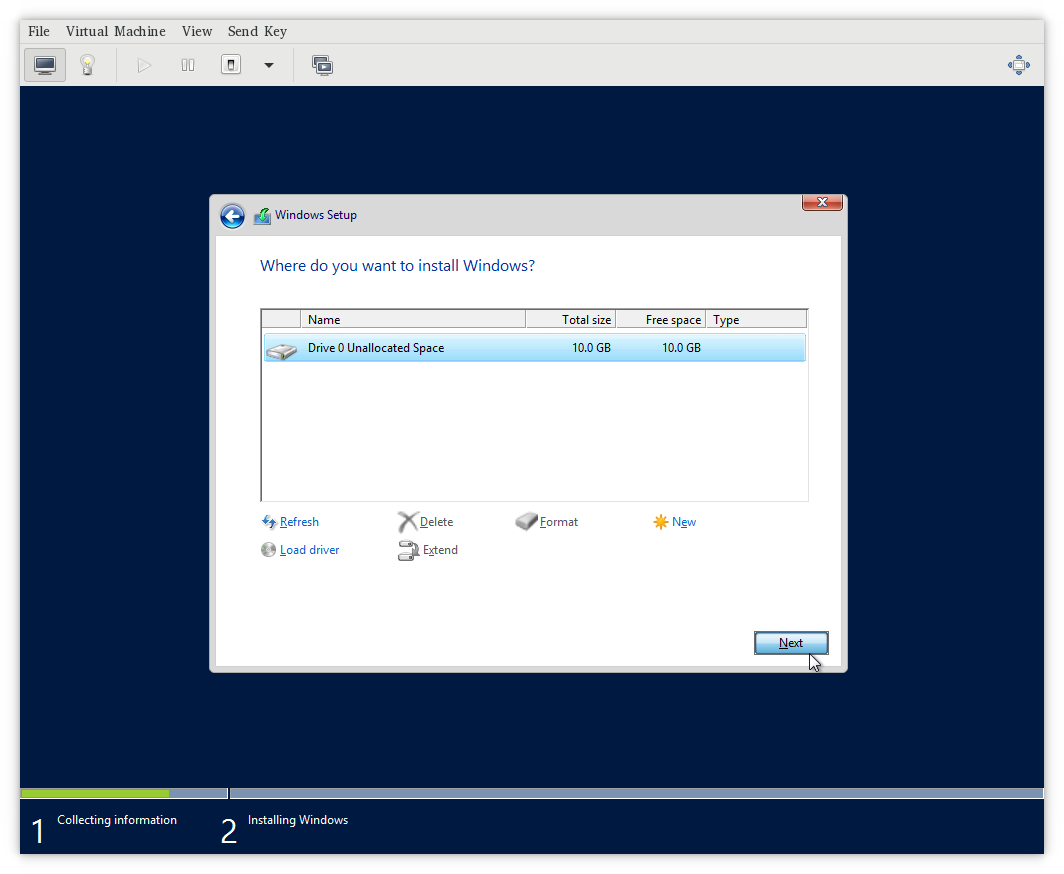
Если вы настроите для виртуальной машины Windows тип SCSI контроллера VirtIO и попробуете выполнить установку операционной систем, то на этапе выбора диска вы не увидите виртуальный диск ВМ:
Для того, чтобы установить драйвер VirtIO на этапе установки системы выполните следующие действия:
1. Загрузить дистрибутив с гостевыми средствами интеграции Proxmox.
2. Подключить дополнительный ISO образ к виртуальной машине.
3. На этапе выбора диски для установки операционной системы нажать кнопку “Load Driver”.
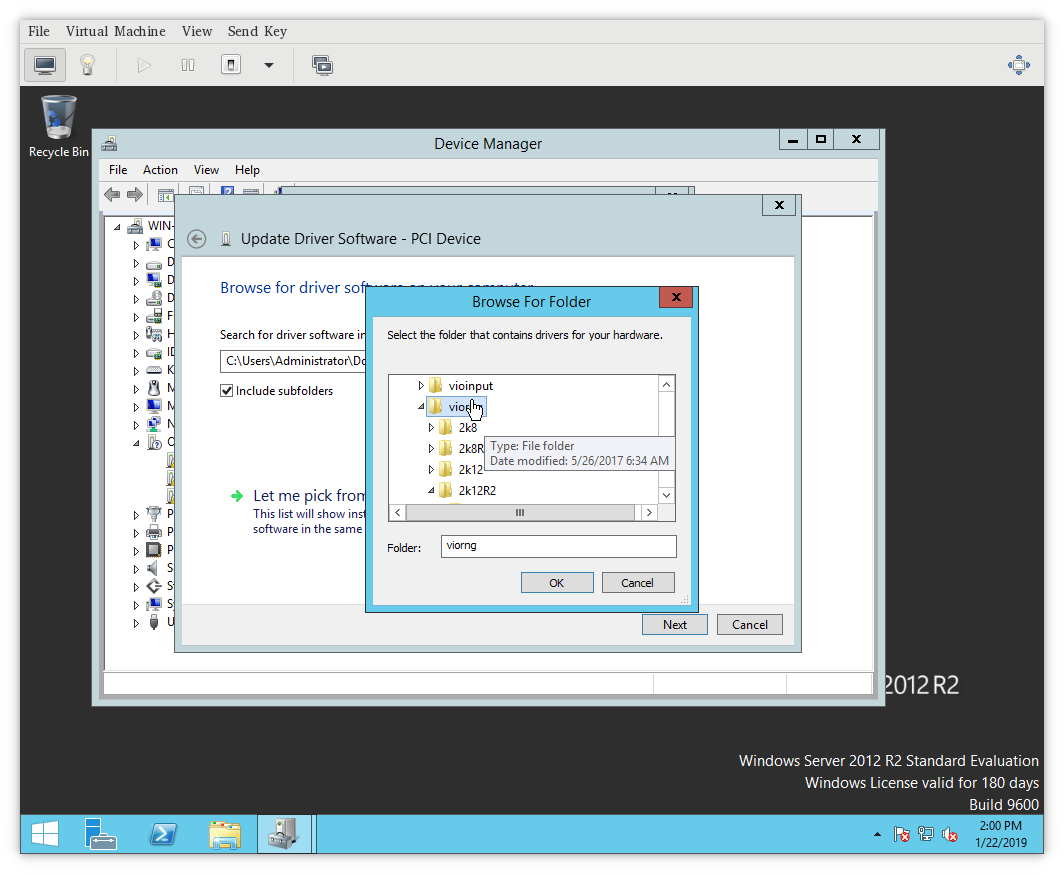
4. В следующем диалоговом коне нажмите кнопку “Browse”.
5. В дереве доступных путей найдите смонтированный ISO образ. В корне образа найдите директорию “vioscsi”. Внутри этой директории найдите нужную вам версию и редакции ОС. Нажмите кнопку “OK”.
6. На следующей странице выберите один доступный драйвер и нажмите кнопку “Next”.
7. После завершения процедуры добавления драйвера диск, подключенный по SCSI через VirtIO будет доступен в качестве диска для установки операционной системы.
8. Дальнейшая установка операционной системы выполняется как обычно – дополнительных сложностей возникнуть не должно.
Вариант 2. Установка драйвера VirtIO для уже установленной ОС
Этот сценарий применим к тем случаям, когда у вас уже есть виртуальная машина с установленной операционной системой, но виртуальный жесткий диск подключен, например, к IDE контроллеру, а не к контроллеру VirtIO.
Приведенный ниже метод протестирован на Windows 10. На других версиях ОС Windows, возможно, алгоритм может немного отличаться.
Например, есть подопытная машина:
т.е. в качестве SCSI контроллера выступает эмуляция контроллера LSI53C895A, а в качестве интерфейса подключения диска с операционной системой – SATA.
Для того, чтобы переключить системный диск на использование контроллера VirtIO нужно выполнить следующие действия:
1. В гостевой операционной системе установить средства интеграции Proxmox.
2. Выключить виртуальную машину.
3. Измените тип SCSI контроллера в параметрах оборудовании виртуальной машины.
4. Добавляем какой-то пустой диск (не важно какого размера). Обязательно подключаем его по SCSI протоколу. Почему-то без этого шага переключение непосредственно диска с ОС сразу на SCSI протокол успехом не увенчалось. Видимо, сама ОС догружает еще какие-то драйвера. Поэтому быстрее было через вот такой шаг с дополнительным диском реализовать автоматическую установку необходимых драйверов.
5. Запускаем виртуальную машину. Дожидаемся окончания загрузки операционной системы и выключаем виртуальную машину.
6. Отсоединить виртуальный жесткий диск с операционной системой.
7. Перейдите в режим редактирования виртуального жесткого диска.
8. Укажите тип контроллера – SCSI и нажмите кнопку “Add”.
9. Убедитесь, что диск с операционной системой, который вы подключили по SCSI является первым загрузочным устройством (Options – Boot order).
10. Запустите виртуальную машину. После выполнения всех действий виртуальный диск операционной системы будет подключен через VirtIO, что позволит обеспечить максимальную эффективность и производительность работы.
Вариант 3. Подготовка шаблона ВМ с установленным драйвером VirtIO
Если вам приходится часто разворачивать виртуальные машины Windows, то вы можете подготовить базовый образ с уже установленным драйвером для VirtIO. Затем в любой момент времени вы можете из готового шаблона развернуть новую виртуальную машину Windows. И в ней уже будет установлен драйвер для VirtIO.
Как подготовить образ:
1. Сначала необходимо выполнить подготовку операционной системы. Далее на выбор – либо вариант 1, либо вариант 2 из предложенных выше. Все зависит от ваших предпочтений и стартовых условий.
2. Дополнительно вы можете установить весь необходимый набор ПО – архиваторы, офисное ПО и любое другое необходимое вам ПО.
3. Далее необходимо подготовить систему – удалить всю идентифицирующую информацию и идентификаторы для того, чтобы в последующем можно было сделать копию системы. Для этих целей у Microsoft есть утилита sysprep. Расположена вот тут:
C:\windows\system32\sysprep\sysprep.exe
4. В утилите sysprep нужно выбрать следующие параметры:
5. Дождитесь завершения работы утилиты sysprep и выключения системы. После этого наша исходная система готова для конвертирования её в шаблон виртуальной машины.
6. Конвертируем виртуальную машину в шаблон.
7. Теперь вы можете клонировать подготовленный вами образ ОС, в котором будут все необходимые драйвера для VirtIO, а также все необходимое вам дополнительное ПО и обновления (если вы включили эти шаги в образ системы).
Использование шаблона позволит значительно сократить время создания и подготовки новой виртуальной машины. Особенно, если вам приходится часто приходится подготавливать типовое развертывание операционной системы.
Источник.