
-
Home
-
News
- How to Install Unsigned Drivers on Windows 10? 3 Methods for You
How to Install Unsigned Drivers on Windows 10? 3 Methods for You
By Vera | Follow |
Last Updated
Driver signatures are enforced by default for knowing the software publisher and some information of the release. If the drivers you have downloaded are not signed, you couldn’t install. How to install unsigned drivers on Windows 10? MiniTool Solution, a PC software provider, will show you 3 simple methods for this work.
Hardware drivers are necessary for all the hardware devices that are attached to your Windows computer so that they could work properly. Because of the access to the kernel, the drivers need to be signed officially.
If the drivers you have got are not signed by Microsoft, they are not allowed to install on your computer. This is a protection move for your PC since you can clearly know some information on the software publisher, release time, etc. This way can avoid malware attack to a certain degree.
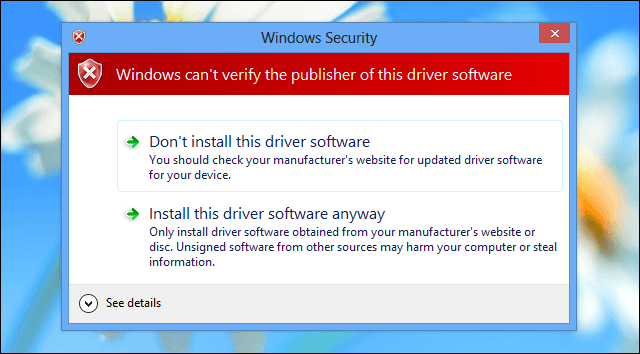
Usually, when installing unsigned drivers on Windows 10, Windows pops up a warning saying Windows can’t verify the publisher of this driver software.
If you still need to install unofficial drivers, old drivers with no digital signature or unsigned drivers, you need to spend some time. How to install unsigned driver on Windows 10 in this way? Follow these methods given below now.
Tip: Unsigned drivers may sometimes cause the blue screen of death – driver_power_state_failure. If you are bothered by this BSOD error, refer to this post – Top 6 Solutions to Drive Power State Failure Windows 10/8/7.
How to Install Unsigned Drivers Windows 10
Method 1: Use the Advanced Boot Menu
This is a temporary way to let driver signature enforcement disabled. It will become enabled the next time you reboot Windows 10 unless you try this way again. The following are the instructions:
Step 1: Click the Start button, choose the Power button, press Shift and click Restart.
Step 2: After Windows enters WinRE, go to Troubleshoot > Advanced options > Startup Settings >Restart.
Related article: A Detailed Introduction to Windows RE
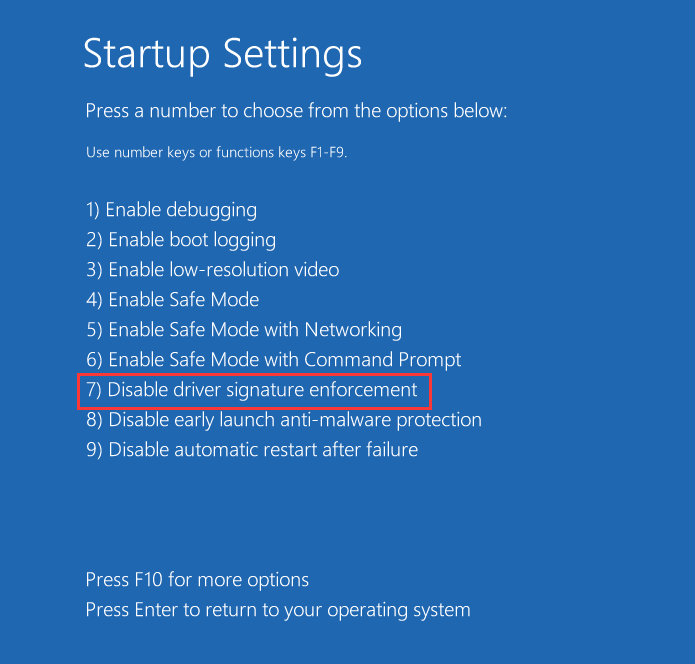
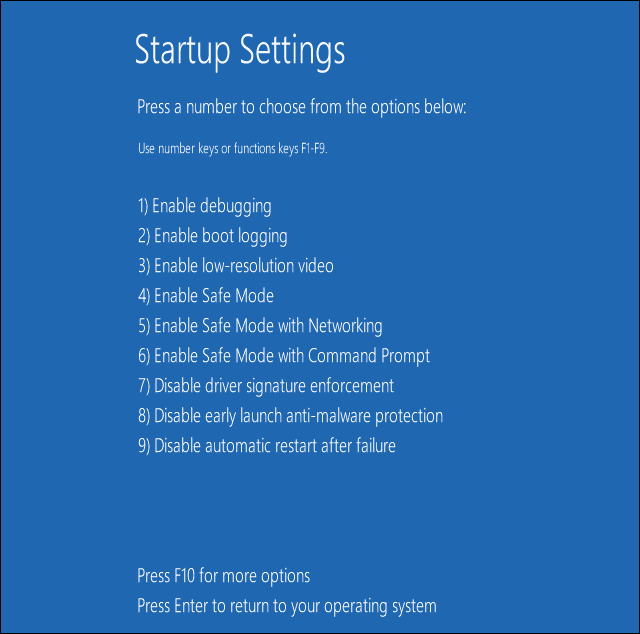
Step 3: To install driver without digital signature, press F7 to choose the Disable driver signature enforcement option.
Step 4: The system will boot to Windows and then you can install any driver that is not signed. After installation, you can restart Windows to let the option get enabled automatically.
Method 2: Enable Test Mode Windows 10
In Windows, there is a mode feature called Test Mode. If you enable it, driver signature enforcement will be turned off until you leave this mode. This is a permanent method and you can install unsigned drivers in Windows 10 easily in this mode.
Step 1: Run Command Prompt as administrator.
Step 2: Input the command in the window: bcdedit /set testsigning on and press Enter.
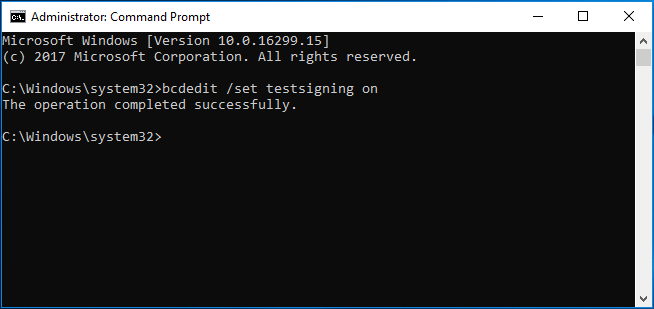
Step 3: Restart your Windows and then you will find a watermark appearing at the bottom right corner of your desktop to tell you that you are in Test Mode. Just install your unsigned drivers.
Note: After installation, disable the mode by using this command – bcdedit /set testsigning off in the Command Prompt window.
Method 3: Disable Integrity Checks
To install driver without digital signature in Windows 10, you can choose to disable the integrity checks. The operations are very simple by following the guide below.
Step 1: Similarly, run Command Prompt as admin.
Step 2: Type the bcdedit /set nointegritychecks off command and press Enter.
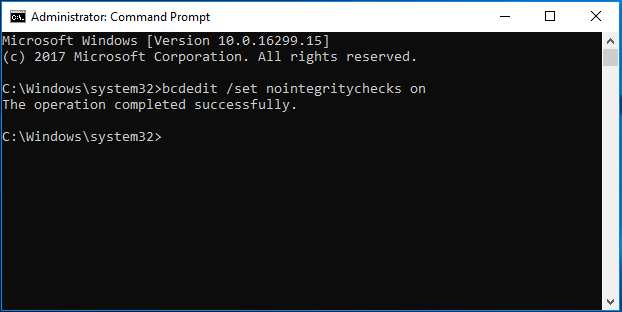
Step 3: Restart your operating system and then you can perform an installation for the unsigned drivers.
Note: Just like Test Mode, you should enable the integrity checks after installation. Using the bcdedit /set nointegritychecks on command can do this work.
Final Words
Right now, we have shown you 3 methods to install unsigned drivers Windows 10. If you have a need, just try one of these methods. But you should note that the drivers that are not signed are not really safe, so you had better only install unsigned drivers from trusted sources. If not necessary, install the driver from the official websites.
Besides, we recommend that you back up your operating system regularly with the professional Windows backup software – MiniTool ShadowMaker to avoid system breakdown caused by virus attacks, mistaken operations, and more.
MiniTool ShadowMaker TrialClick to Download100%Clean & Safe
About The Author
Position: Columnist
Vera is an editor of the MiniTool Team since 2016 who has more than 7 years’ writing experiences in the field of technical articles. Her articles mainly focus on disk & partition management, PC data recovery, video conversion, as well as PC backup & restore, helping users to solve some errors and issues when using their computers. In her spare times, she likes shopping, playing games and reading some articles.
Все способы:
- Установка неподписанного драйвера в Windows
- Способ 1: Особые параметры загрузки Windows
- Способ 2: Командная строка
- Способ 3: Редактор локальной групповой политики
- Способ 4: Создание цифровой подписи
- Вопросы и ответы: 11
Как известно, для корректной, стабильной и производительной работы комплектующих ПК и периферийных устройств требуется установка дополнительного программного обеспечения. Скачанный драйвер с официального сайта или через специальные приложения зачастую устанавливается без проблем. Однако происходит это только в том случае, если его тестирование компанией Майкрософт прошло успешно. В редких случаях сертификат может отсутствовать по некоторым причинам, из-за этого у пользователя возникают проблемы с установкой необходимого драйвера.
Читайте также: Программы для установки и обновления драйверов
Установка неподписанного драйвера в Windows
Как уже было сказано выше, в большинстве случаев все сопутствующее ПО для оборудования предварительно проверяется в Microsoft. При успешно пройденном тестирование компания добавляет специальный файл-сертификат, являющийся цифровой подписью. Этот документ означает подлинность и безопасность драйвера для операционной системы, благодаря чему его инсталляция происходит без труда.
Однако такой сертификат может быть не во всем ПО. К примеру, он может отсутствовать для драйвера к старому (но технически рабочему) оборудованию. Но есть и другие ситуации, в которых подпись может отсутствовать у нового устройства или виртуальных драйверов.
Будьте внимательны при инсталляции непроверенного драйвера! Отключая проверку, вы ставите под угрозу работоспособность системы и сохранность ваших данных. Выполняйте его инсталляцию, только если уверены в безопасности файла и источника, откуда он был скачан.
Читайте также: Онлайн-проверка системы, файлов и ссылок на вирусы
Переходя к основной теме вопроса, хочется отметить, что есть 3 рабочих варианта отключения проверки подписи драйвера. Один из них работает до перезагрузки ПК, второй отключает защиту до последующего ручного включения пользователем. Более подробно о каждом из них читайте ниже.
Способ 1: Особые параметры загрузки Windows
Чаще всего необходимость отключения проверки цифровой подписи возникает единожды. В этой ситуации логичнее всего воспользоваться предоставлением временного разрешения. Оно будет работать один раз: до последующей перезагрузки компьютера. За этот промежуток времени вы можете инсталлировать любое количество непроверенных драйверов, перезапустить ПК, и проверка сертификата будет работать как и прежде, защищая операционную систему.
Первым делом запустите ОС в особом режиме. Пользователям Windows 10 потребуется выполнить следующие шаги:
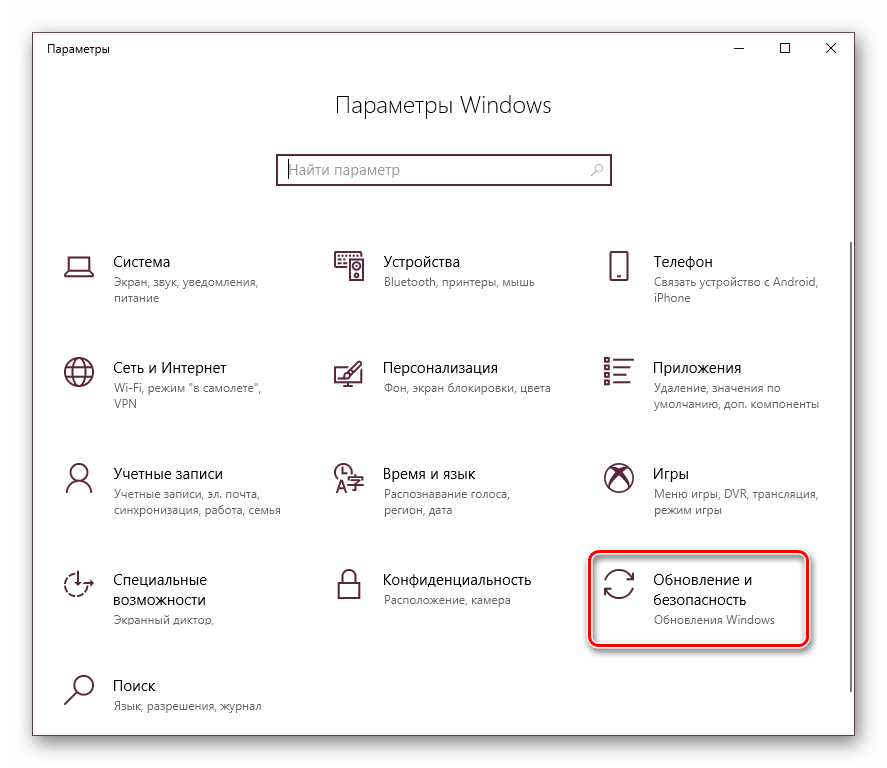
- Запустите «Параметры», вызвав «Пуск».

Это же можно сделать, вызвав альтернативное меню ПКМ.
- Откройте «Обновление и безопасность».
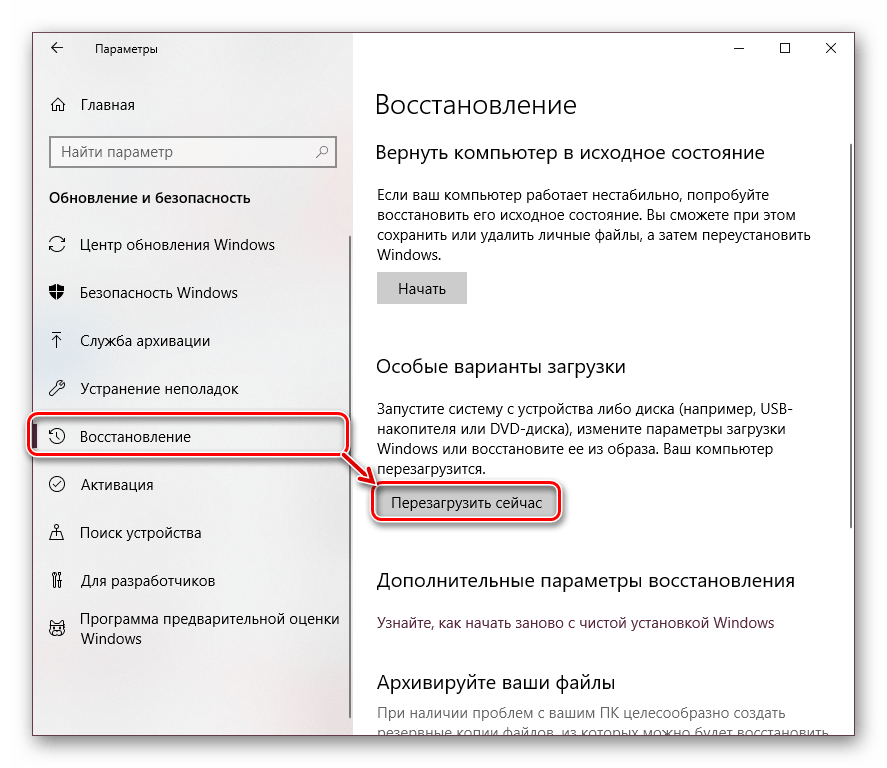
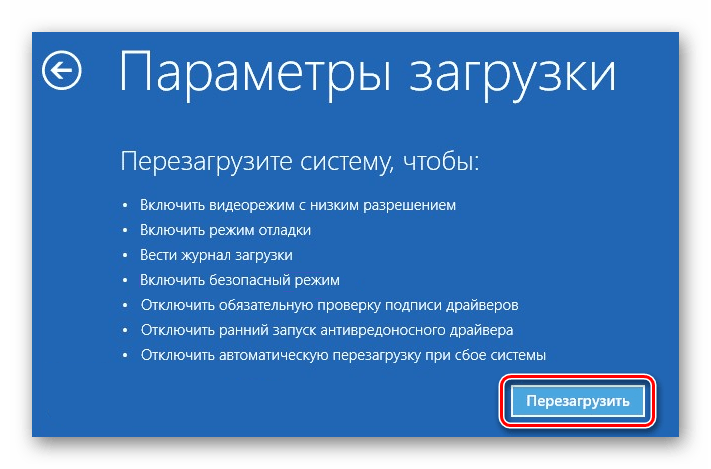
- В меню слева перейдите в «Восстановление», а справа, под «Особые варианты загрузки», кликните «Перезагрузить сейчас».
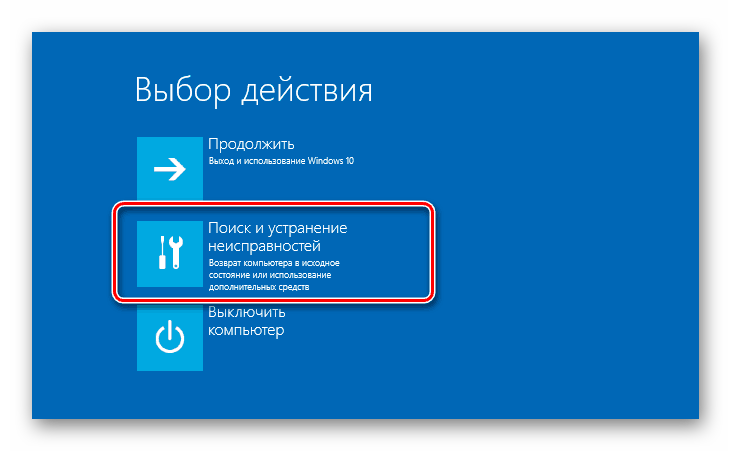
- Дождитесь старта Виндовс и выберите раздел «Поиск и устранение неисправностей».
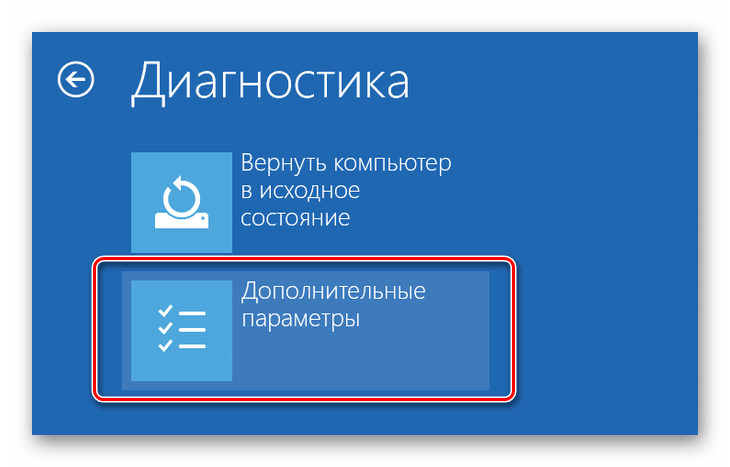
- В «Диагностика» перейдите в «Дополнительные параметры».
- Здесь откройте «Параметры загрузки».
- Ознакомьтесь с тем, что применится при следующем старте системы, и нажмите «Перезагрузить».
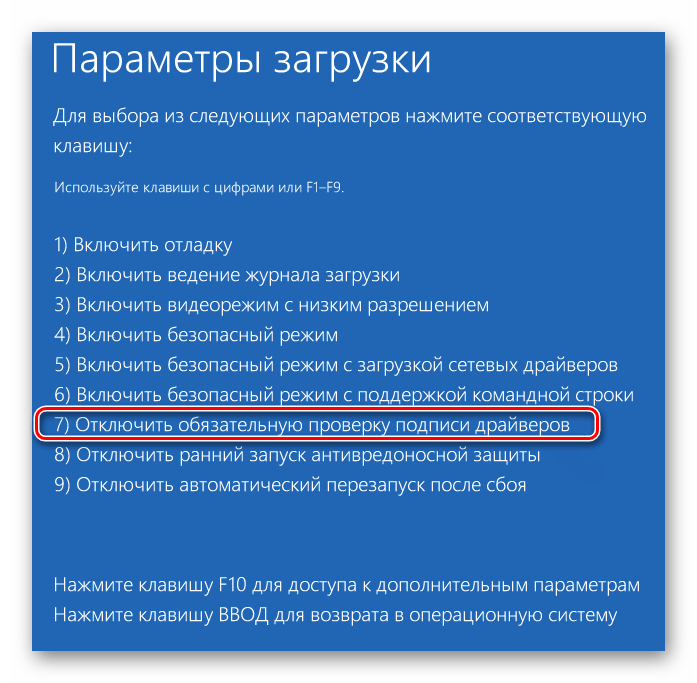
- В этом режиме будет отключено управление мышью, а также изменится разрешение экрана до низкого. Пункт, отвечающий за отключение проверки подписи драйверов, седьмой в списке. Соответственно, нажмите на клавиатуре F7.
- Начнется перезапуск, по завершении которого вы можете выполнить инсталляцию.


Последовательность действий для пользователей Windows 7 другая:
- Перезагрузите компьютер обычным способом.
- После начала запуска системы нажмите F8 (чтобы не пропустить момент, быстро жмите клавишу сразу же после того, как появится приветственный логотип материнской платы).
- Стрелками выберите «Отключение обязательной проверки подписи драйверов».
- Остается нажать Enter и дождаться перезапуска системы.

Теперь можно заняться инсталляцией программного обеспечения.
После следующего включения компьютера будет произведен обычный запуск системы, и она вновь начнет проверять подпись у драйверов, которые вы захотите установить. Обратите внимание, что эта служба не занимается проверкой установленных драйверов, для этого необходимо запускать отдельное приложение, которое по понятным причинам нас не интересует.
Способ 2: Командная строка
Используя известный многим интерфейс командной строки пользователь может отключить цифровую подпись, введя последовательно 2 команды.
Этот способ работает только при стандартном интерфейсе BIOS. Владельцам материнских плат с UEFI потребуется предварительно отключить «Secure Boot».
Подробнее: Как отключить UEFI в BIOS
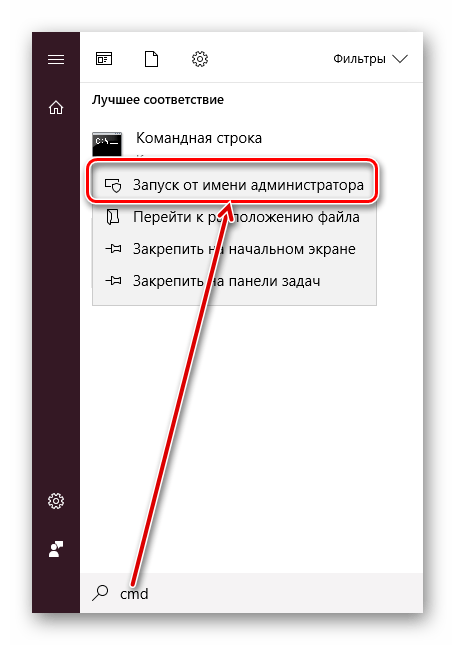
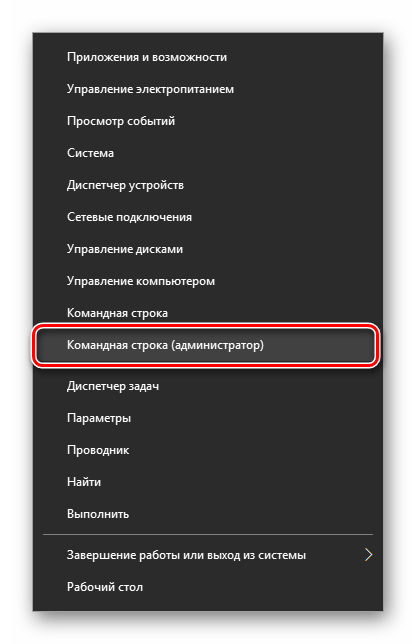
- Откройте «Пуск», введите cmd, кликните ПКМ по результату и выберите «Запустить от имени администратора».

Пользователи «десятки» могут открыть командную строку либо PowerShell (в зависимости от того, как настроено их альтернативное меню) с правами администратора и через ПКМ по «Пуск».
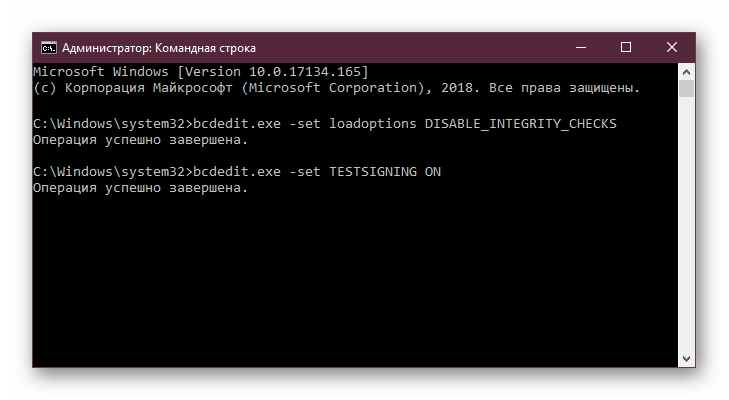
- Скопируйте команду ниже и вставьте ее в строку:
bcdedit.exe -set loadoptions DISABLE_INTEGRITY_CHECKSНажмите Enter и впишите:
bcdedit.exe -set TESTSIGNING ONСнова жмите Enter. Спустя небольшой промежуток времени вы получите уведомление «Операция успешно завершена».
- Перезагрузите ПК и запустите инсталляцию ПО для нужного оборудования.
В любой момент можно вернуть настройки, открыв cmd методом, расписанным выше, и вписав это:
bcdedit.exe -set TESTSIGNING OFF
После этого нажмите Enter и перезагрузить компьютер. Теперь драйверы всегда будут проверяться операционной системой. Дополнительно можно обратно включить UEFI таким же образом, каким вы его отключали.
Способ 3: Редактор локальной групповой политики
Еще один вариант решения поставленной задачи — редактирование политики компьютера. Им могут воспользоваться обладатели Windows версии выше Home (Домашней).
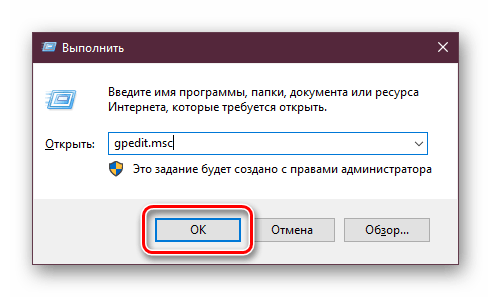
- Зажмите Win + R и впишите gpedit.msc. Подтвердите ввод кнопкой «ОК» либо клавишей Enter.
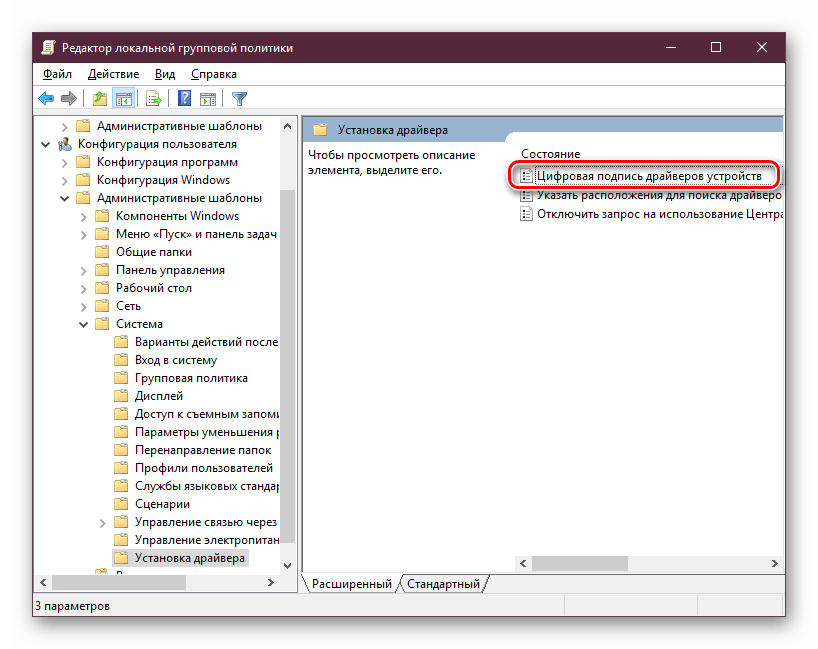
- Используя левое меню, разверните поочередно папки, нажимая на стрелочку перед их названием: «Конфигурация пользователя» > «Административные шаблоны» > «Система» > «Установка драйвера».
- Справа в окне дважды ЛКМ кликните по «Цифровая подпись драйверов устройств».
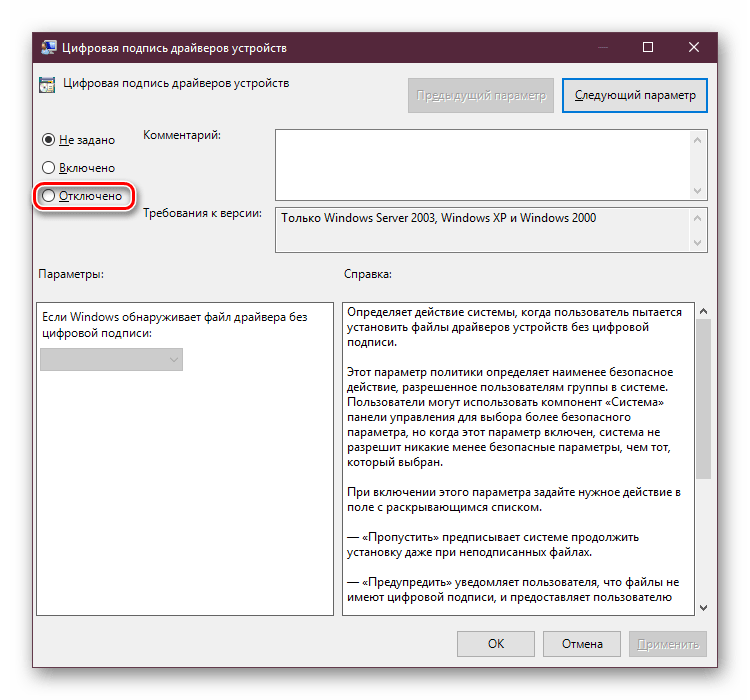
- Здесь задайте значение «Отключено», означающее, что осуществляться сканирование как таковое не будет.
- Сохраните настройки через «ОК» и перезагрузите компьютер.

Запустите драйвер, который не удавалось установить, и повторите попытку.
Способ 4: Создание цифровой подписи
Не всегда методы, рассмотренные в этой статье, работают. При невозможности отключить проверку, можно пойти другим путем — создать подпись вручную. Он же подойдет, если подпись установленного программного обеспечения время от времени «слетает».
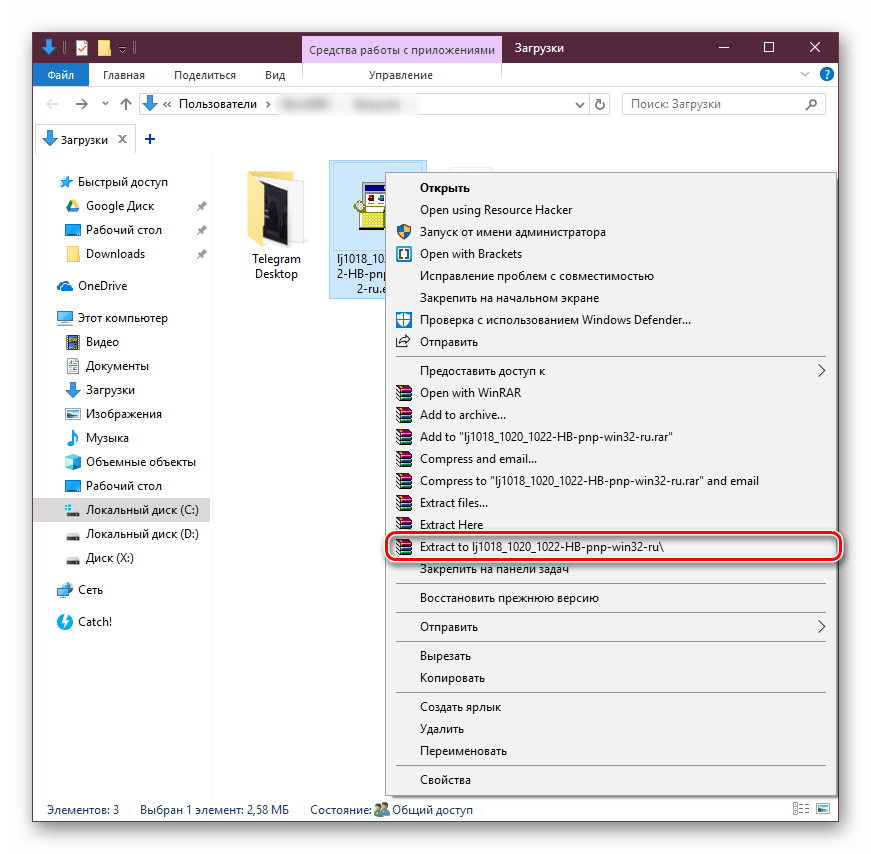
- Распакуйте архиватором скачанный EXE-драйвер, который нужно установить. Давайте попробуем сделать это с использованием WinRAR. Нажмите по файлу правой кнопкой мыши и выберите пункт «Extract to», чтобы распаковать составные инсталлятора в папку рядом.
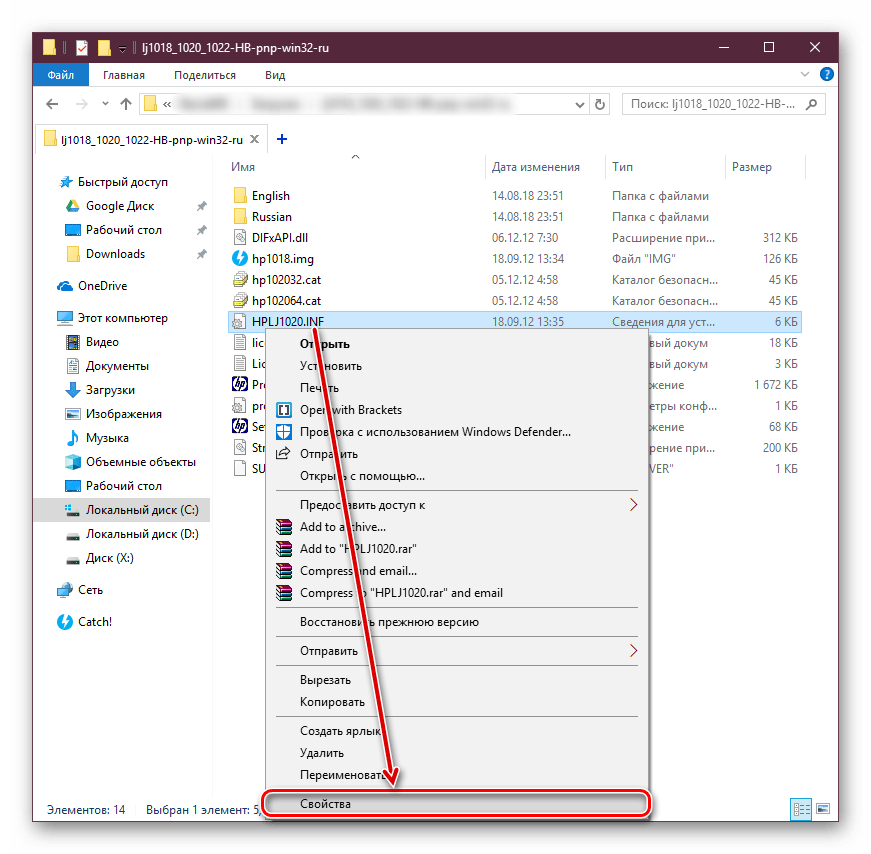
- Зайдите в нее, найдите файл INF и через контекстное меню выберите «Свойства».
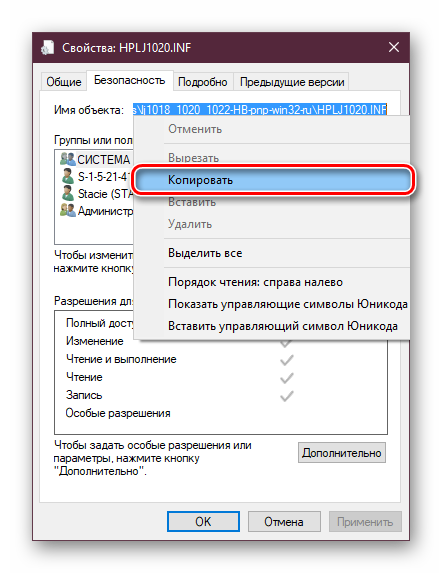
- Перейдите на вкладку «Безопасность». Скопируйте путь к файлу, указанный в поле «Имя объекта».
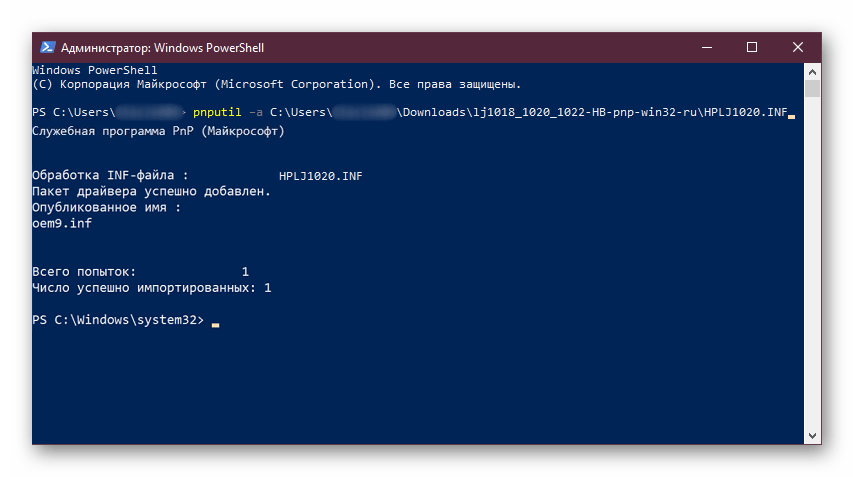
- Откройте командную строку или PowerShell с правами администратора. Как это сделать, написано в Способе 1.
- Впишите команду
pnputil –a, вставив после –a путь, который вы скопировали в Шаге 3. - Нажмите Enter, немного подождите, пока начнется обработка INF-файла. По окончании вы увидите уведомление об успешном импорте. Это значит, что драйвер зарегистрирован в Виндовс.
Мы рассмотрели несколько способов установки неподписанного программного обеспечения. Каждый из них несложен и доступен даже для начинающих юзеров. Еще раз стоит напомнить о небезопасности такой инсталляции и возможных ошибках в виде синего экрана смерти. Не забудьте предварительно создать точку восстановления.
Читайте также: Как создать точку восстановления в Windows XP, Windows 7 и Windows 10
Наша группа в TelegramПолезные советы и помощь
The confusion of dealing with unsigned drivers can sometimes disrupt your software installation process. Windows typically raises a red flag when such drivers come into play, triggering a warning message that it can’t validate the publisher’s credibility.

To push past this hurdle, you usually have to opt for «Install this driver software anyway». But what if there was a way to run these tricky drivers without user intervention?
Sounds tempting, doesn’t it? In this article, we will walk you through the process of installing unsigned drivers.
What should we do when installing unsigned drivers?
To begin, let’s gather the tools we need. Most of these are sourced from the Windows Driver Kit (Latest version: Windows Driver Kit W11 22H2):
- Inf2Cat.exe — For generating the unsigned catalog file from our INF
- MakeCert.exe — Used to create our certificate
- SignTool.Exe — To sign our catalog file with an Authenticode digital signature
- Certmgr.exe — To add and delete our certificate from the system root
Now, let’s have a look at the steps you should follow to get your unsigned certificates installed silently.
How to Create a digital certificate by using the MakeCert tool?
A digital certificate is an electronic document that guarantees the identity of a website or an individual. It’s a necessity for installing unsigned drivers as it creates an aura of trustworthiness.
Now, we’ll focus on creating a self-signed digital certificate using the MakeCert tool from the Windows Driver Kit.
For this process, we will be using an x86/x64 Free Build Environment command prompt with administrator permissions.
This task might sound daunting, but we have broken it down into simple steps for you. So let’s jump right into it:
1. On the Start menu, right-click x86 Free Build Environment and select Run as administrator.
2. At the x86/x64 Free Build Environment command prompt, type the following command on a single line (it appears here on multiple lines for clarity and to fit space limitations):
makecert -r -n "CN=Name"
		 -ss CertStore
		 -sr LocalMachine
Ex: makecert -r -n CN=»TestCert» -ss Root -sr LocalMachine
Let’s break down what each parameter represents:
— -r: Specifies that the certificate is to be «self-signed,» rather than signed by a CA. Also called a «root» certificate.
— -n «CN=Name«: Specifies the name associated with this new certificate. It is recommended that you use a certificate name that clearly identifies the certificate and its purpose.
— -ss CertStore: Specifies the name of the certificate store in which the new certificate is placed.
— -sr LocalMachine: Specifies that the certificate store created by the -ss option is in the per computer store, instead of the default per user store.

3.The command returns the message «Succeeded» when the store and certificate are created.
How to create a .cat (catalog) file for the driver?
At times, you might come across drivers that lack a .cat (catalog) file, and you’ll need to generate one yourself. The .cat file is crucial as it serves as the digital signature for your driver package. This section will guide you step by step on how to create a .cat file using the Inf2Cat tool provided by Microsoft.
Follow the steps below to generate a .cat file:
1. Open the .INF (Information File) of your driver in a text editor. The .INF file contains all the necessary details about the driver, including its configuration.
2. In this file, under the [version] section, check whether there is an entry specifying a .cat file. If it’s absent, add it at the end of the section as shown below:
[version]
Signature=xxxxxx
Provider=xxxxxx
CatalogFile=MyCatalogFile.cat
3. In the CatalogFile=MyCatalogFile.cat line, «MyCatalogFile.cat» represents the name of the .cat file that you want to generate. If the line specifying it is absent, you will encounter an «Error 22.9.4 — Missing 32-bit catalog file entry» when you run Inf2Cat.exe.
4. Once you’ve confirmed the presence of the CatalogFile entry in the .INF file, you can proceed to generate the .cat file using the Inf2Cat tool. Run the following command line in the command prompt:
Inf2Cat.exe /driver:"<Path to folder containing driver files
Ex : Inf2cat.exe /driver:[PathToINFwithoutFile] /os:10_x64,10_x86
This command line’s parameters are as follows:
- /driver:c:\toaster\device: Specifies the location of the .inf file for the driver package. You must specify the complete folder path. A ‘.’ character does not work here to represent the current folder.
- /os:10_x86 or 10_x64:Identifies the 32-bit version of Windows 10 as the operating system. Run the command inf2cat /? for a complete list of supported operating systems and their codes.

How to Sign the catalog file using SignTool?
After you create a catalog for your driver, it’s time to apply your digital signature using SignTool.
The signing process involves attaching a digital signature to your .cat file, which adds an extra layer of security and verifies the author of the driver.
Let’s walk through the steps on how to sign your catalog file:
First, familiarize yourself with the necessary command parameters. Below is an example command to sign your catalog file using SignTool:
signtool sign /v /sm /s Root /n "TestCert" /t http://timestamp.digicert.com path\example.cat
The meaning of each parameter is as follows:
- /v: Enables verbose output. SignTool will provide more detailed output about the signing process.
- /sm: Specifies that it’s using a machine store, instead of a user store.
- /s CertStore: Specifies the name of the certificate store in which SignTool searches for the certificate specified by the parameter /n. In our case we look at the Root.
- /n “Name”:Specifies the name of the certificate to be used to sign the package.
- /t path to time stamping service: Specifies the path to a time stamping service at an approved certification authority. If you purchase your certificate from a commercial vendor, they should provide you with the appropriate path to their service.
- path\example.cat: Specifies the path and file name of the catalog file to be signed.
Note: You must include enough of the name to allow SignTool to distinguish it from others in the store. If this name includes spaces, then you must surround the name with double quotes.
Run the command in the command prompt with the correct parameters for your specific case. Make sure you run the command prompt with administrator permissions.
SignTool will indicate successful completion with the following message: «Successfully signed and timestamped: C:\toaster\device\example.cat»

This process, when executed correctly, guarantees that your catalog file is securely signed, promoting trust and acceptance when distributing your driver package.
How to Manually Exporting the Certificate from Certstore
Next, export the certificate manually by:
- Run the administrator command: certmgr.exe
- Right-click on your certificate, then select All Tasks → Export…

Install the certificate to Root and TrustedPublisher
With your certificate ready, install it to Root and TrustedPublisher using the ‘certutil.exe’ command:
certutil.exe -addstore "Root" [PathToCertificatewithFile]
certutil.exe -addstore "TrustedPublisher" [PathToCertificatewithFile]

To remove it, you can use this command:
certutil.exe -delstore "Root" [PathToCertificatewithFile]
certutil.exe -delstore "TrustedPublisher" [PathToCertificatewithFile]
Now we can install the driver without the prompt.
How to Build the MSI to Install Unsigned Drivers?
Now that we know how to sign a driver, let’s focus on integrating these actions into an MSI. It takes two steps:
- Install the certificate
- Install the driver
For the second step, we already have an article that explains how to install drivers in multiple ways.
Now, we’ll focus on crafting a script that executes the ‘certutil’ commands mentioned earlier.
Let’s assume that the driver .inf name is HP.inf and that we are going to place the certificate directly into the C:\Windows\DPInst.
For VBScript:
Option Explicit
On Error Resume Next
Dim strCmd,WshShell,strInstalldir
Set WshShell = CreateObject("WScript.Shell")
strInstalldir = WshShell.ExpandEnvironmentStrings( "%SYSTEMROOT%" )
strCmd = "certutil.exe -addstore " & chr(34) & "Root" & chr(34) & " " & chr(34) & strInstalldir & "\DPInst\TestCer.cer" & chr(34)
WshShell.Run strCmd
Once the script is created, navigate to the Custom Actions Page and add the Launch attached file predefined custom action into the sequence, select the installation vbscript file that was previously created and configure the Custom Action as such:

Make sure that the script which installs the certificate is placed before the script that installs the driver under the “Install Execution Stage” section.
It’s even easier if you use PowerShell, since we can use the Import-Certificate cmdlet:
$CerLocation = $env:SystemRoot + "\DPInst\TestCer.cer"
Import-Certificate -FilePath $CerLocation -CertStoreLocation Cert:\LocalMachine\Root
Import-Certificate -FilePath $CerLocation -CertStoreLocation Cert:\LocalMachine\TrustedPublisher
Once we have the script ready:
1. Navigate to the Custom Actions Page and add the Run PowerShell script file predefined custom action into the sequence,
2. Select Attached Script
3. Choose the file that was previously created and configure the Custom Action as seen in the image below:

4. Next, build the package. During installation/uninstallation, the PowerShell scripts will run and install/uninstall the driver without asking if we want to install an unsigned driver.
Installing unsigned drivers with Advanced Installer
As you can see, handling unsigned certificates is time consuming and complicated.
Advanced Installer allows you to install unsigned drivers with just a few clicks:
1. Navigate to the Drivers page and click on New Driver.
2. Select the .inf file which must be present in the package.

3. Click on “Install unsigned driver packages and driver packages that have missing files” and let Advanced Installer take care of the rest.

That is it! Now, just build and install the package and you should have a clean installation without any warning messages from the OS.
Conclusion
Installing unsigned drivers can be a daunting task for IT professionals. A seemingly straightforward process can quickly become complex and time-consuming.
However, with the right tools and the tips provided in this guide, you can navigate this challenge with confidence and efficiency. Remember, your ultimate goal is to ensure a seamless and user-friendly installation process.
Good luck!
Written by
Alex Marin
Application Packaging and SCCM Deployments specialist, solutions finder, Technical Writer at Advanced Installer.
When installing unsigned drivers on Windows 10, Windows pops up a warning saying Windows can’t verify the publisher of this driver software.

The following are instructions on how to install unsigned drivers in Windows 10.
NOTE: Checking driver signatures is a security feature in Windows, and disabling it is not recommended. Only install unsigned drivers from trusted sources.
1. Install Unsigned Drivers from Advanced Boot Menu. The easiest way to install unsigned drivers is to use the Windows 10 Advanced Boot menu. To do that, press “Win + X,” navigate to “Shutdown” and then “Shift + Left Click” on the “Restart” option.

2. The above action will restart your system and will take you to the Advanced Boot menu. From here, select the “Troubleshoot” option.

3. In the Troubleshoot section, select the option “Advanced Options”.

4. Now, select “Start-up Settings”.

5. The Start-up Settings option will allow you to boot your Windows system in different modes. Just click on the “Restart” button to continue.

6. Since we need to install unsigned drivers, press F7 on your keyboard to select the seventh option “Disable driver signature enforcement”.

As soon as you press the key, your system will boot into Windows. Now you can install any unsigned driver you wish. After installing, restart your system, and the Driver Signature Enforcement will be automatically enabled from the next reboot. If you want to install another unsigned driver, you must go through the process listed above again.
Readers help support Windows Report. We may get a commission if you buy through our links.
Read our disclosure page to find out how can you help Windows Report sustain the editorial team. Read more
Microsoft developed the Windows 10 OS in order to provide a more user-friendly interface and also for ensuring that each user can operate on a safe and secure platform.
That’s why, among other security features, you won’t be able to install unsigned drivers. However, if you want or have to install a driver without a digital signature, there are solutions (as always).
But first, you should know that you must be an advanced Windows user, or else you might end up damaging your laptop, computer, or tablet.
Microsoft pre-installed the digital signature feature in order to prevent users from installing malicious or just badly programmed drivers which could cause crashes and open gaping security holes.
Applying an unsigned driver is usually required when you want to flash an old or outdated driver or when you try to develop your own software.
So, be careful when dealing with these processes, and before doing anything else save all your data, programs, or processes as the computer will reboot several times while completing the steps from below.
How do I install drivers on Windows 10 without digital signature?
Long story short, the only way to install unsigned drivers on your Windows computer is by disabling driver signature enforcement.
There are two ways to do this: one allows you to temporarily turn off driver signature, while the second one permanently disables this feature.
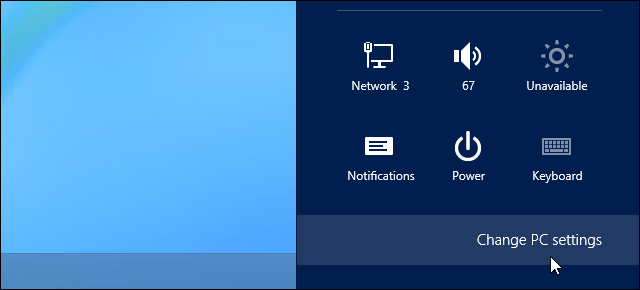
- On your computer open Settings charm by getting your mouse on the bottom right side of your display.

- From there select PC Settings and then pick the General category; finally, select restart now (press and hold Shift keyboard key while pressing on the Restart now button).

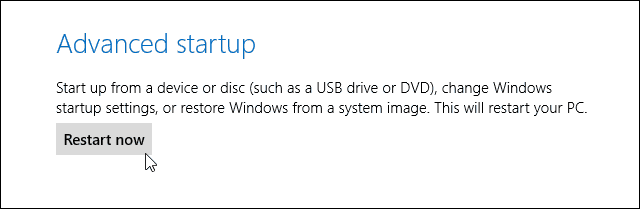
- The Advanced Startup Options will be then displayed.
- From the Choose an Option screen appears tap on Troubleshoot.
- Select Advanced Options from the next window and pick Startup Settings.
- From there once more select the Restart option.
- Up next, within Startup Settings window press F7 or 7 keyboard key in order to select Disable driver signature enforcement option.

- Windows 10 will immediately boot to its typical lock screen. Sign in to Windows 10 as you normally would.
- Do note that you will have to make these changes after each reboot as the digital signature feature will be reapplied by default when you restart your device.
Another option is to use a specialized tool that can automatically install the drivers you need safe and in just a few seconds.
⇒ Get PC HelpSoft Driver Updater
For more information on how to permanently disable driver signature enforcement, check out this step-by-step guide.
Once again, keep in mind that turning off driver signature enforcement makes your computer vulnerable to threats and malware attacks, so proceed at your own risk.
So that’s how you can install unsigned drivers on your Windows 10, Windows 8, or Windows 8.1 based laptop, tablet, or desktop.
In case you have other questions related to this topic, don’t hesitate to share with us by using the comments field below.
Andrew Wafer
Andrew is not just trying to bring you closer to Windows, but he’s truly interested in this platform. He just happens to be passionate about sharing that knowledge with our readers and that’s what makes his presence here, at WindowsReport, such a valuable one.
He specializes in writing about the best products for this operating system and Windows 10 fixes. Determined and creative, Andrew also loves coffee, country music, and Sunday mornings.