
1. Overview
With a bootable Ubuntu USB stick, you can:
- Install or upgrade Ubuntu
- Test out the Ubuntu desktop experience without touching your PC configuration
- Boot into Ubuntu on a borrowed machine or from an internet cafe
- Use tools installed by default on the USB stick to repair or fix a broken configuration
This tutorial will show you how to create a bootable USB stick on Microsoft Windows using Rufus.
For most users we recommend balenaEtcher instead of Rufus which is simpler to use and also available on MacOS and Ubuntu. Instructions are now included in the primary Install Ubuntu Desktop tutorial.
Creating a bootable Ubuntu USB stick from Microsoft Windows is very simple and we’re going to cover the process in the next few steps.
Alternatively, we also have tutorials to help you create a bootable USB stick from both Ubuntu and Apple macOS.

2. Requirements
You will need:
- A 4GB or larger USB stick/flash drive
- Microsoft Windows XP or later
- Rufus, a free and open source USB stick writing tool
- An Ubuntu ISO file. See Get Ubuntu for download links

Take note of where your browser saves downloads: this is normally a directory called ‘Downloads’ on your Windows PC. Don’t download the ISO image directly to the USB stick! If using Windows XP or Vista, download version 2.18 of Rufus.
3. USB selection
Perform the following to configure your USB device in Rufus:
- Launch Rufus
- Insert your USB stick
- Rufus will update to set the device within the Device field
- If the Device selected is incorrect (perhaps you have multiple USB storage devices), select the correct one from the device field’s drop-down menu

You can avoid the hassle of selecting from a list of USB devices by ensuring no other devices are connected.
4. Select the Ubuntu ISO file
To select the Ubuntu ISO file you downloaded previously, click the SELECT to the right of “Boot selection”. If this is the only ISO file present in the Downloads folder you will only see one file listed.
Select the appropriate ISO file and click on Open.

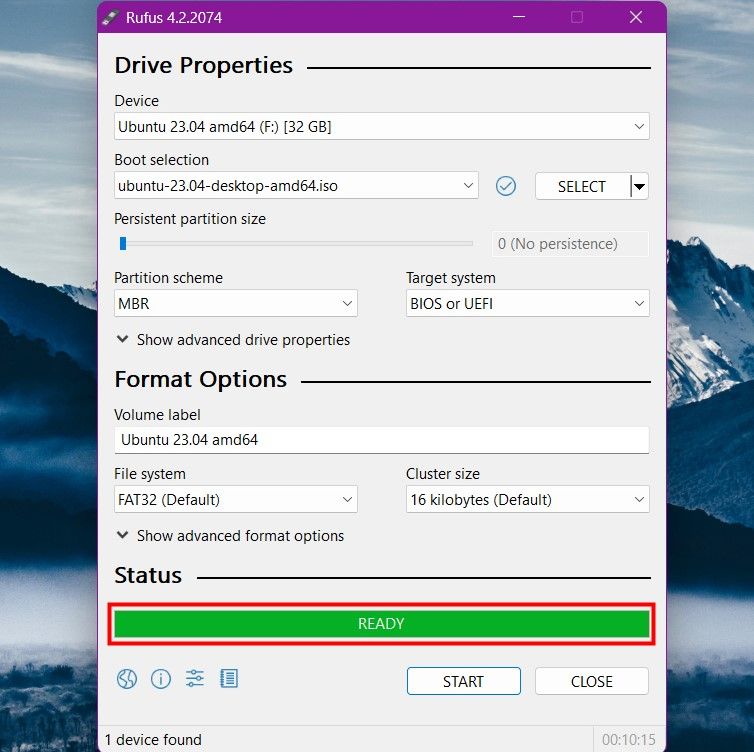
5. Write the ISO
The Volume label will be updated to reflect the ISO selected.
Leave all other parameters with their default values and click START to initiate the write process.

6. Additional downloads
You may be alerted that Rufus requires additional files to complete writing the ISO. If this dialog box appears, select Yes to continue.

7. Write warnings
You will then be alerted that Rufus has detected that the Ubuntu ISO is an ISOHybrid image. This means the same image file can be used as the source for both a DVD and a USB stick without requiring conversion.
Keep Write in ISO Image mode selected and click on OK to continue.

Rufus will also warn you that all data on your selected USB device is about to be destroyed. This is a good moment to double check you’ve selected the correct device before clicking OK when you’re confident you have.

If your USB stick contains multiple partitions Rufus will warn you in a separate pane that these will also be destroyed.
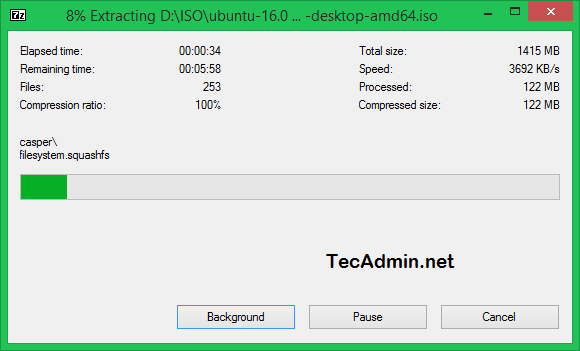
8. Writing the ISO
The ISO will now be written to your USB stick, and the progress bar in Rufus will give you some indication of where you are in the process. With a reasonably modern machine, this should take around 10 minutes. Total elapsed time is shown in the lower right corner of the Rufus window.

9. Installation complete
When Rufus has finished writing the USB device, the Status bar will be filled green and the word READY will appear in the center. Select CLOSE to complete the write process.

Congratulations! You now have Ubuntu on a USB stick, bootable and ready to go.
To use it you need to insert the stick into your target PC or laptop and reboot the device. It should recognise the installation media automatically during startup but you may need to hold down a specific key (usually F12) to bring up the boot menu and choose to boot from USB.
For a full walkthrough of installing Ubuntu, take a look at our install Ubuntu desktop tutorial.
Finding help
If you get stuck, help is always at hand:
- Ubuntu Discourse
- Ask Ubuntu
- IRC-based support
Was this tutorial useful?
Thank you for your feedback.
Summary
- You can install Ubuntu on a USB stick on Windows using tools like balenaEtcher, Rufus, or Ventoy.
- To install Ubuntu on a USB drive using balenaEtcher, select the ISO file, then the destination drive, and click «Flash!»
- balenaEtcher runs an integrity check after installing Ubuntu to the USB disk, so wait for it to finish before ejecting the thumb drive.
If you’re interested in trying Ubuntu but currently use Windows, you may think you need a technician to help. Fortunately, the task is easy and quick, and you can do it without an expert around. All you need to do is create a bootable Ubuntu USB drive, also called a live disk.
Live disks are complete operating systems (OSes) that you can run from a USB stick. They’re handy for many reasons, like using public computers with fewer risks, as is our case, trying Ubuntu without removing Windows. So, let’s do it!
First, Download the Ubuntu ISO
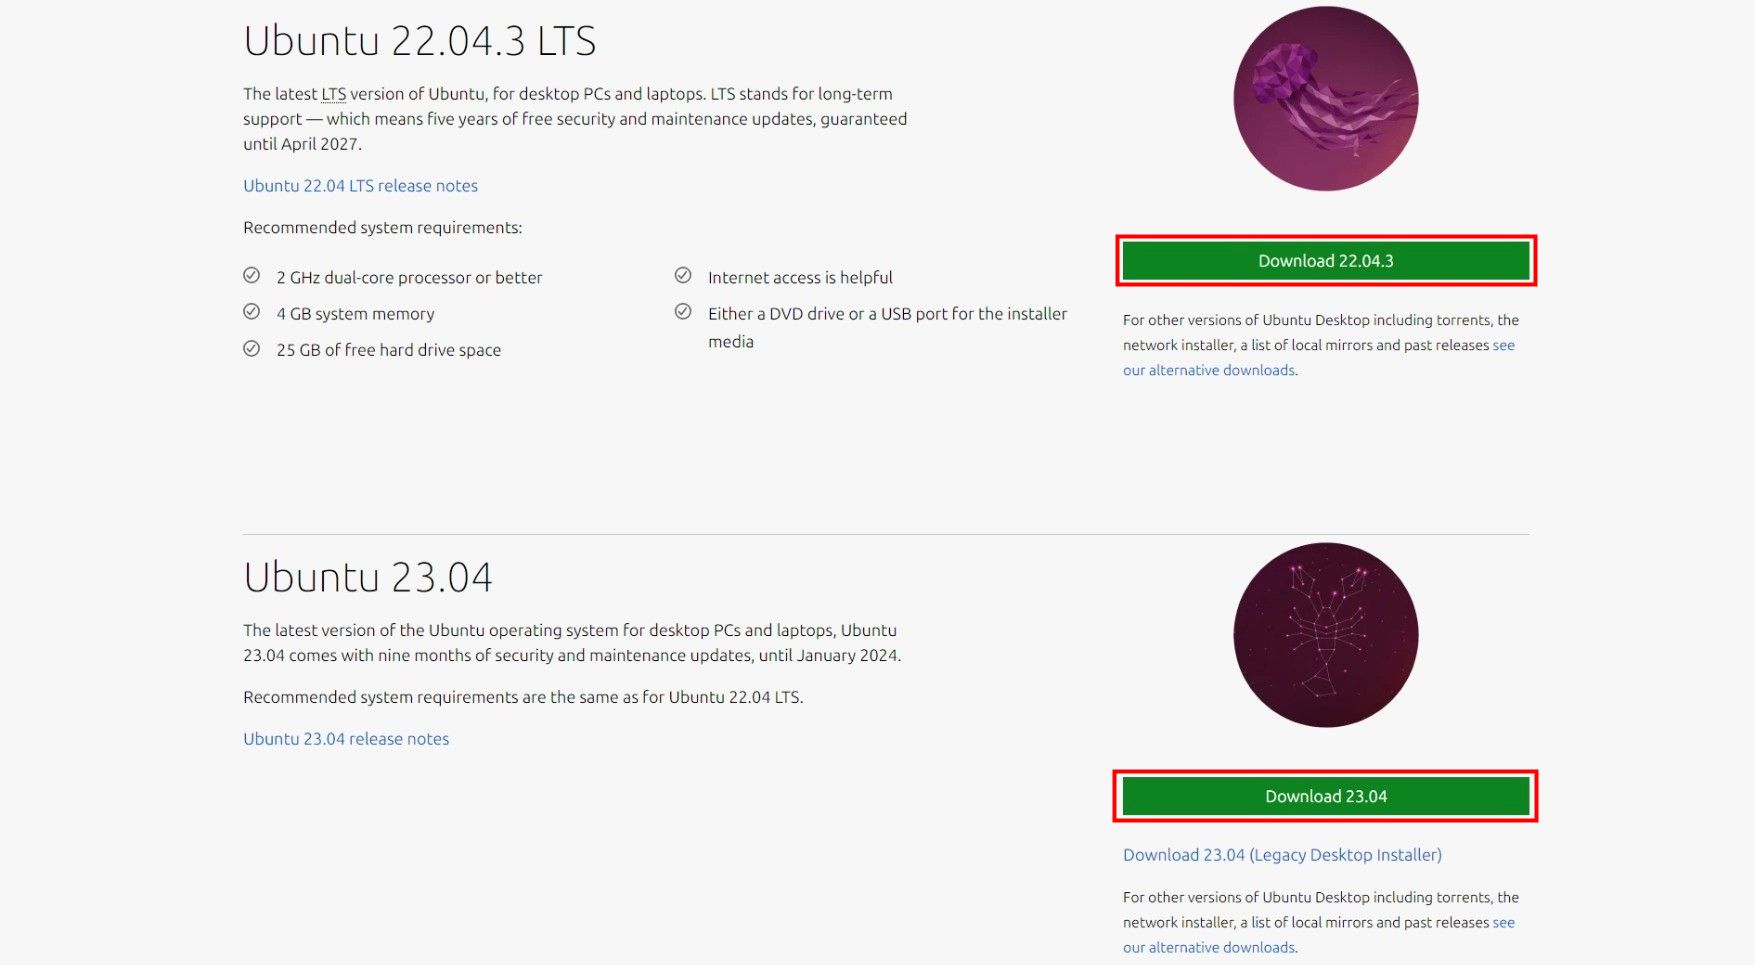
The first step is downloading the ISO image from Ubuntu’s website. On that page, you need to choose which Ubuntu version you want. LTS (Long-Term Support) means you won’t have all the new features, but security updates are provided for five years. The regular version (XX.04 or XX.10, where XX is the current year) only gets nine months of support, but you’ll be able to upgrade every April and October—new versions are released in these months every year.
Regardless of the version you choose, click the respective green «Download» button on the right side of the screen. The ISO file is considerably large, around 5GB, so it may take some time to complete.
An ISO file is called a «disk image». Simply put, it’s like compressing everything in a hard drive into a single file. You can use ISOs for several things, and in our case, we’ll just «copy» all the disk files to our USB stick.
While you wait for the download to finish, install the tool to make that ISO file your new Ubuntu USB disk. We have three options: balenaEtcher, Rufus, and Ventoy.
Option 1: Use balenaEtcher to Install Ubuntu From Windows
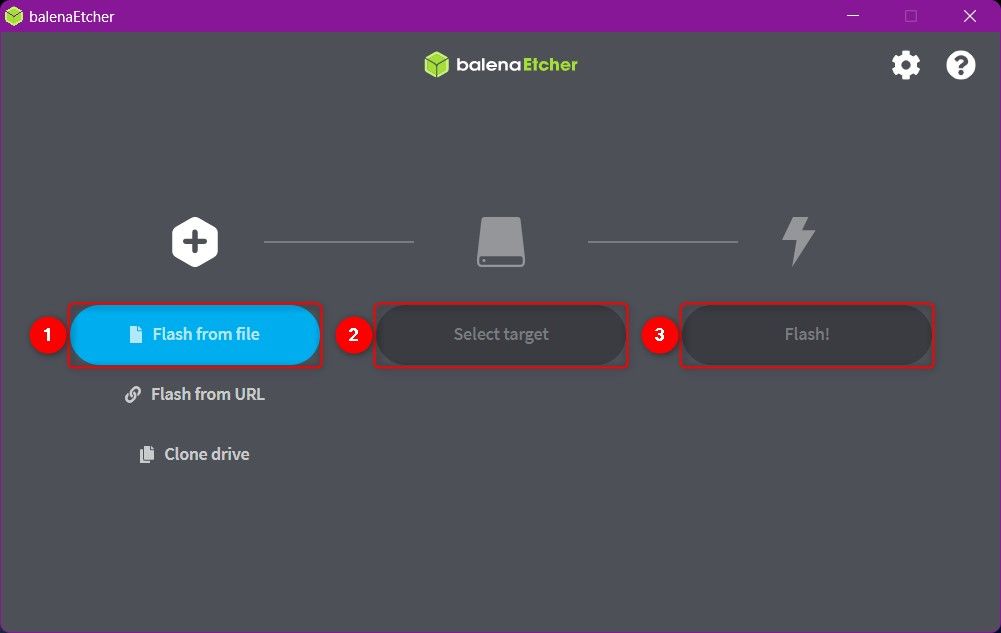
balenaEtcher is possibly the most straightforward tool to install Ubuntu on a USB stick. Start by downloading balenaEtcher. It has an installable version and a portable one that runs directly from the EXE file.
After opening balenaEtcher, click on «Flash From File» and navigate to the downloaded file’s location. Then, choose your USB drive on «Selected Target». The app usually hides your computer’s disks, listing only removable ones. Then, click on «Flash!» to start.
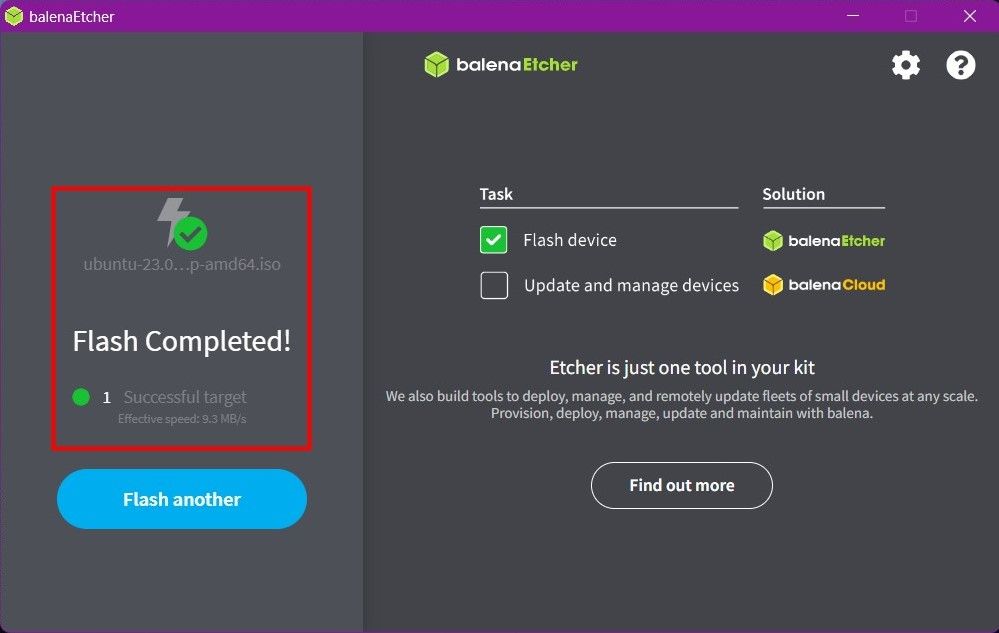
You might be prompted to run the app as administrator. Allow it, and then balenaEtcher will install Ubuntu on your USB drive (green progress bar), also doing a verification check to ensure no files were corrupted (orange progress bar). When you see the «Flash Completed» prompt, it’s done.
Option 2: Install Ubuntu From Windows Using Rufus
Rufus is also an easy tool to install Ubuntu from Windows. However, with its optional features, it may seem more complex than it is.
To begin, download Rufus—again, there are installable and portable versions, but both are very small downloads.
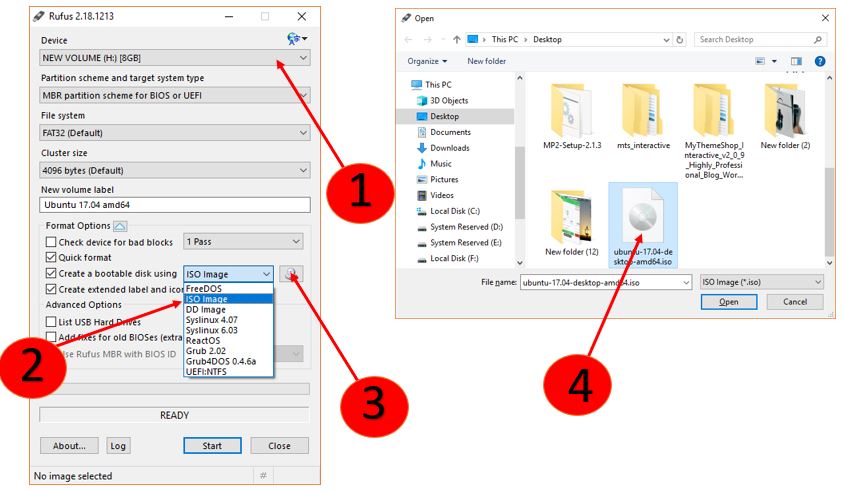
Rufus opens with a small window showing a few options. There’s no need to worry about most of them. Just select your USB drive on «Device» and your ISO file in «Boot Selection» by clicking the «Select» button. After that, click the «Start» button at the bottom of the window.
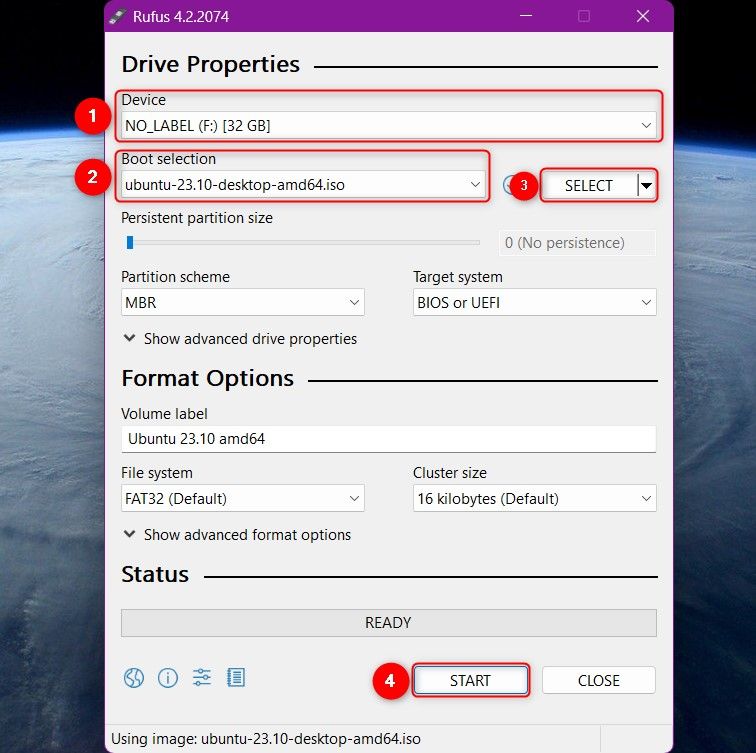
Rufus will give you a few warnings. You can just click «OK» through them all, we just need the default settings. When the progress bar (highlighted in red) finishes, the process is done.
Option 3: Install Ubuntu From Windows With Ventoy
Ventoy works differently from the previous tools. Both balenaEtcher and Rufus work by «flashing» the ISO file: they copy all the files from the disk image to the USB stick and then change a setting to tell computers that this drive can be used to start a computer up (like the internal HDD or SSD your computer usually boots from).
Ventoy, on the other hand, is like a micro-sized OS. You flash Ventoy on the USB stick and then copy the whole Ubuntu ISO file to the thumb drive. The advantage is that, in this case, you’re not limited to a single disk image.
If you want to find and try the best Linux distributions, like Fedora, Linux Mint, or Arch Linux, you can download their ISOs from the respective official sites and copy them to Ventoy’s partition—given that your USB drive has enough space.
That also means Ventoy’s interface is simpler than the one in Rufus or balenaEtcher. Since you only need to choose the destination disk, there’s just a drop-down menu listing disks and an «Install» button (or «Update» if the program detects a Ventoy installation in the selected drive).
If you want to give it a shot, start by downloading Ventoy—the Windows version comes as a ZIP file. Extract the ZIP file and run the «Ventoy2disk» app.
Select your desired USB drive and click «Install». It will show two dialog boxes in a row, just for you to make sure you selected the right drive, and then start flashing.
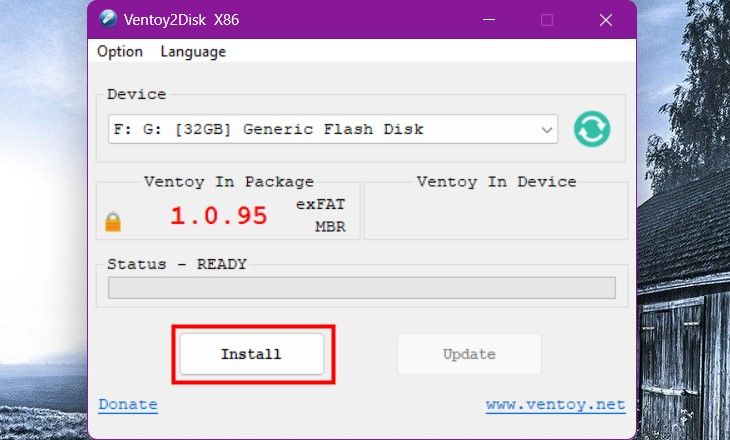
Since Ventoy is a very lightweight tool, this should take less than a minute. Then, a new partition (aptly named Ventoy) will be created on the USB stick.
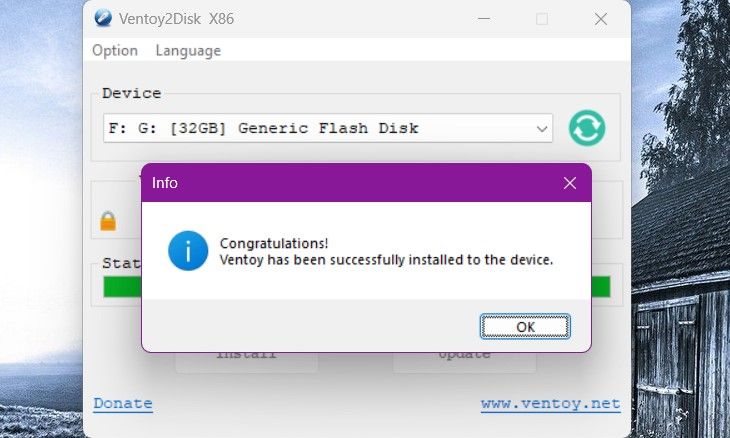
Copy your Ubuntu ISO file to that partition and we’re good to go. When you boot into Ventoy, it’ll show a list of ISOs stored on the drive (in this case, just Ubuntu).
Ready? Boot Ubuntu From the USB Disk
No matter which method you choose, after installing Ubuntu to your USB stick you’ll need to make your computer boot from it. The exact menus vary widely, but we have a good general guide on how to change a computer’s boot order.
You’ll probably need to disable a setting called Secure Boot in the EFI settings/BIOS menu, too. If you decide on running Ubuntu alongside Windows in a dual-boot setup, make sure you disable fast startup on Windows, since it may prevent your Linux installation from starting.
Периодически у пользователей возникает необходимость установить Ubuntu на USB, чтобы иметь возможность пользоваться удобной для себя операционной системой на абсолютно любом компьютере с наличием USB-порта. Преимуществ у данного решения сразу несколько — в режиме Live CD, например, можно удобно восстановить файлы или разметить диски, при этом не устанавливая ОС на постоянную память компьютера. Или же можно полноценно установить дистрибутив на флешку — в этом случае не нужно каждый раз производить настройку «под себя», можно не переживать о приватности и всегда иметь возможность работать с комфортом на любом ПК.
Подготовительный этап
Перед тем, как начать непосредственный процесс установки Ubuntu на USB-носитель, нужно подготовить необходимое аппаратное и программное обеспечение. Для начала пользователю необходимо:
- USB-флешка от 4 ГБ и больше, на которую будет установлен образ операционной системы;
- ещё одна флешка максимально доступного объёма, на которую будет установлена операционная система Ubuntu;
- компьютер, на котором можно выполнить необходимые действия.
Если на флешке имеется какая-либо важная информация, то стоит её сохранить на ПК или другом носителе, так как все данные на флешке будут утеряны. После этого можно приступать к загрузке установочного образа Ubuntu.
Загружаем образ системы:
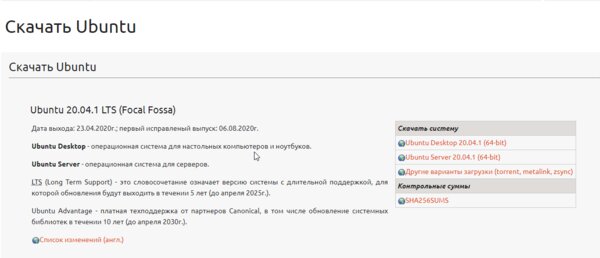
- перейдите по ссылке на официальный сайт Ubuntu в раздел загрузки дистрибутива;

- в правой части окна кликните по ссылке Ubuntu Desktop 20.04.1 (64-bit) (возможно, на момент прочтения статьи версия будет другой, главное загрузить Desktop-вариант);
- начнётся процесс загрузки образа операционной системы (вес ISO-образа составляет 2,6 ГБ, но может меняться от версии к версии).
Как установить образ Ubuntu на флешку
Теперь нужно выполнить несколько простых шагов, чтобы установить образ Ubuntu на наш внешний носитель.
Устанавливаем образ системы на USB:
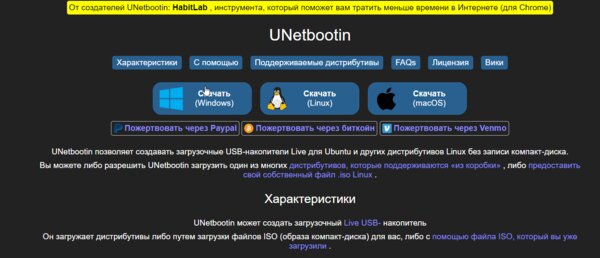
- перейдите по ссылке на официальный сайт UNetbootin;
- кликните по пункту Download (Windows) (выберите ту ОС, с которой вы будете устанавливать образ системы на флешку);
- дождитесь загрузки программы на компьютер;
- кликните правой кнопкой мыши по иконке UNetbootin;
- в выпадающем меню кликните по пункту «Запустить от имени администратора»;
- в появившемся окне нажмите «Да»;
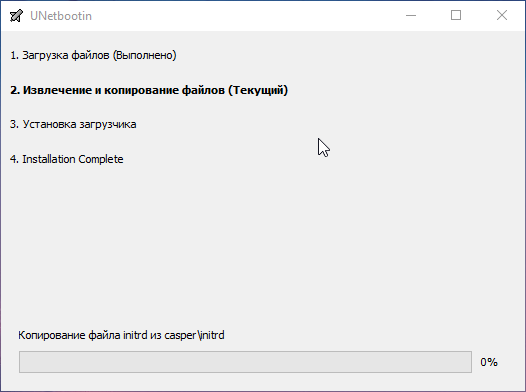
- в UNetbootin переключитесь на пункт «Образ диска» в нижней части окна;
- кликните по кнопке «…» в правой части экрана;
- укажите путь к ранее загруженному образу дистрибутива Ubuntu;
- дважды кликните левой клавишей мыши по образу;
- кликните в нижней части окна UNetbootin по выпадающему меню «Носитель»;
- выберите из списка флешку, на которую будет установлен образ Ubuntu;
- нажмите на кнопку «ОК»;

- подождите, пока процесс установки будет завершён.
Стоит отметить, что записанный образ уже можно использовать в режиме Live CD — это полноценная операционная система, но все изменения, установленные приложения и прочие манипуляции записываются не на постоянную память, а в оперативную. Соответственно, после каждой перезагрузки все изменения будут стёрты. Данный вариант удобен в том случае, если пользователю нужно разметить диски, восстановить файлы с основного накопителя, выполнить разовые запуски скриптов или специальных приложений. Чтобы запустить Ubuntu с флешки с образом, достаточно в первом же меню нажать на кнопку «Попробовать Ubuntu».
Как установить Ubuntu на флешку
Теперь, имея установочный образ, пользователю необходима ещё одна флешка от 4 ГБ и больше (чем больше, тем лучше), на которую, собственно, и будет устанавливаться дистрибутив Ubuntu.
Пошаговая инструкция:
- установите флешку с образом Ubuntu в USB-порт (используем флешку из предыдущего шага);
- установите флешку, на которую будет устанавливаться ОС, в USB-порт;
- перезагрузите компьютер, перейдя в BIOS;
- выберите загрузку с флешки с образом Ubuntu в режиме UEFI;

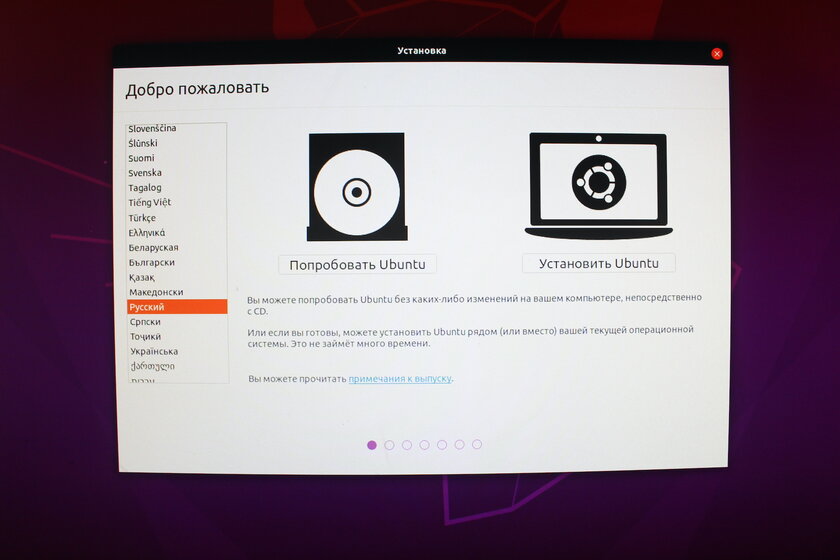
- в появившемся окне кликните мышкой по кнопке «Установить Ubuntu»;
- выберите раскладку клавиатуры (Russian);
- нажмите на кнопку «Продолжить»;
- в окне «Обновления и другие программы» в пункте «Какие приложения вы хотите установить для начала?» переключите выбор на «Минимальная установка»;
- нажмите на кнопку «Продолжить»;
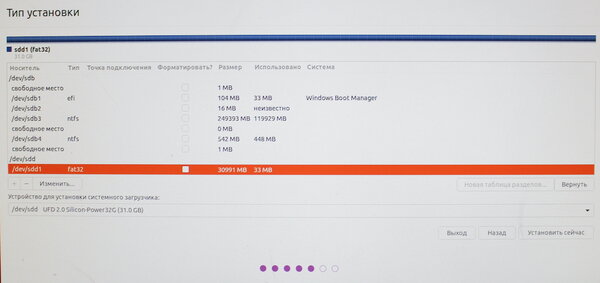
- в окне «Тип установки» переключите выбор на «Другой вариант»;
- нажмите на кнопку «Продолжить»;
- на экране появиться меню для разметки дисков, в котором пользователю нужно найти свою флешку и кликнуть по ней левой клавишей мыши;

- подсказка — найти пустую флешку можно по колонке «Размер»;
- кликните мышкой по кнопке «Установить сейчас»;
- в появившемся окне нажмите «ОК»;
- установщик предложит выбрать локацию, где вы проживаете (необходимо для установки правильного часового пояса);
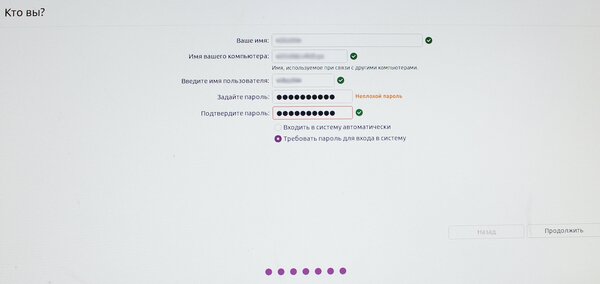
- в окне «Кто вы?» введите имя, имя компьютера, пароль и повторите пароль;

- также рекомендуется поставить выбор на пункт «Требовать пароль для входа в систему»;
- нажмите на кнопку «Продолжить»;
- дождитесь окончания установки системы.
Теперь у вас имеется полноценный дистрибутив Ubuntu на флешке, а все приложения, изменения и настройки будут сохраняться в память накопителя, который можно носить с собой и подключать для работы к любому компьютеру.
Запуск из-под флешки с Ubuntu
К сожалению, пока что ваш ПК и другие компьютеры, на которых вы планируете работать, не знает, что нужно загружать именно флешку с Ubuntu в качестве основного носителя с операционной системой. Чтобы ПК знал это, нужно внести простейшие изменения в Boot Menu в BIOS. Благо, все современные материнские платы могут похвастаться весьма понятным интерфейсом, а даже если вы что-то сделаете не так, всегда можно будет вернуться к заводским настройкам.
Перезагрузите компьютер и сразу после начала его включения многократно нажимайте одну из следующих клавиш или комбинаций:
- ПК — F1, F2, Del;
- Ноутбук Acer — F1, F2, Ctrl+F2, Ctrl+Alt+Esc, Ctrl+Alt+Del;
- Ноутбук ASUS — F2, F9, Del;
- Ноутбук Dell — F1, F2, F10, Del, Esc, Insert;
- Ноутбук HP — F1, F8, F10, F11, Esc, Del;
- Ноутбук Lenovo — F2, Fn+F2, F8, Del;
- Ноутбук Samsung — F2, F8, F12, Del, Fn+F2, Fn+F8, Fn+F12;
- Ноутбук Sony — F1, F2, F3, Del, ASSIST.
В самом BIOS нужно открыть меню Boot Menu (оно может располагаться на первом экране, либо выведено в отдельное меню) и поставить на первое место выбранную вами флешку с дистрибутивом Ubuntu, после чего сохранить изменения и выйти из BIOS (Save and Exit). Или же, если ваша система это поддерживает, можно просто выбрать флешку, и загрузка ПК начнётся с неё.
- Важно: в будущем на любом из компьютеров, на котором вы захотите работать из-под Ubuntu со своей собственной флешки, нужно будет повторять данную манипуляцию.
Как установить Ubuntu с флешки на компьютер
Естественно, установка дистрибутива Ubuntu на HDD или SSD ничем не отличается от аналогичного процесса с флешкой, который описан выше. Пользователю так же нужно скачать образ с официального сайта, после чего смонтировать его на флешку, после чего перезагрузить ПК и загрузиться с данной флешки для запуска установки ОС.
Разница лишь в двух пунктах:
- в окне «Тип установки» ничего переключать не нужно (10 шаг);
- в окне разметки дисков нужно выбрать SSD/HDD, на который нужно установить ОС (12 шаг).
Остальные шаги установки ничем не отличаются.
Возможные трудности и ошибки при установке Ubuntu на флешку
1. Во время загрузки образа Ubuntu с официального сайта может возникнуть проблема со скоростью — она будет предельно низкой. Чтобы не ждать несколько часов, можно воспользоваться другими вариантами загрузки или дополнительными зеркалами. Важно уточнить, что загружать образ стоит лишь с официального сайта, избегая сторонние проекты.
2. На этапе разметки диска для установки дистрибутива у некоторых пользователей может появиться ошибка «Корневая файловая система не определена. Исправьте это из меню разметки».
Проблема, к счастью, решается в несколько кликов:
- найдите в списке доступных накопителей флешку, на которую нужно установить дистрибутив Ubuntu;
- снизу под названием накопителя кликните по надписи «Свободное место»;
- кликните по иконке плюса в нижнем левом углу окна;
- в появившемся окне укажите максимально доступный объём накопителя, установите «Первичный» тип нового раздела, в следующем пункте выберите «Начало этого пространства»;
- в выпадающем меню «Использовать как» выберите «Журналируемая файловая система Ext4» и укажите точку монтирования «/»;
- нажмите на кнопку «ОК»;
- после этой манипуляции выберите накопитель с типом ext4;
- нажмите на кнопку «Установить сейчас»;
- ошибка не появится и установка системы продолжится в штатном режиме.
In the evolving world of operating systems, Ubuntu stands out as a popular, open-source alternative to Windows and macOS. Whether you’re looking to run a dual-boot system, try out Ubuntu without installing it, or need a portable OS, creating a bootable USB drive is an essential first step. This comprehensive tutorial guides you through the process using the Universal USB Installer application in Windows 11/10/8.
Universal USB Installer is a user-friendly, lightweight, and versatile tool compatible with a wide range of operating systems. It simplifies the process of creating a bootable USB drive, making it accessible even for users who are new to such tasks.
Prerequisites
Before starting, ensure you have the following:
- A USB drive with at least 4GB of space.
- A computer running Windows 11, 10, or 8.
- Internet connection to download the necessary software.
- A downloaded ISO file of the Ubuntu version you wish to install.
Step 1: Download Ubuntu ISO
You can easily download the Ubuntu ISO image from its official website. Download the Ubuntu Desktop or server edition as per your requirements.
Download Ubuntu ISO Image
Step 2: Install Universal USB Installer
For this tutorial, I am going to use the Universal USB Installer utility on Windows to create a bootable USB drive. Use the below link to download this tool and install it on your Windows system.
Download Universal USB Installer
At this stage, You have installed Universal USB Installer on your system. Also have downloaded the Ubuntu ISO image. Now start the process of creating an Ubuntu bootable USB.
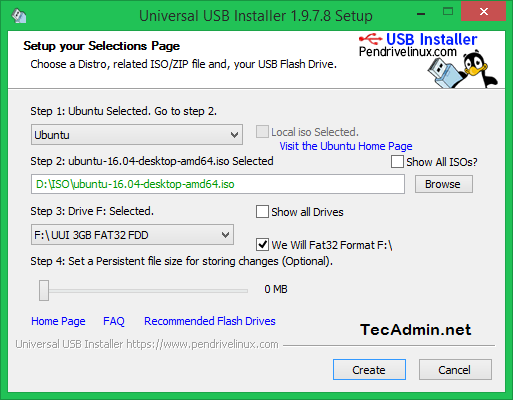
Start Universal USB Installer and select following options.
- Step 1: Select Ubuntu
- Step 2: Browse and select Ubuntu ISO image from your system.
- Step 3: Select the USB drive
Now click on Create button:
The installation process is in progress.
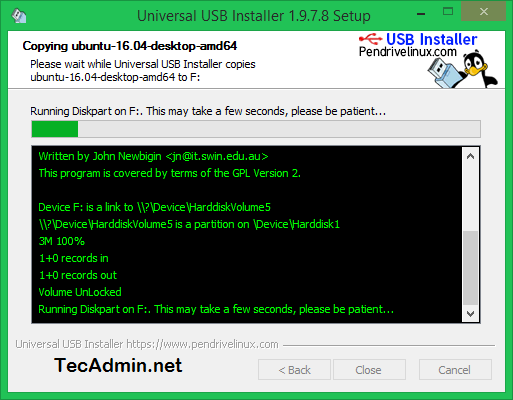
Wait for the installer to complete the process. This process will take time as per your operating system speed.
After completing the process, You will see a screen like this.
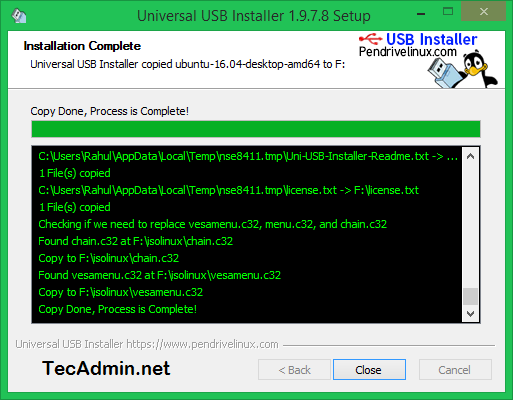
Your Ubuntu bootable USB is ready to use. Use this USB to use as live Ubuntu media or install Ubuntu operating system on your system.
Step 4: Booting from the USB Drive
- Insert the USB Drive: Plug the USB drive into the computer where you want to use Ubuntu.
- Access Boot Menu: Restart the computer and access the boot menu (usually by pressing F12, F10, or ESC, depending on the make and model of your computer).
- Select the USB Drive: From the boot menu, select your USB drive as the boot device.
Conclusion
Congratulations! You now have a bootable Ubuntu USB drive created using Windows 11/10/8. This drive is a gateway to experiencing Ubuntu, whether for testing, installation, or troubleshooting purposes. Remember, booting from a USB drive doesn’t alter your existing operating system unless you choose to install Ubuntu. Enjoy exploring the robust and versatile world of Ubuntu Linux!
For installing Ubuntu Linux from a USB stick, first, we need to create a bootable USB drive. Like Windows, Ubuntu can be installed from a USB flash drive and most of the people opting this method because of the lack of CD DVD ROM in the modern notebooks and computers. Moreover, handling USB drive is much convenient than CD-ROMs. Here in this step by step tutorial, we will show, how to install Ubuntu Linux from a USB memory stick. The USB memory stick sometimes also called Pen drive, USB flash drive or USB mass storage device.
Prerequisites
- A USB drive of at least 4 GB to install Ubuntu. Although its depend upon, what type of Linux OS installation you want and the size of the USB drive is depends on that.
- The USB Memory stick should be blank and completely formatted
- Downloaded Ubuntu Linux ISO image
Step By Step Installation of Ubuntu from a USB Stick on Windows 10
Step 1: First of all download the open-source Linux Ubuntu ISO from the Ubuntu official website. The different flavours of Ubuntu available are Kubuntu, Lubuntu, Mythbuntu, Ubuntu Kylin, Ubuntu GNOME, Ubuntu Budgie, Ubuntu MATE, Ubuntu Studio and Xubuntu. The installation procedure is the same for all the Ubuntu flavours but in performing this tutorial we use the standard Unity Ubuntu.
Step 2: After downloading the Ubuntu ISO, the second step is to get the Ubuntu bootable USB-creator. There are a couple of good free and open-source software options are available such as Linux Live USB Creator, Unetbootin, Rufus and Win32 Disk Imager. You can use any of them but for the tutorial, we are using the Rufus as an Ubuntu startup disk creator. Link to get the open-source Rufus USB installer.
Step 3: After downloading the Rufus install and run it.
Setting up the Rufus USB installer
- Select the USB drive or stick in which you want to install the Ubuntu.
- From a “Create a bootable disk using” option select an ISO image from the drop-down.
- Click on the CD-ROM icon to select the downloaded Ubuntu ISO image.
- Click on the start button to begin the Ubuntu bootable USB creation process.
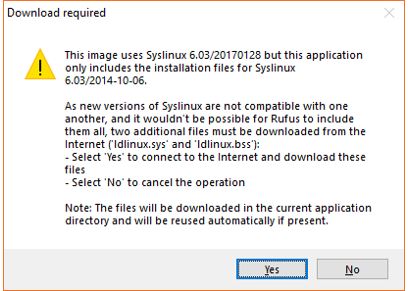
Step 4: After hitting the start button, the Rufus start processing the ISO image, it might ask to download two files ldlinux.sys and lidinux.bss. Click on “Yes”.
Don’t Miss: How to Reset Forgotten User Password in Ubuntu 17.04 Using Terminal
Step 5: Hybrid image confirmation… The Rufus detected the Ubuntu ISO images as an ISOHybrid image which means the same image file without any conversion can use for DVD and USB stick without any modification. Leave the pre-selected recommended option as it is and click on OK.
Step 6: Next step, the Rufus will ask confirmation to destroy any data, if present in the USB memory stick. Click OK and after that, it will start the creating Ubuntu bootable USB stick or pen drive.
Start the Ubuntu Installation from USB
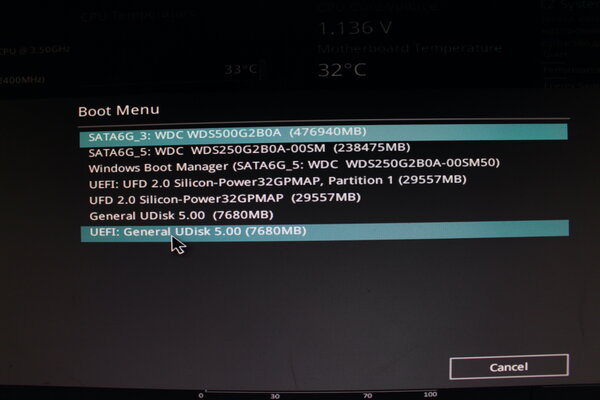
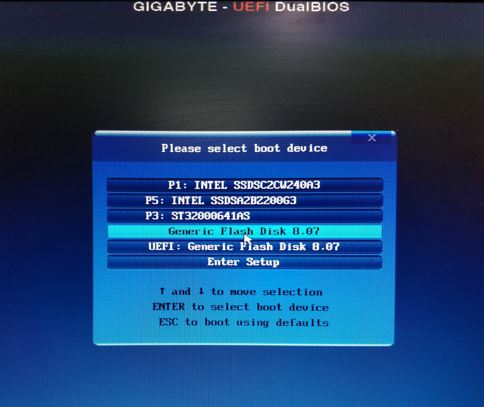
Step 1: Without removing the USB stick, reboot the computer and change the boot order from bios. Key to getting the boot menu depends on your motherboard model. For example, here we are using the Gigabyte and the F12 is the key to select the boot order. You can google about your motherboard model or you can also find it from the first boot screen of the computer. Normally key need to press is one of the following: F1, F2, Del, Esc, F10, F11, or F12.
Note: If the USB does not appear in the boot menu then you need to enable it from the bios.
Once the boot menu appears, select the pen drive or USB stick which we used to create the Ubuntu bootloader.
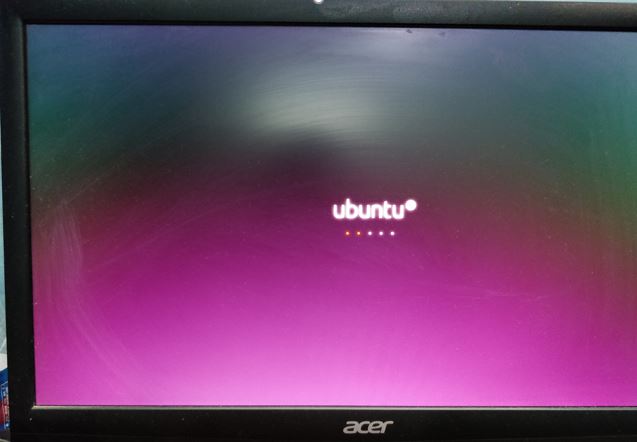
Step 2: If everything is fine, you will see the Ubuntu boot screen.
Step 3: To Install the Ubuntu select the option “Install Ubuntu”.
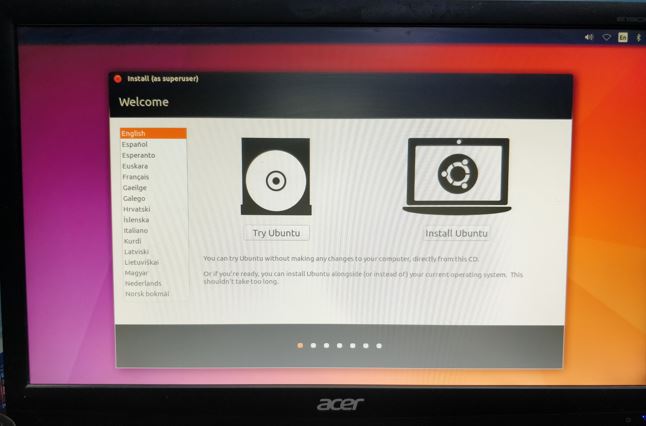
If you want a dual boot configuration of Ubuntu and Windows 10 then at Installation type window, select the first option “Install Ubuntu alongside them“. It will preserve your Windows 7 or Windows 10 OS with all data and give you Operating system selection menu every time you boot the computer. This also applies to other Operating systems using an Ubuntu dual boot environment.
