
|
Needs Updating |
Contents
- Introduction
- Back Up Your Data
-
Have a Windows recovery CD/DVD available
- Getting Recovery Media
-
Install Ubuntu after Windows
-
Install Ubuntu
- Automatic partition resizing (not recommended)
- Manual partitioning
-
Install Ubuntu
- Master Boot Record and Boot Manager
-
Installing Windows After Ubuntu
- Recovering GRUB after reinstalling Windows
- Master Boot Record backup and replacement
- Also see
Introduction
This page describes how to set up your computer in order to dual boot Ubuntu and Windows. While there are some benefits to dual-booting (e.g. better performance for a native install), it is not recommended. Instead, it is best to do a native install of Ubuntu, and then virtualize the other operating system.
Back Up Your Data
Although this may seem obvious, it is important to back up your files to an external backup medium before attempting a dual-boot installation (or any other hard drive manipulation), in case your hard drive becomes corrupted during the process. External hard drives, USB flash drives, and multiple DVDs or CDs are all useful for this purpose.
Have a Windows recovery CD/DVD available
Some computer manufacturers that pre-install Windows provide a Windows recovery/re-installation CD or DVD with the computer. However, many companies no longer ship a physical disc but instead create a hidden partition on the hard drive in which the recovery-disk information is stored. A utility is then usually provided which allows the user to burn a recovery/re-installation CD or DVD from it. If you are buying a new computer and intend on dual-booting, make sure you have (or can make) a physical Windows recovery/re-installation CD or DVD. If neither a CD/DVD nor a recovery partition/burning utility is provided by your computer manufacturer, you may need to contact your vendor and ask for a CD or DVD (to which you are normally entitled under the Windows EULA).
You may need to request a physical recovery/re-installation CD or DVD directly from your computer manufacturer. See WindowsRecoveryCd.
Once you have created a physical backup disc from a restore-image partition on the hard-drive, the restore-image partition can either be removed or left in place. Ubuntu can be installed with it intact without problems.
Install Ubuntu after Windows
A Windows OS should be installed first, because its bootloader is very particular and the installer tends to overwrite the entire hard drive, wiping out any data stored on it. If Windows isn’t already installed, install it first. If you are able to partition the drive prior to installing Windows, leave space for Ubuntu during the initial partitioning process. Then you won’t have to resize your NTFS partition to make room for Ubuntu later, saving a bit of time.
When a Windows installation already occupies the entire hard drive, its partition needs to be shrunk, creating free space for the Ubuntu partition. You can do this during the Ubuntu installation procedure, or you can see How to Resize Windows Partitions for other options.
If you have resized a Windows 7 or Vista partition and cannot boot up Windows, you can use the instructions from WindowsRecovery to fix it.
Install Ubuntu
-
Download an Ubuntu LiveCD image (.iso) from Ubuntu Downloads and burn it to a disc (see BurningIsoHowto).
- Insert the LiveCD into your CD-ROM drive and reboot your PC.
- If the computer does not boot from the CD (e.g. Windows starts again instead), reboot and check your BIOS settings by pressing F2, F12, Delete, or ESC. Select «boot from CD».
- Proceed with installation until you are asked this question: «How do you want to partition the disk?».
- If you have already partitioned the disk and left space for Ubuntu, install it to that and then follow the rest of the steps.
- Otherwise, choose one of the next two steps.
Automatic partition resizing (not recommended)
- Choose the first option, which should say «Install them side by side, choosing between them each startup».
- Specify the size of the new partition by dragging the slider at the bottom of the window.
- Click on «Forward».
-
Continue on to Finishing Ubuntu Installation
Manual partitioning
- Choose «Manually edit partition table».
- Listed will be your current partitions.
- Select the partition you want to resize and press Enter.
- Select «Size:», press Enter.
- Select Yes, press Enter.
- Type in a new size in gigabytes for your partition, it’s recommended you free up at least 10 GB of free space for your Ubuntu install. Press Enter when happy with your changes. It may take some time to apply the changes.
-
Create a swap partition of at least your amount of RAM (if you don’t know, 8000 MB is a good value).
- Create a partition for your Ubuntu installation.
-
Create other partitions if necessary: see DiskSpace
- Select «Finish partitioning and write changes to disk».
Master Boot Record and Boot Manager
GRUB2 is the boot manager installed in Ubuntu by default. GRUB2 is an open source boot manager that install the main parts of the boot loaders inside Ubuntu. This means Ubuntu is independent and avoids any need for writing to other operating systems. To accomplish this, the only thing in your computer outside of Ubuntu that needs to be changed is a small code in the MBR (Master Boot Record) of the first hard disk, or the EFI partition. The boot code is changed to point to the boot loader in Ubuntu. You will be presented with a list of operating systems and you can choose one to boot. If you do nothing the first option will boot after a ten second countdown. If you select Windows then GRUB or LILO will chain-load Windows for you at the Windows boot sector, which is the first sector of the Windows partition.
Windows Vista no longer utilizes boot.ini, ntdetect.com, and ntldr when booting. Instead, Vista stores all data for its new boot manager in a boot folder. Windows Vista ships with an command line utility called bcdedit.exe, which requires administrator credentials to use. You may want to read http://go.microsoft.com/fwlink/?LinkId=112156 about it.
Using a command line utility always has its learning curve, so a more productive and better job can be done with a free utility called EasyBCD, developed and mastered during the times of Vista Beta. EasyBCD is very user friendly and many Vista users highly recommend it.
Installing Windows After Ubuntu
There are two different approaches:
Recovering GRUB after reinstalling Windows
Please refer to the Reinstalling GRUB2 guide.
Master Boot Record backup and replacement
This method does not work for computers with UEFI boot. In consequence, it won’t work for pre-installed Windows 8 and some pre-installed with Windows 7.
Back-up the existing MBR, install Windows, replace your backup overwriting the Windows boot code:
- Create an NTFS partition for Windows (using fdisk, GParted or whatever tool you are familiar with)
-
Backup the MBR e.g. dd if=/dev/sda of=/mbr.bin bs=446 count=1
- Install Windows
-
Boot into a LiveCD
- Mount your root partition in the LiveCD
-
Restore the MBR e.g. dd if=/media/sda/mbr.bin of=/dev/sda bs=446 count=1
- Restart and Ubuntu will boot
- Setup GRUB to boot Windows
Also see
-
MultiOSBoot — How to boot more than two operating systems from a single hard drive.
-
Virtualization Category
Все способы:
- Важная информация
- Шаг 1: Скачивание установочного образа
- Шаг 2: Создание загрузочного носителя
- Шаг 3: Подготовка диска
- Шаг 4: Установка
- Шаг 5: Выбор ОС для запуска
- Вопросы и ответы: 3
Важная информация
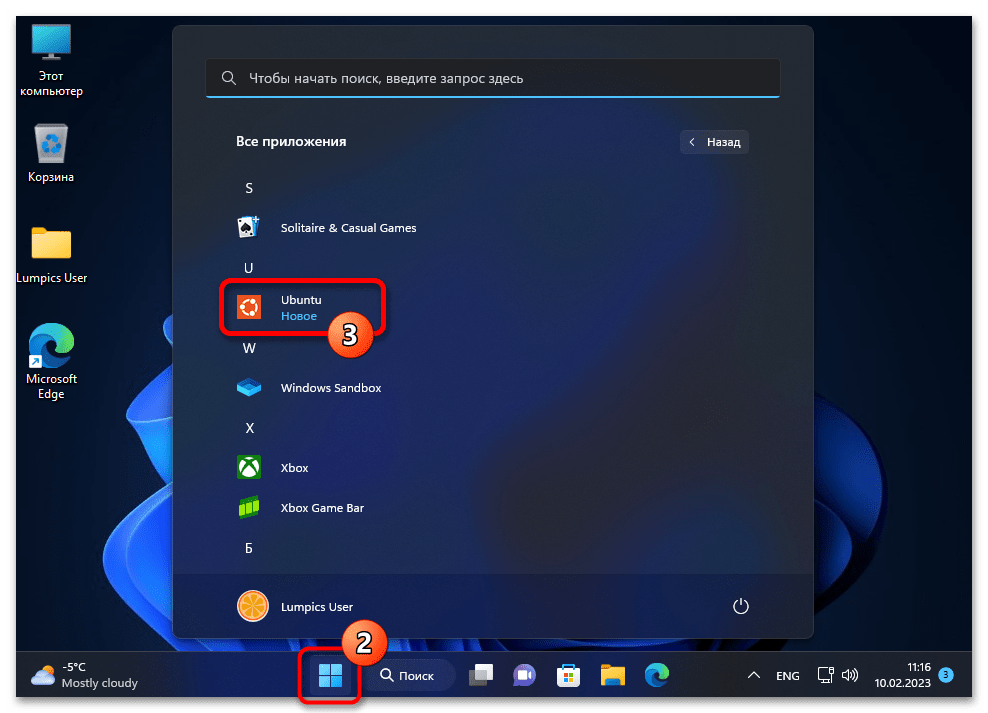
- Первый момент, о котором стоит напомнить, прежде чем вы приступите к инсталляции ОС Linux Ubuntu рядом (на один диск) с функционирующей и настроенной Windows 11, это то, что в комплект поставки второй операционки включена «WSL2» («Подсистема Windows для Linux»).

С помощью данной подсистемы несложно получить доступ к возможностям различных вариантов Linux, включая Ubuntu, без необходимости проведения полноценного развёртывания дистрибутива ещё одной ОС на компьютере. Возможно, указанный и подробно описанный в статье по следующей ссылке подход сможет удовлетворить ваши конкретные потребности.
Подробнее: Установка WSL2 и запуск дистрибутива Linux в среде Windows 11

Читайте также: Полное удаление «Подсистемы Windows для Linux» из Windows 11
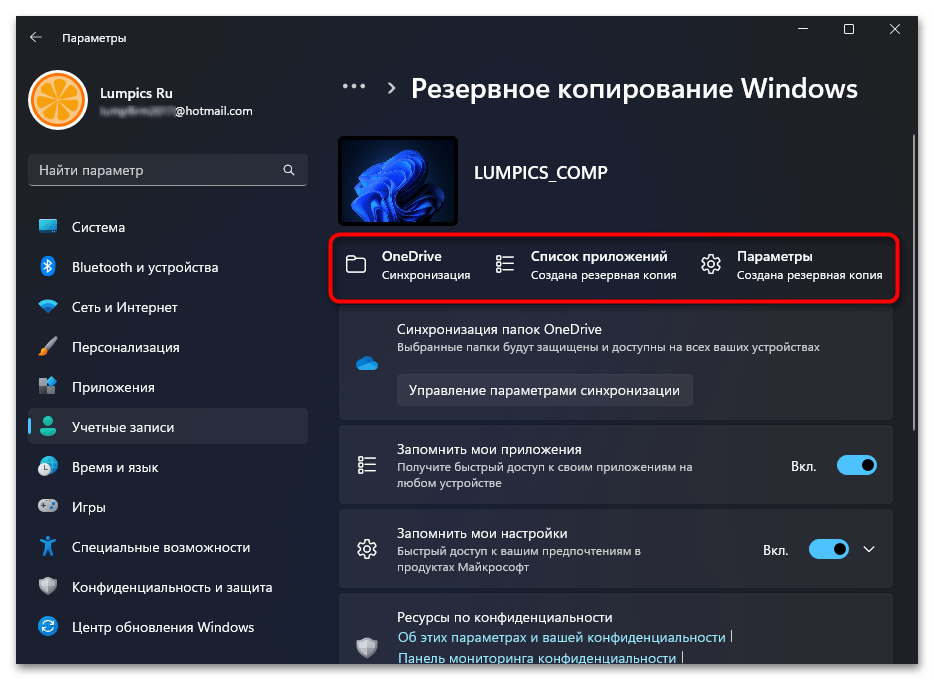
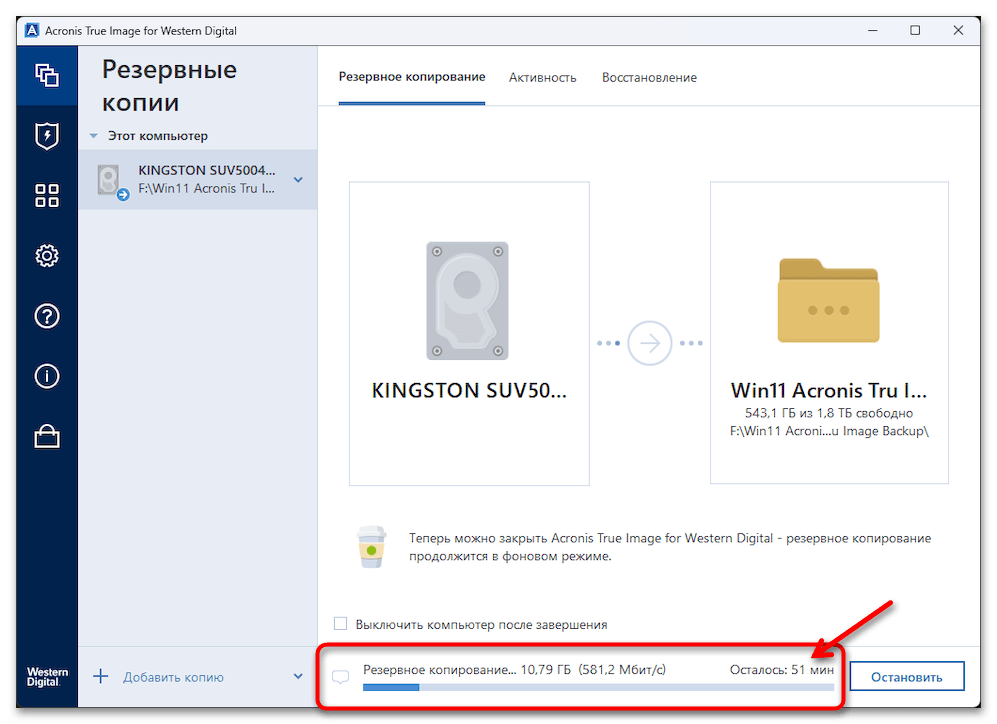
- Несмотря на тот факт, что предложенные в этой статье инструкции не подразумевают удаления каких-либо данных с диска компьютера, во время их выполнения могут произойти ошибки. Кроме того, нет никаких гарантий отсутствия сбоев в процессе работы, и при этом только имеющийся в распоряжении бэкап важной информации (в идеальном варианте – образ Виндовс 11 со всеми пользовательскими приложениями, настройками ОС и прочим) позволит минимизировать негативные последствия различных неприятностей, если они возникнут.

Таким образом, перед началом подразумевающих организацию установки Ubuntu на один компьютер с уже имеющейся Win 11 манипуляций, фактически необходимо создать резервные копии всей важной информации с системного раздела диска.
Подробнее:
Создание резервных копий информации в Windows 11
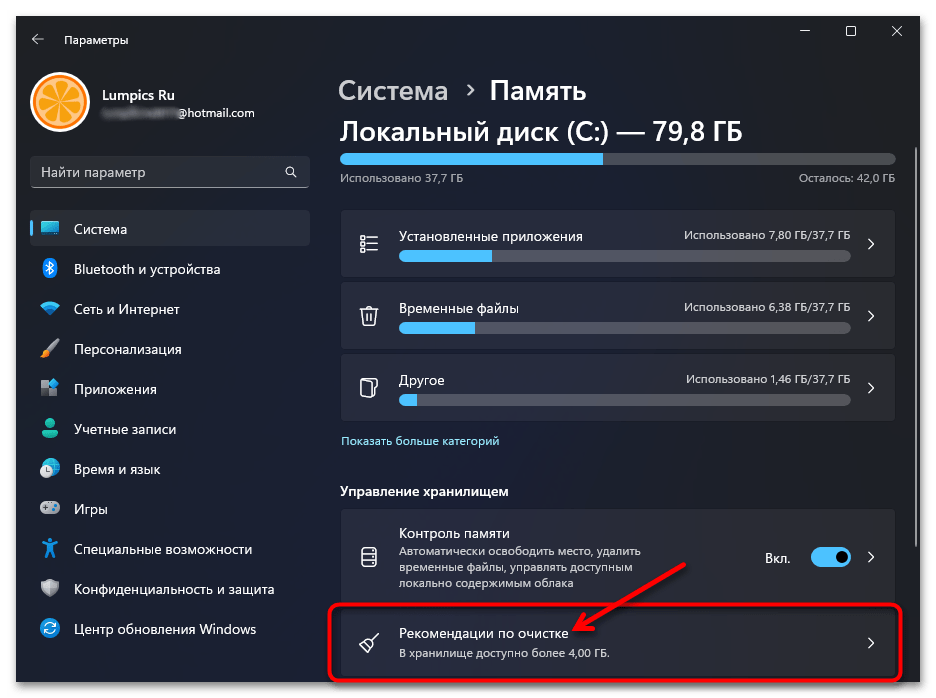
Как получить образ установленной на ПК ОС Windows 11 - Для установки Ubuntu на диске ПК потребуется создать по крайнем мере один отдельный раздел с минимальным объёмом 25 Гб (в общем случае рекомендуется выделять 50-100 ГБ). В рассматриваемой в настоящем материале ситуации формировать Linux-раздел(ы) чаще всего придётся из свободного пространства на диске, где уже установлена Windows 11, поэтому проконтролировать наличие достаточного объёма незанятого здесь места (или освободить пространство в случае необходимости) следует заранее.
Подробнее: Очистка системного (C:) диска в Windows 11
Шаг 1: Скачивание установочного образа
Первым делом после принятия решения о необходимости установки Ubuntu на ПК должно стать получение источника её компонентов — файл-образа в формате ISO. По сути, следуя предложенному в этой статье алгоритму, вы можете развернуть Linux (причём большинство дистрибутивов, а не только Ubuntu) из любого найденного в сети или сформированного самостоятельно ISO-образа, но наиболее разумным и правильным решением будет загрузка системы с официального сайта разрабатывающего и поддерживающего её сообщества.
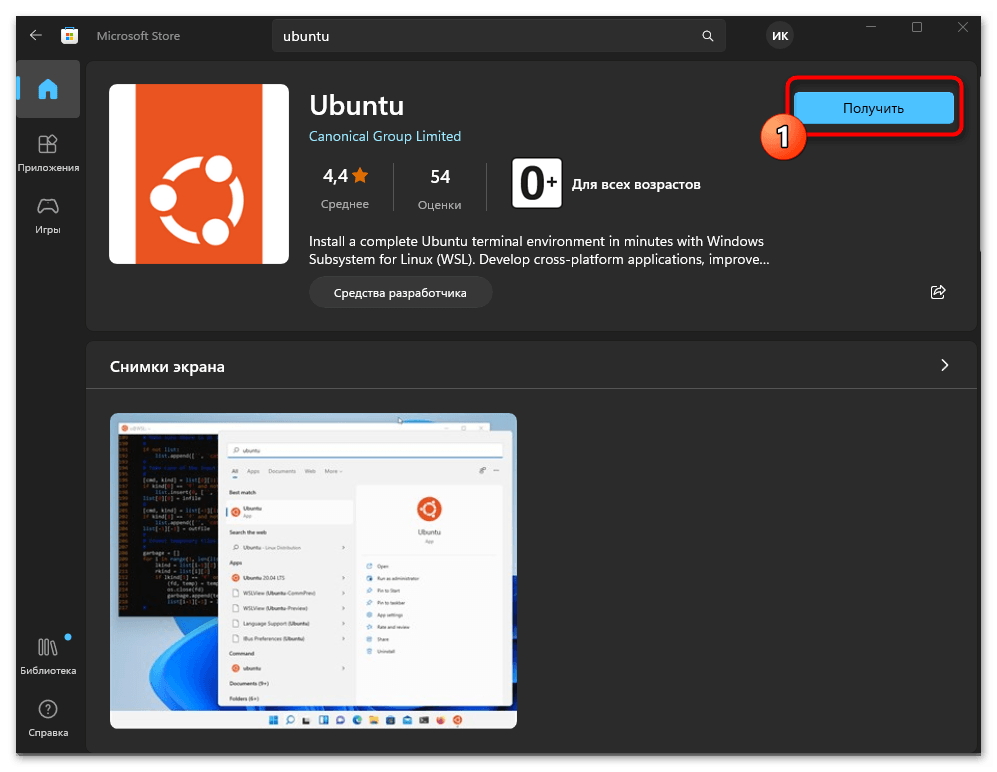
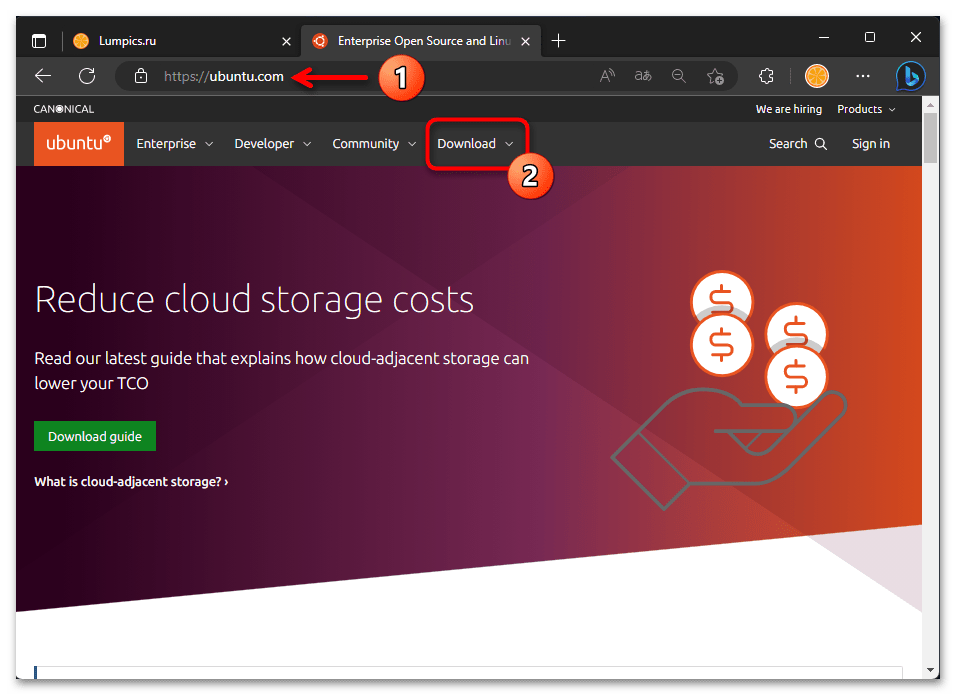
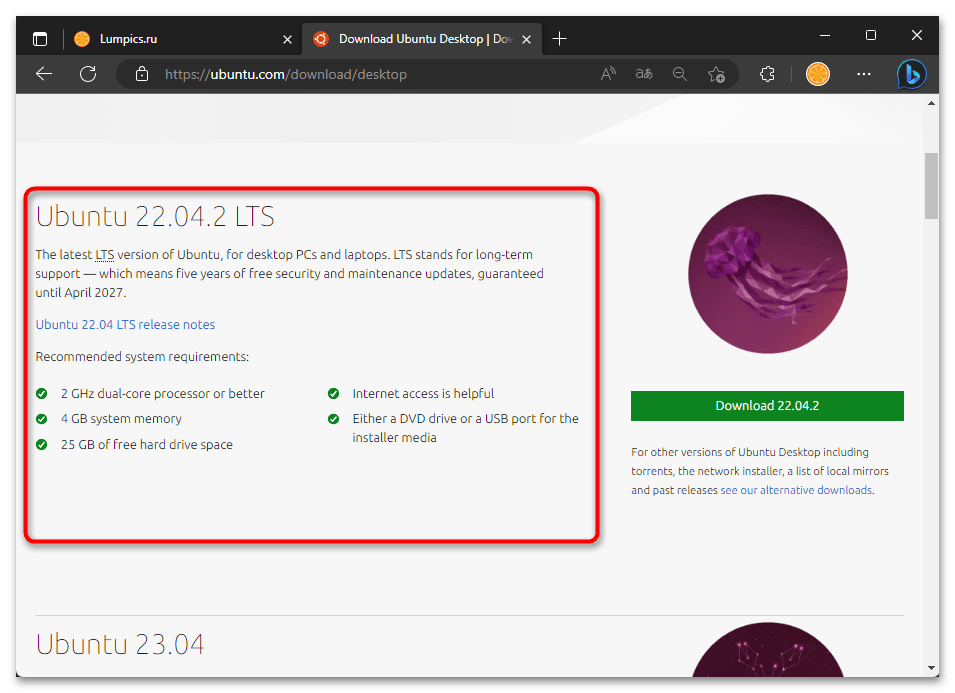
Скачать ISO-образ ОС Ubuntu с официального сайта
Скачать MD5 & SHA Checksum Utility с официального сайта
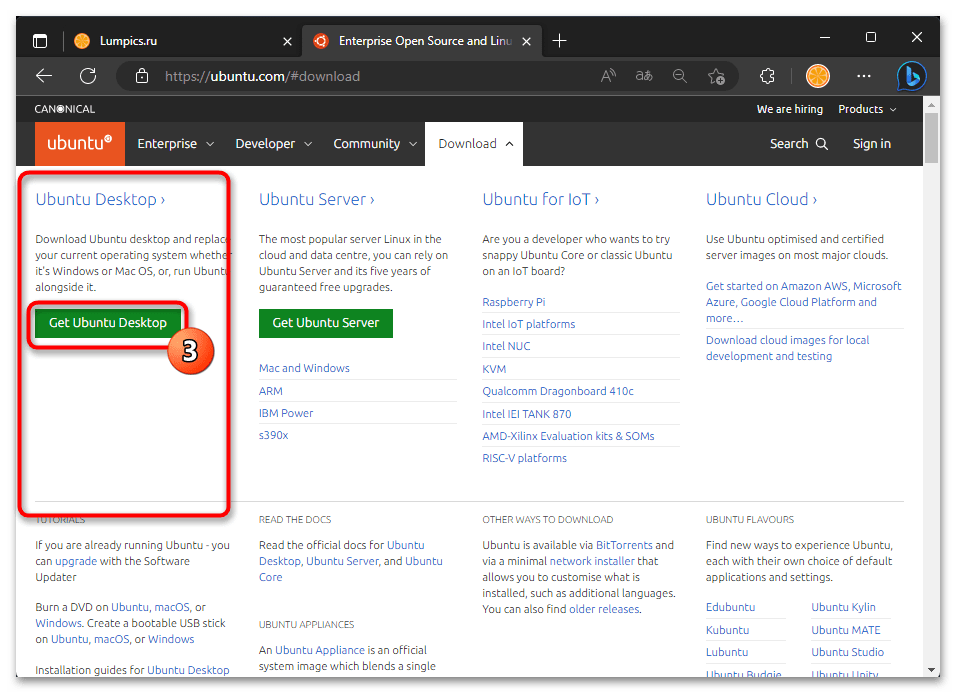
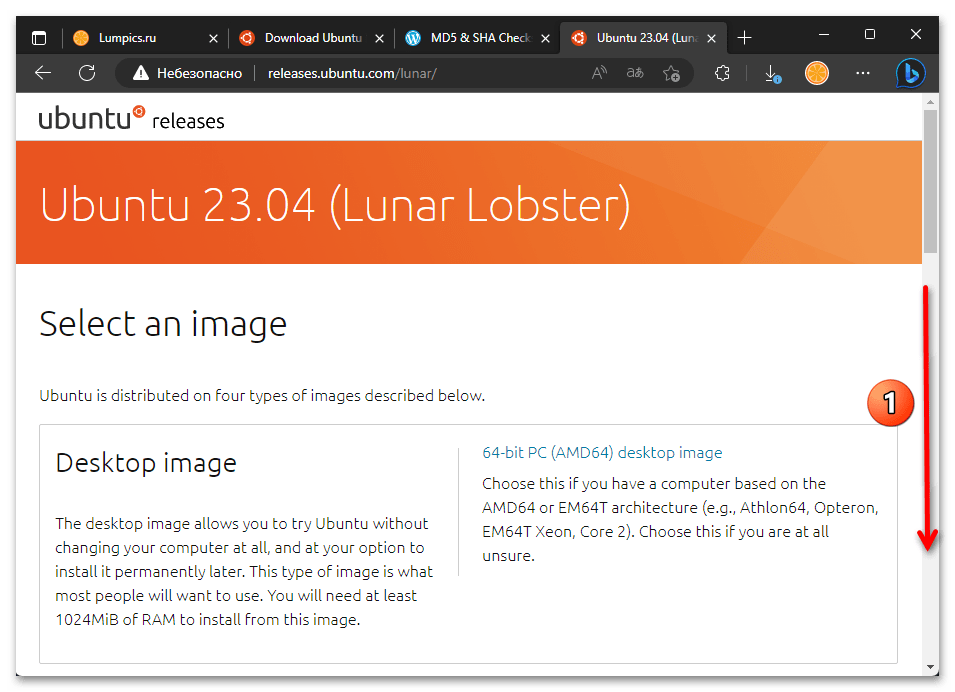
- Перейдите по первой из представленных выше ссылок на официальный сайт Ubuntu, кликните «Download» в верхнем меню,

а затем нажмите на кнопку «Get Ubuntu Desktop» в секции «Ubuntu Desktop» отобразившейся страницы.
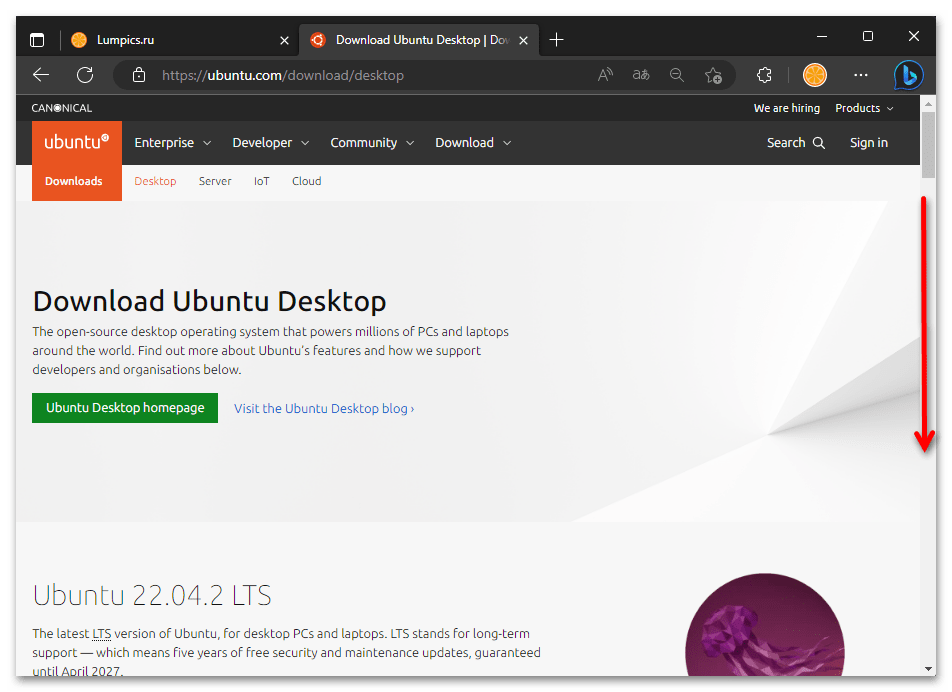
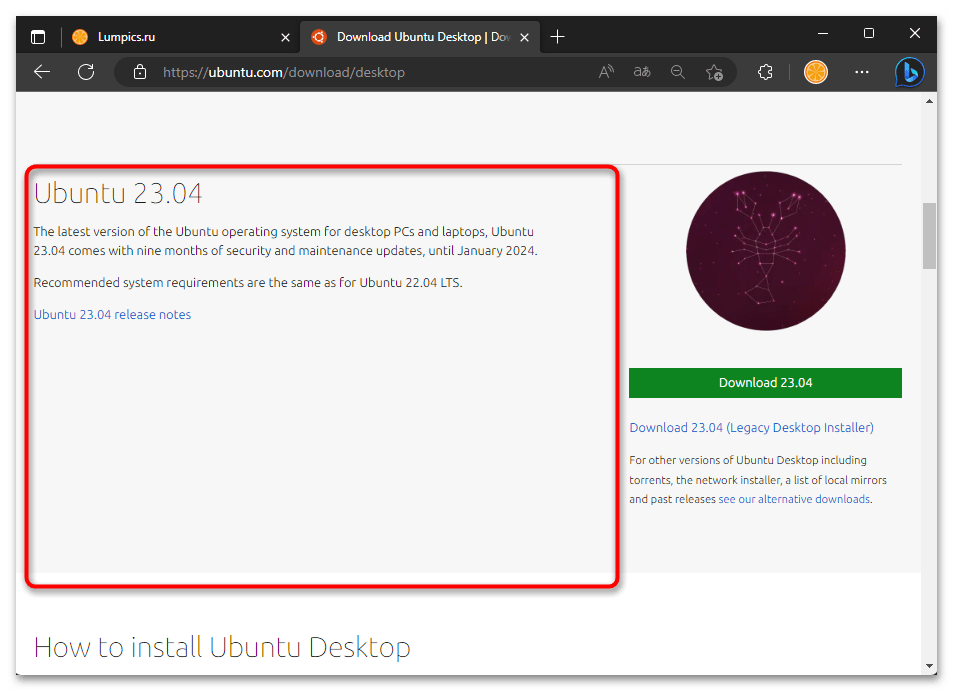
- На следующей странице выберите желаемую к установке рядом с Windows 11 версию ОС Ubuntu.

Вы можете предпочесть любой из двух доступных вариантов: обеспечиваемый поддержкой в течение пяти лет LTS-выпуск,

или же (в примере далее) новейшую сборку операционки.

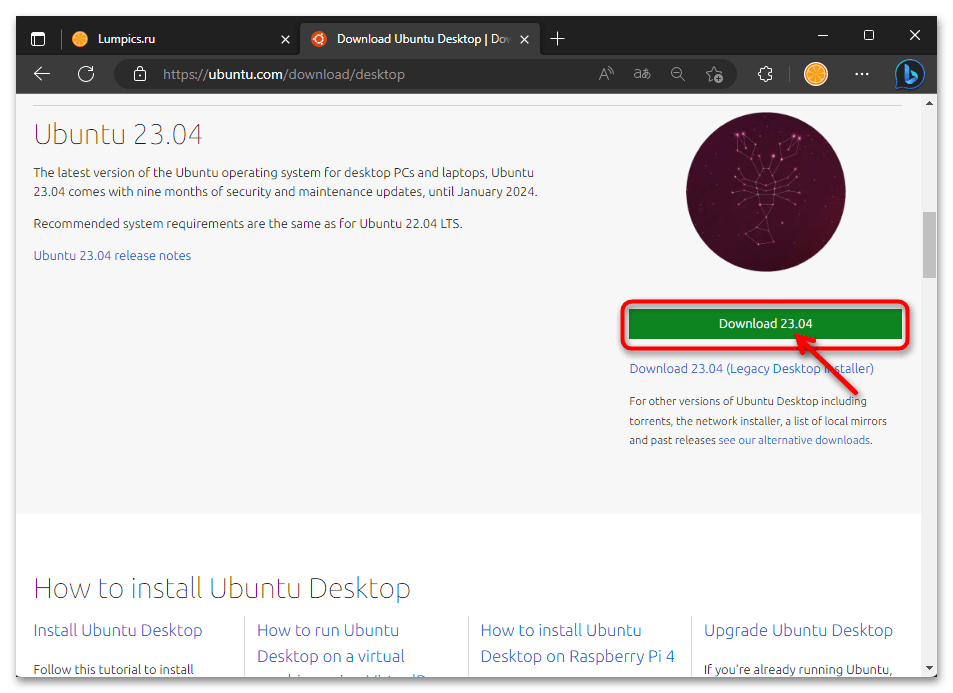
Нажмите на кнопку «Download ВЕРСИЯ» в секции с описанием выбранного вами варианта системы.
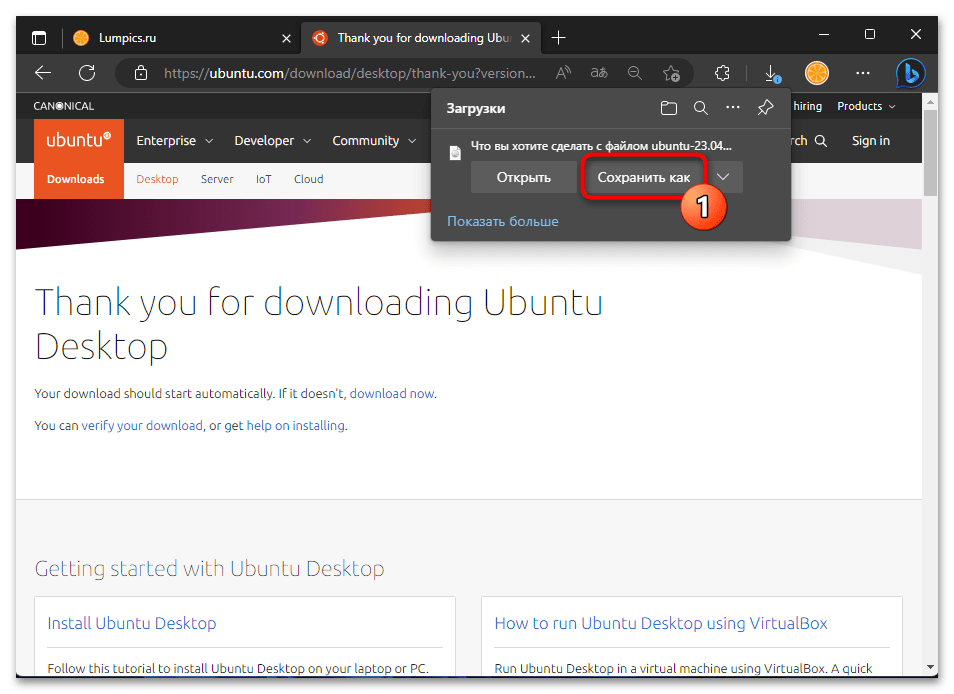
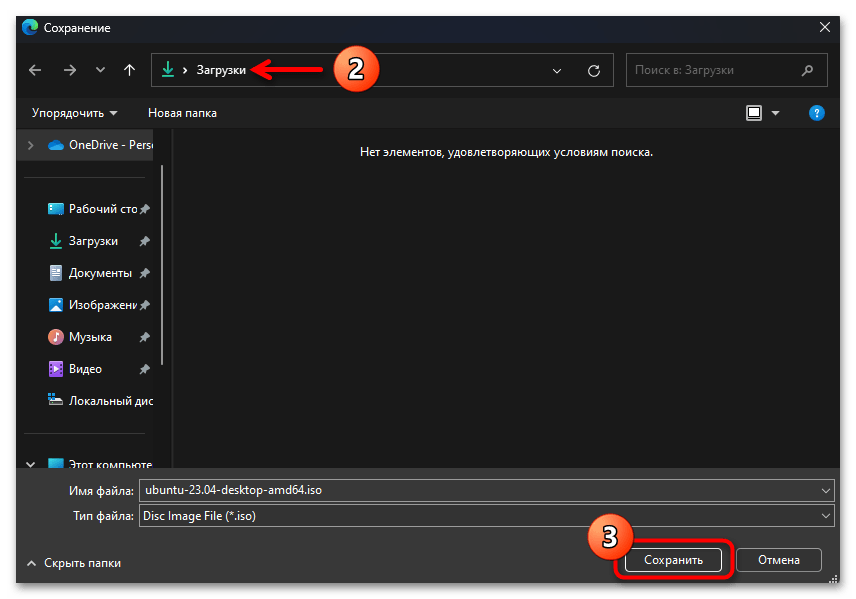
- Если предполагается настройками веб-обозревателя, укажите место сохранения ISO-образа ОС Ubuntu,

нажмите «Сохранить»,

а затем ожидайте завершения загрузки.
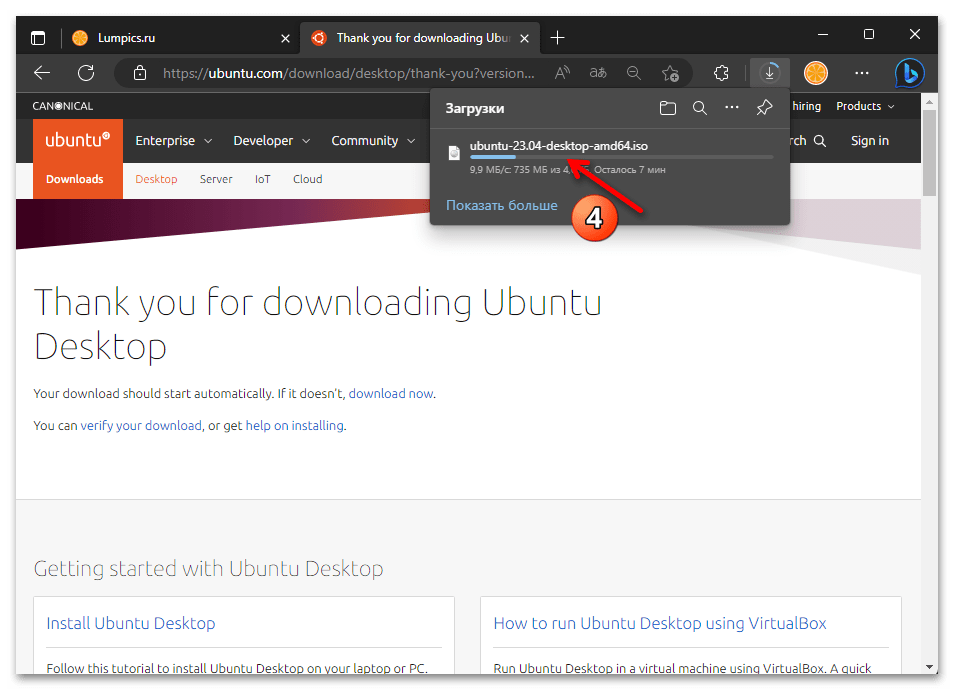
- После того как загрузочный образ ОС Ubuntu будет скачан,

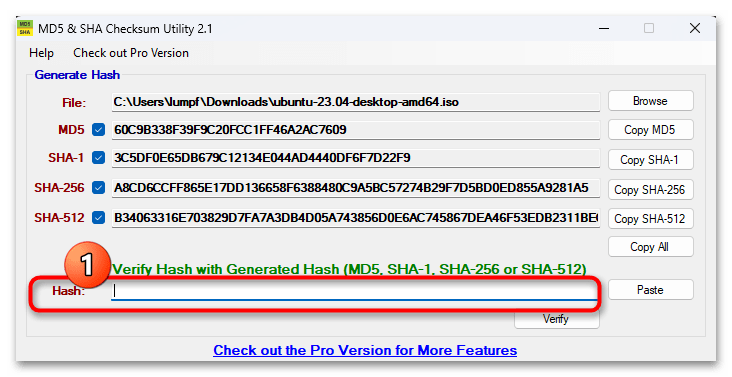
рекомендуется проверить его целостность. Для этого можно использовать одно из широкого ряда приложений, далее продемонстрируем на примере MD5 & SHA Checksum Utility.
Читайте также: Способы проверки контрольной суммы образа ISO
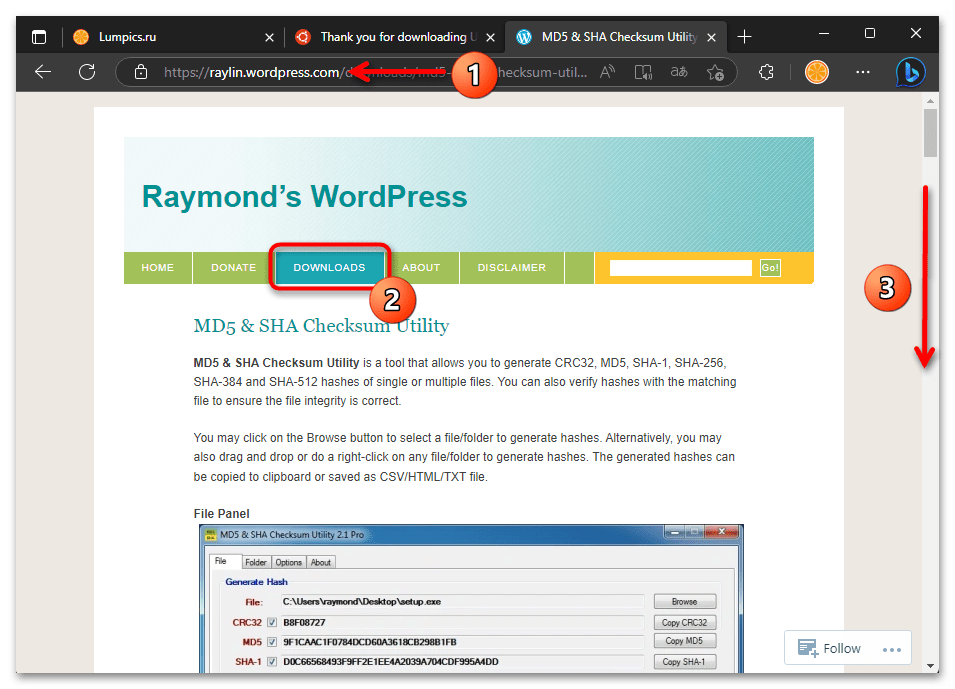
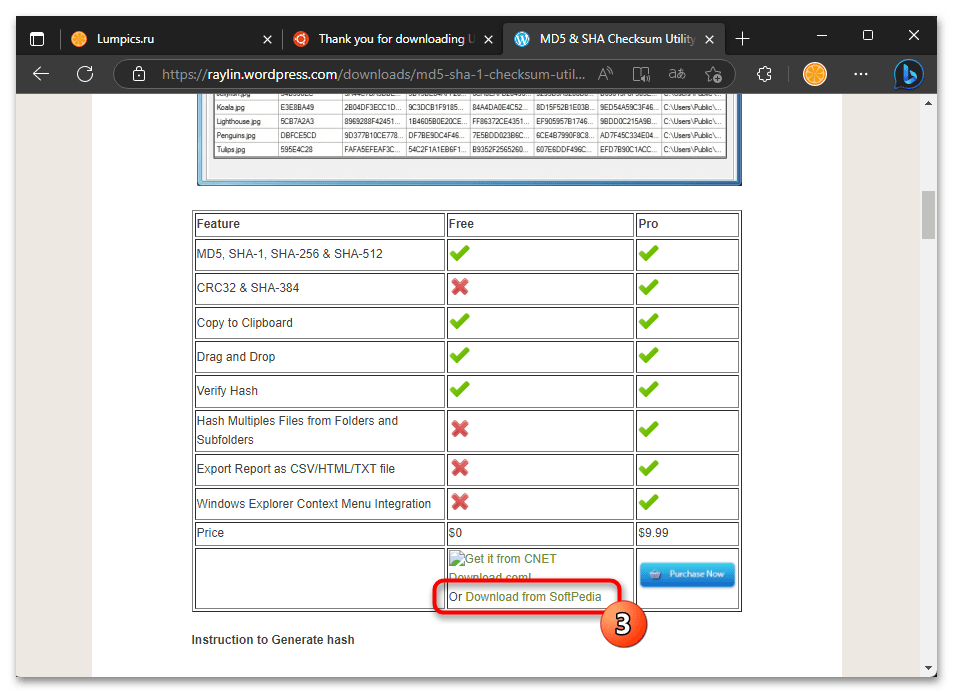
- Скачайте на компьютер приложение MD5 & SHA Checksum Utility (достаточно FREE-версии)

с сайта его разработчика

(вторая ссылка перед этой инструкцией).
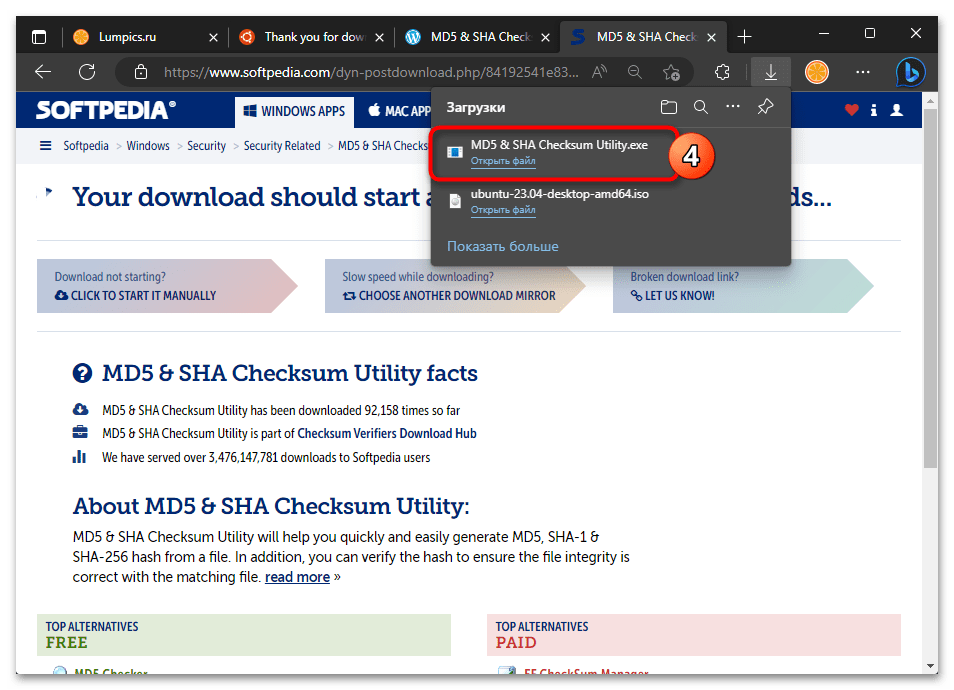
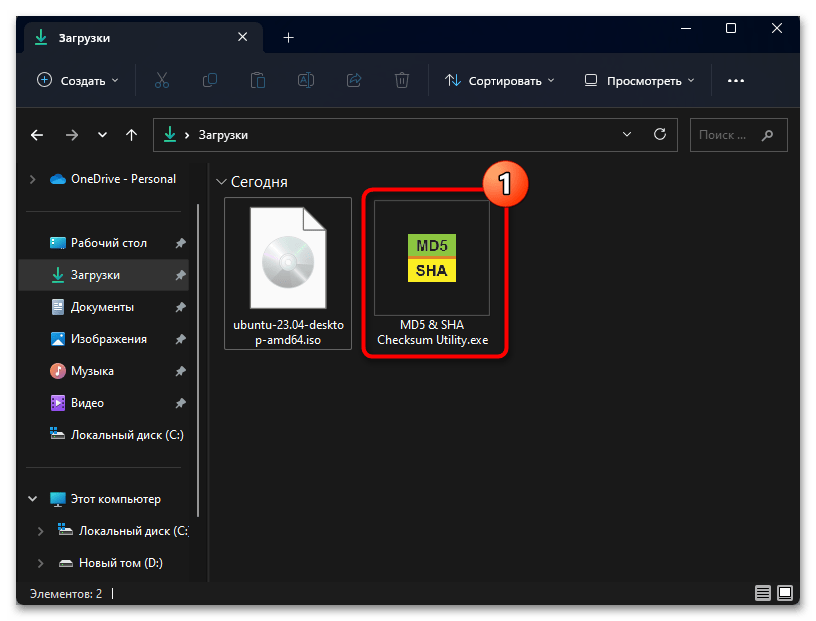
- Путём открытия файла MD5 & SHA Checksum Utility.exe запустите средство

проверки целостности файл-образов.
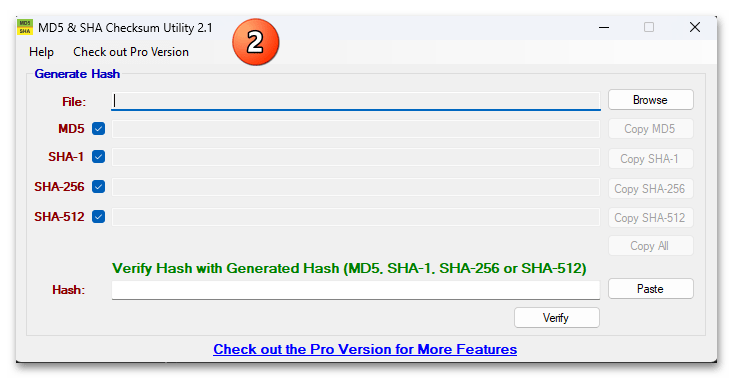
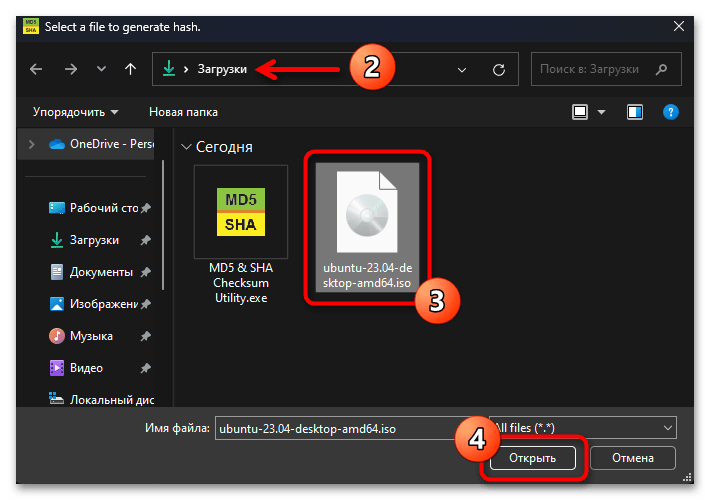
- Щёлкните по кнопке «Browse» справа от поля «File» в окне приложения,

затем откройте загруженный файл-образ ОС Ubuntu.
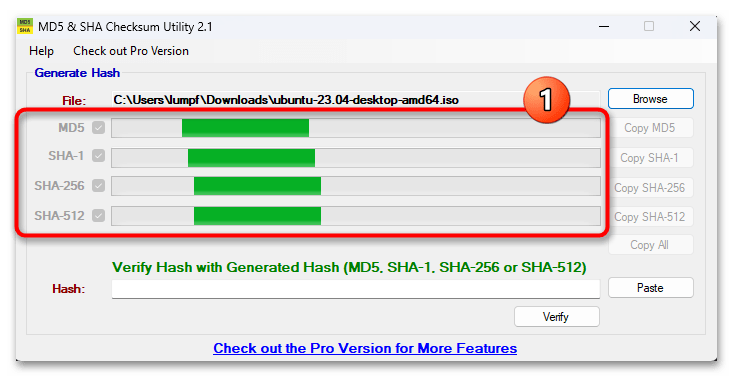
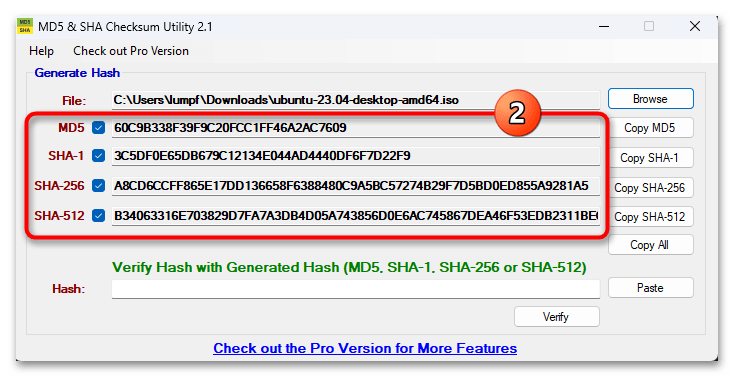
- Подождите, пока утилита вычислит все типы хеша

предоставленного ей ISO-файла.
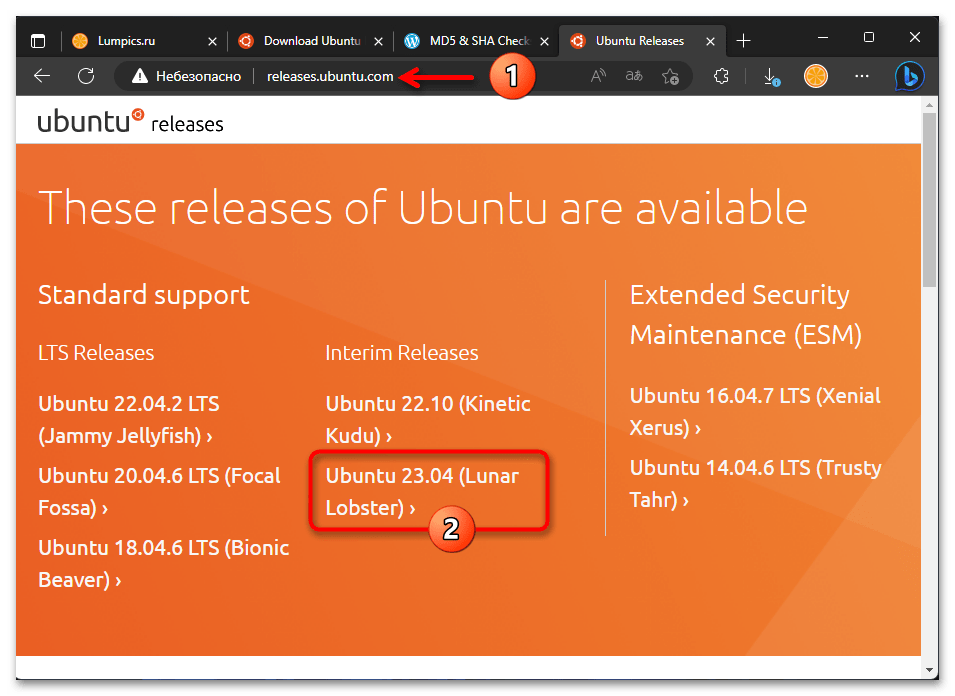
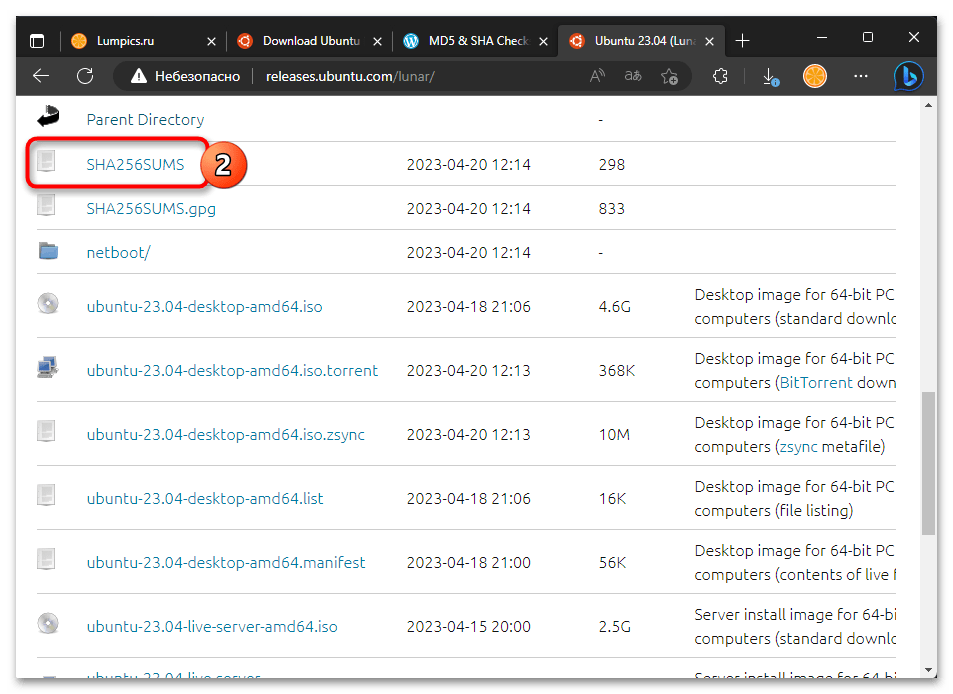
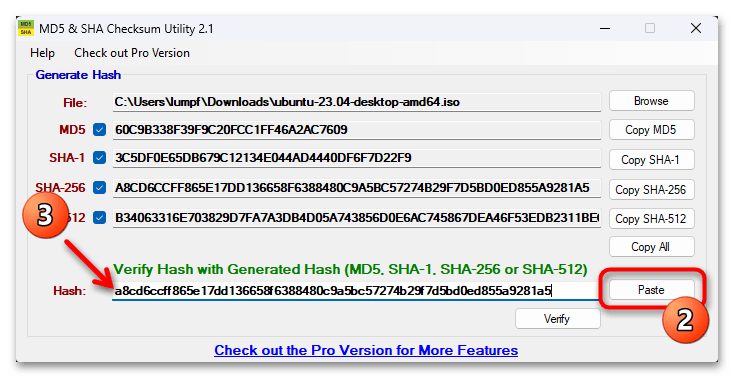
- Откройте веб-страницу releases.ubuntu.com в браузере, кликните по соответствующей версии проверяемого образа Ubuntu ссылке.
- Пролистайте отобразившуюся страницу до таблицы с файлами,

кликните по первой в ней ссылке – «SHA256SUMS».
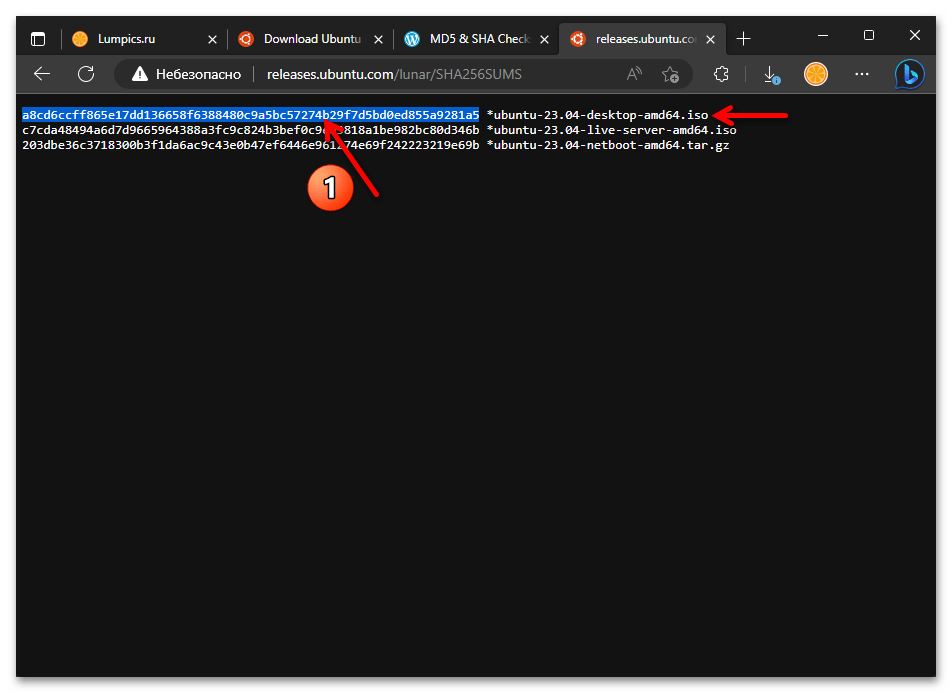
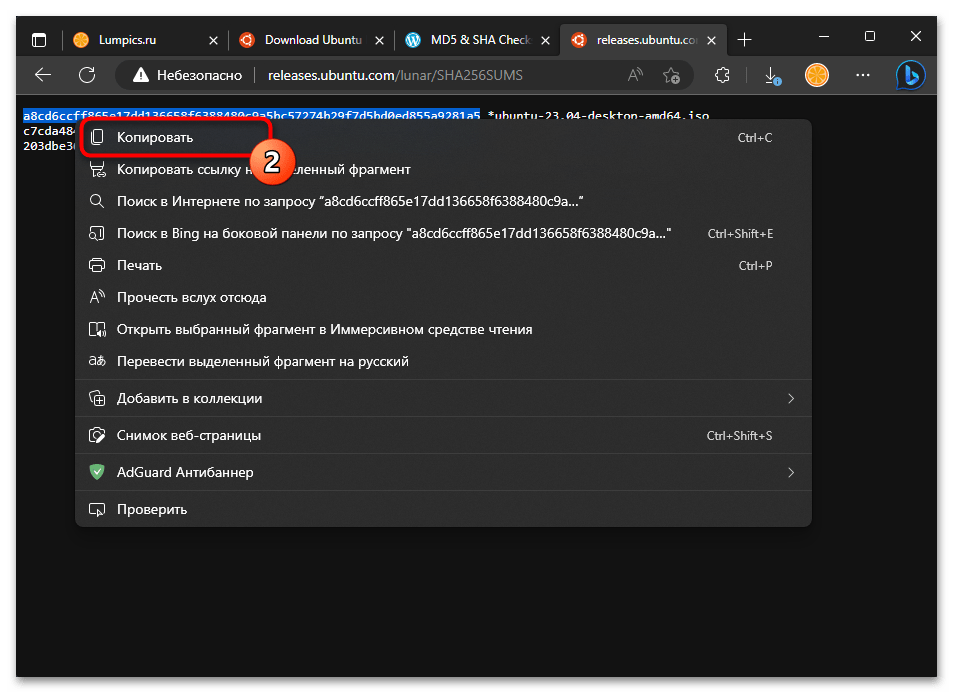
- Скопируйте значение контрольной суммы загруженного вами ранее образа Ubuntu

в буфер обмена Windows 11.
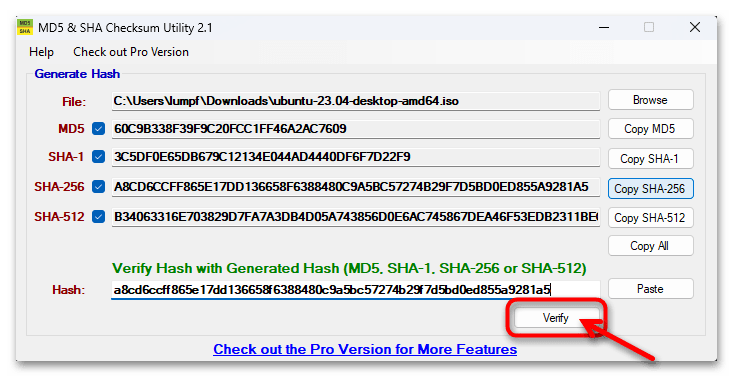
- Вернитесь в MD5 & SHA Checksum Utility, переместитесь в поле «Hash»,

нажмите на расположенную справа от него кнопку «Paste».
- Далее кликните «Verify».
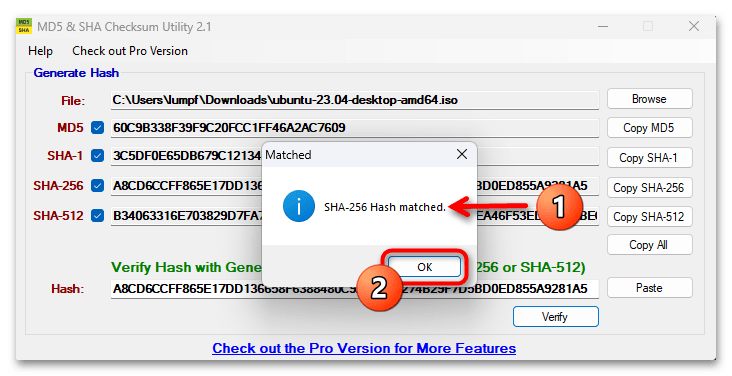
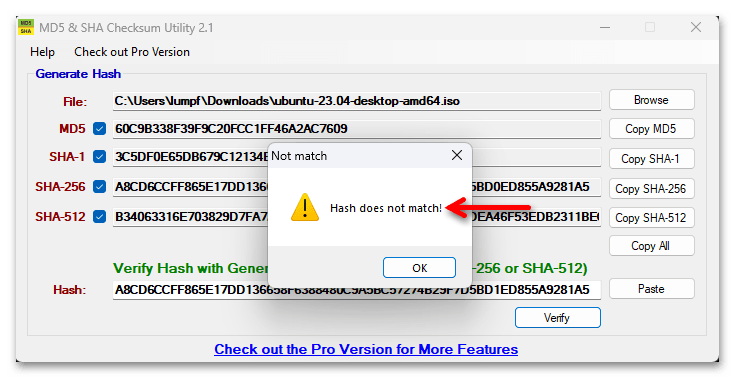
- Если по результату проверки утилита выдаст сообщение «SHA-256 Hash matched», значит, хеш-сумма ISO-образа Ubuntu соответствует оригинальной, файл целостный и может быть использован для установки операционной системы. Закройте задействованный для проверки образа софт и переходите к следующему этапу развёртывания Убунту рядом с Виндовс 11.

Если же хеш-суммы не совпадают, MD5 & SHA Checksum Utility выдаст соответствующее сообщение. Это означает, что ISO-образ Ubuntu поврежден и не подходит для установки, то есть вам потребуется скачать его заново.


- Скачайте на компьютер приложение MD5 & SHA Checksum Utility (достаточно FREE-версии)

Шаг 2: Создание загрузочного носителя
Непосредственная установка Ubuntu на компьютер практически всегда реализуется средствами специального загрузочного USB-накопителя, и поэтому вторым этапом решения нашей задачи будет создание такого инструмента. Потребуется скачанный на шаге выше файл-образ ОС, а также одна из предназначенных для получения загрузочных флешек утилит, — в нашем примере задействуем одну из самых удобных, простых в эксплуатации и при этом эффективных из них – Rufus.
Читайте также: Создание загрузочной флешки с Ubuntu
Скачать Rufus
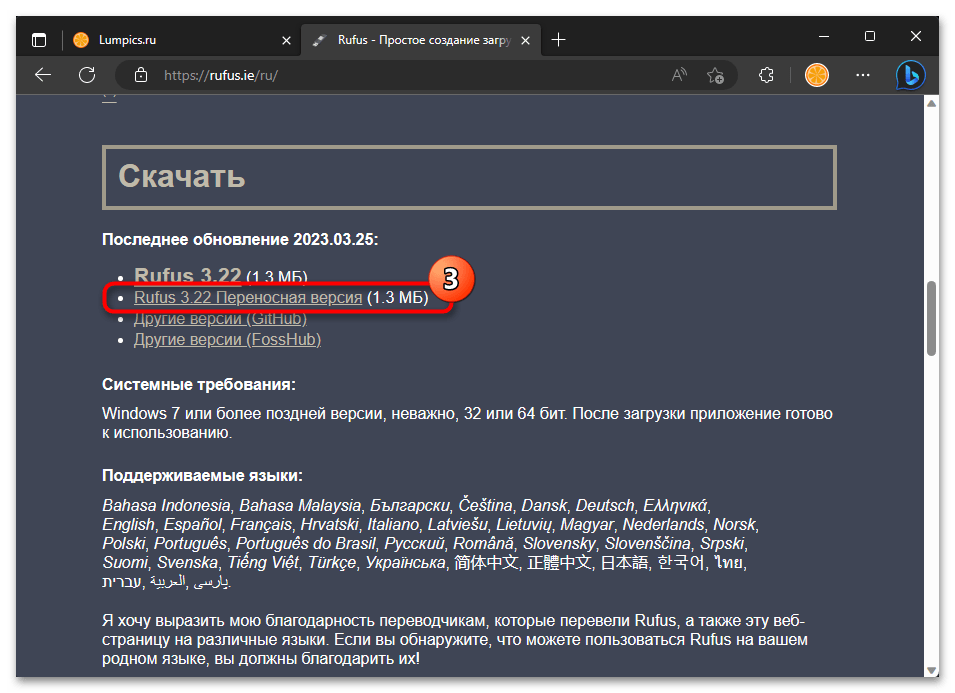
- Перейдите на официальный сайт создателя Rufus по ссылке из статьи-обзора утилиты на нашем сайте. Прокрутите открывшуюся веб-страницу,

в её секции «Скачать» кликните «Rufus X.YZ Переносная версия».
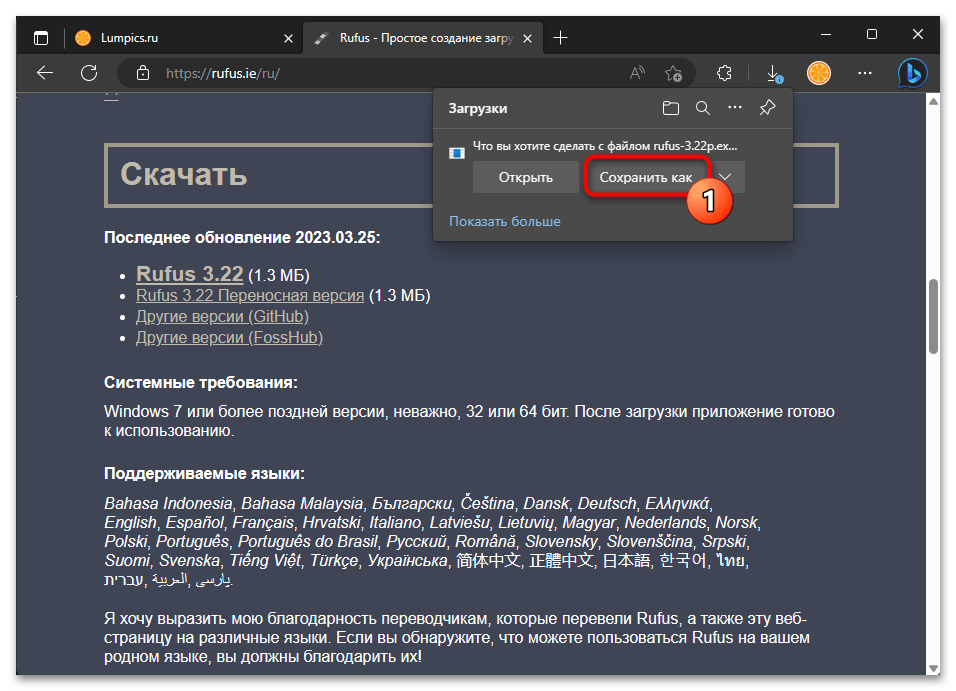
- Сохраните exe-файл Rufus на компьютере,

а затем запустите.
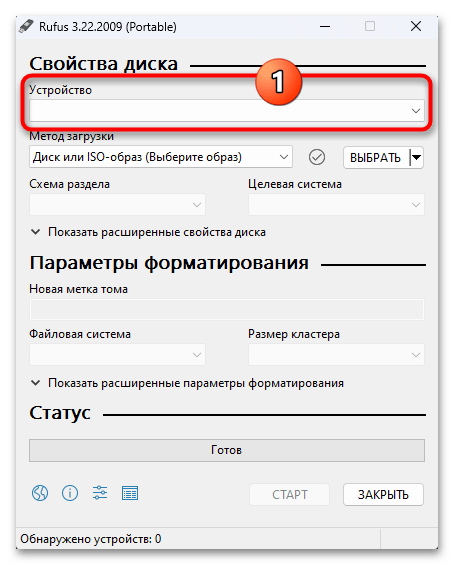
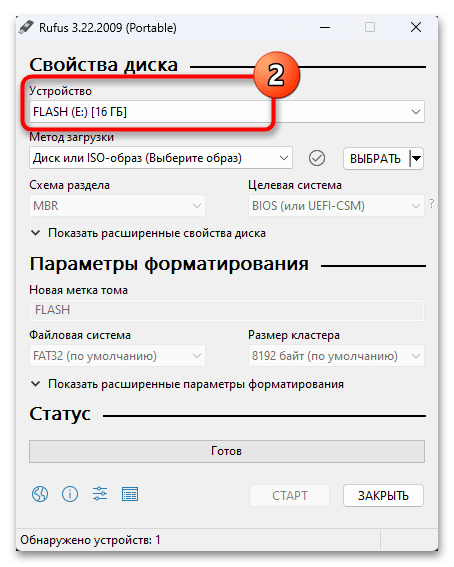
- Подключите превращаемый в загрузочный и установочный Ubuntu USB-накопитель к ПК,

выберите его в раскрывающемся списке «Устройство» окна Rufus.
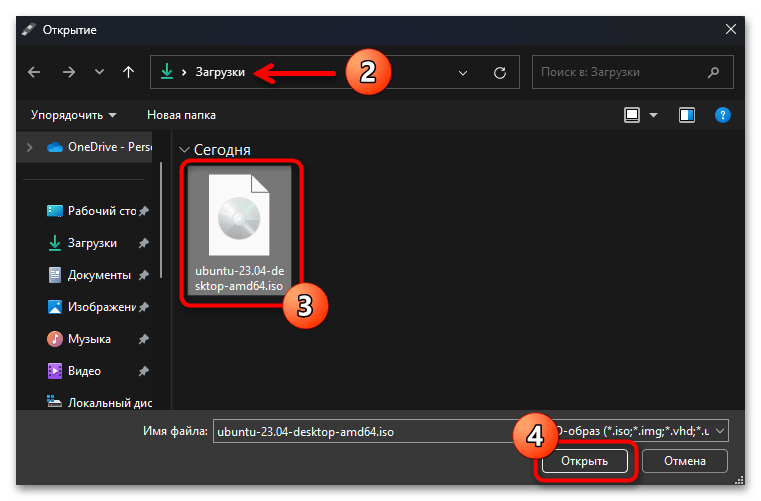
- Убедитесь, что в перечне «Метод загрузки» Руфуса выбрано «Диск или ISO-образ (Выберите образ)», нажмите на расположенную справа кнопку «ВЫБРАТЬ».
- Переместитесь в каталог, где сохранён iso-образ Ubuntu, выделите его, нажмите «Открыть».
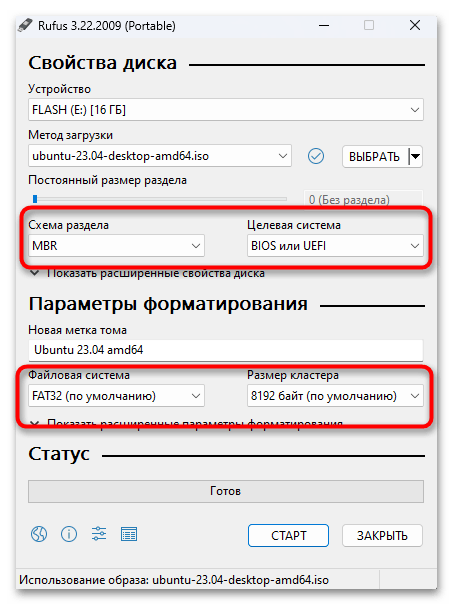
- Проверьте, что в окне утилиты выбраны следующие параметры, а если это не так, переопределите: «Схема раздела» —
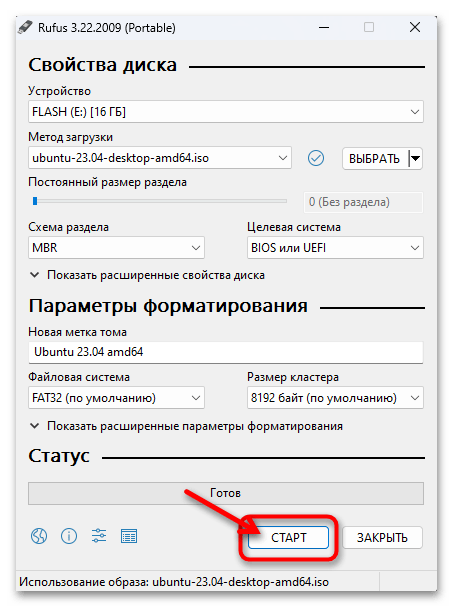
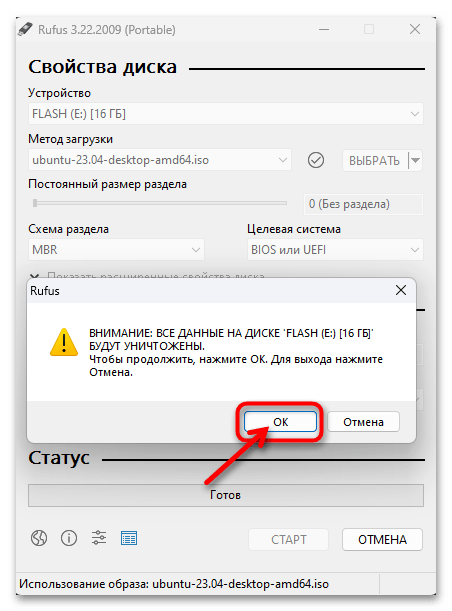
MBR, «Целевая система» —BIOS или UEFI; в блоке «Параметры форматирования» — «Файловая система» —FAT32 (по умолчанию), «Размер кластера» —8192 байт (по умолчанию). - Нажмите на кнопку «СТАРТ».
- В появившемся далее окне «Обнаружен образ ISOHybrid» выберите «Записать в ISO-образ режиме (Рекомендуется), щёлкните «ОК».
- Кликнув «ОК», подтвердите прочтение (и понимание) предупреждения Rufus о последующем далее уничтожении всей информации на съёмном накопителе.
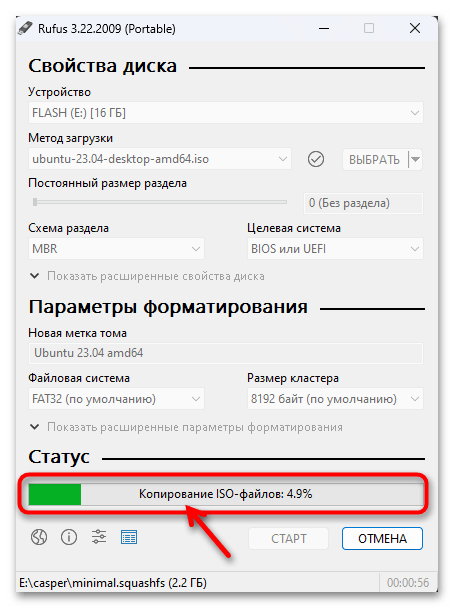
- Далее ожидайте, пока Руфус выполнит свою непосредственную работу – сформирует установочную флешку (или диск) ОС Ubuntu.
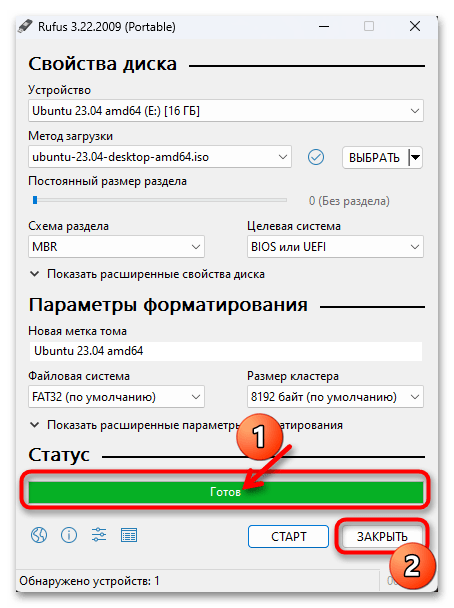
- По завершении процедуры индикатор её выполнения сменится на статус «Готов», после чего можно закрывать утилиту и отсоединять подготовленный ею USB-накопитель от компьютера.


Шаг 3: Подготовка диска
Как уже упоминалось выше, для установки Ubuntu рядом с Windows 11 потребуется создать отдельный раздел(ы) на диске, где инсталлирована вторая из указанных ОС в настоящий момент. На текущем этапе необходимо выделить из незанятого на системном диске объёма нераспределенное (т.е. не имеющее никакой файловой системы) пространство.
Ubuntu позволяет разместить себя саму, файлы пользователя и настройки на разных разделах диска, что упрощает переустановку операционки впоследствии. Таким образом, в идеальном варианте в дальнейшем потребуется создать два раздела: системный (для ОС) и (необязательный) «Home» (условно — для личных файлов). Под системный раздел, который вы создаёте в любом случае, обычно рекомендуется выделять 50-100 Гб, минимальное значение здесь — 25 Гб.
В нашем примере, мы «отрежем» от диска с Win 11 (примерно) 40 Гб пространства, а в процессе инсталляции Ubuntu создадим в нём два Linux-раздела: системный – 30Гб и «пользовательский» — 10ГБ. Вы же должны определить значения объёмов этих разделов самостоятельно, в соответствии с собственной ситуацией (размером свободного места на имеющемся диске) и потребностями.
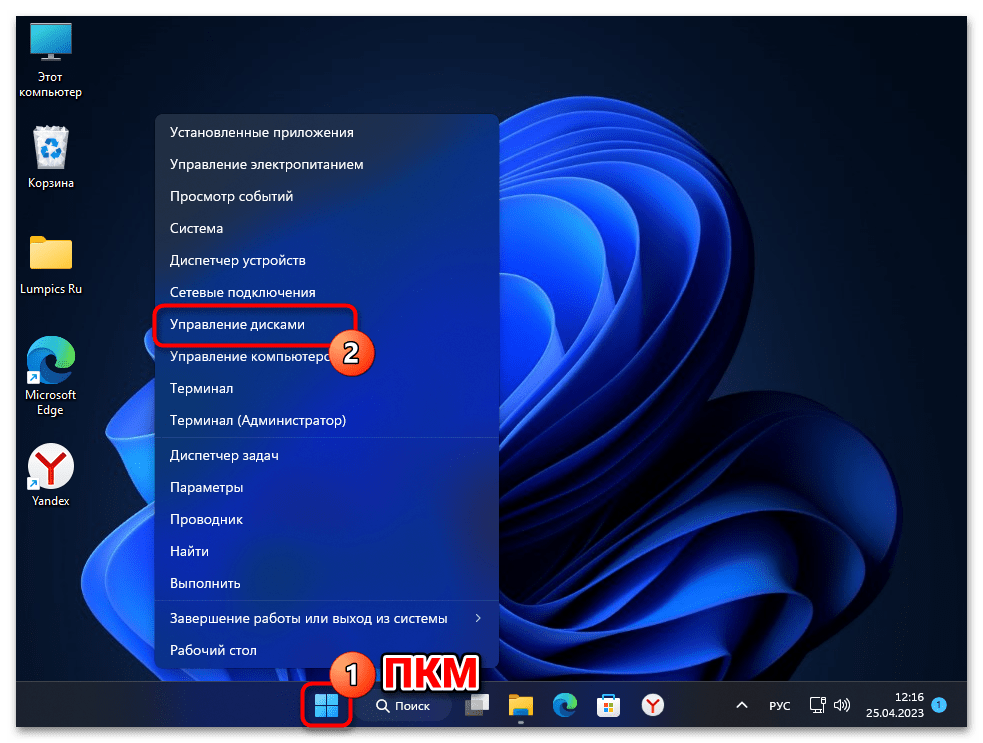
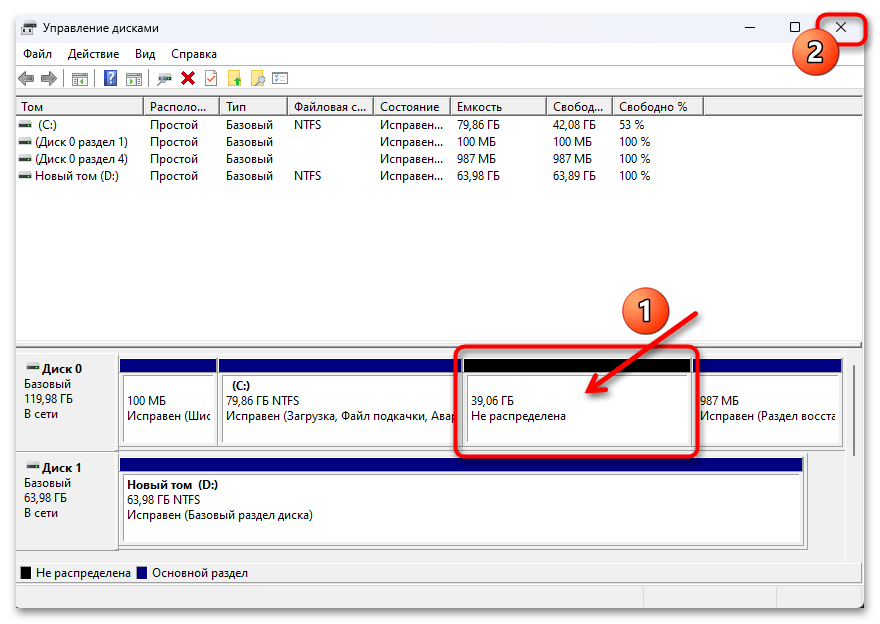
- Откройте системную оснастку Windows 11 «Управление дисками». Проще всего с такой целью будет кликнуть «Пуск» на «Панели задач» правой кнопкой мышки и выбрать соответствующий наименованию средства пункт в отобразившемся меню.
Подробнее: Как открыть «Управление дисками» в Windows 11
- Переместитесь в нижнюю часть окна «Управление дисками» — область с диаграммами, отображающими распределение пространства (разделы) на подключённых к ПК дисках. (В нашем примере мы будем выделять место под Linux, уменьшая системный раздел C: на Диске 0, а в случае, если вам требуется задействовать для инсталляции Ubuntu объём другого диска или тома действуйте по аналогии.)
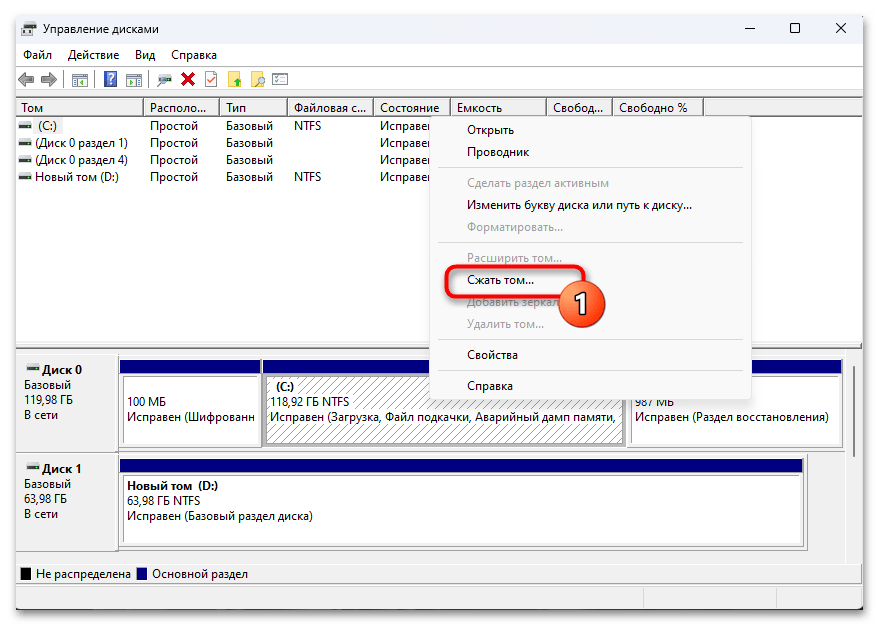
- Кликните по обозначающему системный раздел Windows 11 блоку правой кнопкой мыши, выберите «Сжать том…» в отобразившемся меню действий.

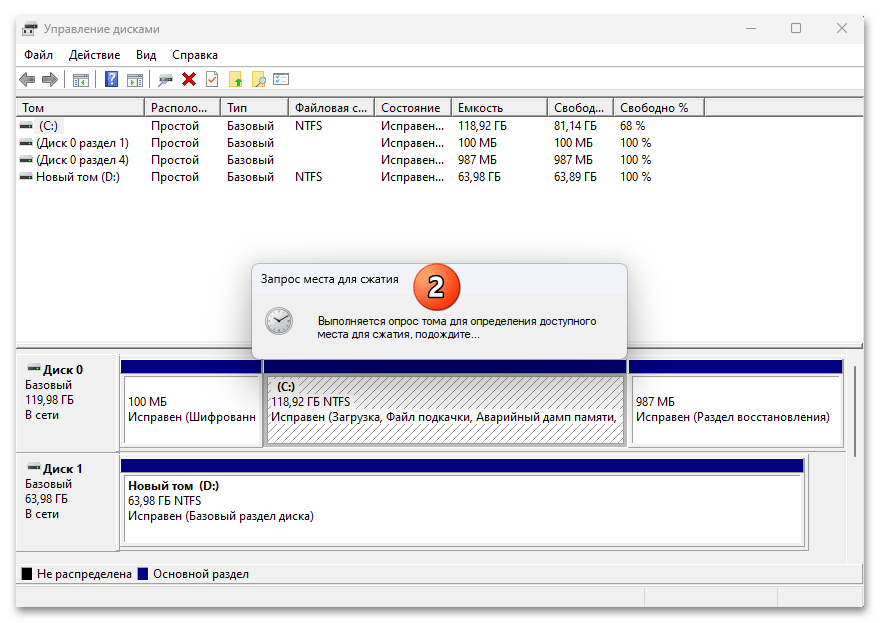
Некоторое время подождите завершения операции «Опрос тома».
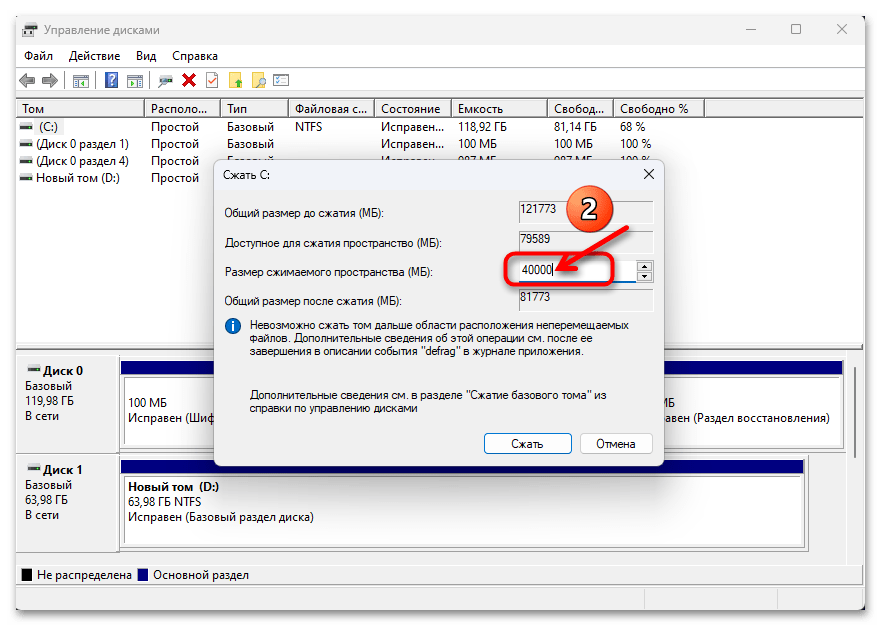
- В поле «Размер сжимаемого пространства (MB)» отобразившегося окна «Сжать С:»

введите значение (в мегабайтах) объёма выделяемого на диске под будущую установку ОС Ubuntu места.
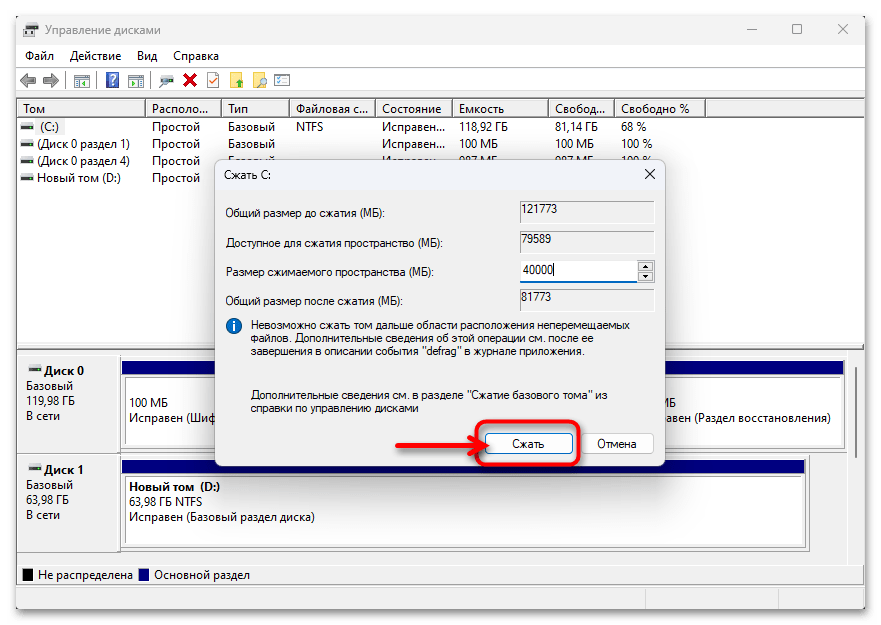
- Кликните по кнопке «Сжать», некоторое время подождите завершения инициированной операции (в процессе система не будет реагировать на ваши действия).
- После того как переразметка диска завершится (в окне «Управление дисками» отобразится аналогичная запечатлённой на скриншоте ниже картина), закройте оснастку и переходите к следующему шагу на пути развёртывания Ubuntu рядом с Windows 11.


Шаг 4: Установка
По завершении полноценного выполнения всех вышеописанных процедур не остаётся никаких препятствий для установки Ubuntu в качестве второй операционной системы десктопа или ноутбука непосредственно. Общий алгоритм действий, чтобы реализовать задуманное, будет следующим:
- Выключите компьютер, а затем загрузите его (если потребуется, предварительно сконфигурировав BIOS) с подготовленного по результату выполнения «Шага 2» в этой статье USB-накопителя c файлами Ubuntu.
Подробнее: Настраиваем BIOS для загрузки с флешки

Читайте также: Расширенные параметры запуска Windows 11
- В меню загрузчика «GNU GRUB» выберите «Try to Install Ubuntu»,

ожидайте запуска операционки

со съемного накопителя.
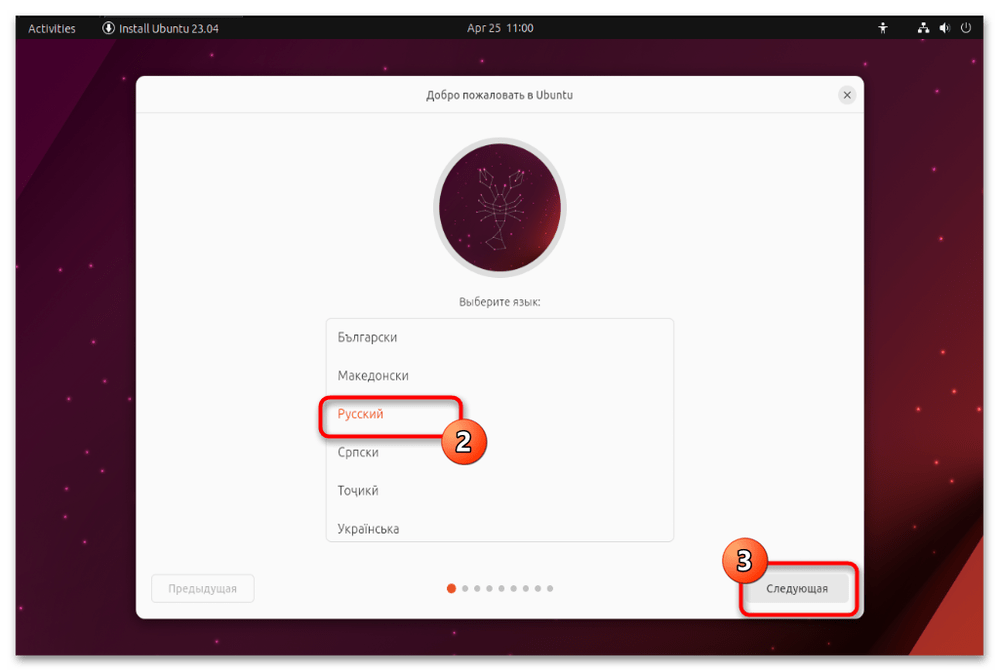
- Выберите «Русский» в окне «Choose your language»,

кликните по кнопке «Следующая».
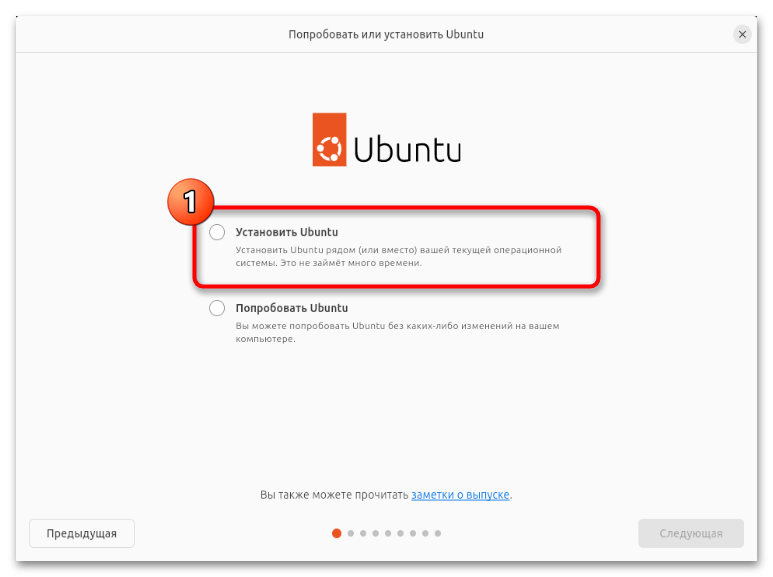
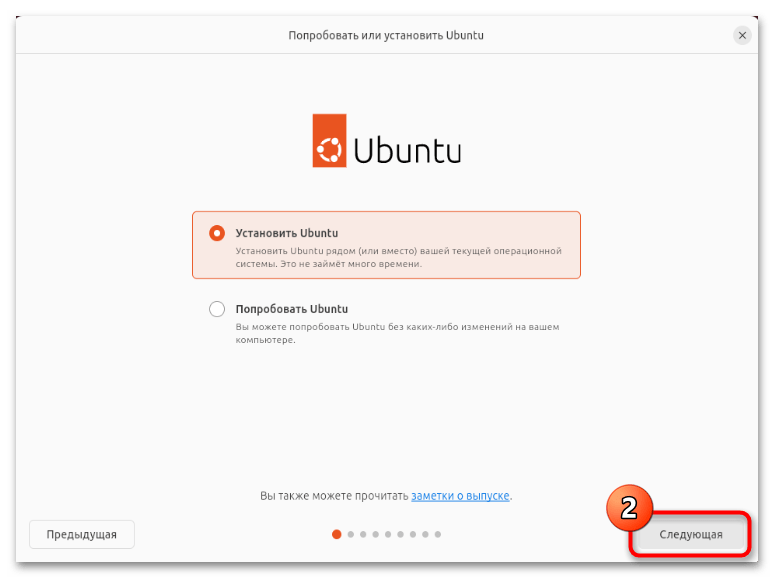
- Далее переведите радиокнопку в положение «Установить Ubuntu»,

перейдите к следующему окну.
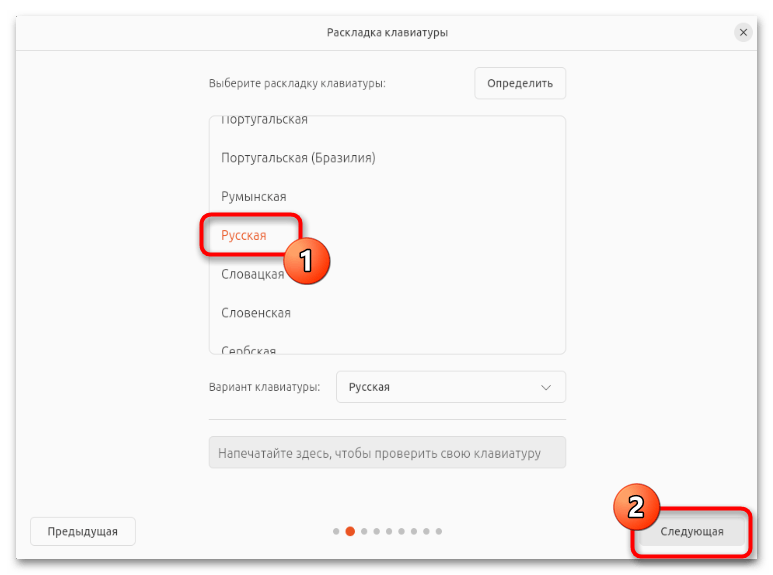
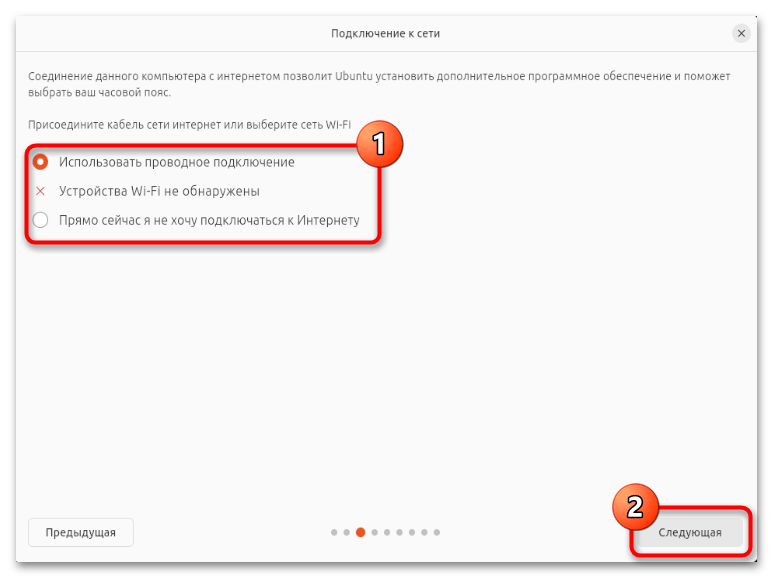
- Определите «Раскладку клавиатуры»,

а затем тип «Подключения к сети».
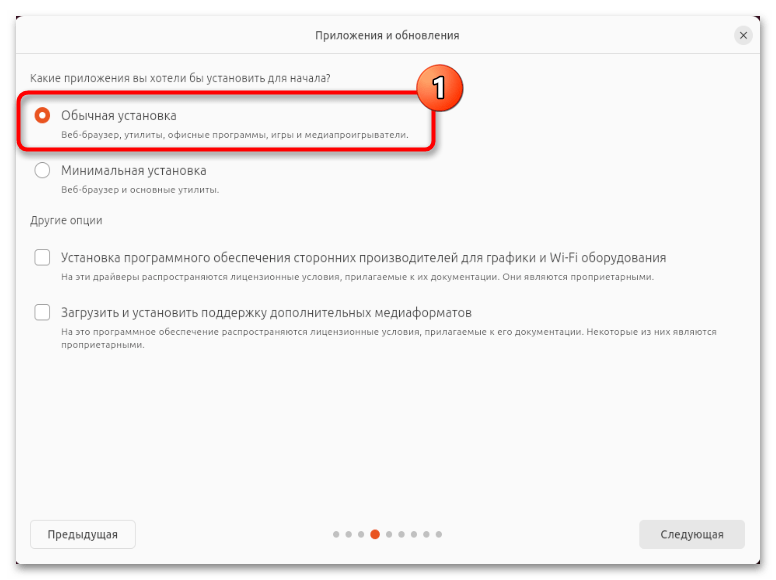
- Далее выберите «Обычная установка».

Кроме того, в текущем окне рекомендуется отметить оба пункта перечня «Другие опции» — сделайте это, затем нажмите «Следующая».
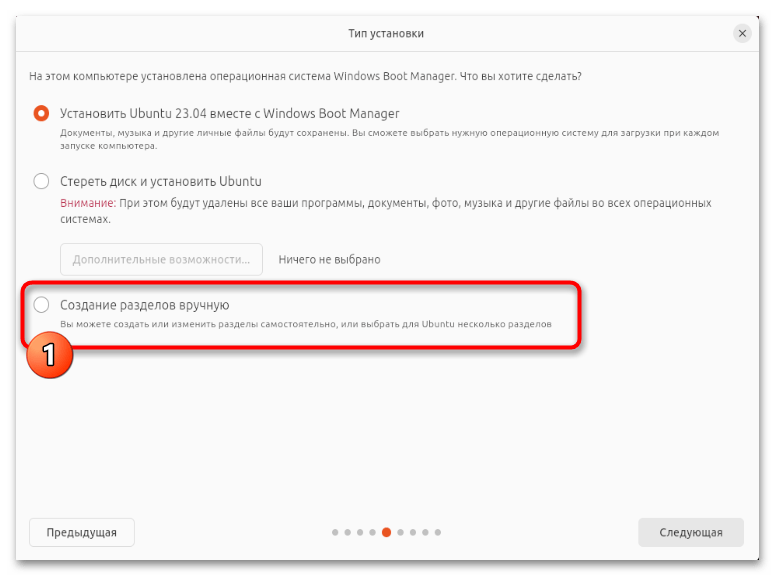
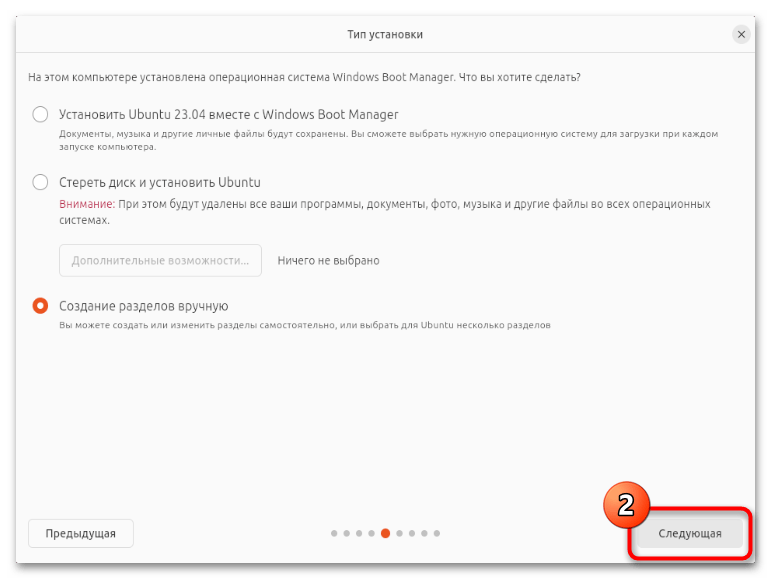
- Теперь один из важнейших шагов — определение «Типа установки» (по сути – способа разметки диска). Здесь можно оставить неизменным параметр по умолчанию — «Установить Ubuntu рядом с Windows», но в целом лучше (и как в примере далее) переключиться на «Создание разделов вручную» —

это обеспечит больший контроль над процессом инсталляции второй ОС на ПК.

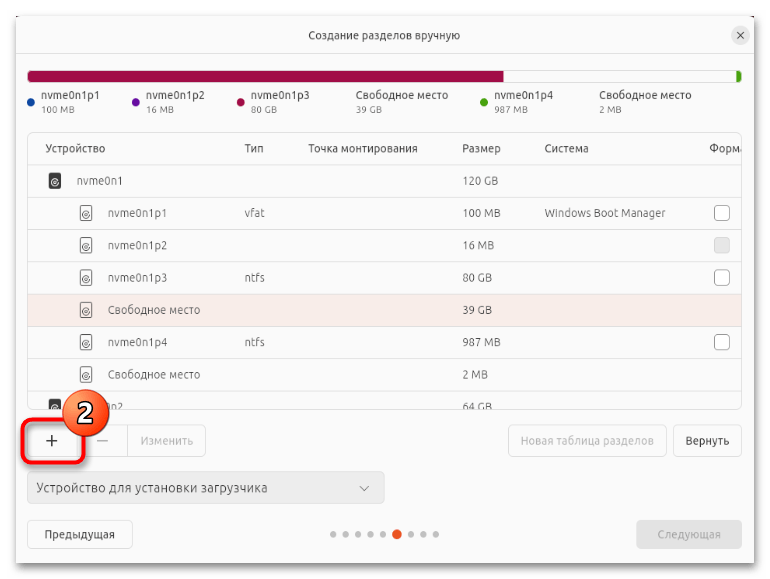
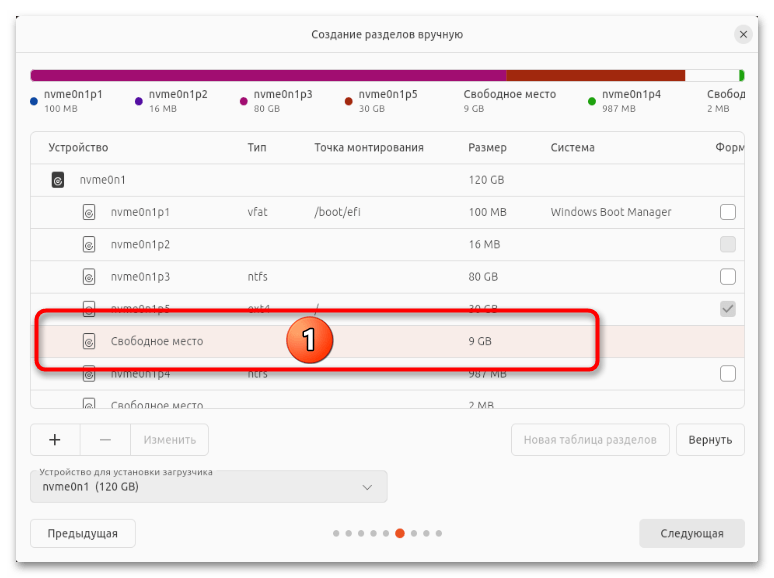
- В перечне окна «Создание разделов вручную» кликом выделите пункт (на диске 1) «Свободное место»,
затем щёлкните «+» внизу слева, чтобы перейти к созданию нового раздела на диске ПК.
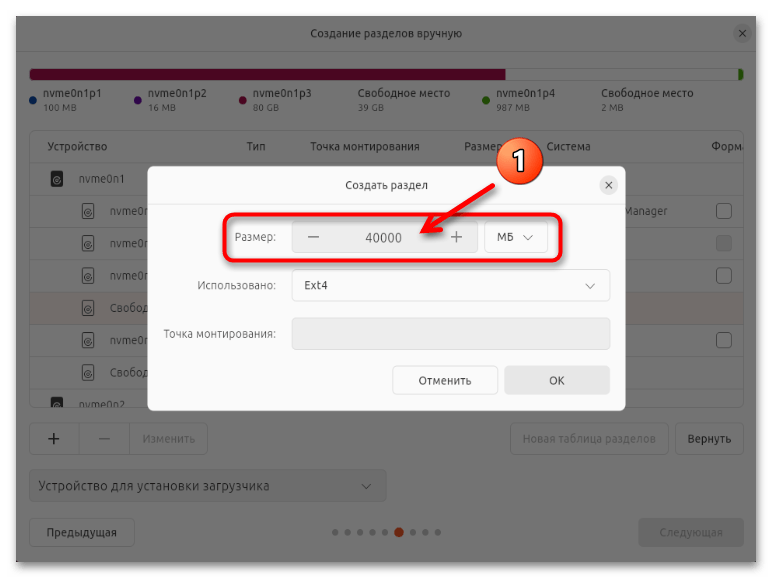
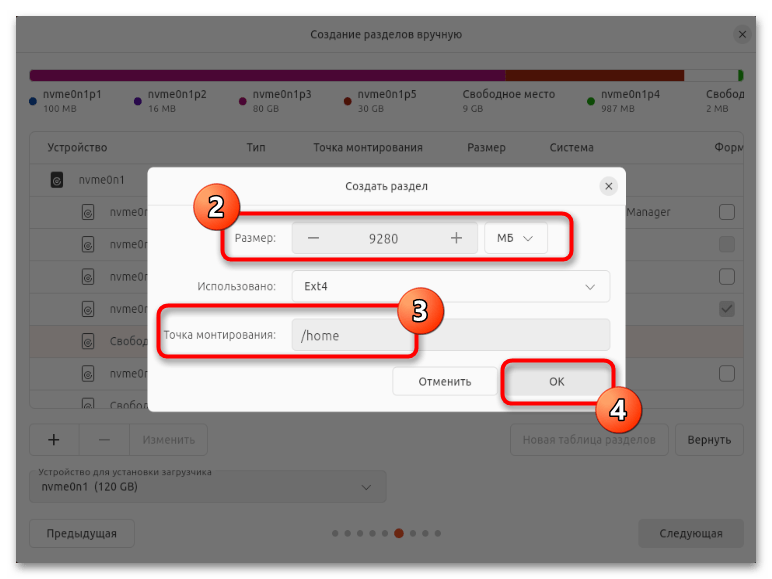
- В поле «Размер» открывшегося далее окна «Создать раздел»

введите объём будущего системного раздела Ubuntu.
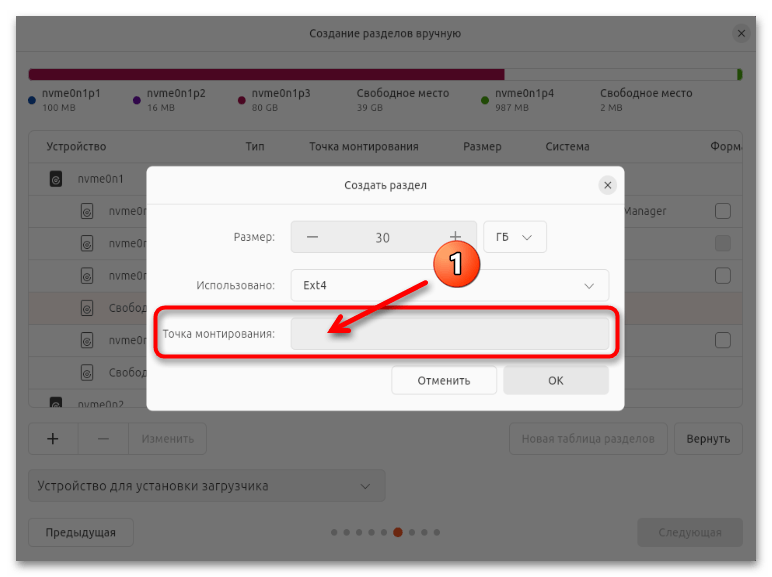
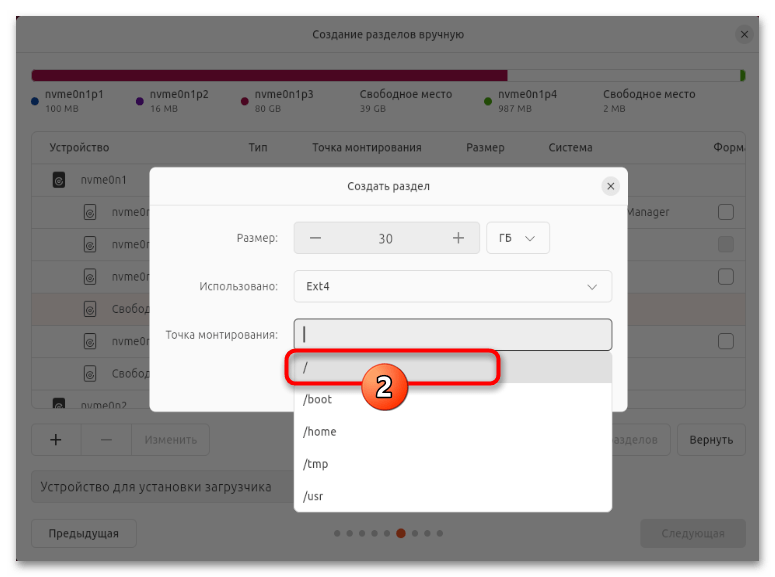
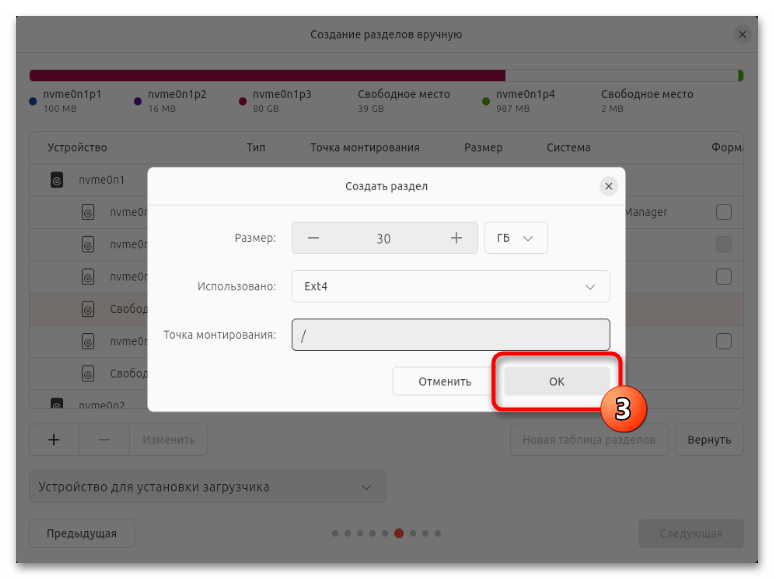
- Далее переместитесь в поле «Точка монтирования:»,

напишите здесь или выберите из раскрывающегося списка
/,
после этого кликните «ОК».
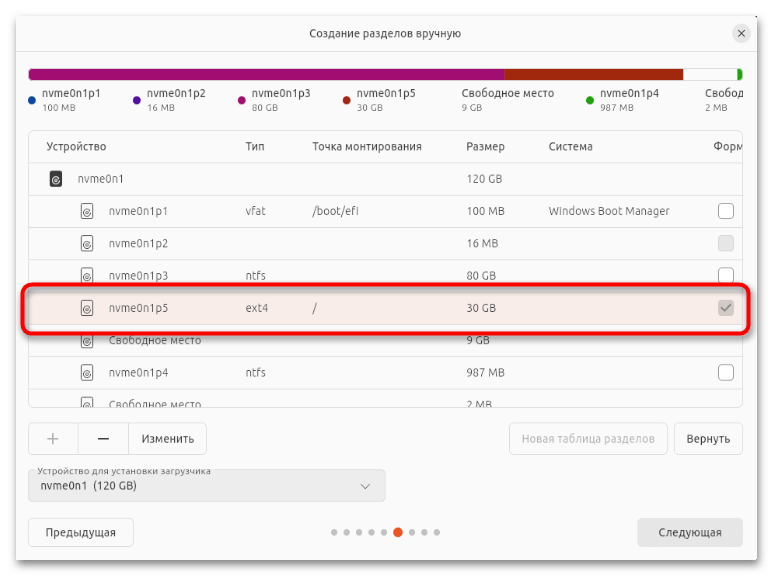
- В результате созданный раздел для размещения ОС Ubuntu отобразится в списке окна «Создание разделов вручную».
- Аналогичным вышеописанному образом создайте пользовательский Linux-раздел (если выделяли для него пространство на диске, в целом данную операцию можно пропустить). Кликните поочерёдно «Свободное место» — «+»,

введите «Размер» формируемого раздела, в поле «Точка монтирования» выберите
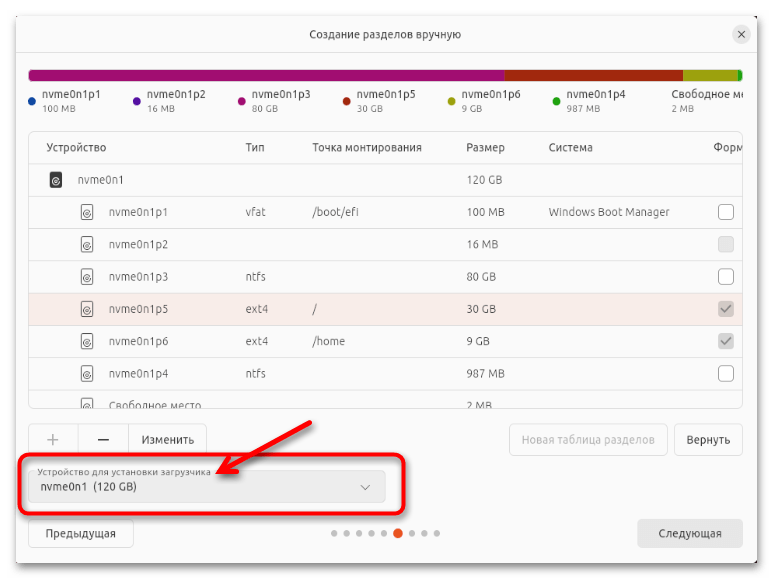
/home, нажмите «ОК». - Если в вашем компьютере имеется несколько физических дисков, проверьте, чтобы в списке «Устройство для установки загрузчика» был выбран тот, где содержится раздел EFI «Windows Boot Manager» (в системах с UEFI важно, чтобы в качестве раздела для установки загрузчика Grub был выбран именно «EFI» или, во всяком случае, диск, на котором расположен последний).
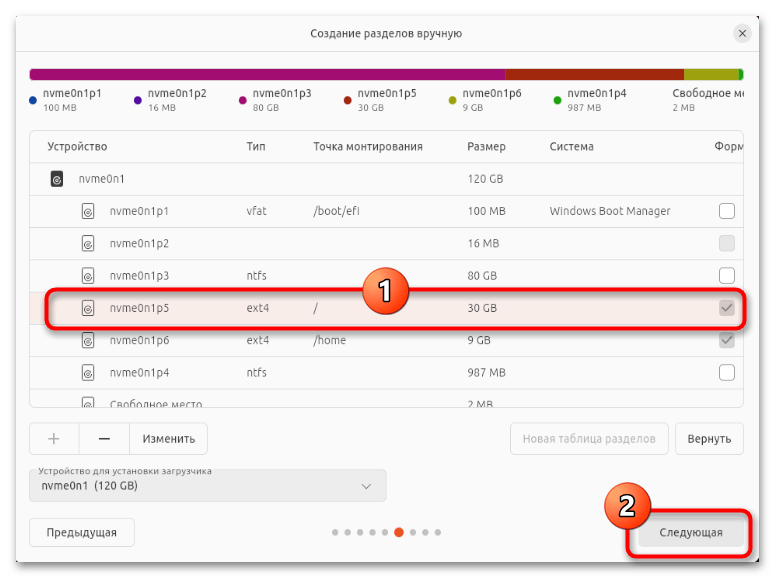
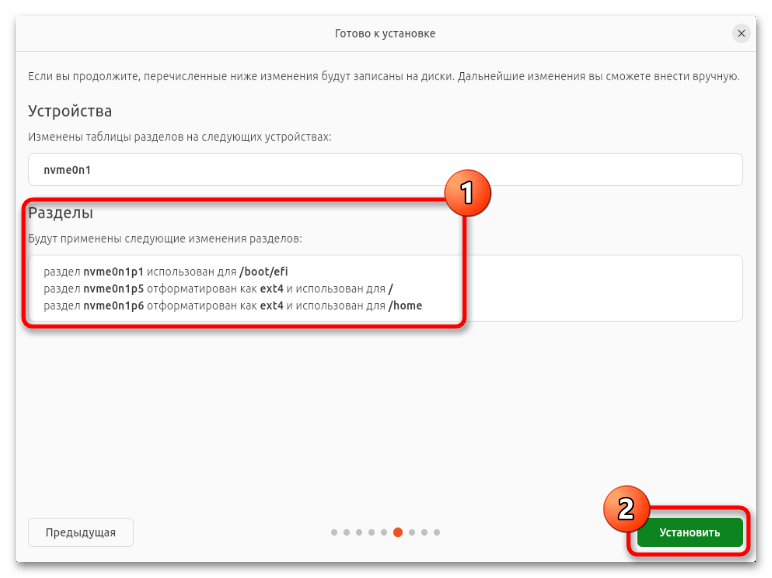
- Щёлкнув мышкой по обозначению в таблице, выделите созданный как системный для Ubuntu раздел, нажмите «Следующая».
- В информационном окне можно перепроверить, что разметка диска будет выполнена правильно, после чего щёлкните «Установить».


- В перечне окна «Создание разделов вручную» кликом выделите пункт (на диске 1) «Свободное место»,
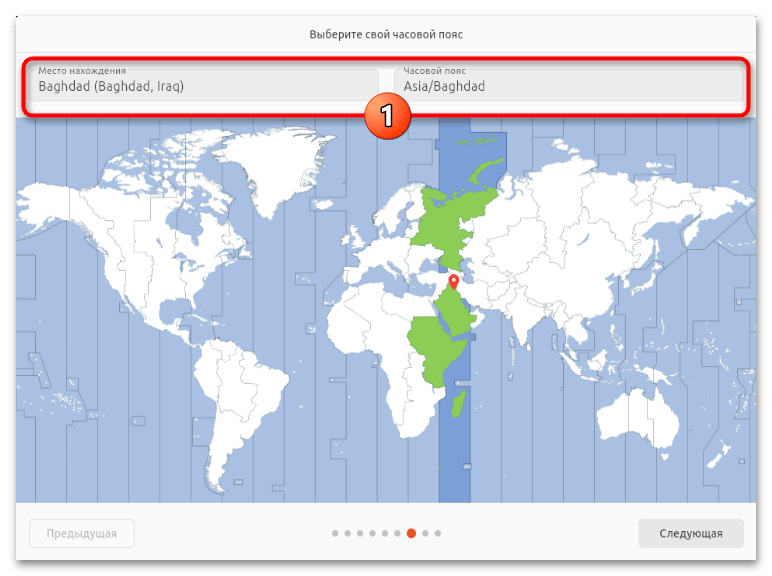
- Выберите местоположение и часовой пояс компьютера,

на который устанавливается Убунту.
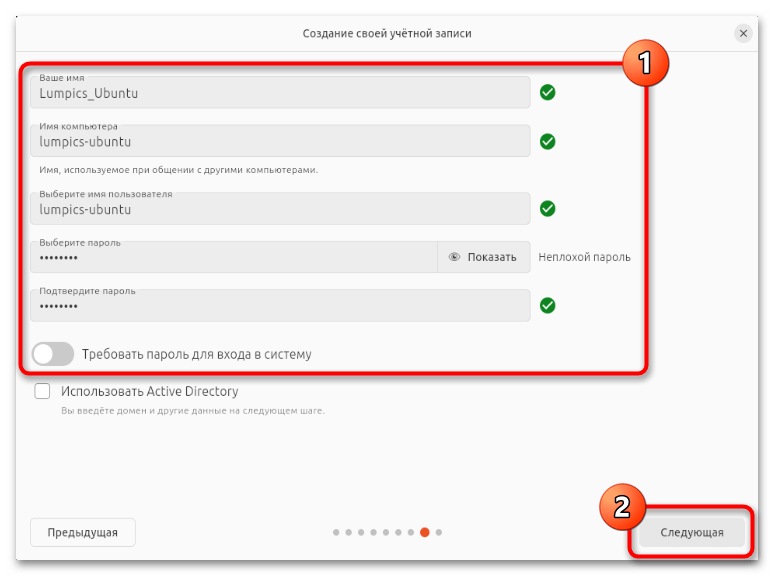
- Заполните поля формы «Создание своей учётной записи» (в Ubuntu). То есть придумайте и введите «Имя пользователя», «Имя компьютера», «Пароль», определите значение опции «Требовать пароль для входа в систему», — после этого кликните «Следующая».
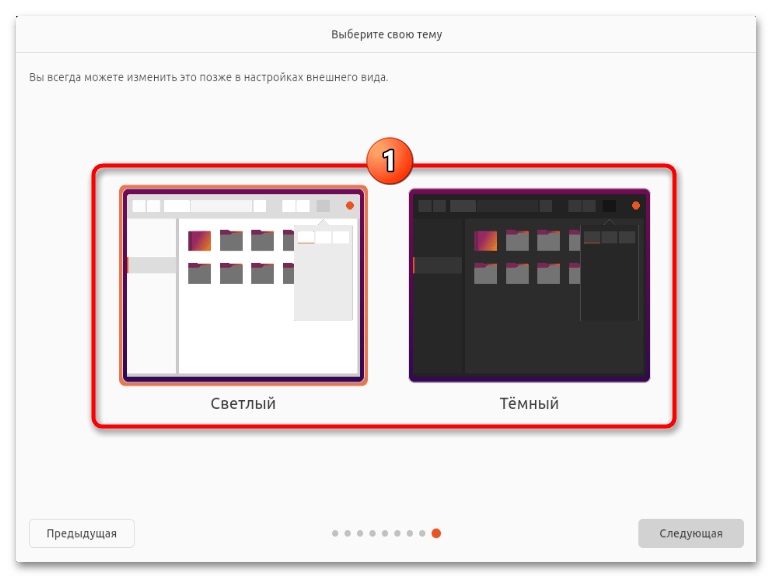
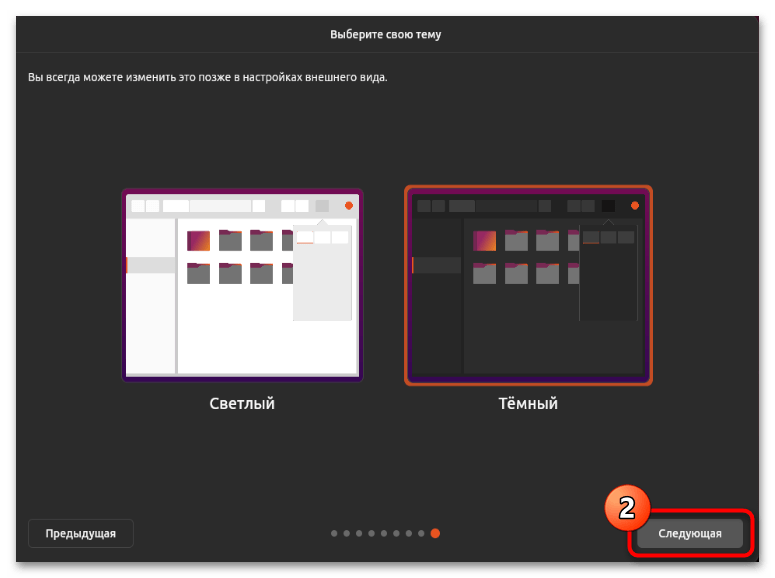
- Последний перед стартом непосредственной установки Убунту на ПК шаг – выбор темы оформления этой операционки (впоследствии можно изменить) – щёлкните по предпочтительному блоку в окне «Выберите свою тему»,
переходите далее.
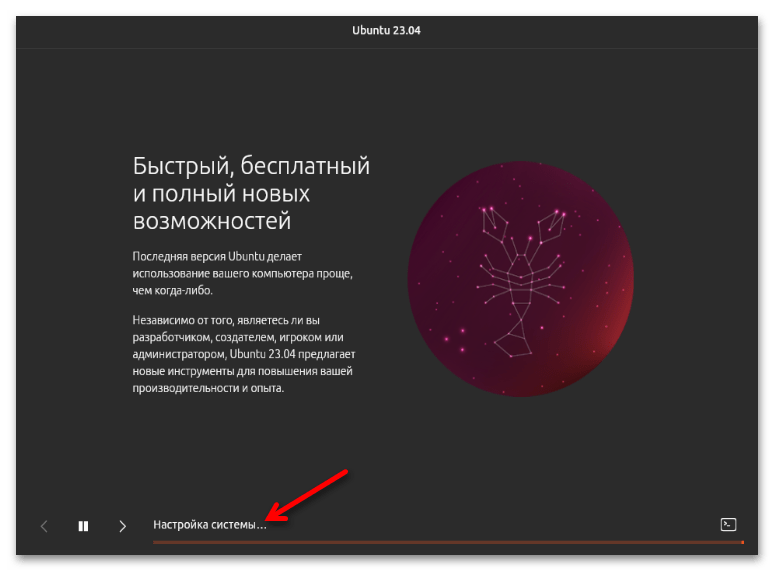
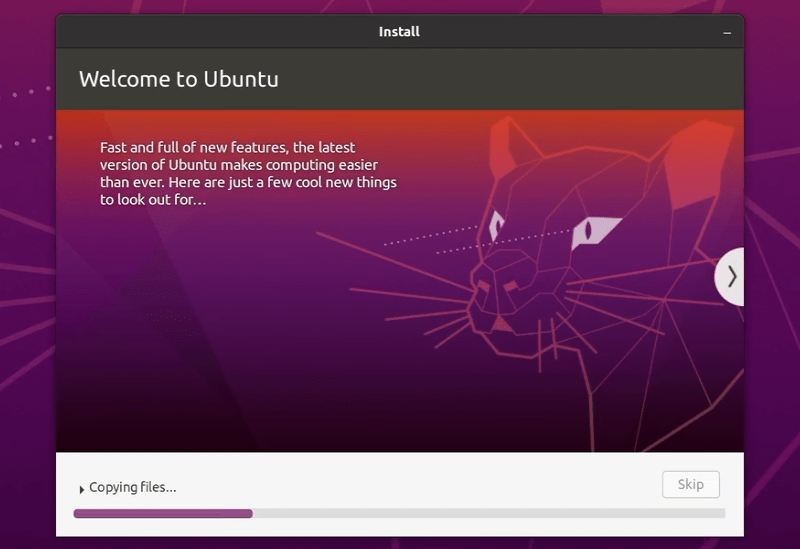
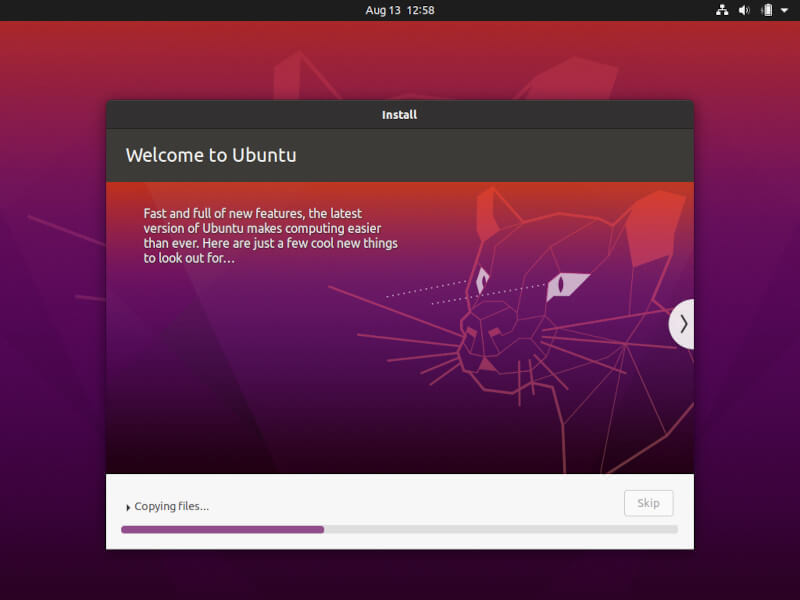
- Ожидайте окончания копирования файлов Ubuntu на компьютер и настройки операционной системы.
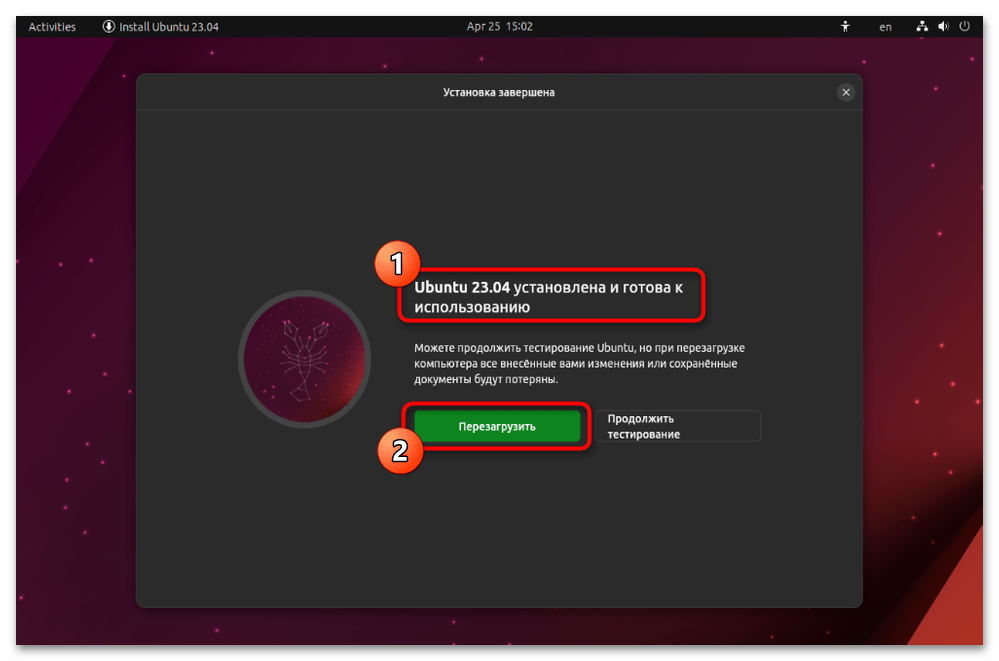
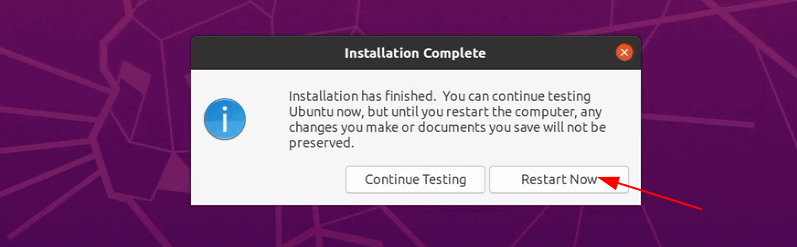
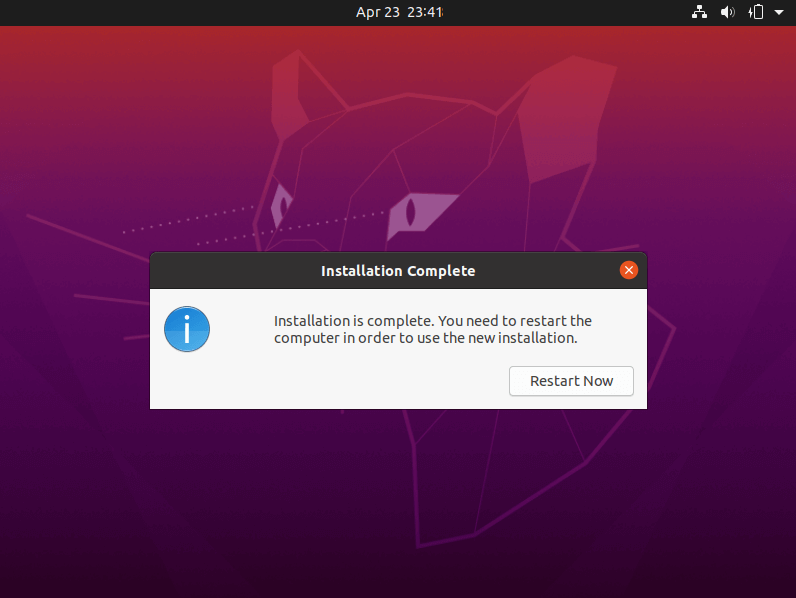
- По завершении инсталляции ОС появится подтверждающее успех операции окно — кликните в нём «Перезагрузить».
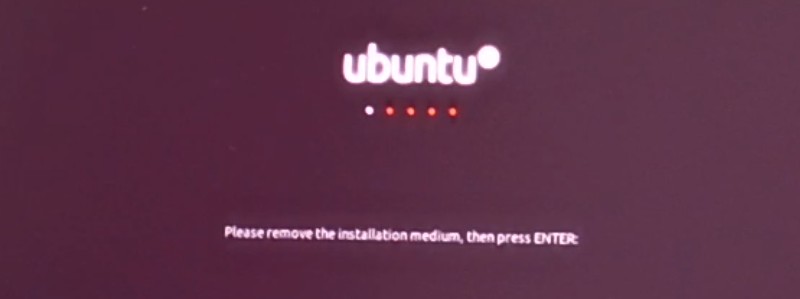
- Отключите загрузочный USB-накопитель Ubuntu от ПК, нажмите «Enter» на клавиатуре. На этом установка второй операционной системы считается завершённой.


Шаг 5: Выбор ОС для запуска
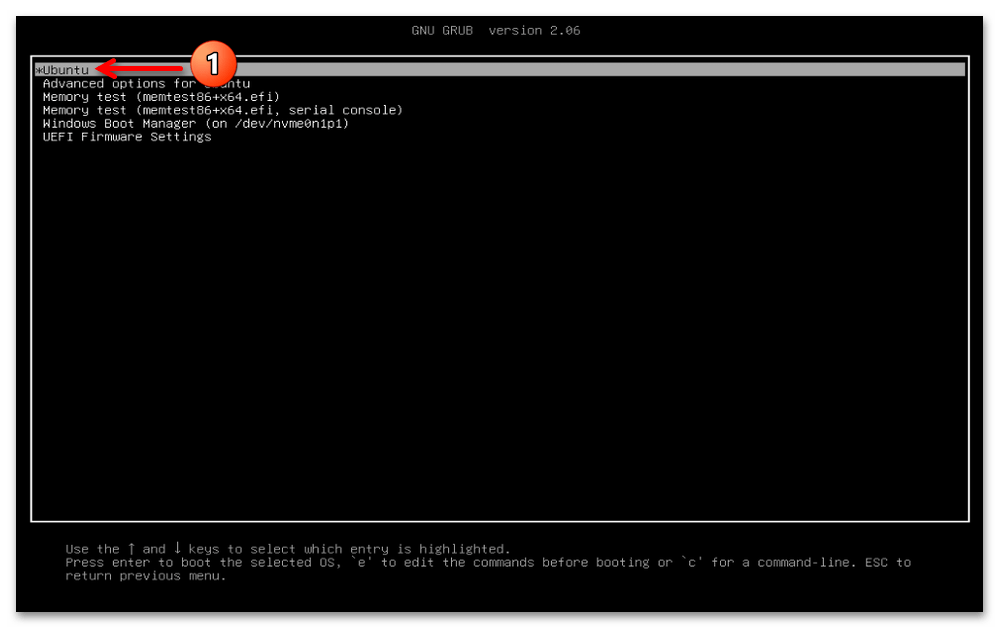
Если всё вышеперечисленное выполнено правильно, все последующие загрузки оснащённого теперь и Windows 11, и Linux Ubuntu компьютера будут начинаться c отображения меню загрузчика «GNU GRUB», — в нём необходимо выбрать, какую систему вы будете эксплуатировать в течение текущего сеанса работы:
- Когда требуется запустить Linux, с помощью стрелок на клавиатуре подсветите пункт «Ubuntu»,

нажмите «Ввод»,

ожидайте загрузки операционной системы.
- Выберите пункт «Windows Boot Manager»

в меню «GNU GRUB»,

если требуется загрузиться в ОС Windows 11.

Наша группа в TelegramПолезные советы и помощь

Dual booting Linux with Windows is one of the most convenient ways of enjoying the two operating systems on the same computer.
You have both OS installed on the disk, on real hardware and when you power on your system, you can choose which operating system to use.
In an earlier tutorial, I showed the steps to dual boot Ubuntu with Windows 7 which comes with an MBR partition. The steps are almost the same for the newer systems that come preinstalled with Windows 10.
In this tutorial, I’ll show you how to install Ubuntu with Windows 10 already installed on the system.
💡
Before you start following the tutorial, I advise reading it entirely first. See what you need and what you should do in this tutorial. Once you have a good idea about the procedure and have all the necessary things on hand, start the process. Dual-boot is not a complicated process. It just takes some time and patience.
The steps mentioned here apply to other Ubuntu versions such as Lubuntu, Kubuntu, Xubuntu and Ubuntu-based Linux distributions such as Linux Mint, elementary OS, etc.
Compatibility checks
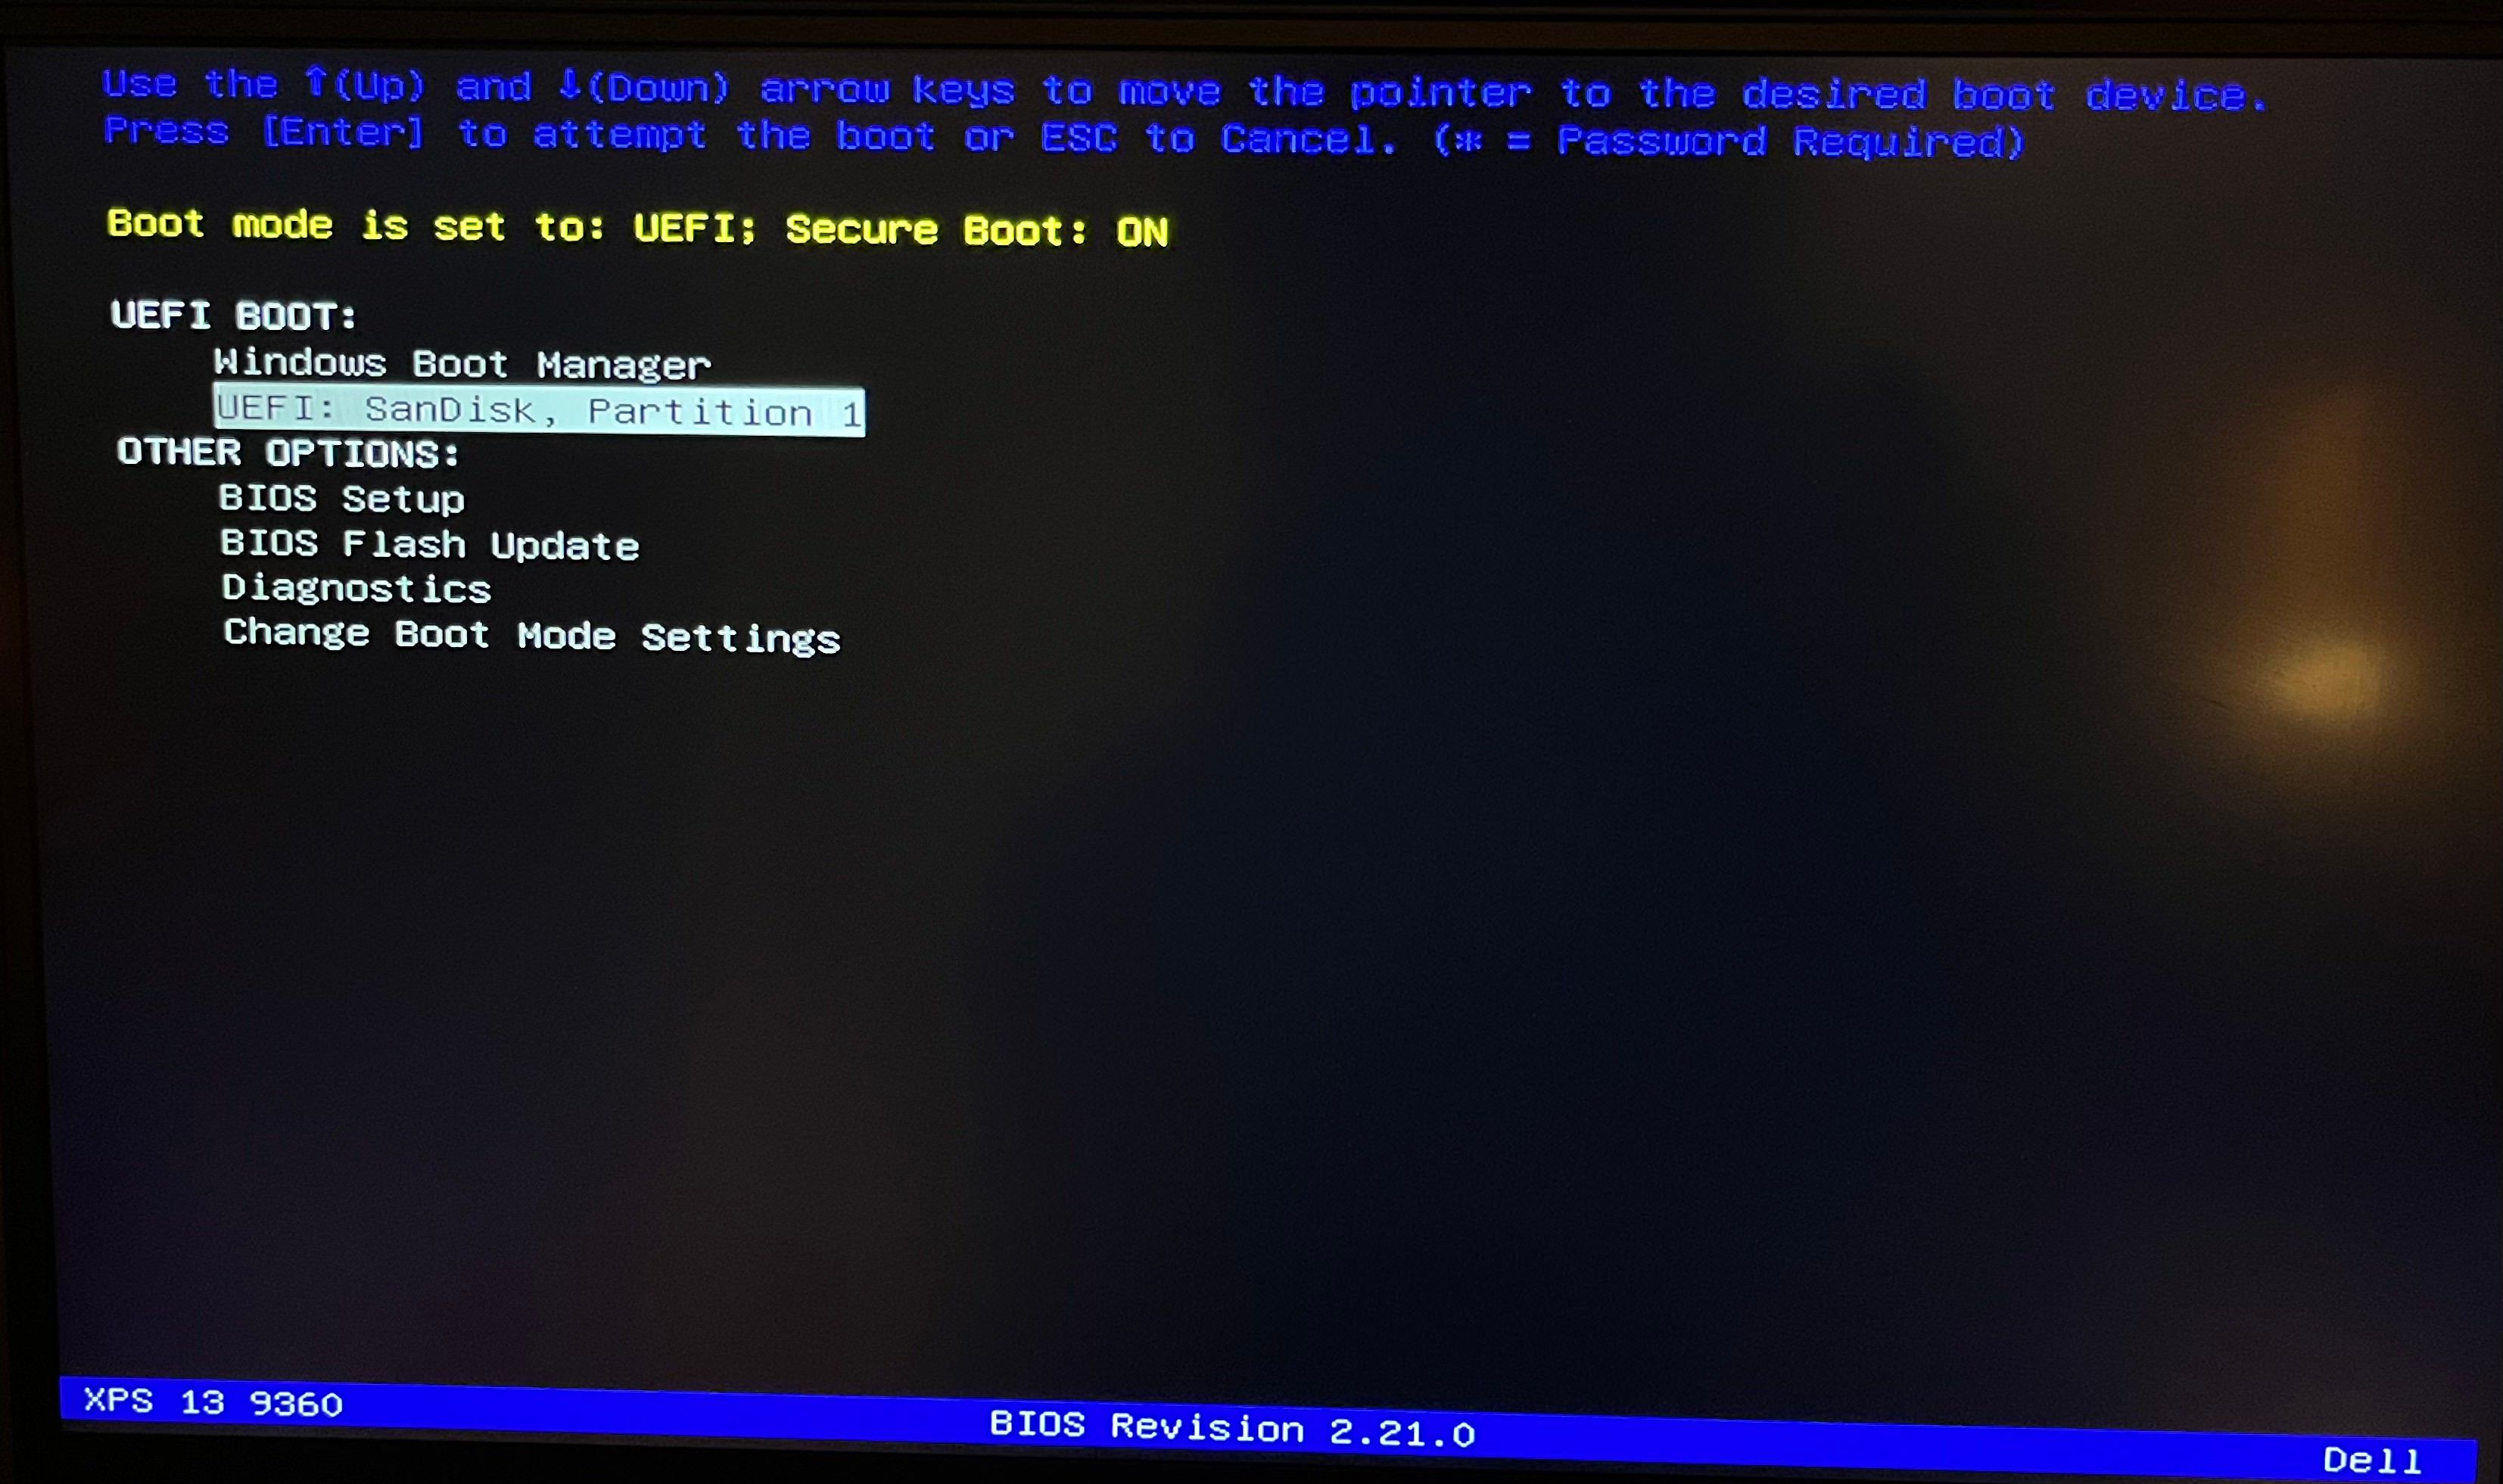
This tutorial is suitable for systems that come with Windows 10 pre-installed with UEFI secure boot and GPT partitioning system. Please check whether your system uses GPT or MBR.
Make sure your system uses UEFI: This tutorial is only applicable for systems with UEFI boot. If you have bought your system in the last 5-6 years, chances are that you should already have a UEFI system on GPT partition. However, there is no harm in verifying that your system uses UEFI. If your system uses legacy BIOS with MBR partitioning system, please follow this dual boot tutorial.
Bitlocker encryption process is different: Newer systems with Windows 10 Pro have their disk encrypted with Bitlocker. If you have such a system, please follow this tutorial to dual boot with Bitclocker encryption.
Dual Booting Ubuntu With Windows 10 Pro With BitLocker Encryption
I have written about dual booting Windows and Ubuntu in the past. The process has improved so much in the last few years. Ubuntu and other Linux play very well with secure boot and UEFI now. So, why I am I writing about installing Ubuntu with Windows 10 once again?
It’s FOSSAbhishek Prakash
System with both SSD and HDD: If you have a system with both SSD and HDD, i.e. dual disk system, the process is pretty much the same. However, you’ll be a lot better following this dedicated tutorial on dual booting dual disk system.
Dual Booting Ubuntu and Windows With a SSD and a HDD
Dual booting Ubuntu and Windows is not that complicated and I have covered it in detailed tutorial in the past. Recently, I also wrote about dual booting on a Bitlocker encrypted Windows system. And yet here I am talking about it again. Why? Because the scenario is slightly different and
It’s FOSSAbhishek Prakash

Prerequisites: What do you need?
You’ll need the following things to easily and safely install Linux alongside Windows:
- A computer that comes preinstalled with Windows 10.
- A USB key (pen drive or USB drive) of at least 4 GB in size and no data on it.
- Internet connection (for downloading Ubuntu ISO image and live USB creating tool). You can do this on any system, not necessarily on the system you are dual booting.
- Optional: External USB disk for making back up of your existing data.
- Optional: Windows recovery or bootable disk (if you encounter any major boot issues, it could be fixed).
Let’s see the steps of installing Ubuntu alongside Windows 10. I have made a video of the entire process. You may watch that as well.
Step 1: Make a backup of your Windows system [optional]
It is always nice to have a backup of your data, just in case you mess up with the system while dealing with disk partitions.
I advise copying all the essential data you cannot afford to lose on an external USB disk. You can use an external HDD (slower but cheaper) or SSD (faster but expensive) and copy the important files and folders.
Step 2: Download Ubuntu (or whichever Linux distribution you are using)
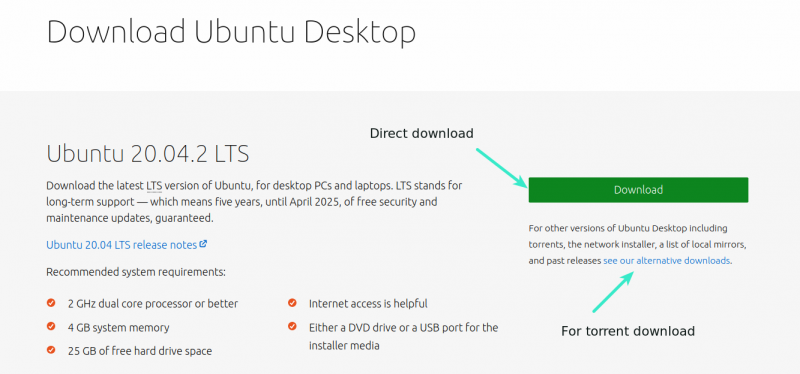
Head over to Ubuntu’s website and download the ISO file. The file should be around 2.5 GB in size. If you need to download Ubuntu via torrents, you can click the ‘alternative downloads.’
Step 3: Create a live USB/disk of Ubuntu
I presume that you are using Windows to create the live USB. Several free applications allow you to create a live Ubuntu USB. You can use any of these tools. Since I cannot show all of them, I’ll go with Rufus.
Download Rufus for free from its website. It will download a .exe file.
Plug in your USB. This device will be formatted so make sure you don’t have any important data on this USB disk.
Run the Rufus tool you just downloaded. It automatically identifies the plugged-in USB but double-check it anyway. Now, browse to the location of the downloaded ISO image and ensure that it uses GPT partitioning scheme and UEFI target system.
Hit the start button and wait for the process to complete. Your live Linux USB is ready.
📋
Installing Ubuntu and creating the live Ubuntu USB process can be done on any computer. But the rest of the process takes on the system on which you are dual booting.
Step 4: Make some free space on your disk for Ubuntu installation
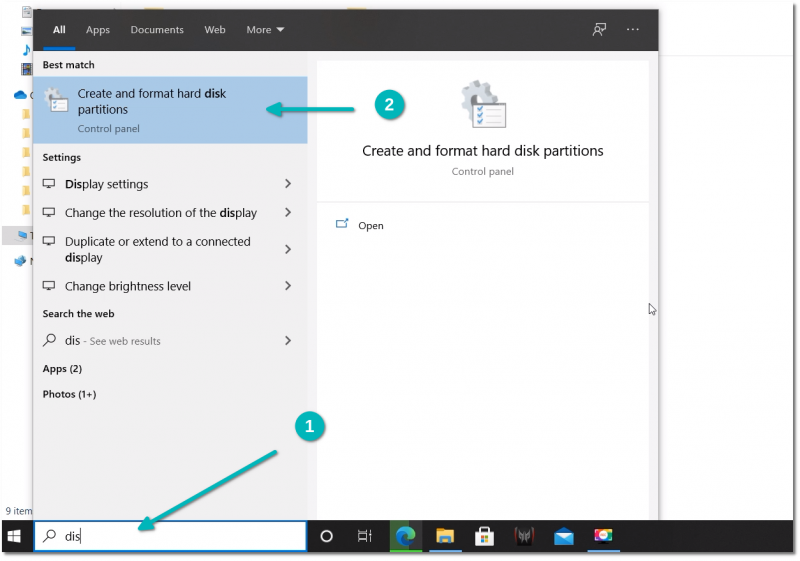
In many systems, while installing Ubuntu, it gives the option to make a disk partition for Ubuntu. However, that is not a surety. This is why making the required free space on the disk would be better before starting the installation procedure.
In the Windows menu, search for ‘disk partitions’ and go to ‘Create and format hard disk partitions.’
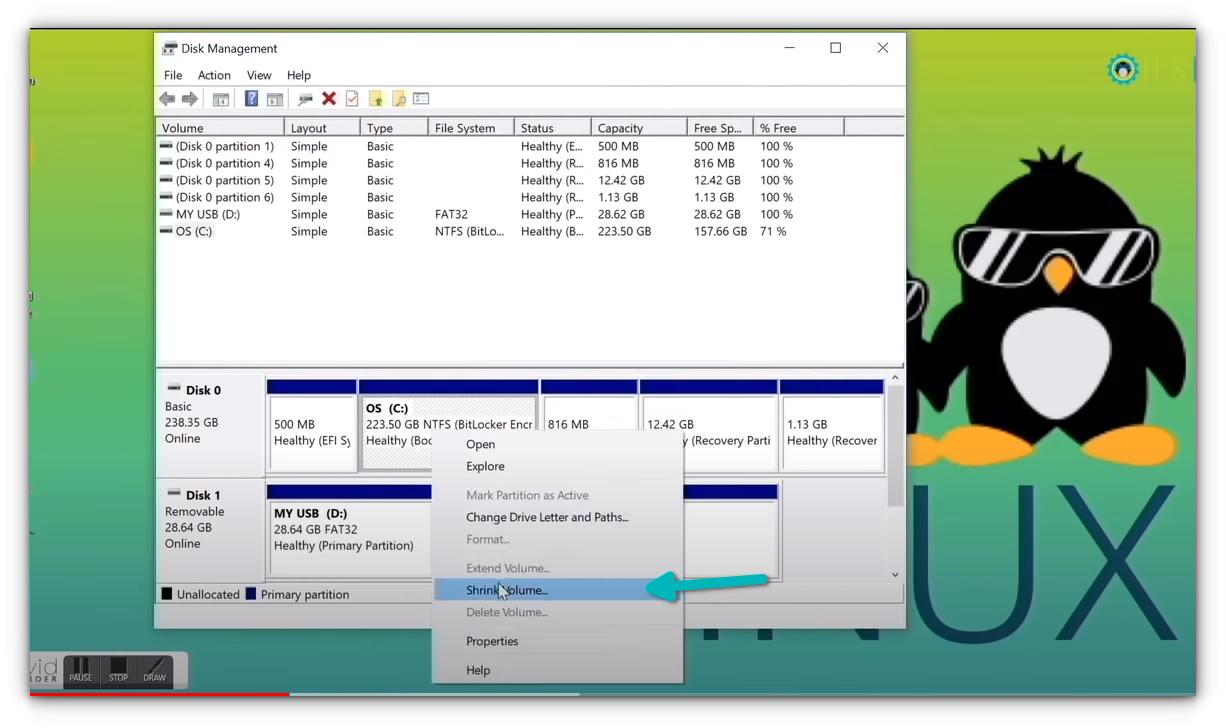
In the Disk Management tool, right-click on the drive which you want to partition and select shrink volume.
If you have just one partition like this, you need to make some free space out of it for Linux. Use any of them except C drive if you have several partitions of considerable size because it may erase the data.
The 256 GB in my system already had several partitions from the manufacturer but mainly for backup and other purposes. The primary partition was the C drive, around 220 GB, where Windows 10 is installed. In my case, I shrank the C drive to make some free space for Linux installation.
How much space do you need for Linux in dual boot?
This depends on how much total disk space you have. You may install Ubuntu on 15 or 20 GB but you’ll soon start running out of disk space. These days, you should have at least 120 GB of disk. In that case, go for 30-40 GB of disk for Linux. If you have 250 GB disk, allocate 60-80 GB or even more. If you have more disk space, allocate even more free space, if you want.
What if you have D, E or F drives?
This is a common confusion for many people as they think Ubuntu can only be installed on the C drive. That’s not true. I had only one C drive, so I shrank it. If you have D, E or F drive, you may shrink one of those drives. You may also choose to delete the D, E or F drive. NEVER DELETE C DRIVE.
Step 5: Boot from live Ubuntu USB
You created a live Ubuntu USB in step 3. Plug it into the system. Before you go and boot from the live USB, let’s have a quick word about the infamous secure boot.
Do I need to disable the secure boot for installing Linux?
6-8 years back, the UEFI secure boot was not well-supported by Linux; hence, you had to disable secure boot before installing Linux. Thankfully, Ubuntu and many other Linux distributions currently support secure boot very well. Usually, you should not need to do anything about it. However, if your system doesn’t allow booting from live USB or if you see any other related issue, you may disable the secure boot on Windows.
Alright! Let’s see how to boot from the USB. You can go to the boot settings by pressing F2/F10 or F12 at the system start time and selecting to boot from the USB. However, some people find it difficult.
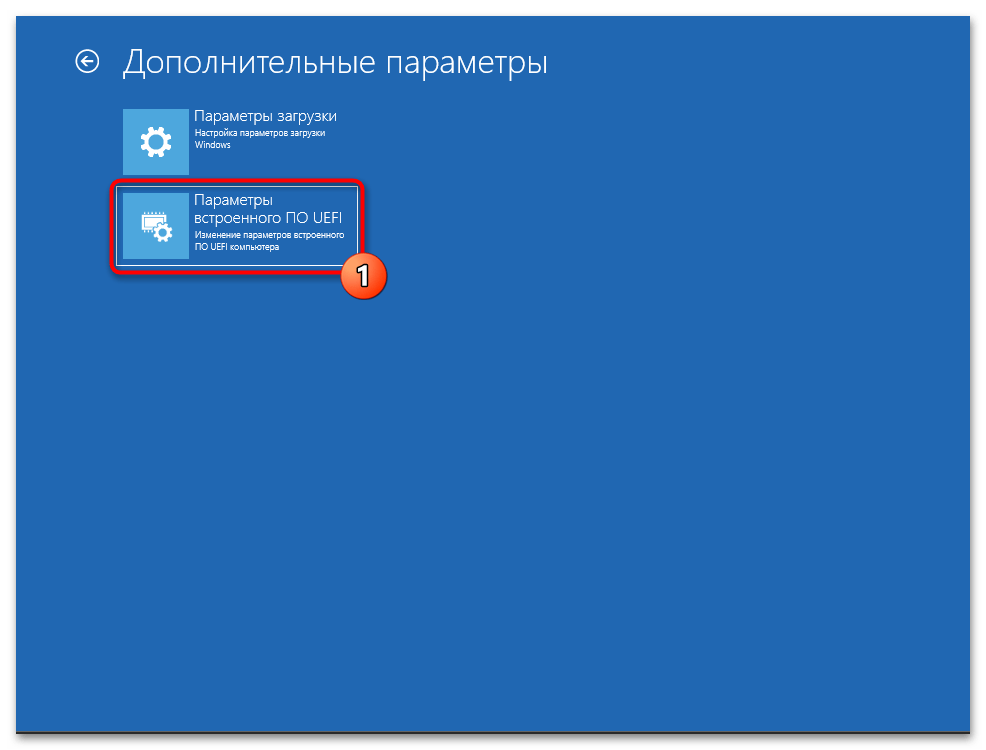
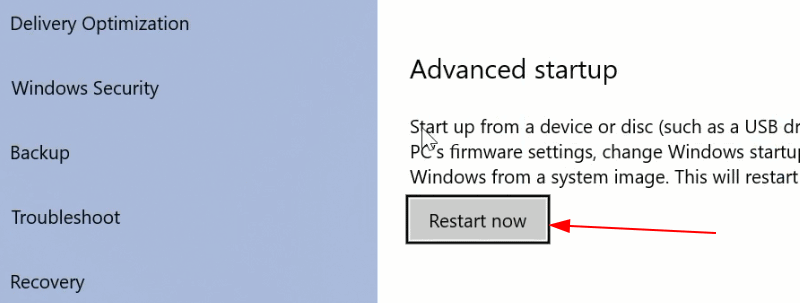
The longer but an easier step is to access the UEFI boot settings from within Windows. In the Windows menu, search for UEFI and then click on ‘Change advanced startup options’:
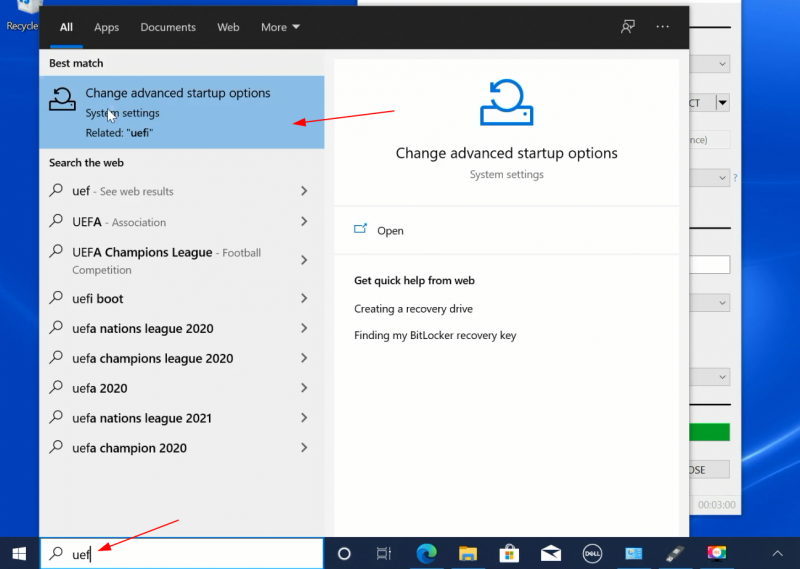
Go to the Advanced startup option and click on Restart now button.
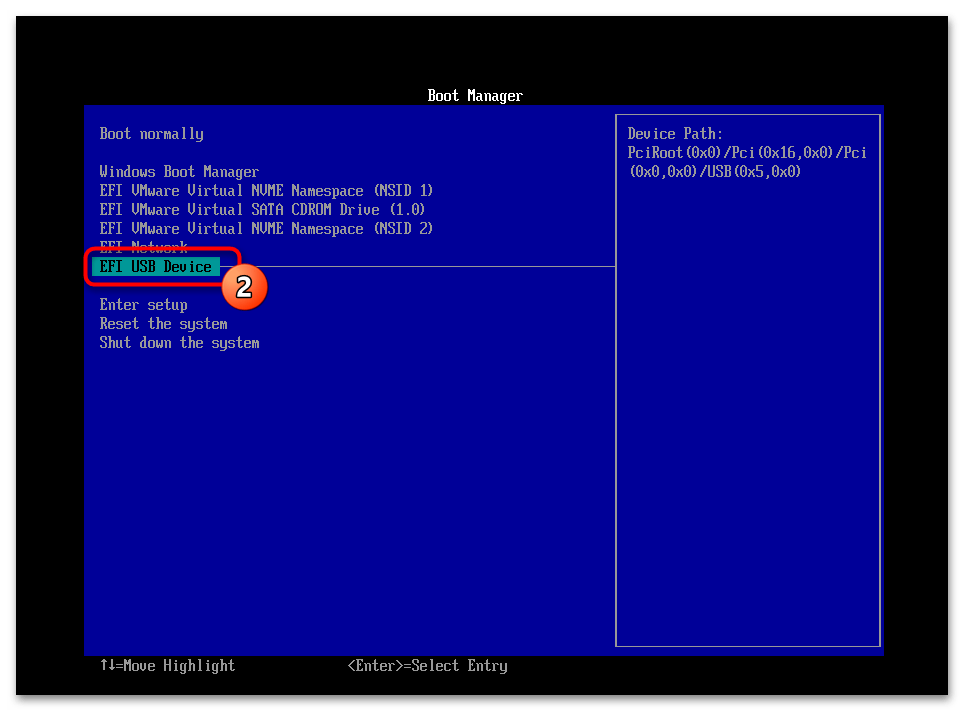
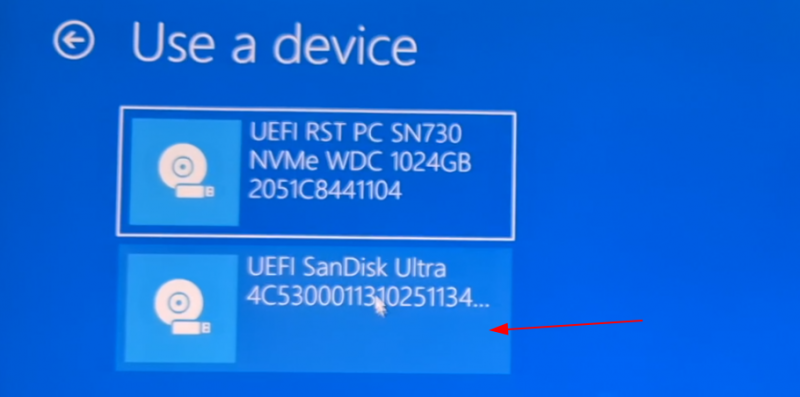
On the next screen, click on ‘Use a device’:
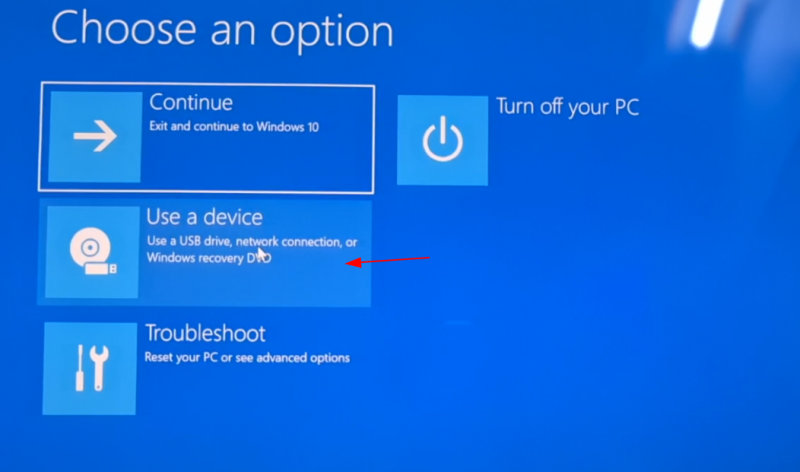
Recognize the USB disk with its name and size. It may also be displayed as EFI USB Device.
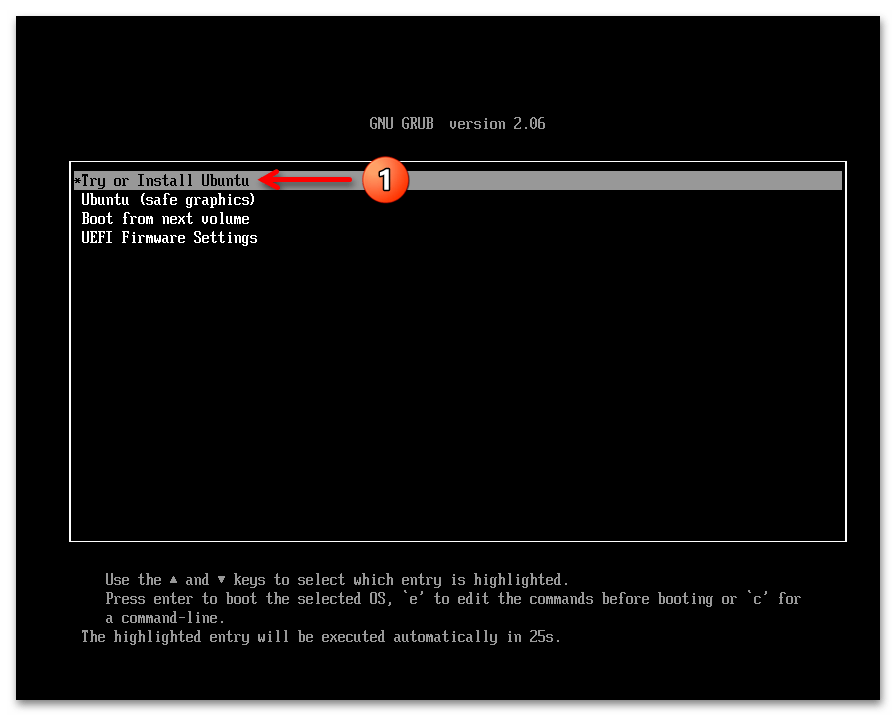
Now it will power off your system and reboot into the disk you chose which should be the live USB disk. You should see a screen like this after a few seconds:
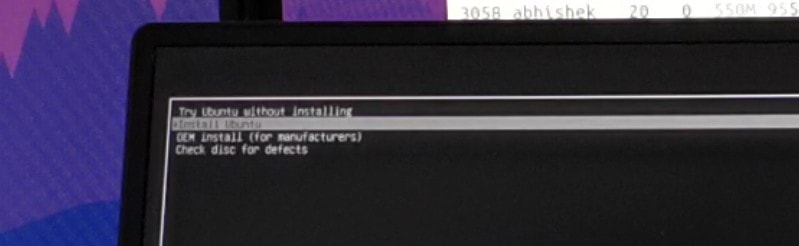
The ‘Try Ubuntu without installing’ option allows you to experience Ubuntu from the live disk. The option to install Ubuntu can be found on the desktop.
The “Install Ubuntu” option will start the Ubuntu installation immediately.
You can opt for either option based on your preference.
Step 6: Installing Ubuntu along with Windows 10
Start the installation procedure. The first few steps are simple. You choose the language and keyboard layout.
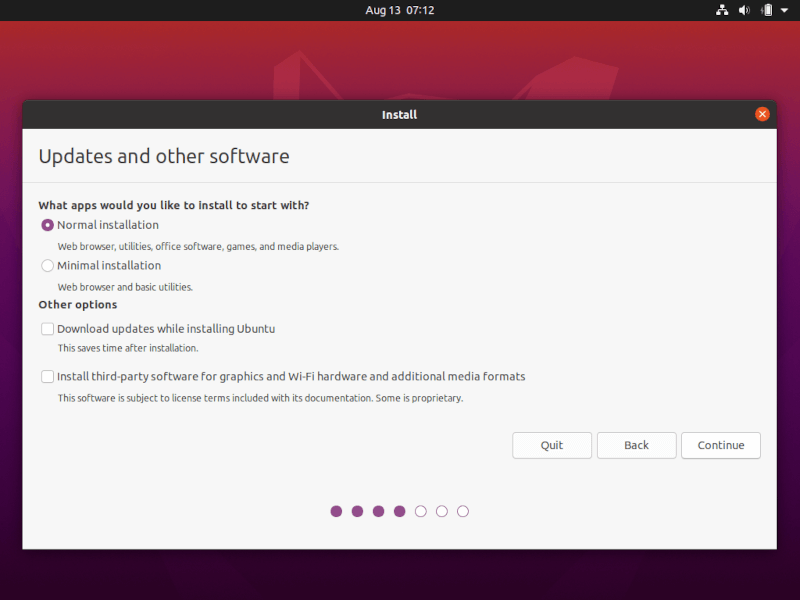
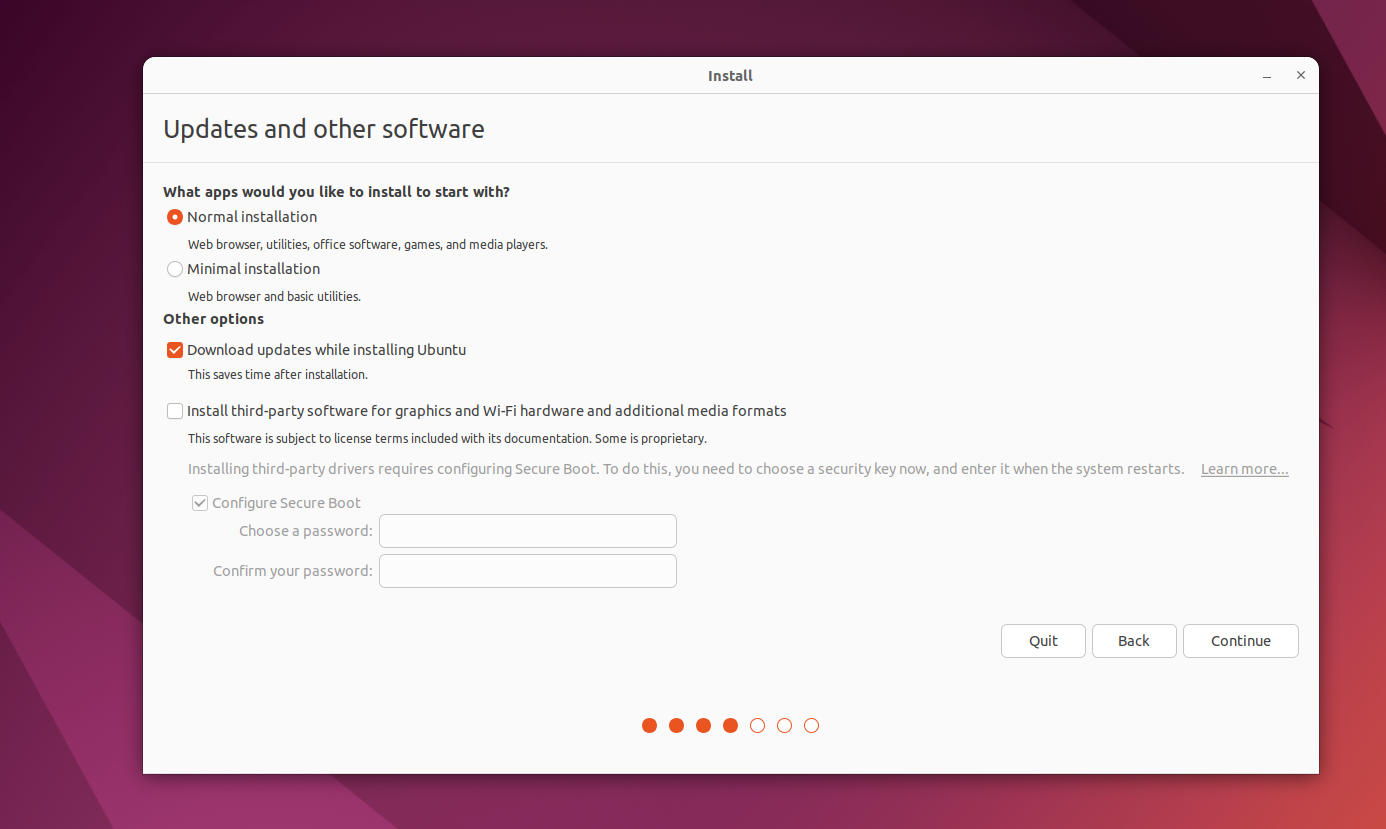
On the next screen, choose Normal installation. No need to download updates or install third-party software just yet. You may do it after the installation completes.
Hit continue. It may take some time to go to the next step.
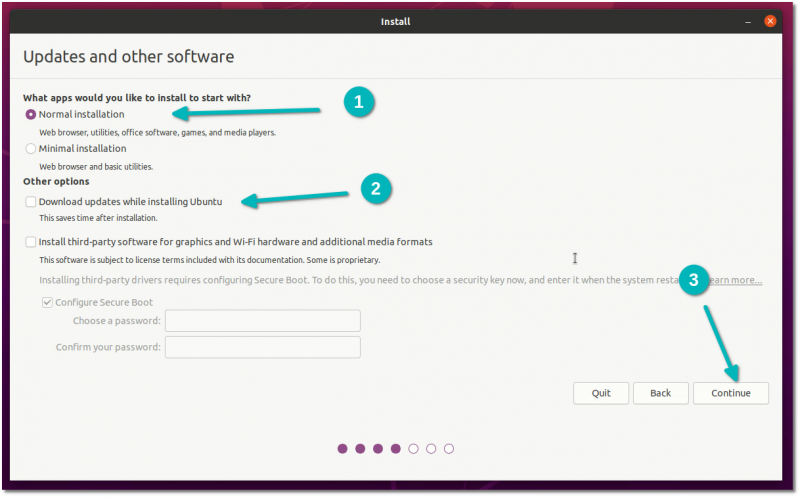
Note: Some people try to download updates and install media codes while installing. In my experience, it sometimes creates issues during installation and may also cause the installation to fail. For this reason, I advise against them.
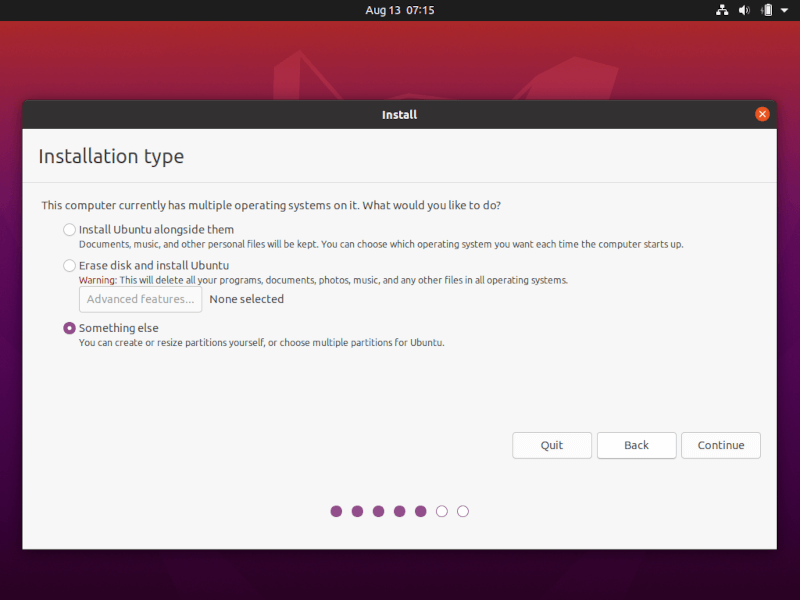
Important: Installation takes two approaches based on what you see on the next screen
Since this is a detailed tutorial, I’ll cover both aspects.
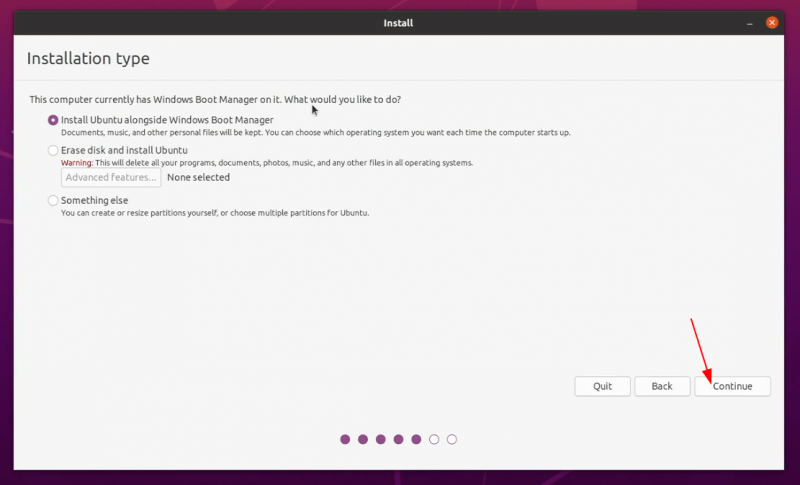
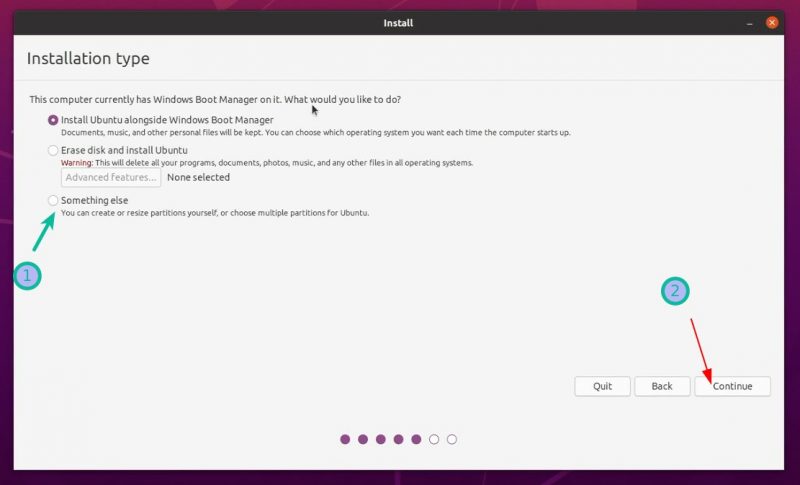
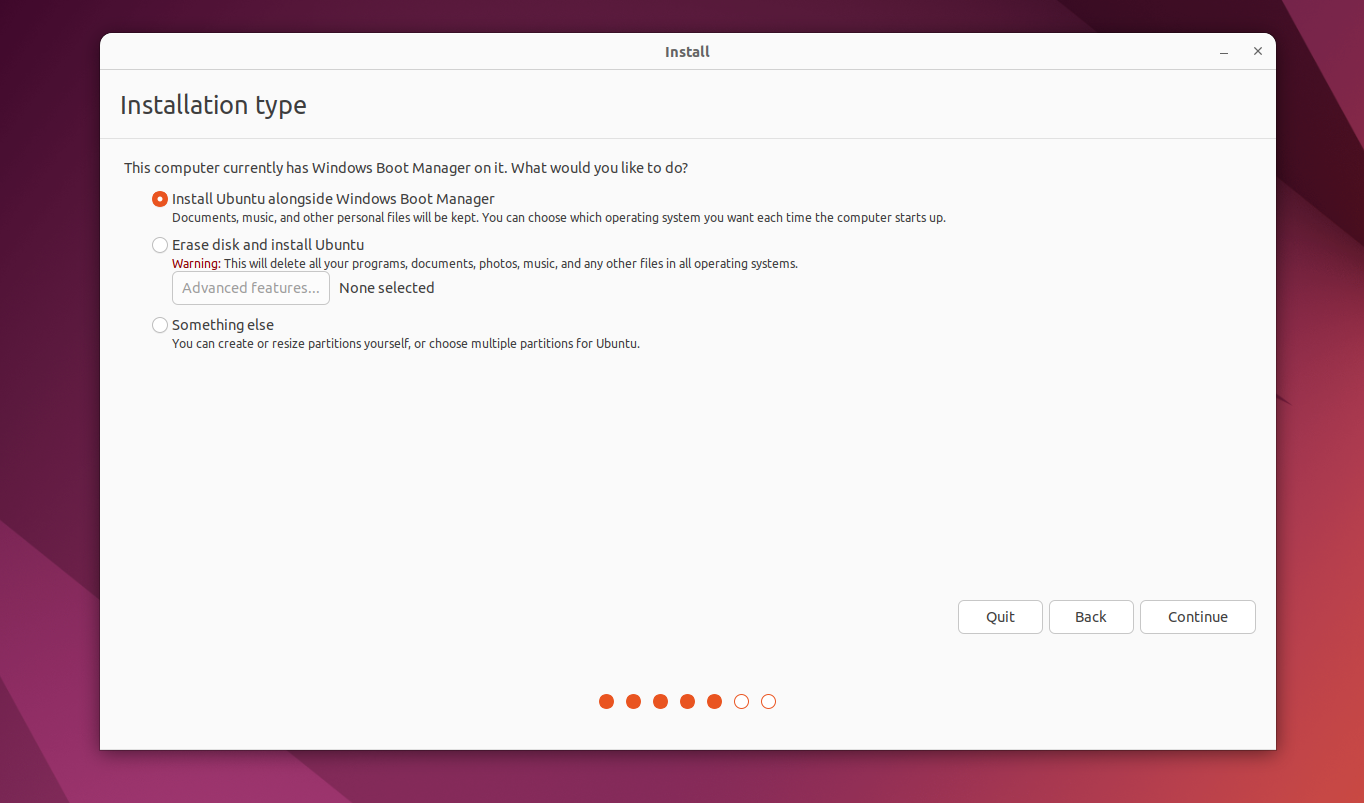
Approach 1: You see the “Install Ubuntu alongside Windows Boot Manager”
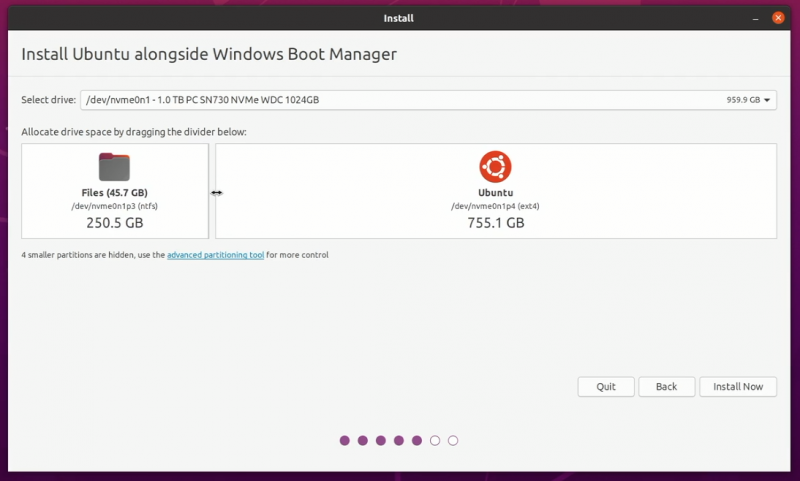
If you see the “Install Ubuntu alongside Windows Boot Manager” on the Installation type screen, you are in luck. You can select this method and hit continue.
The next screen will give you the option to create a partition for Ubuntu by dragging the divider. You can allocate appropriate disk space to Linux here. Ubuntu will create one partition of the allocated disk space and it will have root with home and a swapfile of 2 GB in size under root itself.
Approach 2: You don’t see ‘Install Ubuntu alongside Windows Boot Manager’ option or it is greyed out
But if you are one of the unlucky ones who don’t see this option, no need to worry. Things are not that bad for you. You can still install Ubuntu with Windows.
On the Installation type screen, go with Something Else.
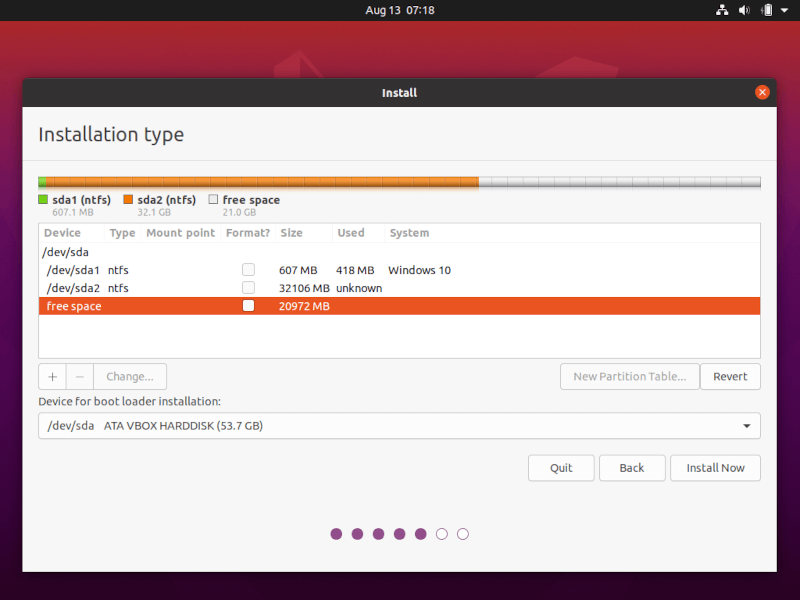
It will take you to the partitioning screen. Remember you had created some free space beforehand?
You may allocate the entire free space to root (swapfile and home will be created automatically under root) or separate root, swap and home partitioning. Both methods are acceptable.
I show the steps for creating root, swap and home partitions separately. But feel free to use a single partition for all of them.
Select the free space and click on the + sign.
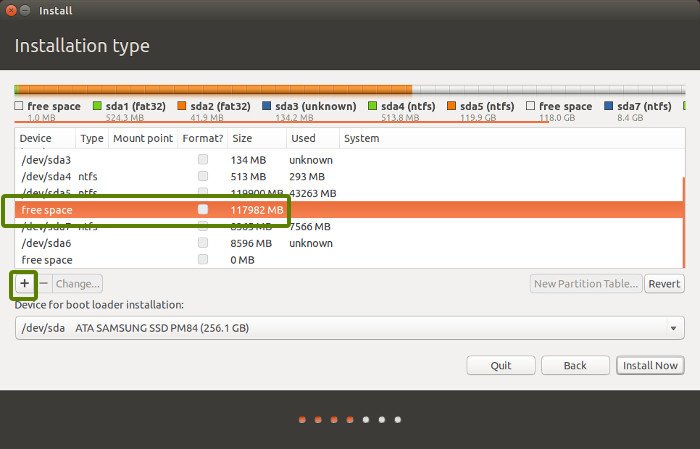
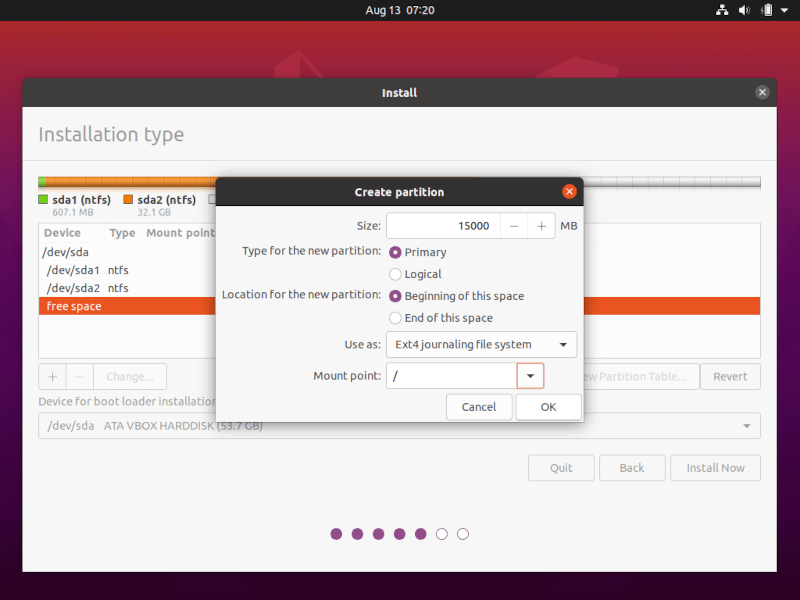
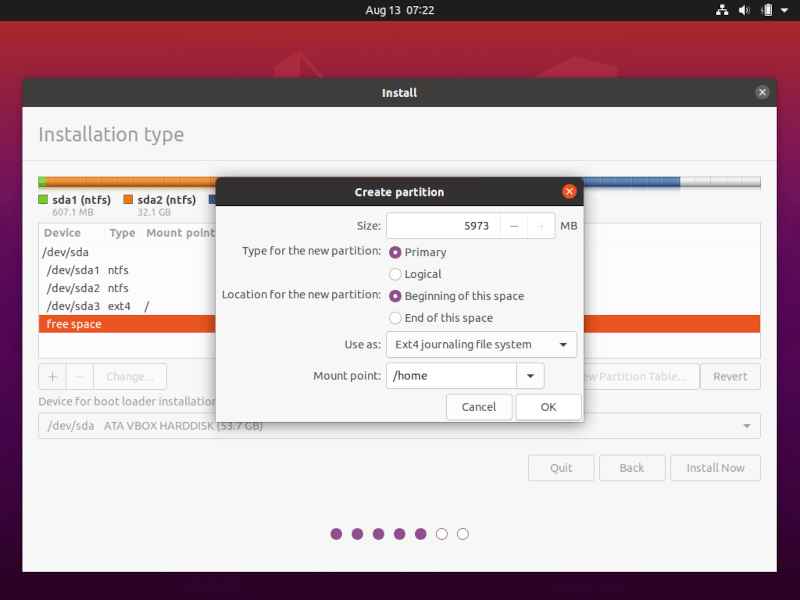
It will provide you with the option to create a Linux partition. You are creating the Root partition. Anything above 25 GB is more than sufficient for it. Choose the size, select Ext 4 as the file type and / (means root) as the mount point.
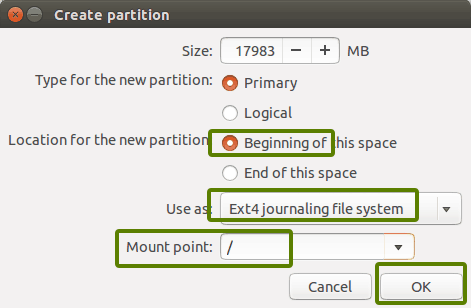
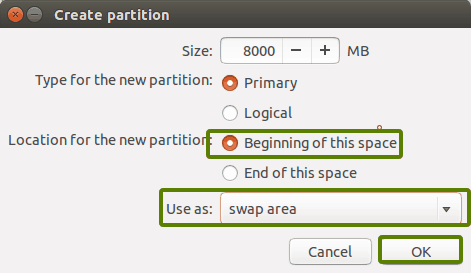
Clicking on OK in the previous step will bring you to the partition screen. Next, create a swap. Like previously, click on the + sign again. This time, use the file type as the Swap area.
Ideal swap size in Linux is debatable. If you have 2 GB or less RAM, use swap double the size of RAM. If you have 3-6 GB of RAM, use a swap of the same size as RAM. If you have 8 GB or more RAM, you may use swap half the size of RAM (unless you have plenty of disk space, and you want to use hibernation and in that case, use a swap of at least the same size as RAM).
If you feel like you have less swap on your system, don’t worry. You can easily create swapfile and add more swap space to your systems.
Similarly, create a Home partition. Allocate it maximum space (in fact allocate it the rest of the free space) because this is where you’ll save music, pictures and downloaded files.
Once you are ready with Root, Swap and Home, click on Install Now:
Well, you have almost won the battle. You can smell victory now. Select a timezone when asked.
Next, you’ll be asked to enter a username, hostname (computer’s name) and password.
Now it’s just a matter of waiting. It should take 8-10 minutes to complete the installation.
Once the installation finishes, restart the system.
You’ll be asked to remove the USB disk. You can remove the disk at this stage without worrying. The system reboots after this.
💡
You do not need the live USB disk to use Linux anymore. You have installed Ubuntu on your computer’s disk. Remove the USB and keep it for later if you want to use it for installing Linux on some other system. You may also format and use it for regular data storage or transfer.
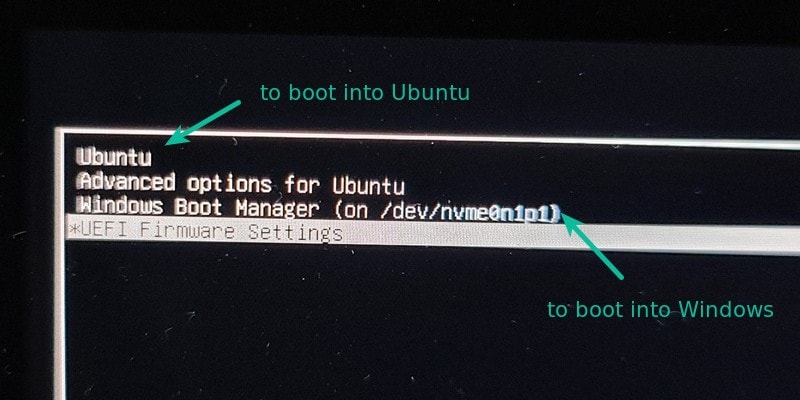
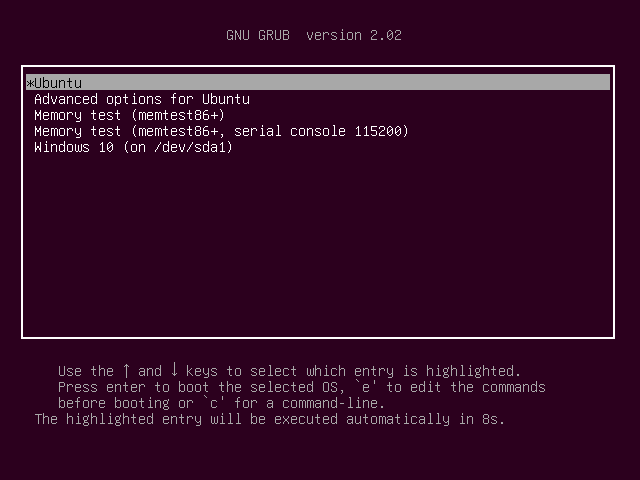
If everything goes smoothly, you should see the grub screen once the system powers on. Here, you can choose Ubuntu to boot into Ubuntu and Windows boot manager to boot into Windows. Pretty cool, right?
Dual boot did not succeed? Here are some troubleshooting tips
Life is not even for everyone. For some, the dual boot might not succeed just yet. However, instead of giving up, you may follow a couple of tips and retry the installation procedure.
Try changing the USB port
This may sound ridiculous but sometimes some USB ports cause issue with booting the USB or installing Linux. Changing the USB port could be a trick.
Try not using internet while installing Linux
I have experienced that sometimes Linux installation throws error if it is connected to the internet. If you encountered a “‘grub-efi-amd64-signed’ package failed to install into /target” error, please try installing Ubuntu without internet.
Disable secure boot and/or fast boot
In some rare cases, secure boot would not allow you to boot from live USB or install Linux. Disable secure boot. You may also disable fast boot in some cases.
Dual boot finished but you don’t see the grub screen to boot into Ubuntu
Please check your boot order in the UEFI settings. Do you see Ubuntu/UEFI below Windows Boot Manager? If yes, move it up the order. If you don’t see grub at all, you may carefully try this or this tutorial.
Grub rescue error or no bootable device found after dual booting
Use this tutorial for no bootable device found error. And this one is for grub rescue error.
Additional Tips: You’ll notice that there is a time difference between Windows and Ubuntu You can fix the time gap issue in dual boot easily. Also, in the grub screen, Ubuntu is up the priority. You can also change the boot order to make Windows default if you are going to use Windows more often than Linux. If you want to reverse the process, follow this guide to remove Ubuntu from dual boot with Windows.

I hope this guide helped you to dual boot Ubuntu with Windows 10 UEFI. I went into too much detail here, but I wanted to answer all the typical confusion and show all the required steps.
If you still have doubts or face strange errors, please comment, and I’ll try to help you out.
This tutorial will guide you on how you can perform the installation of Ubuntu 22.04 in dual-boot with a Microsoft operating system on machines that come pre-installed with Windows operating system.
If your computer has no other operating system already installed and you plan to use a Windows variant alongside Ubuntu, you should first install Microsoft Windows and then proceed with Ubuntu installation.
In this particular case, on Windows installation steps, when formatting the hard disk, you should allocate a free space on the disk with at least 20 GB in size in order to use it later as a partition for Ubuntu installation.
What You’ll Need
- A computer with Windows already installed (preferably with some free disk space).
- A USB drive with at least 4GB capacity (to create a bootable Ubuntu installer).
- An internet connection (recommended for downloading updates during installation).
- A backup of your important Windows data (essential).
Step 1: Prepare Windows Machine for Dual-Boot
1. The first thing you need to take care of is to create free space on the computer hard disk in case the system is installed on a single partition.
Log in to your Windows machine with an administrative account and right-click on the Start Menu -> Command Prompt (Admin) in order to enter Windows Command-Line.
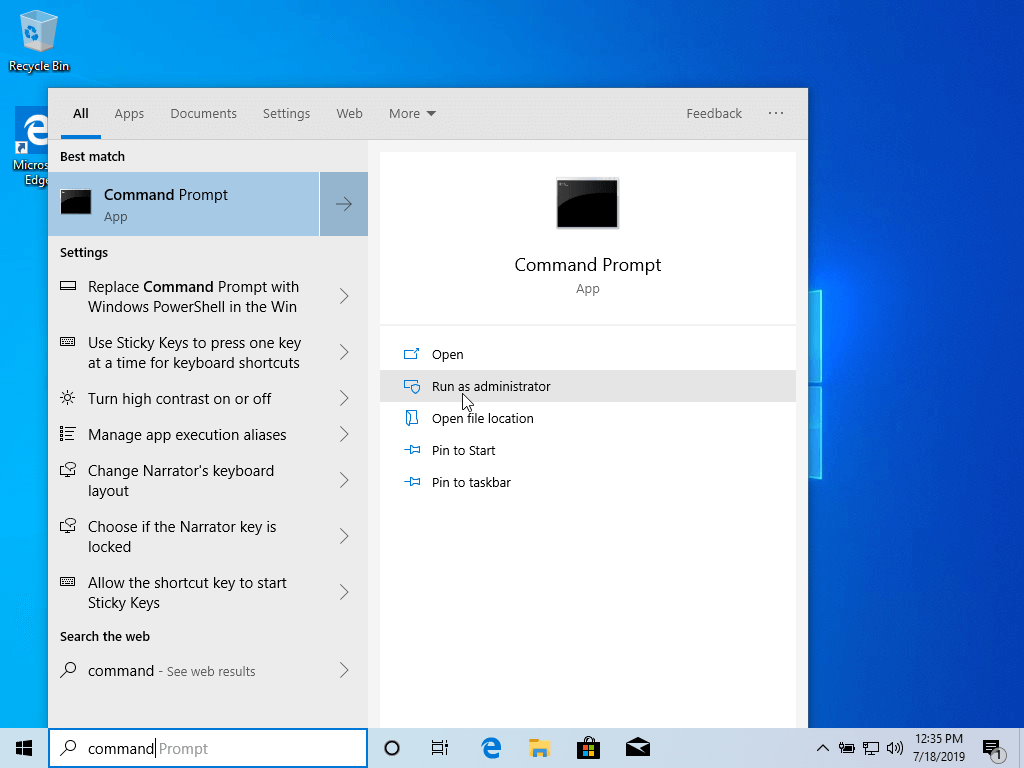
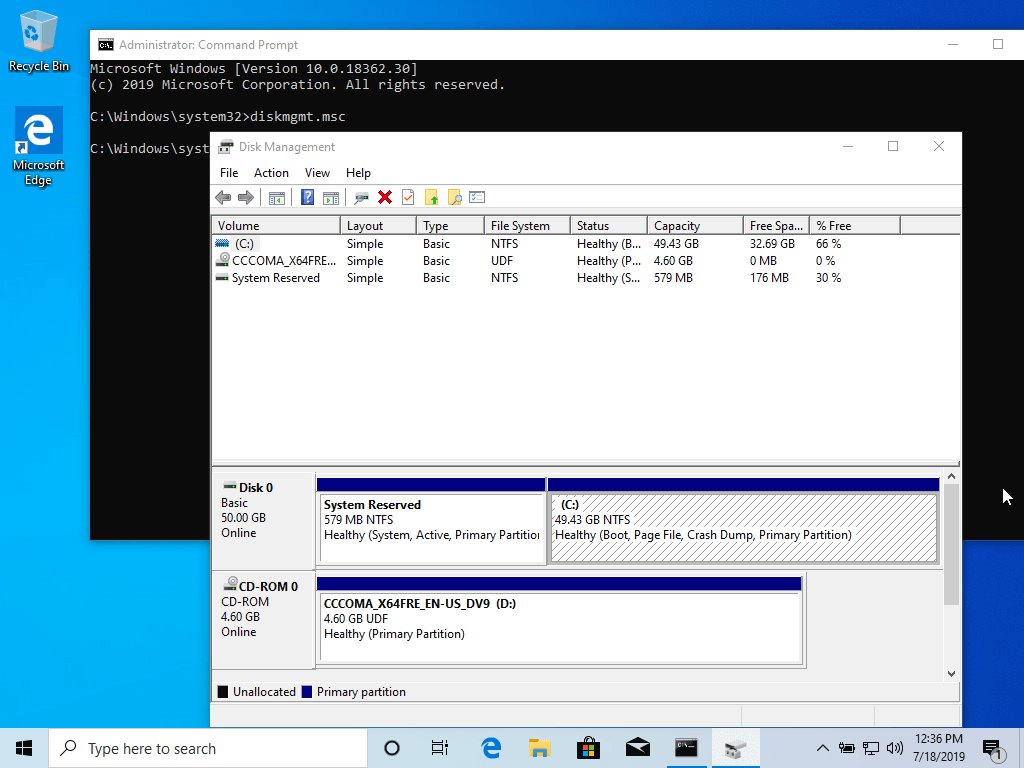
2. Once in CLI, type diskmgmt.msc on prompt, and the Disk Management utility should open. From here, right-click on C: the partition and select Shrink Volume in order to resize the partition.
C:\Windows\system32\>diskmgmt.msc
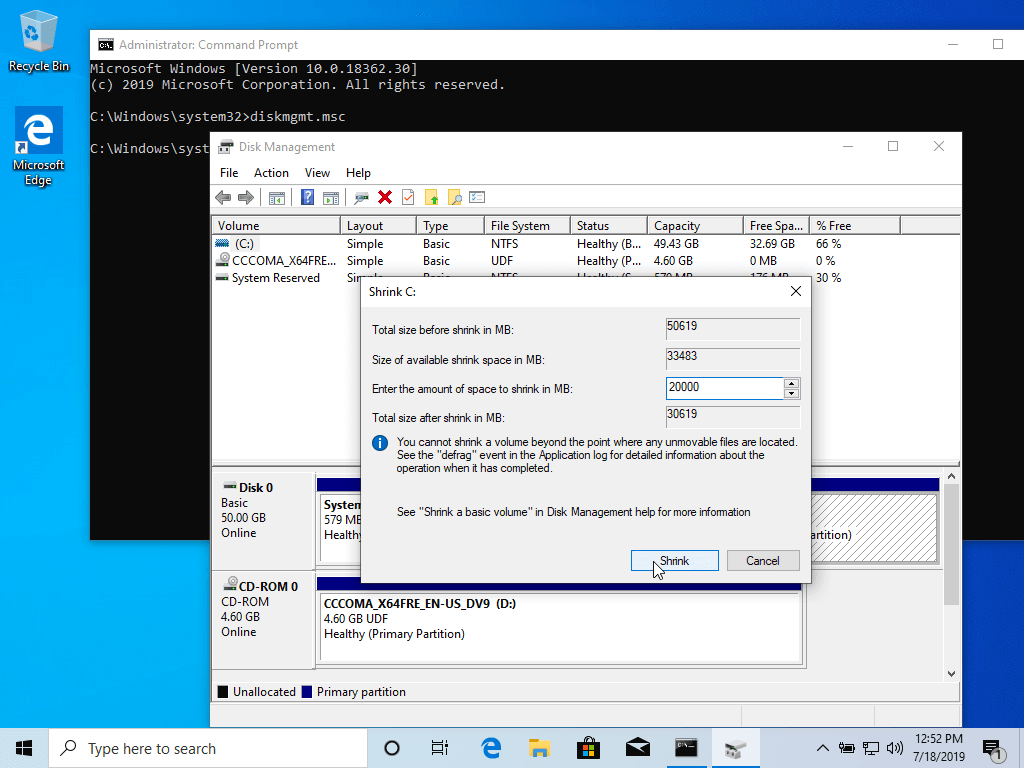
3. On Shrink C: enter a value on space to shrink in MB (use at least 20000 MB depending on the C: partition size) and hit Shrink to start partition resize as illustrated below (the value of space shrink from below image is lower and only used for demonstration purposes).
Once space has been resized you will see a new unallocated space on the hard drive. Leave it as default and reboot the computer in order to proceed with the Ubuntu installation.

Step 2: Install Ubuntu with Windows Dual-Boot
4. For the purpose of this article, We will be installing Ubuntu 20.04 alongside Windows dual boot (you can use any Ubuntu release for installation). Go to the download link from the topic description and grab the Ubuntu Desktop 20.04 ISO image.
Burn the image to a DVD or create a bootable USB stick using a utility such as Universal USB Installer (BIOS compatible) or Rufus (UEFI compatible).
[ You might also like: Create Bootable USB Device Using Unetbootin and dd Command ]
Place the USB stick or DVD in the appropriate drive, reboot the machine, and instruct the BIOS/UEFI to boot up from the DVD/USB by pressing a special function key (usually F12, F10 or F2 depending on the vendor specifications).
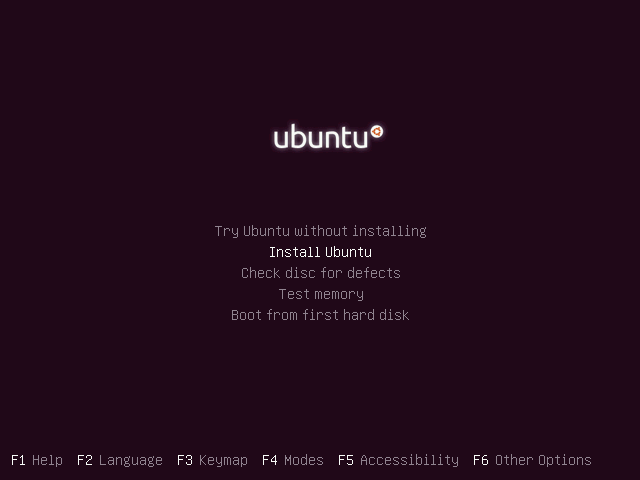
Once the media boot-up a new grub screen should appear on your monitor. From the menu select Install Ubuntu and hit Enter to continue.
5. After the boot media finishes loading into RAM you will end up with a completely functional Ubuntu system running in live mode.
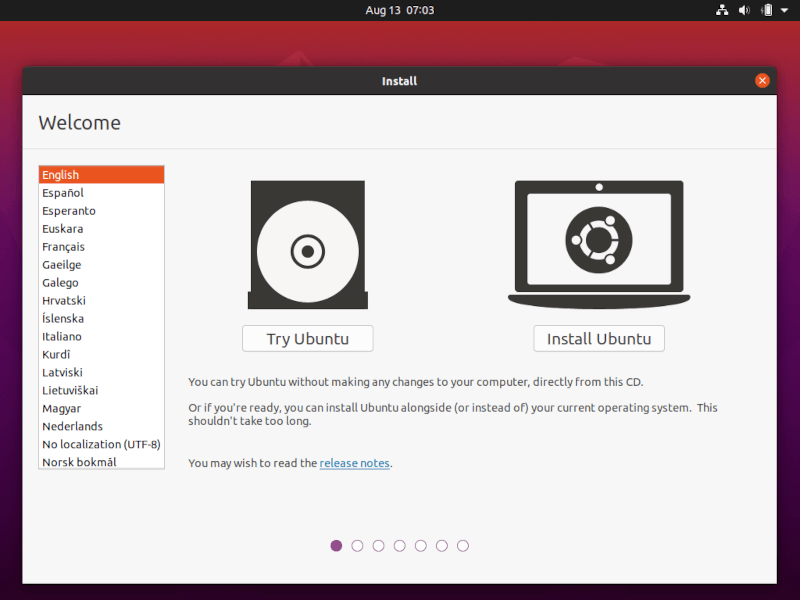
On the Launcher choose Install Ubuntu, and the installer utility will start. Choose the keyboard layout you wish to perform the installation and click on the Continue button to proceed further.

6. Next, choose the first option “Normal Installation” and hit on the Continue button again.
7. Now it’s time to select an Installation Type. You can choose to Install Ubuntu alongside Windows Boot Manager, an option that will automatically take care of all the partition steps. Use this option if you don’t require a personalized partition scheme.
In case you want a custom partition layout, check the Something else option and hit on the Continue button to proceed further.
The option Erase disk and install Ubuntu should be avoided on dual-boot because is potentially dangerous and will wipe out your disk.
8. In this step, we’ll create our custom partition layout for Ubuntu. This guide will recommend that you create two partitions, one for root and the other for home accounts data, and no partition for swap (use a swap partition only if you have limited RAM resources or you use a fast SSD).
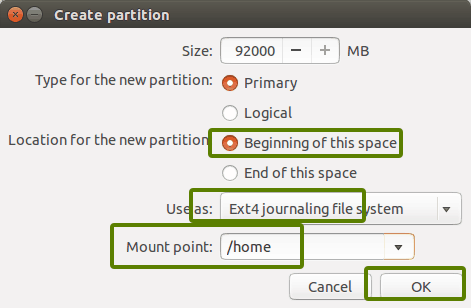
To create the first partition, the root partition, select the free space (the shrinking space from Windows created earlier), and hit on the + icon below. On partition settings use the following configurations and hit OK to apply changes:
- Size = at least 15000 MB
- Type for the new partition = Primary
- Location for the new partition = Beginning
- Use as = EXT4 journaling file system
- Mount point = /
Create the home partition using the same steps as above. Use all the available free space left for the home partition size. The partition settings should look like this:
- Size = all remaining free space
- Type for the new partition = Primary
- Location for the new partition = Beginning
- Use as = EXT4 journaling file system
- Mount point = /home
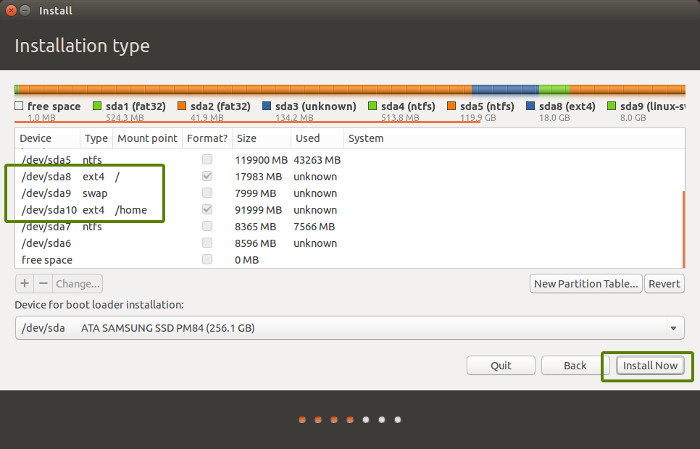
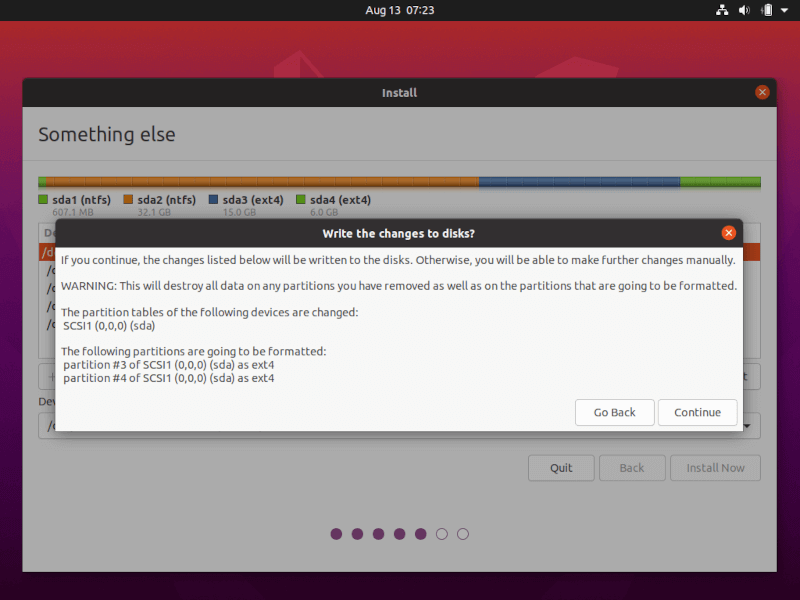
9. When finished, hit the Install Now button in order to apply changes to the disk and start the installation process.
A pop-up window should appear to inform you about swap space. Ignore the alert by pressing the Continue button.
Next, a new pop-up window will ask you if you agree with committing changes to the disk. Hit Continue to write changes to disk and the installation process will now start.
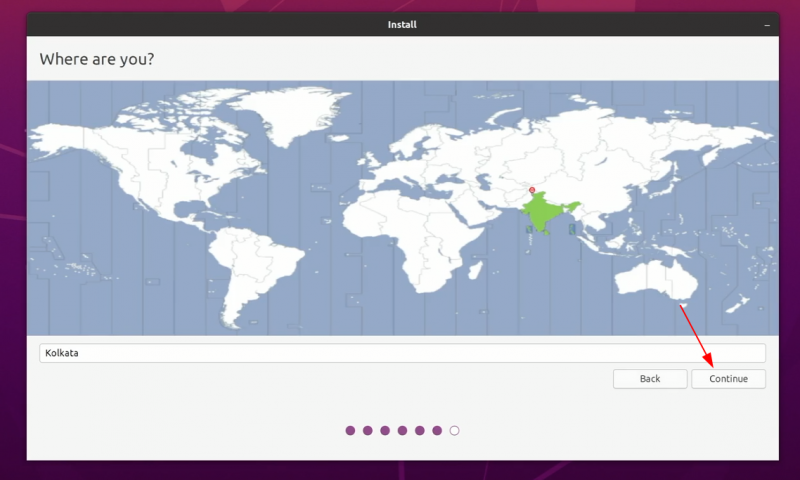
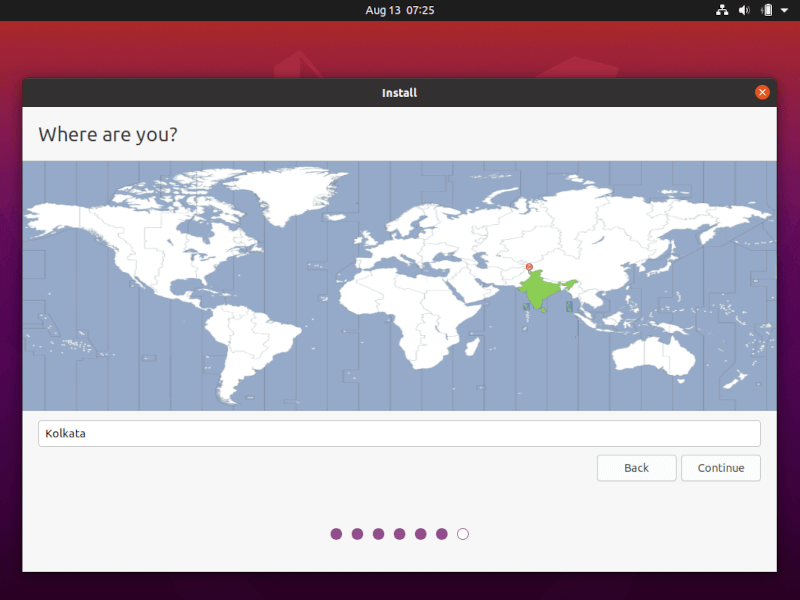
10. On the next screen adjust your machine’s physical location by selecting a city nearby from the map. When done hit Continue to move ahead.
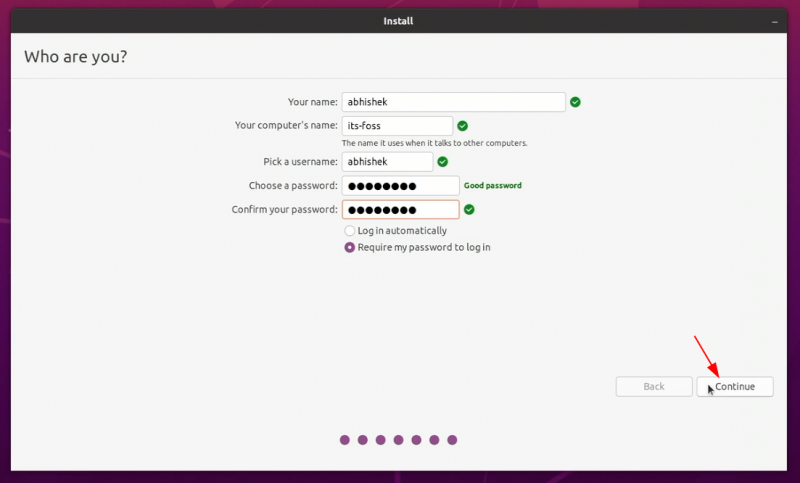
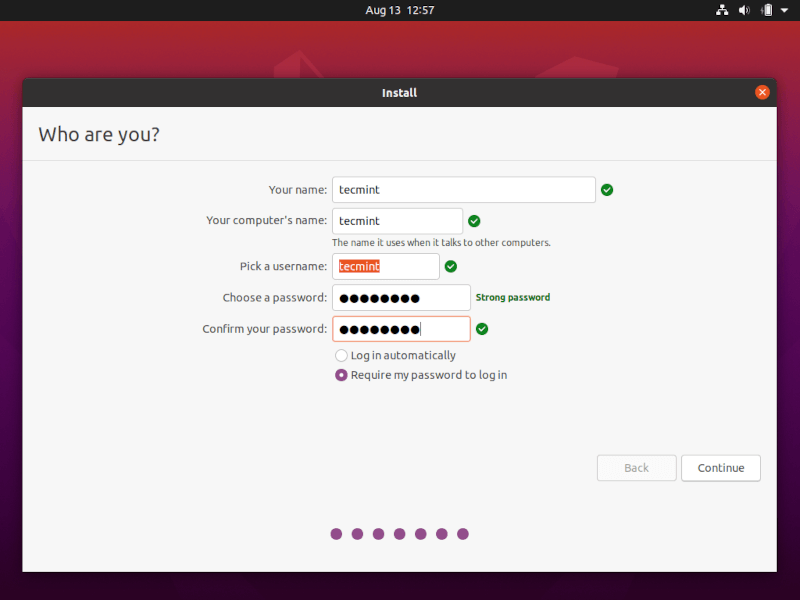
11. Pick up a username and password for your administrative sudo account, enter a descriptive name for your computer and hit Continue to finalize the installation.
These are all the settings required for customizing the Ubuntu installation. From here on the installation process will run automatically until it reaches the end.
12. After the installation process reaches its end hit on the Restart Now button in order to complete the installation.
The machine will reboot into the Grub menu, where for ten seconds, you will be presented to choose what OS you wish to use further: Ubuntu 20.04 or Microsoft Windows.
Ubuntu is designated as the default OS to boot from. Thus, just press Enter key or wait for those 10 seconds timeout to drain.
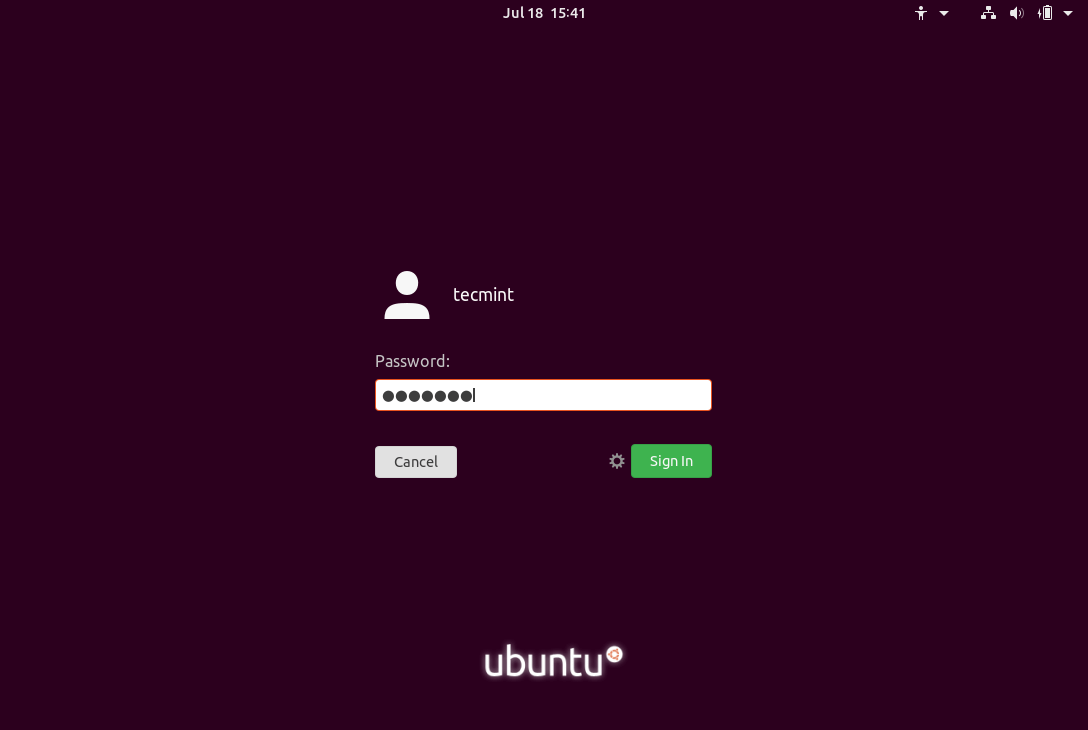
13. After Ubuntu finishes loading, log in with the credentials created during the installation process, and enjoy it. Ubuntu provides NTFS file system support automatically so you can access the files from Windows partitions just by clicking on the Windows volume.
That’s it! In case you need to switch back to Windows, just reboot the computer and select Windows from the Grub menu.
If you want to install some additional software packages and customize Ubuntu, then read our article Top 20 Things to Do After Ubuntu Installation.
Sign in to your MUO account
Quick Links
-
Preparing a Bootable Ubuntu USB
-
Setting Up and Installing Ubuntu
Summary
- Dual booting Ubuntu alongside Windows gives you the best of both worlds.
- You’ll need a flash drive which is larger than 2GB to make the USB installer.
- Make sure to back up all important files before attempting to install Ubuntu.
If you’ve ever wanted to make the switch to Linux, but are reluctant to ditch Windows at the same time, dual booting is a great option. Learn how you can install Ubuntu on your PC without completely removing Windows.
Before You Begin
Before you get started, you’ll need a couple of things ready:
- At least 25GB of free storage on the PC that you are installing Ubuntu on.
- A flash drive or any other form of removable media that’s larger than 2GB.
- The latest Ubuntu disk image.
Before you try installing Ubuntu, make sure to back up any important files that you might have. Any mistakes made during the following steps could result in permanent data loss, so exercise caution.
Preparing a Bootable Ubuntu USB
First, you’ll need to create a bootable drive from where your PC can boot the Ubuntu disk image from. You can do so by following these steps:
These steps will completely erase your USB drive, so make sure to back up any important files first.
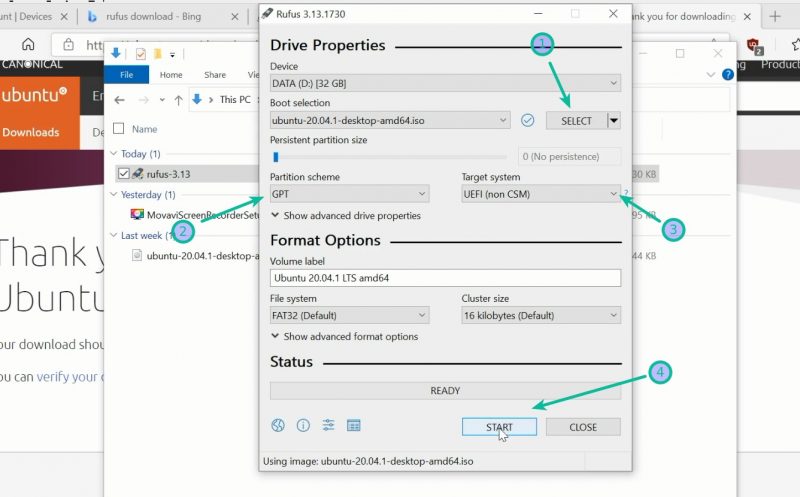
- Download and install the latest version of Rufus.
- Plug-in your USB drive.
- Open Rufus and select your USB drive under the Device drop-down menu.
-
Click on SELECT, and then choose the Ubuntu ISO file from its location.

- Click START to begin the process.

Booting Into the USB
Now that you have created your bootable USB drive, you can boot into Ubuntu.
- Shut down your computer while holding the Shift key.
- You’ll now need to access the boot menu. The method to do this varies depending on your computer’s manufacturer. Usually, you’ll need to press a key like F12, F10, Esc, or Del during the startup process. This guide from wikiHow may help.
-
Once you’re in the boot menu, use the arrow keys to select your USB drive, then press Enter.

- When the computer boots from the flash drive, you’ll see a menu prompting you to either Try Ubuntu or Install Ubuntu. If you want to get a feel for how Ubuntu works, select the first option, otherwise go for the second.
Setting Up and Installing Ubuntu
Your computer should now boot into Ubuntu, and the installer should automatically open on startup.
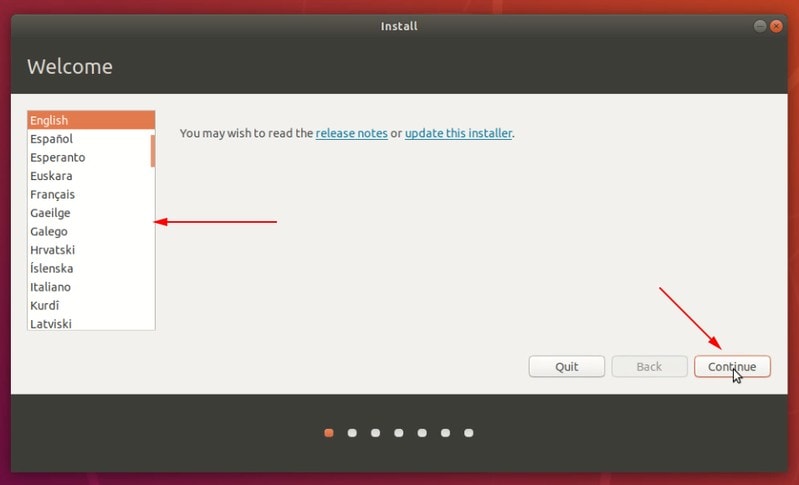
- Follow the on-screen instructions to choose your language, keyboard layout, and Wi-Fi settings. It is optional to connect to a network, but it is highly recommended to do so.
-
Select the Normal installation or Minimal installation option as per your needs.

-
Select Install Ubuntu alongside Windows Boot Manager, and click Continue.

- You’ll see a slider that allows you to allocate disk space between Windows and Ubuntu. Use the slider to adjust the partition sizes according to your preference. As you adjust the slider, you’ll see the allocated space for each operating system change.
-
When you’ve decided how much space to allocate to both operating systems, click Install Now.

Once everything is installed, you’ll need to restart your computer. When it turns back on, you’ll see a boot menu where you can choose to use Windows or Ubuntu. Dual booting might mess up your Windows timezone, but you can fix it by following our guide.
Dual-booting Ubuntu is a smart choice for anyone interested in trying out Linux without giving up their Windows setup entirely. It lets you have both operating systems on your computer, giving you the best of both worlds.
With Ubuntu, you get access to lots of free software and a helpful community. And you can still use Windows for anything you need that’s not available on Linux.