
Applies ToWindows 11 Windows 10 Windows 8.1 Windows 7
Use the Add a language feature to install another language for Windows 11 to view menus, dialog boxes, and supported apps and websites in that language. To do this:
-
Go to Preferred languages, select Add a language.
-
In Choose a language to install, enter and select the name of the language that you want to install, then select Next.
-
In Install language features, select the features that you want to use, then select Install.
To use Microsoft Office in your preferred language, download a Microsoft 365 language pack.
You can download and install any of the following languages in Windows 11.
|
Language |
Native name |
Base language required |
|---|---|---|
|
Afrikaans |
Afrikaans |
English (United States) |
|
Albanian |
shqip |
English (United States) |
|
Amharic |
አማርኛ |
English (United States) |
|
Arabic |
العربية |
Any language |
|
Armenian |
Հայերեն |
English (United States) |
|
Assamese |
অসমীয়া |
English (United States) |
|
Azerbaijani (Latin) |
Azərbaycan |
English (United States) |
|
Bangla (India) |
বাংলা (ভারত) |
English (United States) |
|
Basque |
euskara |
Spanish (Spain) |
|
Belarusian |
беларуская мова |
Russian |
|
Bosnian (Latin) |
bosanski |
English (United States) |
|
Bulgarian |
Български |
Any language |
|
Catalan |
català |
Spanish (Spain) |
|
Cherokee (Cherokee) |
ᏣᎳᎩ ᎦᏬᏂᎯᏍᏗ |
English (United States) |
|
Chinese Simplified |
中文(简体) |
Any language |
|
Chinese Traditional |
中文(繁體) |
Any language |
|
Croatian |
hrvatski |
Any language |
|
Czech |
čeština |
Any language |
|
Danish |
dansk |
Any language |
|
Dutch |
Nederlands |
Any language |
|
English |
English |
Any language |
|
Estonian |
eesti |
Any language |
|
Filipino |
Filipino |
English (United States) |
|
Finnish |
suomi |
Any language |
|
French |
français |
Any language |
|
Galician |
galego |
Spanish (Spain) |
|
Georgian |
ქართული |
English (United States) |
|
German |
Deutsch |
Any language |
|
Greek |
Ελληνικά |
Any language |
|
Gujarati |
ગુજરાતી |
English (United States) |
|
Hebrew |
עברית |
Any language |
|
Hindi |
हिंदी |
English (United States) |
|
Hungarian |
magyar |
Any language |
|
Icelandic |
íslenska |
English (United States) |
|
Indonesian |
Bahasa Indonesia |
English (United States) |
|
Irish |
Gaeilge |
English (United States) |
|
Italian |
italiano |
Any language |
|
Japanese |
日本語 |
Any language |
|
Kannada |
ಕನ್ನಡ |
English (United States) |
|
Kazakh |
Қазақ |
English (United States) |
|
Khmer |
ខ្មែរ |
English (United States) |
|
Konkani |
कोंकणी |
English (United States) |
|
Korean |
한국어 |
Any language |
|
Latvian |
latviešu |
Any language |
|
Lithuanian |
lietuvių |
Any language |
|
Luxembourgish |
Lëtzebuergesch |
French |
|
Macedonian |
македонски јазик |
English (United States) |
|
Malay (Malaysia, Brunei, and Singapore) |
Bahasa Melayu |
English (United States) |
|
Malayalam |
മലയാളം |
English (United States) |
|
Maltese |
Malti |
English (United States) |
|
Maori |
Te Reo Māori |
English (United States) |
|
Marathi |
मराठी |
English (United States) |
|
Nepali |
नेपाली |
English (United States) |
|
Norwegian (Bokmål) |
norsk (bokmål) |
Any language |
|
Norwegian (Nynorsk) |
norsk (nynorsk) |
Norwegian (Bokmål) |
|
Odia |
ଓଡିଆ |
English (United States) |
|
Persian |
فارسی |
English (United States) |
|
Polish |
Polski |
Any language |
|
Portuguese (Brazil) |
português |
Any language |
|
Portuguese (Portugal) |
português |
Any language |
|
Punjabi (Arabic) |
پنجابی |
English (United States) |
|
Quechua |
runasimi |
Spanish (Mexico) |
|
Romanian |
română |
Any language |
|
Russian |
Русский |
Any language |
|
Scottish Gaelic |
Gàidhlig |
English (United States) |
|
Serbian (Cyrillic, Bosnia and Herzegovina) |
српски |
English (United States) |
|
Serbian (Cyrillic, Serbia) |
српски |
Serbian (Latin) |
|
Serbian (Latin) |
srpski |
Any language |
|
Slovak |
slovenčina |
Any language |
|
Slovenian |
slovenski |
Any language |
|
Spanish |
Español |
Any language |
|
Swedish |
svenska |
Any language |
|
Tamil (India and Sri Lanka) |
தமிழ் |
English (United States) |
|
Tatar |
Татар |
Russian |
|
Telugu |
తెలుగు |
English (United States) |
|
Thai |
ไทย |
Any language |
|
Turkish |
Türkçe |
Any language |
|
Ukrainian |
українська |
Any language |
|
Urdu |
اردو |
English (United States) |
|
Uyghur |
ئۇيغۇرچە |
Simplified Chinese (China) |
|
Uzbek (Latin) |
O’zbekcha |
English (United States) |
|
Valencian |
valencià |
Spanish (Spain) |
|
Vietnamese |
Tiếng Việt |
English (United States) |
|
Welsh |
Cymraeg |
English (United States) |
May I redistribute the Language Pack?
If you represent a government or government agency, a government-affiliated or government-sponsored cultural or language board or institution, or an accredited educational institution, you may redistribute the Pack to validly licensed users of the Software, in the same form as received from Microsoft.
Need more help?
Want more options?
Explore subscription benefits, browse training courses, learn how to secure your device, and more.
It is now more and more common for people to use multiple languages for work and life, and Microsoft also allows users to switch display languages on Windows 11 or Windows 10 computers. This article will guide you through Windows 11 and Windows 10 language pack downloading and installation process step by step. In case you are facing problems, like language pack not downloading or your Windows 11/10 is single language edition, we also provide useful solutions and suggestions. Keep reading and install language packs for the latest version of Windows 11/10.
Part 1. Microsoft Windows Language Pack Types
Some Windows users may find that some parts of their operating system interface do not display in desired language after installing language pack. That’s because Microsoft provides 3 types of language pack:
- Fully localized language pack: It contains 100 percent of the resources for a language and locale.
- Partially localized language pack: It contains 100 percent of the resources for a language and locale, but not all of the resources are localized in the language pack
- Language Interface Pack (LIP): A partially localized language pack that includes less than 100 percent of the localized resources. LIPs can be installed only on top of a fully localized language pack.
For end users, what we can do is installing language interface pack, which is partially localized for some languages. This explains why you might install a Portuguese language pack, but still get some parts display in English after a reboot. Check the supported language packs and language interface pack (LIP).
Note: Make sure to save your work and close the running programs before applying the steps below, because your computer may be restarted forcefully or by yourself. In case you lose important work, like interrupted file transfer or unsaved document, don’t hesitate to recover unsaved or lost Word document as soon as possible. You can also use Jihosoft File Recovery Software to recover deleted or formatted photos, videos and more files from SD card, USB drive, hard drive and all other storage devices.
Part 2. Install Windows 10 Language Pack Using Windows Update
For Home and Pro edition users, the easiest method for installing Windows 10 language pack is using Windows Update. Depending on the Windows 10 version of your computer, the specific operation may slightly vary. Here is an instruction for Windows 10 Pro, 1703 build.
If everything goes well, the display language should be changed after a reboot.
Alternatively, since Windows 10 still keeps Control Panel, you can also go to Control Panel > Clock, Language and Region > Language, then choose Add a language, and set it as the primary language.
Part 3. How to Fix Windows 10 Language Pack Not Downloading
On some occasions, the language pack may refuse to be downloaded or installed. Here are some of the symptoms:
- The download process aborts accidentally without any error code
- Download failed
- Failed to install
- A language pack isn’t available
- The language can’t be installed on this computer
Please try a small trick to fix the problem:
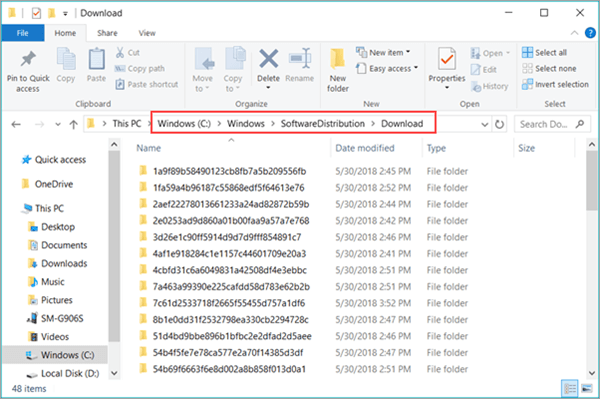
- Step 1. Open Windows Explorer, go to C:\Windows\SoftwareDistribution\Download.
- Step 2. Delete all files and sub-folders within the Download folder.

- Step 3. Go back to the language pack page and try downloading again.
Now the language pack should be downloading, and you can set it as default display language as described above.
Part 4. Manually Download and Install Windows 10 Language Pack
You can also download language pack files (aka. CAB files) and install them manually. Since Microsoft doesn’t provide official direct download links for end users, you may need to search for language pack files on search engine, which is actually also very convenient. Just make sure the language pack suits for your Windows 10 build.
Where to Download Language Pack for Windows 10 Build 1809?
There is no direct link from Microsoft for end users to download the language packs. Besides, the language packs should be installed on the right build of Windows 10. Therefore, if you failed to download language packs through Windows updates, then you need to search for the desired language files online. Some forums and communities may post the latest cab files.
Follow these steps to manually install Windows 10 language pack:
If the installed language is not set as default, you can do it manually on Settings > Time & Language > Region & language. However, the display language of the Office program may not be changed accordingly. You need to download language pack for Office.
Part 5. Windows 10 Single Language Change Language
Windows 10 single language is basically Windows home version, but with only one system language. It is usually pre-installed in some Windows laptops, and the users cannot add or change UI display language as Pro version users do. The best solution for Single Language Windows 10 is to upgrade to Pro version.
Part 6. How to Add Language Packs in Windows 11
Similar to the process in Windows 10, it is also easy to add and install a language pack in Windows 11. Here are the steps:
- Step 1. Click Start button and go to Settings > Time & language > Language & region.
- Step 2. Under Language, select Preferred languages and then click Add a language.
- Step 3. Choose a language from the list, and then click Next.
- Step 4. Select optional features (language pack, text-to-speech, handwriting) and click Install.
- Step 5. Wait a while and then you will see the added language from the drop-down list next to Windows display language.
The instruction above will help you make your Windows 11 computer more locally. However, it is possible that some users will encounter similar troubles as mentioned above which happen to Windows 10. Don’t hesitate to leave a comment with a detailed description of your problem and we will get it covered.
В современных версиях Windows 11 22H2 и Windows 10 21H2+ появилась возможность установки и управления языковыми пакетами с помощью PowerShell. В предыдущих версиях Windows вы могли установить или удалить языковые пакеты только из графического интерфейса классической панели управления или панели Settings (команда быстрого доступа
ms-settings:regionlanguage
).
В новых версиях Windows был добавлен встроенный PowerShell модуль LanguagePackManagement. С помощью команд из этого модуля вы можете установить дополнительный языковой пакет в Windows и задать предпочтительный язык пользовательского интерфейса Windows.
Модуль LanguagePackManagement пока доступен только в клиентских версиях Windows, но не в Windows Server 2022/2019.
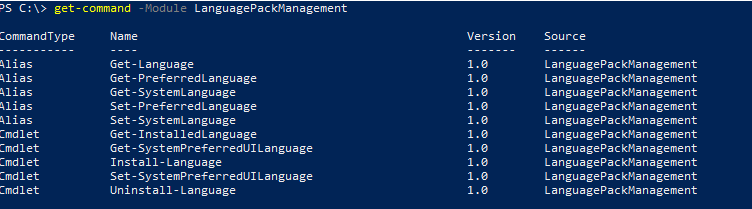
Вы можете вывести список доступных командлетов в модуле:
Get-Command -Module LanguagePackManagement
-
Get-SystemPreferredUILanguage
(
Get-PreferredLanguage
,
Get-SystemLanguage
) – текущий язык системы по умолчанию -
Set-SystemPreferredUILanguage
(
Set-PreferredLanguage
) – задать предпочтительный язык интерфейса Windows -
Get-InstalledLanguage
(
Get-Language
,
Set-SystemLanguage
) – вывести список установленных языковых пакетов и языковых функций -
Install-Language
— установить языковой пакет в Windows -
Uninstall-Language
– удалить языковой пакет
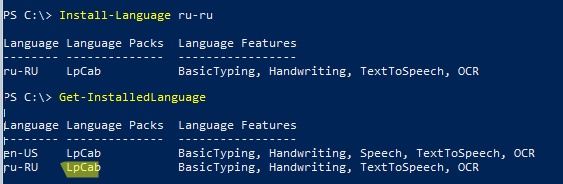
Вывелем список доступных языковых пакетов на компьютере с Windows 10:
Get-InstalledLanguage
В данном примере на компьютере установлен только английский языковой пакет (Language Packs = LpCab). Русский доступен только в качестве языка ввода.
Language Language Packs Language Features
-------- -------------- -----------------
en-US LpCab BasicTyping, Handwriting, Speech, TextToSpeech, OCR
ru-RU None BasicTyping, Handwriting, OCR

Чтобы установить русский языковой пакет, выполните команду:
Install-Language -Language ru-ru
Windows загрузит указанный языковой пакет и дополнительные компоненты с серверов Microsoft и установит их в системе.
Полный список языковых пакетов для Windows
| Тег | Описание |
| ar-SA | Arabic (Saudi Arabia) |
| bn-BD | Bangla (Bangladesh) |
| bn-IN | Bangla (India) |
| cs-CZ | Czech (Czech Republic) |
| da-DK | Danish (Denmark) |
| de-AT | Austrian German |
| de-CH | “Swiss” German |
| de-DE | Standard German |
| el-GR | Modern Greek |
| en-AU | Australian English |
| en-CA | Canadian English |
| en-GB | British English |
| en-IE | Irish English |
| en-IN | Indian English |
| en-NZ | New Zealand English |
| en-US | US English |
| en-ZA | English (South Africa) |
| es-AR | Argentine Spanish |
| es-CL | Chilean Spanish |
| es-CO | Colombian Spanish |
| es-ES | Castilian Spanish (Central-Northern Spain) |
| es-MX | Mexican Spanish |
| es-US | American Spanish |
| fi-FI | Finnish (Finland) |
| fr-BE | Belgian French |
| fr-CA | Canadian French |
| fr-CH | “Swiss” French |
| fr-FR | Standard French (France) |
| he-IL | Hebrew (Israel) |
| hi-IN | Hindi (India) |
| hu-HU | Hungarian (Hungary) |
| id-ID | Indonesian (Indonesia) |
| it-CH | “Swiss” Italian |
| it-IT | Standard Italian (Italy) |
| jp-JP | Japanese (Japan) |
| ko-KR | Korean (Republic of Korea) |
| nl-BE | Belgian Dutch |
| nl-NL | Standard Dutch Netherlands) |
| no-NO | Norwegian (Norway) |
| pl-PL | Polish (Poland) |
| pt-BR | Brazilian Portuguese |
| pt-PT | European Portuguese (Portugal) |
| ro-RO | Romanian (Romania) |
| ru-RU | Russian (Russian Federation) |
| sk-SK | Slovak (Slovakia) |
| sv-SE | Swedish (Sweden) |
| ta-IN | Indian Tamil |
| ta-LK | Sri Lankan Tamil |
| th-TH | Thai (Thailand) |
| tr-TR | Turkish (Turkey) |
| zh-CN | Mainland China, simplified characters |
| zh-HK | Hong Kong, traditional characters |
| zh-TW | Taiwan, traditional characters |
Вы можете использовать дополнительные параметры команды Install-Language:
-
-CopyToSettings
– позволяет сразу назначить данный язык в качестве языка по умолчанию и применить настройки к экрану входа в Windows и для новых пользователей;Ранее вы могли сменить языковые настройки и раскладку клавиатуры на экране входа в систему через панель управления и реестр.
В Windows 11 доступен специальный командлет, который позволяет применить скопировать языковые настройки текущего пользователя и применить его к Welcome Screen и новым пользователям:
Copy-UserInternationalSettingsToSystem -WelcomeScreen $true -NewUser $true -
-ExcludeFeatures
– позволяет исключить дополнительные компоненты языкового пакета (FoD, Features on Demand) из установки. Такие FoD (Features on Demand), как OCR, TextToSpeech или Handwriting.
Вывести предпочтительный язык интерфейса Windows:
Get-SystemPreferredUILanguage
В данном случае язык интерфейса английский (
en-us
).
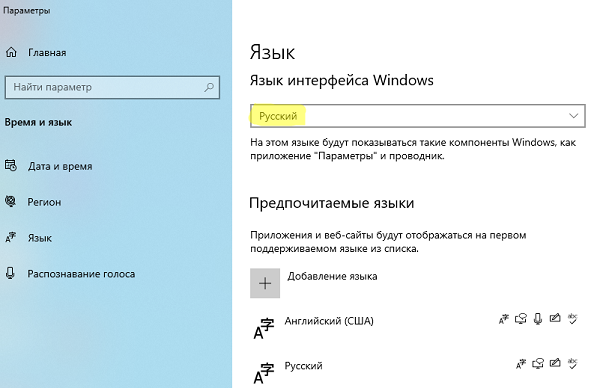
Чтобы задать русский язык в качестве основного языка Windows, нужно выполнить команду:
Set-SystemPreferredUILanguage -Language ru-ru
Чтобы применить новый языковой пакет, нужно перезагрузить Windows. Выполните команду:
Restart-Computer
После перезагрузки язык интерфейса Windows сменится на русский.
Чтобы удалить ненужный языковой пакет в Windows:
Uninstall-Language -Language ru-ru
Если ваш компьютер не подключен к интернету, вы можете установить дополнительные языковые пакеты и компоненты с помощью DISM. Для этого вам нужно скачать ISO образ с Language Pack (https://learn.microsoft.com/en-us/azure/virtual-desktop/windows-11-language-packs), смонтировать ISO образ в Windows и установить языковой пакет и компоненты с помощью команд:
Dism /Online /Add-Package /PackagePath:D:\LanguagesAndOptionalFeatures\Microsoft-Windows-Client-Language-Pack_x64_ru-ru.cab
Dism /Online /Add-Capability /capabilityname:Language.Basic~~~ru-ru~0.0.1.0 /source:D:\LanguagesAndOptionalFeatures
Dism /Online /Add-Capability /capabilityname:Language.Handwriting~~~ru-ru~0.0.1.0 /source:D:\LanguagesAndOptionalFeatures
Dism /Online /Add-Capability /capabilityname:Language.OCR~~~ru-ru~0.0.1.0 /source:D:\LanguagesAndOptionalFeatures
Dism /Online /Add-Capability /capabilityname:Language.Speech~~~ru-ru~0.0.1.0 /source:D:\LanguagesAndOptionalFeatures
Dism /Online /Add-Capability /capabilityname:Language.TextToSpeech~~~ru-ru~0.0.1.0 /source:D:\LanguagesAndOptionalFeatures
Introduction
In a world that increasingly requires language diversity, having the ability to communicate effectively in multiple languages can be beneficial. Windows 11 and Windows 10 offer robust support for language packs, allowing users to change the display language of the operating system or add additional languages as needed. Whether you’re a non-English speaker, a language enthusiast, or someone who needs to work in multiple languages, this guide will detail the steps needed to download and install language packs in both Windows 11 and Windows 10.
Understanding Language Packs
Language packs are files that change the language of the Windows interface, including menus, settings, and help files. When you install a language pack, you may also get additional features, such as speech recognition and handwriting recognition in the new language. Windows’ language packs are available for many languages worldwide, giving users a rich variety of choice.
Why Install Language Packs?
-
Cultural Inclusion: If you’re in a multilingual environment, having the operating system in the user’s preferred language can improve accessibility.
-
Learning Opportunities: Learning a new language can be made easier by interacting with an operating system in that language.
-
Enhanced User Experience: Native language settings can lead to greater comfort and ease of use, especially for those less proficient in English.
-
Professional Needs: Many businesses operate in multiple languages. Supporting various languages can help with ease of communication within teams.
Preparing Your System
Before proceeding with downloading and installing a language pack, ensure your Windows updates are current. An updated system can prevent compatibility issues during installation.
Check for Updates
- Press
Win + Ito open the Settings. - Navigate to Windows Update.
- Click on Check for updates and install any pending updates.
Downloading and Installing Language Packs in Windows 11
Step 1: Open Windows Settings
- Press the
Win + Ikeys to open the Settings menu. - In the Settings window, select Time & Language.
Step 2: Language & Region Settings
- On the left sidebar, click on Language & Region.
- Under the Preferred languages section, you’ll see a list of languages currently installed on your system.
Step 3: Add a Language
- Click on Add a language button.
- A dialog will open, showing a list of available languages. Begin typing the language you wish to install in the search box or scroll through the list.
- Once you find the desired language, click on it, then click Next.
Step 4: Choose Language Options
- After selecting your language, you’ll see options for language features. You may choose to install the display language, text-to-speech capabilities, and hand-writing features.
- Ensure that the box for Set as my display language is selected if you wish to switch your display language.
- Click Install.
Step 5: Completion and Setting Language Preferences
Installation will begin, and you may need to wait a moment for the download to complete. Once installed, you will need to restart your computer for the changes to take effect.
After restarting, you may find the system interface has changed to your selected language. You can return to Settings > Time & Language > Language & Region to make adjustments or add additional languages as needed.
Downloading and Installing Language Packs in Windows 10
The process of downloading and installing language packs in Windows 10 is quite similar to Windows 11. Here is a step-by-step approach.
Step 1: Open Windows Settings
- Press
Win + Ito access the Settings. - Click on Time & Language.
Step 2: Language Settings
- In the left pane, select Language.
- You’ll see the preferred languages section.
Step 3: Add a Language
- Click on Add a language.
- A pop-up window will appear displaying a list of available languages. Search or scroll to find your desired language and click on it.
- Click Next.
Step 4: Language Option Settings
- Choose which features you want to install for the selected language, including the option to set it as your display language.
- After checking your options, click Install.
Step 5: Restarting Your PC
After the installation is complete, the system may prompt you to restart your computer. Doing this will apply the changes, and you should see your new language in effect.
Additional Language Options and Features
After installing a language pack, you might want to explore other language settings:
- Speech Recognition: You can enable speech recognition in your installed language.
- Keyboard Options: You can also add keyboards for the installed languages, allowing for easy typing.
- Regional Settings: Customize the region settings for date, time, and currency formats in your chosen language.
Troubleshooting Common Issues
- Installation Failure: If the installation fails, try running Windows Update and ensure you have a stable internet connection.
- Language Not Changing: If the display language doesn’t change after installation, make sure to set your language as the primary display language in the language settings.
- Missing Features: If specific features like speech recognition do not appear, check if they were selected during the language pack installation.
Uninstalling a Language Pack
If you no longer need a specific language pack, you can easily uninstall it.
Windows 11 Uninstallation Steps
- Open Settings with
Win + I. - Navigate to Time & Language > Language & Region.
- Under Preferred languages, select the language you want to remove.
- Click on the three dots next to the language and select Remove.
Windows 10 Uninstallation Steps
- Press
Win + Ito access Settings. - Head to Time & Language > Language.
- Find the language you wish to uninstall in the preferred languages list.
- Click on it and select Remove.
Conclusion
Installing and managing language packs in Windows 10 and 11 is an intuitive process that caters to a diverse array of users. Whether it’s for professional, educational, or personal reasons, being able to customize your operating system to meet your language preferences is a valuable feature.
From installation to customization, this guide has walked you through the entire process, ensuring you can successfully download and install any language pack you wish to utilize. The flexibility and usability of Windows’ language settings are designed to enrich your experience, allowing you to interact with your device in the language that feels most comfortable to you.
As globalization continues to affect our daily lives, the importance of supporting multilingual environments can only increase. Embrace language diversity and ensure that your technological tools work for you in the best way possible.
In normal circumstances, if you add a new language to Windows 10, it will tell whether a Language Pack is available, and if so, it will give you an option to install it.
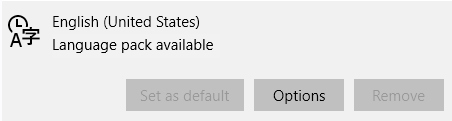
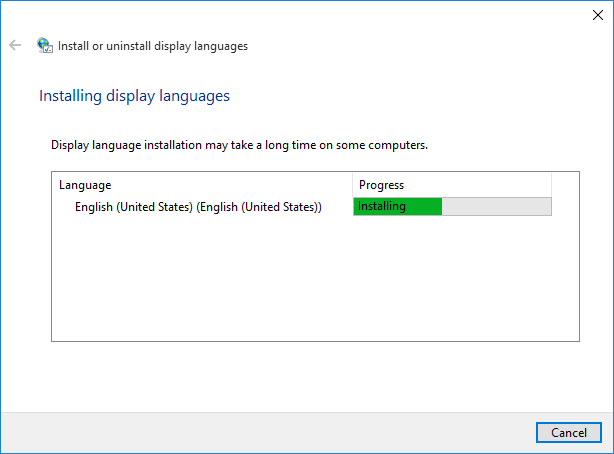
If you don’t see this option, you can install the Language Pack manually.
First of all you need to obtain a language .cab file for correct Windows 10 version. If you have an MSDN subscription, you can download full Microsoft Language Pack ISO image directly from there. If you are not MSDS subscriber, you can find this file online after a bit of searching. If you need the English (United States) language pack for Windows 10 RTM 64bit (for example to install RSAT), you can download it from here.
Once you have the right .cab file, the process is pretty simple:
- Start > Run type lpksetup and press Enter
- Follow a simple wizard, select your language .cab file, and restart the PC when prompted
August 2015
Windows 10 Pro 64bit