
Oracle Database is a highly efficient relational database management system (RDBMS) developed by Oracle Corporation. It is designed to manage and organize large volumes of data while ensuring high performance, security, and scalability. Frequently used by businesses for handling critical data operations, Oracle Database supports SQL, PL/SQL, and other programming languages, making it a flexible tool for both developers and database administrators.
For users running Windows 10, installing Oracle Database offers a reliable solution for managing data locally, whether for personal projects, development work, or small business needs. It provides a robust platform for building and testing database applications, with support for complex queries and large datasets. Windows 10 users can benefit from Oracle Database’s powerful features, as it integrates smoothly with other applications, making it a valuable tool for those seeking efficient data management on their system.
Installing Oracle on Windows 10
Installing Oracle Database Windows 10 requires careful attention to detail and following the correct procedures to ensure a smooth setup.
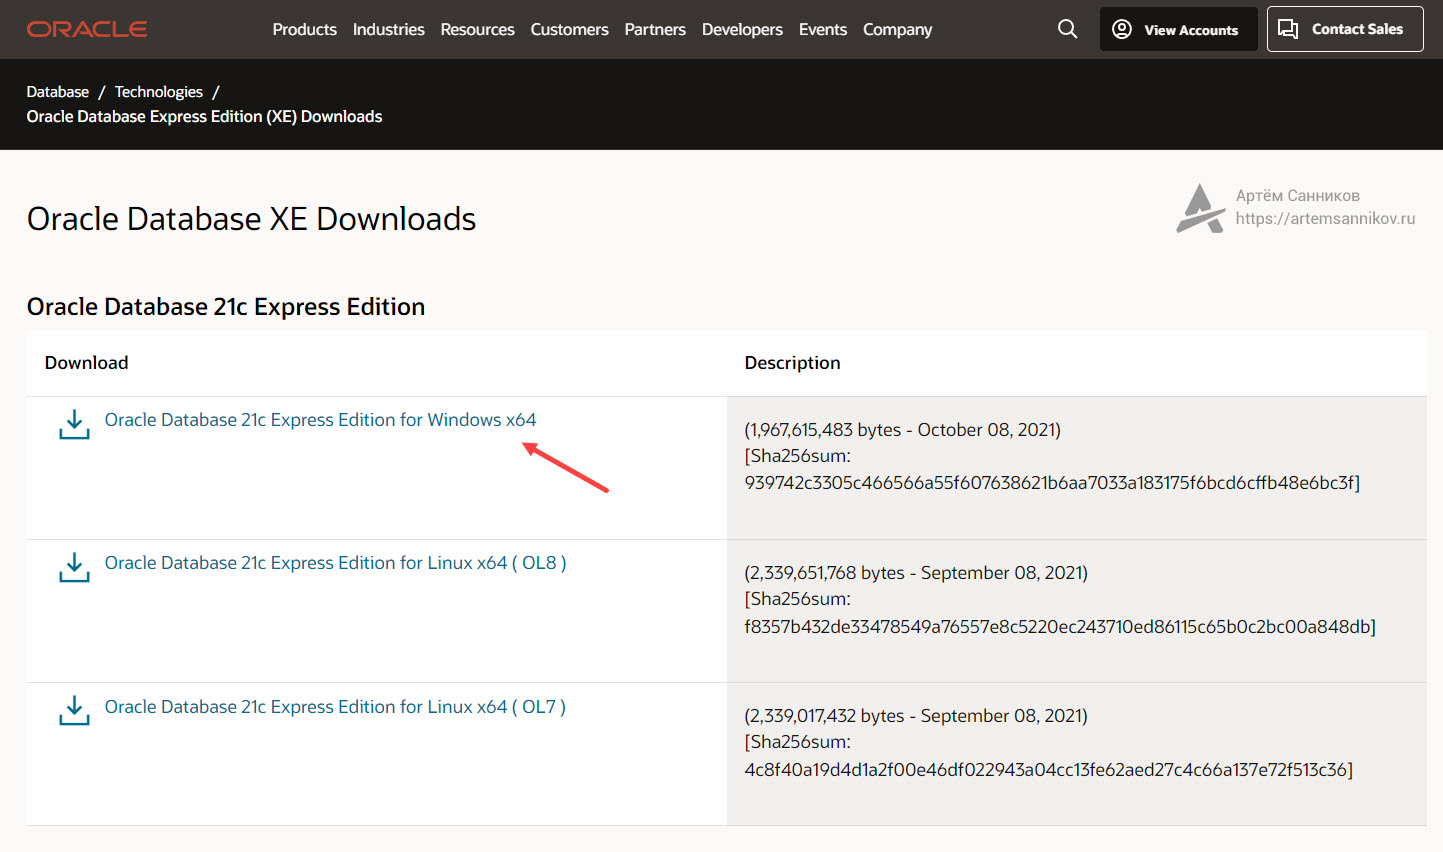
Before beginning the installation, the first step is to download the correct version of Oracle Database that is compatible with Windows 10. Visit the official Oracle website, navigate to the Windows download version, and then click on the Download button:

Once you’ve selected the version, you’ll be required to sign in with an Oracle account to download the software. If you don’t have an account, create one by providing your details. After logging in, download the installation files, which are usually packaged in a ZIP format. Make sure to save the downloaded file in a directory where you can easily locate it for the next steps.
Install Oracle on Our Windows 10 VPS!
Hosting a Windows 10 VPS with Ultahost is easier and faster than ever. Enjoy ultra-fast SSD NVMe speeds with no interruptions or slowdowns.
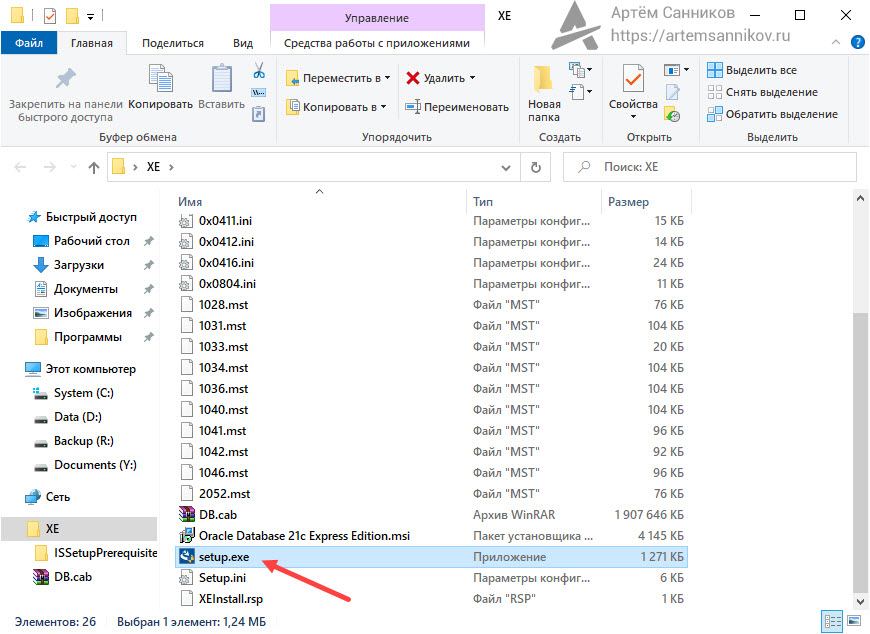
After downloading the Oracle Database software, locate the ZIP file and extract its contents using any extraction tool, such as WinRAR or 7-Zip. Extract the files to a folder on your computer where you have full administrative privileges. This is important because a lack of administrative access can cause the installation to fail.
Once extracted, open the folder and locate the “Oracle Database” file:
Before running the setup, it’s a good practice to temporarily disable any antivirus or security software running on your system. This helps prevent conflicts during the installation process, as some security tools may block certain operations that are essential for the Oracle installer to function properly.
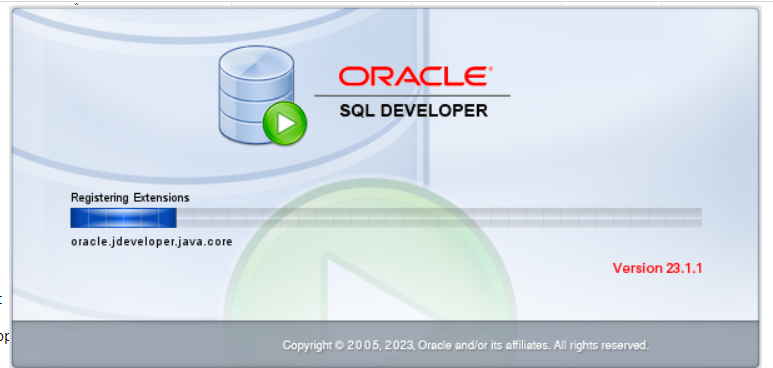
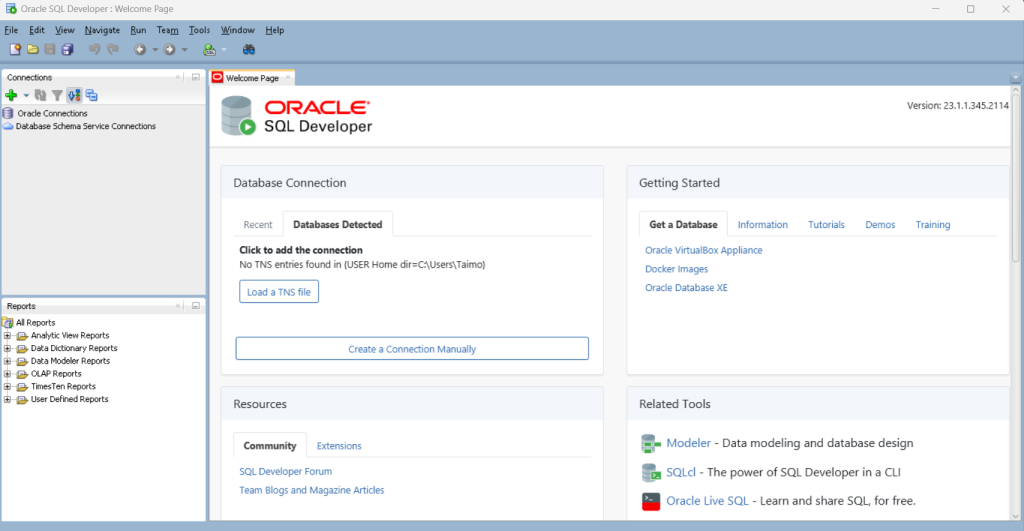
Once the loading is complete it automatically launches the main interface of the Oracle database:
Features of Oracle Database
Oracle Database is a comprehensive relational database management system that offers a wide range of features to support the needs of modern businesses. Here are some of its key features:
Security and Authentication
Oracle Database provides robust security features, including data encryption, access control, and authentication. It also supports various authentication methods, such as username/password, Kerberos, and smart cards.
Data Management
Oracle Database offers advanced data management capabilities, including data partitioning, compression, and caching. It also supports various data types, including relational, object-relational, and XML.
Performance and Scalability
Oracle Database is designed to deliver high performance and scalability. It supports parallel processing, load balancing, and clustering, making it suitable for large-scale enterprise applications.
Support for Big Data and Analytics
Oracle Database supports big data and analytics workloads, including data warehousing, business intelligence, and data mining. It also integrates with other Oracle tools, such as Oracle Big Data Appliance and Oracle Exadata.
Comparison with MySQL & SQL Server
Oracle Database is often compared to other relational databases like MySQL and SQL Server. While all three databases share some similarities, there are key differences:
Cost and Licensing
Oracle Database is generally more expensive than MySQL and SQL Server, especially for large-scale deployments. However, it offers more advanced features and better support for complex workloads.
Performance and Scalability
Oracle Database is known for its high performance and scalability, making it suitable for large-scale enterprise applications. MySQL and SQL Server also offer good performance, but may not be as scalable as Oracle Database.
Security and Compliance
Oracle Database offers more advanced data security features than MySQL and SQL Server, including data encryption and access control. It also supports various compliance standards, such as PCI-DSS and HIPAA.
Integration and Support
Oracle Database integrates well with other Oracle tools and products, making it a good choice for organizations already invested in the Oracle ecosystem. MySQL and SQL Server also offer good integration with other products, but may not be as seamless as Oracle Database.
Benefits of Oracle Database
Oracle Database offers several benefits to organizations, including:
Improved Data Integrity
Oracle Database provides robust data integrity features, including data validation and normalization. This ensures that data is accurate and consistent across the organization.
Enhanced Business Agility
Oracle Database supports agile development methodologies, making it easier to develop and deploy applications quickly. It also provides advanced features, such as data partitioning and compression, to support fast data processing.
Reduced IT Costs
Oracle Database offers advanced automation features, including automated backup and recovery, to reduce IT costs. It also supports cloud deployments, making it easier to scale up or down as needed.
Better Decision Making
Oracle Database supports advanced analytics and business intelligence workloads, making it easier to gain insights from data. It also integrates with other Oracle tools, such as Oracle Analytics Cloud, to support better decision-making.
Conclusion
Oracle Database is a comprehensive relational database management system that offers a wide range of features to support the needs of modern businesses. It provides robust security and authentication features, advanced data management capabilities, and high performance and scalability. Oracle Database also supports big data and analytics workloads, making it a good choice for organizations that need to process and analyze large amounts of data. Additionally, it integrates well with other Oracle tools and products, making it a good choice for organizations already invested in the Oracle ecosystem.
The benefits of using Oracle DB on Windows are numerous, including improved data integrity, enhanced business agility, reduced IT costs, and better decision-making. By leveraging these benefits, organizations can improve their overall efficiency and competitiveness. With its robust features, scalability, and flexibility, Oracle Database is a powerful tool that can support a wide range of applications and use cases, from small-scale to large-scale deployments.
Installing Oracle on Windows can be a simple process for beginners. Upgrading to an Ultahost cheap VPS hosting provides a more streamlined and efficient solution which is the ideal environment for Oracle deployments. This eliminates compatibility issues and simplifies the installation process.
FAQ
What is Oracle Database?
Oracle Database is a multi-model database management system produced by Oracle Corporation. It provides a robust and scalable platform for storing and managing data.
What are the system requirements for Oracle Database on Windows 10?
- Minimum RAM: 2 GB (4 GB or more recommended)
- Minimum free disk space: 10 GB (more is recommended based on the database size)
- Supported Windows versions: Windows 10 Pro, Enterprise, or Education (64-bit)
Where can I download Oracle Database for Windows 10?
You can download Oracle Database from the official Oracle website. Look for the latest version of Oracle Database (e.g., Oracle Database 19c or 21c).
Do I need to install any prerequisites before Oracle Database?
Yes, you need to ensure that your system has the required software, such as Microsoft Visual C++ Redistributable packages. The Oracle installer usually checks for these prerequisites.
How do I run the Oracle Database installer?
After downloading the installation files, extract the zip file, then navigate to the extracted folder and double-click on setup.exe to start the installation process.
What type of installation options are available?
You can choose between “Desktop Class” for a simpler installation or “Server Class” for more advanced configurations. Desktop Class is generally recommended for personal use or development.
How do I secure my Oracle Database?
Change the default passwords for the database users. Enable network encryption and other security features in the database configuration.

Welcome to our guide on Install Oracle Database 19c in Windows. You’ll find valuable insights here whether you’re a beginner or an expert.
Table of Contents
1.First log in to your Windows machine or VirtualBox as an Oracle user, invoke the dbca utility and respond to its windows as follows.

2. Select Create Database and click on Next:

3. Now click on Advanced Configuration and proceed:

4. As per your requirement, you can select the template name. For further information, click on view details.

5. Provide the Global database name and SID. If you want to create the PDB also then click on Create as container Database otherwise uncheck this option and proceed:

OR,

6. Select “Use following for the database storage attributes” and Use Oracle-Managed Files(OMF) :

7. Select “Specify Fast Recovery Area” and keep its default value. If you want you can enable archiving or you can do it later also.

8. Now click on Create a new listener and provide the Listener name and port:

9. Here you can select the components that you need. I have selected the basic Oracle JVM, Oracle Multimedia, and Oracle Spatial. You can select more if you want.

10. Use Automatic shared memory management and keep the value as it is.

11. Now click on Sizing and crosscheck the details.

12. I have kept the Character sets as it is:

13. Use dedicated server mode:

14. Click the check box if you want to create the HR sample schema in your database:

15. Configure Enterprise Manager(EM) database express if you want.

16. Here I am using the same password for both the user’s SYS and SYSTEM. The password is sys123. Also, provide the oraclesvc user password( password is Or#c73svc@123)

17. Now install Oracle Database 19c on Windows.

18. Save the response file if you want to use it later and proceed with the Oracle database creation on Windows by clicking on finish.

19. Please wait until the Oracle database 19c installation in Windows is completed.

20. Chick on Password management if you want to change any user password. Here we will change the password for the HR user.

Provide the new password for HR and confirm the same. Once done click on close.

Congratulations! You have successfully created the Oracle database in Windows system.
21. Now open the Command prompt in Windows and run the command services.msc. Another window will open, sort the services by Log On As, and you will see some services are running from the user oraclesvc. Keep all the services as it is and if you do not need any services then you can disable it.

22. log in as sysdba and check the database status:

23. Now check the listener status:

I hope you found this article helpful. Feel free to reach out if you have any questions. Explore related topics on our site to deepen your understanding like creating an Oracle 19c database on a Linux machine.
Spread the love
In this article, we will install Oracle Database 23ai on Windows 11. Oracle Database is a powerful database that has so many features. In the previous article, we’ve learned how to install Oracle Database on Oracle Linux 9. Oracle Database 23ai introduces advanced AI capabilities, enhancing performance and scalability for modern applications. Installing this database on Windows 11 is straightforward.
Prerequisites
Before beginning, ensure you have:
- Operating System: Windows 11 (64-bit)
- Memory (RAM): Minimum 2 GB; 4 GB or more recommended
- Storage: At least 10 GB of free disk space
- Privileges: Administrator rights on the system
Step 1. Install Java JDK
Oracle Database requires Java to run properly. Please install Java JDK prior to the Oracle Database installation. Download the latest version of Java for Windows from the link below.
https://www.oracle.com/java/technologies/downloads/#java8-windows
Once installed, open Command Prompt and run this command
Make sure it returns the Java version installed on your system such as:

In most cases, we need to edit JAVA_HOME environment. You can Googling how to edit the Java home environment on Windows 11.

Step 2: Download Oracle Database 23ai
- Visit the Oracle Database 23ai Downloads page.
- Choose the Windows version suitable for your system.
- Sign in with your Oracle account or create a new one to proceed with the download.

Step 3: Extract the Installation Files
- Once downloaded, navigate to the location of the ZIP file.
- Right-click the ZIP file and select Extract All.
- Choose a destination folder and click Extract.
Step 4: Initiate the Installation
- Open the extracted folder.
- Locate and double-click
setup.exe.
Follow the installation wizard

By default, the Oracle Database 23ai will be installed to C:\app\your-username\product\23ai. You can change this location but in this example, I will leave it as is.


Make sure the installation completed without any errors.
Step 5. Verify the Installation
Now let’s check if Oracle Database 23ai installed correctly. Open Command Prompt and login to Oracle
If you see the following prompt, then Oracle Database is installed correctly

Step 6. Enable Remote Connection
By default, Oracle Database only accessible from the localhost. If you are planning to access the database remotely, we need to edit the listener.ora file.
Below is the original content of the file listener.ora. Note the WIN11-TEST host. This is my hostname and in your file, this will be written as your host name. We need to change this part.
# listener.ora Network Configuration File: C:\app\dhani\product\23ai\dbhomeFree\NETWORK\ADMIN\listener.ora
# Generated by Oracle configuration tools.

DEFAULT_SERVICE_LISTENER = FREE

LISTENER =
  (DESCRIPTION_LIST =
    (DESCRIPTION =
      (ADDRESS = (PROTOCOL = TCP)(HOST = WIN11-TEST)(PORT = 1521))
      (ADDRESS = (PROTOCOL = IPC)(KEY = EXTPROC1521))
    )
  )
Change the host value to 0.0.0.0
# listener.ora Network Configuration File: C:\app\dhani\product\23ai\dbhomeFree\NETWORK\ADMIN\listener.ora
# Generated by Oracle configuration tools.

DEFAULT_SERVICE_LISTENER = FREE

LISTENER =
  (DESCRIPTION_LIST =
    (DESCRIPTION =
      (ADDRESS = (PROTOCOL = TCP)(HOST = 0.0.0.0)(PORT = 1521))
      (ADDRESS = (PROTOCOL = IPC)(KEY = EXTPROC1521))
    )
  )
Now restart the listener service. Open Command Prompt as Administrator and then use this two commands to restart
lsnrctl stop
lsnrctl start
Configure Firewall
Now we need to configure the Firewall to allow incoming connection to port 1521. Open Windows Defender Firewall with Advanced Security and then click Inbound Rules. Click New Rule, select Port and type 1521 on the specific local ports.

Click Next and choose Allow the connection.
At this point, we have successfully installed Oracle Database 23ai on Windows 11. I hope this will be useful for you who wants to learn Oracle Database. See you next time.
Oracle Database 21c Express Edition — это бесплатная система управления базами данных Oracle Database. Данная система управления базами данных работает на большинстве таких платформ, как: Windows, Linux, Mac OS X Server и т.д.
Поскольку Oracle Database 21c Express Edition распространяется бесплатно, скачать данное программное обеспечение с официального сайта Oracle. Для загрузки дистрибутива необходимо будет зарегистрироваться на сайте, так как осуществлять загрузку могут только авторизованные пользователи.
Открываем страницу для загрузки Oracle Database XE, ссылка предоставлена ниже:
https://www.oracle.com/database/technologies/xe-downloads.html
Выбираем необходимый дистрибутив, и нажимаем на ссылку для осуществления загрузки.
Распаковываем архив на рабочий стол и запускаем установочный файл — setup.exe
Открылось окно приветствия, нажимаем — Next
Принимаем условие лицензионного соглашения, отмечаем пункт — «I accept the terms in the license agreement», и нажимаем — Next
Сейчас необходимо указать директорию для установки Oracle Database 21c Express Edition. Можно оставить путь, который предлагает система по умолчанию, но лучше его изменить.
Важный момент: не используйте путь, в котором содержатся пробелы. В дальнейшем это может вызвать затруднения при использовании программы.
Указываем необходимую директорию, и нажимаем — Next
Сейчас необходимо придумать и указать пароль для будущих системных учетных записей: SYSTEM, SYS и PDBADMIN. Данные учётные записи помогут нам осуществить первое подключение к локальному серверу. Нажимаем — Next
Путь для установки сформированы, осталось нажать — Install
Процесс установки запущен, и он займёт некоторое время. Всё зависит от вычисляемых мощностей вашего компьютера.
На финальном этапе установки появится дополнительное окно, в котором будет отображаться прогресс настройки компонентов Oracle XE Database components.
Установка программы Oracle Database 21c Express Edition завершена, далее на экране будут отображены реквизиты для подключения, их необходимо запомнить или записать.
Особое внимание уделите строке Pluggable Database (localhost:1521/XEPDB1), она понадобится при создании подключения в Oracle SQL Developer. В Oracle Database 21c Express Edition база данных по умолчанию называется — XEPDB1.
Нажимаем — Finish
Программа Oracle Database 21c Express Edition установлена, теперь необходимо проверить её работоспособность. В качестве проверки будет выступать обычное подключение к локальному серверу при помощи стандартной утилиты SQL Plus.
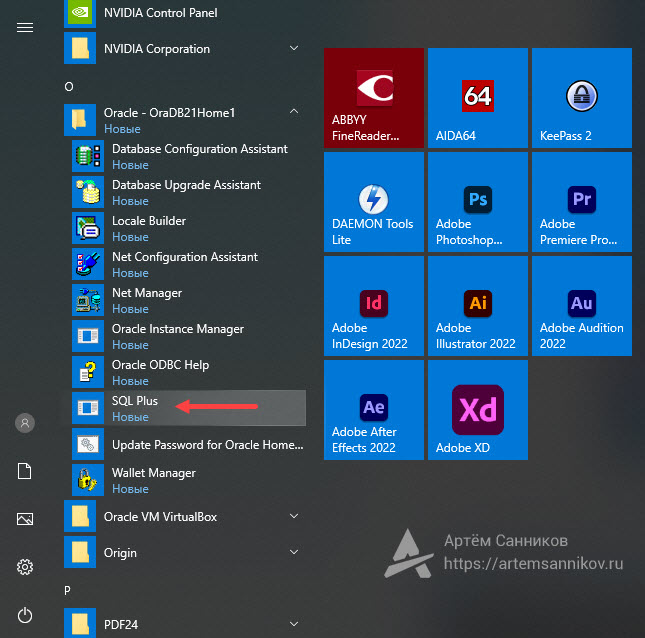
Открываем Пуск и находим ново созданную директорию Oracle-OraDB21Home1, разворачиваем её и затем нажимаем на ярлык утилиты SQL Plus.
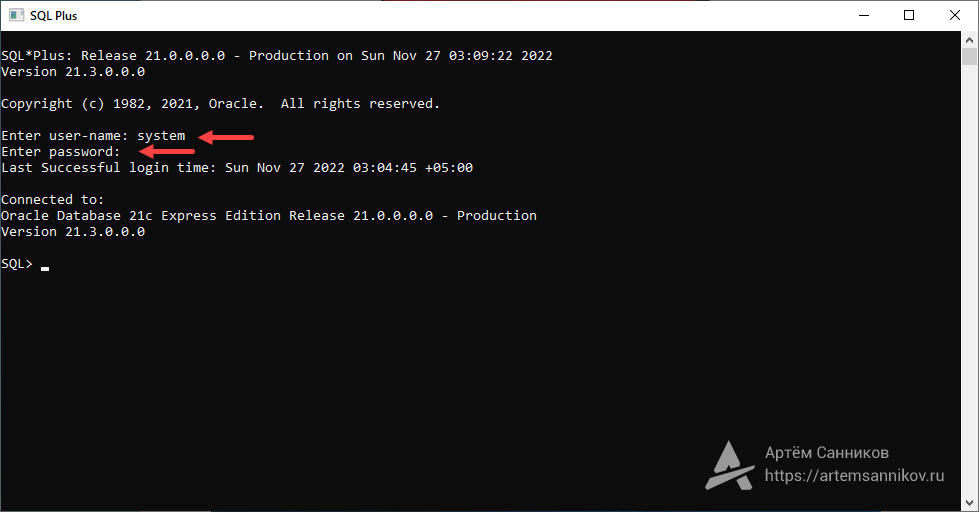
Открывается командная строка, в которой нам необходимо ввести реквизиты для подключения к локальному серверу.
Реквизиты для подключения:
- user name (SYSTEM);
- password (это тот самый пароль, который мы придумали для системных учётных записей в начале установки. Пароль отображаться не будет, просто вводим пароль и нажимаем Enter).
Если вы получили сообщение типа: Connected to: Oracle Database 21c Express Edition Release 21.0.0.0.0 — Production Version 21.3.0.0.0, значит всё установилось корректно и никаких проблем не обнаружено.
Метки: Oracle.
Below are the steps I used to install Oracle Database 18c XE on Windows 10.
Oracle Database 18c XE is the free Express Edition of Oracle. This is a good entry point into Oracle Database. XE is a regular Oracle Database, and it therefore provides compatibility with other Oracle Database editions. You can always move to another edition if you ever need to.
Download Oracle
Download the installation file from the Oracle Database XE Downloads page.
Click Oracle Database 18c Express Edition for Windows x64 to download the Windows file.
You’ll need to sign in (or create an account) if you aren’t already signed in. Once signed in, the download starts immediately.
Once the ZIP file has downloaded, extract it to a folder of your choosing.
Now we can go ahead and install Oracle Database.
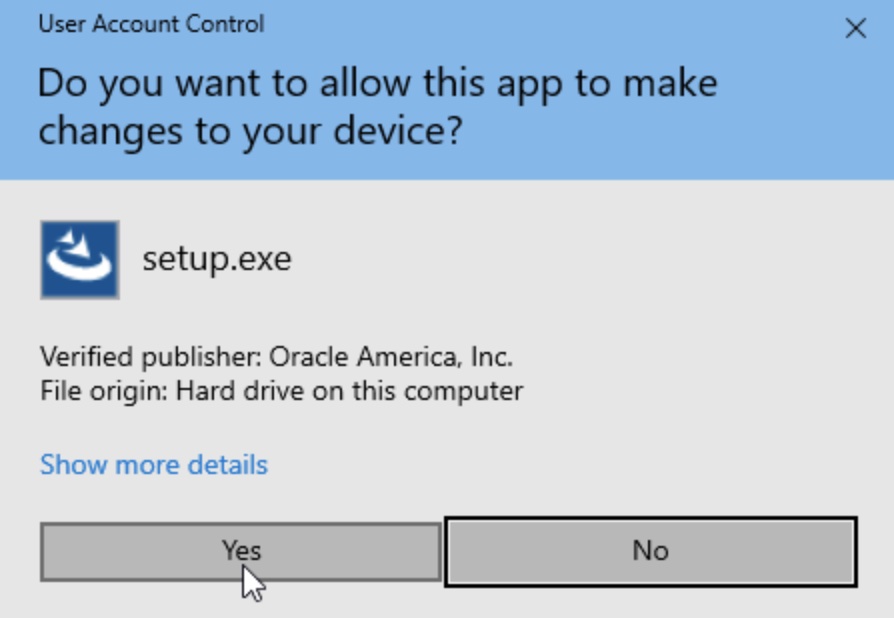
Double click setup.exe to launch the installation:

If asked whether or not you want to run the app, click Yes:
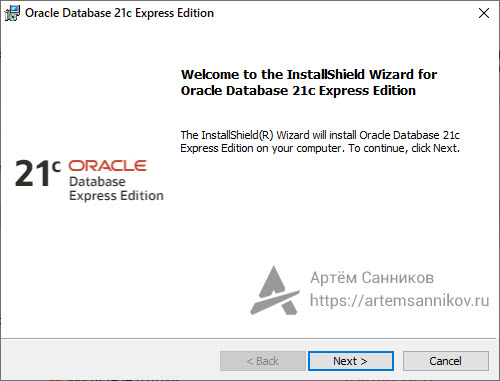
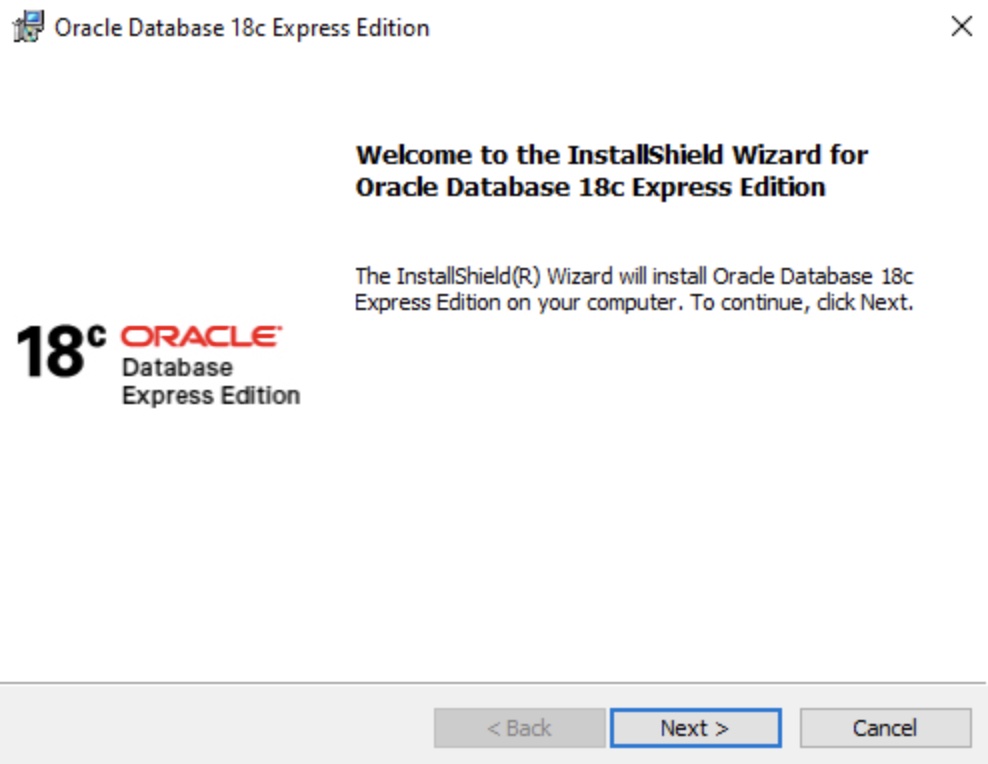
This brings us to the Welcome screen for the InstallShield Wizard. Click Next >:
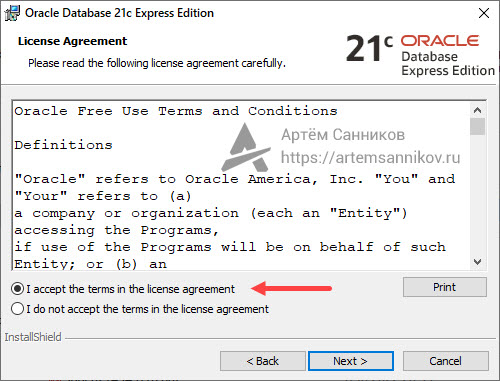
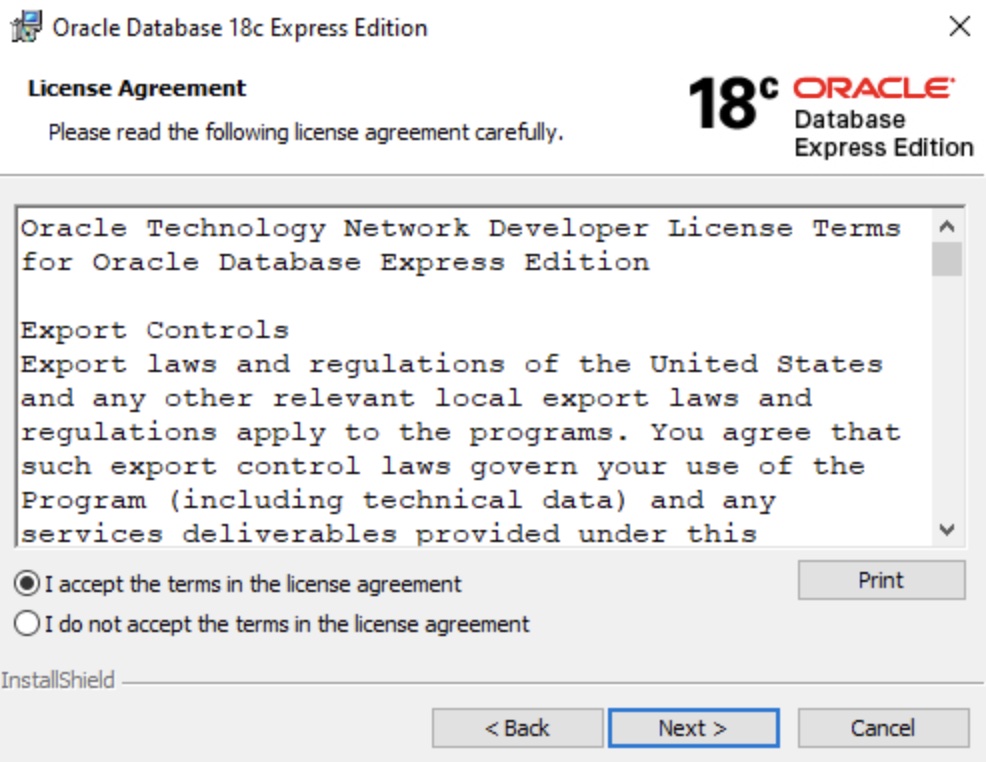
If you accept the terms, select I accept the terms in the license agreement and click Next >:
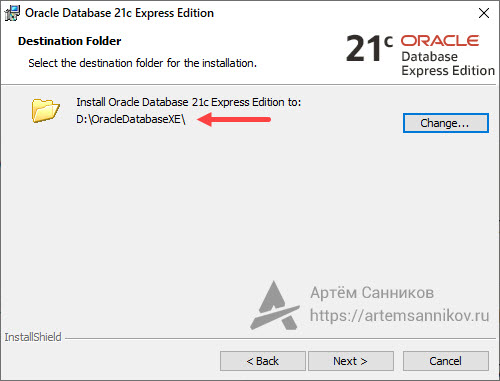
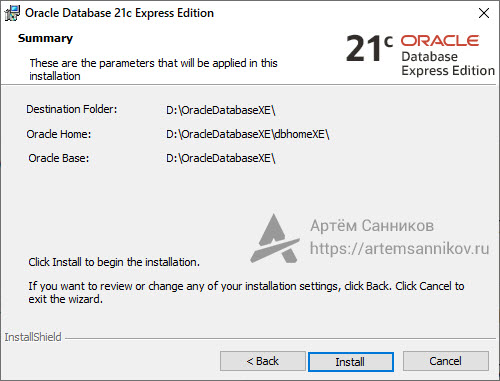
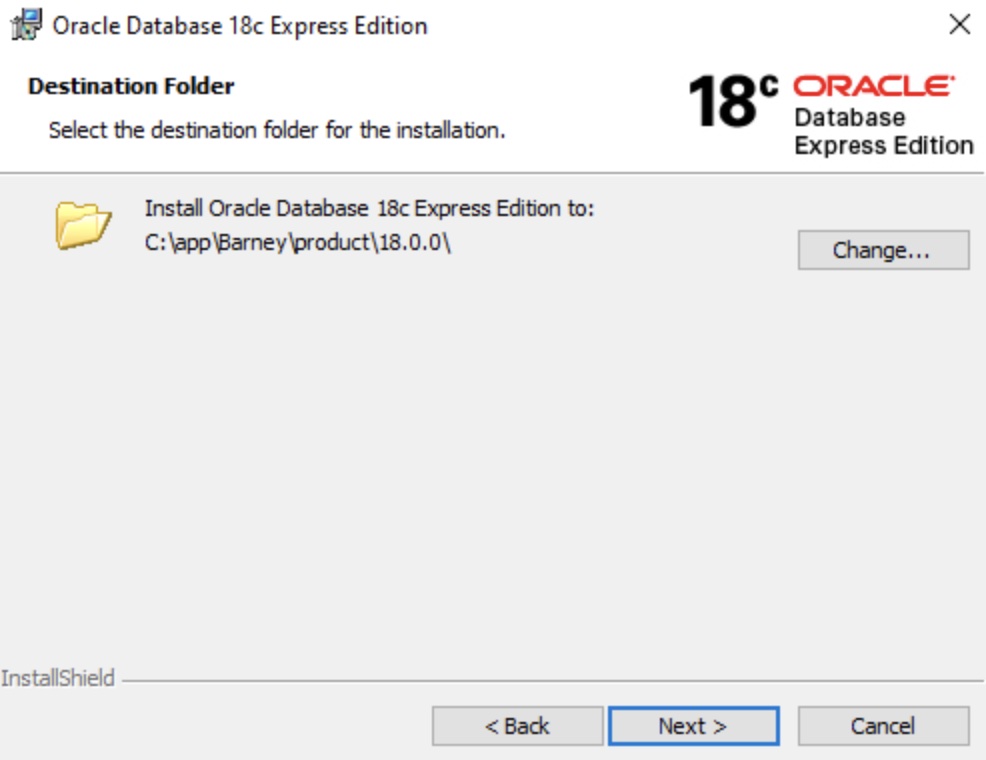
Review the destination folder. Leave it at the default or change as required. Once it’s good, click Next >:
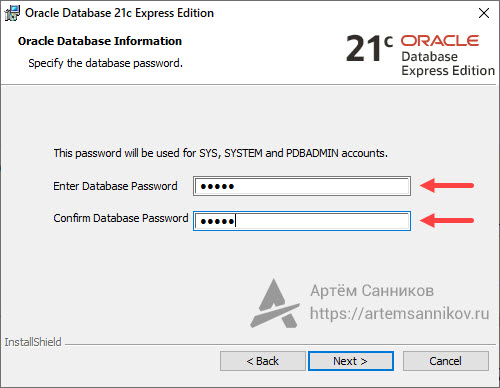
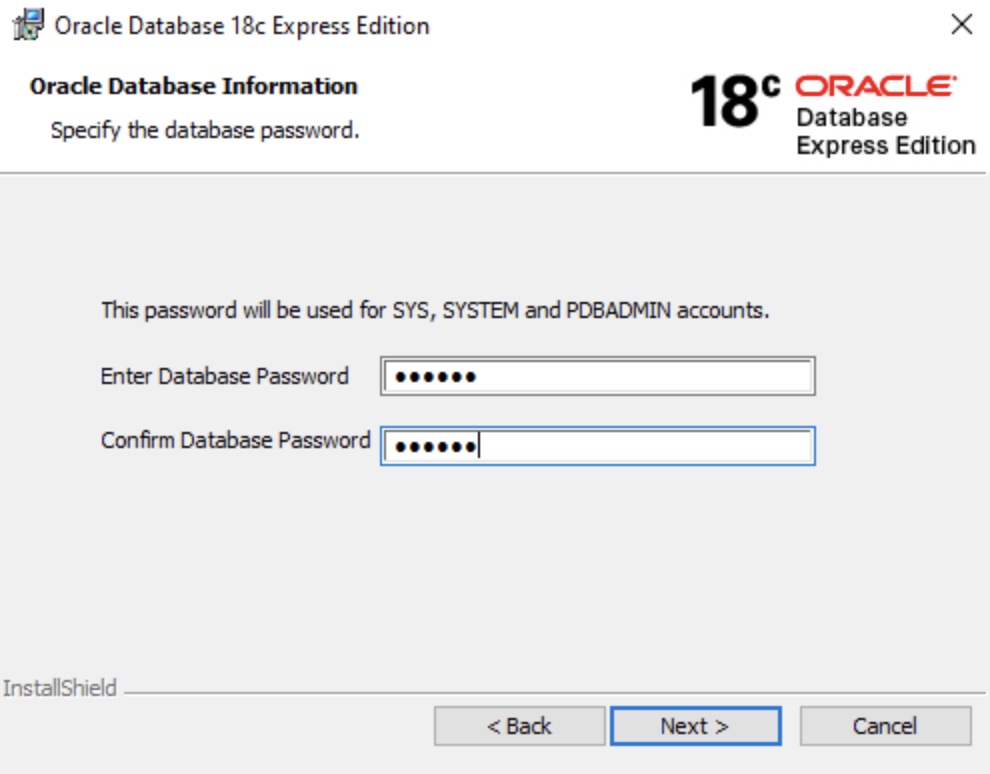
Enter a password for the SYS, SYSTEM, and PDBADMIN accounts and click Next >:
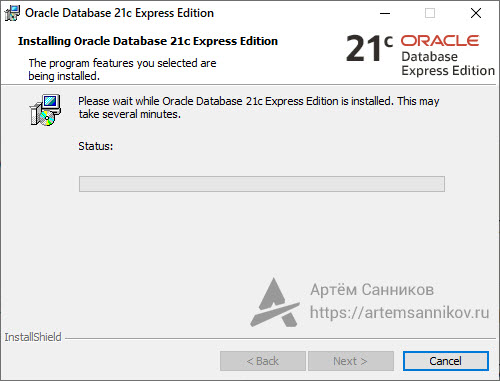
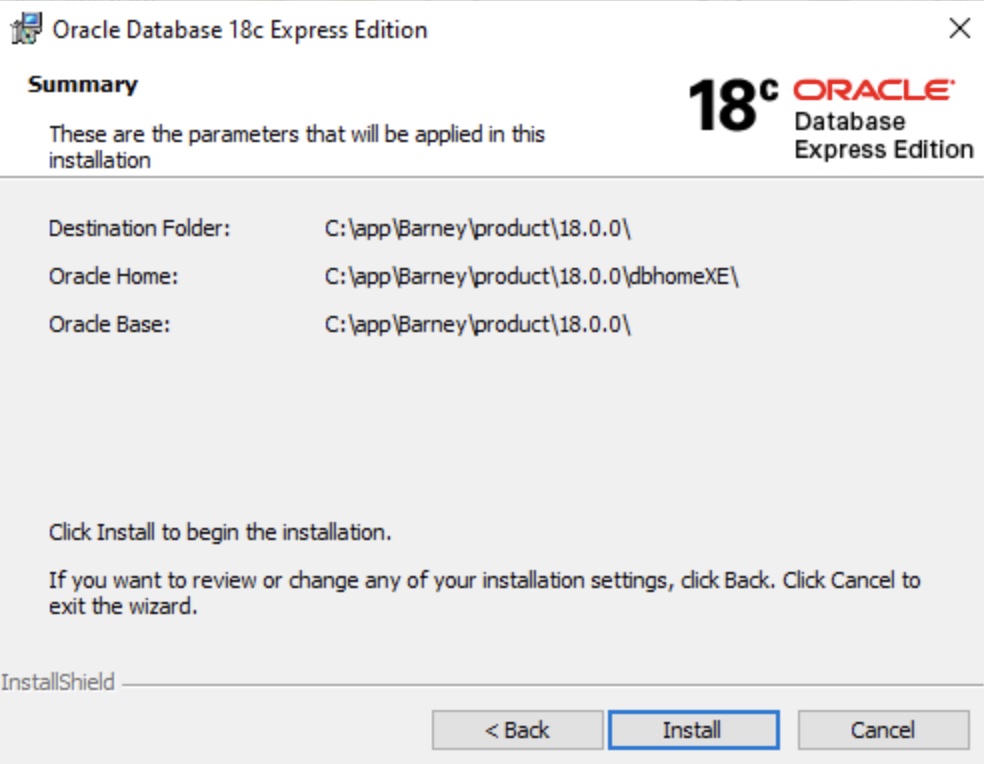
Review the summary of the parameters that are about to be applied in the installation. You can go back and change anything that’s not right. Once it all looks good, click Install:
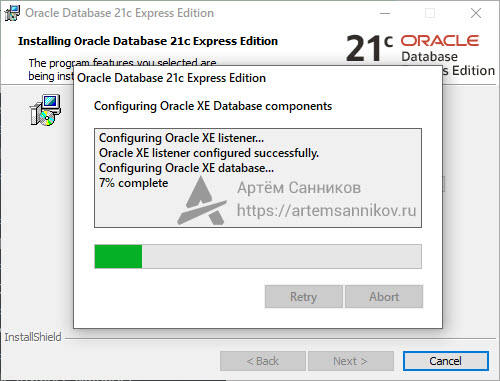
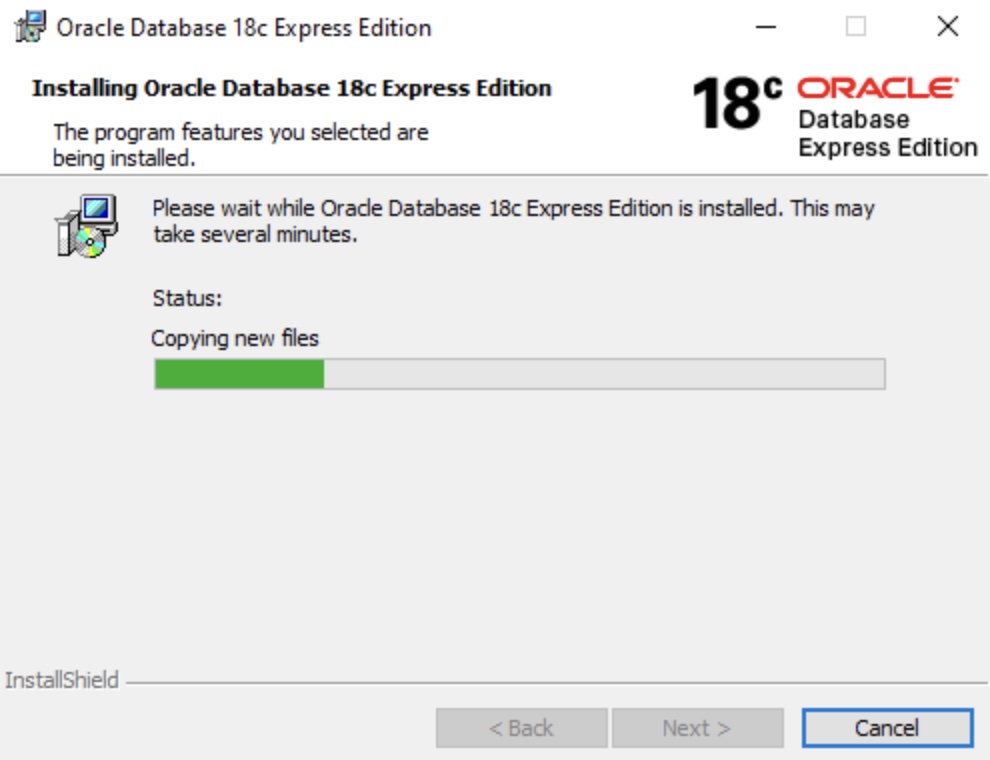
The installation goes ahead:
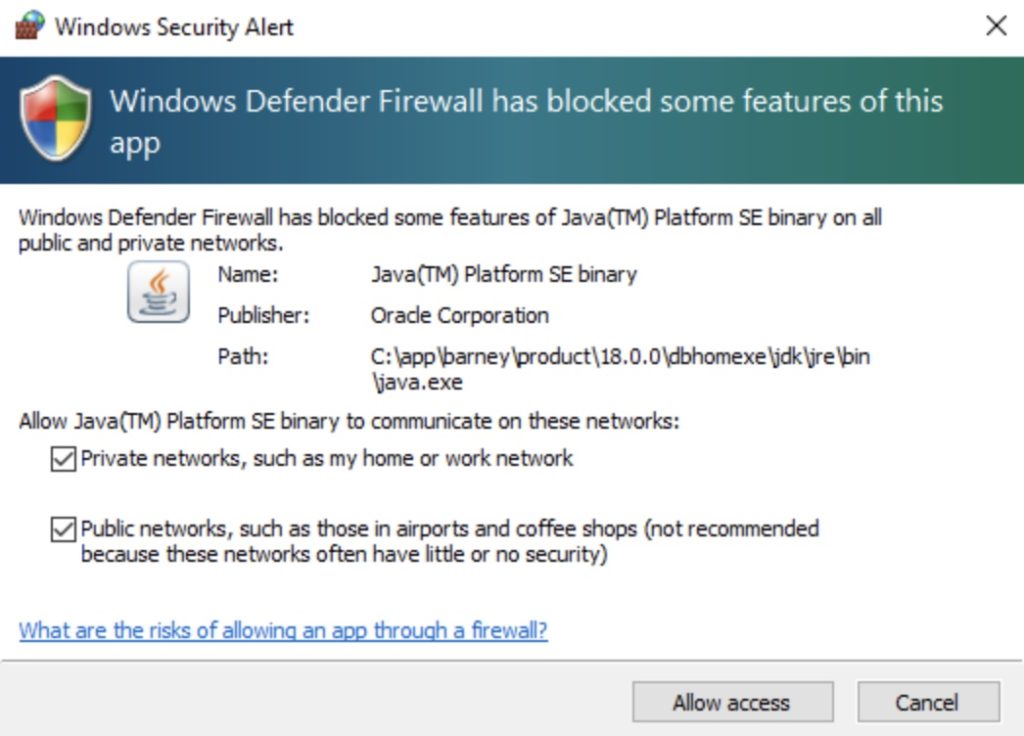
If Windows Defender Firewall is activated, you will be asked to allow network access to the Java Platform SE binary. If you don’t allow access, some features of Oracle may not work properly. Select the networks that you’d like to grant access to, then click Allow Access:
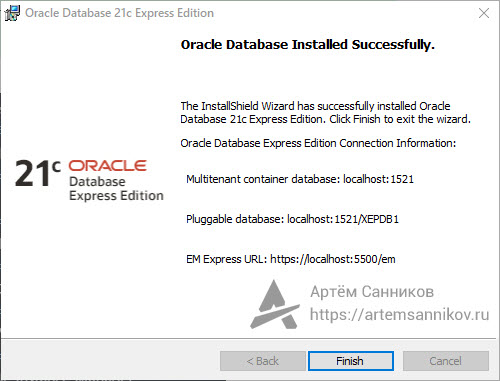
The installation continues. Once complete, the Oracle Database Installed Successfully screen is displayed, along with the container database, pluggable database and Enterprise Manager Express connection details. Click Finish.
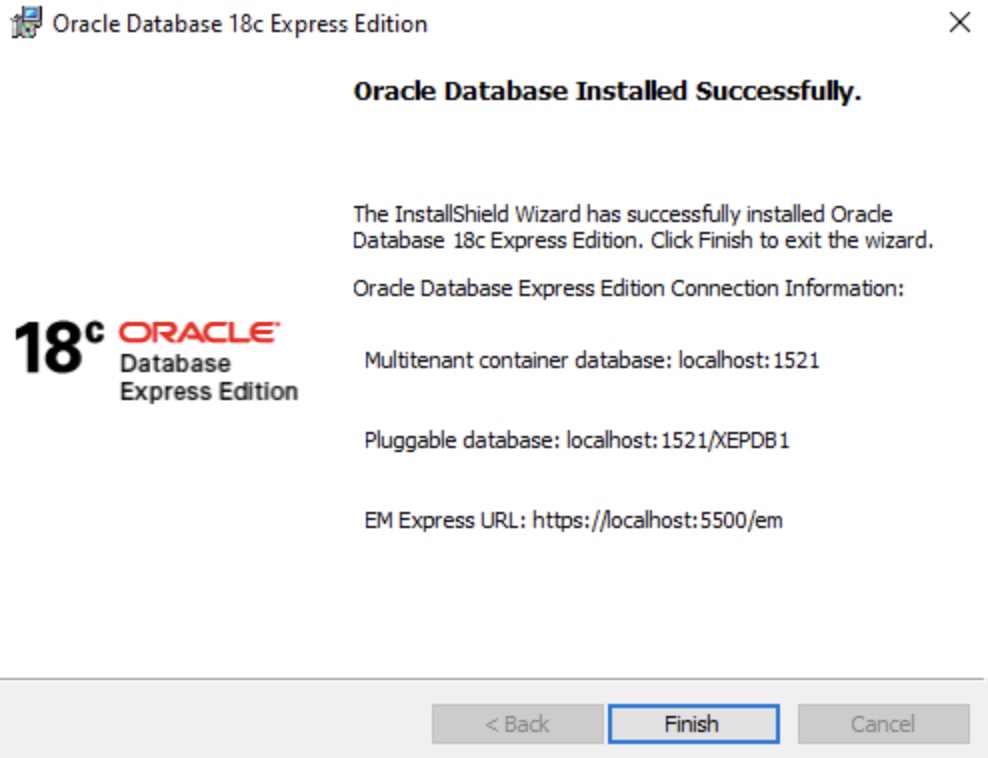
Oracle Database is now installed on Windows 10.
Connect to Oracle
Now that Oracle Database is installed, we can connect to it using tools, such as the SQL*Plus command line interface or SQL Developer.
SQL*Plus is installed with Oracle Database, so we can launch that straight away using the Command Prompt.
Here’s an example:
sqlplus SYS/oracle AS SYSDBAEntering that into Command Prompt launches SQL*Plus and logs in to Oracle Database as SYSDBA using SYS as the username and oracle as the password.
Result:
SQL*Plus: Release 18.0.0.0.0 - Production on Thu Aug 26 15:15:51 2021
Version 18.4.0.0.0

Copyright (c) 1982, 2018, Oracle.  All rights reserved.


Connected to:
Oracle Database 18c Express Edition Release 18.0.0.0.0 - Production
Version 18.4.0.0.0

SQL>
Once connected, the SQL> prompt is displayed. We can now run SQL queries etc against our Oracle Database installation.