1. What is Oracle Client?
If you have 2 computers A and B. Computer B is installed Oracle Database. Standing at computer A, if you want to work withthe Oracle database at Computer B, Computer A needs to be installed Oracle Client.
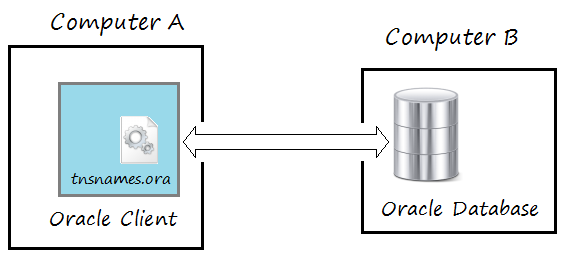
Oracle Client is part of Oracle Database software. It is not a database, but, it helps talk with an Oracle database.
Note: Oracle Database itself is a Oracle Client.
2. Download Oracle Client
The latest version of Oracle Client is 12.x, which can work with any different versions of Oracle Database (10, 11, 12), therefore, you should download this version.
To download the Oracle Client, visit the following address
- http://www.oracle.com/technetwork/database/enterprise-edition/downloads/index.html
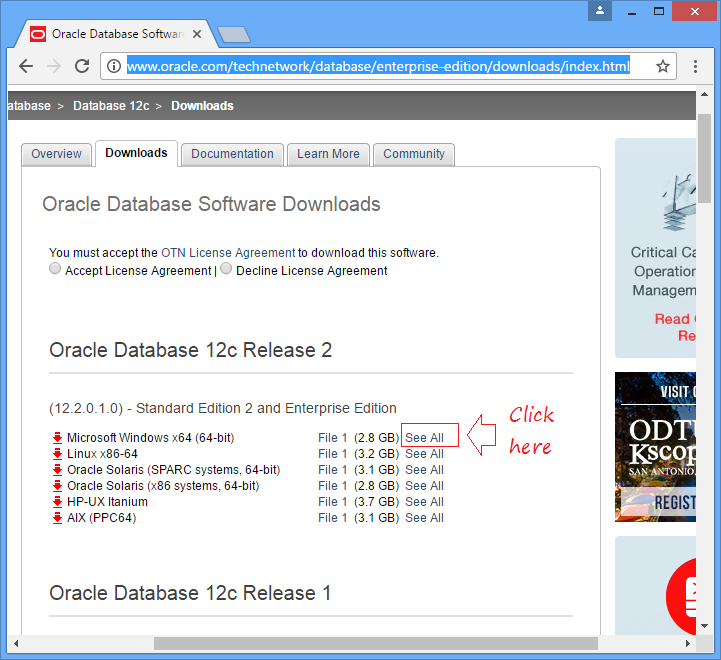
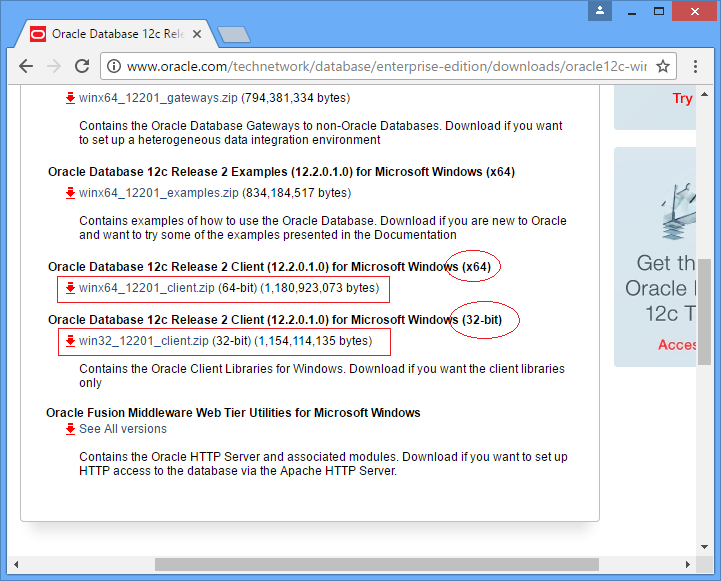
Here, you have two choices for downloading such as Oracle Client 32bit or Oracle Client 64bit. If you want to work with the visual tools such as PL/SQL Developer, Toad, .. you should download and install 32bit version.
Here, I will download the 32bit version. Downloading requires you to log in with an account. If you do not have an account, you can register for free.
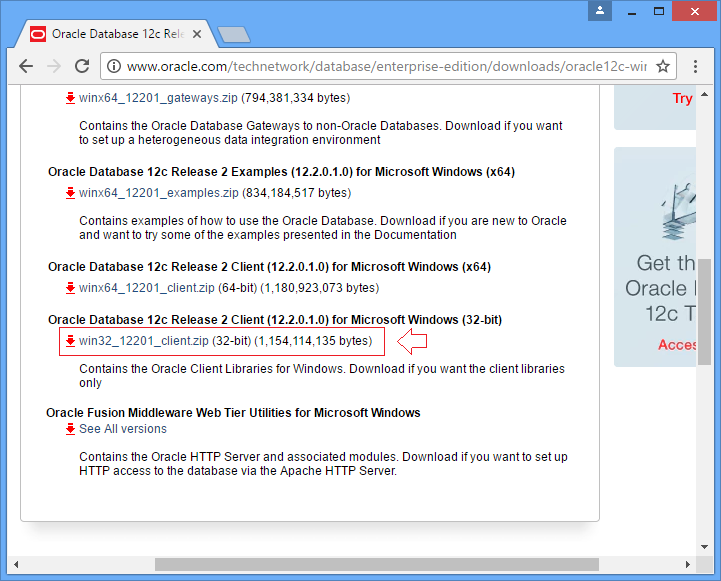
Downloaded results:
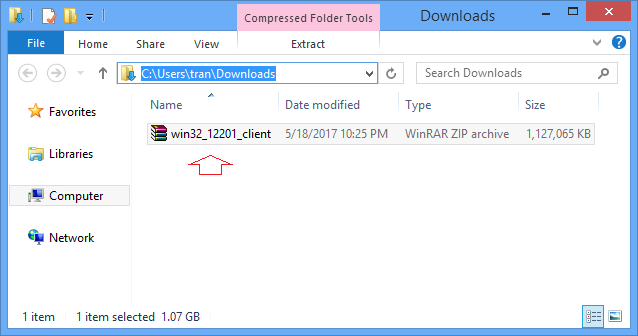
3. Installing Oracle Client
Extract the file downloaded in the above step by you.
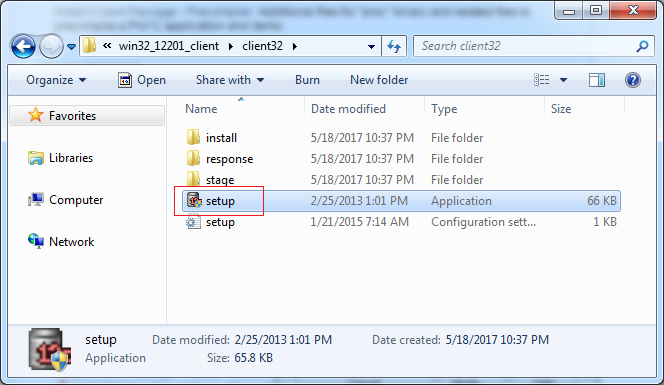
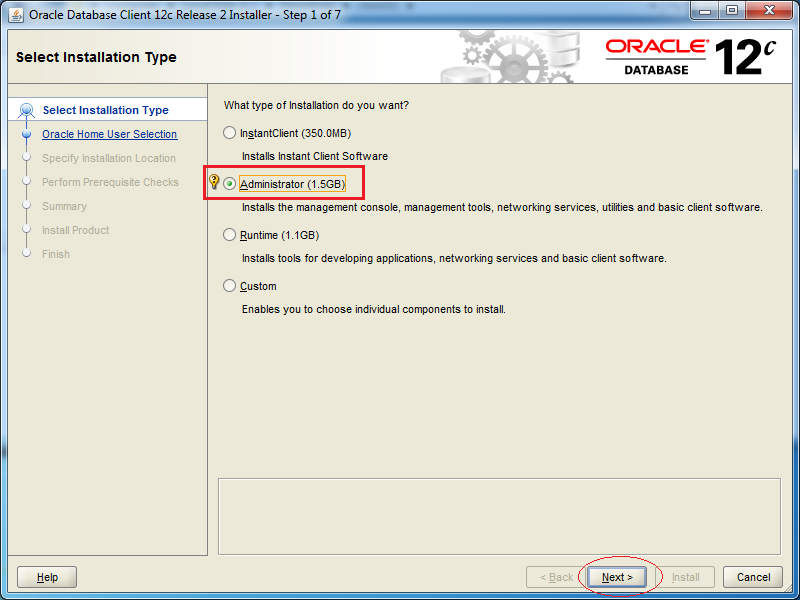
You have 4 options to install:
Instant Client
This installation type installs only the shared libraries required by Oracle Call Interface applications that use the Instant Client feature. It requires much less disk space than the other Oracle Client installation types.
Note: If you select Instant Client install type, then you cannot apply software updates during the installation session. To download and apply the latest software updates, you must select Administrator, Runtime, or Custom install type.
Administrator
This installation type installs the Oracle Enterprise Manager Standalone Console, Oracle networking services, and client software that enables applications or individuals to connect to an Oracle database. It also installs development tools that you can use to develop applications.
Runtime
This installation type installs a limited number of components for a database application user. With the exception of Oracle Enterprise Manager Standalone Console, it installs the same components as the Administrator installation type.
Custom
This installation type allows you to select the client applications and utilities that you want to install.
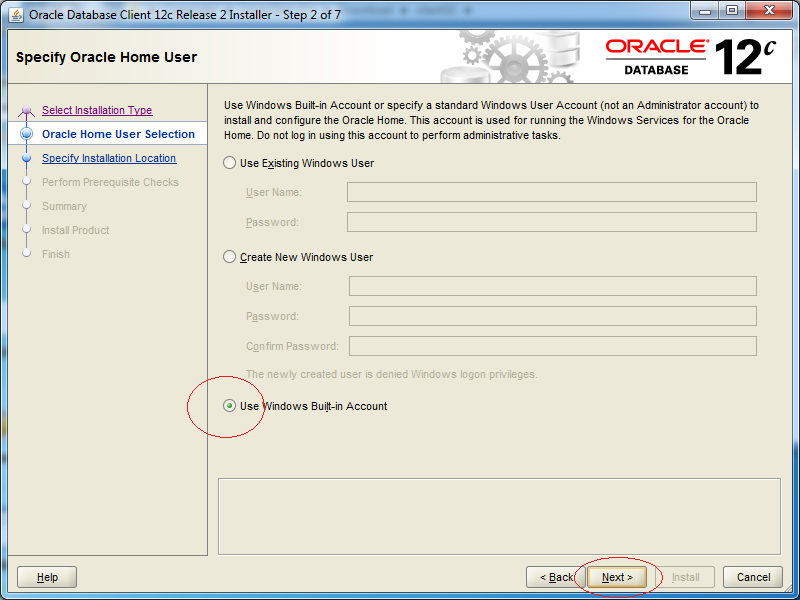
Enter:
-
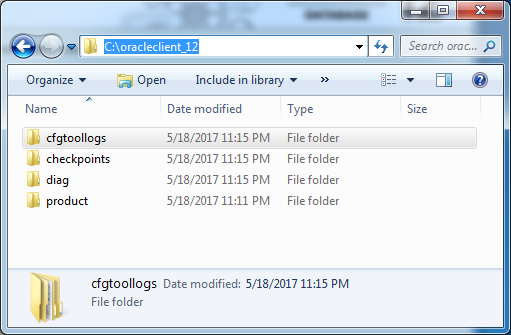
Oracle base: C:/oracleclient_12
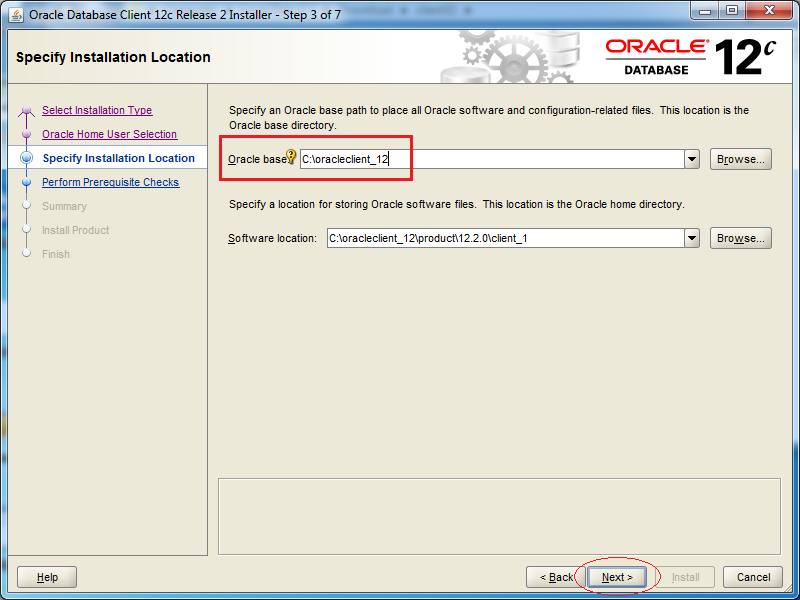
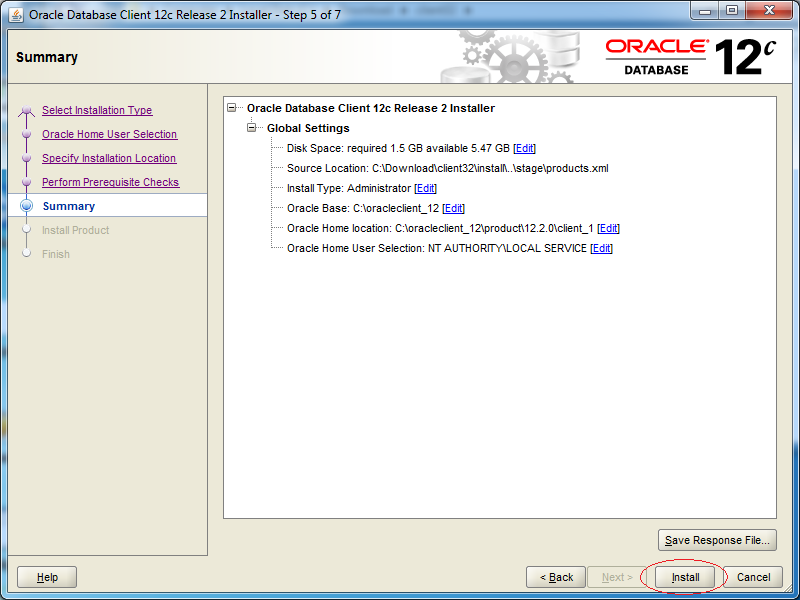
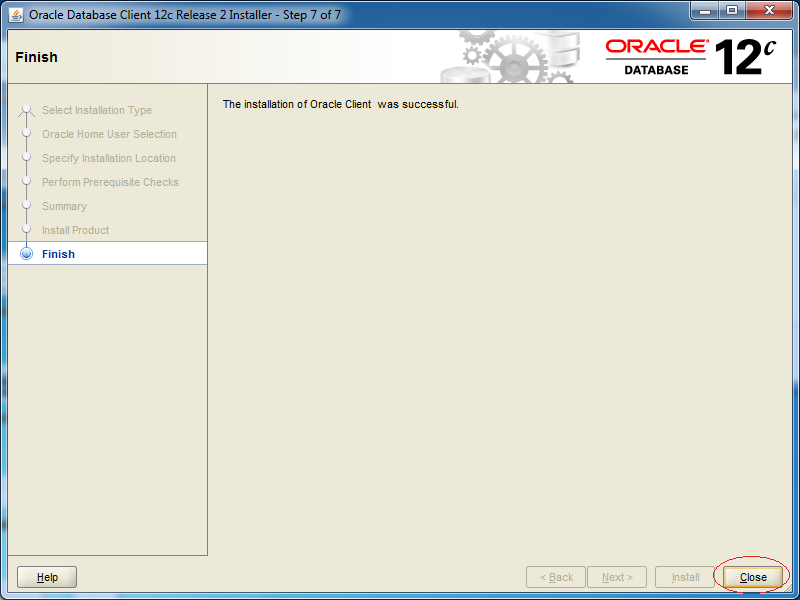
OK, Oracle Client has been installed successfully.
4. Configuring TNSNAME
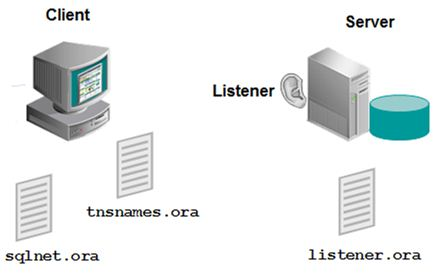
tnsping
Trước hết, hãy kiểm tra để đảm bảo Server hoạt động tốt.
# tnsping server-host:1521/sid-id

# Example:

tnsping 192.168.13.129:1521/db12c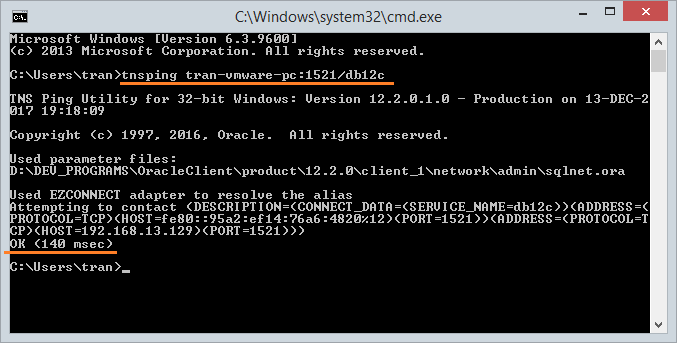
To be able to connect to a database located in another computer, you need to configure TNSNAME. Create a file named tnsnames.ora located in the folder:
-
C:\oracleclient_12\product\12.2.0\client_1\network\admin
tnsnames.ora
YOUR_DB_ALIAS =

  (DESCRIPTION =
    (ADDRESS = (PROTOCOL = TCP)(HOST = your_server_ip )(PORT = 1521))
    (CONNECT_DATA =
      (SERVER = DEDICATED)
      (SERVICE_NAME = db12c)
    )
  )
In this article, I will provide a detailed guide on Oracle client installation on Windows VirtualBox.We’ll walk you through each step of the process with a proper screenshot. Let’s get started with installing Oracle database software in Windows.
In the following steps, we will perform all the steps to install Oracle client 19c on Windows in my Windows VirtualBox winsrv.
Table of Contents
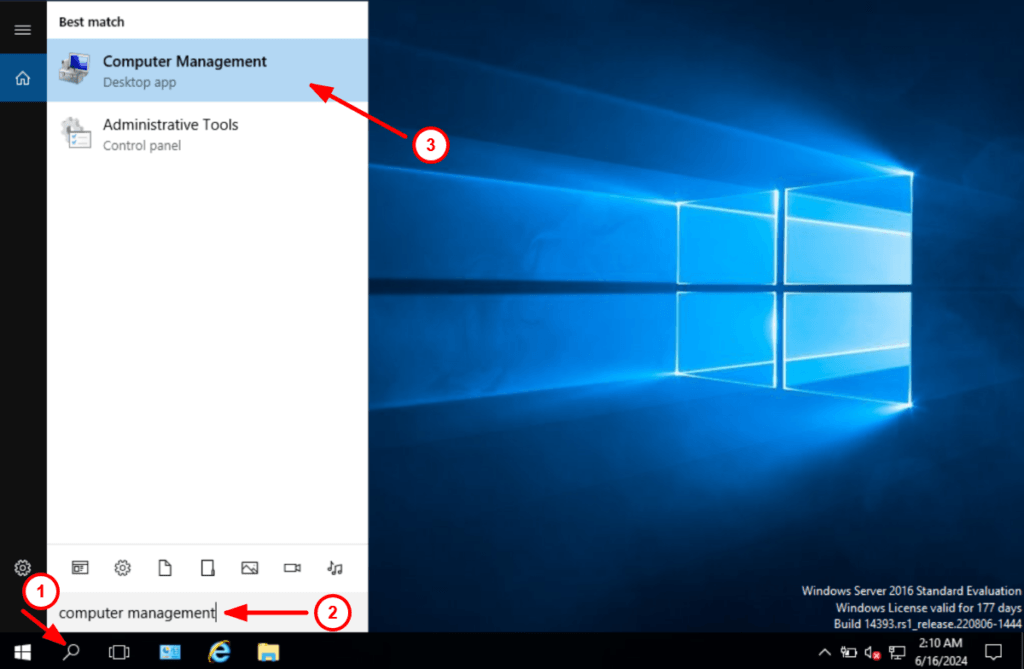
1. First log in to winsrv as an administrator, search for Computer Management, and click on it:
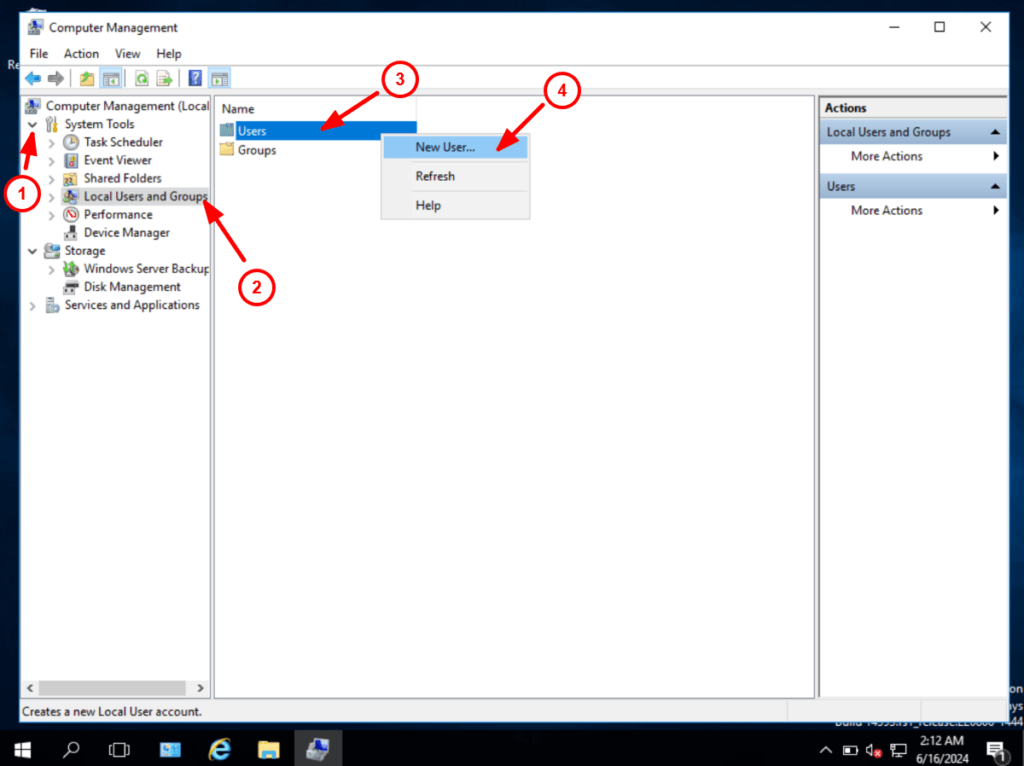
2. On the left side, click on Local Users and Groups > Users, right-click on Users, and select New User.
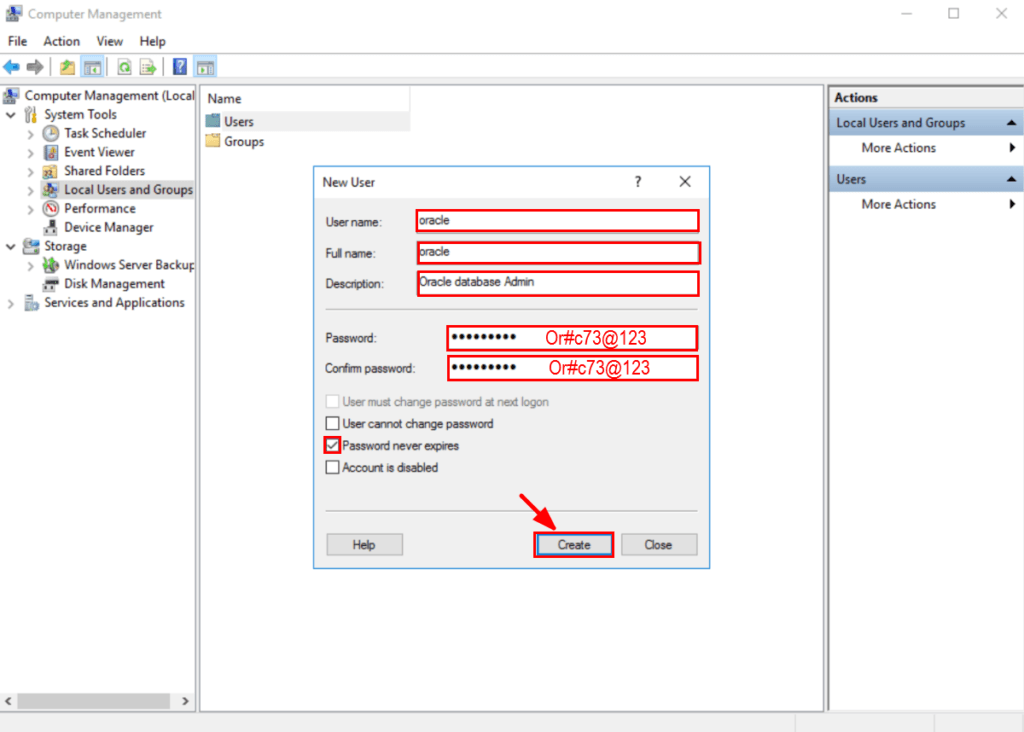
Create a user called Oracle then click on the Create button.
This user will be used as the administrator user. Tick on the password never expires.
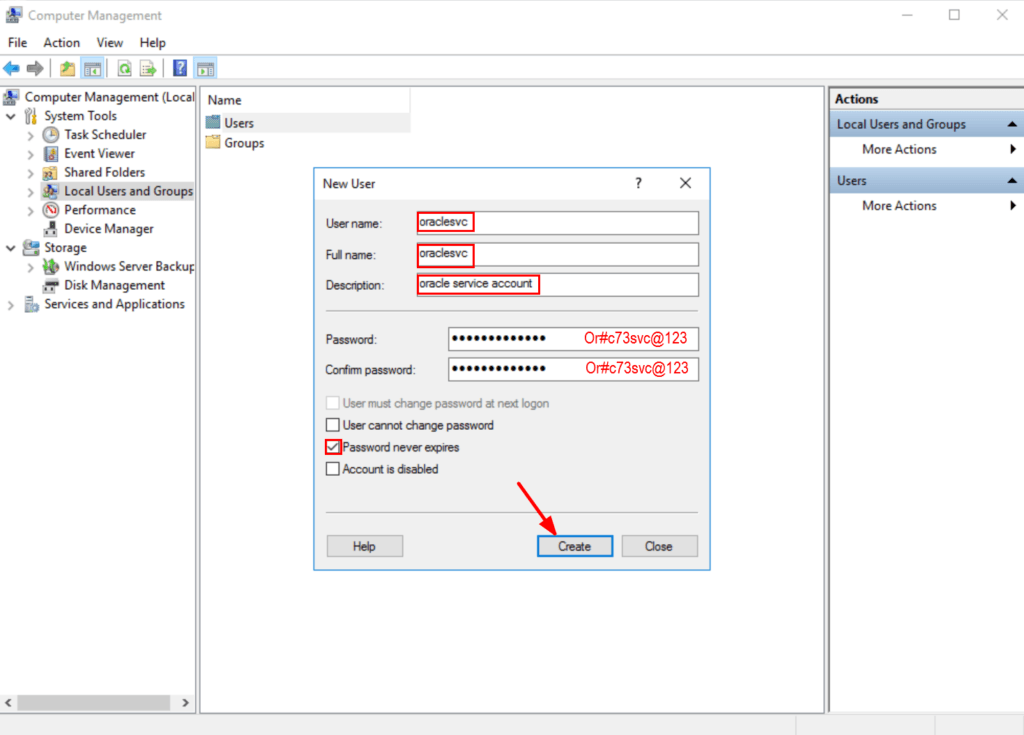
3. In the same way create another user called oraclesvc. This user will be used as the service account.
4. On the left side, click on the Groups, and after that double click on the Administrators.
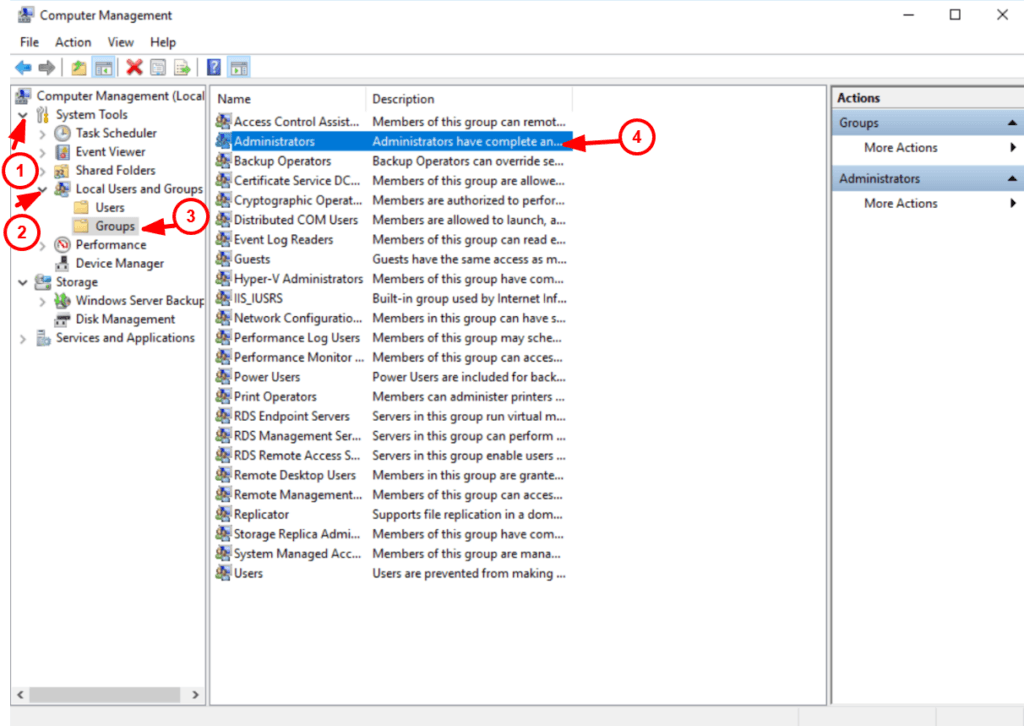
Add Oracle user to the administrator’s group:
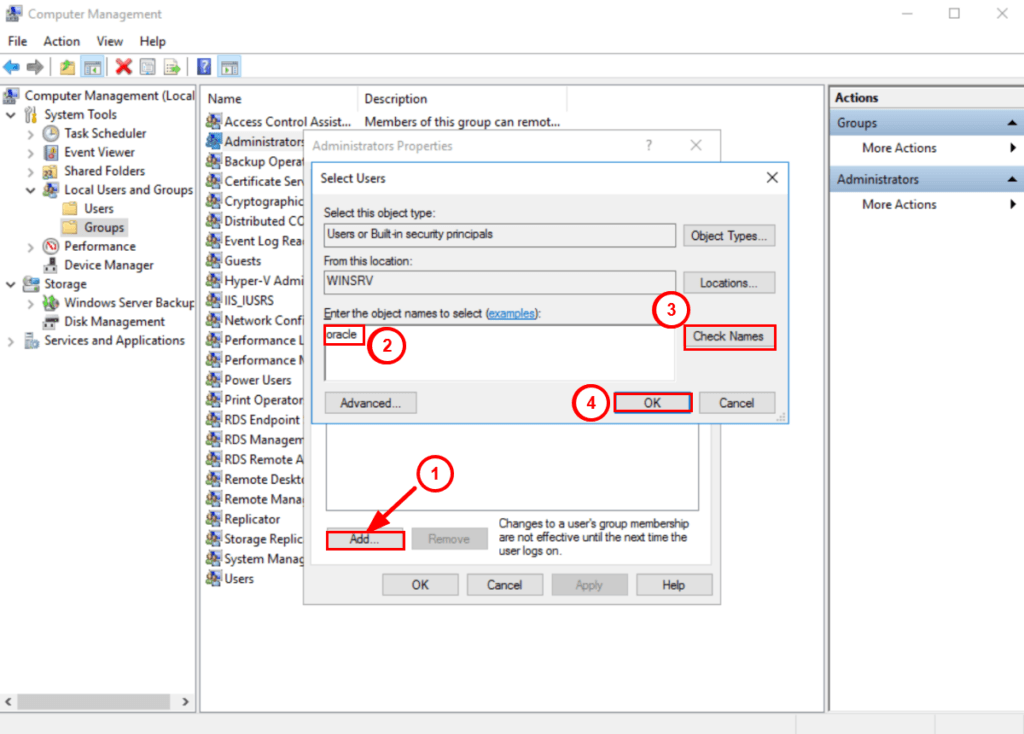
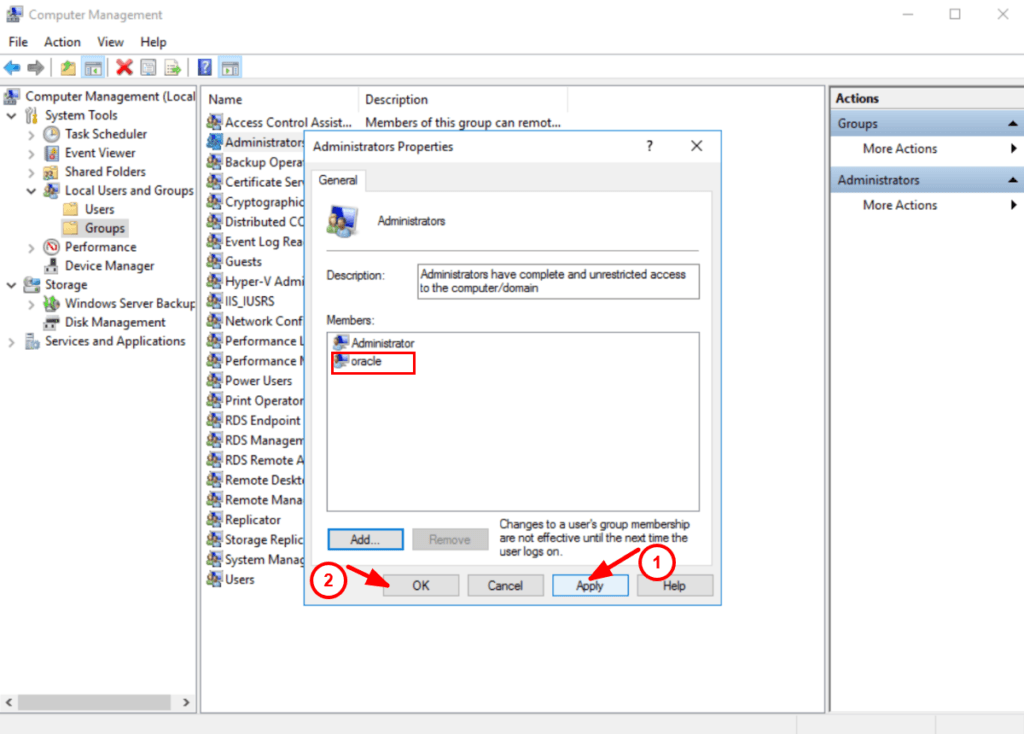
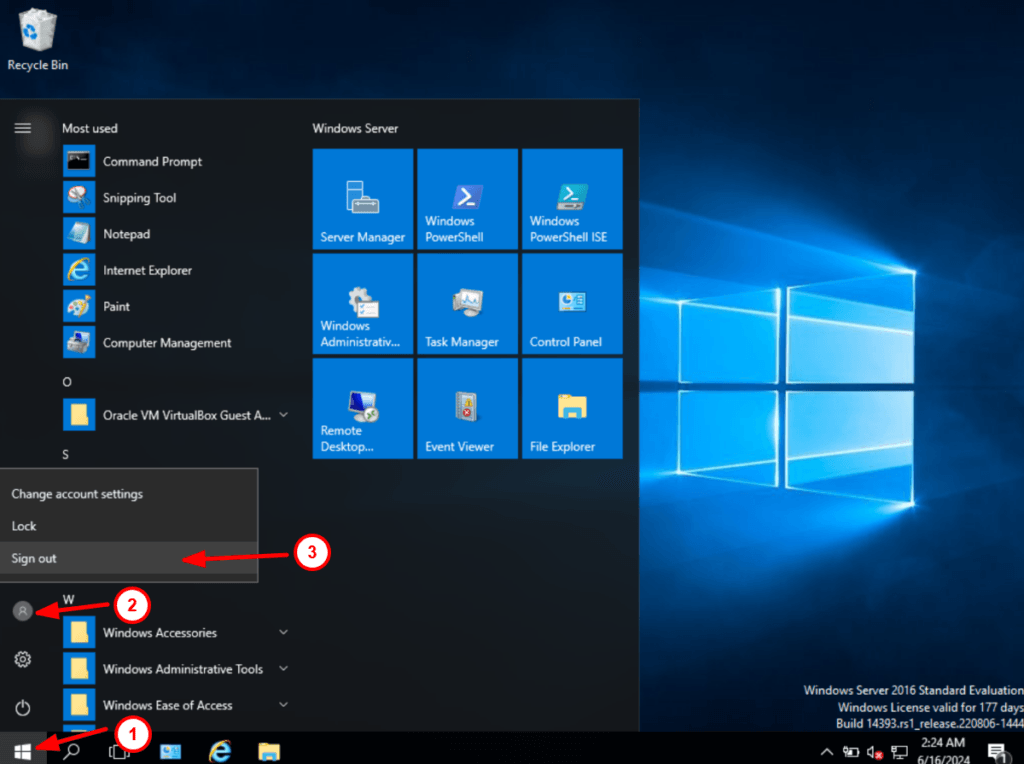
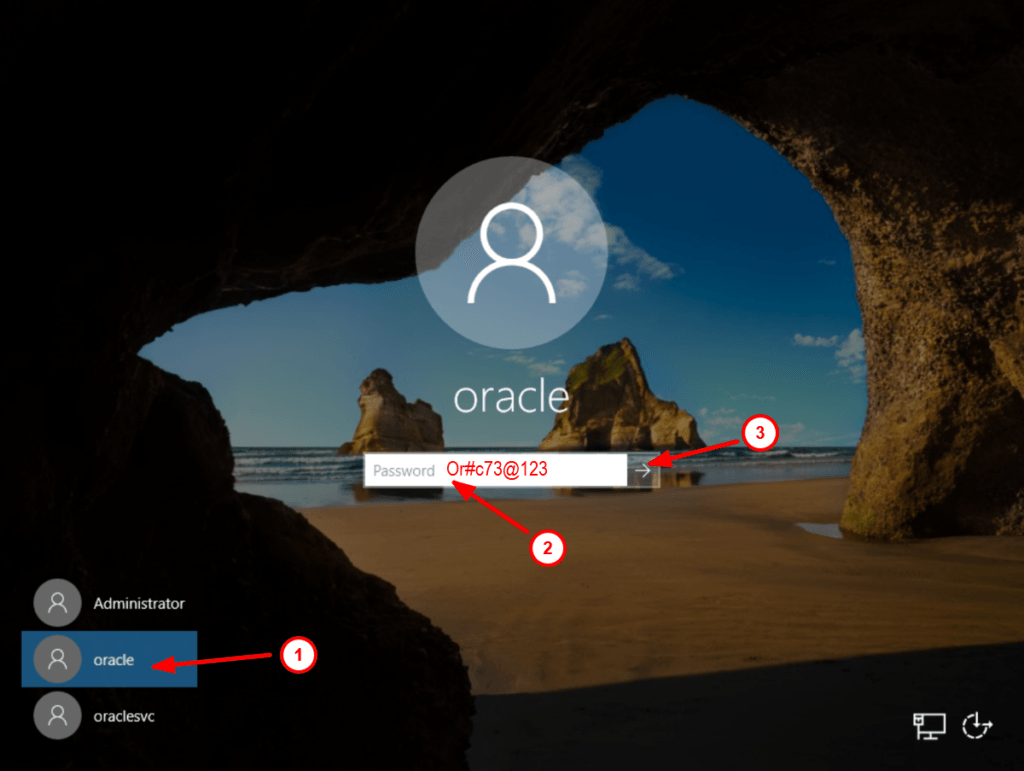
5. Sign out from Winsrv Windows machine and log in as an Oracle user:
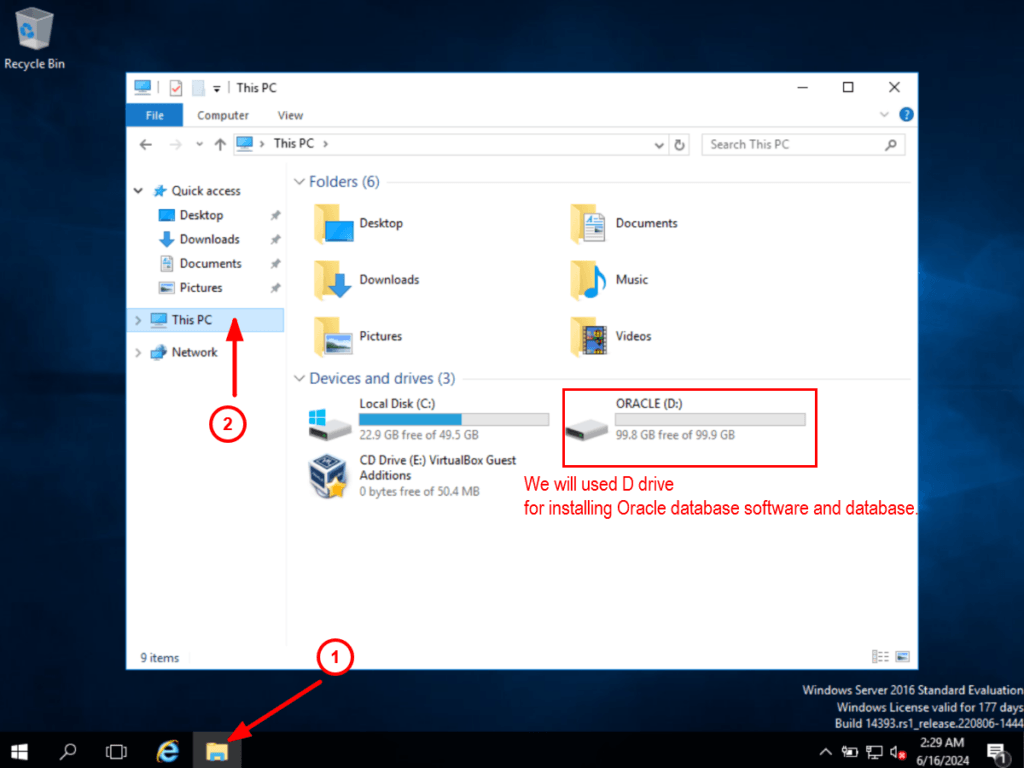
6. Now Open the File Explorer > This PC > Check the storage drives available in the system to install Oracle client for Windows:
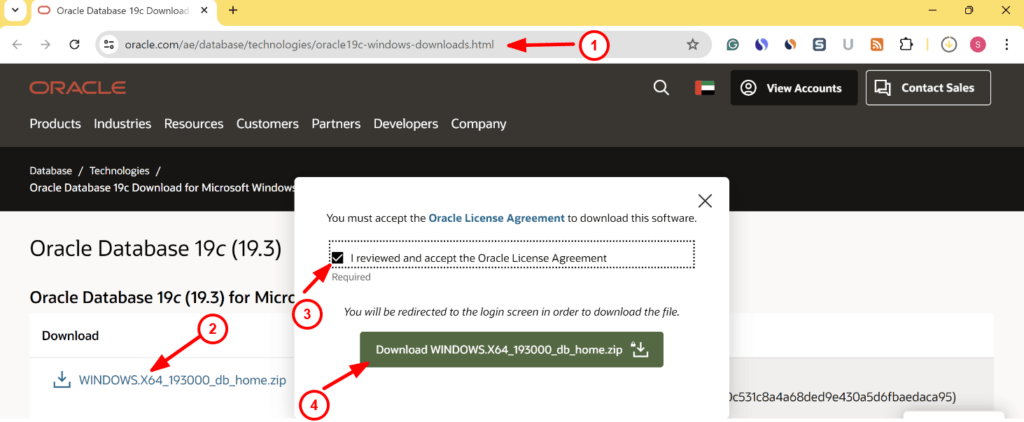
7. Download the Oracle database 19c installation file for Windows x64 from this link.
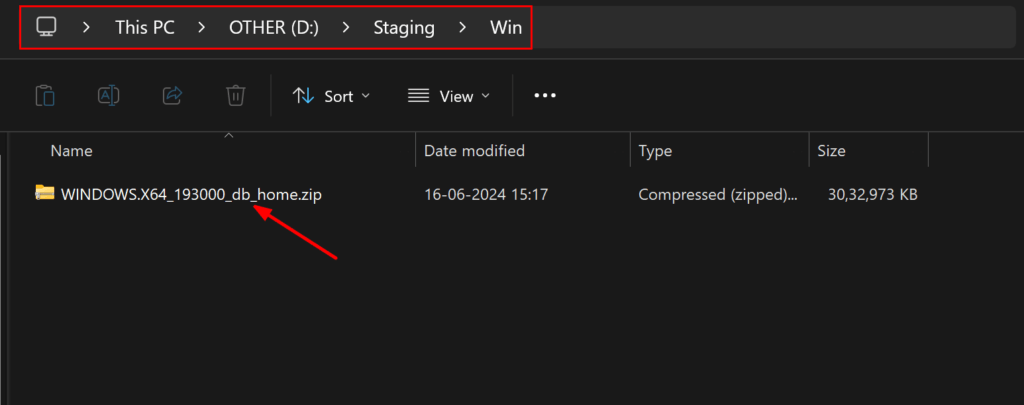
8. Now place the downloaded file to the shared folder configured in your machine to access it through your VirtualBox Windows machine.
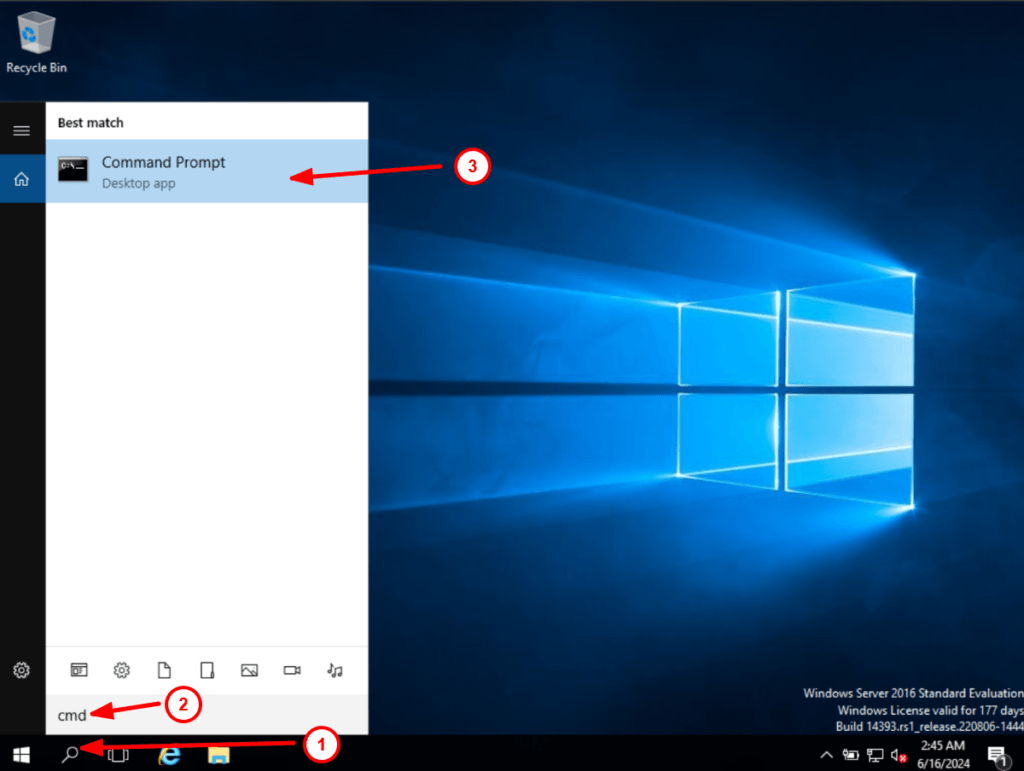
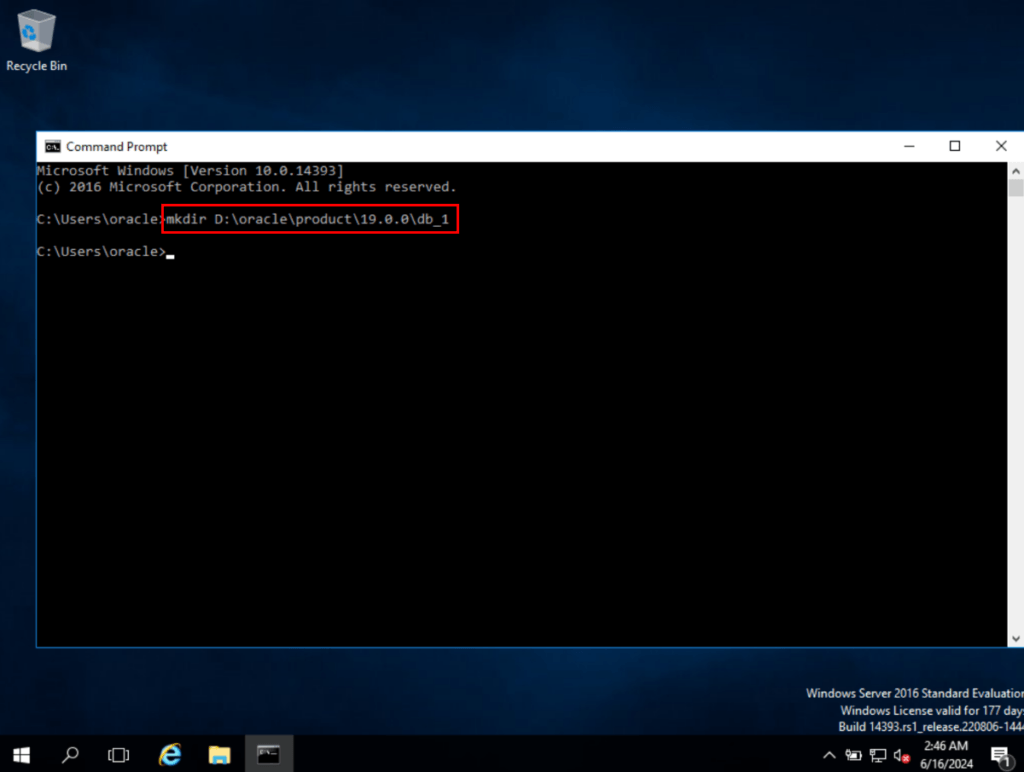
9. Now open the cmd prompt and run the command mkdir D:\oracle\product\19.0.0\db_1 to create the windows home directory:
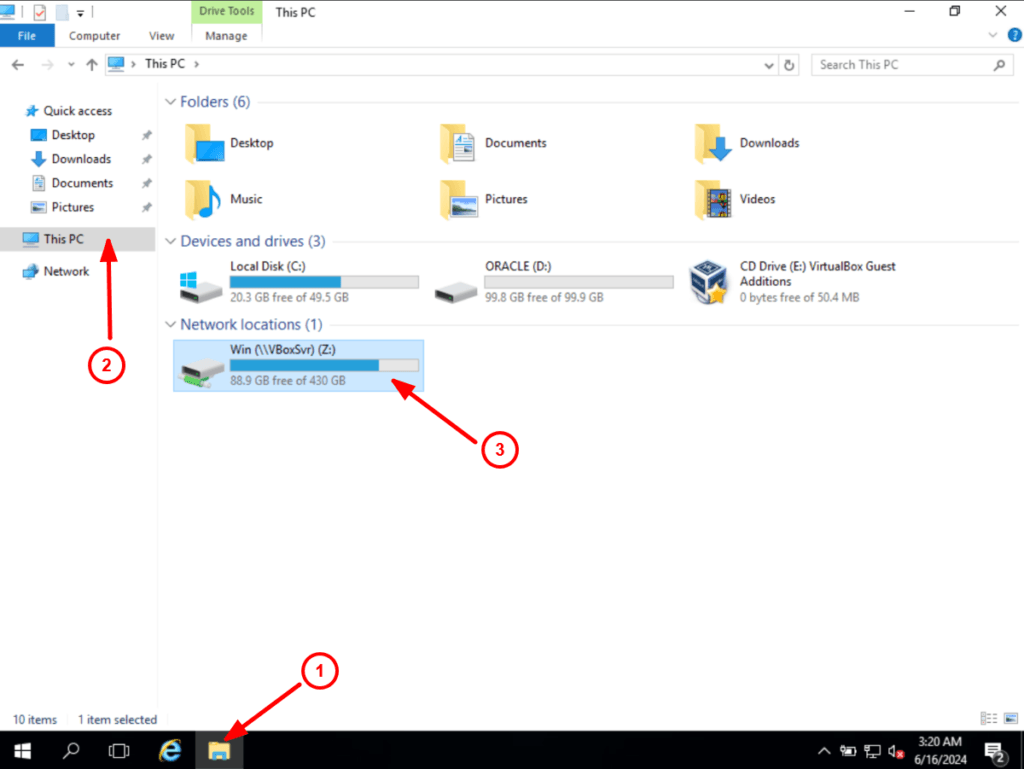
10. Open the File Explorer > check the drive mapped to the shared folder (usually it is z drive):
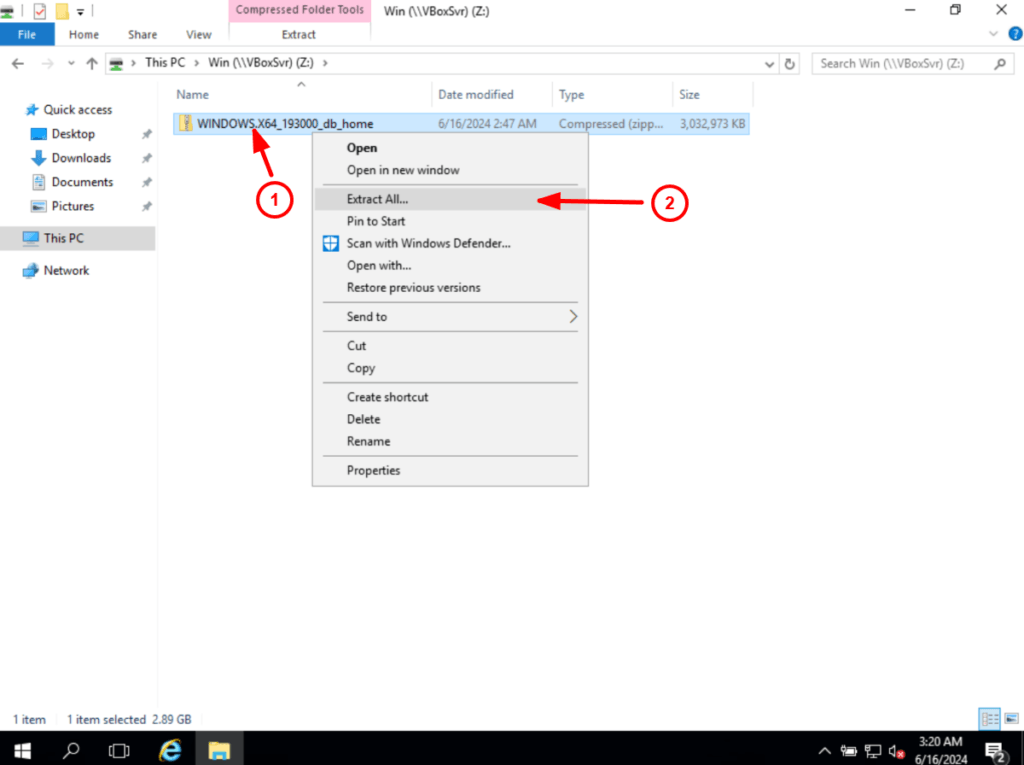
Right-click on WINDOWS.X64_193000_db_home.zip file and select Extract All:
Enter the location D:\oracle\product\19.0.0\db_1 and click on the Extract button:
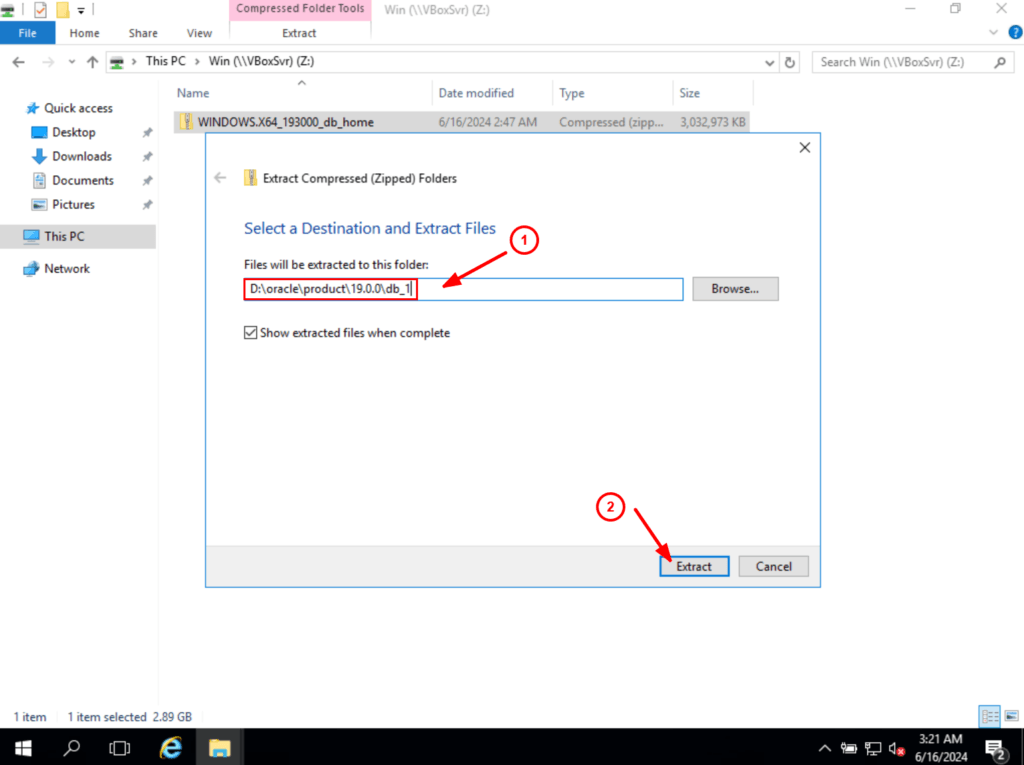
It will take some time. Please wait!
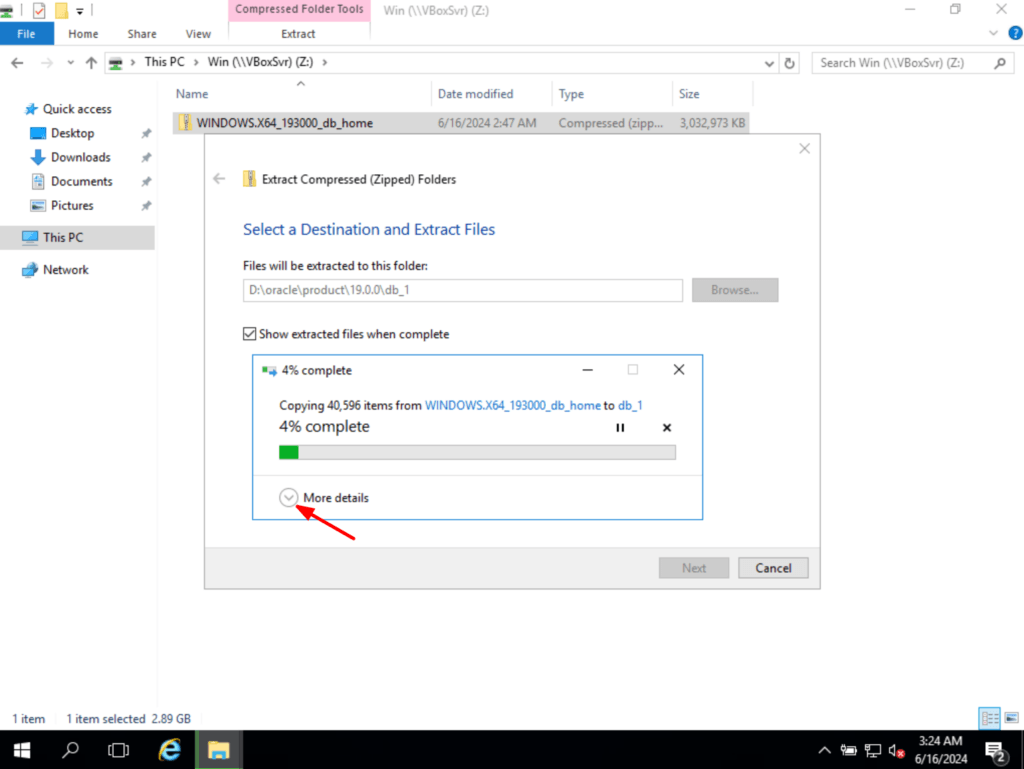
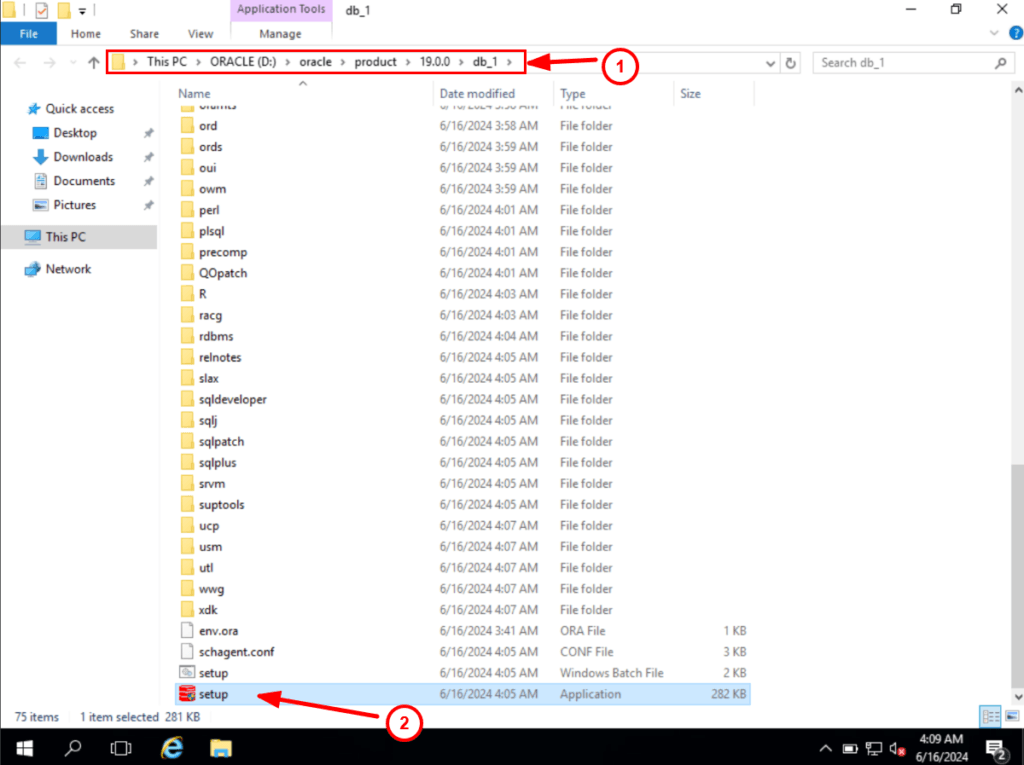
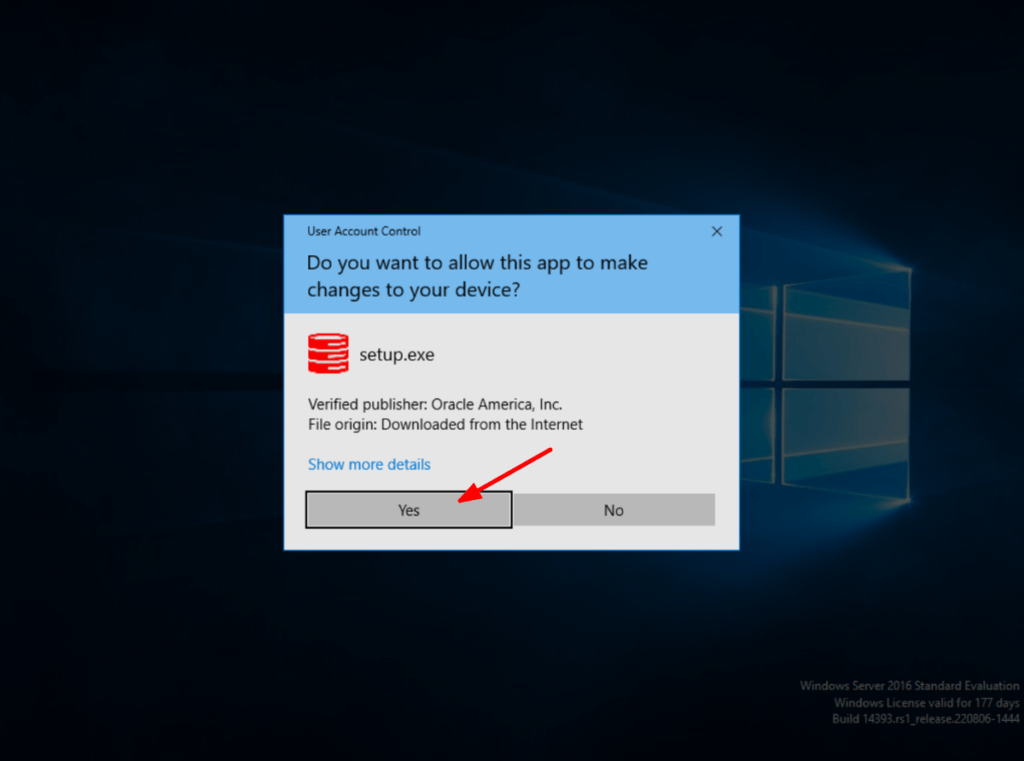
11. Go to the location D:\oracle\product\19.0.0\db_1 and double-click on the setup.exe file:
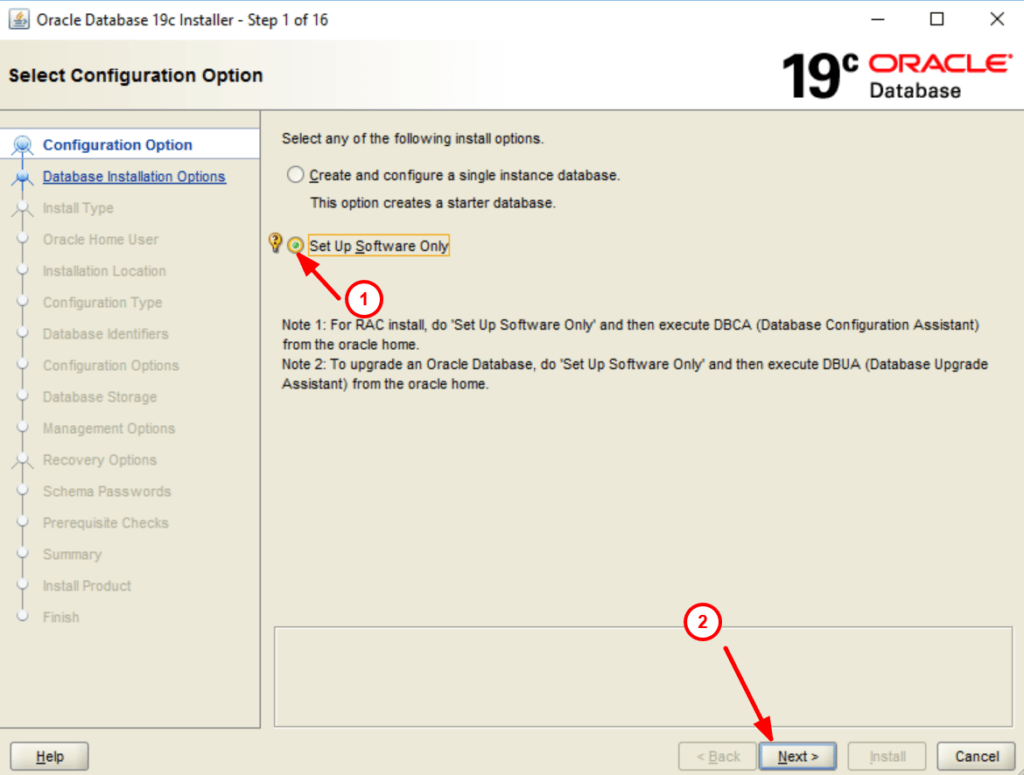
12. Select set up software only:
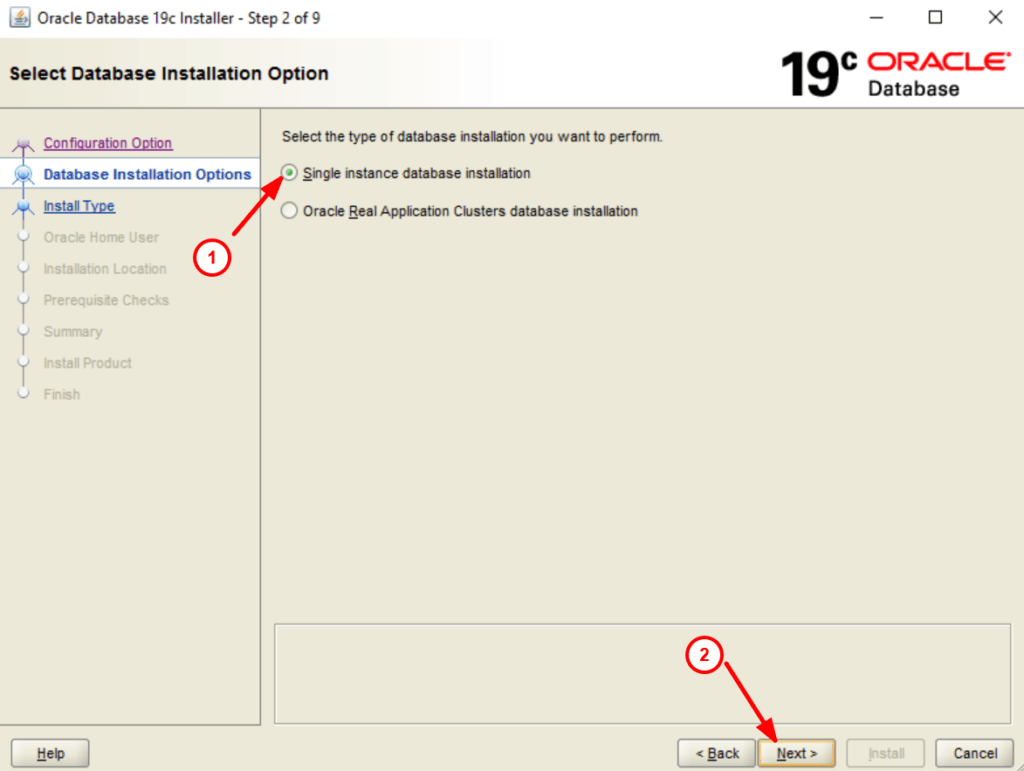
13. Select single instance database installation and proceed:
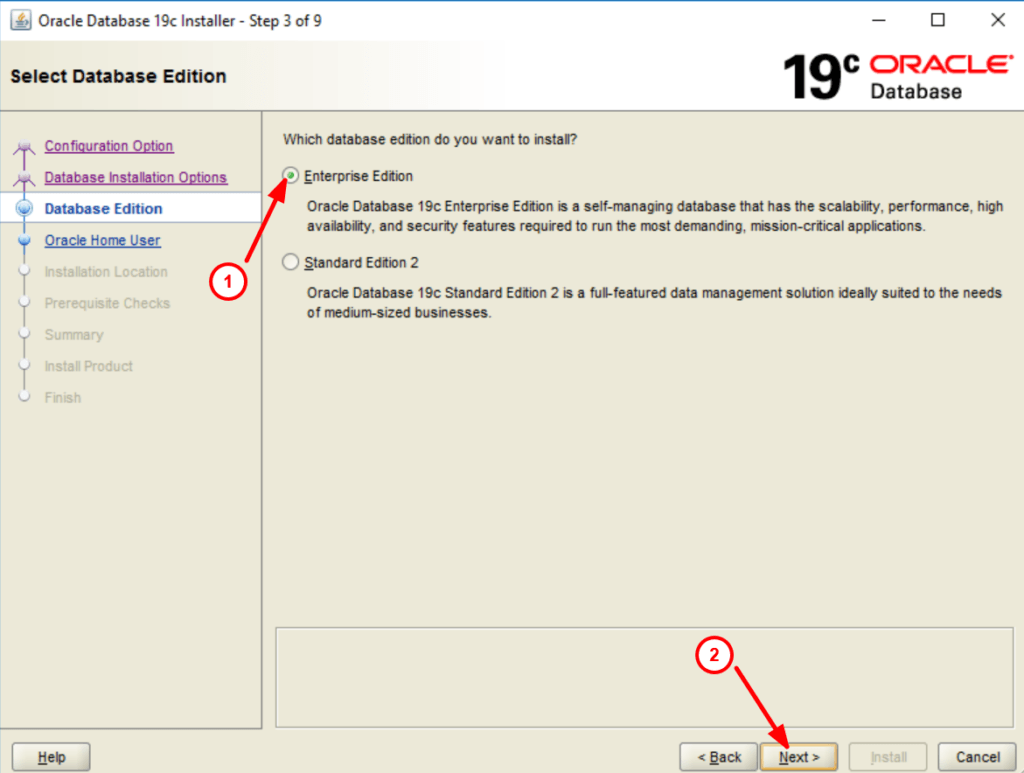
14. Select Enterprise Edition and click on Next:
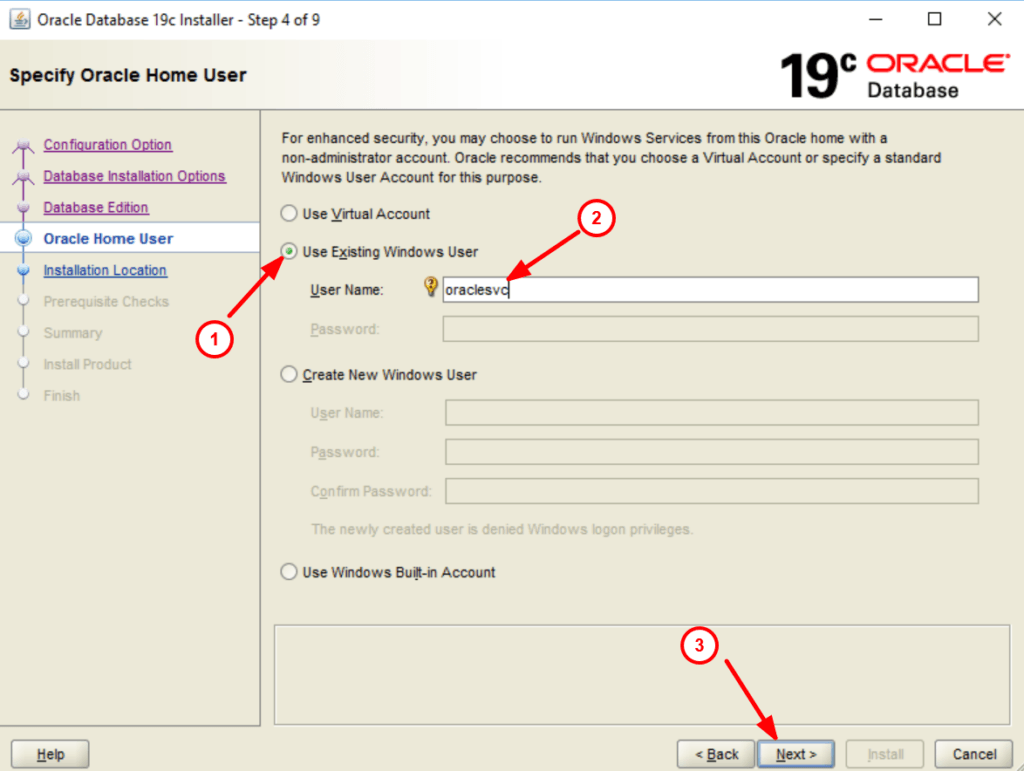
15. Use existing Windows user oraclesvc and click on next:
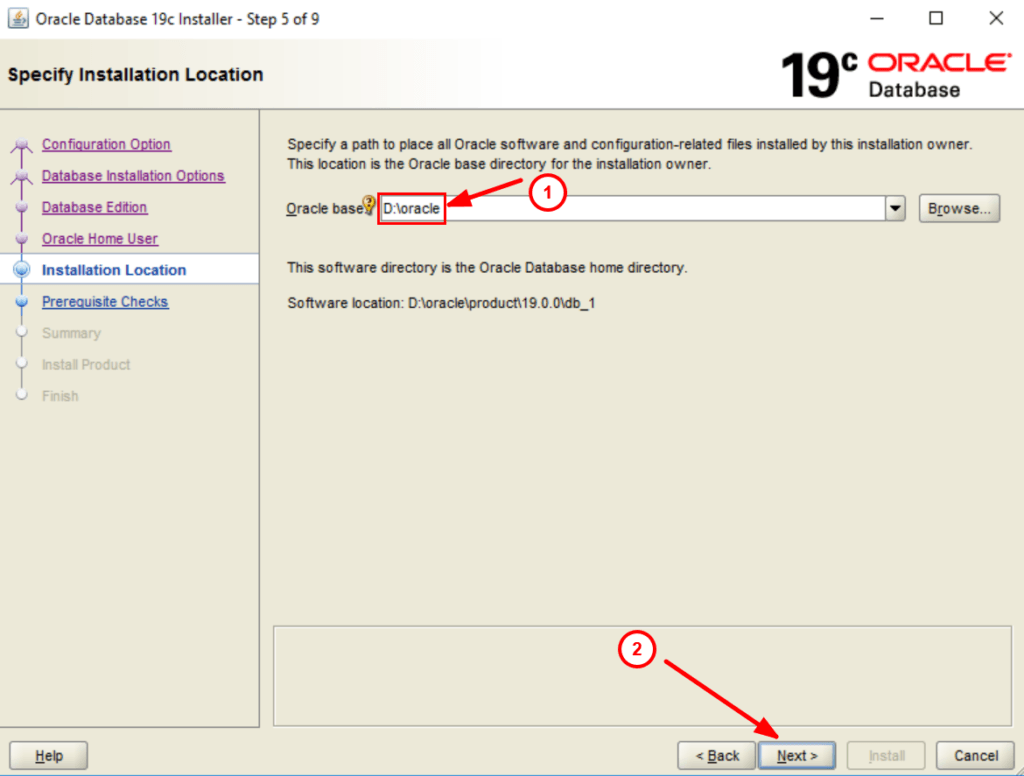
16. Provide the Oracle base location and click on next:
17. Now you can save the response file and proceed with install:
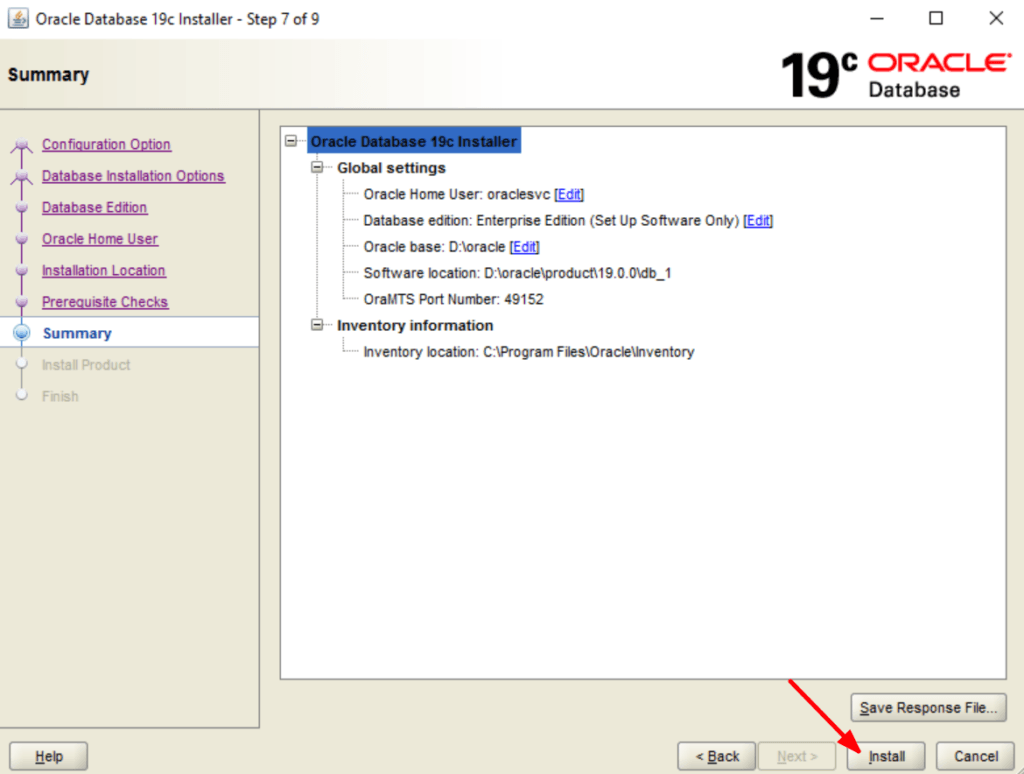
18. Please check the details and wait for the installation:
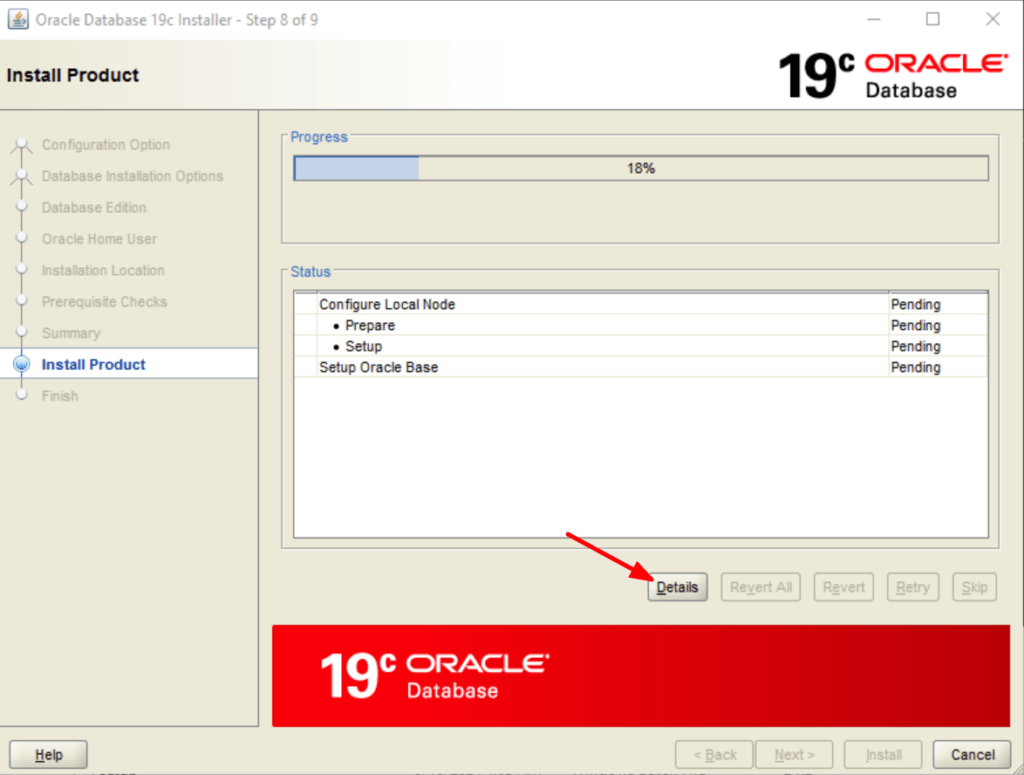
19. Congratulations! Oracle client installation is completed successfully.
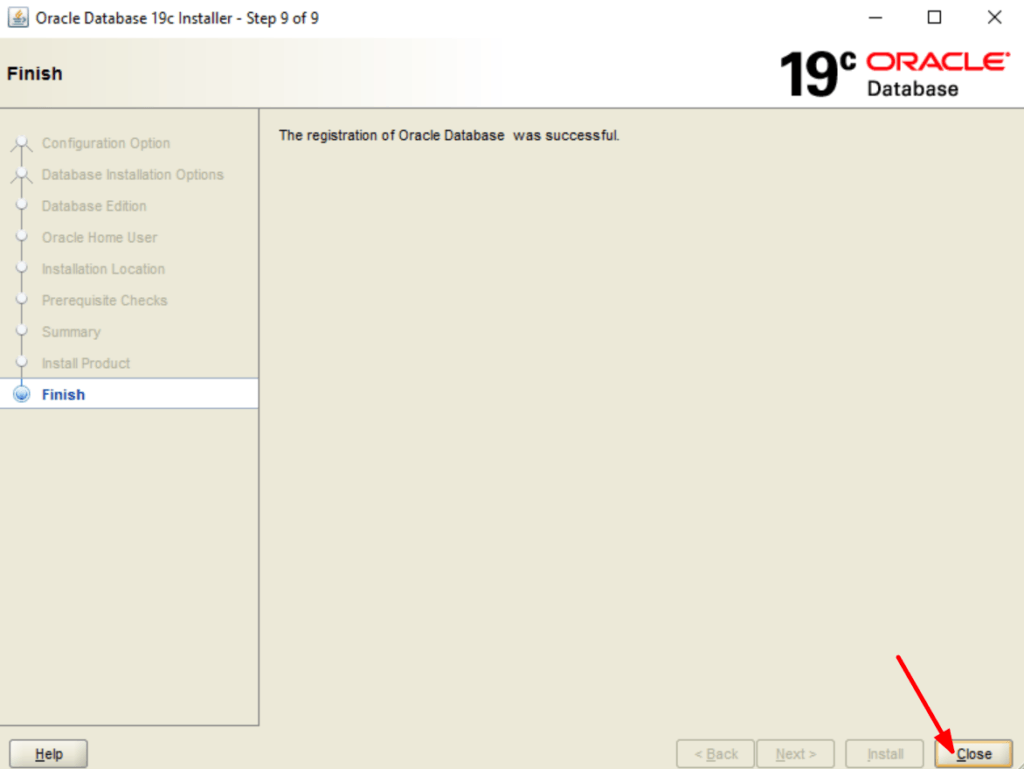
20. Now verify the Oracle 19c client installation:
a, Open the File Explorer and check for the Inventory directory:
C:\Program Files\Oracle\Inventory\ContentsXML
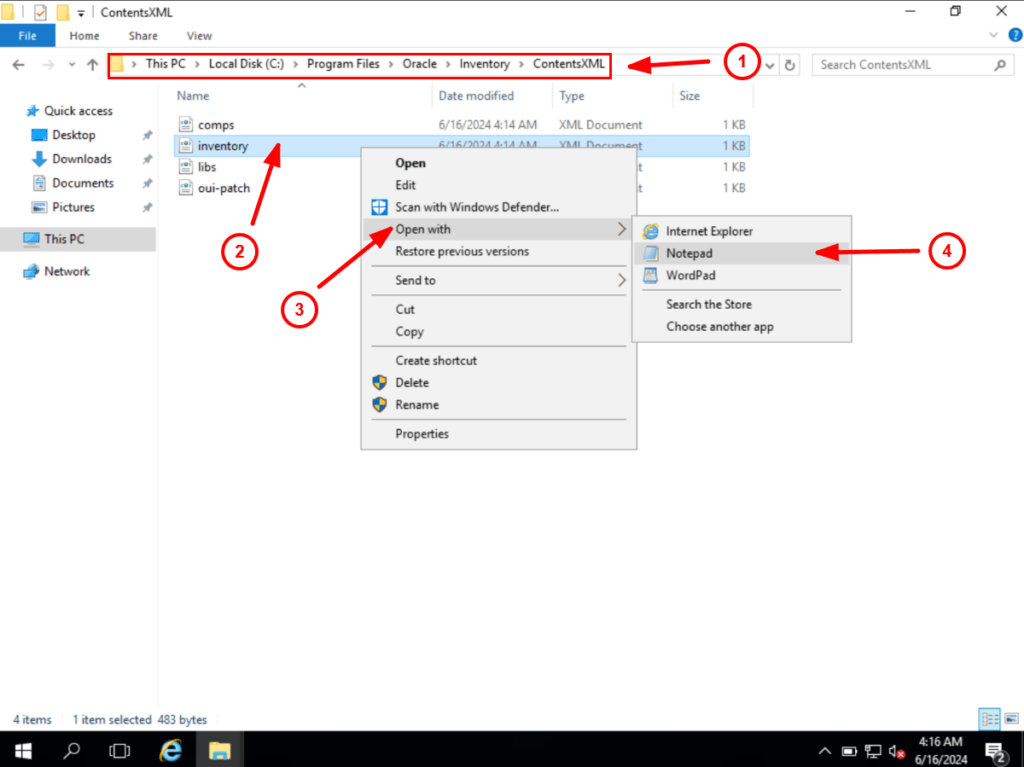
You will see the installed Oracle home:
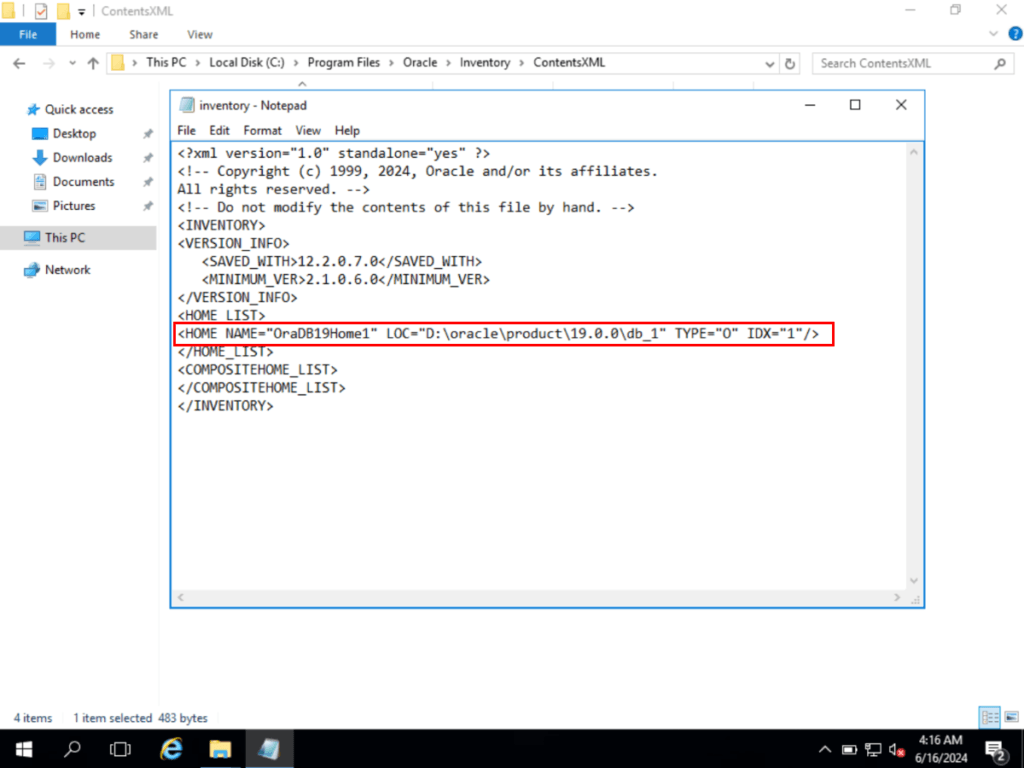
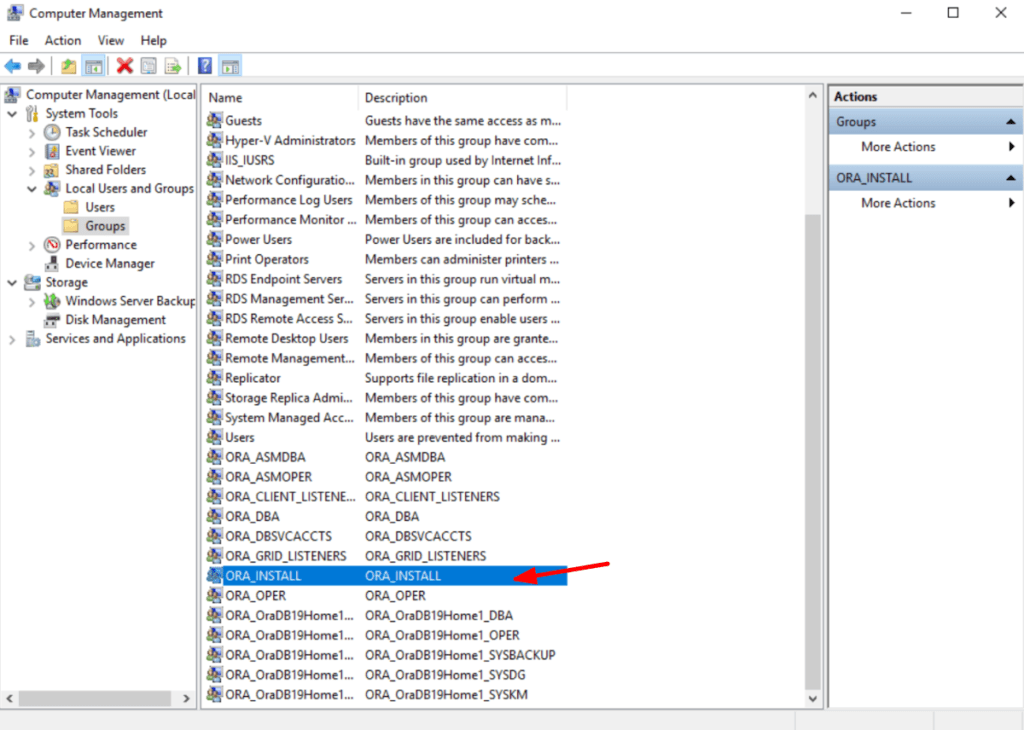
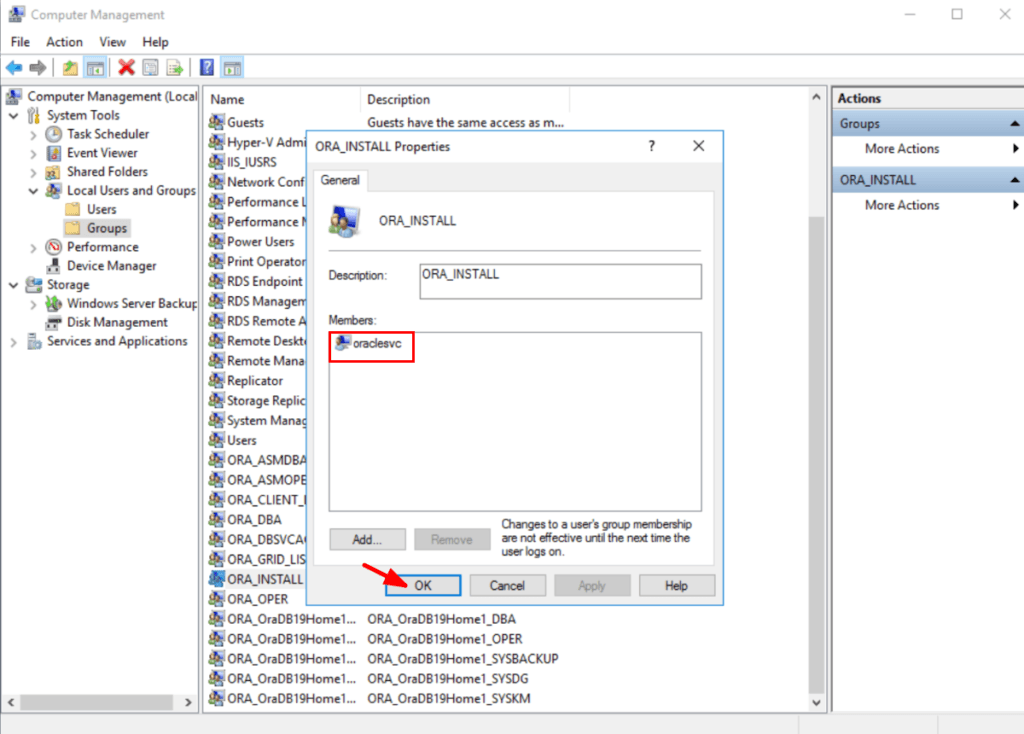
b.Check the members of the groups ORA_DBA and ORA_INSTALL
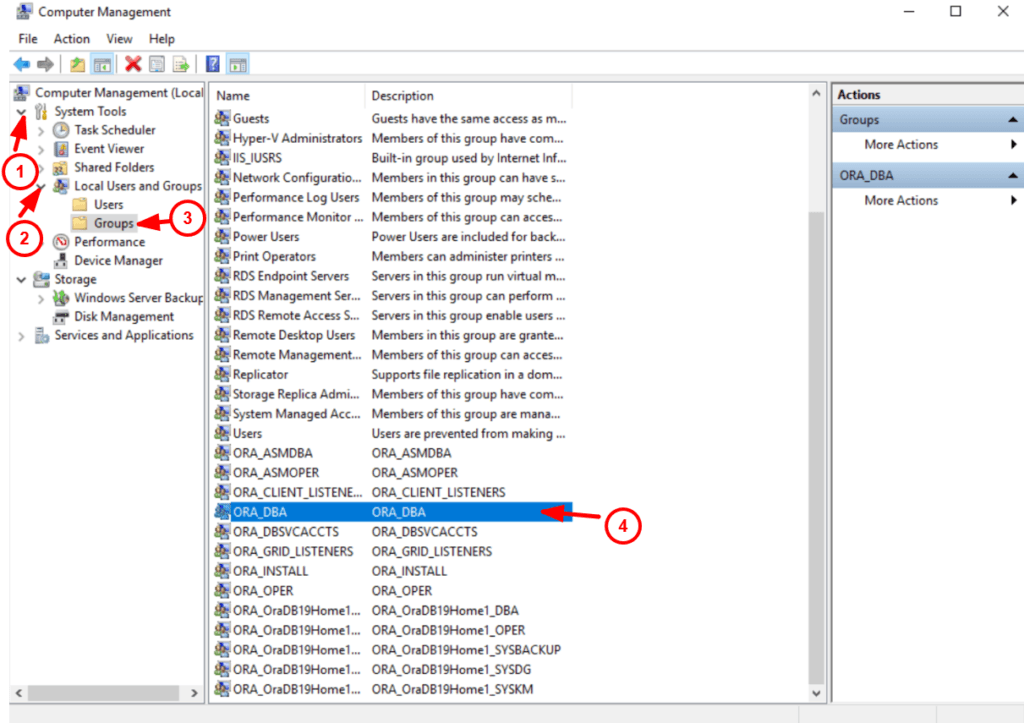
Search for Computer Management and click on Local Users and Groups > Groups
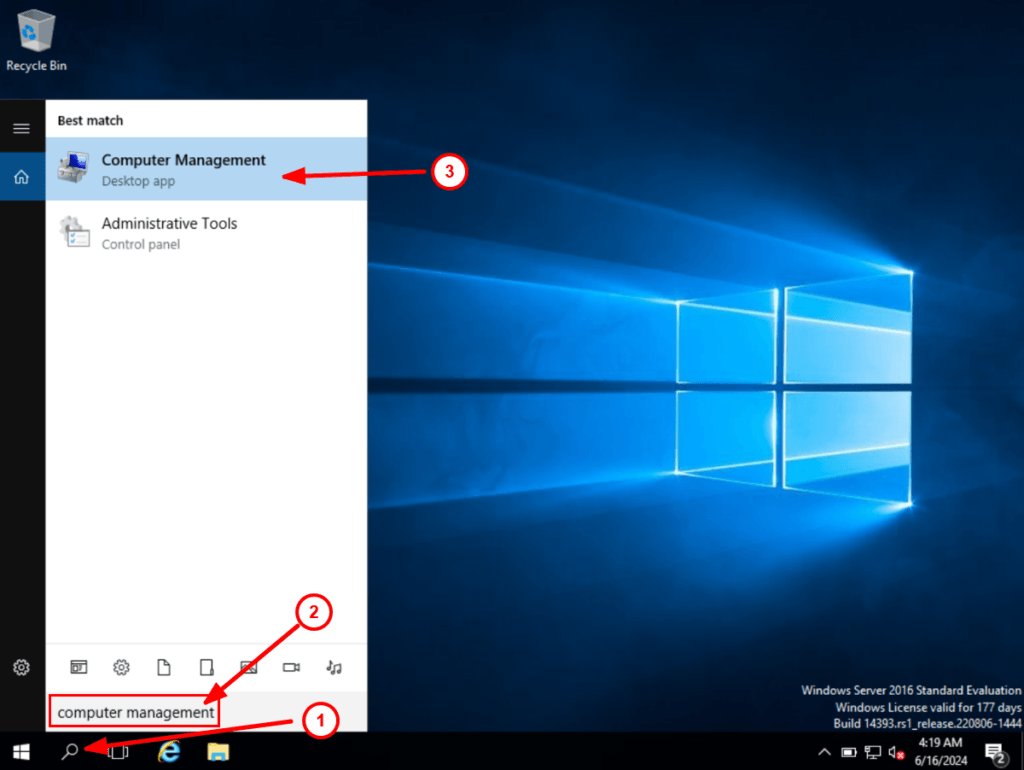
We can see Oracle user is a member of ORA_DBA. This means Oracle users can log in to Oracle databases running on this machine as sysdba.
Also, oraclesvc user is a member of ORA_INSTALL because this user is an Oracle home user.
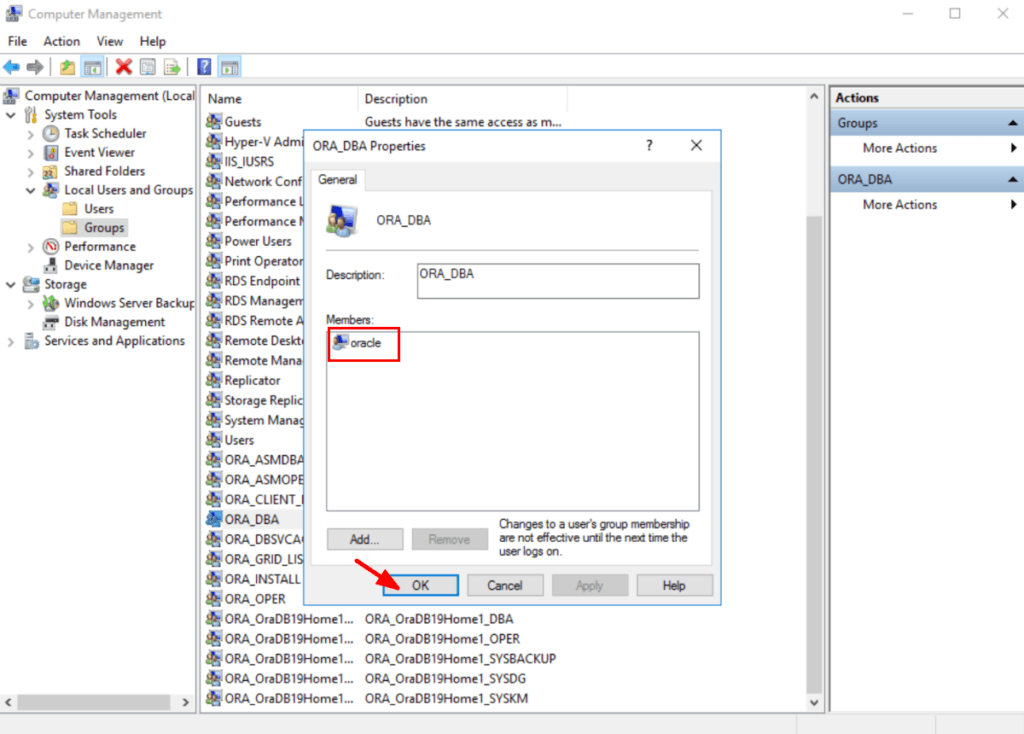
So installing Oracle database software in Windows is completed successfully. If you want to install the Oracle 19c client in Linux then you can follow my article Oracle 19c Client installation.
Предыдущие посты: Часть 1 и Часть 2.
В этой заметке я расскажу как установить и настроить oracle-клиент в ОС Windows. Плюс немного расскажу об инструменте, который можно использовать для работы с СУБД.
Прошу обратить внимание – Windows
Т.к. в конечном итоге у нас задача написать Windows приложение в Delphi, то далее описываемые мной действия относятся в основном к Windows 7. Если у Вас Windows XP, то отличия будут минимальны.
Описываемые далее действия Вы можете выполнить либо для хост-системы, либо для другой виртуальной машины с установленной ОС Windows. Версия и разрядность ОС принципиального значения не имеют.
Настройка файла hosts (не обязательно)
Для удобства можно дописать в файл hosts такую строку:
192.168.56.101 oracle
Это позволит использовать указанное имя oracle вместо указанного IP адреса при подключении к серверу. Например, вместо ping 192.168.56.101 можно будет писать ping oracle, результат будет одинаковым.
HINT: Для редактирования файла hosts понадобятся права администратора. Можно сделать так: Пуск \ Все программы \ Стандартные, правой кнопкой мыши на Блокнот, выбрать пункт Запуск от имени администратора:
И в блокноте уже меню Файл \ Открыть… –> C:\Windows\System32\drivers\etc\hosts
Уcтановка Oracle Instant Client
Для работы с СУБД Oracle на локальном компьютере должен быть установлен так называемый oracle-клиент. Oracle-клиент – это библиотека OCI.DLL плюс ещё несколько библиотек, необходимых для работы программ с СУБД. (Отмечу правда, что возможны случаи обхода этого правила, однако я настоятельно не рекомендую их использовать.)
HINT: Oracle-клиент – это отдельный продукт, развиваемый разработчиками Oracle параллельно развитию СУБД. Oracle-клиент, как и СУБД, имеет свою версию. Как правило с выходом новой версии СУБД Oracle, в свет появляется соответствующая версия oracle-клиента. Так например, на нашей Oracle Developer Days установлена СУБД Oracle 11g, так же доступна версия 11 для oracle-клиента. Oracle рекомендует поддерживать эту параллель и своим клиентам, однако Вы можете использовать и предыдущую версию oracle-клиента для подключения к текущей версии СУБД (и наоборот).
HINT: Кроме разных версий, oracle-клиент может входить в разные дистрибутивы. Если Вы установите на своём компьютере (на хосте) СУБД Oracle, то установщик автоматически установит и Oracle-клиент. Мы же СУБД запускаем в виртуальной машине, для хоста (либо другой виртуальной машины) нам понадобиться Oracle Instant Client.
Итак, скачиваем Instant Client – выбираем версию: так как мы будем запускать Win32 приложения, то и клиент должен быть Win32: Instant Client for Microsoft Windows (32-bit).
HINT: Даже если у вас ОС 64-битная, всё равно качаем 32-битную версию клиента; в будущем, если Вы будете делать сборки приложений под Win64, то можно также скачать и Win64 версию клиента.
Далее соглашаемся с лицензионным соглашением и выбираем версию *Instant Client Package — Basic Lite (18,4 Мб) – лайт версии нам вполне хватит. При желании можете скачать ещё *Instant Client Package — SQL*Plus – SQL Plus это консольная утилита для исполнения SQL-запросов, именно она чаще всего используется для иллюстрации примеров в книгах, документации и на форумах. Однако я буду использовать другую бесплатную утилиту, об этом чуть ниже.
Скачиваем zip-архив, однако из всего архива нам достаточно будет извлечь всего три файла (это легко выявляется экспериментальным путём):
- oci.dll
- orannzsbb11.dll
- oraociicus11.dll
Сохраняем их в отдельный каталог, например в C:\Oracle\InstantClient.
Настройка Oracle Instant Client
Для того, чтобы приложения смогли найти oci.dll, необходимо произвести одну настройку. На самом деле, можно поступить разными способами: есть приложения, у которых в настройках можно явно задать путь к oci.dll, но в основном приложения ищут библиотеку по некоторым правилам – сначала в реестре, затем в путях, указанных в переменной среды окружения Path. Сделаем именно это: жамкаем Win+Pause и далее находим слева пункт “Дополнительные параметры системы” (это для Windows 7, для Windows XP просто выбираем вкладку “Дополнительно”):
Жамкаем кнопку “Переменные среды…” и добавляем в переменную Path (через точку с запятой) путь к каталогу, куда мы распаковали архив (C:\Oracle\InstantClient). Сюда же добавляем переменную: TNS_ADMIN = C:\Oracle\InstantClient – это ссылка на каталог, где у нас будет лежать файл tnsnames.ora. Пусть это будет тот же каталог, где лежит oci.dll. У меня это всё выглядит так:
Здесь ещё можно указать NLS-параметры, подробнее о них можно почитать … мм, хотел вставить ссылку из своих закладок на хорошее описание, однако ресурс уже недоступен. На скорую руку нашёл такую интересную статью (ссылка). И ещё (ссылка).
Сохраняем изменения (ОК), для Windows XP Sp2 и ниже необходимо сделать выход из системы, чтобы эти переменные применились (ну или перезагрузить компьютер), для Windows XP Sp3 и Windows7 эти настройки применяются к текущему окружению сразу же (нужно лишь перезапустить файловый менеджер или проводник).
В принципе, на этом настройка Oracle Instant Client завершена, однако для удобства сделаем ещё одну вещь.
Настройка файла tnsnames.ora (не обязательно)
Создаём обычный текстовый файл под названием tnsnames.ora и сохраняем в каталог, на который ссылается переменная TNS_ADMIN. У нас этот файл будет содержать всего одну строку:
orcl = //oracle/orcl
У меня приведён вариант с использованием упрощённого синтаксиса:
<alias> = //<host>[:port]/<sid>
где alias – это имя, которое могут использовать приложения для подключения к БД (помните мы выбирали параметр Network Alias в предыдущей заметке, когда настраивали подключение к БД в Oracle SQL Developer?), host – IP-адрес сервера, я указал слово oracle, т.к. именно его мы прописали в файле hosts (а если не прописали, то здесь можно указать IP-адрес 192.168.56.101 явно), port – необязательный параметр, если не указать, то будет использован порт по-умолчанию 1521, sid – имя экземпляра БД, в нашем случае это orcl.
Более подробно об этом файле и как его конфигурировать – здесь.
Подключаемся к БД и выполняем запросы
Итак, Instant Client установлен и сконфигурирован. Скачиваем бесплатную утилиту SQLTools (сайт программы — http://www.sqltools.net/). Устанавливаем. Запускаем. При первом запуске программа предложит ввести пароль – это можно сделать, если Вы хотите, чтобы другие пользователи Вашего компьютера не смогли воспользоваться подключениями, которые будут сконфигурированы в SQL Tools, я же отказался от такой возможности. А далее мы увидим окно, в котором можно создавать подключения к базам данных. Здесь параметры аналогичны параметрам подключения программы Oracle SQL Developer (пароль – oracle):
Если же Вы не редактировали файл hosts и не создавали файл tnsnames.ora, то можно указать такие параметры:
Кнопка Test проверяет, можно ли подключиться к БД. Кнопка Save сохраняет введённые параметры в список слева. Кнопка Connect выполняет подключение к БД и закрывает диалог.
Выполняем простейший запрос:
select * from emp
И нажимаем F5, должно получиться примерно следующее:
Постскриптум
Вы наверное заметили, что “быстрый старт” – это мягко сказано: нам пришлось сделать как минимум три вещи. Если Вы не хотите заниматься всеми этими настройками, то можно поступить очень просто: скачать и установить дистрибутив СУБД Oralce для Windows, например бесплатную версию Oracle Database Express Edition 11g Release 2. При этом установщик автоматически за Вас сделает необходимую настройку Oracle-клиента. И Вам останется только запустить службу СУБД.
Однако я сознательно решил воспользоваться именно виртуальной машиной, чтобы показать на примере, с какими трудностями может столкнуться разработчик приложений под эту СУБД. Плюс, возможность использования виртуальных машин позволяет ставить СУБД (и другие виртуальные машины) на паузу, что происходит быстрее, чем остановка и запуск службы СУБД. Плюс это нам даёт такой “бонус” как перенос виртуальных машин с одной физической машины на другую. И ещё плюс – мы не “засоряем” хост-систему – “поигравшись” в разработчиков, достаточно удалить виртуальную машину и всё. Минус всей этой темы только один: СУБД в виртуальной машине работает чуть медленнее, чем на реальной физической машине, однако на сегодня, когда процессоры поддерживают виртуализацию на аппаратном уровне, это не существенно.
Hi dear friends, we’ve wrote about installing Linux on a virtual server and installing an Oracle database in our previous posts. In this writing, we’re going to explain how to install Oracle Instant Client and Toad editor in order to connect to an Oracle database and then ways of connecting to database with Toad.
1- Installing Oracle Instant Client
An Oracle Client Software is absolutely needed to be installed in the server which will connect so that application or developers can connect to Oracle database. Oracle suggests using client versions which aren’t older than the database version to be connected. The probability of encountering faults in connections increases when old client versions are still used in newer database versions.
Click on the Windows version which is compatible with your server here. I choose “Instant Client For Microsoft Windows (x64)”.
There are many client versions that are compatible with Oracle database version. Choose “Basic Light Package” of the version which is compatible with yours. I continue to installing by choosing client version 19.13.
Upon clicking the link, unzip the downloaded ZIP file on the chosen location.
Now, you need to arrange environment variables. Write “environment variables” in the search bar.
Click “Advanced > Environment Variables…” on the opening tab.
Up half of the below tab is valid for only this user but down half is for all users. Choose Path for this user and click “Edit”.
Click “New” and enter path of the client file you’ve extracted. Then, click “Move Up” and you should get the image below. This is the end of the phases needed for installing Oracle Client.
2- Installing Toad Editor
“Toad for Oracle” is a highly preferred licensed software by Oracle developers and DBAs due to its practical use. We’re going to write about Toad use for DBAs in detail. You can download a current version of Toad here.
Run the setup file as Administrator and continue installing as below.
Accept the Agreement.
Add your license.
Select the other products you want to install.
Select the installation path.
Upon approving that you pass all prerequisites, click “Install” and start installing. At this phase, you may also see whether the client you installed is successful or not.
Installation continues…
Click “Finish” and successfully complete installing Toad.
3- Ways of Connecting to Oracle Database with Toad
Initialize Toad.
We’re going to show you the direct connection way with IP/Port as the first way. Enter IP and Port information of the database server. If you didn’t determine a specific value for Port information in the database installation phase, default Port of Oracle is 1521. Upon entering Service Name or SID information, you can sign in by clicking “Connect”. You may choose the client to be used for connection from “Installed Clients”.
Another form of the first way is connecting with the hostname information. You may connect with the hostname information you’ve entered in the “/etc/hosts” file in the database server.
As the second way, to connect with TNS, you should define a “tnsnames.ora” file.
Create a tnsnames file like the “$ORACLE_HOME/network/admin/tnsnames.ora” file present in your database server in the index you’ve installed the client. In this file, you may enter the analysable hostname or IP information where says “HOST”.
Click Environment Variables and then click “New”.
Define a variable called TNS_ADMIN and enter the path in which you put the tnsnames file as the variable value.
Go back to Toad and select TNS tab. You will see the name of the service you’ve added below “Database”, choose your service, click “Connect and then you can connect successfully. Click “TNSNames Editor” and then you can make changes such as add or drop in the tnsnames.ora file you’ve defined.
There is the third way, LDAP, but we won’t explain it in this writing.
Database connection is installed with Toad as in the picture below. Now, you can do what you want on the database in accordance with the authorizations of that user you’ve logged in with.
This is how our post, which explains the steps from installing Oracle Client to connecting with Toad, ends.
Hope to see you in new posts,
Take care.
To administer your Oracle Database remotely, you will need to connect to the database instance, especially from an SQL*Plus terminal. To be able to do that, you may install the Oracle Database Client and configure it correctly.
The Oracle Client is a software suite allowing you to administer your database remotely, perform basic network configurations, write PL/SQL applications, connect your database to Java, Python type applications, etc.
This guide provides instructions about installing and configuring Oracle Database Client on Windows. The installation process is identical on Linux.
You can also download my ebook which details the whole installation process.
Oracle Database Client requirements
You can easily install the Oracle Client on a 64-bit Windows PC with a modern processor (AMD or Intel), 2GB of RAM and 2GB of free disk space. Oracle Database Client for Windows x64 is supported on the major x64 distributions (Windows 7, Windows 8, Windows 10, Windows Server 2012 and Windows Server 2016). We recommend you update Windows before starting the client installation.
You also need to connect the client machine to a network and ensure it is able to communicate with the database server. In some cases, you may add exceptions to your firewall on the server side to allow network traffic between the server and the client.
Moreover, we will make sure that the database server is running correctly and is able to serve remote connections. Apart from network connectivity, a listener must be configured on the database server.
Oracle also recommends creating a standard non-administrative user account on the client machine to run the Windows services for the Oracle home. In this tutorial, we’ll call this user Client.
Oracle Database Client Download
You can download the Oracle Database Client for Windows for free from Oracle’s Technology Network website. We will focus here on version 19c. Oracle recommends using an Oracle Client version that matches the highest Oracle database version that you need to connect to. Using older clients to connect to newer database versions can cause issues.
The Oracle Client is available in 32-bit and 64-bit versions. The choice of which version to install depends on the architecture of your OS.
Downloading the Oracle Client requires an Oracle account. This account will allow you to download other Oracle products and access Oracle Cloud services.
Once you have created your account, select the right version for your needs and accept the Oracle License Agreement to start the download.
Related: Configure & Connect SQL Developer to Oracle Database (19c, 18c, 12c)
After checking the hardware and software prerequisites and downloading the Oracle Database Client software, you can install it by following the simple steps below. Note that the installation process is almost similar for versions 12c and 18c of Oracle Database Client. So, let’s get started.
1. Navigate to the installation folder and launch the setup file
After downloading the Oracle Client, you can unzip it to a directory of your choice, then run the setup.exe file.
2. Provide Oracle Home user account details
In this step, enter the Oracle Home user credentials (username and password) you create earlier. You can also create a new account or use a built-in Windows account (for example, the one you use to launch setup.exe).
3. Select a location for Oracle base directory
In this step, you can provide the Oracle base directory which contains the Oracle Client software and related configuration files, then click “Next” to perform prerequisite checks.
After the prerequisite checks, you should have a summary of your installation configuration. If there is no error, then click on “Install” to install the product. Otherwise, go back to section 1 to audit your environment.
Then wait a few minutes for the installation wizard to copy the files, perform setup and basic configuration and finish the installation. You can close the window once the installation is complete.
In the next section, we will configure the Oracle Client to connect with the Oracle Database server.
Configuring and testing Oracle Database Client
After installing the Oracle Client, you can use it to access and administer your Oracle database remotely but you will need to configure it first. This configuration can be done with tools available immediately after the client installation. We’ll use Oracle Network Manager to create a database service linked to the remote Oracle Database instance.
1. Launch Oracle Net Manager from Windows Start menu
2. Add a new database service
Select “Service Naming” and click on the “+” button.
3. Give a name to the remote database service name
Select a name (identifier) for the database service name and click on “Next”.4. Configure the network access protocol
In this step, provide the Oracle Database hostname or IP address and a port number to access the database instance. The port number must be the same as the one configured in the listener at the server side.5. Specify database instance name
Enter the global database name of the remote database (eg. db.ept.sn) and optionally the connection mode. The database name might be ORCL if the database server is installed with default configurations.
6. Perform a connectivity test to the remote database
Before finishing the service name configuration, you can run a test to check if you can access the remote database with the parameters you provided. The wizard will try to connect to the server with a default user account, namely Scott.
Depending on the database creation options on the server side, Scott account might not exit or is locked.
You can change the user account you want to use for the test by clicking on “Change Login”. If the test runs successfully, then you can close the windows and finish the service name configuration.
7. Save the network configuration
Connecting to the remote database using SQL*Plus
You can now access your Oracle Database server from the Client using tools like SQL*Plus or Oracle SQL Developer. For example, you can open a command prompt and connect to the Oracle Database instance with the following command:
sqlplus username/password@service_nameFor example
sqlplus hr/hr@client_accessStill having questions on how to install the Oracle Client? Leave a comment below or let me do it for you.
You might also like: Oracle Database Network configuration
