
This page gives specific instructions on setting up Node-RED in a Microsoft Windows environment. The instructions are specific to Windows 10. They may also work for Windows 7 and Windows Server from 2008R2, but it is advisable not to use them due to lack of current support.
Note : Some of the following instructions mention the «command prompt». Where this is used, it refers to either the Windows cmd or PowerShell terminal shells. It is recommended to use PowerShell on all newer versions of Windows as this gives you access to commands and folder names that are closer to those of Linux/Mac.
Quick Start
1. Install Node.js
Download the latest LTS version of Node.js from the official Node.js home page. It will offer you the best version for your system.
Run the downloaded MSI file. Installing Node.js requires local administrator rights; if you are not a local
administrator, you will be prompted for an administrator password on install. Accept the defaults when installing. After installation completes, close any open command prompts and re-open to ensure new environment variables
are picked up.
Once installed, open a command prompt and run the following command to ensure Node.js and npm are installed correctly.
Using Powershell: node --version; npm --version
Using cmd: node --version && npm --version
You should receive back output that looks similar to:
2. Install Node-RED
Installing Node-RED as a global module adds the command node-red to your system path. Execute the following at the command prompt:
npm install -g --unsafe-perm node-red
3. Run Node-RED
Once installed, you are ready to run Node-RED.
Alternative Installations on Windows
In this section, we provide you with information on alternative ways to install Node.js, npm and the Windows Build Tools needed to install some Nodes for Node-RED on Windows.
Note : You should not use an administrative (a.k.a. «elevated») command prompt unless specifically instructed to. You will very likely need to be quite familiar with command prompts as you learn about Node-RED and Node.js and it will be worth while reading some of the Microsoft articles on PowerShell. the PowerShell Tutorial and PowerShell One-Liners sites may also be helpful.
Standard installations of Node.js on Windows require local administrator rights. Download the appropriate version from the official Node.js home page. It will offer you the best version. While you can use either 32 bit or 64 bit versions on 64 bit Windows, it is recommended to use the 64bit version of Node. If for some reason, you need a different installation, you can use the Downloads Page.
There are two potentially useful alternatives to installing Node.js with the MSI installer.
-
Using the Chocolatey package manager
Chocolatey is a package manager for Windows similar to APT or yum on Linux and brew on the Macintosh platforms. If you are already using Chocolatey, you may want to use this tool to install Node.js (e.g. using the
nodejs-ltspackage). Note however, that many packages have uncertain management and that these packages may use different folder locations than those mentioned above. -
Using a Node version manager
Using a Node.js version manager such as nvm-windows can be very helpful if you are doing Node.js development and need to test against different versions. Keep in mind that you will need to reinstall global packages and may need to re-install local packages when when you switch the version of Node you are using.
Note : Microsoft maintain a parallel version of Node that uses the Microsoft Chakra Core JavaScript engine instead of V8. This is not recommended for Node-RED as it has not been tested.
npm on Windows
When you install Node.js, you are also installing the npm package manager. You may see some instructions on the web that recommend installing later releases of npm than the one that comes with the Node.js release. This is not recommended as it is too easy to later end up with an incompatible version. Node.js releases are very regular and that is sufficient to keep npm updated.
Sharing Node-RED between Users
Node.js is installed into the Program Files folder as you would expect. However, if you install a global package like Node-RED using npm -g, it is installed into the $env:APPDATA\npm folder (%APPDATA%\npm using cmd) for the current user. This is less than helpful if you are installing on a PC with multiple user logins or on a server and installing using an admin login rather than the login of the user that will run Node applications like Node-RED.
Note : To see what a folder name like %APPDATA% translates to, you can simply type it into the address bar of the Windows File Explorer. Alternatively, in PowerShell, type the command cd $Env:APPDATA(cd %APPDATA% using cmd).
To fix this, either give permissions to the folder to other users and make sure that the folder is included in their path user environment variable.
Alternatively, change the global file location to somewhere accessible by other users. Make sure that you use the user that will be running Node-RED to make these changes. For example, to change the location to $env:ALLUSERSPROFILE\npmglobal using PowerShell:
mkdir $env:ALLUSERSPROFILE\npmglobal
npm config set prefix $env:ALLUSERSPROFILE\npmglobal
You will then want to change the npm cache folder as well:
mkdir $env:ALLUSERSPROFILE\npmglobal-cache
npm config set cache $env:ALLUSERSPROFILE\npmglobal-cache --global
If using the above changes, you can add the new prefix folder to the PATH System variable and remove the old folder from the user’s Path variable. To change the PATH Environment variable, type environment into the start menu or Cortana and choose Edit Environment Variables.
For each of the users running Node-RED, check that the above settings for the other users are correct.
Installing Node.js Windows Build Tools
Many Node.js modules used by Node-RED or installed nodes have binary components that will need compiling before they will work on Windows. To enable npm to compile binaries on the Windows platform, install the windows-build-tools module using the command prompt as an Administrator:
npm install --global --production windows-build-tools
If you wish to have the built-in Python v2.7 install exposed for use, use the command:
npm install --global --production --add-python-to-path windows-build-tools
Notes:
- Not all Node.js modules will work under Windows, check the install output carefully for any errors.
- During the install some errors may be reported by the
node-gyp
command. These are typically non-fatal errors and are related to optional dependencies
that require a compiler in order to build them. Node-RED will work without these
optional dependencies. If you get fatal errors, first check that you installed thewindows-build-toolsmodule and that you have closed and opened your command prompt window.
Running on Windows
Once installed, the simple way to run Node-RED is to use the node-red command in a command prompt:
If you have installed Node-RED as a global npm package, you can use the node-red command:
This will output the Node-RED log to the terminal. You must keep the terminal open in order to keep Node-RED running.
Note that running Node-RED will create a new folder in your %HOMEPATH% folder called .node-red. This is your userDir folder, think of it as the home folder for Node-RED configuration for the current user. You will often see this referred to as ~/.node-red in documentation. ~ is shorthand for the user home folder on Unix-like systems. You can use the same reference if using PowerShell as your command line as recommended. If you are using the older cmd shell, that won’t work.
You can now create your first flow.
Using PM2
If you are using Windows to develop Node-RED flows or nodes, you may find it helpful to use PM2 to run Node-RED. This can be configured to automatically restart when files change, always keep Node-RED running and manage log output.
Run Node-RED on Startup
If you want to use Windows as a production platform for Node-RED, you will want to have a Windows Task Scheduler job set up. To do so:
- Go to the start menu and type “task scheduler” and click on the result.
- Click on “Create Task…” in the right-hand menu. Follow the steps to create a new task.
Make sure that you use the user login that you’ve used to set up and do the initial run of Node-RED. You can use an “At startup” trigger to always run Node-RED at system startup. Use the Action “Start a program” with details set to C:\Users\<user>\AppData\Roaming\npm\node-red.cmd (replacing <user> with your actual user name).
You may wish to make sure that it only starts if the network is available. You may also wish to restart if the job fails. Perhaps restarting every minute but only 3 times — if it won’t start by then, the error is fatal and will need some other intervention. You can check for failures by looking in the event log. If you want to access to the logs when running this way, you should amend the node-red.cmd file to redirect std and error outputs to a file (creating an alternative startup file would be better so that it isn’t overwritten on updates).
Node-RED is a powerful flow based programming tool that allows you to connect hardware devices, APIs, and online services. It is a great choice for building IoT applications automating tasks and creating web based dashboards.
In this post, we will discuss the step by step of installing Node-RED on the Windows operating system. Furthermore, we will cover the troubleshooting step during the installation of Node-RED.
Getting Started
Node-RED developed by IBM is a powerful tool that enables users to create visually driven applications. Through its node based architecture it simplifies connecting various systems. Whether you are new to coding Node-RED’s visual approach makes it easily accessible.
Installing Node-RED on Windows
Following are steps described below to install Node-RED Windows operating system:
Step 1: Install Node JS
Node-RED runs on Node.js so you will need to have it installed first. Visit the official Node.js website. You will find two versions:
- LTS (Long Term Support)
- Current.
For most users, the LTS version is recommended for stability. Once downloaded, follow our guide on how to install Node.js and NPM on Windows operating system. After that check Node.js and NPM stands for Node Package Manager are installed correctly, open Command Prompt, and type the following:
node -v
npm -v

This should display the installed versions of Node.js and npm.
Step 2: Install Node-RED
To download Node-RED Windows with Node.js installed you can now proceed. This is done via the npm, make sure you have administrative privileges. In the Command Prompt, type:
npm install -g --unsafe-perm node-red

The -g flag installs Node-RED globally, making it available from any directory. The --unsafe-perm flag allows the installation to be complete without certain permission issues that might occur on Windows.
Install Node-RED On Our NodeJS Hosting!
Unlock the full potential of your Node.js applications with Ultahost’s reliable hosting solutions. From seamless deployment to robust performance, we’ve got you covered.
Step 3: Running Node-RED
Once Windows install Node-RED, running Node-RED is simple. In the Command Prompt, simply type:
node-red
This will start the Node-RED server. The command prompt will show the server logs, and you’ll see something like this:

Open your web browser and navigate to http://127.0.0.1:1880/. This will bring you to the Node-RED flow editor.

Now that Node-RED is up and running let’s understand how to use Node-RED on the Windows operating system:
Creating First Flow
In the editor, you will see a palette on the left containing various nodes.
Drag and drop an inject node and debug node that helps generate messages and logs output onto the canvas.
Connect the inject node to the debug node by clicking and dragging a line between the output port of the inject node to the input port of the debug node.

Click the inject node to configure it. You can set a payload value like a simple string like “Hello, Node-RED!”. Click Done to save the configuration.

Click the Deploy button in the top right corner to deploy your flow.
Click the button on the left of the inject node. The debug tab on the right will show the message “Hello, Node-RED!”.
Install Additional Nodes
The true power of Node-RED lies in its extensive library of additional nodes which you can install to extend its functionality.
Visit the Node-RED library to search for nodes that suit your needs.

In the Node-RED editor click the menu button in the top right corner then select Manage palette.
In the Palette tab click Install then search for the node you want to install for example node-red-dashboard.
Click Install next to the desired package.

Setting Up as a Service
To have Node-RED start automatically when your computer boots up, you can set it up as a service.
You need to install NSSM stands for Non-Sucking Service Manager is a tool that can help with this. Download it from the NSSM website.
After downloading, extract the NSSM zip file to a directory. Open the Command Prompt as an administrator. Navigate to the extracted NSSM directory. Run the following command to install Node-RED as a service:
nssm install NodeRED
In the GUI that appears enter the path to the Node.js executable usually C:\Program Files\nodejs\node.exe and the path to the Node-RED script C:\Users\yourusername\AppData\Roaming\npm\node-red.cmd.
Click Install Service. After installing the service, you can start it by running:
nssm start NodeRED
To ensure the service starts automatically check your services list by typing services.msc in the Run dialog and set the NodeRED service to Automatic.
Conclusion
Installing Node-RED on Windows is a simple process involving the installation of Node.js followed by Node-RED itself. Once set up Node-RED provides a versatile platform for creating and managing workflows integrating various services and devices seamlessly. By following this guide you should be well on your way to leveraging the full potential of Node-RED in IoT projects.
While installing Node-RED on Windows is simple but managing dependencies and ensuring compatibility across different server environments can be technical. Upgrading to Ultahost’s Windows VPS hosting plan empowers you with a robust solution that helps you to install the latest package managers and repositories simplifying Node-RED installation and updates.
FAQ
What is Node-RED?
Node-RED is a tool for wiring together devices, APIs, and online services.
How do I install Node-RED on Windows?
Install Node.js first, then install Node-RED using the npm command.
Do I need Node.js to install Node-RED?
Yes, Node.js is required to run Node-RED on Windows.
Which command installs Node-RED?
Run npm install -g node-red in your command prompt.
Can I run Node-RED on Windows 10?
Yes, Node-RED works on Windows 10 and later versions.
How do I start Node-RED after installing?
Use the command node-red in your terminal to start it.
Is Node-RED free to use?
Yes, Node-RED is an open-source tool and free to use.
Contents
- 1. Introduction
- 2. Software & Equipment Requirements
- 3. Installing Node-RED
- 3.1 Node.js
- 3.2 Install Node-RED
- 4. Additional packages you will need
- 4.1 Node-RED-dashboard
- 4.2 node-red-contrib-modbus
- 5 Running Node-RED
- 6. An Overview of Node-RED
- 6.1. Palette
- 6.2. Workspace
- 6.3. Sidebar
- 6.4. Header

1. Introduction
Node-RED is a visual programming tool aimed at connecting hardware devices, APIs and online services in alternative ways, without the need for traditional programming experience. The software provides a browser-based editor that makes it easy to wire together flows using the wide range of nodes in the palette that can be deployed to its run-time in a single-click.
Although the concept of flows, nodes & palettes may sound unfamiliar, Node-RED makes programming simple by using a visual representation of code in blocks with lines between them.
Some examples of the many functions available are:
- REST clients to query data on other servers
- Modbus TCP client to talk to Brainboxes Remote IO devices
- JavaScript functions can be created within the rich text editor
- A built-in library allows you to save useful functions, templates or flows for re-use
- The flows created in Node-RED are stored using JSON which can be easily imported and exported for sharing with others
- An online flow library allows you to share your best flows with the world.
2. Software & Equipment Requirements
You will need:
- A Brainboxes Remote Ethernet I/O device
- Any Windows PC/laptop
- Network connection
3. Installing Node-RED
The following are instructions on how to install Node-RED on a Windows based operating system. All required download links can be found on the official Node-RED and NodeJS websites.
3.1 Node.js
Node-RED uses a runtime engine called Node.js. Node.js is a JavaScript based programming language and must be installed before Node-RED. Node.js can be downloaded from the official Node.js website. When installing Node.js for use with Node-RED it is recommended that you install the 10.XX.X. LTS variant:

Once the installation is complete, open up a Windows command prompt, you can open a command prompt by using the keyboard shortcut (Windows key + r) type cmd and then once the command prompt has opened, input the following:
node --version && npm --version
This command checks if both Node.js and NPM are correctly installed, and if so it will return a version number.
The output should look something like this:

NPM is a package manager for the JavaScript programming language, this is needed for installing additional Node-RED packages which we will need later. NPM should be installed by default when installing Node.js.
3.2 Install Node-RED
Now we can begin to install Node-RED, navigate to CMD and input the command:
npm install -g --unsafe-perm node-red
Please note if the module does not install and throws up error messages regarding permissions, you will need to run CMD in Administrator mode. If you are having trouble with this please contact your System Administrator. Once this command is ran Node-RED will begin to install. Please note this can take some time to complete:

Once complete, the output should look like this:

4. Additional packages you will need
There are some additional packages you will need to install when following this guide.
4.1 Node-RED-dashboard
The first package you will need to install is the Node-RED dashboard, this module adds nodes which allow us to easily create a live data dashboard.
To install this module simply open up a command prompt and input:
npm install -g node-red-dashboardPlease allow a few minutes for this to package install:

Please note if the module does not install and throws up error messages regarding permissions, you will need to run CMD in Administrator mode. If you are having trouble with this please contact your System Administrator.
When the module is successfully installed the response should look something like this:

4.2 node-red-contrib-modbus
The next package you will need to install is contrib-modbus, this module adds nodes that allow us to communicate in ModbusTCP
To install this module simply open up a command prompt and input:
npm install -g node-red-contrib-modbus
Again, please allow a few minutes for this to install:

Please remember you may need to run this command on an elevated command prompt.
When the module is successfully installed the response should look something like this:

5 Running Node-RED
Once everything has been successfully installed you can now begin to run your Node-RED webserver.
You can do this by navigating to a command prompt and typing in the following command:
Node-RED
As we installed Node-RED as a global NPM module it adds the command node-red to your system path which you can then input into a command prompt to start Node-RED:

Once the server has booted up successfully the command prompt will let us know that the server is now running, and what IP address it is on:
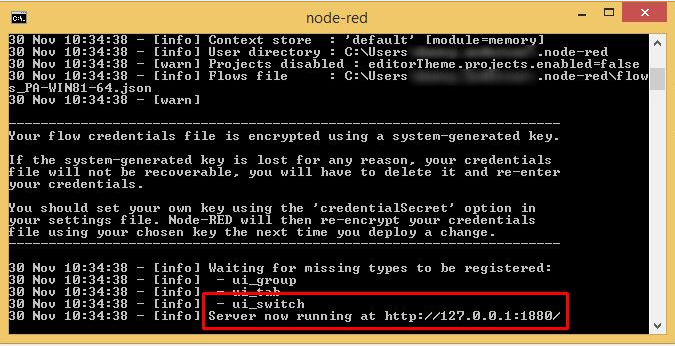
Take note of the Node-RED webserver’s IP address and input it into your web browser:

You have now successfully installed, booted up, and accessed your Node-RED webserver.
You can now begin to create your own flows.
6. An Overview of Node-RED
So how do we get started? Below is an overview of the Node-RED interface, with a brief description of each section:

6.1. Palette
The palette on the left contains all the different nodes available for use. From injecting different types of information (strings, Booleans, numbers, etc.), executing Linux command lines and the ability to make different types of connections, to recording simple debug traces, sending emails notifications and displaying information on a text box:
6.2. Workspace
The workspace in the middle is where your flows will be created. As you follow through this simple guide, you will learn how the flows connect and work together in an easy to use, programmable way.
The sidebar on the right provides additional settings and debug information. Using the debug node available from the palette will show the user what information is being sent, or the information which is being received from the node it is attached to.
The header at the top, contains the deploy button, which is used for deploying your current workspace. Deploying it will make it available for execution, or it will immediately start running, depending on how you have it set up. You will also find the main menu which allows you to import/export workspaces, or change several configurations regarding your Node-RED project.
Node-RED installer
The Node-RED installer is a standalone installer that includes Node-RED and Node.js.
Because this installer easily sets up the Node-RED environment by executing the installer binary,
it is useful for beginner users who would like to start Node-RED without command-line operations.
This project is under development. Therefore, it is not ready for production use currently.
Quick Start
The installer binaries are available for Windows, macOS, and Linux environments.
Windows
(1) Download the Windows installer (Node-RED-x.x.x.msi) from the GitHub releases page.
(2) Execute installer which was downloaded.
(3) After installing Node-RED, the installer automatically opens the Node-RED flow editor on the default browser.
While executing the Node-RED server, The task tray area has the Node-RED icon. To terminate the Node-RED process, you can select «Quit» on the menu of the icon.
Node-RED will be registered in the start menu as an application. Therefore, you can start Node-RED from the start menu after the installation.
macOS
(1) Download the macOS installer (Node-RED-x.x.x.dmg) from the GitHub releases page.
(2) Open the dmg file.
(3) Drag and drop the Node-RED icon to the Application directory.
(4) On the Finder in the Application directory, you need to right-click the Node-RED icon and select «Open» in the menu to start.
While executing the Node-RED server, The menu bar area has the Node-RED icon. To terminate the Node-RED process, you can select «Quit» on the menu of the icon.
Prerequisites
As the default, there is no prerequisite to use Node-RED but other software is needed when you use additional features.
-
Node installation
If you want to install third-party nodes on the flow editor, you need the npm command in your environment.
The Node.js installer is the simple way to install the npm command. -
Project feature
To use the project feature, the git command is required. To install the git command, you can use the git installer.
After installing the git command, the Node-RED environment automatically enables the project feature.
Running Node-RED on Windows 10
Node-RED is an open-source flow-based programming platform by IBM working on software and hardware. This article will explain how to install Node-RED on the Windows platform. The following instructions are based on Windows 10. However, anyone can install Node-Red in any version of the Windows environment.

Quick Install Node-RED in Windows 10
Step 1 (Install Node.js):
Search for «Node.js download» and install Node.js latest LTS version from the official node.js website.
Or go to node js official website and download/download/button node js latest LTS version. Select 32 or 64-bit based on your operating system. After downloading, run the MIS file with administrative privilege and follow the installation instructions.
After successful installation, open the command prompt. Press win+r, type cmd, and hit enter to run the command prompt in Windows. Then run the following command to check the node js and npm versions.
node —version && npm —version
The command prompt should return the output node js and npm installed successfully.

Step 2 (Install Node-RED):
To install Node-RED as a global module, adds the command node-red to your system path and execute the following at the command prompt:
npm install -g —unsafe-perm node-red
Step 3 (Run Node-RED):
Once installed, we are ready to use Node-Red. Just run the command «node-red» in the command prompt. And you are good to go.

Once started, you can access Node-RED from any web browser. The node-red will be available in the following URL:
http://localhost:1880
Video demonstration on How to install Node-RED in Windows:
For more detailed instructions, please watch the next video.