
NANO FOR WINDOWS
This is a 64-bit/32-bit and Windows on ARM port of the legendary GNU nano text editor, a small and compact CLI editor that packs a world of functionality in a small footprint (less than 300KB). It can be run in a Windows Terminal, Powershell window, Command Prompt window, SSH session, or similar environment.
GNU nano is constantly being upgraded, but the original project is focused on providing support and functionality for Linux. This project is meant to bring the latest updates to both 64-bit and 32-bit Windows users.

Features ported to Windows
Pretty much everything is supported except for Linux-specific functions, including:
- Interface customization: colors, key shortcuts, line numbers, infobar, scroll bar, etc…
- Syntax coloring for 47 different types of documents. It can be upgraded thanks to community support, for instance here or here you can find additional syntax files for many other document types.
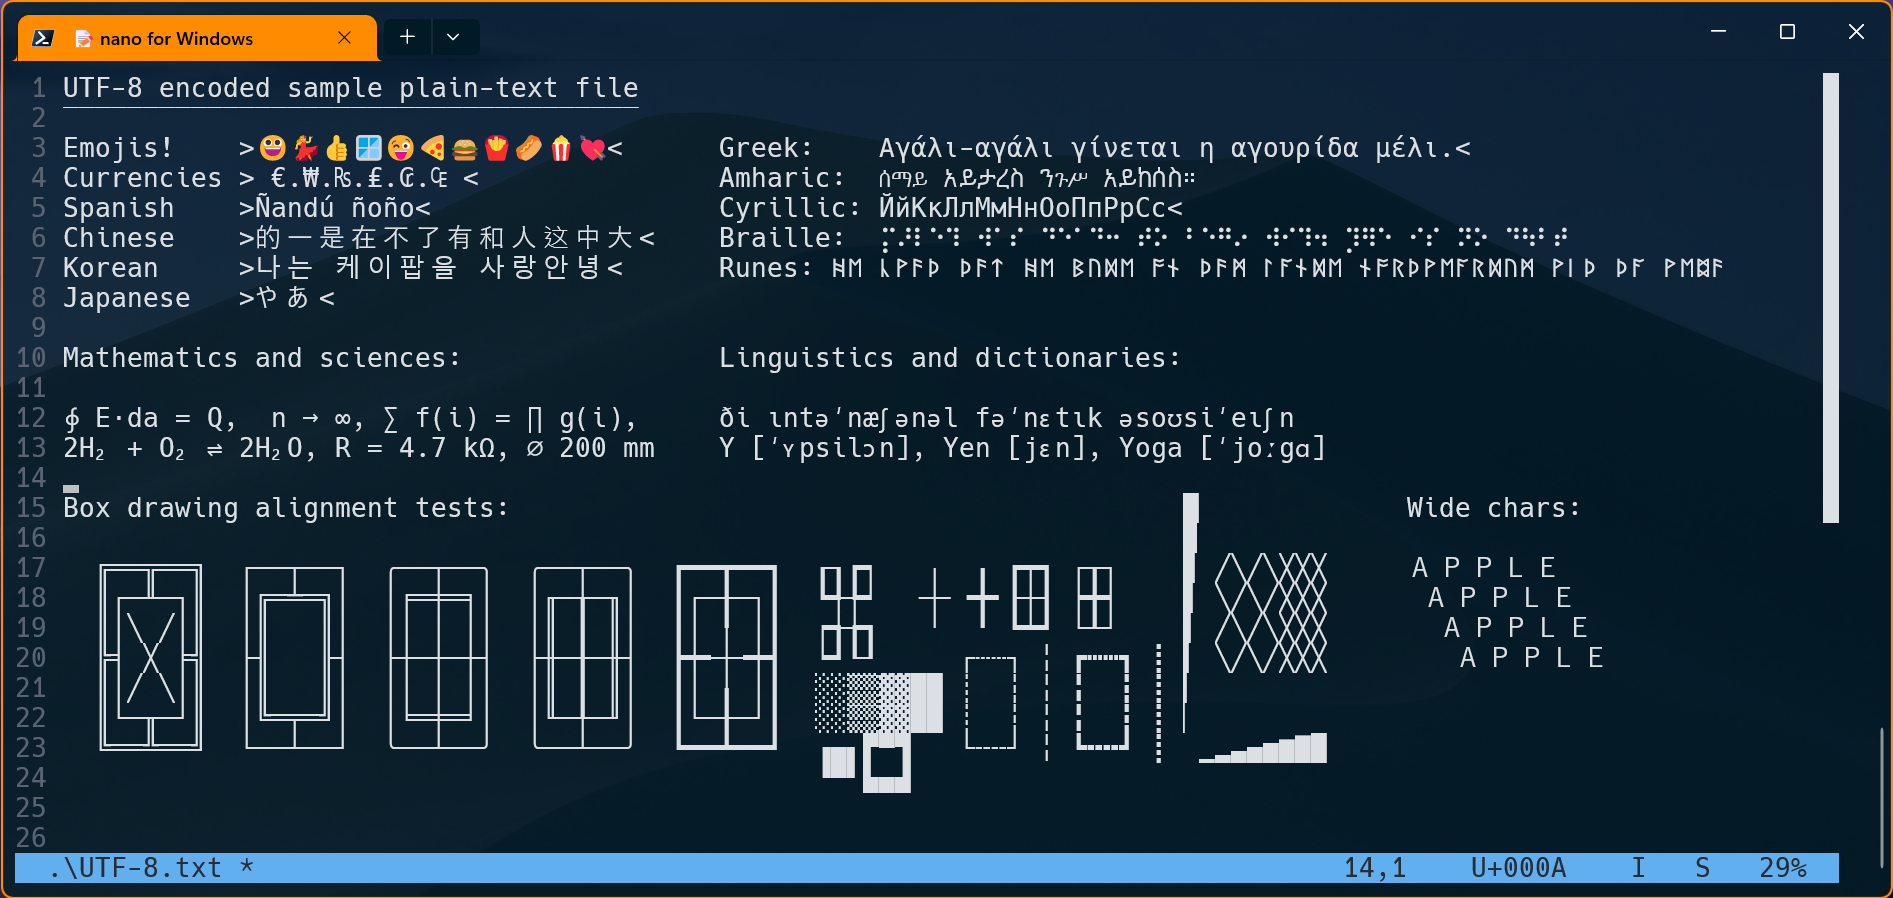
- Full support for UTF-8 encoded files.
- Supplemental Unicode character support, including all the languages and emojis 😜in the CLI interface.
- Multi-document editor.
- Integrated file browser.
- Mouse support for scroll and cursor location.
- Normal and regular expression (regex) search and replace.
- Auto-indent, syntax highlight and fast line comment for many programming languages.
- Line wrap, search, cut, copy & paste, and all the basic functions of any full-fledged editor.
- Data input through stdin support, from a pipe or the keyboard.
- Transparent backgrounds in Windows Terminal, and other supported environments.
- Beta native support for Windows on ARM (WoA)
Installation
The easiest way to install nano is via Scoop.
- To install Scoop, open a PowerShell terminal (version 5.1 or later) and run:
Set-ExecutionPolicy RemoteSigned -Scope CurrentUser # Optional: Needed to run a remote script the first time
irm get.scoop.sh | iex
- Add nano for Windows directly from its bucket:
scoop bucket add .oki https://github.com/okibcn/Bucket  # Optional: the changes are propagated faster this way
scoop install nano
To remove the app, type:
To update the app, type:
Installation via direct download
Visit the releases page, and download the latest release file ending in .zip for your architecture (Windows 32, Windows 64, or Windows on Arm). Then unzip the file to a directory in your %PATH%.
Usage
This repo handles only the conversion to the Windows OS. The original GNU nano documentation covers all the usage instructions. For a quick reference, you can just press F1 within nano to open the integrated help.
The interface customization file is located in the user profile and has good descriptions of each setting. To edit it, just open a powershell terminal, and type:
Notes
-
When using Windows Terminal and the screen is resized within nano, after returning to the shell there could be some corruption due to the new size. To fix the issue without losing the terminal history just resize the terminal window to zero lines and return to the desired size.
-
Feel free to open any issue you find, or use the Discussions section for any other issue, suggestion, question, etc…
Skip to content
People who have used any distribution of Linux know about a very small and useful editor called nano. This editor is either included in the Linux itself or you can easily install through application managers for those flavors of Linux. For example, in Debian based Linux distributions, you can use the command sudo apt-get install nano for installing nano in a few seconds.
While Linux users can get nano editor quickly and use it for editing all kinds of text, source code or configuration files, Windows users are often left out. But good news is that now Windows builds of nano editor are also available. These are binary files that you have to just download and use. There is no confusing or difficult to understand instructions. It is native Windows PE file and does not have any extra requirements.
In order to install or setup nano editor in Windows, you can follow these quick steps:
- Download latest version of nano editor for Windows from https://files.lhmouse.com/nano-win/.
- Extract the contents of downloaded 7Z file to a folder. You may have to use 7-Zip for extracting files.
- Find nano.exe from inside the “bin” folder and copy it to C:\Windows\ folder of your PC.
- This is it. Now you can invoke nano.exe from anywhere in your Windows PC. You can basically launch command prompt and give command nano to invoke nano editor.


If you have never used nano before and are new to the GNU nano editor, then you may find a PDF file about the nano editor very useful. You can download this nano documentation from https://nano-editor.org/dist/v5/nano.pdf. It covers the basic use and all the options available for the nano editor. If you do not want to download the PDF version, then they also offer an online version of the nano editor documentation which is available from https://nano-editor.org/dist/latest/nano.html.
We use cookies on our website to give you the most relevant experience by remembering your preferences and repeat visits. By clicking “Accept”, you consent to the use of ALL the cookies.
GNU nano is a great text editor for developers who work on Linux, but did you know it can run on Windows too? This guide will show you how to install GNU nano on Windows to make your text editing experience seamless.
Let’s get started!
To install nano on Linux, use apt-get, which will get everything up and running in no time. Installing it on Windows isn’t as straightforward, however.
To install nano on Windows:
First, click here to download nano from https://www.nano-editor.org.
Next, rename the file to nano.exe and move it to your preferred folder.
And then finally, make nano available everywhere via the command line:
For Windows 10 and 8:
- Type “Edit environment variables”
- Open the option “Edit the system environment variables.”
- Click the “Environment variables…” button
- You will see two boxes in the “System Variables” box; find the path variable.
- Click “Edit”
- A Window will then pop up. Click the “New” button.
- Type the folder path of your .exe or batch file
- Click “Ok” on all open windows
- Restart the command prompt.
About GNU nano
GNU nano is a text editor. It’s designed to be simple for beginners and powerful enough for experts, making it an ideal choice of text editor for everyone. Furthermore, the GNU nano editor is free software, which means it’s free to download and use; you can also freely share it with others.
Another popular text editor is Vim. It is one of the most popular text editors globally, and it’s not hard to see why. It has a lot of powerful features that can increase your productivity. However, nano may be easier to get into if you want something easy to use and feature-rich.
Visit https://www.nano-editor.org if you want more information.
GNU Nano Cheat Sheet
File handling
| Ctrl+S | Save current file |
| Ctrl+O | Save the current file as |
| Ctrl+R | Insert a file into the current one |
| Ctrl+X | Close buffer, exit from nano |
Editing
| Ctrl+K | Cut current line |
| Alt+6 | Copy the current line |
| Alt+U | Undo the last action |
| Alt+E | Redo the last undone action |
Search and replace
| Ctrl+Q | Start backward search |
| Ctrl+W | Start forward search |
Visit the official cheat sheet for the full list.
Wrapping up
If you’re a Windows user who has been hesitant to try nano because of the installation process, we urge you to give it a go. The benefits are worth the effort, and we promise you won’t want to go back once you start using nano for windows. With just a little setup time, you can have a seamless text editing experience between Linux and Windows systems on your computer.
You may also be interested in
Anto, a seasoned technologist with over two decades of experience, has traversed the tech landscape from Desktop Support Engineer to enterprise application consultant, specializing in AWS serverless technologies. He guides clients in leveraging serverless solutions while passionately exploring cutting-edge cloud concepts beyond his daily work. Anto’s dedication to continuous learning, experimentation, and collaboration makes him a true inspiration, igniting others’ interest in the transformative power of cloud computing.
View all posts by Anto Online →
Nano Editor Installation features tutorials and howto examples advantages and is used for Java developer.
This tutorial shows you how to install and open Nano Editor on Windows
Multiple ways we can install
-
Use Chocolatey
-
Windows + Start, Select Windows Powershell, Right Click on it, Select Run as Administrator
Type choco, in the prompt, it gives Chocolatey version.
  PS C:\WINDOWS\system32> choco
Chocolatey v2.1.0
Please run 'choco -?' or 'choco <command> -?' for the help menu.
If the above commands give an error, please install choco with the below command in the prompt
Set-ExecutionPolicy Bypass -Scope Process -Force; [System.Net.ServicePointManager]::SecurityProtocol = [System.Net.ServicePointManager]::SecurityProtocol -bor 3072; iex ((New-Object System.Net.WebClient).DownloadString('https://chocolatey.org/install.ps1'))
Once, Choco is installed, Run choco install nano -y to install the nano editor
PS C:\WINDOWS\system32> choco install nano -y
Chocolatey v2.1.0
Installing the following packages:
nano
By installing, you accept licenses for the packages.
Progress: Downloading nano-win 7.2.36... 100%

nano-win v7.2.36 [Approved]
nano-win package files install completed. Performing other installation steps.
An attempt to get headers for https://files.lhmouse.com/nano-win/nano-win_10191_v7.2-36-g639dc4989.7z failed.
  The remote file either doesn't exist, is unauthorized, or is forbidden for url 'https://files.lhmouse.com/nano-win/nano-win_10191_v7.2-36-g639dc4989.7z'. Exception calling "GetResponse" with "0" argument(s): "The remote name could not be resolved: 'files.lhmouse.com'"
Downloading nano-win
  from 'https://files.lhmouse.com/nano-win/nano-win_10191_v7.2-36-g639dc4989.7z'
Progress: 100% - Completed download of C:\Users\Kiran\AppData\Local\Temp\chocolatey\nano-win\7.2.36\nano-winInstall.zip (664.31 KB).
Download of nano-winInstall.zip (664.31 KB) completed.
Hashes match.
Extracting C:\Users\Kiran\AppData\Local\Temp\chocolatey\nano-win\7.2.36\nano-winInstall.zip to C:\ProgramData\chocolatey\lib\nano-win\tools...
C:\ProgramData\chocolatey\lib\nano-win\tools
Environment Vars (like PATH) have changed. Close/reopen your shell to
 see the changes (or in powershell/cmd.exe just type `refreshenv`).
 ShimGen has successfully created a shim for nano.exe
 ShimGen has successfully created a shim for nano.exe
 The installation of nano-win was successful.
  Software installed to 'C:\ProgramData\chocolatey\lib\nano-win\tools'
Progress: Downloading nano 7.2.36... 100%

nano v7.2.36 [Approved]
Nano package files install completed. Performing other installation steps.
 The installation of nano was successful.
  Software installed to 'C:\ProgramData\chocolatey\lib\nano'

Chocolatey installed 2/2 packages.
 See the log for details (C:\ProgramData\chocolatey\logs\chocolatey.log).
nano is installed, you can create or open existing files, nano command works in the command line.
Nano Close and Open
Editor can be opened with or without opening a file
nano command used to create a file
nano
To Open an existing file, pass the path of the file to the nano command
nano pathfile
You can specify the absolute or relative path of a file
nano c:\test.txt
To exit the nano editor
- Ctrl + X to exit the editor
- Asks for whether to save changes Yes or No.
- On selecting one i.e yes, It closes the Nano editor
How to Install Nano on Windows 11
Nano is a popular text editor that is widely used in Unix-based operating systems. If you are a Windows 11 user and you want to use Nano, you need to install it first. In this tutorial, we will guide you through the process of installing Nano on Windows 11.
Step 1: Download the binary file
The first step in installing Nano on Windows 11 is to download the binary file. You can download it from the official Nano website at http://nano-editor.org/download.php.
Step 2: Extract the binary file
Once you have downloaded the binary file, you need to extract it to a folder on your computer. You can use any file extraction utility such as WinRAR or 7-Zip.
Step 3: Add the binary file to the PATH
The next step is to add the binary file to the PATH environment variable so that you can run Nano from any directory on your computer.
- Open the Start menu and search for «environment variables».
- Click the «Edit the system environment variables» option.
- Click the «Environment Variables» button.
- Under the «System Variables» section, scroll down until you find the «Path» variable and click the «Edit» button.
- Click the «New» button and add the path to the folder where you extracted the Nano binary file.
- Click «OK» to save the changes.
Step 4: Launch Nano
Now that Nano is installed on your Windows 11 computer, you can open a command prompt and type «nano» to launch it. You can also use it as a default editor for files by setting the association in the Windows registry.
Congratulations, you have successfully installed Nano on your Windows 11 computer. Enjoy using the powerful text editor for your projects!
If you want to self-host in an easy, hands free way, need an external IP address, or simply want your data in your own hands, give IPv6.rs a try!
Alternatively, for the best virtual desktop, try Shells!