
Meld Studio is available for Windows and macOS.
macOS
Install
- Locate and double-click to open the
MeldStudioInstaller.dmgfile. - Drag Meld Studio into the Applications folder.
- Close the window and press ⏏️ in Finder to dismount the image.
- Launch Meld Studio.
Drag Meld Studio into the Applications folder.
Windows
Once you’ve signed up for early access to the Windows Beta and received the download link in your email, follow these steps to install:
- Download Meld Studio.
- Locate and run the
MeldStudio.appinstallerfile. - Click Install.
- Launch Meld Studio.
Update
Meld Studio will auto-update. Easily check for updates anytime to ensure you’re running the latest version.
Check for Updates
- Navigate to Preferences > Updates.
- Click the
Check for Updatesbutton.
If an update is available you can download it, and restart Meld Studio.
Meld Studio is not Updating
If Meld Studio isn’t updating automatically, contact our team for assistance.
Troubleshooting
Solutions to common installation issues on Windows.
Outdated AppInstaller
If you’re having trouble installing Meld Studio on Windows, it may be due to an outdated AppInstaller or a potential issue with your operating system.
- Ensure that your AppInstaller is up to date.
You can download the latest version from the Microsoft AppInstaller page.
Outdated Operating System
Verify that your device is updated to the latest version by following these steps:
- Click the Start button.
- Open Settings.
- Navigate to Windows Update.
- Verify that there are no pending updates and install them if necessary.
Blocked by Antivirus Software (e.g., McAfee)
If your antivirus flags Meld Studio incorrectly you can:
-
You can temporarily disable your antivirus software while installing Meld Studio. Be sure to re-enable the antivirus after the installation is complete.
-
Whitelist Meld Studio in your antivirus settings.
If you’re unable to download or install Meld Studio due to McAfee’s WebAdvisor tool flagging it incorrectly, you can:
- Disable WebAdvisor temporarily during installation.
- Alternatively, uninstall WebAdvisor if it is unnecessary for your workflow.
Learn how to disable or uninstall WebAdvisor here.
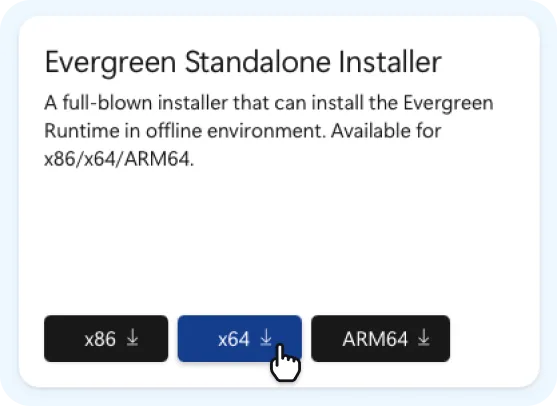
Microsoft WebView2 Runtime
In the case of installation failing followed with a prompt for Microsoft.WebView2, download and install it from the Microsoft WebView2 Runtime page.
- Visit the Microsoft WebView2 Runtime page.
- Click Download.
- Download the Evergreen Standalone Installer x64.
Installation error code: 0x800700005 (Access Denied)
This tends to be an Access Denied type of error code.
- Update your system drivers.
- Run the Windows System File Checker by opening Command Prompt as an administrator and entering:
sfc /scannow
You can find more detailed solutions here or contact our team for assistance.
Installation error code: 0x800f0806 (File Corruption)
This error occurs due to certain Windows files being corrupted.
- Run the Windows Troubleshooter for Windows Update.
- If the issue persists, open Command Prompt as an administrator and run:
sfc /scannow
You can find more detailed solutions here or contact our team for assistance.
FAQ
Is Meld Studio free?
Yes, Meld Studio is free-to-use broadcast software.
How to download the Windows Beta?
Sign Up for early access to the Windows Beta to have the download link sent to your email address.
Why is Meld Studio not Installing on my Windows machine?
If you’re having trouble installing Meld Studio on Windows, it may be due to an outdated AppInstaller or a potential issue with your operating system.
- Ensure that your AppInstaller is up to date.
You can download the latest version from the Microsoft AppInstaller page.
Can I change the application install location?
The MeldStudio.appinstaller is an MSIX package installed in the fixed location C:\Program Files\WindowsApps. This path cannot be changed, as it ensures security and better management of Meld Studio.
Will Meld Studio eventually support the EXE file format?
Currently, we are focusing on maintaining a single file format for Windows.
Is Meld Studio available for Linux?
No. Meld Studio is available for Windows and macOS*
Last Updated :
01 Feb, 2023
Meld is a visual diff and merge tool that allows users to compare and merge differences between files and directories. It is typically used by developers and other technical professionals to compare and merge code changes, but it can also be used to compare and merge other types of files. Meld is available for different operating systems such as Linux, macOS, and Windows. It is open-source software and can be downloaded for free from the Meld website.
Key features of Meld
- Visual comparison: Meld allows users to compare and merge differences between files and directories visually, making it easier to understand and resolve conflicts.
- Three-way comparison: Meld supports three-way comparisons, which allows users to compare and merge changes between three different versions of a file or directory.
- File and directory comparison: Meld can compare and merge differences between files as well as directories, allowing users to compare and merge entire directory structures.
- Syntax highlighting: Meld supports syntax highlighting for a range of programming languages, making it easier to understand and resolve conflicts in code files.
System Requirements of Meld
- Operating System(OS): Windows XP/Vista/7/8/8.1/10.
- RAM: 512 MB or More.
- Hard Disk Space(HDD): Minimum 50 MB free space required.
- Processor: Intel Dual Core, Intel i3 or above.
Installation steps of Meld application on windows:
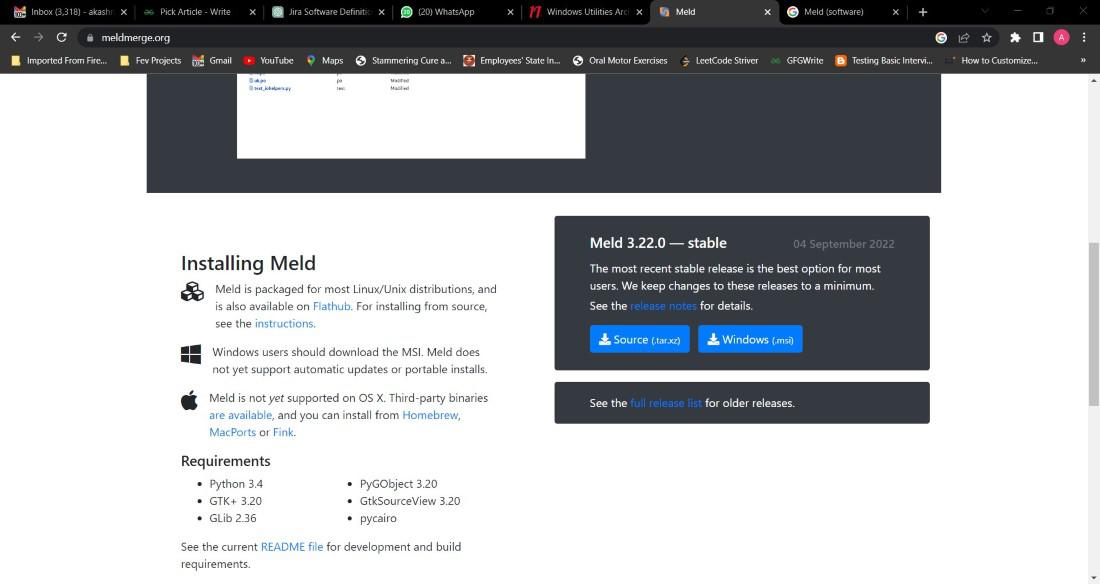
Step 1: Download Meld’s executable file from its official website and execute the package to start the installation process.
https://meldmerge.org/
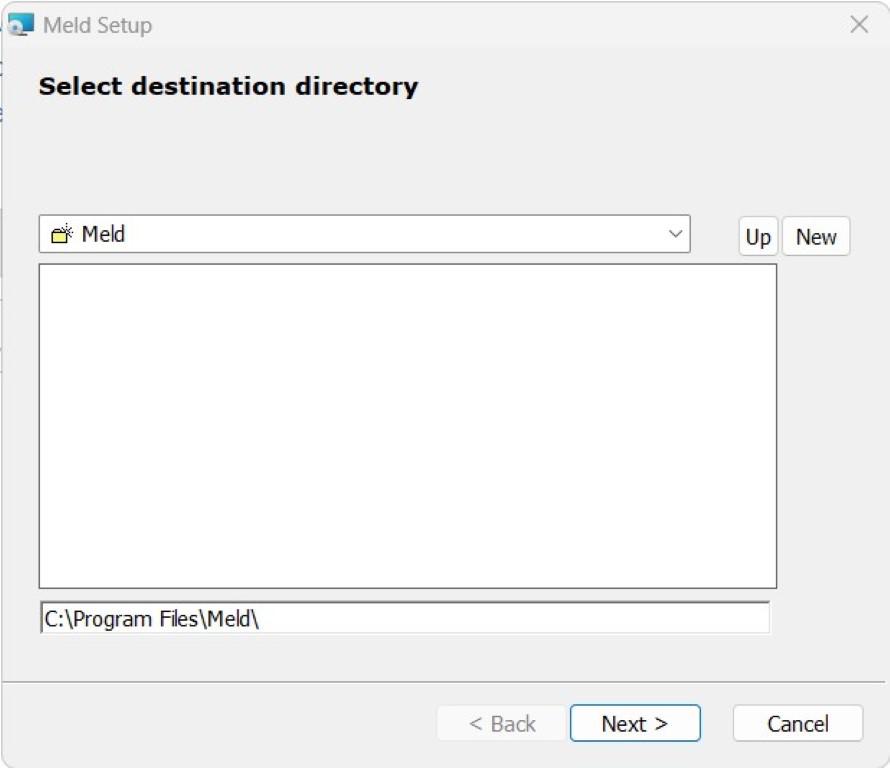
Step 2: Then select the destination directory where should you want to install the meld application then click on Next.
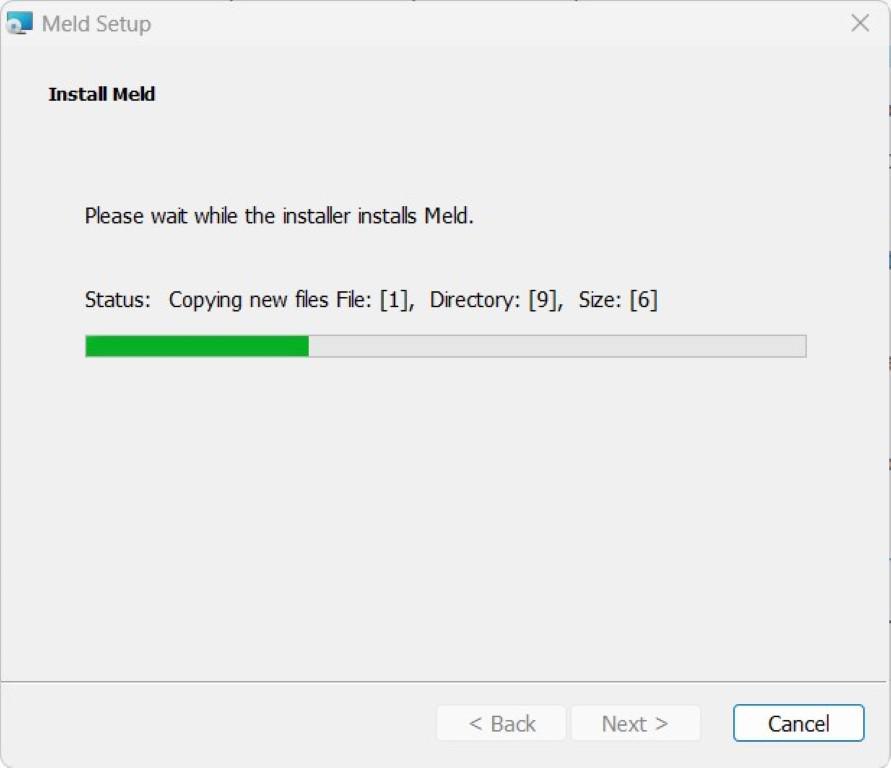
Step 3: Now the installation of the Meld application gets started please wait while the installer installs Meld.

Step 4: Now you can see the installation of the Meld is in progress.
Step 5: Now the installation of the Meld application gets over then click on the Finish button to exit the installer.

Now Meld application is successfully installed on our machine.

Время на прочтение6 мин
Количество просмотров14K
Краткая справка: Meld — утилита для визуального сравнения файлов/папок.
Наверняка не каждый согласится, что этот иструмент стоит тех танцев с бубном, которые необходимо совершить вокруг него для более менее комфортной работы (Meld слегка не расчитан на работу в Windows, но так как написан на python с использованием GTK, может функционировать и в ней). Я же, потыкав палочкой в бесплатные альтернативы, решил для себя, что если оно заведется, то усилия не будут напрасными.
Предлагаю заинтересовавщимся перейти к делу.
Весть процесс можно разделить на две части: установка и допиливание.
Установка
Основные манипуляции описаны здесь: Meld/Windows. Ниже привожу этот же список со своими комментариями.
- Python:
- С версиями python’а жонглировать не стал, установил ту, что указана в мануале.
- http://python.org/ftp/python/2.6.2/python-2.6.2.msi.
- Устанавливаем (напр. c:\dev\python).
- GTK+ All-in-one bundle:
- А вот этот пак я взял поновее (2.18 вместо 2.16).
- http://ftp.gnome.org/pub/gnome/binaries/win32/gtk+/2.18/gtk+-bundle_2.18.7-20100213_win32.zip.
- Распаковываем (напр. c:\dev\gtk).
- Python gnome bindings:
- С этими штуками нужно поаккуратнее. Чуть не та версия, сразу ничего не работает.
- http://ftp.gnome.org/pub/GNOME/binaries/win32/pygtk/2.12/pygtk-2.12.1-3.win32-py2.6.exe.
- http://ftp.gnome.org/pub/GNOME/binaries/win32/pygobject/2.20/pygobject-2.20.0.win32-py2.6.exe.
- http://ftp.gnome.org/pub/GNOME/binaries/win32/pycairo/1.4/pycairo-1.4.12-2.win32-py2.6.exe.
- От себя добавлю еще pygtksourceview, пригодилось при допиливании.
- http://ftp.gnome.org/pub/GNOME/binaries/win32/pygtksourceview/2.2/pygtksourceview-2.2.0.win32-py2.6.exe.
- Все это нужно установить убедившись, что инсталятор правильно нашел папку с python’ом (напр. c:\dev\python).
- libglade:
- Тут тоже без изменений, тем более, что версия последняя на данный момент.
- http://downloads.sourceforge.net/gladewin32/gtk-2.12.9-win32-2.exe.
- Устанавливаем (напр. c:\dev\glade).
- gtksourceview:
- Пара именно этих версий (pygtksourceview-2.2.0 и gtksourceview-2.2.2) у меня заработала.
- http://ftp.gnome.org/pub/GNOME/binaries/win32/gtksourceview/2.2/gtksourceview-2.2.2.zip.
- А еще понадобится версия 2.9.3, т.к. в 2.2.2 не хватает некоторых файлов.
- http://ftp.gnome.org/pub/GNOME/binaries/win32/gtksourceview/2.9/gtksourceview-2.9.3.zip.
- Распаковываем 2.2.2 (напр. c:\dev\gtksourceview).
- Cygwin:
- Зачем Cygwin я так и не понял. Работает и без него.
- http://www.cygwin.com/setup.exe.
- Устанавливаем по ситуации (напр. c:\dev\cygwin).
- Если же не работает, ни без Cygwin’а, ни с ним, нужно доустановить пакет patch.
- Download meld source code:
- http://ftp.gnome.org/pub/gnome/sources/meld/1.3/meld-1.3.1.tar.bz2
- Распаковываем (напр. c:\dev\meld).
- Add this to your Path:
- Да да, в переменную PATH нужно добавить пути к python’у (пункт 1, c:\dev\python), к библиотекам (пункты 2, 4 и 5, c:\dev\gtk\bin, c:\dev\glade\bin и c:\dev\gtksourceview\bin) и к Cygwin’у, если установлен (пункт 6, c:\dev\cygwin\bin). Еще можно добавить путь к самому Meld’у (пункт 7, c:\dev\meld\meld-1.3.1)
Теперь, если запустить python, указав путь к Meld’у (c:\dev\meld\meld-1.3.1\meld) в качестве параметра, должно открыться окно Meld’а. Иначе, либо я опечатался, либо вы что-то сделали не так.
Допиливание
- Первый вопрос, после успешного запуска: «на кой черт мне это черное консольное окошко?!».
Решается просто: нужно запускать не python, а pythonw.
- Следующий момент: окно утилиты не сохраняет свою позицию и состояние развернутости на весь экран (не то, что fullscreen, а то, что maximized). Возможно, это проблема GTK, возможно, менеджера окон Windows.
Полностью исправить такое поведение мне не удалось.Сохранение позиции окна можно реализовать, сохраняя координаты вручную, но т.к. позиционировать окно до его отображения нельзя, а двигать его уже после отображения некрасиво, я этого делать не стал.
Решил ограничится сохранением флага
WINDOW_STATE_MAXIMIZED. Достигается это путем добавления опции window_maximized в настройки приложения, и обработчика сигнала window-state-event. Сперва, нужно описать обработчик: в файл meldapp.glade (c:\dev\meld\meld-1.3.1\glade2\meldapp.glade) в секцию<widget class="GtkWindow" id="meldapp">добавить строку<signal name="window_state_event" handler="on_window_state_event"/>:--- c:\dev\meld-base\meld-1.3.1\glade2\meldapp.glade +++ c:\dev\meld\meld-1.3.1\glade2\meldapp.glade @@ -7,6 +7,7 @@ <property name="title" translatable="yes">Meld</property> <property name="icon">pixmaps/icon.png</property> <signal name="size_allocate" handler="on_size_allocate"/> + <signal name="window_state_event" handler="on_window_state_event"/> <signal name="delete_event" handler="on_delete_event"/> <child> <widget class="GtkVBox" id="appvbox">Затем, добавить обработчик: в файл meldapp.py (c:\dev\meld\meld-1.3.1\meldapp.py) добавить метод
on_window_state_event:--- c:\dev\meld-base\meld-1.3.1\meldapp.py +++ c:\dev\meld\meld-1.3.1\meldapp.py @@ -615,6 +615,9 @@ self.prefs.window_size_x = rect.width self.prefs.window_size_y = rect.height + def on_window_state_event(self, window, state): + self.prefs.window_maximized = bool(state.new_window_state & gtk.gdk.WINDOW_STATE_MAXIMIZED) + # # Toolbar and menu items (file) #Добавить настройку по-умолчанию:
--- c:\dev\meld-base\meld-1.3.1\meldapp.py
+++ c:\dev\meld\meld-1.3.1\meldapp.py
@@ -313,6 +313,7 @@
     defaults = {
         "window_size_x": prefs.Value(prefs.INT, 600),
         "window_size_y": prefs.Value(prefs.INT, 600),
+        "window_maximized": prefs.Value(prefs.BOOL, 1),
         "use_custom_font": prefs.Value(prefs.BOOL,0),
         "custom_font": prefs.Value(prefs.STRING,"monospace, 14"),
         "tab_size": prefs.Value(prefs.INT, 4),
И напоследок, применить настройку перед отображением окна:
--- c:\dev\meld-base\meld-1.3.1\meldapp.py +++ c:\dev\meld\meld-1.3.1\meldapp.py @@ -499,6 +500,8 @@ self.scheduler.connect("runnable", self.on_scheduler_runnable ) self.widget.set_default_size(self.prefs.window_size_x, self.prefs.window_size_y) self.ui.ensure_update() + if self.prefs.window_maximized: + self.widget.maximize() self.widget.show() self.widget.connect('focus_in_event', self.on_focus_change) self.widget.connect('focus_out_event', self.on_focus_change) - Некоторые настройки, как например стиль отображения панели инструментов, берутся из файлов конфигурации рабочего стола GNOME, а если их нету, используется настройка по-умолчанию. Для стиля панели инструментов это
TOOLBAR_BOTH, т.е. отображение иконок и подписей.Для себя я просто поменял на
TOOLBAR_ICONS:--- c:\dev\meld-base\meld-1.3.1\meldapp.py +++ c:\dev\meld\meld-1.3.1\meldapp.py @@ -375,7 +376,7 @@ def get_toolbar_style(self): if not hasattr(self, "_gconf"): - return gtk.TOOLBAR_BOTH + return gtk.TOOLBAR_ICONS style = self._gconf.get_string('/desktop/gnome/interface/toolbar_style') or "both" style = {"both":gtk.TOOLBAR_BOTH, "text":gtk.TOOLBAR_TEXT, "icon":gtk.TOOLBAR_ICONS, "icons":gtk.TOOLBAR_ICONS, - Забавные вещи происходят при сохранении файлов с переносами отличными от LF (\n). В таком случае все LF заменяются на переносы файла, поэтому CRLF (\r\n) превращается в CRCRLF, а при следующем сохранении еще раз.
Возможно проблема кроется в неправильном парсинге файла (в Ubuntu Meld себе такого не позволяет), но пока я решил ее, просто закомментировав участок кода, заменяющий одни переносы на другие:
--- c:\dev\meld-base\meld-1.3.1\filediff.py
+++ c:\dev\meld\meld-1.3.1\filediff.py
@@ -815,6 +815,7 @@
             else:
                 return melddoc.RESULT_ERROR
         text = buf.get_text(buf.get_start_iter(), buf.get_end_iter(), 0)
+        """
         if bufdata.newlines:
             if type(bufdata.newlines) == type(""):
                 if(bufdata.newlines) != '\n':
@@ -832,6 +833,7 @@
                         if k != '\n':
                             text = text.replace('\n', k)
                         break
+        """
         if bufdata.encoding:
             try:
                 text = text.encode(bufdata.encoding)
Тем более, что этот же код все переносы ровняет под одну гребенку.
- В Meld’е установленном по инструкции на сайте GNOME, не доступны функции подсветки синтаксиса, отображения номеров строк и отображения пробелов вместо символов табуляции.
Чтобы исправить это, я добавил в мануал библиотеку gtksourceview-2.2.2. В ней не хватает файлов language.rng, language2.rng и styles.rng, зато они есть в gtksourceview-2.9.3 в папке share\gtksourceview-2.0\language-specs. Их нужно просто скопировать в аналогичную в gtksourceview-2.2.2.
Теперь Meld ведет себя достаточно адекватно. Можно пользоваться.
Если кто-то будет применять на практике вышенаписанное, заглядывайте время от времени, возможно будут обновления.
P.S. Ранее не имел дела с python’ом, GTK и PyGTK, поэтому, если где-то написал откровенную ерунду, поправьте пожалуйста.
-
Star
(34)
You must be signed in to star a gist -
Fork
(8)
You must be signed in to fork a gist
-
Clone this repository at <script src="https://gist.github.com/kjlubick/5a49a3ae5f39ae359997.js"></script>
- Save kjlubick/5a49a3ae5f39ae359997 to your computer and use it in GitHub Desktop.
Clone this repository at <script src="https://gist.github.com/kjlubick/5a49a3ae5f39ae359997.js"></script>
How to install Meld on Windows and getting it set up with Git
This file contains hidden or bidirectional Unicode text that may be interpreted or compiled differently than what appears below. To review, open the file in an editor that reveals hidden Unicode characters.
Learn more about bidirectional Unicode characters
| After installing it http://sourceforge.net/projects/meld-installer/ | |
| I had to tell git where it was: | |
| git config —global merge.tool meld | |
| git config —global diff.tool meld | |
| git config —global mergetool.meld.path “C:\Program Files (x86)\Meld\meld\meld.exe” | |
| And that seems to work. Both merging and diffing with “git difftool” or “git mergetool” |
Step-by-Step Guide: Installing Meld on Windows 10
Table of Contents
- Introduction
- Understanding the Purpose of Meld
- Steps to Install Meld on Windows 10
- Launching Meld
- Comparing Two Files using Meld
- Selecting Files for Comparison
- Analyzing the Changes
- Making Changes
- Conclusion
How to Install and Use Meld in Windows 10
Introduction
In this article, we will guide You through the process of installing and using Meld, a powerful file comparison tool, on Windows 10. Meld is widely used among developers to compare two files and identify differences. By following the steps provided, you will be able to easily install Meld and explore its functionalities.
Understanding the Purpose of Meld
Before diving into the installation process, let’s first understand the purpose of Meld. Meld is a tool that allows developers to compare two files written in different programming languages. It enables them to easily identify changes, additions, and deletions between the two files. This is particularly useful when working with different versions of a program or when collaborating with other developers.
Steps to Install Meld on Windows 10
To install Meld on your Windows 10 operating system, follow these steps:
-
Open your favorite browser and enter the following URL in the address bar: «meldmerge.org».
-
Click on the official Website of Meld, which should be the first search result.
-
On the Meld website, scroll down until you find the «Download» button for Windows. Click on it.
-
The Meld installer will start downloading. Once the download is complete, locate the downloaded file in your designated directory.
-
Double-click on the downloaded file to start the installation process.
-
Follow the installation wizard by keeping all the default settings.
-
Once the installation is complete, click on the «Finish» button.
Launching Meld
After installing Meld, you can easily launch it by following these steps:
-
Click on the search icon in the Windows 10 taskbar.
-
Type «meld» in the search bar.
-
Click on the Meld app to launch it.
Comparing Two Files using Meld
Meld allows you to compare two files and analyze the changes between them. Here’s how you can do it:
-
Click on the «File» option in the Meld menu.
-
From the drop-down menu, select «New Comparison» and then «File Comparison».
-
Click on the folder icon to open the file selection window.
-
Navigate to the directory where the files you want to compare are located.
-
Select the first file and click «Open».
-
Go back to the directory and select the Second file.
-
Click «Open» to add the second file for comparison.
Analyzing the Changes
Once you have selected the files for comparison, Meld will display the differences between them. It will highlight the changes, additions, and deletions, making it easier for you to analyze them. You can navigate through the files and see the modifications made, such as changed text, added paragraphs, or modified code.
Making Changes
If you want to make changes to the files, you can do so directly in Meld. Simply select the portion you want to modify and make the necessary changes. Meld will reflect your changes and provide a visual indication of what has been modified.
Conclusion
In this article, we explored the installation and usage of Meld on a Windows 10 operating system. Meld is an essential tool for developers who need to compare and analyze differences between files. By following the steps outlined, you should now be able to install Meld, launch it, and use its powerful file comparison features for your programming projects.