
A Makefile is a special file that contains information about a program’s flow, targets, and libraries. To use it, we need to access the Make command. However, it is not preinstalled on Windows. In this post, we will learn how to install and run Makefile on Windows.
A Makefile is a file that contains information about a program’s flow, targets, and libraries. It is also known as a description file as it includes a group of targets and the sources on which they depend. Additionally, the Makefile contains libraries that support the source code. This type of file is executed using the make command. To install and run Makefile on your computer, you are supposed to follow the steps mentioned below.
- Download and install MinGW
- Configure Environmental Variable
- Install the Make command
- Rename mingw32-make.exe to Make
- Create and run the Makefile
Let us talk about them in detail.
1] Download and install MinGW
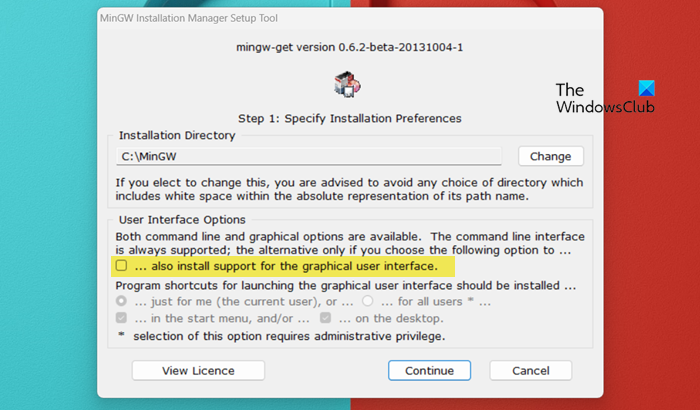
MinGW is the Windows adaptation of the GNU Compiler Collection (GCC), offering freely distributable import libraries and header files essential for developing native Windows applications. To use Make, we first need to download the MinGW installation media. Once downloaded, run the installation media, make sure to untick“also install support for the graphical user interface.”, and follow the on-screen instructions to complete the process. It will take some time to complete the installation process, so wait, and once done, click on Continue or Quit.
2] Configure Environmental Variable

After installing MinGW, we need to add the environmental variable to access the ‘Make’ command. For this, we need to first fetch the path of MinGW and add it to the environmental variables. Follow the steps mentioned below to copy the path of the mingw-get file.
- Open File Explorer by Win + I.
- Go to the location where you have installed MinGW. If you didn’t make any changes to the default location, go to C:\MinGW.
- Double-click on Bin to open the folder.
- You need to copy the path of the folder, as that would be the path of mingw-get.
Once you know the path of the file, follow the steps mentioned below to add it to the Environmental Variable.
- Open Control Panel.
- Search for “Environmental Variables”.
- Click on Edit the system environmental variable.
- Now, click on the Environmental Variable button.
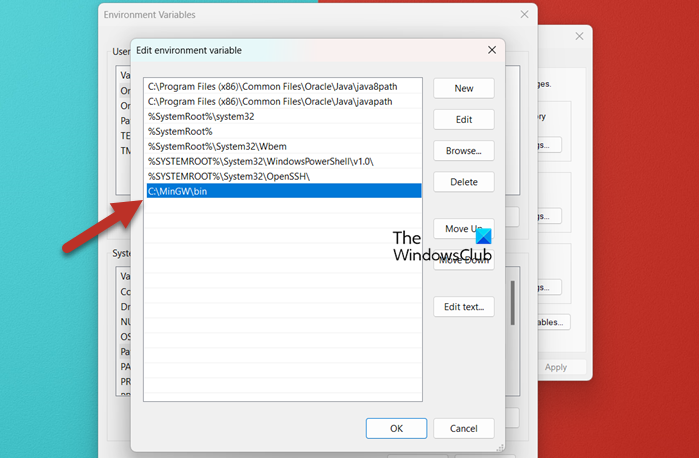
- From the System variables section, click on Path, and then on Edit.
- Click on New and then paste the path we asked you to copy earlier.
- Click on Ok.
Now you can close all interfaces as we have added the environmental variable.
3] Install the Make command
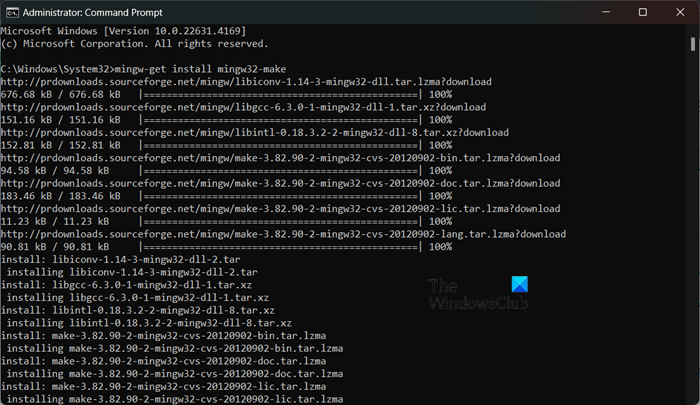
After adding the environmental variable, we can install the Make command. However, you won’t be able to run the Make command without following the previous steps. To do so, open the Command Prompt as an administrator and then run the following command.
mingw-get install mingw32-make
When you run this command, MinGW will install all the modules related to Make; however, it will take a while to do so.
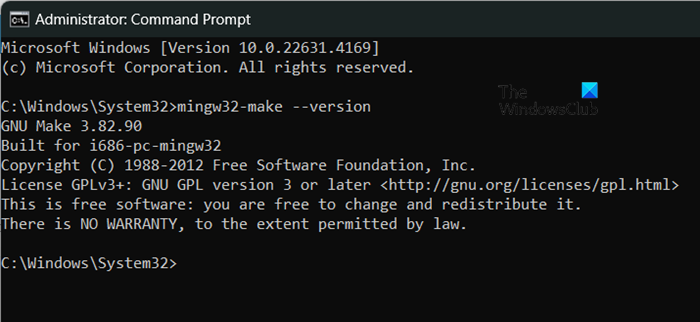
To know if it is installed, you can run mingw32-make --versioncommand. It will give you the version information about the MinGW installation.
4] Rename mingw32-make.exe to Make

Don’t you think, running ‘mingw32-make’ every time to use the ‘make’ command is a bit of a hassle? If yes, we would rename mingw32-make to Make so that next time we can just use the ‘make’ command. To do so, follow the steps mentioned below.
- Open File Explorer.
- Go to the location where you have installed mingw32.
- Now, double-click on Bin, and then rename mingw32-make file to make.
To verify this, run make --version. If the command is running without throwing any error, you can rest assured that renaming worked.
5] Create and run the Makefile
Upon installing the Make command, we can create a Makefile. There are various ways to do this, but we have listed a general guide below that you can follow.
- You can create a new folder with a name of your choice or the Makefile on your desktop; that’s what we did.
- Now, create a text file. To do so, right-click on a space and select New > Text document.
- Open the file and paste the following lines of code. Make that before starting the second line, you give a Tab.
firstmakefile:
      echo "Getting started with Makefile";
- To save it, go to File > Save as.
- Give it a name, let’s say, Makefile, change the Save as type to All files, and click on Ok.
- To run the file, open Command Prompt.
- Navigate to the location where you have created the folder, for that, run the cd command. Since my location is C:\Users\yusuf\OneDrive\Desktop, I ran cd C:\Users\yusuf\OneDrive\Desktop.
- Run dir to list all the files present in that particular directory.
- To run the file, just run
make -f filename.
That’s how you can create and run a Makefile.
Read: How to install NumPy using PIP on Windows
What is the command to run a makefile?
To run a makefile, you are required to use the make command. However, if you want to call a file, use -f option so that the command would look like make -f filename.
Read: How to create a file without Extension in Windows
How do I install Make on Windows?
To install Make on your computer, we can install MinGW first, then add the environmental variable path, and finally, install Make. We recommend that you follow the guide mentioned earlier to install Make on your system.
Read: 5 System Information Tools in Windows.
Как запустить Make на Windows
Make — это широко используемая для автоматизации сборки проектов утилита, которую бывает проблематично установить и запустить на windows. Сегодня я поделюсь самым простым способом, который позволит вам это сделать. Использовать мы будем Chocolatey.
Chocolatey (choco) — это менеджер пакетов для Windows, который позволяет устанавливать и управлять программным обеспечением из командной строки. Вот как установить утилиту make на Windows с помощью Chocolatey:
-
Установка Chocolatey:
-
Откройте PowerShell от имени администратора.
-
Вставьте следующую команду и нажмите Enter:
Set-ExecutionPolicy Bypass -Scope Process -Force; [System.Net.ServicePointManager]::SecurityProtocol = [System.Net.ServicePointManager]::SecurityProtocol -bor 3072; iex ((New-Object System.Net.WebClient).DownloadString('https://community.chocolatey.org/install.ps1'))Эта команда скачает и запустит скрипт установки Chocolatey. Подтвердите выполнение команды, если будет запрошено разрешение.
-
Установка make с помощью Chocolatey:
После установки Chocolatey выполните следующую команду в PowerShell:
choco install makeChocolatey автоматически загрузит и установит утилиту make и все необходимые зависимости.
-
Проверка установки:
make --versionЕсли установка прошла успешно, вы увидите вывод с информацией о версии make.
Далее, для использования make можно использовать обычный CMD, но, всегда в режиме администратора.
Если было полезно — подписывайтесь и ставьте лайки. Благодарю за внимание.
Installing Make on Windows: A Step-by-Step Guide
Introduction
Make is a powerful tool for building, testing, and debugging C and C++ programs. It provides a comprehensive set of features and tools for developers to create and manage complex projects. In this article, we will guide you through the process of installing Make on Windows.
Prerequisites
Before installing Make, you need to have the following:
- A Windows operating system (Windows 10 or later)
- A C or C++ compiler (e.g., GCC, Clang)
- A C or C++ source code file
Installing Make
To install Make, follow these steps:
Step 1: Download the Make Installer
- Go to the official Make website (www.gnu.org/make.html) and click on the «Download» button.
- Select the Windows installer for your version of Windows (e.g., Make-1.4.0.exe for Windows 10).
- Run the installer and follow the prompts to install Make.
Step 2: Add the Make Binaries to Your System Path
- After installing Make, you need to add the Make binaries to your system path.
- Right-click on the Start menu and select «System».
- Click on «Advanced system settings» on the left side.
- Click on «Environment Variables».
- Under «System Variables», scroll down and find the «Path» variable, then click «Edit».
- Click «New» and add the following path:
C:Program FilesGNUMakebin - Click «OK» to close all the windows.
Step 3: Verify the Installation
- Open a new Command Prompt or PowerShell window.
- Type
make --versionand press Enter. - If Make is installed correctly, you should see the version number.
Using Make
Now that Make is installed, you can use it to build, test, and debug your C and C++ programs. Here are some basic commands to get you started:
Building a Simple Program
- Create a new file called
hello.cwith the following content:
#include <stdio.h>
int main() {
printf(«Hello, World!n»);
return 0;
}
2. Compile the program using Make:

```bash

make hello
This will build the program and print «Hello, World!» to the console.
Testing a Program
- Compile the program again:
make hello - Run the program:
./helloThis will print «Hello, World!» to the console.
Debugging a Program
- Compile the program again:
make hello - Run the program:
./hello - Use the debugger to step through the program and inspect variables.
Advanced Make Commands
Here are some advanced Make commands to get you started:
Creating a Makefile
- Create a new file called
Makefilewith the following content:
CC = gcc

CFLAGS = -Wall -O2

SOURCES = hello.c

OBJECTS = $(SOURCES:.c=.o)

EXECUTABLE = hello
all: $(EXECUTABLE)
$(EXECUTABLE): $(OBJECTS)
$(CC) $(CFLAGS) $(OBJECTS) -o $(EXECUTABLE)
%.o: %.c
$(CC) $(CFLAGS) -c $< -o $@
clean:
rm -f $(OBJECTS) $(EXECUTABLE)
2. Compile the Makefile:

```bash

make
This will build the program and print «Hello, World!» to the console.
Running a Makefile
- Compile the Makefile:
makeThis will build the program and print «Hello, World!» to the console.
Using Make Variables
- Create a new file called
Makefilewith the following content:
CC = gcc

CFLAGS = -Wall -O2

SOURCES = hello.c

OBJECTS = $(SOURCES:.c=.o)

EXECUTABLE = hello
all: $(EXECUTABLE)
$(EXECUTABLE): $(OBJECTS)
$(CC) $(CFLAGS) $(OBJECTS) -o $(EXECUTABLE)
%.o: %.c
$(CC) $(CFLAGS) -c $< -o $@
clean:
rm -f $(OBJECTS) $(EXECUTABLE)
2. Compile the Makefile:

```bash

make
This will build the program and print «Hello, World!» to the console.
Conclusion
Installing Make on Windows is a straightforward process that requires only a few steps. With Make, you can build, test, and debug C and C++ programs with ease. By following the steps outlined in this article, you can get started with Make and start creating complex projects with confidence.
Unlock the Future: Watch Our Essential Tech Videos!
For tech enthusiasts, Make is a very neat way of building applications. Whether you’re trying to package your app or install somebody else’s, Make makes things easier.
Make isn’t available in Windows. When downloading a Windows application we download a setup file of EXE format. There’s no telling what these setup files may contain. You may even be downloading malware with exe format.
Below we have compiled a few different approaches to installing Make in Windows.
What is Make?
GNU.org tells Make is a tool that controls the generation of programs from its source files. In simple terms, the Make tool takes the source code of the application as input and produces the application as output.
Make is targeted for applications that follow the Free and Open Source Software (FOSS) principle. It was originally designed to work across Linux systems only. The source code can be modified in any way we want before we package it up for use.
Installing Make on Windows
Using Winget
Winget tool by Windows manages installation and upgrade of application packages in Windows 10 and 11. To use this tool, you need to have at least Windows 10 or later installed on your PC.
- Press Win + R together to open the Run window.
- Type cmd and press Enter to bring up the Command Prompt.
- Type the command
Winget install GnuWin32.makeand press Enter.
- Type Y to agree to source agreements.
- After installation, press Win + R again.
- Type
systempropertiesadvancedand press Enter.

- Select Environment Variables under the Advanced tab.

- Under System variables, select New.
- Under the variable name, enter make.
- Under Variable value, enter
C:\Program Files(x86)\GnuWin32\bin\make.exe. - Or, select Browse File and go to the above location.

- Press on OK.


Using Chocolatey
Using Chocolatey is a great way to install make if you do not meet the minimum requirements for Winget. It is a package manager and installer for the Windows platform. For anyone familiar with Ubuntu, it is the equivalent of apt command for software installation.
Since Make is not directly available in Windows, we need to install the package manager first. Then, we will use this package manager to install the make tool.
- Press Win + X keys together to open the Power menu.
- Select Windows Powershell(Admin).
- Type the command ‘
Set-ExecutionPolicy Bypass -Scope Process -Force; iex ((New-Object System.Net.WebClient).DownloadString('https://community.chocolatey.org/install.ps1'))'and press Enter.
- Downloads and installs chocolatey as available from their official source.
- Type
chocoto verify if the installation worked.
- Now, type the command ‘
choco install make‘ to install Make.
- Go to the installation directory
C:\Program Files(x86)\GnuWin32\to confirm the installation worked.


Using WSL
Using WSL or Windows Subsystem for Linux, we can install Make directly on our PC. WSL is released by Windows so this is the most preferred way of installing Make on Windows.
For WSL, we will install Ubuntu inside our Windows.
- Press Win + X keys together to open the Power menu.
- Select Windows Powershell(Admin).
- Type the command ‘
Wsl --install‘ and press Enter.
- Restart your PC.
- Go to the Start Menu and type Ubuntu to bring up the Ubuntu command line.
- Type the following ‘
Sudo apt install gcc build-essential make -y‘ and press Enter.
- Wait until the installation completes.


Using MinGW
MinGW is one of the older ways to install Make on Windows. MinGW is a collection of minimal GNU files for Windows. Note that using this method, you will have to type the ming32-make instead of the make command. Both do the same work except ming32-make is the MinGW version of make.
- Download the latest version of MinGW-get-setup.exe.
- Install MinGW by opening the setup file.

- Turn off installing graphical interface.
- Select Continue to start installation.

- Go to the installation directory and locate the bin folder.
- Make sure MinGW-get.exe exists.
- Press Win + R together to open the Run window.
- Type
systempropertiesadvancedand press Enter. - Select Environment Variables under the Advanced tab.
- Under System variables, double-click on Path.
- Select New.

- Type the location of MinGW-get.exe. E.g.
C:\MinGW\bin
- Select OK.
- Press Win + X together to open the Power menu.
- Select Windows Powershell.
- Type the command ‘
Mingw-get install mingw32-make‘ and press Enter.


How to use Make on Windows?
Using Make on Windows is pretty much the same as Linux or other platforms. You need to start with a makefile along with the source code of the program.
- Go to the location of the source code.
- Do a right-click and select Text document under New.
- Give it the name Makefile.

- Assuming the source code is source.c, paste the following lines in your makefile as given in this tutorial.
- Finally, open Command Prompt and go to the source code location using the cmd command.
- Type make and press Enter.
- You can now share and open the output file as an application.
- You can also modify the source code source.c any number of times and make will compile it as application output.


If you want to learn more about using the Make command, there’s entire documentation on its usage.
Make is an incredibly powerful tool for managing application compilation, testing and installation, or even setting up the development environment. It comes standard on Linux and macOS, and it is therefore widely adopted. But how can you get started with Make on Windows?
I’ve previously written about using Make for Python development, you might find it interesting.
If you are using Windows Subsystem for Linux (WSL/WSL2), then you can easily install make with the sudo apt install make command. However, if you want to have the command available natively on a normal terminal prompt then you need to install a Windows-specific version.
How to install Make on Windows?
The easiest way to configure Make is to use the Chocolatey package manager for Windows. It will handle downloading the correct executable, installing it, and making sure that the command is added to the system path.
- Install Chocolatey if you don’t already have it installed
- Open an elevated terminal (Run as administrator)
- Type the command
choco install make, approve the installation if prompted
Next, verify that make works, and then you can start using it normally:
>> make --version
GNU Make 4.3
Built for Windows32
Copyright (C) 1988-2020 Free Software Foundation, Inc.
License GPLv3+: GNU GPL version 3 or later <http://gnu.org/licenses/gpl.html>
This is free software: you are free to change and redistribute it.
There is NO WARRANTY, to the extent permitted by law.
Alternatively, if you’d prefer to use the new native Windows package manager you can use this winget command:
>> winget install GnuWin32.Make
This will download the installer and run it for you automatically. Make will also be added to the list of installed programs so you can uninstall it from the Add or remove programs section. You will still get the following error since the installer does not add make to the system path:
make : The term 'make' is not recognized as the name of a cmdlet,
function, script file, or operable program...
To make it executable you need to open the Start menu and search for Edit the system environment variables. Click Environment Variables, then under System variables choose Path and click Edit. Click New and insert C:\Program Files (x86)\GnuWin32\bin, then save the changes. Open a new terminal and test that the command works.
As of writing this article the current version that gets installed with winget is 3.81, so it is older than the one from Chocolatey. You may want to take that into consideration when choosing the installation method. You can check which version would be installed with winget show GnuWin32.Make.
Using Make on Windows
From a syntax perspective there is no difference between Linux and Windows. You still need to write a Makefile and define the shell commands in tab-indented sections. However, the commands themselves need to be adjusted for the changed operating system.
Normally on a Makefile each line runs on a separate shell. If you need to run many commands from the same shell instance then they should be defined on the same line and chained together with the && operator.
.PHONY: test
test: venv
	.\venv\Scripts\activate && python -m unittest discover

.PHONY: venv
venv:
	python -m venv venv
The above example defines phony Make targets for setting up a Python virtual environment and running unit tests. Assuming that you have installed Python, running make test should execute successfully, running zero unit tests since it couldn’t find any.
If you need to make your Makefile support different operating systems, then you have to also detect the operating system to be able to run a different set of commands for each OS. With Windows the added difficulty is that in some cases (MSYS, MINGW) you actually need to use the Linux commands.
This answer on Stack Overflow has one solution for finding the correct environment, relying on how the system Path is delimited by semicolons ; unlike all other OSes. We can use that information to make our small example Makefile work natively on both Windows and Linux:
ACTIVATE := ./venv/bin/activate
PYTHON := python3
ifeq '$(findstring ;,$(PATH))' ';'
	ACTIVATE := .\venv\Scripts\activate
	PYTHON := python
endif

.PHONY: venv
venv:
	$(PYTHON) -m venv venv

.PHONY: test
os: venv
	$(ACTIVATE) && $(PYTHON) -m unittest discover
The command for activating the virtual environment is different on Windows compared to other OSes. Also the Python executable is named python on Windows, but on Linux you need to use python3. The conflicting commands can be defined as variables and then referenced in the targets.
Similarly, if you’re compiling C or C++ code, you need to use gcc or g++ on Linux, and cl on the Windows developer command prompt. Also the command arguments will need to be different.
Conclusion
It’s possible to use Make natively on Windows, and it’s not even that difficult. If you’re accustomed to using Bash and Linux commands then the switch to PowerShell commands might require a bit of adaptation. Definitely the biggest challenge is to write Makefiles that support different operating systems, but as we saw that can be accomplished with some tricks.