
Компонент WSL (Windows Subsystem for Linux или Подсистема Windows для Linux) появился в Windows 10 и с тех пор постоянно развивается. Одна из новых возможностей, которую кто-то из пользователей мог пропустить — возможность простого и удобного запуска программ Linux с GUI прямо в ОС Windows.
В этом материале — пример быстрой установки всего необходимого и запуска приложений с графическим интерфейсом в Windows 11 и 10 и дополнительная информация, которая может оказаться полезной.
Установка WSL, дистрибутива Linux и приложений
Установить WSL и нужный дистрибутив можно разными способами:
- Включив необходимые компоненты в дополнительных компонентах Windows и загрузив дистрибутив в Microsoft Store (подробнее).
- Почти автоматически в командной строке.
Далее будет рассмотрен второй вариант, как более быстрый в контексте рассматриваемой темы.
Для установки WSL и конкретного дистрибутива Linux достаточно выполнить следующие шаги:
- Запустите командную строку от имени администратора, введите команду
wsl --install
и нажмите Enter, дождитесь завершения выполнения команды.

- Перезагрузите компьютер и снова зайдите в командную строку. Если на первом шаге была также произведена установка Ubuntu (в некоторых версиях Windows устанавливается автоматически), завершите установку с помощью
wsl --install Ubuntu
В процессе потребуется задать имя пользователя и пароль.
- Если требуется другой дистрибутив или автоматическая установка не выполнялась, по порядку введите команды (первая покажет список доступных дистрибутивов, во второй укажите имя дистрибутива из левого столбца):
wsl --list --online
wsl --install NAME


Готово, дистрибутив установлен, а поддержка графического интерфейса приложений в WSL текущих версий включается автоматически (ранее этого можно было добиться лишь обходными путями, по умолчанию приложения работали только в режиме терминала), переходим к установке приложений:
- Введите команду
sudo apt-get update
также можно использовать apt вместо apt-get. Дождитесь обновления репозиториев.
- Для установки приложения по его имени введите команду
sudo apt-get install ИМЯ_ПРИЛОЖЕНИЯ -y
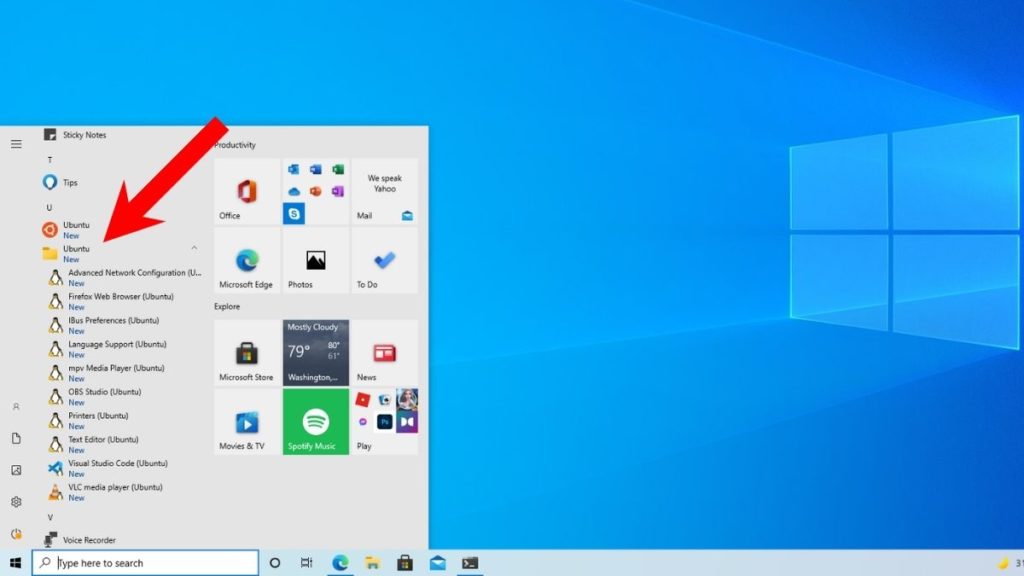
- Приложение будет установлено и появится в меню «Пуск» Windows (в папке соответствующего дистрибутива), откуда его можно будет запустить:

- Тем же способом можно установить и другие необходимые приложения, а для их удаления используйте команду
sudo apt-get remove ИМЯ_ПРИЛОЖЕНИЯ


Результат: приложения Linux с графическим интерфейсом исправно работают прямо в Windows:
Делают это со звуком, ускорением графики OpenGl, пробросом локальных дисков.
При желании вы даже можете установить менеджер пакетов с графическим интерфейсом (своего рода «магазин приложений»). Например, мне удалось добиться вполне исправной работы Gnome Software:
- Устанавливаем с помощью команды в WSL
sudo apt install gnome-software -y
- Изменяем свойства ярлыка, добавленного в меню «Пуск» (правый клик по ярлыку в меню Пуск — перейти к расположению файла — открыть свойства ярлыка), заменив поле объект на (пример для Ubuntu)
"C:\Program Files\WSL\wslg.exe" -d Ubuntu -u root sudo gnome-software
Подобным же способом можно «заставить» запускаться от имени суперпользователя с ярлыков Windows и другие программы.

- Пользуемся для установки, обновления и удаления приложений Linux прямо в Windows, в графическом интерфейсе:


Подробная техническая информация о том, как именно работают Linux-приложения с GUI доступна на GitHub проекта WSLg, с помощью которого реализована соответствующая функциональность.
Although Windows users could also wish to run Linux software, Linux users frequently desire to run Windows applications on Linux. You can use Linux applications without leaving Windows, whether you’re searching for an improved development environment or strong command-line tools. There are several alternatives to purchasing a new laptop to run the OS for running Linux applications on Windows. Since anybody can set up a virtual machine with a free Linux distribution without the requirement for software licenses, it is simpler than running Windows software on Linux.
There are two popular methods for running Linux software on Windows, they are
- WSL (Windows Subsystem for Linux)
- Virtual Machine
In this article, we’ll discuss how to implement both of these methods briefly.
Note: If you’re using Windows 11, the below steps can be omitted since Windows 11 can run Linux GUI apps out of the box.
Method 1: Windows Subsystem for Linux (WSL)
The WSL is a feature available in Windows that’ll enable one to run the Linux file system, along with Linux command-line tools and GUI applications, directly on Windows. And they can be completely integrated with Windows tools. But the only drawback of WSL is that they are mainly targeted for command-line tools and cannot be used for graphics-intensive programs.
Step 1: Enable the Windows Subsystem for Linux optional feature
Start PowerShell or Command-Prompt with administrator privileges and enter the following command to enable the WSL services on windows, this may be enabled by default in some systems.
Enable-WindowsOptionalFeature -Online -FeatureName -Microsoft-Windows-Subsystem-Linux

Alternatively, you can enable it using the ‘programs and features’ settings.

Step 2: Enable the Virtual Machine platform and Install WSL2
The virtual machine has to be enabled before installing WSL, this can be done using the following command.
dism.exe /online /enable-feature /featurename:Microsoft-Windows-Subsystem-Linux /all /norestart

Once it has been enabled, install WSL by entering the following command in PowerShell or Command-Prompt.
wsl --install
Set the default version of WSL to 2
wsl --set-default-version 2

Step 3: Download and Install a Linux distribution
You can download and install any distro of your choice, for the sake of convenience we’ll be installing ubuntu. Navigate to Microsoft Store and search for ‘ubuntu’ then install the application. Once downloaded open the app and follow through with the installation wizard. Once the installation process is complete you’ll be left with the following terminal. Linux Command-line tools can be executed using this terminal.

Step 4: Download and Install VcXsrv Windows X Server
The X server is a third-party display manager which is a provider of graphics resources and keyboard/mouse events. Download VcXsrv Windows X Server from the link provided — VcXsrv Windows X Server
Once the setup is complete, make sure to disable the access control option to avoid running into errors while running the GUI applications.

Step 5: Setting up the DISPLAY environment variable
Starting the bash terminal, we have to set the DISPLAY environment variable so it uses the windows host IP address since WSL2 and Windows host doesn’t share the network device. Use any of the following commands to set the DISPLAY variable.
export DISPLAY=$(ip route|awk ‘/^default/{print $3}’):0.0
export DISPLAY=»`grep nameserver /etc/resolv.conf | sed ‘s/nameserver //’`:0″

Run the below command to check whether the variable is properly set or not.
echo $DISPLAY

The variable is reset every time a session is restarted so as to avoid running the command each and every time we open the terminal. We can add the command at the end of the /etc/bash.bashrc file. Open the bashrc file using nano or vim and then add the command at the end.
sudo nano /etc/bash.bashrc

Step 6: Create a .xsession file in the user’s home directory
The following command can be used to create a .xsession file in the user’s home directory /home/<user>/.xsession with the content xfce4-session.
echo xfce4-session > ~/.xsession
Now Windows desktop can run Linux GUI apps.

Method 2: Using a Virtual Machine
Using a Virtual Machine is the most efficient and easy way to run Linux apps on Windows, we’ll briefly discuss the installation and setting up a virtual machine with a Linux OS.
Step 1: Download and Install a Virtual Machine
Download a virtual machine of your choice (Oracle or VMware), here we’ll be using a VMware workstation. Download the software from the below link and follow the installation process. Refer to this How to Install VirtualBox on Windows GeeksforGeeks article for setting up a virtual machine using oracle.
Download VMware Workstation.

Step 2: Download a Linux distribution of your choice
You can download any Linux distribution, below are some of the most popular choices along with their links.
- Ubuntu
- Pop! OS
- Linux Mint
- Fedora
Step 3: Installing the OS
Open VMware Workstation, and click on the ‘Create new Virtual Machine’. And then select the installer disc image option and choose the downloaded Linux operating system’s ISO file.

Specify the disk capacity and click on next.

Name the virtual machine and move on to the next step.

Start the virtual machine to boot up the OS and follow the installation steps. Once the installation is complete you can run any Linux GUI apps using the virtual machine.

Step 4: Starting and Running the applications
You can now run any Linux application while within the virtual machines environment, here are some examples.
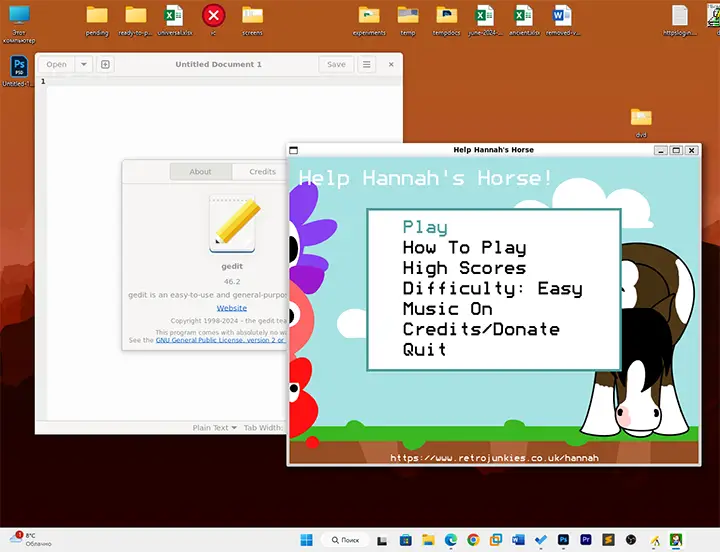
$ gedit

$ sudo apt install x11-apps -y
$ xcalc

$ xclock

$ xeyes

Linux has experienced tremendous growth in the past few years due to many amazing distro releases and tech giants like Microsoft finally realizing Linux’s worth and bringing it to Windows 10 in the form of Windows Subsystem for Linux.
WSL is great, but what enthusiasts really want is the ability to run Linux apps on Windows natively. While you could use a third-party X server along with WSL to pull this off, you’d need to follow extra installation steps that might be challenging for newbies. But, the good news is, in the latest Windows 10 insider preview, you can finally try it out and see it in action. Hence, in this article, let’s look at how you can install Linux GUI apps on Windows. Let’s get started.
Installing Linux GUI Apps On Windows
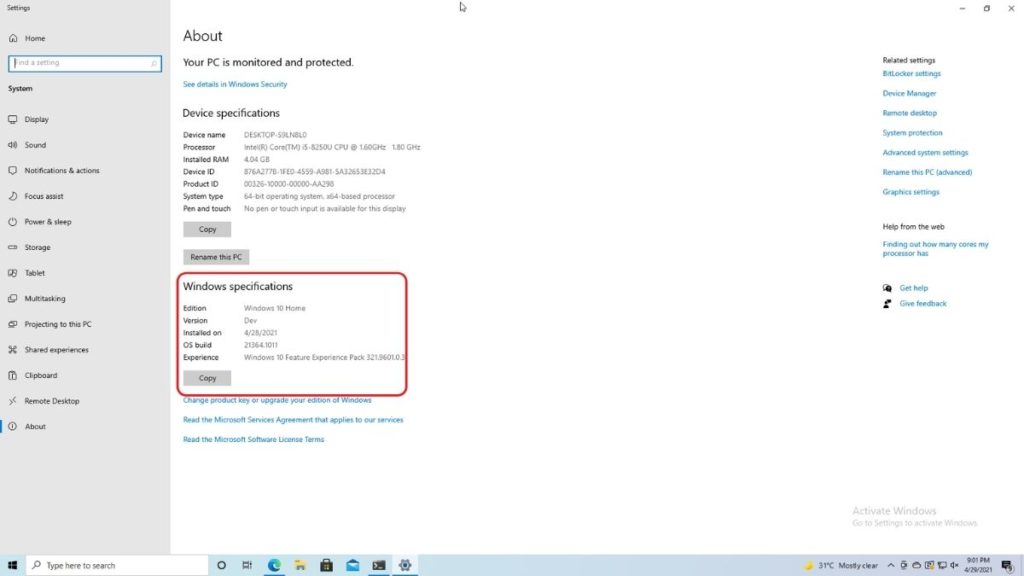
Updating To The Latest Windows Insider Dev Build (21364)
As the title says it all, you’ll need to update to the latest Windows insider build to try out this feature. Now, Windows’ preview builds are usually unstable so, if you don’t want to update to the insider 21364 build, you can do a fresh Windows 10 installation in VirtualBox or, if you’re running Linux, here’s the easiest way to install Windows on Ubuntu or Ubuntu-based distros. That’s it. That’s the catch.
After the installation’s done, follow these steps to enroll into the Windows Insider program.
1. Click on the Start button on the bottom-left corner, start typing “Windows insider,” and click on the first search result.
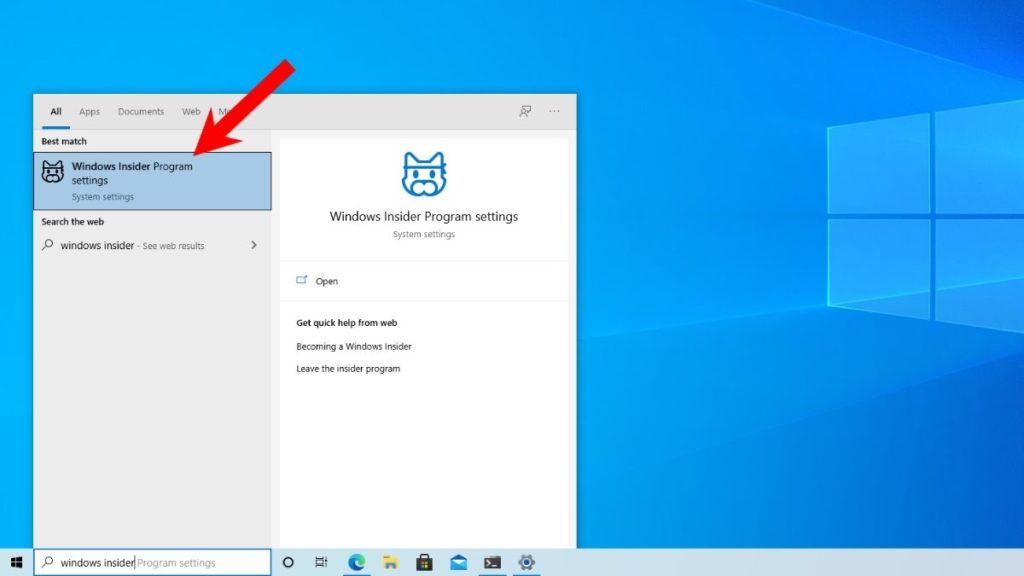
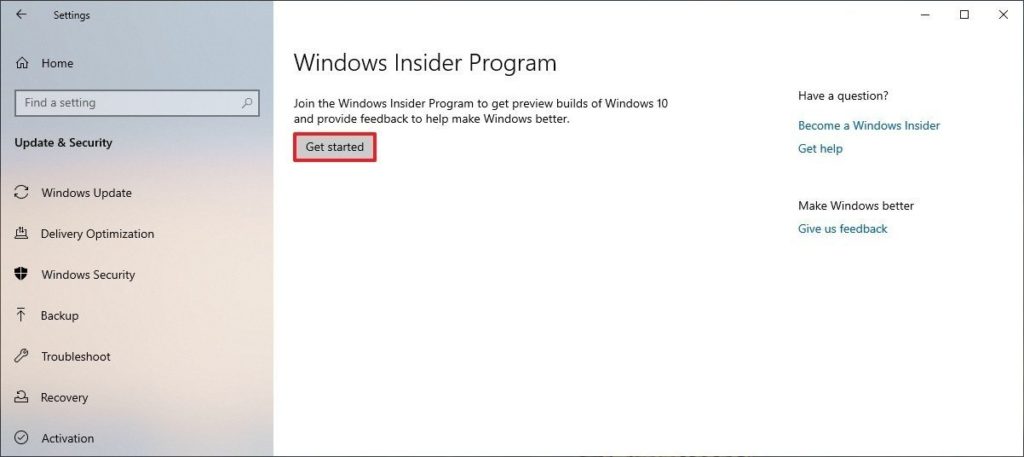
2. In the settings app, you can now see “Windows Insider Program” and an option to enroll yourself into the program. Click on Get Started.
3. Now, you’ll be asked to link a Microsoft account and after doing that, click on Register.
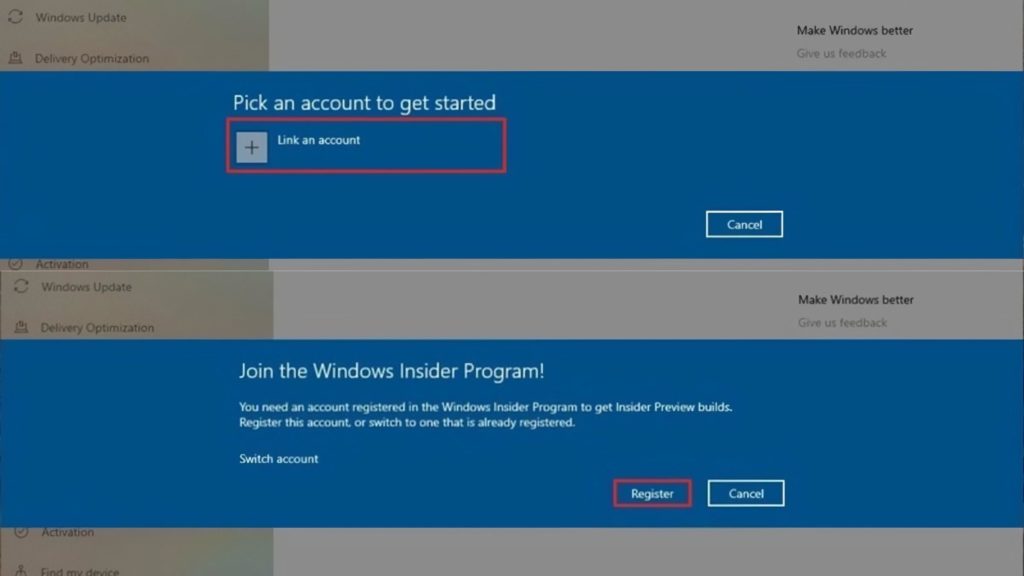
4. Accept all the terms and conditions and click on Sign up. The process is pretty self-explanatory.
5. While following these steps, make sure that you choose to receive builds from the Dev channel in one of the steps.
6. Your computer will restart multiple times during this process so, don’t panic.
7. Welcome to the Windows Insider Build 21364!
Installing WSL
Installing WSL is pretty easy. All you need to do is:
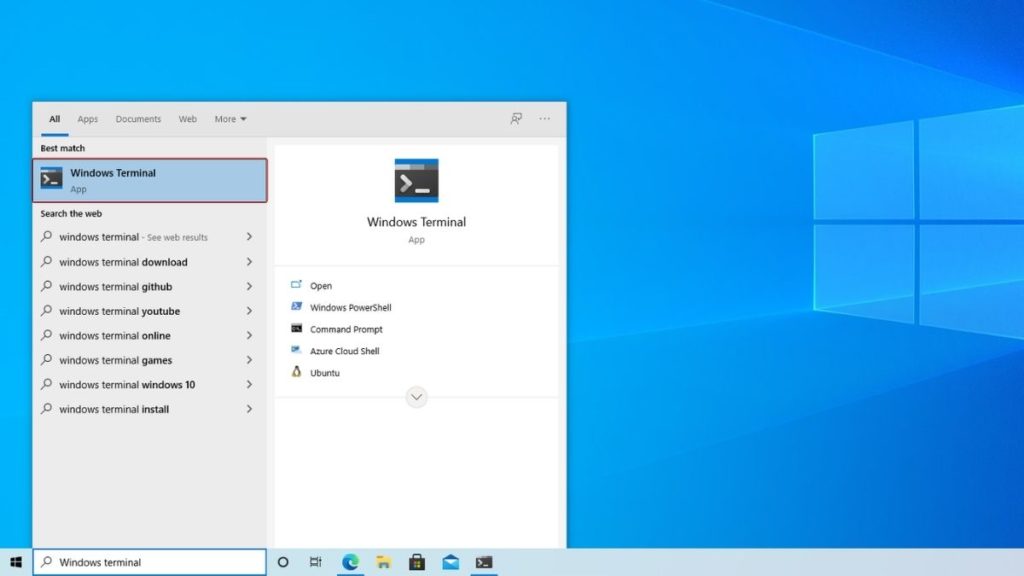
1. Fire up the new Windows terminal by clicking on the Start button, searching for “Windows Terminal,” and clicking on the first search result.
2. Now, in the Windows Terminal, type the following command and hit enter.
wsl --install -d UbuntuThis command installs Ubuntu. However, you can also go with Debian or OpenSUSE. If you’re having trouble installing it via the command line, open the Windows Store, search for Ubuntu, and install it. Pretty simple, right?
3. Sit back and relax until the installation’s done. It should take around 20-40 minutes to complete depending on your internet’s speed.
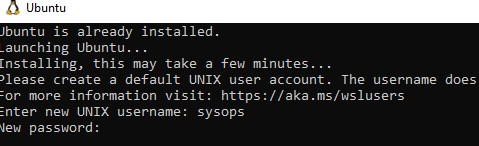
4. After the installation’s done, you’ll need to type out a new UNIX username, password and re-enter the password.
Set new UNIX username: abubakar
set a new password: ********
re-enter the password: ********
Congratulations on successfully installing WSL. Now you can install Linux apps.
Installing Linux Apps
Install Gedit On WSL
To demonstrate, we’ll be installing one of the popular Linux text editors, Gedit, and Microsoft’s Visual Studio Code.
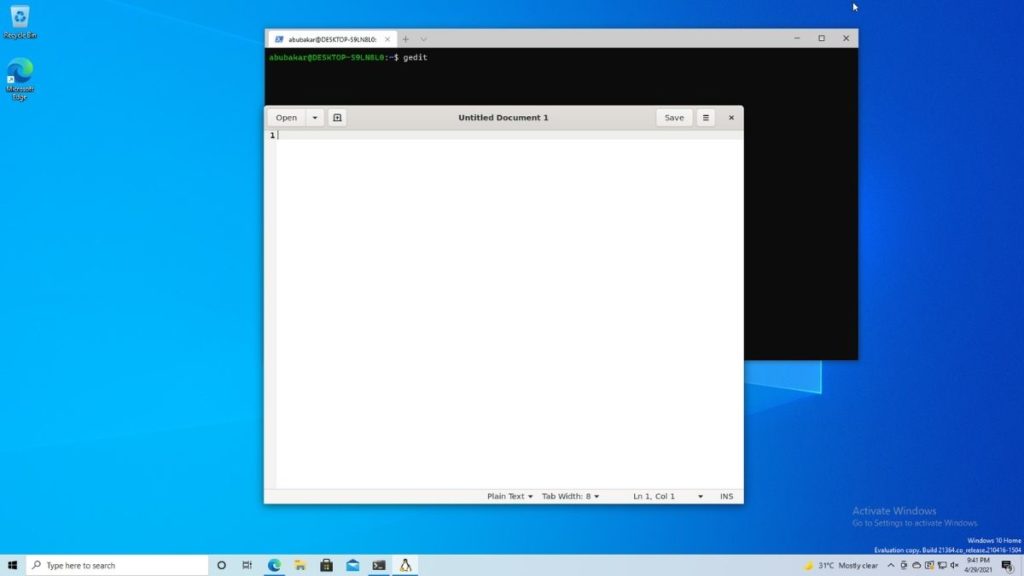
To install Gedit, type the following command.
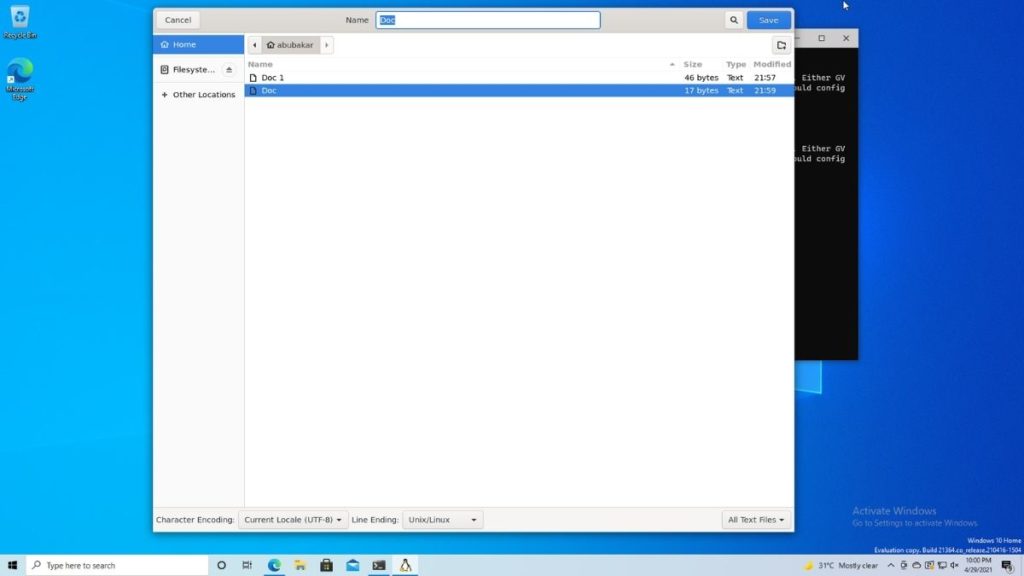
sudo apt install geditNow, all you need to do is type gedit in the terminal.
The app startup speeds are great. Microsoft says it’s using a companion distro which can be clearly seen while saving the text file.
Install VS Code On WSL
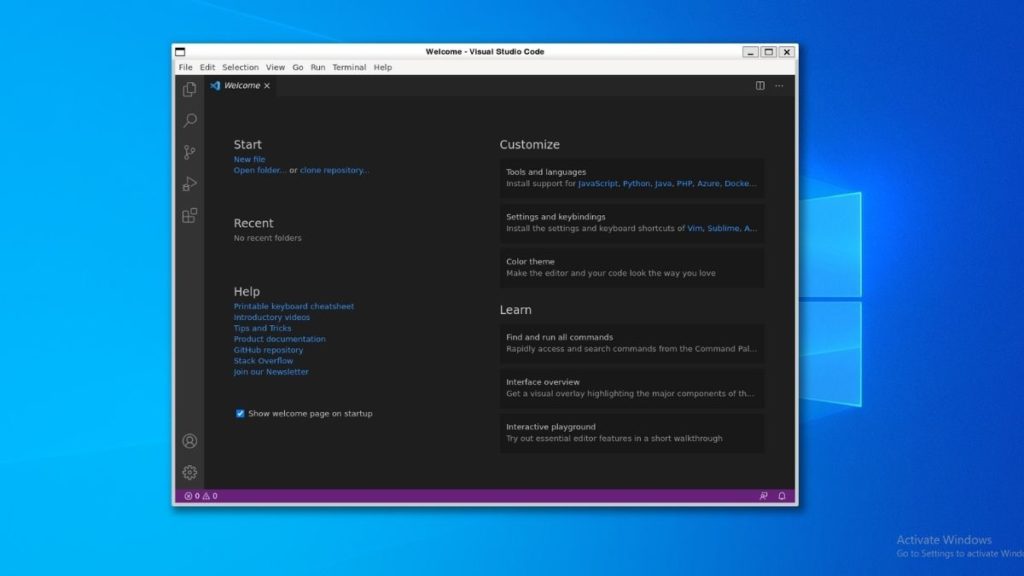
To install Visual Studio Code on WSL, all you need to do is copy and paste the following command and hit enter.
cd ~
curl https://packages.microsoft.com/keys/microsoft.asc | gpg --dearmor > microsoft.gpg
sudo mv microsoft.gpg /etc/apt/trusted.gpg.d/microsoft.gpg
sudo sh -c 'echo "deb [arch=amd64] https://packages.microsoft.com/repos/vscode stable main" > /etc/apt/sources.list.d/vscode.list'
sudo apt update
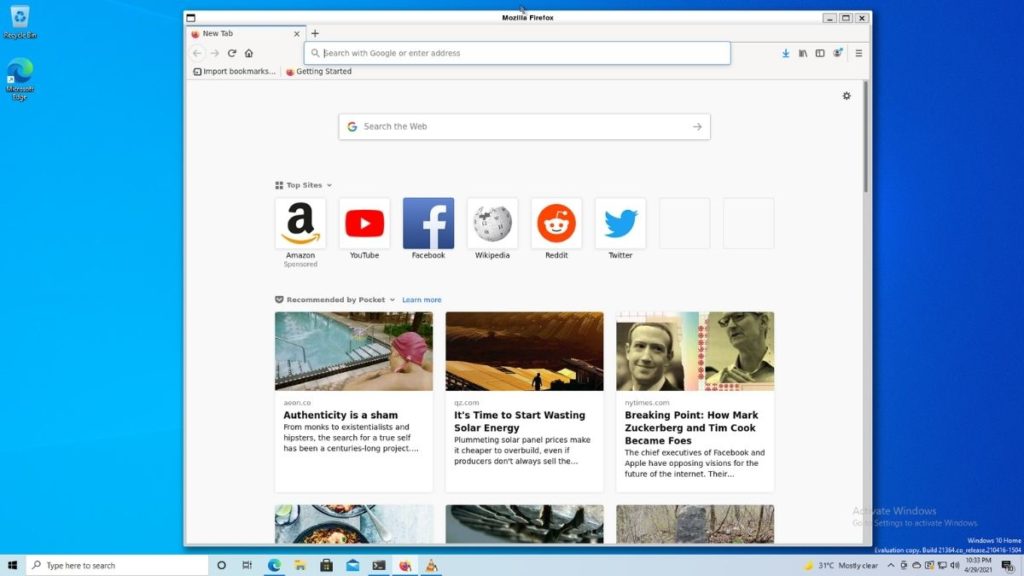
sudo apt install codeThe build also includes PulseAudio. Hence, you can use any multimedia apps like VLC, Audacious, or Audacity.
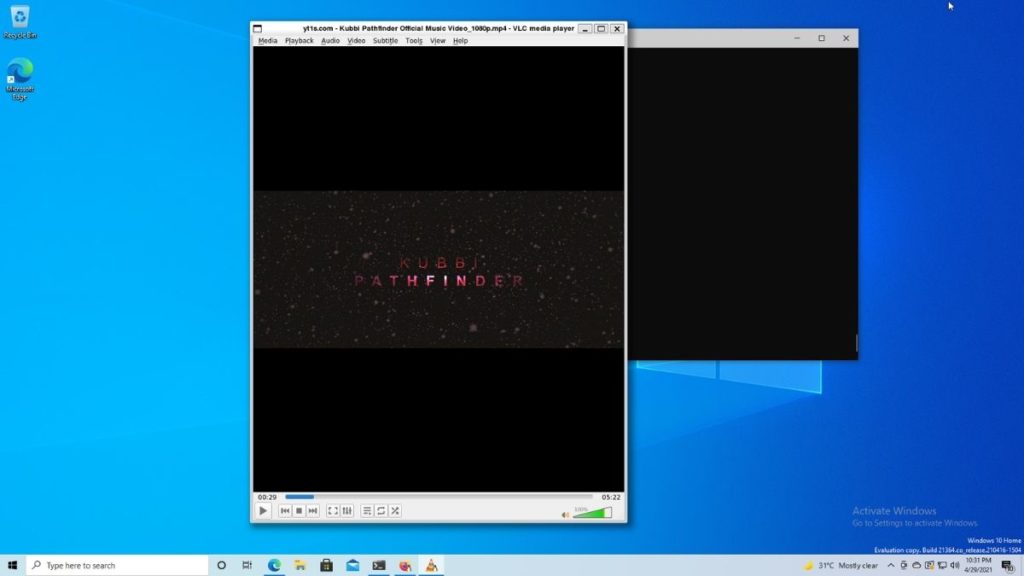
I’ve also tested the latest Firefox Quantum build, OBS Studio, and VLC worked very well. Sure, there were many lags and hiccups (probably because I was running it in a VM with limited resources). Still, everything worked pretty great, and for the first version running Linux GUI apps on Windows feels like nothing short of a miracle.
To avoid confusion, Linux apps in the taskbar have Tux (Linux’s mascot) below the app icons.
You can find all the installed Linux applications in the Ubuntu folder right below the Ubuntu app in the Start Menu.
Wrapping Up
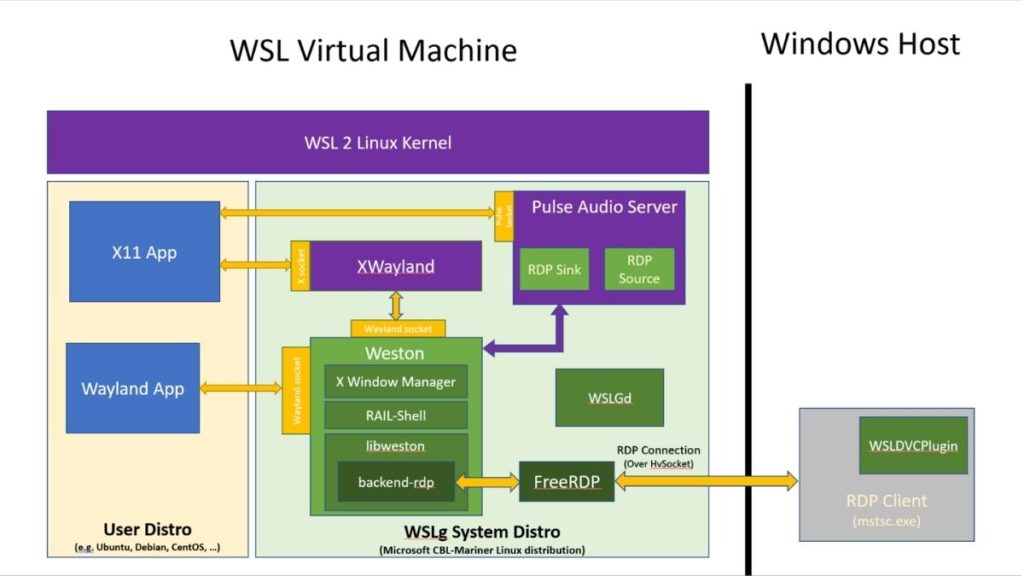
Here’s how the architecture looks like. If you’d like to read more about the architecture and its implementation, read this blog post by Microsoft.
So, that’s pretty much it in this article. If you’re a Linux user, do you think this feature will make you switch to Windows? Do share your thoughts.
There’s still a lot of development to be done until we see this in stable build, but at least we know that day is not too far.
Среда Windows Subsystem for Linux (WSL) позволяет запускать нативные приложения, писать скрипты, выполнять команды и скрипты Linux непосредственно из Windows без использования эмуляторов или развертывания выделенных виртуальных машин. Актуальной версией среды является WSL 2, в которой используется полноценное ядро Linux (версия ядра 5.15) и обеспечивает полную совместимость с системными вызовами. Образ ядра Linux в WSL представляет собой легкую виртуальную машину, для запуска которой не нужно устанавливать полноценную роль Hyper-V.
Содержание:
- Как установить Windows Subsystem for Linux (WSL2)?
- WSL: Установка дистрибутива Linux в Windows
- Команды для управления WSL в Windows
- Использование Linux в среде WSL
Вы можете запустить WSL 2:
- Во всех версиях Windows 10, начиная с 1903, а также в Windows 11 и Windows Server 2022;
- В настройка BIOS/UEFI компьютера должна быть включена поддержка аппаратной виртуализации: Intel VT (Intel Virtualization Technology) или AMD-V (SVM Mode).
Как установить Windows Subsystem for Linux (WSL2)?
Компонент WSL по умолчанию отключен в Windows. Современных дистрибутивах Windows 10 и Windows 11 для установки среды WSL достаточно выполнить команду:
wsl --install
Этак команда автоматически включит все необходимые компоненты Windows, необходимые для работы WSL, установить обновление ядра Linux для WSL2, загрузит дистрибутив Ubuntu (по-умолчанию) и установит его в WSL.
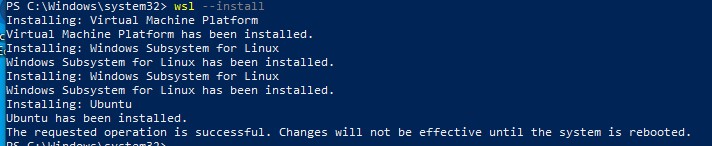
Осталось перезагрузить компьютер, и вы можете запускать среду WSL!
Вы можете установить для WSL другой дистрибутив Linux. Выведите список доступных дистрибутивов:
wsl --list --online
Укажите имя дистрибутива Linux, который установить в WSL. Например:
wsl --install -d kali-linux

Если в BIOS/UEFI компьютера не включена виртуализация, при установке WSL вы получите ошибку:
Installation failed with error 0x80070003 or error 0x80370102” it means that Bios Level Virtualization is not enabled on your computer.
Вы можете установить WSL2 в Windows вручную. Для этого придется вручную последовательно выполнить все этапы, который команда wsl —install запускала автоматически:
- Установить WSL
- Включить компонент виртуалзации VirtualMachinePlatform
- Установить ядро WSL 2
- Скачать и установить дистрибутив Linux для WSL
Сначала установите следующие компоненты Windows:
Enable-WindowsOptionalFeature -Online -FeatureName Microsoft-Windows-Subsystem-Linux
Enable-WindowsOptionalFeature -Online -FeatureName VirtualMachinePlatform
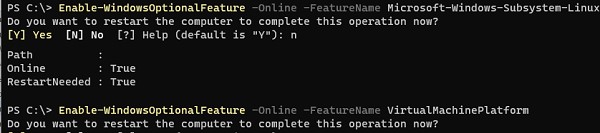
Перезагрузите компьютер.
Скачаем и установим обновление ядра Linux для WSL2 (WSL2 Linux kernel update package for x64 machines — https://wslstorestorage.blob.core.windows.net/wslblob/wsl_update_x64.msi). Можете скачать пакет вручную или с помощью PowerShell:
Invoke-WebRequest -Uri https://wslstorestorage.blob.core.windows.net/wslblob/wsl_update_x64.msi -OutFile "$($env:userprofile)\Downloads\wsl_update_x64.msi" -UseBasicParsing
Invoke-Item "$($env:userprofile)\Downloads\wsl_update_x64.msi"
rm "$($env:userprofile)\Downloads\wsl_update_x64.msi"
Еще раз перезагрузите компьютер и назначьте версию WSL 2 в качестве среды по-умолчанию:
wsl --set-default-version 2

WSL: Установка дистрибутива Linux в Windows
После того, как ядро WSL установлено в Windows, вы можете установить один или несколько дистрибутивов Linux на компьютер.
Можно установить пакет с дистрибутивом Linux через Microsoft Store. Доступны следующие дистрибутивы:
- Ubuntu
- Debian
- Kali Linux
- OpenSUSE
- Oracle Linux
- SUSE Linux Enterprise Server
- Fedora
Найдите нужную версию дистрибутива в Store и установите ее, нажав кнопку Получить (Get).

Если у вас отключен Windows Store, вы хотите установить дистрибутив WSL в Core редакции Windows Server или вам нужно установить WSL на Изолированном от интернета компьютере (оффлайн), вы можете скачать дистрибутив Ubuntu с помощью PowerShell командлета Invoke-WebRequest:
Invoke-WebRequest https://aka.ms/wslubuntu2204 -OutFile ubuntu-2204.appx –UseBasicParsing
Установите пакет для WSL с помощью:
Add-AppxPackage .\ubuntu-2204.appx
После окончания установки появится окно, в котором вам будет предложено указать имя пользователя и пароль для вашего дистрибутива.
После установки вы можете в меню Пуск появится отдельная программа для запуска Linux.
Также вы можете запустить ваш Linux из отдельной вкладки Windows Terminal или с помощью команды
wsl
.
Команды для управления WSL в Windows
Рассмотрим основные команды для управления ядром и дистрибутивами Linux в WSL.
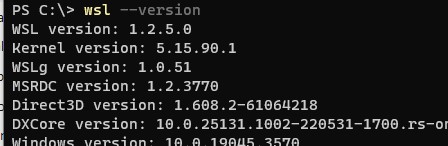
Проверить текущую версию ядра WSL:
wsl --version
Обновить ядро WSL вручную:
wsl --update
Откатится к предыдущему ядру WSL:
wsl --update rollback
Вывести список установленных версий Linux:
wsl --list
Вывести дистрибутив Linux, который используется по-умолчанию:
wsl --status
Дистрибутив Linux по-умолчанию в WSL можно изменить:
wsl --setdefault Ubuntu
Запустить определенный дистрибутив в WSL:
wsl -d kali-linux
Завершить среду WSL:
wsl --shutdown
Можно войти в WSL Ubuntu под root и сбросить пароль:
ubuntu config --default-user root
Passwd
Вернуть пользователя по умолчанию
ubuntu config --default-user your_username
Для настройки параметров WSL и дистрибутивов Linux используются конфиг файлы:
- wsl.conf – файл с настройками конкретного дистрибутива Linux (находится в директории /etc)
- .wslconfig – глобальные настройки WSL, которые применяются ко всем дистрибутовам (находится в профиле пользователя в
%UserProfile%
)
Например, если вы хотите ограничить использование оперативной памяти и CPU компьютера дистрибутивами Linux в WSL, создайте такой файл
%UserProfile%\.wslconfig
:
[wsl2]
memory=2GB
processors=2
Использование Linux в среде WSL
Дистрибутив Linux, установленный в WSL является полноценной операционной системой. Поэтому после установки рекомендуется выполнить обновление пакетов. Для Ubuntu выполните команду:
$ sudo apt-get update && sudo apt-get upgrade -y
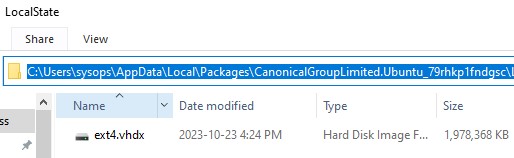
Файловая система вашего дистрибутива Linux хранится в профиле пользователя в виде VHDX файла. Например, виртуальный диск Ubuntu хранится в папке
%USERPROFILE%\AppData\Local\Packages\CanonicalGroupLimited.Ubuntu_79rhkp1fndgsc\LocalState
Файловая система Linux в WSL монтируется в виде сетевой папки прямо в проводник Windows.
Также для прямого доступа к файлам WSL из Windows можно использовать UNC путь. Например:
notepad \\wsl$\Ubuntu\sysops\home\1122.txt
В свою очередь локальные диски Windows монтируются в WSL в папку mnt. Вывести список файлов папок на диске C:
wsl
ls /mnt
ls/mnt/c

Другие примеры запуска Linux команд из Windows:
dir | wsl grep Sa
wsl ls ‑la > 123.txt
wsl ls ‑la /proc/cpuinfo
wsl ls ‑la “/mnt/c/Program Files”
Вы можете установить любые пакеты в Linux. Например, установите файловый менеджер Midnight Commander:
$ sudo apt-get install mc
В современной версии WSL 2 вы можете запускать из Windows любые приложения Linux с графическим интерфейсом (X11 и Wayland). Например, установите графический редактор:
$ sudo apt install gimp -y
Чтобы запустить его из Windows просто выполните команду:
wsl gimp

Yes, you heard it right! You can run Linux apps on Windows like native apps on the Windows system by following this tutorial.
With the release of Windows Subsystem for Linux (WSL), you can now run Linux applications directly on your Windows system, eliminating the need for dual-boot configurations or virtual machines. WSL2, in particular, integrates a full Linux kernel into Windows, allowing you to run Linux GUI applications as if they were native Windows applications. This guide will walk you through the process of configuring WSL, installing the required components, and running Linux GUI applications on Windows.
System Requirements: Windows 10 (Version 2004 and higher) or Windows 11, and a 64-bit processor with virtualization support enabled in BIOS/UEFI.
Step 1: Enable WSL and WSL2
- Open PowerShell as an administrator.
- Run the following command to enable the WSL feature:
dism.exe /online /enable-feature /featurename:Microsoft-Windows-Subsystem-Linux /all /norestart
- Next, execute the following command to enable the Virtual Machine Platform, which is required for WSL2:
dism.exe /online /enable-feature /featurename:VirtualMachinePlatform /all /norestart
- Restart the machine to complete the changes.
- Then set WSL2 as the default version by running:
wsl --set-default-version 2
Step 2: Install a Linux Environment
You can install various Linux distros, such as Ubuntu, Kali Linux, Debian, Fedora Remix, etc, directly from the Microsoft Store after setting up WSL. Additionally, other distributions like Manjaro and community-developed versions such as Arch Linux can also be installed through unofficial channels like GitHub.
Open the Microsoft Store and search for a Linux distribution, like Ubuntu or Kali Linux. Click Install and wait for the installation to complete. Once installed, launch the Linux environment from the Start menu.

Sometimes, you may encounter an issue like the screenshot below indicating that the WSL 2 requires an update to its kernel component. This often happens when the WSL 2 kernel is outdated or hasn’t been installed yet.

To solve this issue, update the WSL kernel by executing the following command in the PowerShell:
wsl.exe --update
Now go ahead with launching the Linux distro you installed from the Microsoft Store.
When you first launch the Linux environment, it will prompt you to create a username and password. Complete the setup by following the on-screen instructions.

Step 3: Running Linux GUI Applications
After setting up the Linux distribution, ensure that it is updated, and install the necessary GUI applications. For example, to run the Gedit application, which is exclusive to Linux distros, follow these steps:
- Update the Linux distribution using the appropriate update command for it:
sudo apt update && sudo apt upgrade- Next, execute the installation command for the specific software you need. (For example: Gedit installation):
sudo apt install gedit- After application installation, simply type the application name in the WSL terminal, and it will open as a window on your Windows desktop
gedit
Step 4: Pinning Linux GUI Application to Windows
To pin a Linux GUI application like gedit to the Windows taskbar or create a desktop icon, follow these steps:
- Search for the application: Open the Windows search bar and type the name of the application (e.g.,
gedit). - Pin to Taskbar: Once you find the application in the search results, right-click on it and select Pin to Taskbar.

- Create a Desktop Icon: If you prefer a desktop icon, right-click on the application and select Open File Location. This will open the application’s location in Windows File Explorer.
- From there, right-click the application, choose Send to, and then select Desktop (create shortcut).

This will allow users to easily pin the app to the taskbar or create a desktop shortcut for quick access.
Important Features to Explore
- Your Windows file system is accessible from within Linux distro at /mnt/c/
- Your Linux distro files can be accessed from your Windows system by typing
\\wsl$into the address bar of Windows File Explorer. - You can drag files between Windows and Linux applications.
- You can write scripts that use both Windows and Linux tools to automate tasks.
With WSL2 and integrated GUI support, running Linux applications on Windows is now easier and more efficient than ever. Whether you need to test software, develop in a Linux environment, or simply use specific Linux tools, WSL2 offers a seamless experience that makes Linux apps feel like they’re a natural part of your Windows system.
Managed VPS Hosting, Simplified
Unlock the potential of your website with Veeble VPS. Experience powerful hosting without the hassle. Get started today!
Explore Plans