
Last Updated :
02 Jun, 2022
Git is an open-source and free, decentralized version control system designed to handle projects of all sizes with speed and efficiency. Basically, it is a software tracking application that is commonly used to monitor projects across several teams. The best way of downloading and installing Git on the windows command line is to download it from its official site. Lets learn the step for the same,
Steps to download and install Git on Windows
Downloading
Step 1: Go to the official website: https://git-scm.com
Step 2: Click on 64-bit Git for Windows Setup and allow the download to complete.

Extract and Launch Git Installer
Step 3: Go to your download location and double-click the file to launch the installer.
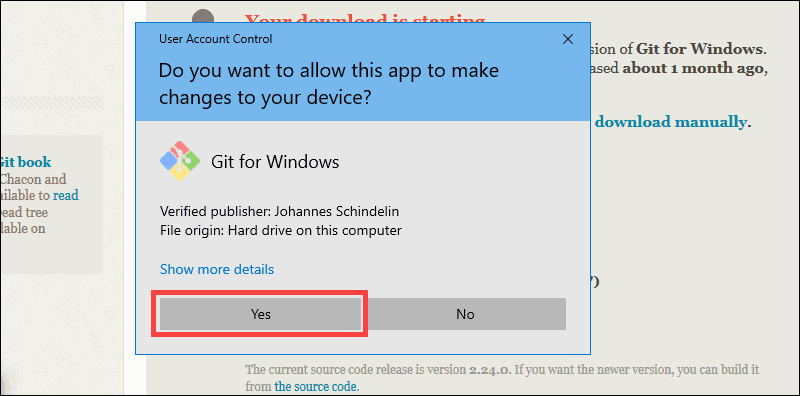
Step 4: Allow the app to modify your device by selecting Yes in the User Account Control window that appears.
Step 5: Check the GNU General Public License and click Next.

Step 6: Select the install location. If you don’t have a reason to modify it, leave it to default and click Next.

Step 7: A screen for component selection will display. Leave the settings as it is and click Next.

Step 8: The installer asks you to create a start menu folder. Simply click Next.

Step 9: Choose the text editor you want to use with Git and click Next.

Step 10: The following step allows you to give your original branch a new name. ‘Master’ is the default. Leave the default choice selected and press the Next button.

Step 11: You can adjust the PATH environment during this installation phase. When you run a command from the command line, the PATH is the default set of folders that are included. Continue by selecting the middle (recommended) option and clicking Next.

Step 12: The following option concerns server certificates. The default choice is used by the majority of users. Simply click Next.

Step 13: This step deals with how data is structured, and altering this option may create issues. So, it is advised to leave the default selection.

Step 14: Select the terminal emulator that you wish to use. Because of its features, the default MinTTY is suggested. Click Next.

Step 15: The installer now prompts you to specify what the git pull command should perform. Leave the default selected option and click Next.

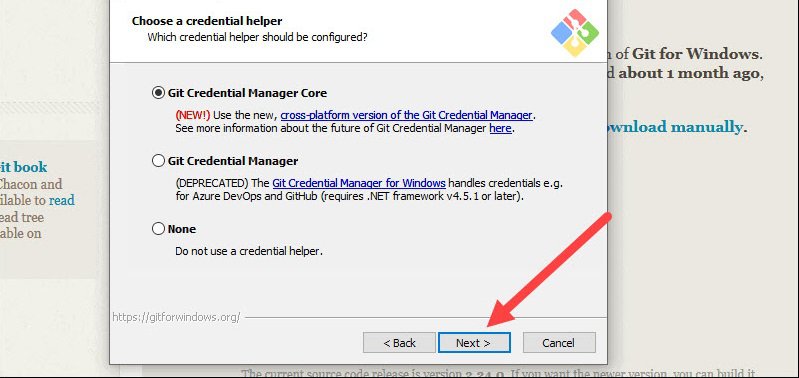
Step 16: The next step is to decide which credential helper to employ. Credential helpers are used by Git to retrieve or save credentials. Leave the default selection and click Next.
Step 17: Although the default choices are suggested, this step allows you to select which additional features to activate.

Step 18: Git offers to install some experimental features. Leave them unchecked and click Install.

Step 19: Once the installation is complete, launch the Git bash.


How to install Git on any OS
Git can be installed on the most common operating systems like Windows, Mac, and Linux. In fact, Git comes installed by default on most Mac and Linux machines!
Checking for Git
To see if you already have Git installed, open up your terminal application.
- If you’re on a Mac, look for a command prompt application called «Terminal».
- If you’re on a Windows machine, open the windows command prompt or «Git Bash».
Once you’ve opened your terminal application, type git version. The output will either tell you which version of Git is installed, or it will alert you that git is an unknown command. If it’s an unknown command, read further and find out how to install Git.
Install Git Using GitHub Desktop
Installing GitHub Desktop will also install the latest version of Git if you don’t already have it. With GitHub Desktop, you get a command-line version of Git with a robust GUI. Regardless of if you have Git installed or not, GitHub Desktop offers a simple collaboration tool for Git. You can learn more here.
Install Git on Windows
- Navigate to the latest Git for Windows installer and download the latest version.
- Once the installer has started, follow the instructions as provided in the Git Setup wizard screen until the installation is complete.
- Open the windows command prompt (or Git Bash if you selected not to use the standard Git Windows Command Prompt during the Git installation).
- Type
git versionto verify Git was installed.
Note: git-scm is a popular and recommended resource for downloading Git for Windows. The advantage of downloading Git from git-scm is that your download automatically starts with the latest version of Git included with the recommended command prompt, Git Bash . The download source is the same Git for Windows installer as referenced in the steps above.
Install Git on Windows through Visual Studio Code
GitHub integration is provided through the GitHub Pull Requests and Issues extension.
To get started with the GitHub in VS Code, you’ll need to create an account and install the GitHub Pull Requests and Issues extension.
Once you’ve installed the GitHub Pull Requests and Issues extension, you’ll need to sign in. Follow the prompts to authenticate with GitHub and return to VS Code.
Note: You can perform actions like, you can search for and clone a repository from GitHub using the Git: Clone command in the Command Palette (Ctrl+Shift+P) or by using the Clone Repository button in the Source Control view (available when you have no folder open).
Learn more here
Install Git on Mac
Most versions of MacOS will already have Git installed, and you can activate it through the terminal with git version. However, if you don’t have Git installed for whatever reason, you can install the latest version of Git using one of several popular methods as listed below:
Install Git From an Installer
- Navigate to the latest macOS Git Installer and download the latest version.
- Once the installer has started, follow the instructions as provided until the installation is complete.
- Open the command prompt «terminal» and type
git versionto verify Git was installed.
Note: git-scm is a popular and recommended resource for downloading Git on a Mac. The advantage of downloading Git from git-scm is that your download automatically starts with the latest version of Git. The download source is the same macOS Git Installer as referenced in the steps above.
Install Git from Homebrew
Homebrew is a popular package manager for macOS. If you already have Homebrew installed, you can follow the below steps to install Git:
- Open up a terminal window and install Git using the following command:
brew install git. - Once the command output has been completed, you can verify the installation by typing:
git version.
Install Git on Linux
Fun fact: Git was originally developed to version the Linux operating system! So, it only makes sense that it is easy to configure to run on Linux.
You can install Git on Linux through the package management tool that comes with your distribution.
Debian/Ubuntu
- Git packages are available using
apt. - It’s a good idea to make sure you’re running the latest version. To do so, Navigate to your command prompt shell and run the following command to make sure everything is up-to-date:
sudo apt-get update. - To install Git, run the following command:
sudo apt-get install git-all. - Once the command output has been completed, you can verify the installation by typing:
git version.
Fedora
- Git packages are available using
dnf. - To install Git, navigate to your command prompt shell and run the following command:
sudo dnf install git-all. - Once the command output has been completed, you can verify the installation by typing:
git version.
Note: You can download the proper Git versions and read more about how to install on specific Linux systems, like installing Git on Ubuntu or Fedora, in git-scm’s documentation.
Other Methods of Installing Git
Looking to install Git via the source code? Learn more here.
Contribute to this article on GitHub.
Get started with git and GitHub
Review code, manage projects, and build software alongside 40 million developers.
Sign up for GitHub
Sign in
Установка Git
Прежде чем использовать Git, вы должны установить его на своём компьютере.
Даже если он уже установлен, наверное, это хороший повод, чтобы обновиться до последней версии.
Вы можете установить Git из собранного пакета или другого установщика, либо скачать исходный код и скомпилировать его самостоятельно.
|
Примечание |
В этой книге используется Git версии 2.8.0. |
Установка в Linux
Если вы хотите установить Git под Linux как бинарный пакет, это можно сделать, используя обычный менеджер пакетов вашего дистрибутива.
Если у вас Fedora (или другой похожий дистрибутив, такой как RHEL или CentOS), можно воспользоваться dnf:
$ sudo dnf install git-allЕсли же у вас дистрибутив, основанный на Debian, например, Ubuntu, попробуйте apt:
Чтобы воспользоваться дополнительными возможностями, посмотрите инструкцию по установке для нескольких различных разновидностей Unix на сайте Git https://git-scm.com/download/linux.
Установка на Mac
Существует несколько способов установки Git на Mac.
Самый простой — установить Xcode Command Line Tools.
В версии Mavericks (10.9) и выше вы можете добиться этого просто первый раз выполнив ‘git’ в терминале.
Если Git не установлен, вам будет предложено его установить.
Если Вы хотите получить более актуальную версию, то можете воспользоваться бинарным установщиком.
Установщик Git для OS X доступен для скачивания с сайта Git https://git-scm.com/download/mac.
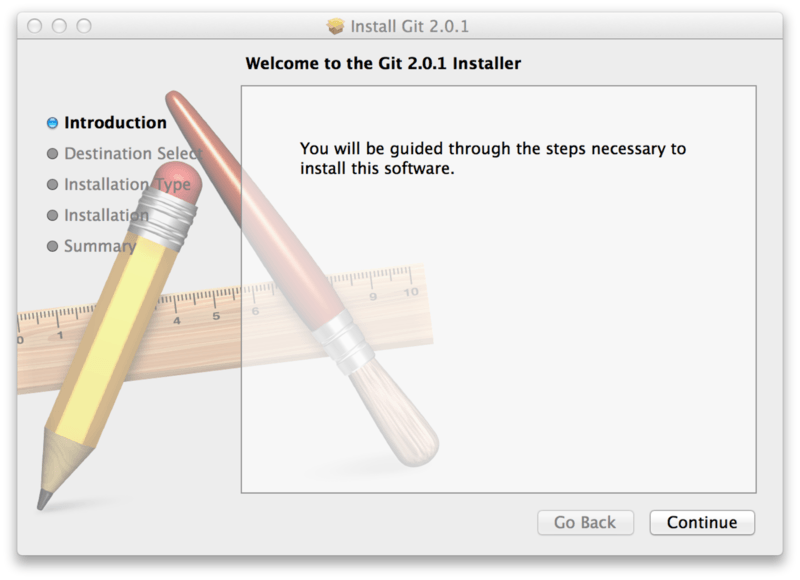
Рисунок 7. OS X инсталлятор Git
Установка в Windows
Для установки Git в Windows также имеется несколько способов.
Официальная сборка доступна для скачивания на официальном сайте Git.
Просто перейдите на страницу https://git-scm.com/download/win, и загрузка запустится автоматически.
Обратите внимание, что это отдельный проект, называемый Git для Windows; для получения дополнительной информации о нём перейдите на https://gitforwindows.org.
Для автоматической установки вы можете использовать пакет Git Chocolatey.
Обратите внимание, что пакет Chocolatey поддерживается сообществом.
Установка из исходников
Многие предпочитают устанавливать Git из исходников, поскольку такой способ позволяет получить самую свежую версию.
Обновление бинарных инсталляторов, как правило, немного отстаёт, хотя в последнее время разница не столь существенна.
Если вы действительно хотите установить Git из исходников, у вас должны быть установлены следующие библиотеки, от которых он зависит: autotools, curl, zlib, openssl, expat и libiconv.
Например, если в вашей системе используется dnf (Fedora) или apt-get (системы на базе Debian), вы можете использовать одну из следующих команд для установки всех зависимостей, используемых для сборки и установки бинарных файлов Git:
$ sudo dnf install dh-autoreconf curl-devel expat-devel gettext-devel \
  openssl-devel perl-devel zlib-devel
$ sudo apt-get install dh-autoreconf libcurl4-gnutls-dev libexpat1-dev \
  gettext libz-dev libssl-dev
Для того, чтобы собрать документацию в различных форматах (doc, html, info), понадобится установить дополнительные зависимости:
$ sudo dnf install asciidoc xmlto docbook2X
$ sudo apt-get install asciidoc xmlto docbook2x|
Примечание |
Пользователи RHEL и производных от неё (таких как CentOS или Scientific Linux) должны подключить репозиторий EPEL для корректной установки пакета |
Если вы используете систему на базе Debian (Debian/Ubuntu/Ubuntu-производные), вам так же понадобится установить пакет install-info:
$ sudo apt-get install install-infoЕсли вы используете систему на базе RPM (Fedora/RHEL/RHEL-производные), вам так же понадобится установить пакет getopt, который уже установлен в системах на базе Debian:
$ sudo dnf install getoptК тому же из-за различий имён бинарных файлов вам понадобится сделать следующее:
$ sudo ln -s /usr/bin/db2x_docbook2texi /usr/bin/docbook2x-texiКогда все необходимые зависимости установлены, вы можете пойти дальше и скачать самый свежий архив с исходниками из следующих мест:
с сайта Kernel.org https://www.kernel.org/pub/software/scm/git, или зеркала на сайте GitHub https://github.com/git/git/releases.
Конечно, немного проще скачать последнюю версию с сайта GitHub, но на странице kernel.org релизы имеют подписи, если вы хотите проверить, что скачиваете.
Затем скомпилируйте и установите:
$ tar -zxf git-2.8.0.tar.gz
$ cd git-2.8.0
$ make configure
$ ./configure --prefix=/usr
$ make all doc info
$ sudo make install install-doc install-html install-info
После этого вы можете получать обновления Git посредством самого Git:
$ git clone git://git.kernel.org/pub/scm/git/git.gitTo install Git on Windows using the command line, you can use the Windows Package Manager (winget) with the following command:
winget install --id Git.Git -e --source winget
What is Git?
Git is a distributed version control system that enables multiple developers to work together on projects efficiently. Imagine a collaborative environment where everyone can make changes, track revisions, and revert to earlier states of their code when necessary. Git serves as the backbone for modern software development, allowing for collaborative coding, version management, and easy integration of changes.
Using Git helps streamline the development process by providing tools for tracking and reverting changes, as well as facilitating branching and merging operations. This makes it an essential tool for both individuals and teams in the world of software development.
Quick Guide to Install Git on Windows 11
System Requirements
Hardware Requirements
For installing Git, you do not need a high-performance computer. However, for a smooth experience, your system should meet these basic specifications:
- CPU: A modern processor (Intel or AMD recommended)
- RAM: At least 2 GB
- Disk Space: A minimum of 100 MB of free space for Git installation
Software Requirements
Make sure you have:
- A supported version of Windows (Windows 7 or later).
- Administrator access to install software on your machine.
Install Git on Windows 10: Your Quick Start Guide
Downloading Git for Windows
Official Git Website
To begin the installation process, head over to the official Git website: [git-scm.com](https://git-scm.com). This is where you’ll find the latest version of Git suitable for Windows.
Choosing the Right Version
On the downloads page, you’ll see options for different versions of Git. Depending on your Windows architecture, choose the correct version:
- 32-bit version: For 32-bit Windows installations.
- 64-bit version: For 64-bit Windows installations.
If unsure about your system architecture, right-click on ‘This PC’ or ‘My Computer’ in Windows Explorer and select ‘Properties’ to check your system type.
Mastering Git Windows Console: Quick Command Guide
Installation Process
Step 1: Running the Installer
Once the installer is downloaded, locate the file in your default downloads folder. Typically, this will be named something like `Git-2.x.x-64-bit.exe`.
Double-click the installer to initiate the setup process. During this process, you may encounter a User Account Control (UAC) prompt, which will ask if you want to allow the program to make changes to your computer. Click Yes to proceed.
Step 2: Installation Wizard Setup
The installation wizard will guide you through various options:
-
Choosing Installation Options: One crucial option is whether to add Git to your `PATH` environment. Selecting the option to «Use Git from the Windows Command Prompt» is recommended because it will allow you to run Git commands directly from your command line.
-
Configuring Line Ending Conversions: You will also encounter settings for handling line endings. For most users, the recommended option is «Checkout Windows-style, commit Unix-style line endings» to ensure compatibility across different systems.
Step 3: Completing Installation
After configuring your desired settings, click through the prompts to complete the installation. You may choose to check the box labeled «Launch Git Bash» before finishing, which will open a new terminal window where you can use Git immediately.
Mastering Git Log in Command Line: A Quick Guide
Configuring Git
Setting Up User Information
After installation, it’s essential to configure Git with your user information. This step helps to attribute your commits correctly in the version history.
Open Git Bash and run the following commands:
git config --global user.name "Your Name"
git config --global user.email "your.email@example.com"
Replace `»Your Name»` and `»your.email@example.com»` with your actual name and email address. This information will be associated with your Git commits.
Check Your Configuration
To verify that Git was installed correctly and your configuration is set, use this command:
git --version
This will display the currently installed version of Git, confirming that everything is working as expected.
Install Git in Terminal: A Quick Guide for Beginners
Testing Git Installation
Using Git in Command Line
To ensure everything is functioning properly, create a simple test repository. Start by creating a new directory and initializing it as a Git repository:
mkdir test-repo
cd test-repo
git init
This command creates a new folder named `test-repo` and initializes it with an empty Git repository.
Making Your First Commit
Now let’s create a file, add it to your repository, and make your first commit. Enter the following commands one by one:
echo "Hello, Git!" > hello.txt
git add hello.txt
git commit -m "Initial commit"
The commands above do the following:
- Create a new text file named `hello.txt` containing the text “Hello, Git!”
- Stage the `hello.txt` file for committing
- Commit the staged file with a message «Initial commit»
Congratulations! You’ve successfully created your first Git repository and made your first commit.
Install Git on Amazon Linux: A Simple Guide
Common Issues and Troubleshooting
Installation Problems
While the installation process is typically smooth, some users may experience issues such as the installer failing to launch or UAC permission problems. If the installer fails to launch, try running it as Administrator. Right-click the installer and choose «Run as Administrator» to bypass permission issues.
Command Line Errors
You might encounter command-line errors if Git commands are not recognized. Ensure that Git’s `bin` and `cmd` folders are included in your PATH environment variable. If not, you may need to modify your system’s environment variables manually.
Mastering Git Commit from Command Line: A Quick Guide
Conclusion
In this guide, we explored how to successfully install Git on the Windows command line and configure it for your use. If you’ve followed these steps, you should now have a fully functional Git environment ready for your projects.
As you continue your Git journey, consider delving deeper into more advanced features, like branching, merging, and working with remote repositories. The possibilities with Git are vast, and mastering it will greatly enhance your development skills.
Install Git on Windows: A Quick Step-by-Step Guide
Further Reading and Resources
For additional information, refer to the following resources:
- Official Git Documentation: An extensive guide on Git features and commands.
- Online Courses and Tutorials: Platforms like Udacity and Coursera offer in-depth Git courses.
- Community Forums and Help Sites: Engage with the Git community on sites like Stack Overflow to get your questions answered.
With this step-by-step guide, you’re now empowered to install Git and start leveraging its capabilities in your development processes. Happy coding!
Git is a powerful version control system widely used in software development. Installing Git on Windows allows you to manage your code repositories efficiently. While many users prefer a graphical installer, installing Git through the command line offers a lightweight and flexible approach.
In this blog, we’ll guide you through installing Git on a Windows machine using the Command Prompt (CMD).
Step-by-Step Guide to Install Git on Windows Using CMD
1. Verify If Git is Already Installed
Before installing Git, check if it’s already installed on your system:
- Open the Command Prompt.
- Press
Win + R, typecmd, and press Enter.
- Run the following command:
git --version- If Git is installed, the version number will be displayed.
- If not, you’ll receive an error message indicating the command is not recognized.
2. Download the Git Installer
You can download the latest version of Git directly using CMD. Follow these steps:
- Navigate to a Directory
Choose a directory to download the installer. Use thecdcommand to navigate:
cd C:\Users\<YourUsername>\Downloads- Download Git
Use thecurlcommand to download the Git installer.
curl -o git-installer.exe https://github.com/git-for-windows/git/releases/latest/download/Git-2.42.0-64-bit.exe(Replace the URL with the latest version’s URL if needed.)
3. Install Git Using the Silent Installer
Once the installer is downloaded, execute it silently using the command line. This method installs Git without requiring any manual input during the installation process.
Run the following command:
git-installer.exe /SILENT- The
/SILENTflag ensures the installation runs without any user interaction. - Git will be installed with default settings, including Git Bash, Git GUI, and essential tools.
4. Add Git to the System Path (Optional)
If Git is not automatically added to your system’s PATH during installation, you can do it manually through CMD:
- Locate the Installation Directory
The default installation path for Git is:
C:\Program Files\Git\bin- Add to PATH
Use thesetxcommand to add Git to your PATH:
setx PATH "%PATH%;C:\Program Files\Git\bin"- Restart CMD
Close and reopen Command Prompt for the changes to take effect.
5. Verify the Installation
After installation, verify that Git is properly set up by running:
git --versionIf the installation was successful, the command will output the installed version of Git.
Bonus: Configure Git After Installation
Once Git is installed, configure it to work with your repositories by setting your username and email.
- Set your username:
git config --global user.name "Your Name"- Set your email:
git config --global user.email "[email protected]"- Verify the configuration:
git config --listTroubleshooting Common Issues
1. “Command not recognized” After Installation
- Ensure Git is added to your system’s PATH.
- Verify the installation directory and update the PATH variable accordingly.
2. Download Errors Using curl
- If
curlis not available, download the installer manually from git-scm.com.
Conclusion
Installing Git on Windows using the Command Prompt is a quick and efficient method that gives you control over the process. Once installed, you can seamlessly manage your repositories, collaborate with your team, and take full advantage of Git’s powerful version control features.
By following this guide, you’ve taken the first step toward mastering Git.