
The GDAL project distributes GDAL as source code and Containers only. Binaries produced by others are available for a variety of platforms and package managers.
Source Code
Current Release
-
2025-04-07 gdal-3.10.3.tar.gz 3.10.3 «Gulf of Mexico» Release Notes (3.10.3 md5)
Past Releases
Links to Past Releases are also available.
Development Source
The main repository for GDAL is located on GitHub at
https://github.com/OSGeo/GDAL.
You can obtain a copy of the active source code by issuing the following
command
git clone https://github.com/OSGeo/GDAL.git
Additional information is available about Build requirements and Building GDAL from source.
Maintenance policy
The GDAL upstream team only maintains the branch on which the latest release has
been done, with bugfixes releases issued roughly every 2 months.
So, for example, during the development phase of GDAL 3.10.0, GDAL 3.9.x bugfixes
releases are done based on the release/3.9 branch, but not older branches (GDAL 3.8.x or older).
Binaries
In this section we list a number of the binary distributions of GDAL
all of which should have fully reproducible open source build recipes.
Note that the maintainers of those distributions are generally not the maintainers
of the GDAL sources, so please report any issue specific to those builds through
their own support channels.
Windows
Windows builds are available via Conda Forge (64-bit only). See the
Conda or pixi section for more detailed information. GDAL is also distributed
by GISInternals and OSGeo4W and through the NuGet and vcpkg package managers.
Linux
Packages are available for Debian, Alpine, Fedora, and other distributions.
Mac OS
GDAL packages are available on Homebrew.
Android
GDAL can be installed using vcpkg. You may also refer to vcpkg Android support for general instructions.
For example to install default configuration for the arm64-android target:
git clone https://github.com/Microsoft/vcpkg.git
cd vcpkg
./bootstrap-vcpkg.sh  # ./bootstrap-vcpkg.bat for Windows
./vcpkg integrate install
export ANDROID_NDK_HOME=/path/to/android_ndk_home  # to adapt
./vcpkg search gdal --featurepackages  # list optional features
./vcpkg install gdal:arm64-android  # install with default configuration
./vcpkg install gdal[poppler,netcdf]:arm64-android  # install with Poppler and netdf support
Cross-Platform Package Managers
Conda
Conda can be used on multiple platforms (Windows, macOS, and Linux) to
install software packages and manage environments. Conda packages for GDAL are
available through conda-forge.
Latest version:
conda install [-c channel] [package...]
GDAL is available as several subpackages:
-
gdal: Python bindings and Python utilities (depends on libgdal-core) -
libgdal: meta-package gathering all below libgdal-* packages (except libgdal-arrow-parquet) -
libgdal-arrow-parquet: (Geo)Arrow IPC File Format / Stream and (Geo)Parquet drivers as a plugin (depends on libgdal-core) -
libgdal-core: core library and C++ utilities, with a number of builtin drivers (available since GDAL 3.9.1) -
libgdal-fits: FITS — Flexible Image Transport System driver as a plugin (depends on libgdal-core, available since GDAL 3.9.1) -
libgdal-grib: GRIB — WMO General Regularly-distributed Information in Binary form driver as a plugin (depends on libgdal-core, available since GDAL 3.9.1) -
libgdal-hdf4: HDF4 — Hierarchical Data Format Release 4 (HDF4) driver as a plugin (depends on libgdal-core, available since GDAL 3.9.1) -
libgdal-hdf5: HDF5 — Hierarchical Data Format Release 5 (HDF5) driver as a plugin (depends on libgdal-core, available since GDAL 3.9.1) -
libgdal-jp2openjpeg: JP2OpenJPEG — JPEG2000 driver based on OpenJPEG library driver as a plugin (depends on libgdal-core, available since GDAL 3.9.1) -
libgdal-kea: KEA driver as a plugin (depends on libgdal-core, available since GDAL 3.9.1) -
libgdal-netcdf: NetCDF: Network Common Data Form driver as a plugin (depends on libgdal-core, available since GDAL 3.9.1) -
libgdal-pdf: PDF — Geospatial PDF driver as a plugin (depends on libgdal-core, available since GDAL 3.9.1) -
libgdal-postgisraster: PostGISRaster — PostGIS Raster driver driver as a plugin (depends on libgdal-core, available since GDAL 3.9.1) -
libgdal-pg: PostgreSQL / PostGIS driver as a plugin (depends on libgdal-core, available since GDAL 3.9.1) -
libgdal-tiledb: TileDB — TileDB raster driver as a plugin (depends on libgdal-core, available since GDAL 3.9.1) -
libgdal-xls: XLS — MS Excel format driver as a plugin (depends on libgdal-core, available since GDAL 3.9.1)
To install the gdal package (Python bindings and utilities), and libgdal-core:
conda install -c conda-forge gdal
To install the libgdal meta-package with all available drivers, but libgdal-arrow-parquet:
conda install -c conda-forge libgdal
To install the Arrow and Parquet drivers as plugins:
conda install -c conda-forge libgdal-arrow-parquet
GDAL master Conda builds
GDAL master builds are available in the gdal-master
channel. They are based on dependencies from the conda-forge channel.
First, install mamba into the base environment, create a dedicated gdal_master_env
environment, and then activate the dedicated gdal_master_env environment.
conda update -n base -c conda-forge conda
conda install -n base --override-channels -c conda-forge mamba 'python_abi=*=*cp*'
conda create --name gdal_master_env
conda activate gdal_master_env
Then install GDAL from the gdal-master channel:
mamba install -c gdal-master gdal
mamba install -c gdal-master libgdal-arrow-parquet # if you need the Arrow and Parquet drivers
pixi
Pixi is a package management tool for developers. It allows the developer
to install libraries and applications in a reproducible way. Packages for GDAL are
available through the conda-forge channel.
If you want to be able to use GDAL as part of a project:
pixi init name-of-project
cd name-of-project
pixi add gdal libgdal-core
pixi add libgdal-arrow-parquet # if you need the Arrow and Parquet drivers
pixi shell
Pixi supports using tools like GDAL and OGR globally, similar to conda’s base environment, without having to use an activate command:
pixi global install gdal libgdal-core
pixi global install libgdal-arrow-parquet # if you need the Arrow and Parquet drivers
vcpkg
The GDAL port in the vcpkg dependency manager is kept up to date by Microsoft team members and community contributors.
You can download and install GDAL using the vcpkg as follows:
git clone https://github.com/Microsoft/vcpkg.git
cd vcpkg
./bootstrap-vcpkg.sh  # ./bootstrap-vcpkg.bat for Windows
./vcpkg integrate install
./vcpkg search gdal --featurepackages  # list optional features
./vcpkg install gdal  # install with default configuration
./vcpkg install gdal[poppler,netcdf]  # install with Poppler and netdf support
If the version is out of date, please create an issue or pull request on the vcpkg repository.
Spack
Spack is a package management tool designed to support multiple versions and
configurations of software on a wide variety of platforms and environments.
It was designed for large supercomputing centers. Spack builds packages from
sources, and allows tweaking their configurations.
You can find information about GDAL in Spack at
https://packages.spack.io/package.html?name=gdal
For the default GDAL build with a reduced number of drivers:
git clone -c feature.manyFiles=true https://github.com/spack/spack.git
cd spack/bin
./spack install gdal
For a build with netcdf driver enabled:
./spack install gdal +netcdf
Containers
Docker images with nightly builds of GDAL master and tagged releases are available at
GitHub Container registry.
Information on the content of the different configurations can be found at
https://github.com/OSGeo/gdal/tree/master/docker.
Documentation
This documentation is also available as a PDF or a ZIP of individual HTML pages for offline browsing.
GDAL is a useful command line tool to process spatial data, if you haven’t heard of the tool before some examples of what it can do are:
- Create contours from a DEM
- Create a TMS tile structure
- Rasterize vector into a raster file
- Build a quick mosaic from a set of images
Each of the above functions are python scripts which can be run from the command-line once GDAL is successfully installed.
This tutorial covers how to install GDAL on a Windows PC, if you are interested in getting GDAL running on a Mac please go here (https://sandbox.idre.ucla.edu/sandbox/general/how-to-install-and-run-gdal)
Step 1: Install Python
Python is necessary for GDAL, and if you already have an installation of Python then skip to step 4 below.
1. Feel free to download the latest 2.7x version of python (rather than the 3.x python version).
The python version used for this tutorial can be downloaded here:
https://www.python.org/ftp/python/2.7.8/python-2.7.8.msi
2. Install python with the default options and directories.
3. After installation, go to Python –> IDLE (Python GUI) to find out what version of Python you are using:
4. Make a note of the number that shows the version of your Python in the top right, as highlighted below:
Note: MSC v.1500 may differ if you are using a different Python installation, if it does then please make a note of that number. Note, if you installed the 64-bit version of Python, for the rest of the tutorial please remove the (x86) from the paths.
Step 2: Install GDAL
1. Head over to Tamas Szekeres’ Windows binaries and download the appropriate GDAL Binary.
For this tutorial, we are using the MSC v.1500 on a 32-bit system, the picture below illustrates how to match the version with your own python version. The blue highlight is where you should look for either 64-bit or 32-bit systems, and the green shows the release-1500 number which should match the number from IDLE in step 4 above.

2. Clicking the link will take you to the list of binaries (installers) to download.

3. Locate the “core” installer, which has most of the components for GDAL.

4. After downloading your version, install GDAL with standard settings.
5. Next, return to the list of GDAL binaries and install the python bindings for your version of Python, this can either be 2.7, 3.1, or 3.2.
Recall that we had installed Python 2.7 earlier, so we have to locate this version, as seen below:

6. Download the Python bindings and install them.
Step 3: Adding Path Variables:
We need to tell Windows system where the GDAL installations are located, so we need to add some system variables.
1. Right click on “Computer” on the desktop and go to “Properties”:
2. Click on Advanced System Properties

3. Select Environment Variables.
4. Under the System variables pane, find the ‘Path’ variable, then click on Edit.
5. Go to the end of the box and copy and paste the following:
;C:\Program Files (x86)\GDAL
Note: For 64-bit GDAL installations you would simply remove the (x86) after Program Files.
6. In the same System variables pane, click on “New” and then add the following in the dialogue box:
Variable name: GDAL_DATA
Variable value: C:\Program Files (x86)\GDAL\gdal-data
7. Click “OK”
8. Add one more new variable by clicking “New…”
10. Add the following in the dialogue box:
Variable name: GDAL_DRIVER_PATH
Variable value: C:\Program Files (x86)\GDAL\gdalplugins
11. Click “OK”
Step 4: Testing the GDAL install
1. Open the Windows command line, by going to the Start Menu -> Run ->Type in cmd and press Enter.
2. Type in
gdalinfo --version
3. Press Enter.
4. If you get the following result, then congratulations your GDAL installation worked smoothly!
GDAL, the Geospatial Data Abstraction Library, was designed to interact with raster and vector (geospatial) data. Over time it has evolved to include sophisticated data manipulation and analysis tools. The GDAL source code is C++, which makes it fast to run but difficult to install.
Many software and applications use GDAL for handling and analyzing geospatial data. It is such a powerful and ubiquitous software that many geospatial workflows can be performed using only GDAL. it can be easily deployed on the desktop or in the cloud, as a command-line program, written in scripts, or the backend analysis engine for a GUI.
This article will help you get GDAL installed on any operating system so that you can leverage its power for your geospatial work.
IMPORTANT: For all installation methods, try to remember the directory where GDAL will be installed. For some installation methods this may not be apparent (that’s okay), but remember it if you can. It will help if you need to troubleshoot later.
Install GDAL for Windows
Use the OSGeo4W Network Installer
The OSGeo4W Network Installer installer gives you access to several different pieces of open-source geospatial software (including QGIS and GRASS GIS). It is very easy to use.
Follow these steps to install GDAL with the OSGeo4W Network Installer:
- Download the installer from https://trac.osgeo.org/osgeo4w/
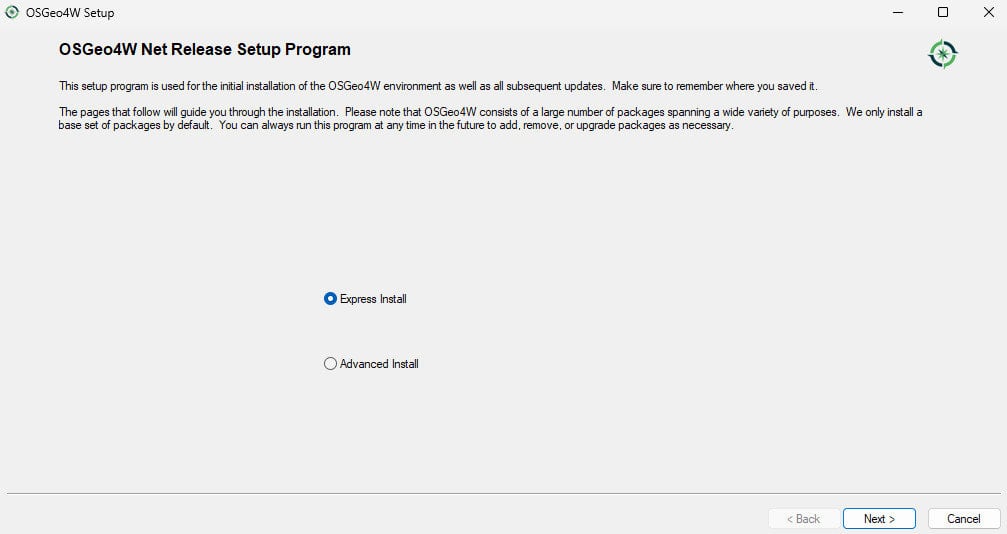
- Open the installer
- Select ‘Express Install’ (you can also use “Advanced Install” if you have specific needs)
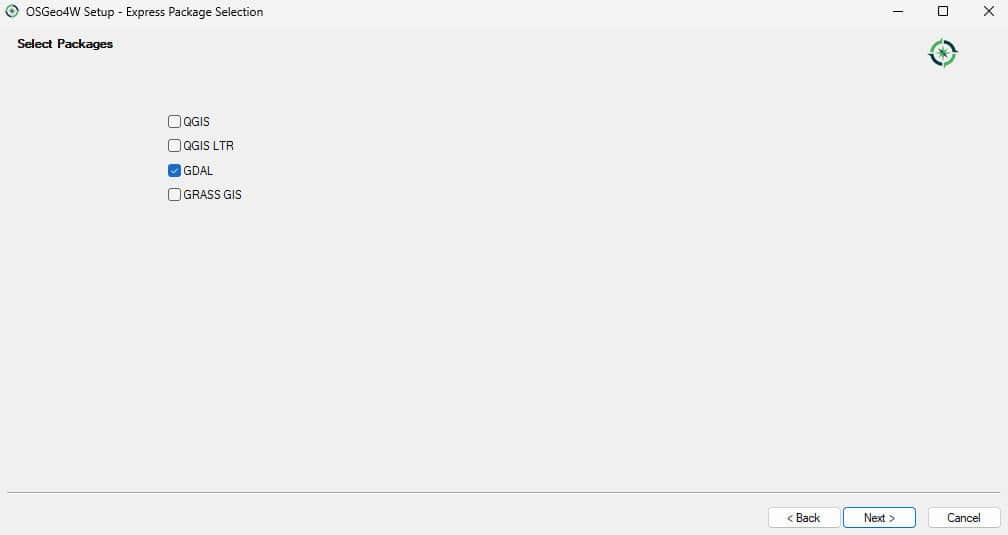
- Select the packages to install
- Wait for the installation to complete
After installation, the easiest way to use GDAL is with the OSGeo4W terminal.
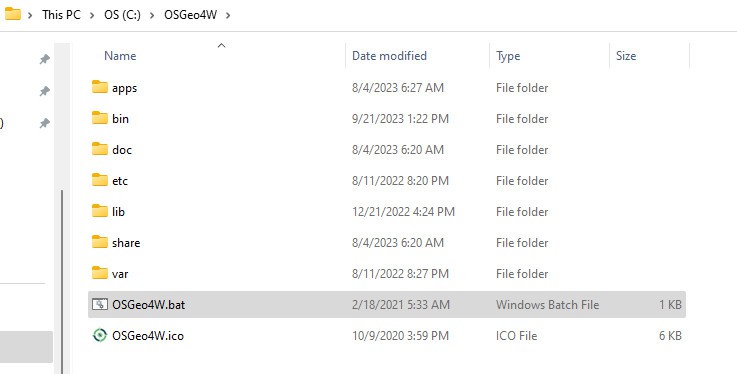
To find the terminal, navigate to your C: drive and look for a folder with a name similar to OSGeo4W. Open the folder. Inside you should find a file named OSGeo4W.bat. Double-click to open. This will open a command prompt. Type o-help to see a list of available commands. You should see some GDAL tools. Follow the directions a few sections down to check your GDAL installation.
You can also add the path of the GDAL tools (C:\OSGeo4W\bin) to your Windows Path variable to access it with powershell or the Windows command prompt.
Installing GDAL with QGIS
If you have QGIS installed, you may also have GDAL installed. Since one of the install options for QGIS is to use the OSGeo4W Network installer, you may have installed GDAL at the same time. To check, navigate to your C: drive folder listed in the directions above to see if it (and the GDAL installation) exists.
Follow these steps to install GDAL on MacOS:
- Install HomeBrew (if not installed already). You can use this command:
/usr/bin/ruby -e "$(curl -fsSL https://raw.githubusercontent.com/Homebrew/install/master/install)" - Use HomeBrew to install GDAL:
brew install gdal - Upgrade
pip, the Python package manager:pip install --upgrade pip - Complete installation with
pip:pip install gdal
This will install GDAL for use from the terminal and in Python.
Follow the instructions below to check the installation.
Install GDAL for Linux
Follow these steps to install GDAL on Linux distributions:
- Add the ubuntugis ppa to your sources:
sudo add-apt-repository ppa:ubuntugis/ppa - Update source packages:
sudo apt-get update - Install GDAL:
sudo apt-get install gdal-bin - Install the GDAL development libraries:
sudo apt-get install libgdal-dev
If you want to also install GDAL for Python check out this article for more information.
Check Your GDAL Installation
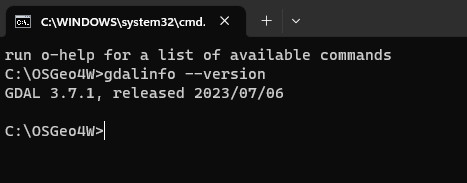
Once you have GDAL installed. Check your installation on the command line with gdalinfo --version.
If installed correctly, this will print out your GDAL version (see image below).
If you cannot run the command successfully, check out the troubleshooting section below for help.
Installation Methods for Any Operating System
There are a couple of easy GDAL installation methods that work for any operating system. They are linked to Python installations. If you install GDAL this way, you will just need a Python installation. Once installed you will be able to access GDAL from the command-line.
Anaconda/Miniconda/Conda
GDAL is very easy to install from conda’s conda-forge channel. I have a detailed article on how to do this.
Just activate your desired environment (or install it on the base environment) and run this code:
conda install -c conda-forge gdal
PIP
GDAL is also available with Python’s standard package manager, pip.
Mac and Linux users should be able to run pip install gdal.
It will be a little more difficult for Windows users. Once again, I have a detailed article that will walk you through the steps.
Troubleshooting GDAL Installation Problems
If the installation process completed successfully then GDAL was successfully installed on your machine. However, your system may always recognize that GDAL has been installed.
So, if you thought GDAL was installed, but you get an error when trying to verify your installation, this section should help you out.
The most likely problem is that you need to update the Path and/or GDAL_DATA environment variables so that your system knows where to find the program you just installed.
To do this you need to locate two directories. The “bin” and “data” directories.
The “bin” directory is the most important and contains the GDAL/OGR tools.
Once you’ve located the “bin” directory (it should be in a location like this: gdal-installation-folder/bin), add it to the Path variable.
Locate the data directory (it may not exist for all installations) and add it to the GDAL_DATA variable (Note: you may need to create a new variable named GDAL_DATA).
Getting started with GDAL tools
There are many different command line tools that are part of the GDAL/OGR package. For a list of these tools, and how to use them check out the official GDAL documentation.
Many of the GDAL/OGR tools are also implemented in QGIS, this gives the tools a GUI and might make them easier for beginners to use.
Using GDAL with a User Interface (or Viewer)
Working with command-line (terminal) tools can be intimidating if you’re not used to it. GDAL does not have a user interface but is an easy way to use GDAL tools with a user interface.
GDAL is very well embedded into QGIS. And QGIS has an excellent user interface.
From QGIS you can use many (if not all) of the GDAL tools. In QGIS, most of the GDAL tools are found under the “Raster” option of the Main Menu. Here you can access the GDAL tools for raster creation, clipping, merging, transformation, projection, interpolation, and more.
GDAL tools are also accessible in the QGIS Processing Toolbox under the GDAL heading. Here the tools are organized into subcategories.
Note: To get the GDAL tools in QGIS you will need to use the OSGeo4W Network Installer to install both QGIS and GDAL.
This recipe shows how to install gdal in your Windows Environment
Prerequisites
- To run this code you need:
-
-
A running Python 3.x Environment
-
Know if your computer is 32 bit or 64 bit
-
Recipe
Often GDAL is a very important library to manipulate satellite data.
Note
You can find the architecture of your PC going in: Settings -> System -> About
To install GDAL:
Open the web page https://github.com/cgohlke/geospatial-wheels/releases
If needed, click on the small “Show all XXX assets” link to expand the list
Identify your GDAL wheel
Note
A sample is: GDAL-3.9.2-cp312-cp312-win_amd64.whl
GDAL-3.9.2: means gdal version 3.9.2
cp312-cp312: means build for python 3.12
win_amd64: means a 64 bit windows
You can find the version of gdal you need for your python version.
Both Intel and AMD Processors are in the amd64 architecture
-
Download GDAL wheel, in this tutorial we will assume GDAL-3.9.2-cp312-cp312-win_amd64.whl
-
Open your python environment
-
Install the wheel:
pip install "C:\Users\YOUR_USER\Downloads\GDAL-3.9.2-cp312-cp312-win_amd64.whl"
Now, you should be able to import gdal in your code.
Note
You may have still a problem when running a python script with gdal.
If you see this error:
ImportError: DLL load failed while importing _gdal: The specified module could not be found.
This probably means that you are missing the VC — redist libraries.
These can be found here:
This is the direct link to the version for x64 Machines:
A Beginner’s Guide to Installing the Geospatial Data Abstraction Library (GDAL)
Are you intrigued by the world of geospatial data and looking for an efficient way to manage and process different geospatial datasets? Look no further!
This blog post will introduce you to the powerful Geospatial Data Abstraction Library (GDAL) and explore how it can transform your geospatial data processing experience.
GDAL is an open-source library enabling users to work with raster and vector data, offering extensive support for numerous geospatial formats. Along with its integrated Simple Features Library (OGR) for handling vector data, GDAL provides a comprehensive solution for various geospatial operations, including data manipulation, reprojection, resampling, and format conversion.
Although GDAL does not include a dedicated viewer or graphical user interface (GUI), several popular GIS software applications, such as QGIS, GRASS GIS, gvSIG use GDAL as a backend library. These applications provide a user-friendly environment for visualizing and manipulating geospatial data while leveraging GDAL’s capabilities.
By the end of this blog post, you’ll have a solid understanding of GDAL’s capabilities and how they can be implemented into your geospatial data processing workflow.
How to install GDAL on your machine
How to install GDAL on Windows:
- OSGeo4W Network Installer: Download the OSGeo4W Network Installer (osgeo4w-setup.exe) from the OSGeo4W website (https://trac.osgeo.org/osgeo4w/). Run the installer and choose the Express or Advanced installation, depending on your needs. Select the GDAL package and complete the installation process. This will also provide you with the OSGeo4W Shell, where you can run GDAL commands.
- Conda: If you use Anaconda or Miniconda, you can install GDAL in a new or existing environment using the command
conda install -c conda-forge gdal
How to install GDAL on macOS:
- Homebrew: If you have Homebrew installed, use the command
brew install gdalto install GDAL. - Conda: If you use Anaconda or Miniconda, you can install GDAL in a new or existing environment using the command
conda install -c conda-forge gdal.
How to install GDAL on Linux (Ubuntu/Debian):
Use the following commands to install GDAL:
sudo add-apt-repository ppa:ubuntugis/ppa
sudo apt-get update
sudo apt-get install gdal-bin
sudo apt-get install libgdal-dev
Conda: If you use Anaconda or Miniconda, you can install GDAL in a new or existing environment using the command conda install -c conda-forge gdal.
After installing GDAL, you can test the installation by running gdalinfo --version in the command prompt or terminal, which should display the installed GDAL version. For using GDAL in your preferred programming language, make sure you also install the appropriate GDAL bindings for that language.
Does Gdal have a viewer? or Graphical user interface?
GDAL itself does not include a dedicated viewer or graphical user interface (GUI) for visualizing geospatial data. Its primary focus is on providing libraries and command-line utilities for data processing, conversion, and analysis.
However, there are several open-source GIS software applications that use GDAL as a backend library and provide GUIs for visualizing and manipulating geospatial data:
- QGIS: A popular open-source GIS software that supports a wide range of geospatial formats and offers numerous plugins for various GIS tasks. QGIS utilizes GDAL and OGR for handling raster and vector data and allows users to perform many GDAL operations within its GUI.
- GRASS GIS: Another open-source GIS software that offers both a GUI and a command-line interface. GRASS GIS uses GDAL for importing and exporting various raster and vector formats.
- gvSIG: An open-source GIS application that supports various geospatial formats, including those supported by GDAL, and offers a range of GIS tools within its GUI.
These GIS software applications provide user-friendly interfaces to work with geospatial data, allowing you to leverage GDAL’s capabilities without dealing directly with the command line or programming.
Common mistakes people make when installing GDAL include:
Some common mistakes people make when installing GDAL include:
Incompatible versions:
Installing a version of GDAL that is incompatible with the operating system or other software packages being used, such as Python or GIS software. To avoid this, make sure to install a compatible version that meets your system requirements and software dependencies.
Incorrect environment variables:
Failing to set environment variables, such as PATH and GDAL_DATA, can result in errors when trying to use GDAL in the command line or when importing it as a library in Python. To resolve this, ensure that the appropriate environment variables are correctly set, pointing to the respective GDAL installation directories.
Setting the GDAL_DATA and PATH environment variables is important to ensure that GDAL can locate its support files and be accessed from the command line. The process of setting these variables depends on your operating system:
Setting the GDAL_DATA and PATH environment variables in Windows:
- Locate the GDAL installation directory on your system. It is usually found in a folder named
gdalwithin theProgram FilesorProgram Files (x86)directory. - Inside the GDAL installation folder, find the
binanddatadirectories. Take note of the full paths to these directories, as you will need them to set the environment variables. - Right-click on “Computer” or “This PC” and select “Properties.” Then, click on “Advanced system settings” to open the System Properties window.
- In the System Properties window, click on the “Environment Variables” button.
- Under “System Variables,” scroll down to the “Path” variable and click on “Edit.”
- In the “Edit environment variable” window, click on “New” and add the full path to the
bindirectory you noted in step 2. Press “Enter” to add the new entry. - Next, click on “New” again under “System Variables” and create a new variable with the name “GDAL_DATA.” Set its value to the full path of the
datadirectory you noted in step 2. - Click “OK” to close all open windows and save the changes.
- Restart any open command prompt or terminal windows for the changes to take effect.
Setting the GDAL_DATA and PATH environment variables in macOS and Linux:
- Locate the GDAL installation directory on your system. The exact location may vary depending on the method used to install GDAL. For instance, with a Homebrew installation on macOS, the
bindirectory is typically located at/usr/local/opt/gdal/bin, and thedatadirectory is at/usr/local/opt/gdal/share/gdal. - Open a terminal window and open your shell profile file using a text editor. For bash, this would be
~/.bash_profileor~/.bashrc. For zsh, this would be~/.zshrc. - Add the following lines to the file, replacing
/path/to/gdal/binand/path/to/gdal/datawith the correct paths to thebinanddatadirectories you noted in step 1:bashCopy codeexport PATH="/path/to/gdal/bin:$PATH" export GDAL_DATA="/path/to/gdal/data" - Save the changes and close the text editor.
- Restart your terminal or run
source ~/.bash_profile(for bash) orsource ~/.zshrc(for zsh) to apply the changes.
Now GDAL should be accessible from the command line, and the GDAL_DATA variable will enable GDAL to locate its support files.