
Applies ToWindows 7 Service Pack 1 Windows 7 Ultimate Windows 7 Enterprise
INTRODUCTION
Windows 7 language packs are available for computers that are running Windows 7 Ultimate or Windows 7 Enterprise. The Windows 7 language packs can be installed only from the Optional Updates section in Windows Update. However, these language packs are not available on the Microsoft Windows Server Update Services (WSUS) server or through the Microsoft Download Center.
More Information
How to install a Windows 7 language pack
To download and install a Windows 7 language pack, follow these steps:
-
Start Microsoft Update. To do this, click Start , type Windows Update in the Search programs and files box, and then click Windows Update in the Programs list.
-
Click the optional update links for the language packs.
Note If the optional update links cannot be found, click Check online for updates from Microsoft Update to search the optional updates.
-
Under the Windows 7 Language Packs category,select the desired language pack.
Note If you install many additional language packs, the disk space and system performance are affected. In particular, disk space and system performance are affected during servicing operations, such as Service Pack installations. Therefore, we recommend that you only add a language pack to your computer if you will use the language pack.
-
Click OK, and then click Install updates to start the download and installation process.
How to change the interface of Windows 7 after a language pack is installed
When you install a language pack, you can change the interface language of Windows 7 to the language that you select.
Language packs also let multiple users who share a computer select distinct display languages. For example, one user can select to see the dialog boxes, menus, and other text in Japanese, whereas another user can select to see the same content in French.
To change the display language, follow these steps:
-
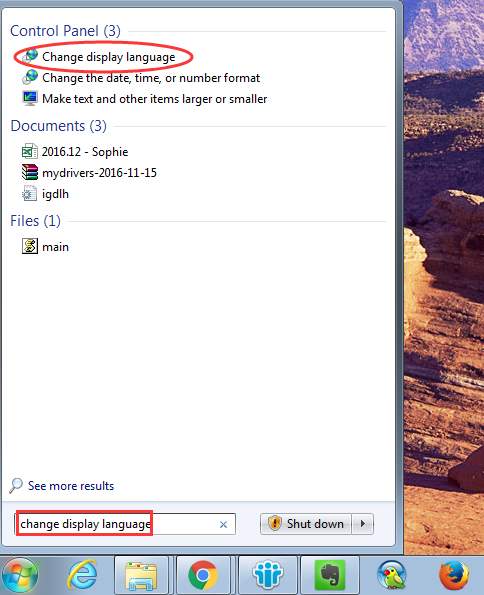
Click Start, and then type Change display language in the Start Search box.
-
Click Change display language.
-
In the drop-down list that appears, select the language that you want, and then click OK.
How to uninstall a Windows 7 language pack
To uninstall a language pack, follow these steps:
-
Click Start, and then type Uninstall display language in the Start Search box.
-
Click Install or uninstall display languages.
-
Click Uninstall display languages.
-
Select the language or the languages that you want to uninstall, and then click Next.
-
Follow the rest of the steps to uninstall this language or these languages.
After you install the desired language packs, you can hide unwanted language packs in Windows Update. To hide unwanted language packs in Windows Update, follow these steps:
-
Click the Windows 7 Language Packs category in the Select the updates you want to install page to highlight all the language packs.
-
Right-click the highlighted updates, and then select Hide update.
STILL NEED HELP?
If this article does not answer your question, click this button to pose your question to other community members at Microsoft Community:
Need more help?
Want more options?
Explore subscription benefits, browse training courses, learn how to secure your device, and more.
Достаточно часто начинающие пользователи испытывают проблемы с русификацией Windows 7. Здесь есть несколько нюансов. Есть отличия в русификации различных версий Window 7. Наиболее прост и понятен процесс русификации Microsoft Windows 7 Enterprise и Ultimate.
Для начала необходимо скачать русский языковой пакет для Windows 7, наиболее простой способ – воспользоваться службой обновлений Microsoft. Для чего нужно перейти в Start › All Programs › Windows Update. Из интерфейса центра обновлений Windows нужно запустить загрузку и установку пакета русской локализации. Это наиболее простой и безопасный способ русификации Windows.
Пакеты русской локализации для Windows 7 можно скачать с сайта Microsoft и установить вручную. Вы должны скачивать пакет локализации в соответствием разрядности своей ОС и установленного Service Pack.
Русский язык Windows 7 без SP1 (KB972813):
- windows6.1-kb972813-x86-ru-ru_f4df4bcb8d3194323f17a086a17f46dd0c9c492a.exe (x86);
- windows6.1-kb972813-x64-ru-ru_f0acfc688d609ee45d43cc60c6412a3071a665bd.exe (x64).
Русский язык для Windows 7 с установленным Service Pack 1 (KB2483139): Напомню, что я уже писал заметку о том, где можно скачать Windows 7 Service Pack 1.
- windows6.1-kb2483139-x86-ru-ru_6532a8f36ad7d15277d5d60da92555f0fbee4daa.exe (x86);
- windows6.1-kb2483139-x64-ru-ru_0587eb296a2f04e0d3699650d39b53ee18b97a79.exe (x64).
Чтобы русифицировать интерфейс Windows 7 Enterprise или Ultimate, необходимо перейти в панель управления (Start Menu -> Control Panel) и выбрать элемент Clock, Language and Region.

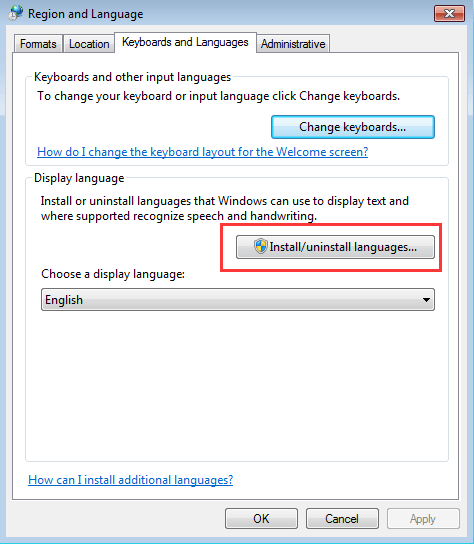
В появившемся окне нужно нажать на ссылку «Change display language», а потом перейти на вкладку Keyboards and Languages.

На этой форме есть кнопка Install/Uninstall Languages, нажав на которую вы перейдете к мастеру настройки языка интерфейса Windows 7. В появившемся мастере вы сможете русифицировать систему, для чего вам нужно будет указать скачанный файл . cab с русским MUI Windows 7, и выбрать установку русского языка интерфейса.
В том случае, если ваша версия windows 7 не максимальная (не Ultimate или Enteprise), то windows 7 Language Pack придется ставить вручную.
Для чего запускаем командную строку (cmd) с правами администратора и выполняем следующие команды:
DISM /Online /Add-Package /PackagePath:"D:\Downloads\ru-RU\lp.cab"
bcdedit /set {current} locale ru-RU
bcdboot %WinDir% /l ru-RU
Где, D:\Downloads\ru-RU\ – это путь к папке, в которую вы распаковали скачанные языковые пакеты. В этой папке должен находится файл локализации lp.cab.
После чего запускаем редактор реестра (regedit), перейти в ветку HKEY_LOCAL_MACHINE/SYSTEM/CurrentControlSet/Control/MUI/UILanguages и удалить параметр en-US, после чего компьютер нужно перезагрузить.
После загрузки компьютера вы получите русифицированную версию Windows 7.
Также вы можете познакомиться со статьей о русификации Windows Server 2008 R2.
Download Article
Download Article
- Display Language (Ultimate and Enterprise)
- Display Language (Any Version)
- Input Language
- Video
- Q&A
|
|
|
|
Windows 7 allows you to change the display language for most of the interface. The process is fairly straightforward and the most comprehensive if you have Windows 7 Ultimate or Enterprise. If you are using Windows 7 Starter, Basic, or Home, you can install Language Interface Packs, which translate the most-used elements into your chosen language. You can also change the keyboard input language so that you can easily type in other languages.
-

If you are using Windows 7 Ultimate or Enterprise, you can install language packs that translate most of the Windows interface. These are only available for Ultimate and Enterprise. If you are using Starter, Basic, or Home, you can install Language Interface Packs (LIPs).[1]
These translate parts of the interface, and require a base language installed. See the next section for details.- You can open the Control Panel from the Start menu or use the Command Prompt.
-
This will allow you to quickly access any Control Panel option.
Advertisement
-
You can use the Windows Update tool to download any of the available language packs.
-
If the link is not there, click «Check for updates».
-
After selecting the language, click OK.
-
Install updates. You may be prompted by UAC to continue, and you may be asked to input the administrator password.
- It may take a few minutes for the language pack to download.
-
Select the Keyboards and Language tab.
-
All of your installed languages will be listed here.[2]
[3]
-
Apply and then Log off now to log out. Your changes will be applied when you log back into Windows.
-
Some programs may not display your new language until you change your system locale settings to match that region.
- Open the Control Panel and select «Region and Language».
- Click the Administrative tab and click Change system locale.
- Select the language you’ve just installed and click OK. You’ll be prompted to restart your computer.[4]


Advertisement
-
Traditional language packs translate the majority of the UI elements, and are only available to Ultimate and Enterprise users (see the above section). For everyone else, there are LIPs. These are smaller packs that translate the most-used parts of the interface. They require a base-language installed, since not everything is translated.[5]
-
You can browse through all of the available LIPs here.
-
The third column of the table will let you know what base language the LIP requires, as well as what versions of Windows it works with.
- If the LIP requires Ultimate or Enterprise, you’ll need to upgrade your copy of Windows to change the language.
-
This will open the page for the language you’ve selected. The page will be displayed in that language.
-
This will open a new window displaying the language files.
-
You will have the option to choose between a 32-bit or a 64-bit file. You can find the version that you have by opening the Start menu, right-clicking «Computer», and selecting «Properties». Look for the «System type» entry.
-
The LIP file will be downloaded to your Downloads folder.
-
This will open the language installer with your new language automatically selected. Click Next to start the installation.
- You’ll be asked to read and accept the Microsoft terms before the language is installed.
-
The ReadMe file for the language you select will be displayed before it is installed. You usually don’t need to review this, but it may contain information about known issues or compatibility problems.
-
This may take a few moments.
-
After the installation is complete, you’ll see a list of all of your installed languages. Select your newly-installed language and click Change display language.
- If you want the Welcome screen to change, as well as any system accounts, check the box beneath the list of languages.
-
You will be prompted to log out in order for your new language to be applied. When you log back in, Windows will be using the new language. Anything that isn’t translated with the LIP will be displayed in the base language.
-
Some programs designed for certain languages will only display the language if the system is set to that region.
- Click the Start menu and open the Control Panel.
- Open the «Region and Language» option.
- Click the Administrative tab and then click Change system locale.
- Select the language that you just installed, and reboot your computer when prompted.


Advertisement
-
You can add additional keyboard layouts to your Windows installation that will allow you to type in different languages.
-
This will make it easier to find the correct option.
-
Keyboards and Languages tab. Click the Change keyboards… button.[6]
-
Add to install another language. A list of available languages will appear.
-
Expand the language, and then expand the «Keyboard» option. Select the specific form of that language that you want by checking the box. Click OK to add the language.
- Languages will have multiple options if different regions speak different dialects.
-
This is located in the taskbar, to the left of the System Tray and clock.[7]
The abbreviation for the active language will be displayed. Clicking the abbreviation will allow you to switch between your different input methods.- You can also press ⊞ Win+Space to cycle through the installed languages.
- If you can’t find the Language bar, right-click on the taskbar, select «Toolbars», and then click «Language bar»


Advertisement
Add New Question
-
Question
I lost my MSN homepage for news, and it is now in Japanese. How do I get the English version for the USA back again?
Click the Settings wheel in the top right corner and select Options to open the Outlook.com Mail settings. Here, under General, you will see the setting to change Region & Time Zone; you’ll find the setting to change the Language there as well.
-
Question
What If l can’t read German?
The coding cat
Community Answer
If you cannot read the language displayed on screen, use a translating app until you get to the language settings.
-
Question
I tried to change the language of a Windows 7, which is Arabic. I tried the first method seeing the pics but it didn’t work. The whole system is in Arabic so I cant understand a single word.
The coding cat
Community Answer
If you cannot understand the language your machine is displaying, use a translating app until you can change the language.
See more answers
Ask a Question
200 characters left
Include your email address to get a message when this question is answered.
Submit
Advertisement
Thanks for submitting a tip for review!
References
About This Article
Article SummaryX
To change the display language on Windows 7, open the Control Panel, and change the view to Large icons. Click the Region and Language icon and select a language from the menu. If you don’t see what you’re looking for, click the Install/uninstall languages button to add it to the list. Once the language is selected, click Apply, and then follow the on-screen instructions to log out and back into Windows 7 with the new language. If you don’t see the correct language, return to the Region and Language panel, select Administrative, and then click Change system locale. Select your language and reboot when prompted.
To change the keyboard or input language, open the Control Panel and change the view to Large icons. Click the Region and Language icon. On the Keyboard and Languages tab, click the Change keyboards button, and click Add to install another language. Check the box next to the language you want to install, and then click OK to install it. You can now switch between input languages using the taskbar language menu near the bottom-right corner of the screen.
Did this summary help you?
Thanks to all authors for creating a page that has been read 796,801 times.
Reader Success Stories
-
«Thank you for such a big help. I had this problem for two years and with your images, it made it much easier for…» more
Is this article up to date?
Все способы:
- Процедура установки
- Способ 1: Загрузка через «Центр обновления»
- Способ 2: Ручная установка
- Вопросы и ответы: 5
При работе с компьютером в особых случаях требуется сменить язык его интерфейса. Этого нельзя сделать без установки соответствующего языкового пакета. Давайте узнаем, как как поменять язык на компьютере с Windows 7.
Читайте также: Как добавить языковые пакеты в Windows 10
Процедура установки
Процедуру установки языкового пакета в Windows 7 можно разделить на три этапа:
- Загрузка;
- Инсталляция;
- Применение.
Существует два способа установки: автоматический и ручной. В первом случае загрузка языкового пакета происходит через «Центр обновлений», а во втором проводится инсталляция заранее скачанного или перенесенного другими средствами на компьютер файла. Теперь рассмотрим каждый из этих вариантов более подробно.
Способ 1: Загрузка через «Центр обновления»
Для того чтобы загрузить необходимый языковый пакет, требуется перейти в «Центр обновления Windows».
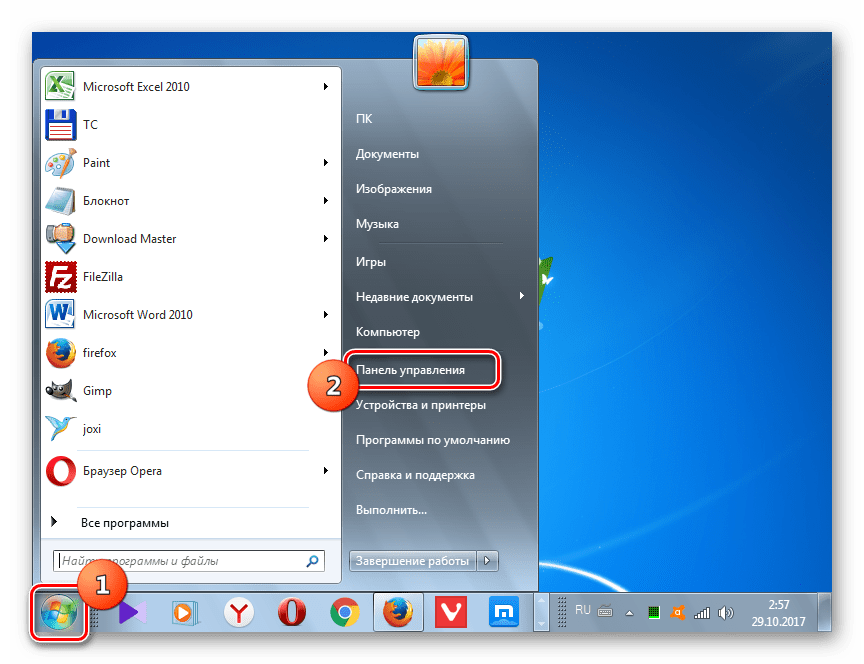
- Щелкайте меню «Пуск». Переходите в «Панель управления».
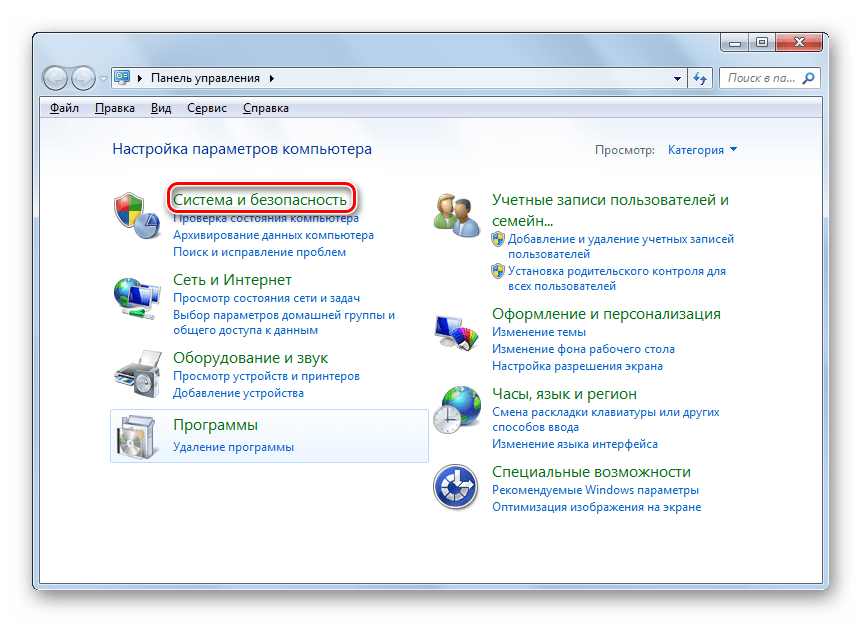
- Далее зайдите в раздел «Система и безопасность».
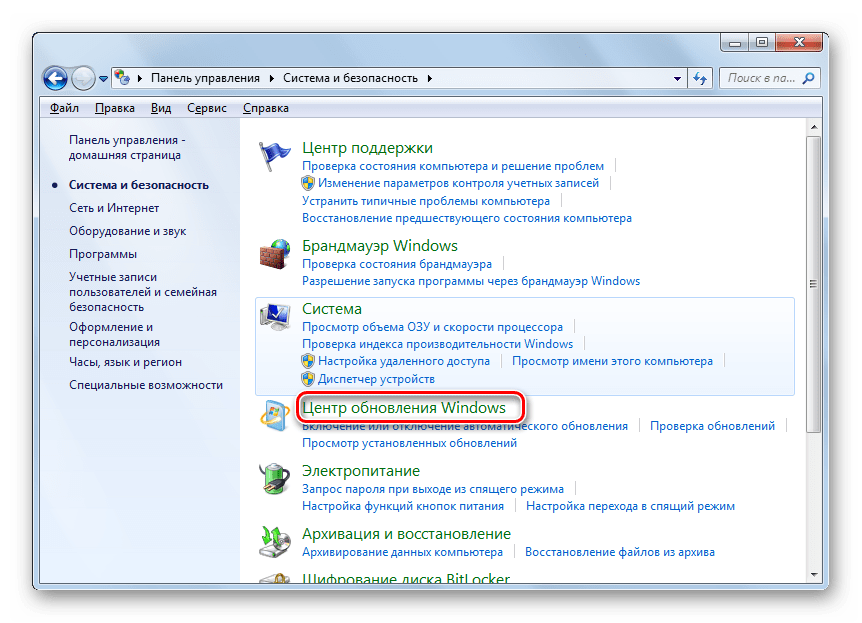
- В появившемся окошке щелкайте по надписи «Центр обновления Windows».
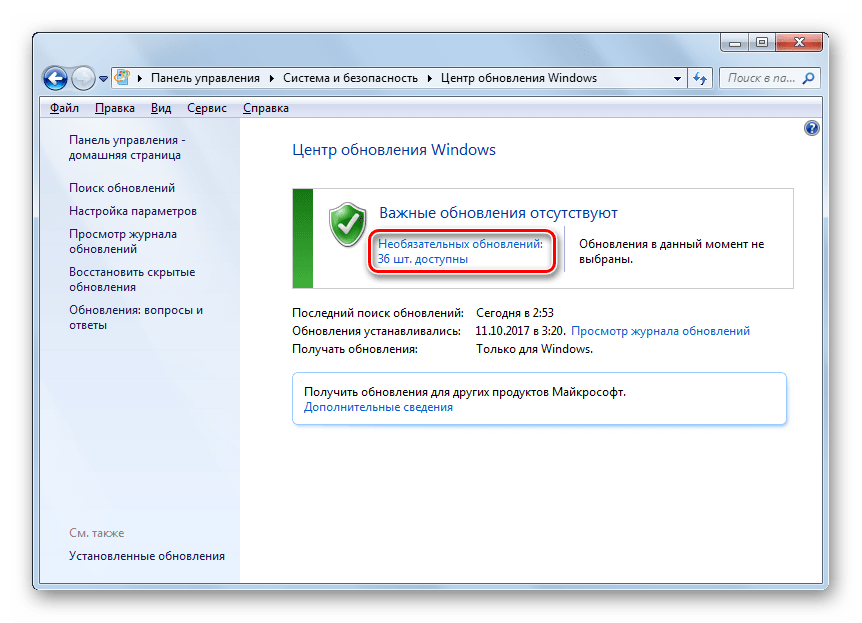
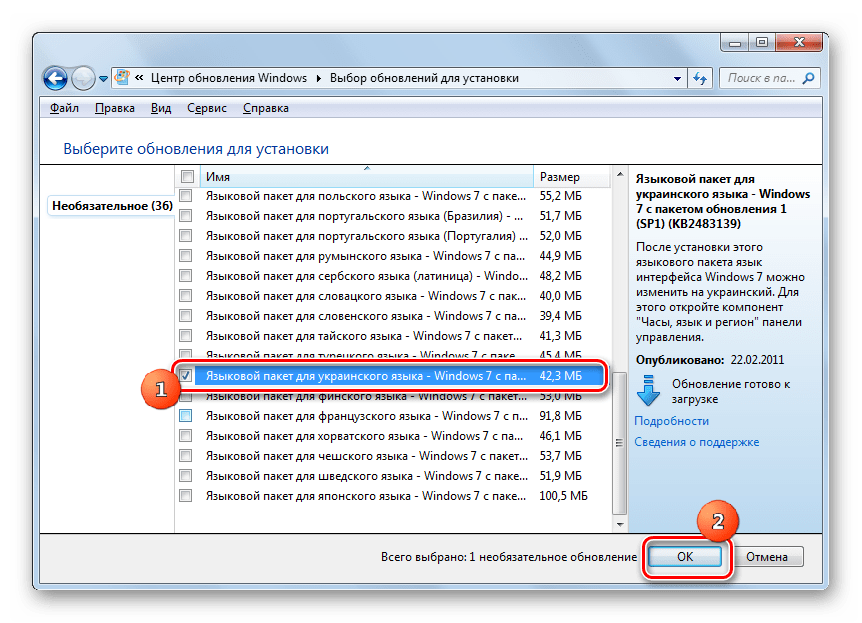
- В открывшейся оболочке «Центра обновления» жмите по надписи «Необязательных обновлений…».
- Открывается окошко доступных, но неустановленных необязательных обновлений. Нас интересует группа «Windows language Packs». Именно тут расположены языковые пакеты. Отметьте галочкой тот объект или несколько вариантов, которые вы хотите установить на ПК. Щелкайте «OK».
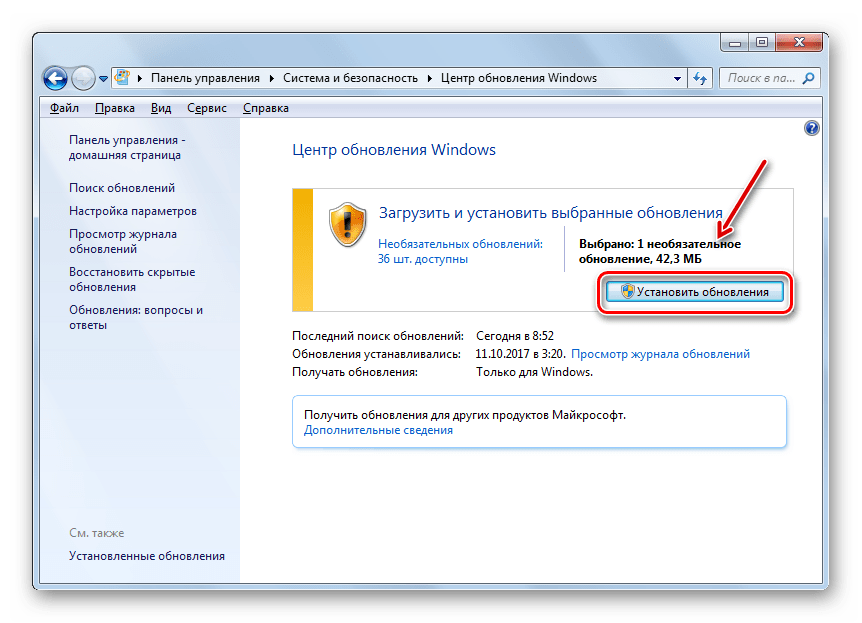
- После этого вас перебросит в основное окно «Центра обновлений». Количество выбранных обновлений будет отображено над кнопкой «Установить обновления». Для активации загрузки следует нажать на указанную кнопку.
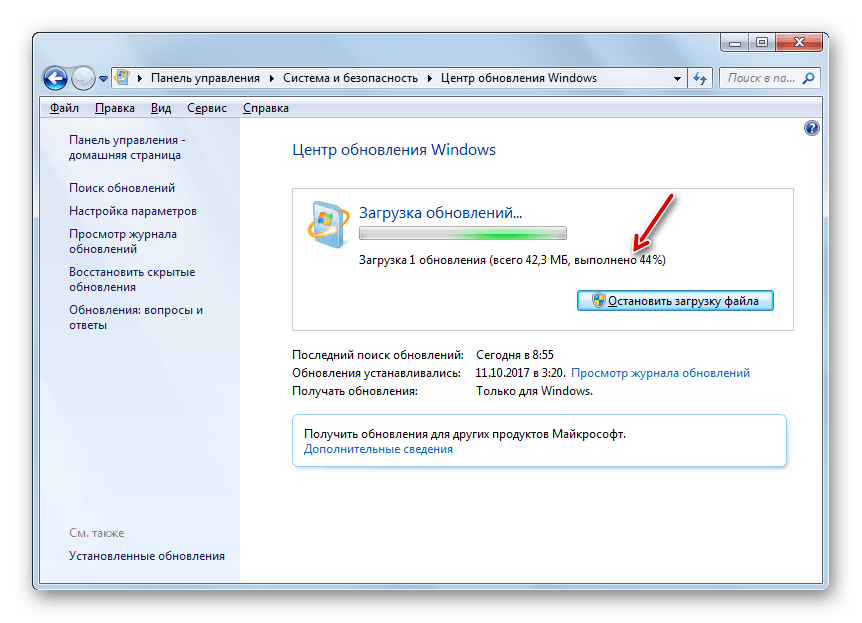
- Выполняется процедура загрузки языкового пакета. Информация о динамике данного процесса отображается в том же окне в процентном отношении.
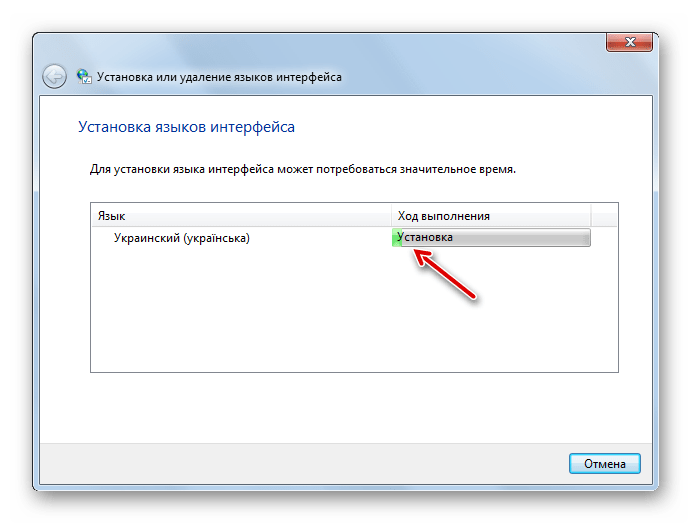
- После загрузки языкового пакета на компьютер выполняется его установка без вмешательства пользователя. Эта процедура может занять значительное время, но вы параллельно имеете возможность выполнять на ПК и другие задачи.
Способ 2: Ручная установка
Но не у всех пользователей есть возможность пользоваться интернетом на компьютере, нуждающемся в установке пакета. Кроме того, не все возможные варианты языков доступны через «Центр обновлений». В этом случае существует вариант использовать ручную инсталляцию заранее закачанного и перенесенного на целевой ПК файла языкового пакета.
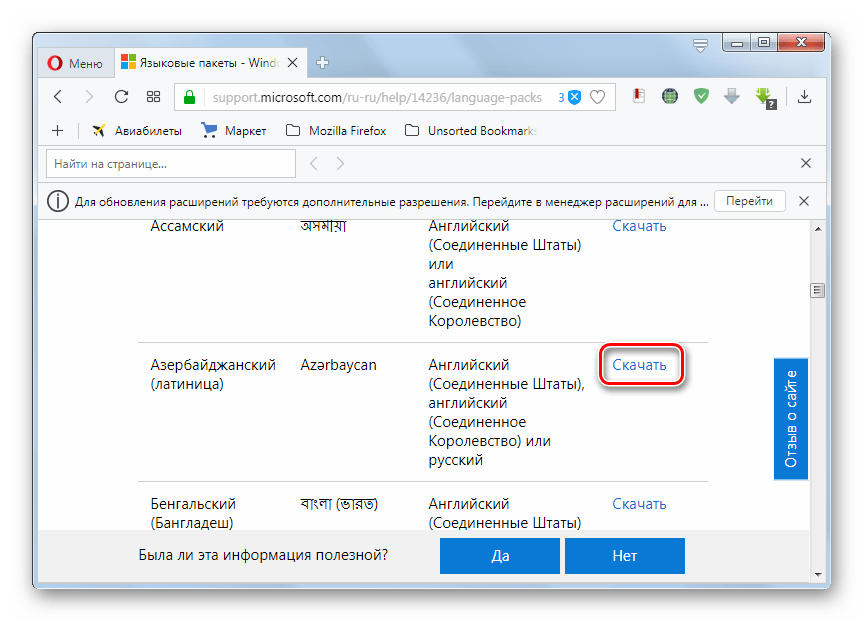
Скачать языковый пакет
- Скачайте языковый пакет с официального сайта Microsoft или выполните перенос его на компьютер другим способом, например, при помощи флэшки. Стоит отметить, что на веб-ресурсе Майкрософт представлены только те варианты, которых нет в «Центре обновлений». При выборе важно учитывать также разрядность вашей системы.
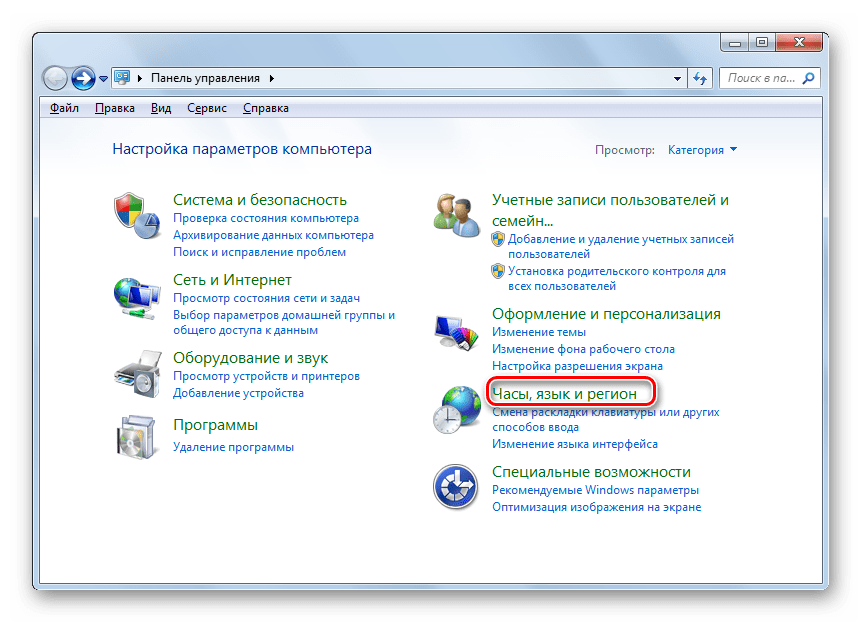
- Теперь переходите в «Панель управления» через меню «Пуск».
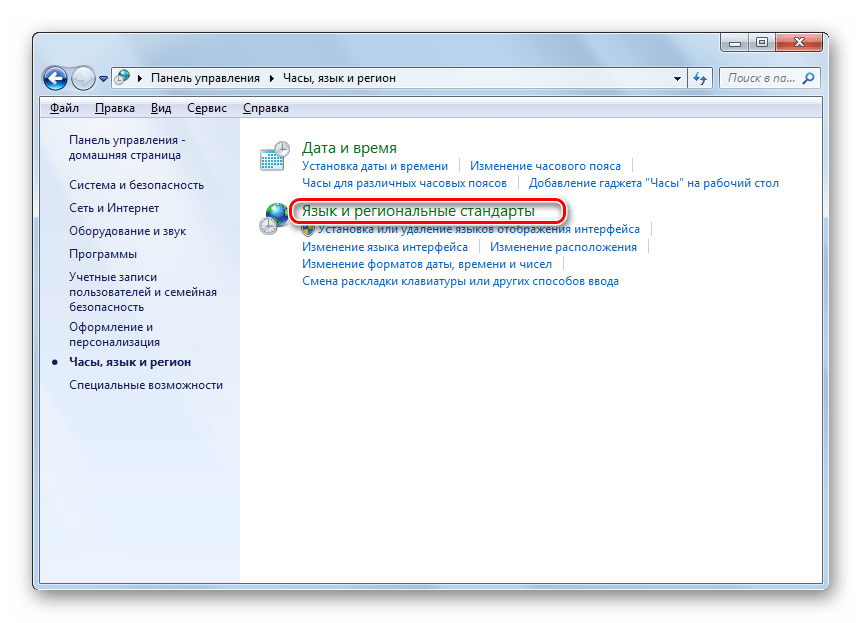
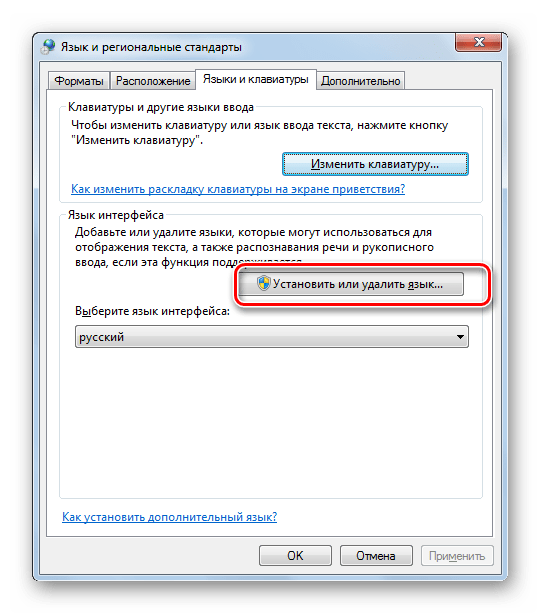
- Переходите в раздел «Часы, язык и регион».
- Далее щелкайте по наименованию «Язык и региональные стандарты».
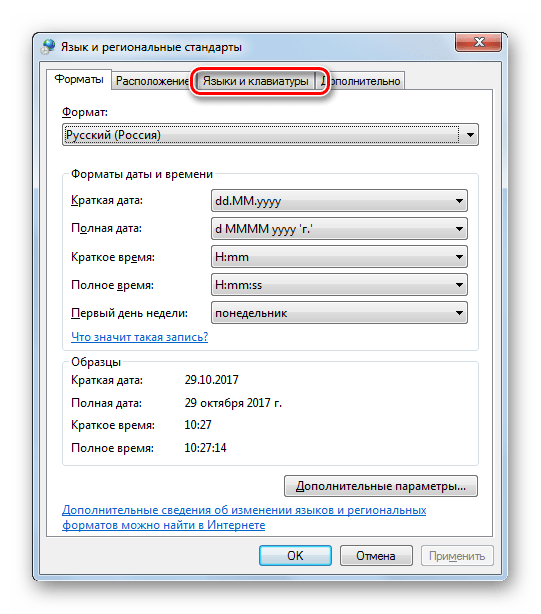
- Запускается окошко управления настройками локализации. Переходите во вкладку «Языки и клавиатура».
- В блоке «Язык интерфейса» жмите «Установить или удалить язык».
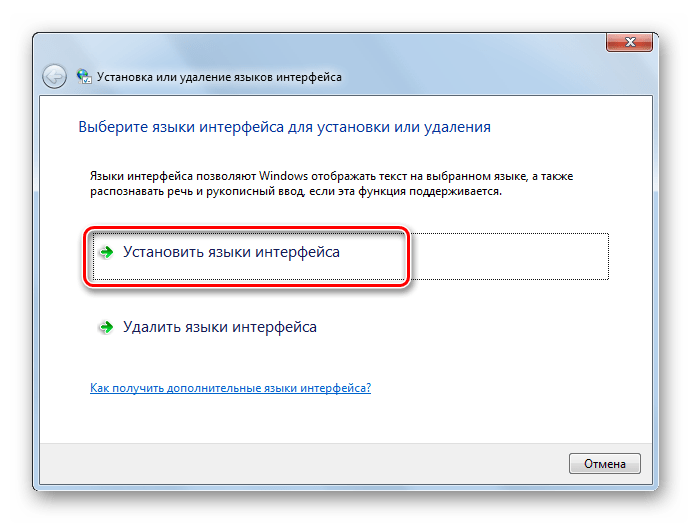
- В открывшемся окошке выбирайте вариант «Установить язык интерфейса».
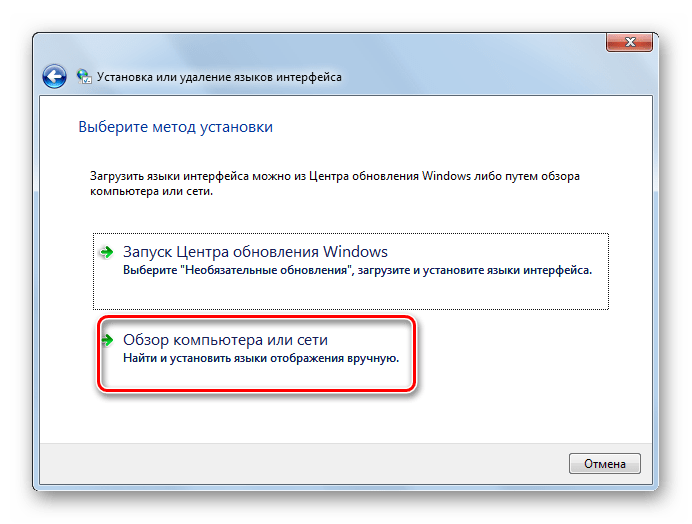
- Запускается окно выбора метода установки. Щелкайте «Обзор компьютера или сети».
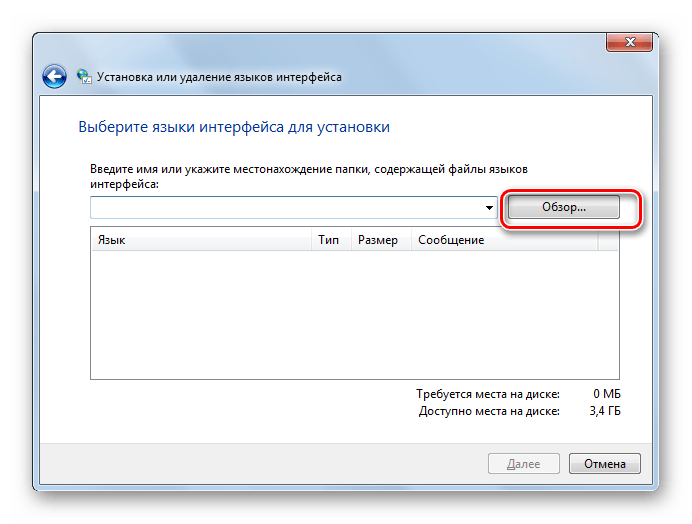
- В новом окошке жмите «Обзор…».
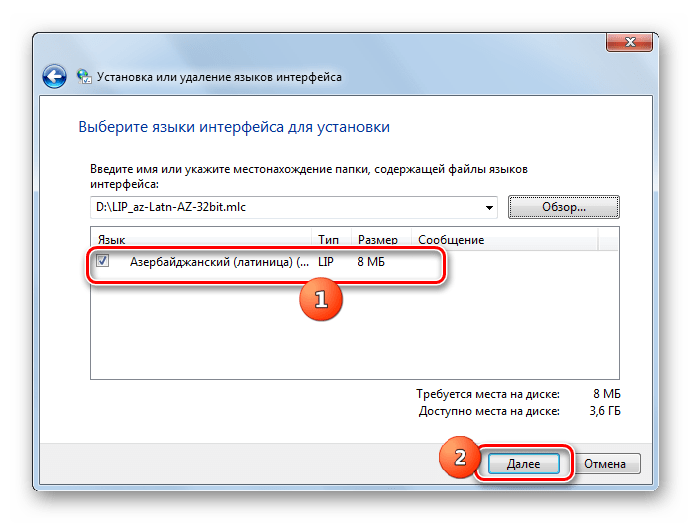
- Открывается инструмент «Обзор файлов и папок». С его помощью перейдите в ту директорию, где находится скачанный языковый пакет с расширением MLC, выделите его и жмите «OK».
- После этого наименование пакета отобразится в окне «Установки или удаления языков». Проверьте, чтобы напротив него была установлена галочка, и жмите «Далее».
- В следующем окошке вам требуется согласиться с лицензионными условиями. Для этого ставьте радиокнопку в положение «Я принимаю условия» и жмите «Далее».
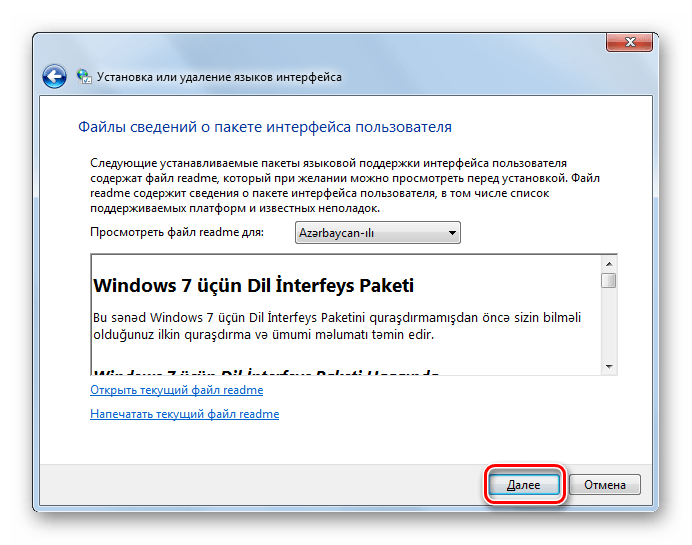
- Затем предлагается ознакомиться с содержимым файла «Readme» для выбранного языкового пакета, которое отображается в этом же окне. После ознакомления жмите «Далее».
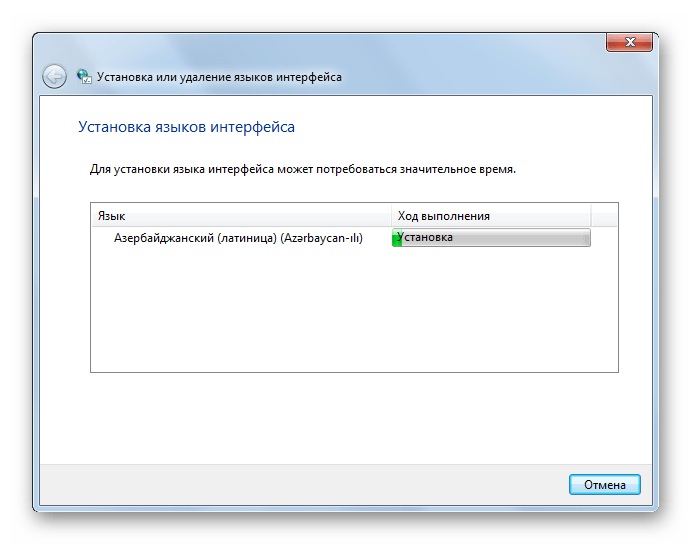
- После этого стартует непосредственно процедура установки пакета, которая может занять значительное время. Продолжительность зависит от размера файла и вычислительных мощностей компьютера. Динамика установки отображается с помощью графического индикатора.
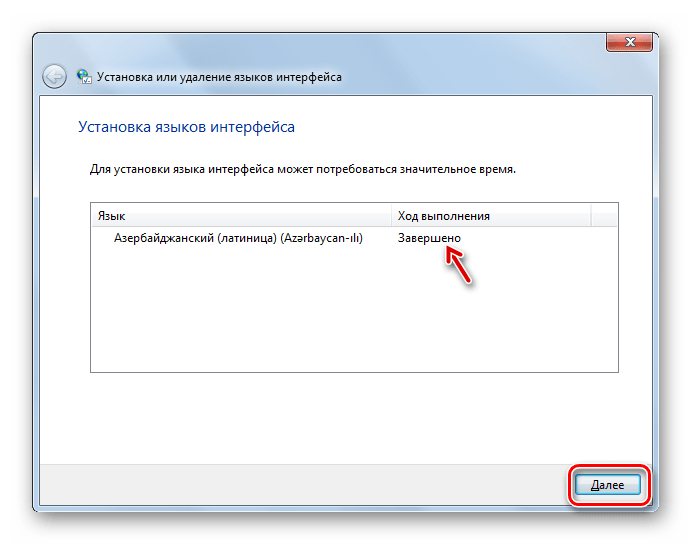
- После того как объект будет инсталлирован, напротив него в окне установки языков интерфейса появится статус «Завершено». Щелкайте «Далее».
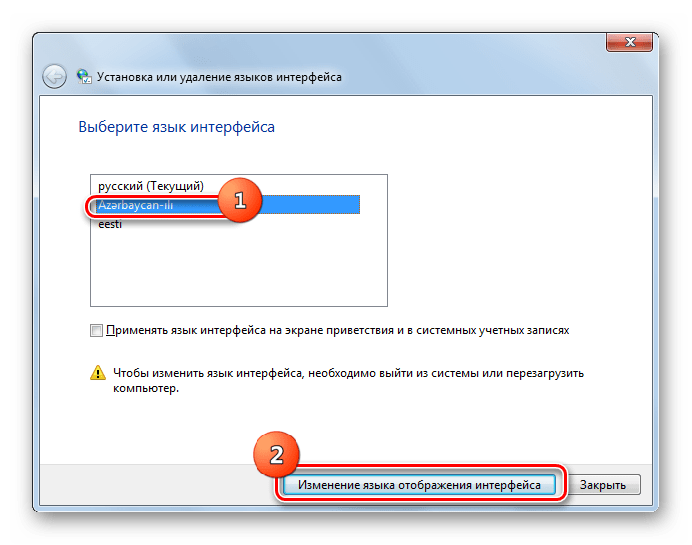
- После этого открывается окно, в котором вы можете выбрать только что установленный языковый пакет в качестве языка интерфейса компьютера. Для этого следует выделить его наименование и нажать «Изменение языка отображения интерфейса». После перезагрузки ПК выбранный язык будет установлен.

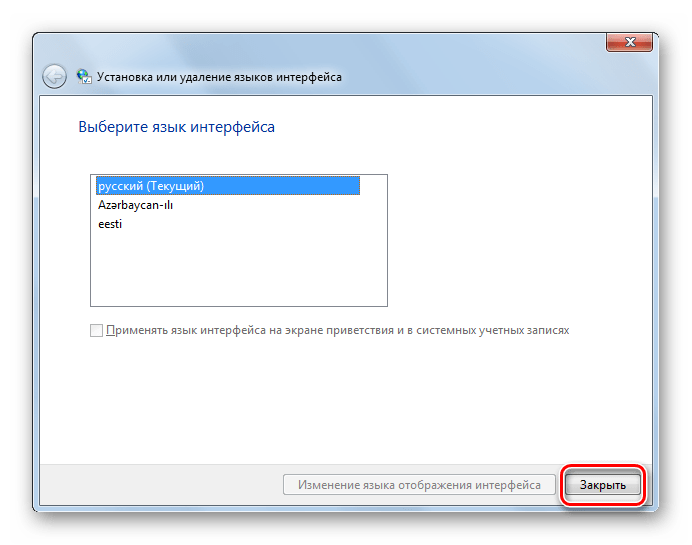
Если же вы пока не хотите применять данный пакет и изменять языковые настройки системы, то просто нажмите кнопку «Закрыть».


Как видим, процедура установки языкового пакета в целом интуитивно понятна, как бы вы не действовали: через «Центр обновления» или через настройки языковых параметров. Хотя, конечно, при использовании первого варианта действий процедура более автоматизирована и требует минимального вмешательства самого пользователя. Таким образом, вы узнали, как русифицировать Windows 7 или наоборот перевести ее на иностранный язык.
Наша группа в TelegramПолезные советы и помощь
Windows 7 allows you to change the display language yourself. If you purchased a computer having English installed, and you want to change it to other language, you can follow instructions below to change the language.
Firstly, install the language pack:
1. Click the Start button in bottom left corner of the desktop.
2. Type change display language in the search box then select Change display language from the result list. Then Region and Language dialog box will open.
3. Click the Install/Uninstall languages… button.
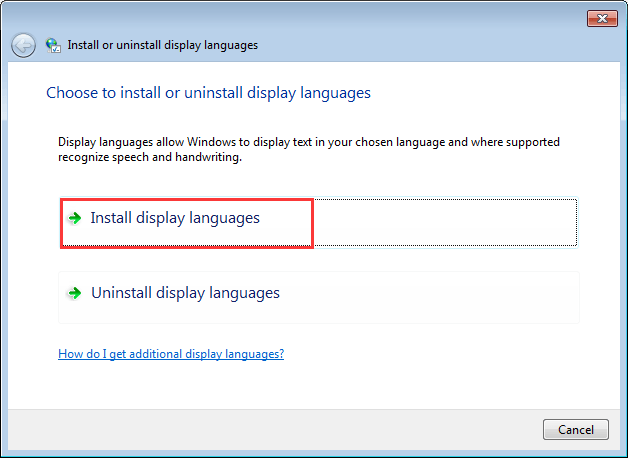
4. Select Install display languages.
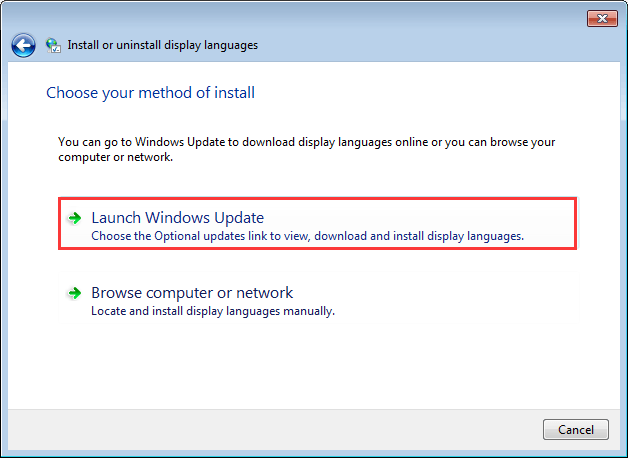
5. Select Launch Windows Update.
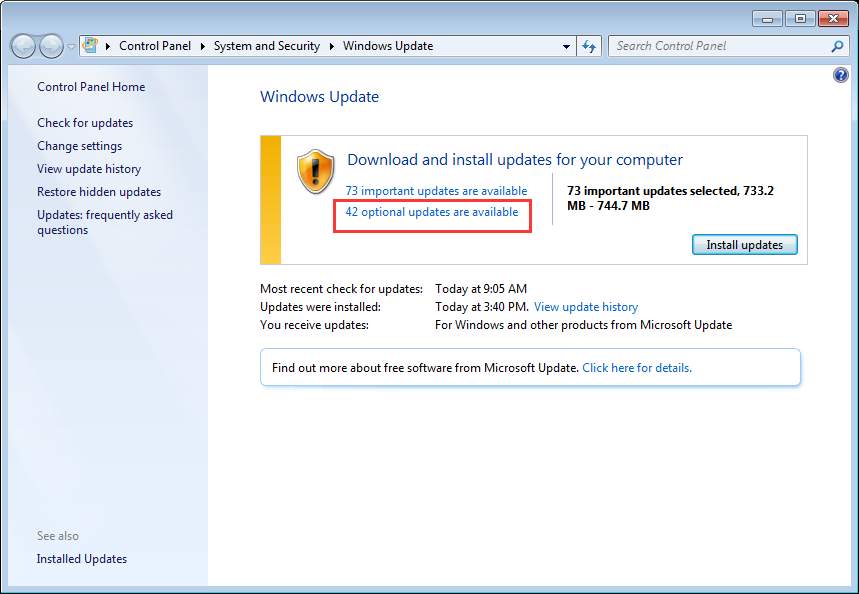
6. Click on optional updates are available.
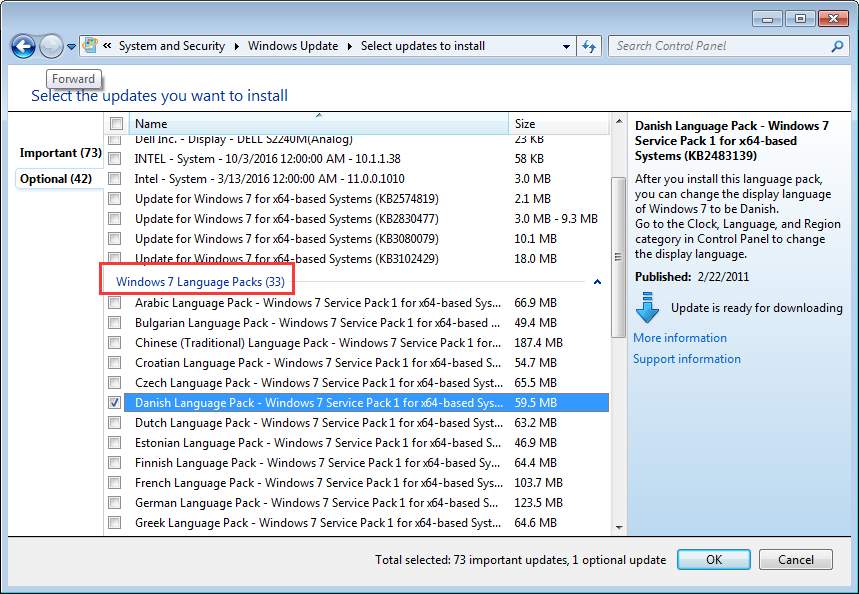
7. Under Windows 7 Language Packs, select the language that you want to install on Windows 7 (for example, select Danish Language Pack).
Note: The Important updates may be selected by default. If you just need to install the language pack, check for Important updates and make sure they are not selected.
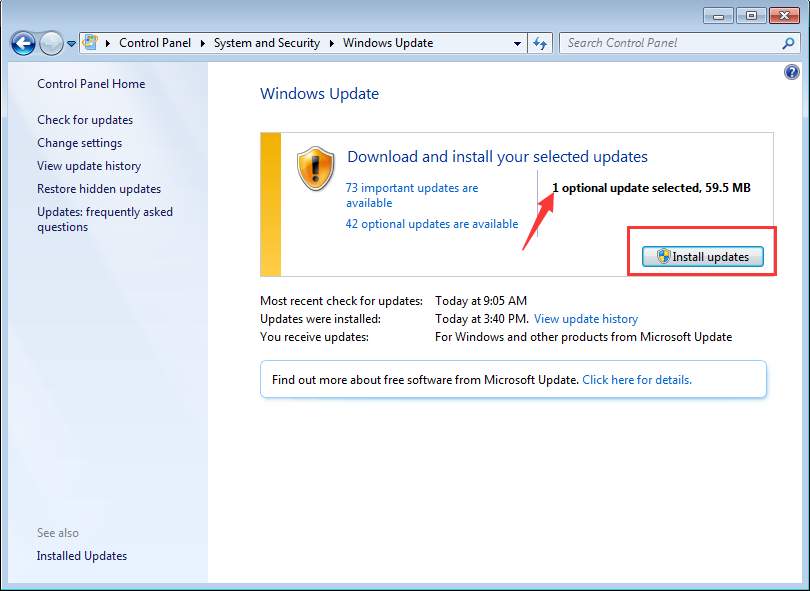
8. Then click the OK button to go back to Windows Update screen.
9. Click Install updates then the selected language pack will start downloading and installing. (In the screen, you also get how many updates will be installed.)
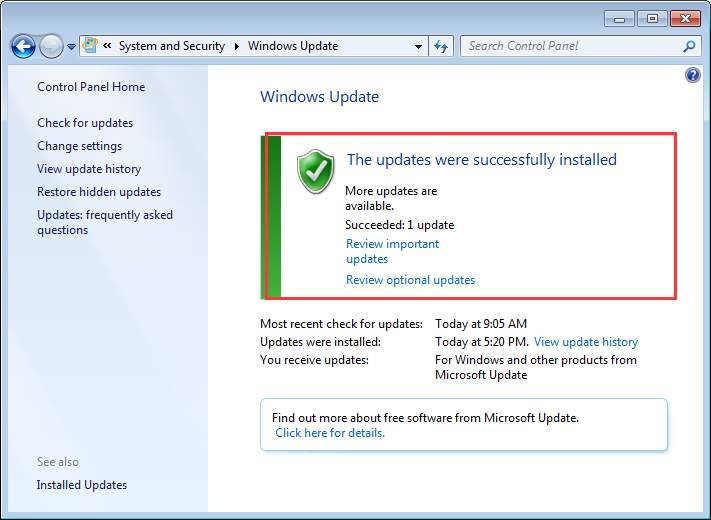
When the update is done, you will see the message as follows:
Secondly, change the display language:
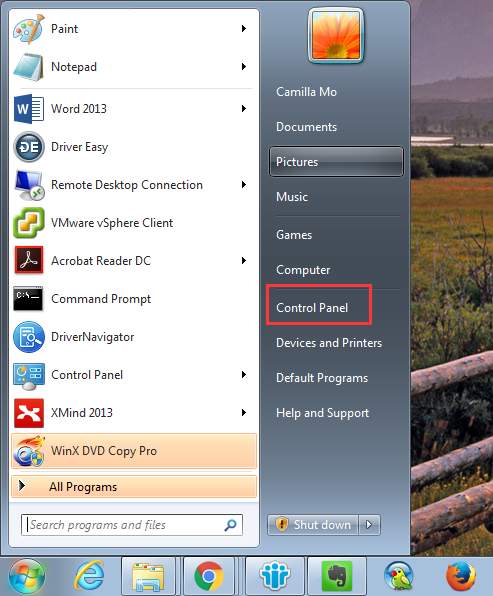
1. Click the Start button and click Control Panel on the pop-up menu.
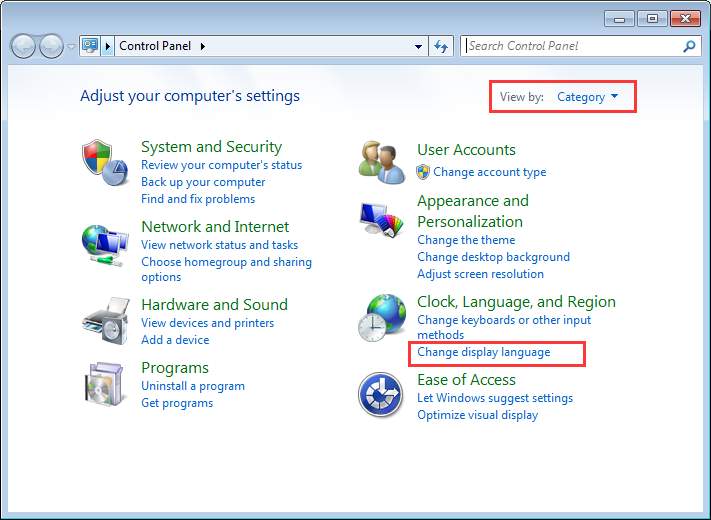
2. View by Category in Control Panel. Under “Clock, Language and Region”, click Change display language.
3. Then Choose a display language (In my case, I will choose dansk.).
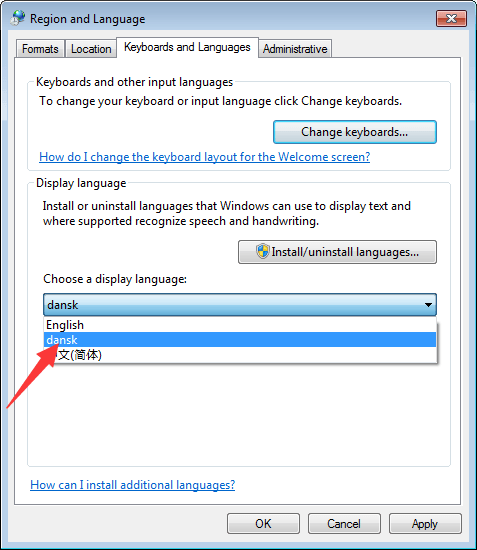
4. Click OK.
5. Restart your PC for the changes to take effect.