
Overview
OpenBLAS is an open source library for highly optimized linear algebra calculation (BLAS is acronym for Basic Linear Algebra Subprograms).
While it is very easy to build OpenBLAS for Linux (and usually not actually required), building OpenBLAS for Windows could be pretty painful. Proper installation and configuration of MinGW on Windows is doable, but error prone. Many people don’t wish to even hear about it.
In an ideal world, you could download prebuilt binaries and call it a night. However, you may require it to be compiled with different options, and security concerns cannot be ignored.
If you are interested in building OpenBLAS in easy and repeatable (!) manner then you should continue reading.
Prerequisites
We won’t use any Windows tools for building OpenBLAS (with one small and pretty straightforward exception in the end, if necessary). All the steps below will be done via command line both in Windows and Linux. Please pay attention to where we do what. Here is what you will need:
- Linux subsystem for Windows 10 (or just actual Ubuntu machine, but you will have to slightly adjust the following instructions accordingly). Instead of having a painful experience with MinGW on Windows we will harness the fact that latest Windows 10 actually includes Linux subsystem.
- If you have not installed it yet, then open PowerShell as admin and execute the following (copyright: http://www.scconfigmgr.com/2016/09/11/enable-ubuntu-in-windows-10-during-osd-with-configmgr/):
$RegistryKeyPath = 'HKLM:\SOFTWARE\Microsoft\Windows\CurrentVersion\AppModelUnlock'
if (-not(Test-Path -Path $RegistryKeyPath)) {
   New-Item -Path $RegistryKeyPath -ItemType Directory -Force
}
New-ItemProperty -Path $RegistryKeyPath -Name AllowDevelopmentWithoutDevLicense -PropertyType DWORD -Value 1
Enable-WindowsOptionalFeature -FeatureName Microsoft-Windows-Subsystem-Linux -Online -All -LimitAccess -NoRestart
- C/Fortran and MinGW libraries and compilers for Linux
-
Click Start type Bash and click Enter
-
After that enter the following (you can omit sudo if you are using Windows 10’s Linux, but it won’t hurt):
sudo apt-get update
sudo apt-get install -y build-essential gcc-mingw-w64-x86-64 gfortran-mingw-w64-x86-64
Leave the Bash open, you will need it.
- On Windows download cv2pdb tool:
-
cv2pdb.exe (link was found here: https://github.com/rainers/cv2pdb/releases)
I assume you downloaded it to your ‘downloads’ folder.
- Get the sources, in Bash (hopefully you are still in your home directory) type:
git clone https://github.com/xianyi/OpenBLAS.git
cd OpenBLAS
- Build the release (ensure that you copy the whole command line and be patient – it will take ~15-25min)
make BINARY=64 HOSTCC=gcc CC=x86_64-w64-mingw32-gcc FC=x86_64-w64-mingw32-gfortran CFLAGS='-static-libgcc -static-libstdc++ -static -ggdb' FFLAGS='-static' && mv -f libopenblas.dll.a libopenblas.lib
-
The end game should look like this (ignore the warnings, during the build):

-
Note that you will probably want to add more options like USE_THREAD=0 or USE_OPENMP=1 (never tried myself). Otherwise the build will make its own decision based on the actual number of cores on your computer.
- Copy away release build to your chosen location. On Windows open the folder %localappdata%\Lxss\root\OpenBLAS (if you used Linux VM or etc. you will have to find your own way to get the binaries) and copy libopenblas.dll and libopenblas.lib to wherever you need them.
- (Optional) Build the debug build (it will take another ~15-25min)
make clean && make DEBUG=1 BINARY=64 HOSTCC=gcc CC=x86_64-w64-mingw32-gcc FC=x86_64-w64-mingw32-gfortran CFLAGS='-static-libgcc -static-libstdc++ -static -ggdb' FFLAGS='-static' && mv -f libopenblas.dll.a libopenblas.lib
- Again add additional flags of your choice.
- (Optional) Copy debug build to desired location. See 3.
- Create PDBs (if necessary) stripping debug information from the DLLs. On Windows execute:
%userprofile%\Downloads\cv2pdb <Path to release build>\libopenblas.dll
%userprofile%\Downloads\cv2pdb <Path to debug build>\libopenblas.dll
-
PDBs will be created and debug symbols will be stripped from the DLLs.
-
You are done!
Conclusion
We’ve just succeeded to compile an open source project without using somewhat cumbersome GNU packages for Windows. Our build process is repeatable and will give the same result elsewhere. Linux subsystem on Windows 10 opens new opportunities in establishing a bridge between open source world and Windows, so let’s use it!
Senior Software Development Engineer at Microsoft Corp.
View all posts by Benjamin Zhitomirsky
BLAS (Basic Linear Algebra Subprograms) and LAPACK (Linear Algebra Package) are widely used libraries for performing linear algebra operations efficiently. These libraries provide optimized implementations of common linear algebra routines, such as matrix multiplication, solving linear systems, and eigenvalue computations. In Python, the scipy library relies on BLAS and LAPACK to provide high-performance linear algebra capabilities.
Why Install BLAS and LAPACK for scipy?
By default, scipy uses the built-in BLAS and LAPACK libraries provided by the system. However, these default implementations may not always be the most optimized versions, especially on certain operating systems or hardware configurations. Installing optimized versions of BLAS and LAPACK can significantly improve the performance of linear algebra operations in scipy, making it faster and more efficient.
Installing BLAS and LAPACK
To install optimized BLAS and LAPACK libraries for scipy in Python 3, you have a few options depending on your operating system.
Linux
On Linux, you can install the OpenBLAS library, which is a highly optimized open-source implementation of BLAS and LAPACK. OpenBLAS is available in most Linux package managers, so you can simply use the package manager to install it. For example, on Ubuntu, you can run the following command:
sudo apt-get install libopenblas-dev
After installing OpenBLAS, scipy will automatically use it for linear algebra operations.
macOS
On macOS, you can install the Accelerate framework, which provides optimized implementations of BLAS and LAPACK. The Accelerate framework is included with macOS, so no additional installation is required. Scipy will automatically use the Accelerate framework for linear algebra operations.
Windows
On Windows, you can install the Intel Math Kernel Library (MKL), which is a highly optimized implementation of BLAS and LAPACK. The MKL is not freely available, but it can be obtained by installing the Intel Distribution for Python, which includes the MKL. You can download the Intel Distribution for Python from the Intel website and follow the installation instructions. After installing the Intel Distribution for Python, scipy will automatically use the MKL for linear algebra operations.
Verifying the Installation
Once you have installed the optimized BLAS and LAPACK libraries, you can verify that scipy is using them by checking the output of the following code:
import scipy.linalg

print(scipy.linalg.get_blas_funcs())
This code will display a list of available BLAS functions and their corresponding implementations. If the output shows the optimized BLAS library you installed (e.g., OpenBLAS, Accelerate, or MKL), then scipy is successfully using the optimized libraries.
By installing optimized BLAS and LAPACK libraries for scipy in Python 3, you can enhance the performance of linear algebra operations. Whether you are using Linux, macOS, or Windows, there are options available to install optimized libraries such as OpenBLAS, Accelerate, or the Intel Math Kernel Library. Verifying the installation ensures that scipy is utilizing the optimized libraries, allowing you to take full advantage of their performance benefits.
Example 1: Installing BLAS and LAPACK using Anaconda
If you are using Anaconda, you can easily install BLAS and LAPACK by creating a new environment and installing the required packages. Here’s an example:
# Create a new environment
conda create -n myenv python=3.8

# Activate the environment
conda activate myenv

# Install BLAS and LAPACK
conda install -c conda-forge blas
conda install -c conda-forge lapack
Example 2: Installing BLAS and LAPACK using pip
If you are using pip to manage your Python packages, you can install BLAS and LAPACK using the following commands:
# Install BLAS
pip install cython
pip install numpy
pip install scipy

# Install LAPACK
pip install scikit-build
pip install cmake
pip install dlib
Example 3: Verifying the installation
Once you have installed BLAS and LAPACK, you can verify the installation by running the following code:
import numpy as np
from scipy.linalg import lapack

# Create a random matrix
A = np.random.rand(3, 3)

# Solve a linear system using LAPACK
x = lapack.dgesv(A, np.ones(3))

print(x)
Reference Links:
- Anaconda documentation on installing BLAS and LAPACK
- NumPy package on PyPI
- SciPy package on PyPI
- SciPy documentation on LAPACK
Conclusion:
Installing BLAS and LAPACK is essential for using advanced numerical computation libraries like SciPy in Python. BLAS provides efficient linear algebra operations, while LAPACK offers a comprehensive set of linear algebra routines. By following the installation instructions provided by Anaconda or using pip, you can easily set up BLAS and LAPACK on your system. Once installed, you can verify the installation by running sample code that utilizes LAPACK functions. With BLAS and LAPACK installed, you can take advantage of the powerful numerical capabilities provided by libraries like SciPy.
BLAS: Basic Linear Algebra Subprograms | Navigating Through BLAS on Your Windows Machine
Basic Linear Algebra Subprograms (BLAS), a term I encountered while working with the LLAMA (LLM model from Meta) on my windows machine seems to directly affect the performance of the model’s inference. Most probably you (like me) already have BLAS capabilities on your windows machine and may be missing on the chance to leverage its capabilities. Lets understand the steps to ensure you are aware of BLAS and its implementation on your machine.
Introduction:
Basic Linear Algebra Subprograms (BLAS) is the standard that outlines a collection of fundamental routines designed to execute prevalent linear algebra operations, including vector addition, scalar multiplication, dot products, linear combinations, and matrix multiplication. Universally recognized as the standard foundational routines for linear algebra libraries, BLAS routines offer bindings for both C, through the «CBLAS interface,» and Fortran, known as the «BLAS interface.» While the BLAS specification is universally applicable, implementations are frequently optimized for a specific machine’s speed, offering notable performance enhancements. Consequently, BLAS implementations often harness specialized floating-point hardware features, such as vector registers or SIMD instructions, to bolster computational efficiency.
Importance:
Hence Basic Linear Algebra Subprograms (BLAS) is pivotal in the computational and scientific computing domains, offering low-level routines optimized for performing common linear algebra operations.
WINDOWS:
While BLAS may not be a typical installation in Windows, it is deeply integrated into various scientific computing software. In this guide, we’ll explore how to verify if BLAS is accessible on your Windows machine and how to utilize it.
1. Checking BLAS in Python
- Using NumPy: The numerical library NumPy, widely used in Python, often links to BLAS for efficient numerical operations.
import numpy as np
np.__config__.show()
- Understanding Output: Navigate through the output, looking for references to BLAS or associated libraries like OpenBLAS or Intel MKL.
2. Manual Verification of BLAS Libraries
• Inspecting Environment Variables: Ensure that any installed BLAS libraries are referenced in your system’s PATH.
○ Navigate to: This PC / Computer > Properties > Advanced system settings > Environment Variables
○ Scrutinize the ‘Path’ under ‘System variables’ for any BLAS-related entries.
• Utilizing Windows Search: Simply enter «BLAS» into the Windows search bar and scan through the results for relevant entries.
• Checking Installed Software: Navigate through the ‘Control Panel’ to explore the installed software list for any programs that may incorporate BLAS, such as MATLAB or Anaconda.
3. Installing BLAS on Windows
• Through Software Packages: Install software like MATLAB or Anaconda, which inherently provide access to BLAS libraries.
• Standalone BLAS Libraries: Consider installing a specific BLAS library like OpenBLAS. This can be achieved by downloading pre-built binaries or using a package manager.
Compiling BLAS from Source: Though it demands a more intricate process, compiling BLAS from source is an alternative approach, especially for developers needing a customized setup.
Conclusion
The applicability of BLAS in linear algebra computations is vast and wide-reaching in the scientific computing arena. While ensuring it’s available on your Windows machine might require a bit of navigation and checking, the rewards in computational efficiency are well worth the efforts. Whether utilizing it through a higher-level language like Python or linking directly to the libraries in your applications, BLAS can be a potent tool in your numerical computing toolkit.
Windows has no default BLAS / LAPACK library. By “default” we mean,
installed with the operating system.
Numpy needs a BLAS library that has CBLAS C language wrappers.
Here is a list of the options that we know about.
ATLAS
The ATLAS libraries have been the default BLAS / LAPACK libraries for numpy
binary installers on Windows to date (end of 2015).
ATLAS uses comprehensive tests of parameters on a particular machine to chose
from a range of algorithms to optimize BLAS and some LAPACK routines. Modern
versions (>= 3.9) perform reasonably well on BLAS benchmarks.
Each ATLAS build is optimized for a particular machine (CPU
capabilities, L1 / L2 cache size, memory speed), and ATLAS does not select
routines at runtime but at build time, meaning that a default ATLAS build can
be badly optimized for a particular processor. The main developer of ATLAS is
Clint Whaley. His main priority is optimizing for HPC machines, and he does
not give much time to supporting Windows builds. Not surprisingly, ATLAS is
difficult to build on Windows, and is not well optimized for Windows 64 bit.
Advantages:
- Very reliable;
- BSD license;
Disadvantages:
- By design, the compilation step of ATLAS tunes the output library to the
exact architecture on which it is compiling. This means good performance
for machines very like the build machine, but worse performance on other
machines; - No runtime optimization for running CPU;
- Has only one major developer (Clint Whaley);
- Compilation is difficult, slow and error-prone on Windows;
- Not optimized for Windows 64 bit
Because there is no run-time adaptation to the CPU, ATLAS built for a CPU with
SSE3 instructions will likely crash on a CPU that does not have SSE3
instructions, and ATLAS built for a SSE2 CPU will not be able to use SSE3
instructions. Therefore, numpy installers on Windows use the “superpack”
format, where we build three ATLAS libraries:
- without CPU support for SSE instructions;
- with support for SSE2 instructions;
- with support for SSE3 instructions;
We make three Windows .exe installers, one for each of these ATLAS
versions, and then build a “superpack” installer from these three installers,
that first checks the machine on which the superpack installer is running, to
find what instructions the CPU supports, and then installs the matching numpy
/ ATLAS package.
There is no way of doing this when installing from binary wheels, because the
wheel installation process consists of unpacking files to given destinations,
and does not allow pre-install or post-install scripts.
One option would be to build a binary wheel with ATLAS that depends on SSE2
instructions. It seems that 99.5% of Windows machines have SSE2 (see:
Windows versions). It is not technically difficult to put a check in the
numpy __init__.py file to give a helpful error message and die when the
CPU does not have SSE2:
try:
    from ctypes import windll, wintypes
except (ImportError, ValueError):
    pass
else:
    has_feature = windll.kernel32.IsProcessorFeaturePresent
    has_feature.argtypes = [wintypes.DWORD]
    if not has_feature(10):
        msg = ("This version of numpy needs a CPU capable of SSE2, "
                "but Windows says - not so.\n",
                "Please reinstall numpy using a superpack installer")
        raise RuntimeError(msg)
Intel Math Kernel Library
The MKL has a reputation for being fast, particularly on Intel chips (see the
MKL Wikipedia entry). It has good performance on BLAS / LAPACK benchmarks across
the range, except on AMD processors.
It is closed-source, but available for free under the Community licensing
program.
The MKL is covered by the Intel Simplified Software License (see the Intel license page). The
Simplified Software License does allow us, the developers, to distribute
copies of the MKL with our built binaries, where we include their terms of use
in our distribution. These include:
YOU AGREE TO INDEMNIFIY AND HOLD INTEL HARMLESS AGAINST ANY CLAIMS AND
EXPENSES RESULTING FROM YOUR USE OR UNAUTHORIZED USE OF THE SOFTWARE.
This clause appears to apply to the users of our binaries, not us, the authors
of the binary. This is a change from Intel’s previous MKL license, which
required us, the authors, to pay Intel’s legal fees of the user sued Intel.
See discussions about MKL on numpy mailing list
and MKL on Julia issues.
Advantages:
- At or near maximum speed;
- Runtime processor selection, giving good performance on a range of different
CPUs.
Disadvantages:
- Closed source.
AMD Core Math Library
The ACML was AMD’s equivalent to the MKL, with similar or
moderately worse
performance. As of time of writing (December 2015), AMD has marked the ACML
as “end of life”, and suggests using the AMD compute libraries instead.
The ACML does not appear to contain a CBLAS interface.
Binaries linked against ACML have to conform to the ACML license
which, as for the older MKL license, requires software linked to the ACML to
subject users to the ACML license terms including:
2. Restrictions. The Software contains copyrighted and patented
material, trade secrets and other proprietary material. In order to
protect them, and except as permitted by applicable legislation, you
may not:a) decompile, reverse engineer, disassemble or otherwise reduce the
Software to a human-perceivable form;b) modify, network, rent, lend, loan, distribute or create derivative
works based upon the Software in whole or in part […]
AMD compute libraries
AMD advertise the AMD compute libraries (ACL) as the successor to the ACML.
The ACL page points us to BLAS-like instantiation software framework for BLAS and
libflame for LAPACK.
libflame
libflame is an implementation of some LAPACK routines. See the libflame
project page for more
detail.
libflame can also be built to include a full LAPACK implementation. It is a
sister project to BLIS.
COBLAS
COBLAS is a “Reference BLAS library in
C99”, BSD license. A quick look at the code in April 2014 suggested it used
very straightforward implementations that are not highly optimized.
Eigen
Eigen is “a C++ template library for linear algebra: matrices, vectors,
numerical solvers, and related algorithms.”
Mostly covered by the Mozilla Public Licence 2, but some features covered by
the LGPL. Non-MPL2 features can be disabled
It is technically possible to compile Eigen into a BLAS library, but there is
currently no CBLAS interface.
See Eigen FAQ entry discussing BLAS / LAPACK.
GotoBLAS2
GotoBLAS2 is the predecessor to OpenBLAS. It was a library written by
Kazushige Goto, and released
under a BSD license, but is no longer maintained. Goto now works for Intel.
It was at or near the top of benchmarks on which it has been tested (e.g BLAS
LAPACK review Eigen benchmarks). Like MKL and ACML,
GotoBLAS2 chooses routines at runtime according to the processor. It does not
detect modern processors (after 2011).
OpenBLAS
OpenBLAS is a fork of GotoBLAS2 updated for newer processors. It uses the
3-clause BSD license.
Julia uses OpenBLAS by default.
See OpenBLAS on github for current code state. It appears to be actively
merging pull requests.
There have been some worries about bugs and lack of tests on the numpy
mailing list
and the octave list.
It appears to be fast on benchmarks.
OpenBLAS on Win32 seems to be quite stable. Some OpenBLAS issues on Win64 can
be adressed with a single threaded version of that library.
Advantages:
- at or near fastest implementation;
- runtime hardware detection.
Disadvantages:
- questions about quality control.
Recently, I want to write a simple CNN network with C ++. I need to use the Blas library. I learned the installation method of online giant, especially for this big blog post: (PS: The title is mimicing people), and I have encountered some problems. Of course, I also solved it. After the article, the main part and the big are not the same, I will record it, I hope to help see this blog post. you.
Material preparation
1. Download the BLAS library, download the address:https://github.com/xianyi/OpenBLAS
2. Download and install Perl, download the address:https://strawberryperl.com/
3.cmake download official website:https://cmake.org/The version I installed is 3.16.0, and the version gap is not very big.
start installation
step1: Install the BLAS, record the download directory (more attention: here:Do not appear in the OpenBLAS library installation directory, otherwise it is wrong to compile it.: My is: D: \ 1_Guo_all \ OpenBlas
step2: Download Prel,

Choose version, 64 digits are selected above, and 32 digits are selected.
If you don’t say it, if you appear «Add Perl Add Environment Variable Path» option, you must check and do not continue to install. Then test:

step3: Install CMAKE, this online information is much, and there is nothing to say.
step4: Create a cmake generation directory, mine: D: \ 1_Guo_all \ OpenBlas \ OpenBLAS_BULID
step5: Open CMAKE, enter two paths, the top is the OpenCV download path, below is the cmake generated path (that is, two directories).
My respective is:
D:/1_guo_ALL/OpenBLAS/OpenBLAS-develop/OpenBLAS-develop
D:/1_guo_ALL/OpenBLAS/OpenBLAS_Bulid
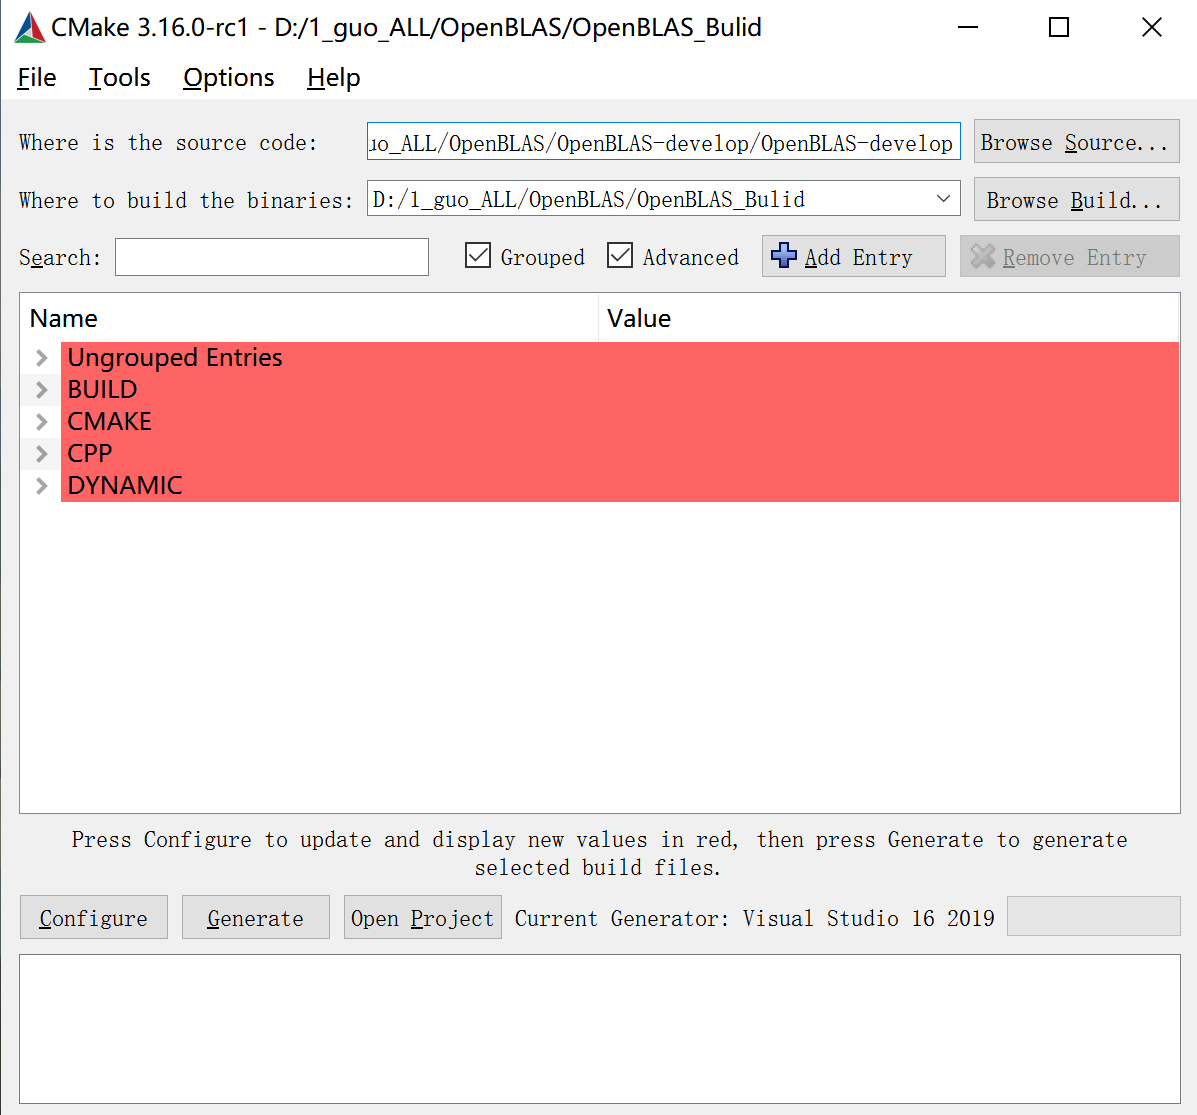
Click on Configure, then there is a window, the top is the version of the VS, and choose the default.

Then click Generate until the red part is white.
step7: Open the cmake generation directory, click OpenBLLAS.SLN, and then view its code on VS, at this time we need to compile in VS.
Click on the view -> Solution Explorer, the result can be seen:
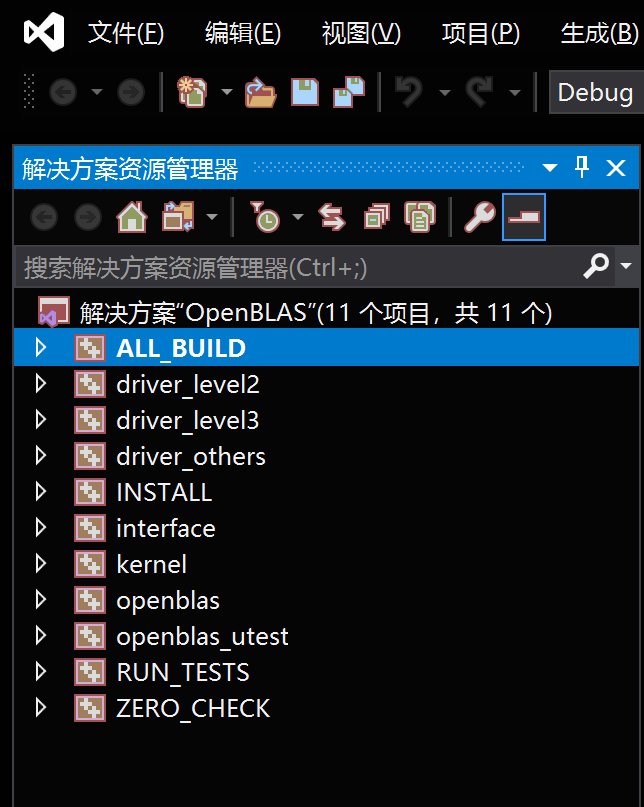
Then select all_build, right-click generation
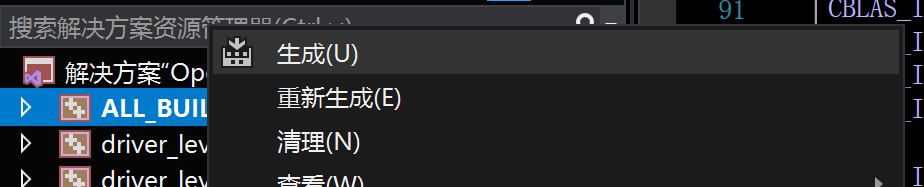
Waiting for a while, finally «9, failure 0» (I am so, if there is too much failure, it may be no success)
*** Step8: *** Open D: \ 1_Guo_all \ OpenBlas \ OpenBLAS_BULID \ LIB \ Debug appears OpenBlas.lib, which is successful.

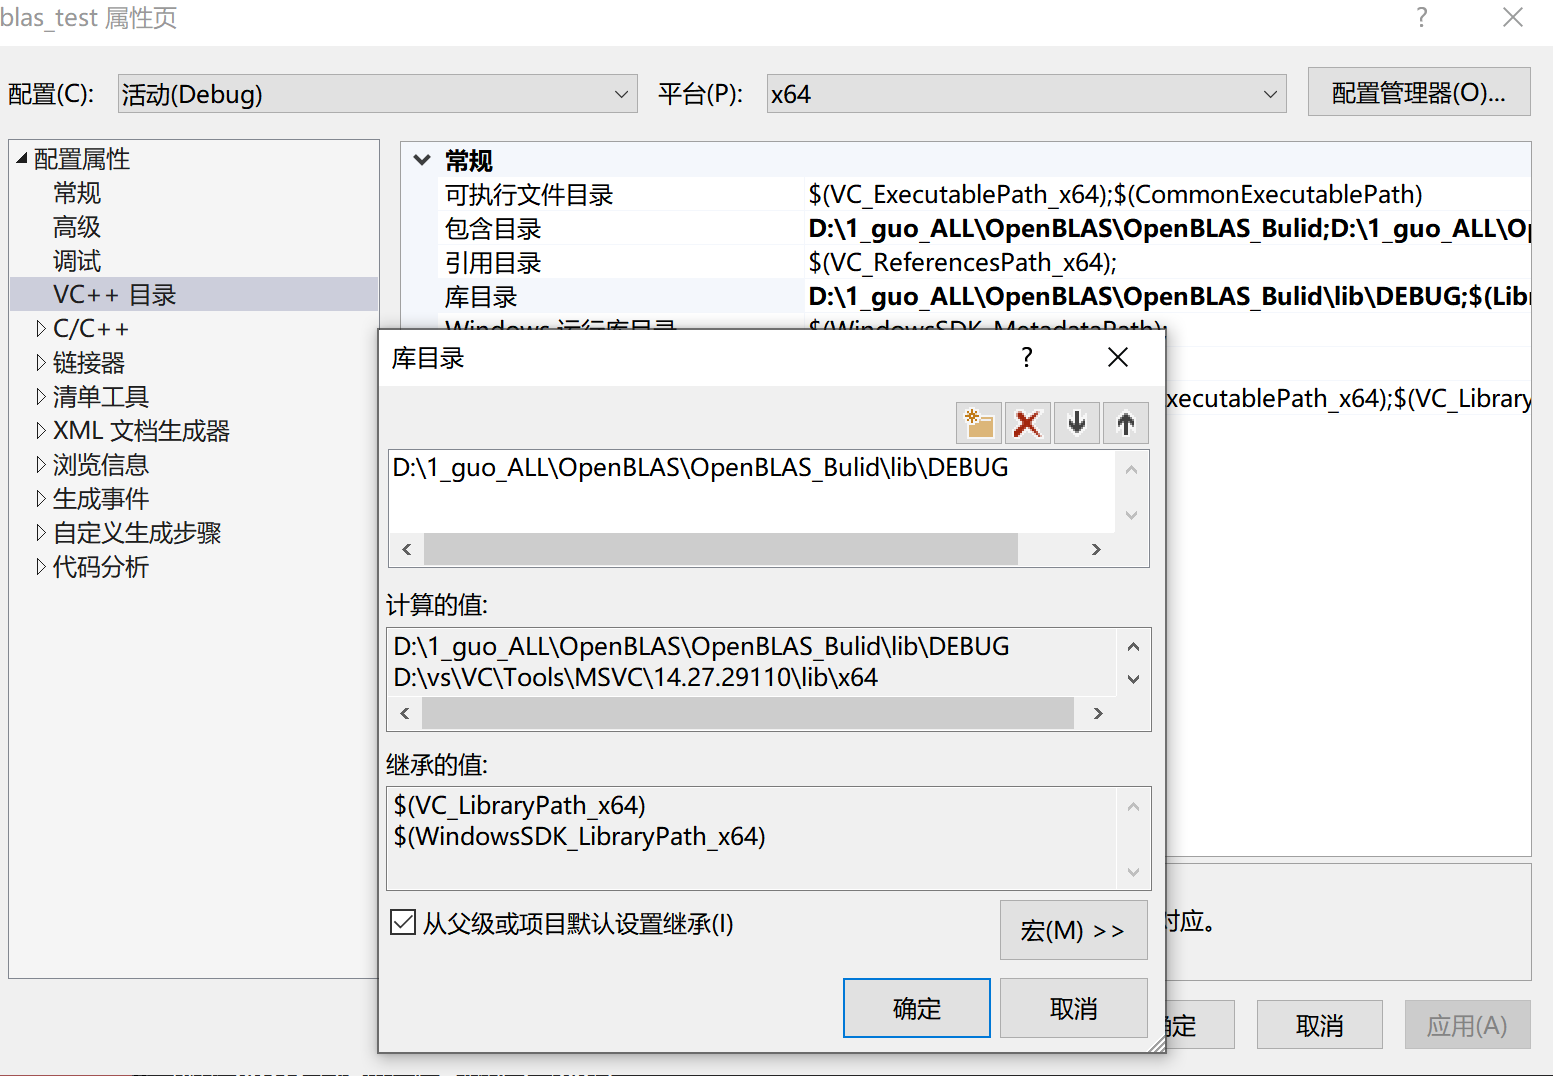
step9: Below is the configuration environment, create a new C ++ project, click View -> Explorer, right key project name, then click Properties to find the C ++ directory
Contains directory and library。
Enter in the directory:
D:\1_guo_ALL\OpenBLAS\OpenBLAS_Bulid
D:\1_guo_ALL\OpenBLAS\OpenBLAS_Bulid\generated
Enter:
D:\1_guo_ALL\OpenBLAS\OpenBLAS_Bulid\lib\DEBUG
Here is a slight saying that the path in the directory is .h, the header file, the path in the library directory is .lib file, sometimes not configured, report in the run code, I can’t find XXX.h files Contains the directory is not configured, find the path to XXX.H to join in, may not report an error.
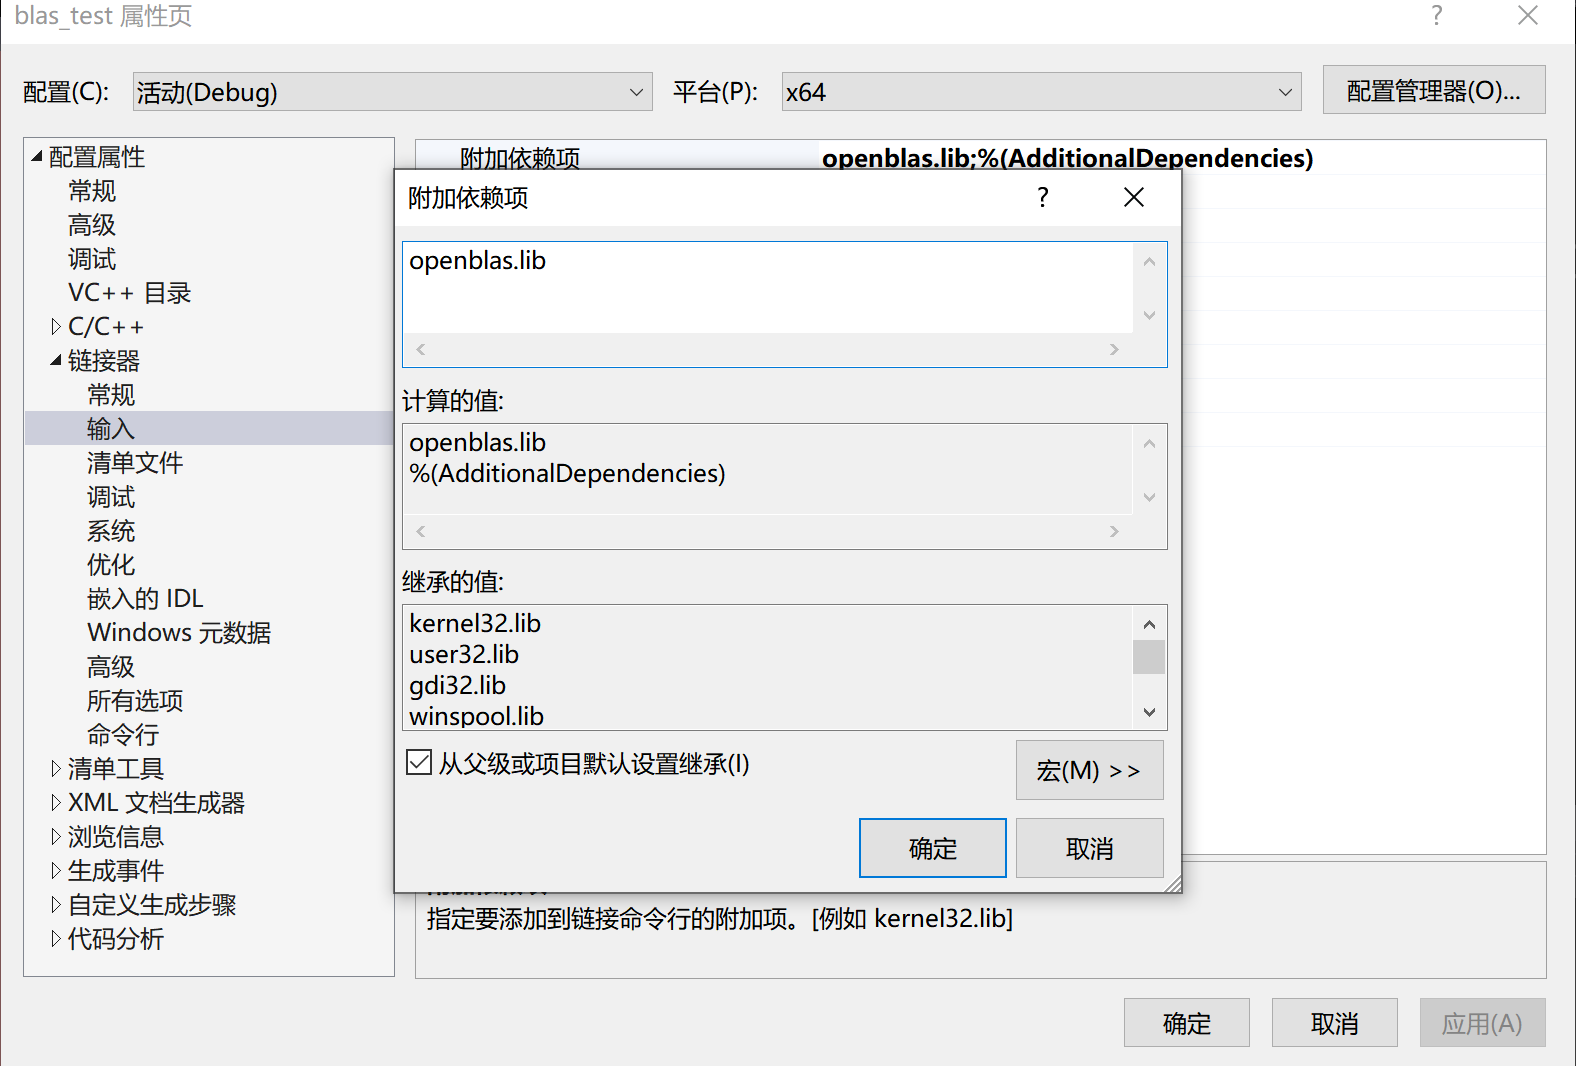
After that Linkr -> Input -> Additional Dependency, Point to enter OpenBlas.lib.
If I have built a BLAS_TEST project, right click on the attribute.
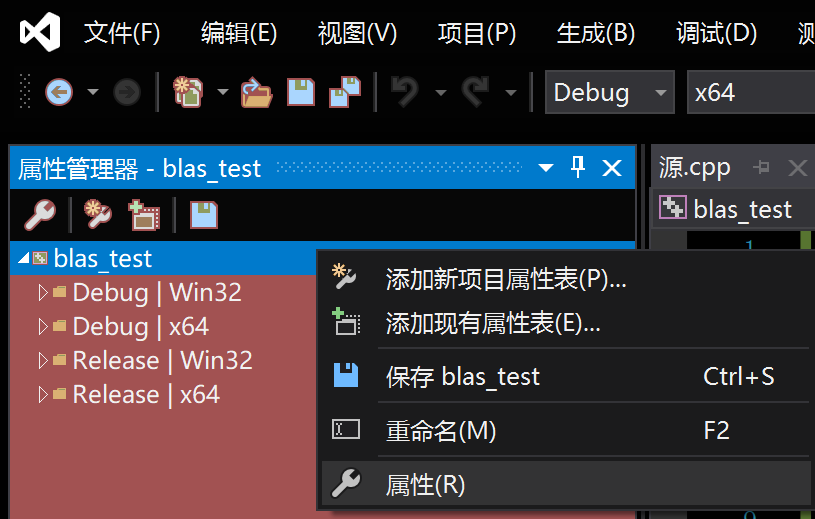

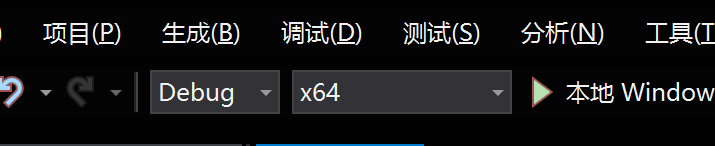
*** step: *** change to Debug X64
test:
extern "C" {
#include <cblas.h>
}
#include <iostream>

int main() {
	float a[1] = { 2 };
	float b[1] = { 3 };
	float c[1] = { 0 };
	cblas_sgemm(CblasRowMajor,
		CblasNoTrans, CblasNoTrans,
		1, 1, 1,
		1,
		a, 1,
		b, 1,
		0,
		c, 1);
	std::cout << *c << std::endl;
	system("pause");
	return 0;
}
Output:
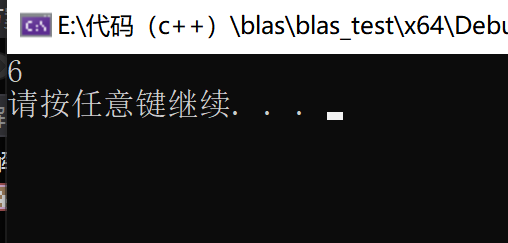
Datual! ! !