
Get started with Angular quickly with online starters or locally with your terminal.
Play Online
If you just want to play around with Angular in your browser without setting up a project, you can use our online sandbox:
Set up a new project locally
If you’re starting a new project, you’ll most likely want to create a local project so that you can use tooling such as Git.
Prerequisites
- Node.js — v^18.19.1 or newer
- Text editor — We recommend Visual Studio Code
- Terminal — Required for running Angular CLI commands
- Development Tool — To improve your development workflow, we recommend the Angular Language Service
Instructions
The following guide will walk you through setting up a local Angular project.
Install Angular CLI
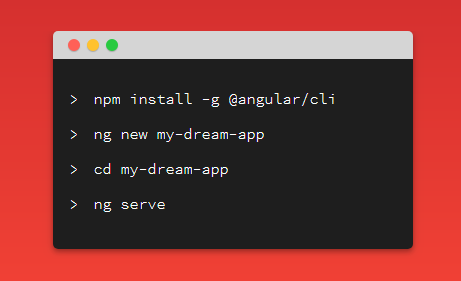
Open a terminal (if you’re using Visual Studio Code, you can open an integrated terminal) and run the following command:
npm install -g @angular/cli
pnpm install -g @angular/cli
yarn global add @angular/cli
bun install -g @angular/cli
If you are having issues running this command in Windows or Unix, check out the CLI docs for more info.
Create a new project
In your terminal, run the CLI command ng new with the desired project name. In the following examples, we’ll be using the example project name of my-first-angular-app.
You will be presented with some configuration options for your project. Use the arrow and enter keys to navigate and select which options you desire.
If you don’t have any preferences, just hit the enter key to take the default options and continue with the setup.
After you select the configuration options and the CLI runs through the setup, you should see the following message:
✔ Packages installed successfully. Successfully initialized git.
At this point, you’re now ready to run your project locally!
Running your new project locally
In your terminal, switch to your new Angular project.
All of your dependencies should be installed at this point (which you can verify by checking for the existent for a node_modules folder in your project), so you can start your project by running the command:
If everything is successful, you should see a similar confirmation message in your terminal:
Watch mode enabled. Watching for file changes...NOTE: Raw file sizes do not reflect development server per-request transformations. ➜ Local: http://localhost:4200/ ➜ press h + enter to show help
And now you can visit the path in Local (e.g., http://localhost:4200) to see your application. Happy coding! 🎉
Next steps
Now that you’ve created your Angular project, you can learn more about Angular in our Essentials guide or choose a topic in our in-depth guides!

By Ahmed Bouchefra
In this tutorial, we’ll learn how to install Angular CLI in Windows and use it to create an Angular project.
What is Angular CLI?
Angular CLI is the official tool for initializing and working with Angular projects. It saves you from the hassle of complex configurations and build tools like TypeScript, Webpack, and so on.
After installing Angular CLI, you’ll need to run one command to generate a project and another to serve it using a local development server to play with your application.
Like most modern frontend tools these days, Angular CLI is built on top of Node.js.
Node.js is a server technology that allows you to run JavaScript on the server and build server-side web applications. However, Angular is a front end technology, so even if you need to install Node.js on your development machine, it is only for running the CLI.
Once you build your app for production you won’t need Node.js because the final bundles are just static HTML, CSS, and JavaScript that can be served by any server or a CDN.
That being said, if you are building a full-stack web application with Angular, you may need Node.js for creating the back end part if you like to use JavaScript for the front end and back end.
Check out the MEAN stack – it’s an architecture that includes MongoDB, Express (a web server and REST API framework built on top of Node.js) and Angular. You can read this article if you’d like a step by step tutorial to get started.
In this case, Node.js is used to build the back end part of your app and can be replaced with any server-side technology that you want such as PHP, Ruby, or Python. But Angular doesn’t depend on Node.js except for its CLI tool and for installing packages from npm.
NPM stands for Node Package Manager. It’s a registry for hosting Node packages. In recent years it’s also been used to publish front end packages and libraries like Angular, React, Vue.js and even Bootstrap.
Note: you can download our Angular 8 Book: Build your first web apps with Angular 8 for free.
Installing Angular CLI on Windows
First, you need to have Node and npm installed on your development machine. There are many ways to do that, such as:
- using NVM (Node Version Manager) for installing and working with multiple versions of node in your system
- using the official package manager of your operating system
- installing it from the official website.
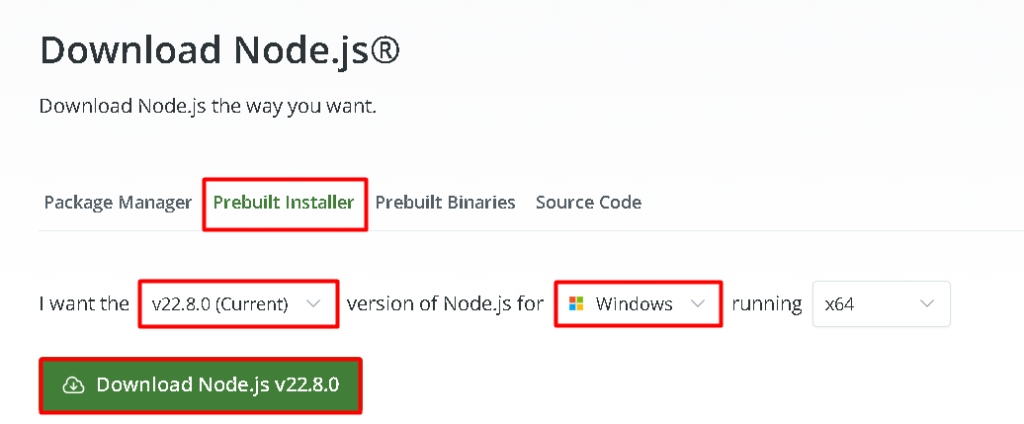
Let’s keep it simple and use the official website. Simply visit the download page and grab the binaries for Windows, then follow the setup wizard.
You can make sure Node is installed on your system by running the following command in a command prompt which should display the installed version of Node:
$ node -v
Next, run the following command to install Angular CLI:
$ npm install @angular/cli
After the command finishes successfully, you should have Angular CLI installed.
A Quick Guide for Angular CLI
After installing Angular CLI, you can run many commands. Let’s start by checking the version of the installed CLI:
$ ng version
A second command that you might need to run is the help command for getting a complete usage help:
$ ng help
The CLI provides the following commands:
add: Adds support for an external library to your project.
build (b): Compiles an Angular app into an output directory named dist/ at the given output path. Must be executed from within a workspace directory.
config: Retrieves or sets Angular configuration values.
doc (d): Opens the official Angular documentation (angular.io) in a browser, and searches for a given keyword.
e2e (e): Builds and serves an Angular app, then runs end-to-end tests using Protractor.
generate (g): Generates and/or modifies files based on a schematic.
help: Lists available commands and their short descriptions.
lint (l): Runs linting tools on Angular app code in a given project folder.
new (n): Creates a new workspace and an initial Angular app.
run: Runs a custom target defined in your project.
serve (s): Builds and serves your app, rebuilding on file changes.
test (t): Runs unit tests in a project.
update: Updates your application and its dependencies. See https://update.angular.io/
version (v): Outputs Angular CLI version.
xi18n: Extracts i18n messages from source code.
Generating a Project
You can use Angular CLI to quickly generate your Angular project by running the following command in your command line interface:
$ ng new frontend
Note: frontend is the name of the project. You can , of course, choose any valid name for your project. Since we’ll create a full-stack application I’m using frontend as a name for the front-end application.
As mentioned earlier, the CLI will ask you Would you like to add Angular routing?, and you can answer by entering y (Yes) or n (No), which is the default option. It will also ask you about the stylesheet format you want to use (such as CSS). Choose your options and hit Enter to continue.

After that you’ll have your project created with a directory structure and a bunch of configurations and code files. It’ll be mostly in TypeScript and JSON formats. Let’s see the role of each file:
/e2e/: contains end-to-end (simulating user behavior) tests of the website/node_modules/: All 3rd party libraries are installed to this folder usingnpm install/src/: contains the source code of the application. Most work will be done here/app/: contains modules and components/assets/: contains static assets like images, icons and styles/environments/: contains environment (production and development) specific configuration filesbrowserslist: needed by autoprefixer for CSS supportfavicon.ico: the faviconindex.html: the main HTML filekarma.conf.js: the configuration file for Karma (a testing tool)main.ts: the main starting file from where the AppModule is bootstrappedpolyfills.ts: polyfills needed by Angularstyles.css: the global stylesheet file for the projecttest.ts: this is a configuration file for Karmatsconfig.*.json: the configuration files for TypeScriptangular.json: contains the configurations for CLIpackage.json: contains the basic information of the project (name, description and dependencies)README.md: a markdown file that contains a description of the projecttsconfig.json: the configuration file for TypeScripttslint.json: the configuration file for TSlint (a static analysis tool)
Serving your Project
Angular CLI provides a complete tool-chain for developing front-end apps on your local machine. As such, you don’t need to install a local server to serve your project — you can simply, use the ng serve command from your terminal to serve your project locally.
First navigate inside your project’s folder and run the following commands:
$ cd frontend
$ ng serve
You can now navigate to the http://localhost:4200/ address to start playing with your front end application. The page will automatically live-reload if you change any source file.
Generating Angular Artifacts
Angular CLI provides an ng generate command which helps developers generate basic Angular artifacts such as modules, components, directives, pipes, and services:
$ ng generate component my-component
my-component is the name of the component. The Angular CLI will automatically add a reference to components, directives and pipes in the src/app.module.ts file.
If you want to add your component, directive or pipe to another module (other than the main application module, app.module.ts), you can simply prefix the name of the component with the module name and a slash :
$ ng g component my-module/my-component
my-module is the name of an existing module.
Conclusion
In this tutorial, we’ve seen how to install Angular CLI on our Windows machine and we used it to initialize a new Angular project from scratch.
We have also seen various commands that you can use throughout the development of your project for generating Angular artifacts such as modules, components, and services.
Check out our other Angular tutorials.
You can reach out to or follow the author via his personal website, Twitter, LinkedIn and Github.
Learn to code for free. freeCodeCamp’s open source curriculum has helped more than 40,000 people get jobs as developers. Get started
Introduction
Angular is a comprehensive front-end development framework. You can use Angular to streamline the creation, implementation, and testing of your web applications. It is based on JavaScript, and developers who are already proficient in HTML, CSS, and JavaScript find Angular easy to use.
Learn how to install Angular on Windows and create a local environment for developing web applications.
Follow the steps below to easily install Angular on Windows.
Step 1: Install Node.js
Angular bases its build environments on Node.js, and many of its features depend on NPM packages. Conveniently, the Node Package Manager (NPM) client is part of the default Node.js package.
To install Node.js:
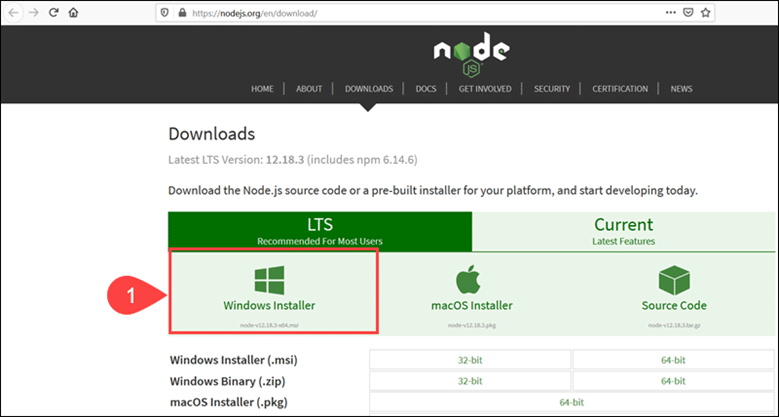
1. Visit the official Node.js page and download the latest Node.js Windows Installer.
2. Access the download location and double-click the Windows Installer Package.
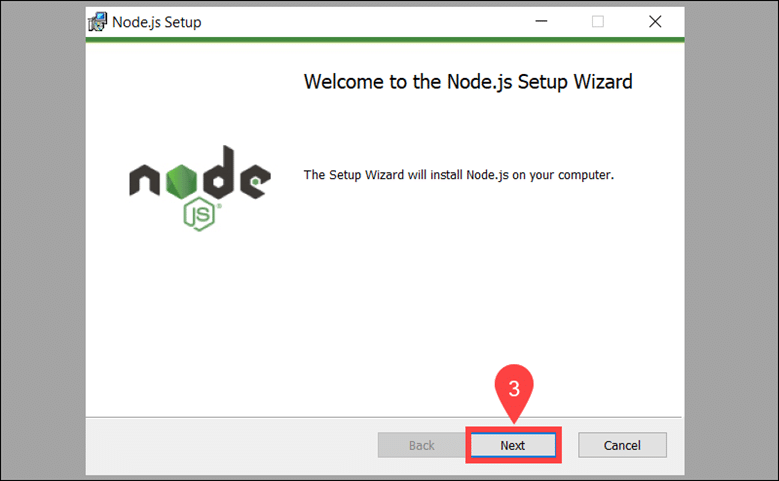
3. Select Next on the initial Node.js Setup Wizard screen.
4. Accept the License Agreement and click Next.

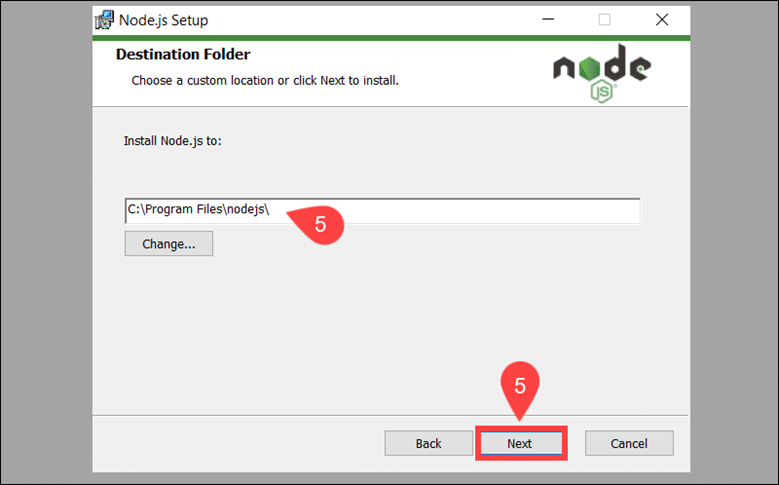
5. Define the destination folder for the installation and select Next.
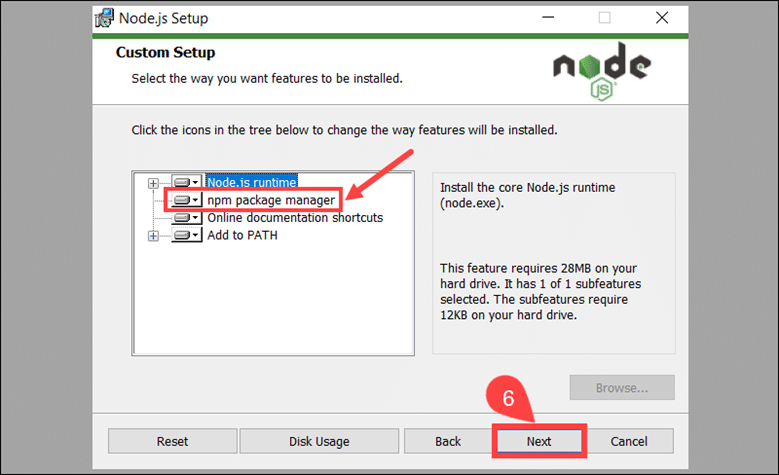
6. You can customize how to install available features. Make sure that the npm package manager is part of the installation bundle. Click Next to proceed.
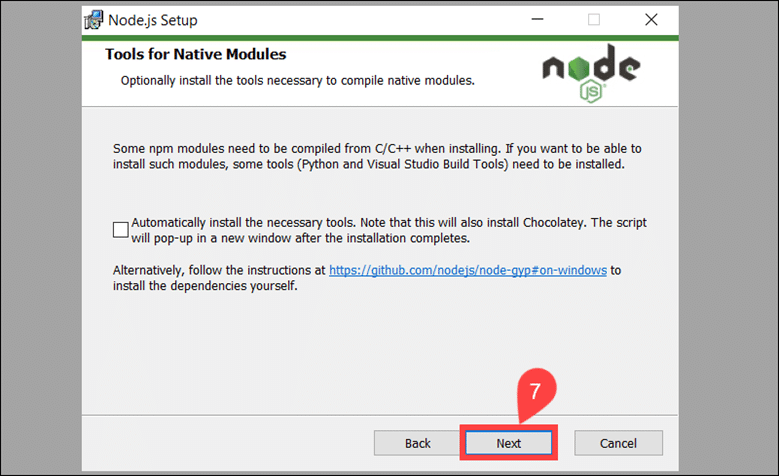
7. Check the box if you would like to install tools for compiling native modules automatically. They are not mandatory and require an additional 3 GB of space. Select Next to continue.
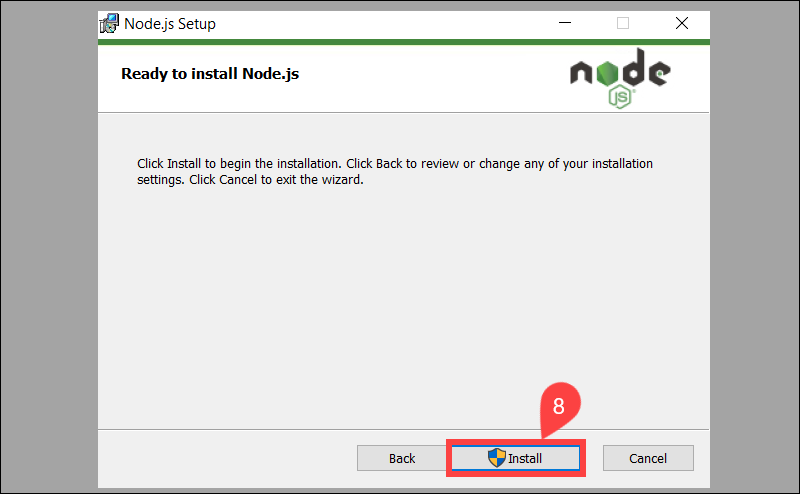
8. Click Install to start the installation process.
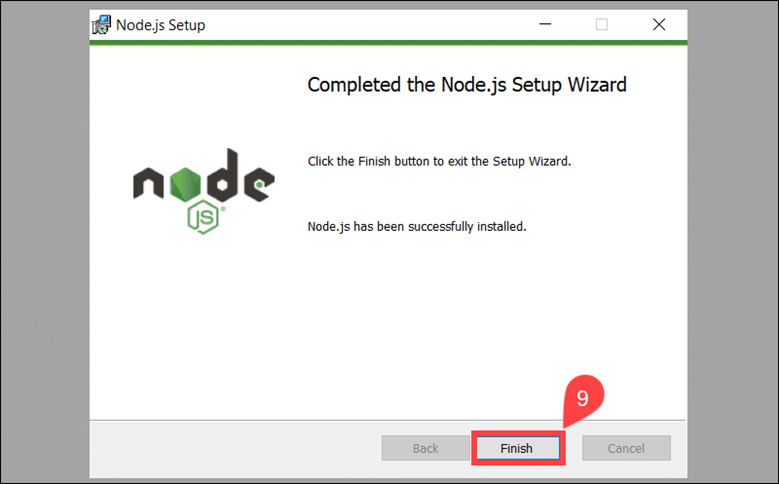
9. Once the installation is complete, select Finish to exit the Setup Wizard.
10. Access the Windows Command Prompt (or PowerShell) and check the Node.js version:
node -v
The system confirms that Node.js v12.18.3 is installed.

11. To verify the NPM version, use the following command:
npm -v
The output shows you have installed NPM version 6.14.6.

If you need to install a specific version, or update an existing installation, read the detailed guide on how to install Node.js and NPM on Windows.
Step 2: Install TypeScript (Optional)
TypeScript makes JavaScript easier to maintain and understand. You can install TypeScript as an NPM package. The installation is optional, as it is not a prerequisite for developing an Angular application.
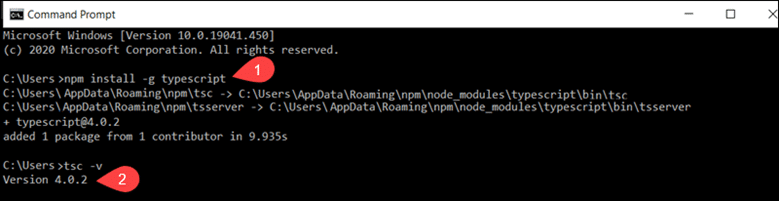
1.. Access the Windows Command Prompt and install TypeScript with the following command:
npm install -g typescript
2. Once the installation is complete, verify the TypeScript version:
tsc -v
In this example, the TypeScript version is 4.0.2.
Step 3: Install Angular CLI
The Angular command-line interface (CLI) tool allows you to initialize, develop, and manage your Angular applications. You can use the NPM package manager to install the Angular CLI.
1. Access the Windows Command Prompt and enter the following command:
npm install -g @angular/cli
During the installation process, the system asks you if you would like to share usage data with the Angular Team. You are free to answer either Yes or No as it does not affect functionality.
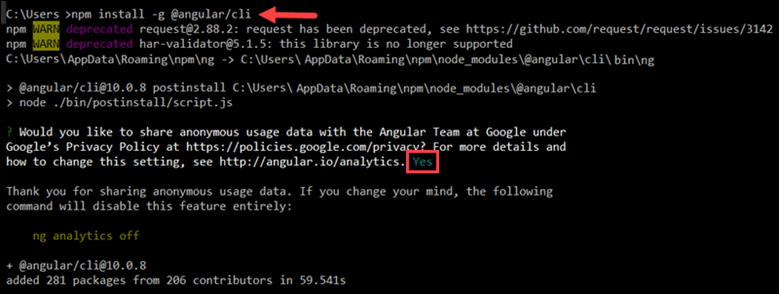
2. Once all packages have been added, verify the installed version:
ng —version
The Angular CLI version is 10.0.8.

Step 4: Create Angular Project
1. Use the Angular CLI to start a new Angular project. It this example, the name of the project is kitchen-sink. You are free to use the name of your choice for your project name. Type the following command in your Windows Command Prompt:
ng new kitchen-sink
Before proceeding, you can customize the application. Define if you would like to use Angular routing and choose a stylesheet format. These settings can be edited at a later point.
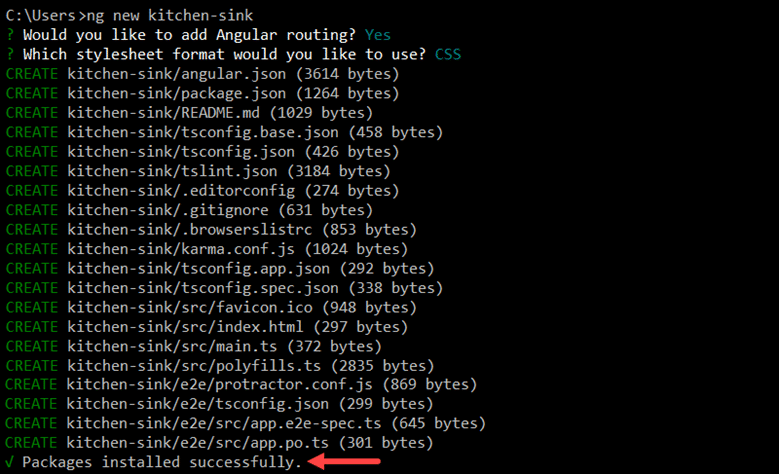
The system takes a few moments to create the project. Once it finishes, you see the “Packages installed successfully” message.
2. Access your project’s root folder (kitchen-sink in this example) from the Windows Command Prompt and enter the following command:
ng serve
The system proceeds to generate the environment for your Angular application.

Keep the Windows Command Prompt running. You can continue using the terminal, and the changes you make will be reflected in the application within your browser.
3. Use any browser to access your Angular local development server on localhost:4200:
http://localhost:4200/
You can now start creating new Angular components.

Conclusion
Now you know how to install Node.js, NPM, and the Angular command-line interface on Windows. The initial steps with Angular CLI should not provide too much of a challenge; exploring Angular’s broad assortment of options might take more time.
In this article, We are going to perform, How to Install Angular CLI on Windows 10 or any other cloud platform like Amazon EC2, Azure VM, Google Cloud Compute, etc. with preinstalled Windows OS.
Table of Contents
Introduction:
Angular is most popular open source Google-developed JavaScript framework. It is used to design client-side web and mobile application.
Why You Should Use Angular:
MVC Architecture: It is Open Source framework MVC based framework and advanced Typescript/JavaScript support.
Supports All Platforms: It has ability to build applications on any platforms like Web, Mobile and native mobile.
Beautiful UI and UX: Using Angular you can develop Featured Rich, Amazing UI and Single Page application.
Large Community: Angular became extremely among developers, largely available training materials, forums and third-party tools and can find solution of every issues.
Prerequisite:
- Windows 10 with Administrator Access.
- Minimum 1 CPU and 2 GB RAM.
- Open Firewall Ports 3000 and 4200.
Step #1: Download Node.js package for Windows
First download the latest node.js package from node.js official site and click on Windows installer, it will download .msi file.
Click on 32 bit or 64 bit version of node.js for windows.
![How to Install Node.js on Windows 10 [4 Steps] 1](https://www.fosstechnix.com/wp-content/uploads/2020/09/Download-latest-node.js-for-windows--1024x542.png)
once you clicked, it will ask for to save dowloaded node.js msi setup, click on Save File.
![How to Install Node.js on Windows 10 [4 Steps] 2](https://www.fosstechnix.com/wp-content/uploads/2020/09/save-node.js-msi-file-in-windows-1024x442.png)
once downloaded, double click on node.js Windows Installed .msi file.
you will see Node.js Setup Wizard , click on Next as shown below.
![How to Install Node.js on Windows 10 [4 Steps] 3](https://www.fosstechnix.com/wp-content/uploads/2020/09/node.js-setup-wizard-click-on-Next-1024x529.png)
click on Node.js License agreement and click on Next.
![How to Install Node.js on Windows 10 [4 Steps] 4](https://www.fosstechnix.com/wp-content/uploads/2020/09/accept-node.js-agreement-and-click-on-next-1024x515.png)
Select Destination folder where you want to Install Node.js and click on Next.
![How to Install Node.js on Windows 10 [4 Steps] 5](https://www.fosstechnix.com/wp-content/uploads/2020/09/change-the-node.js-installation-path-and-click-on-Next-1024x528.png)
Select on to install npm modules like python and Visual Studio Build Tools if not installed and click on Next
![How to Install Node.js on Windows 10 [4 Steps] 6](https://www.fosstechnix.com/wp-content/uploads/2020/09/click-on-install-node.js-necessory-tool-and-click-on-next-1024x518.png)
custom setup for Node.js and click on Next.
![How to Install Node.js on Windows 10 [4 Steps] 7](https://www.fosstechnix.com/wp-content/uploads/2020/09/click-on-next-button-1024x551.png)
Step #2: Install Node.js on Windows
Now Install Node.js on Windows 10, click on Install.
![How to Install Node.js on Windows 10 [4 Steps] 8](https://www.fosstechnix.com/wp-content/uploads/2020/09/click-on-node.js-install--1024x519.png)
wait to finish to Install Node.js on Windows.
![How to Install Node.js on Windows 10 [4 Steps] 9](https://www.fosstechnix.com/wp-content/uploads/2020/09/wait-till-install-node.js-on-windows-1024x520.png)
once installing of Node.js finished, click on Finish.
![How to Install Node.js on Windows 10 [4 Steps] 10](https://www.fosstechnix.com/wp-content/uploads/2020/09/click-on-finish-button-1024x517.png)
It will open commands prompt to Install Addition Tools for Node.js for Windows, click Enter.
![How to Install Node.js on Windows 10 [4 Steps] 11](https://www.fosstechnix.com/wp-content/uploads/2020/09/install-additional-tool-for-node.js-commands-prompt-1024x621.png)
once you entered, it will open Windows Powers shell and wait till to Install additional Tools for Node.js.
once all finished, open a commands prompt .
Check Node.js and npm version on Windows.
![How to Install Node.js on Windows 10 [4 Steps] 12](https://www.fosstechnix.com/wp-content/uploads/2020/09/check-node.js-and-npm-version-on-windows.png)
Note: when you install node.js using msi installed, you don’t need to setup system variables for node.js.
Step #3: How to Update Node.js and NPM on Windows
To update node.js and npm on windows , you can download the node.js version from the node.js official site , install and replace it with existing version.
OR
open a commands prompt and run below commands to update the node.js and npm on windows
npm install npm –global
Run below command to install angular CLI.
npm install -g @angular/cli
/usr/bin/ng -> /usr/lib/node_modules/@angular/cli/bin/ng

> @angular/[email protected] postinstall /usr/lib/node_modules/@angular/cli
> node ./bin/postinstall/script.js

? Would you like to share anonymous usage data with the Angular Team at Google under
Google’s Privacy Policy at https://policies.google.com/privacy? For more details and
how to change this setting, see http://angular.io/analytics. Yes
+ @angular/[email protected]
added 277 packages from 207 contributors in 19.024s
Run below command to check install Angular Version.
ng --version
Sample Output:
Angular CLI: 10.1.1
Node: 12.18.3
OS: linux x64

Angular:
...
Ivy Workspace:

Package Version
------------------------------------------------------
@angular-devkit/architect 0.1001.1
@angular-devkit/core 10.1.1
@angular-devkit/schematics 10.1.1
@schematics/angular 10.1.1
@schematics/update 0.1001.1
rxjs 6.6.2
Step #5: Creating new Angular Project in Windows
Run following command to create New Angular Project named test-project.
ng new test-project
Output:
.....
......
added 1167 packages from 1048 contributors and audited 19053 packages in 72.14s
23 packages are looking for funding
  run `npm fund` for details
found 0 vulnerabilities
    Successfully initialized git.
Step #6: Running Angular Application
Once Project created successfully, navigate to project and Run your Application using ng server command.
cd test-project

ng serve
Output:
To Access Angular Application on browser, enable the port 4200 in firewall or inbound rule in Cloud.
http://localhost:4200
Successfully we have performed how to install angular CLI on Windows 10.
Conclusion:
We have covered, How to Install Angular CLI on Windows 10, Commands to check version of node JS,NPM and Angular, Creating and running test project in Angular in Windows.
Related Articles:
How to Install Node.js on Windows 10 [4 Steps]
How to Install node.js on Mac OS
Angular is a powerful front-end web development framework created by Google. It enables developers to build dynamic, single-page applications with ease. For Windows users, Angular offers a robust platform to create responsive and interactive web experiences.
Installing Angular on Windows opens up a world of possibilities for developers. It provides a structured environment for building scalable applications, complete with two-way data binding, dependency injection, and a component-based architecture. These features streamline the development process, allowing for faster creation of complex web applications. Windows users benefit from Angular’s cross-platform compatibility, ensuring their projects run smoothly across different devices and operating systems.
By setting up Angular on your Windows machine, you gain access to a comprehensive toolset for modern web development. This guide will walk you through the Angular framework installation Windows process, helping you get started with Angular quickly and efficiently.
Installing Angular on Windows
Step 1: Install Node.js
Before installing Angular, you need to set up Node.js on your Windows system. Node.js is a crucial prerequisite for Angular development as it provides the runtime environment necessary to execute JavaScript code outside of a web browser. Here’s why Node.js is essential:
- Package Management: Node.js comes with npm (Node Package Manager), which Angular uses to manage dependencies and install project-specific packages.
- Build Tools: Many Angular build tools and development servers rely on Node.js to function properly.
- Command-Line Interface: Install Angular CLI on Windows, which we’ll install later, runs on Node.js to create, develop, and manage Angular projects.
To install Node.js:
- Visit the official Node.js website (nodejs.org).
- Download the LTS (Long Term Support) version for Windows.
- Run the installer and follow the prompts, accepting the default settings unless you have specific requirements.
After installation, verify that Node.js is correctly installed by opening a Command Prompt and running:
node -v

This command should display the installed version of Node.js. If you see a version number, it means Node.js is successfully installed and ready to use.
Step 2: Installing Angular via Command Prompt
With Node.js in place, you can now install Angular using the Angular CLI (Command Line Interface). The CLI is a powerful tool that helps you initialize, develop, scaffold, and maintain Angular applications.
Open a Command Prompt with administrator privileges and run the following command:
npm install -g @angular/cli@17

Let’s break down this command:
- npm install: This tells npm to download and install a package.
- g: This flag stands for “global,” meaning the package will be installed system-wide, not just for a specific project.
- @angular/cli: This is the name of the package we’re installing, which is the Angular CLI.
- @17: This specifies version 17 of the Angular CLI. You can omit this to install the latest version.
This command does several important things:
- Downloads the Angular CLI package and its dependencies from the npm registry.
- Installs the CLI globally on your system, making it available from any directory in the Command Prompt.
- Sets up necessary files and configurations for Angular development.
- Provides access to the ng command, which you’ll use to create and manage Angular projects.
The installation process may take a few minutes, depending on your internet connection and system performance. You’ll see a progress bar and some output in the Command Prompt as the installation proceeds.
Step 3: Verifying Angular Installation
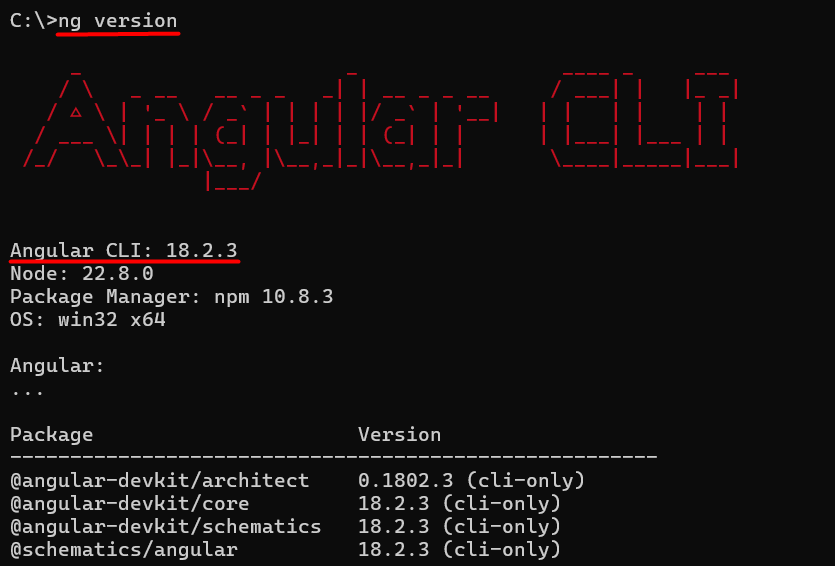
After the installation completes, it’s important to verify that Angular CLI was installed correctly. To do this, run the following command in the Command Prompt:
ng version
Additional Tips for a Smooth Angular Experience
IDE Selection: Consider using an IDE (Integrated Development Environment) like Visual Studio Code, which offers excellent support for Angular development with helpful extensions and integrations.
- Keep Updated: Regularly update your Angular CLI and project dependencies to benefit from the latest features, performance improvements, and security patches.
- Learn Angular CLI Commands: Familiarize yourself with common Angular CLI commands like ng new, ng serve, and ng generate to streamline your development workflow.
- Explore Angular Documentation: Visit angular.io for comprehensive documentation, tutorials, and best practices to make the most of your Angular development experience.
- Join the Community: Engage with the Angular community through forums, Stack Overflow, and local meetups to stay informed about the latest trends and get help when needed.
Install Angular on Our Windows 10 VPS!
Hosting a Windows 10 VPS with Ultahost is easier and faster than ever. Enjoy ultra-fast SSD NVMe speeds with no interruptions or slowdowns.
Key Features of Angular
Angular’s robust feature set makes it a top choice for building modern web applications. Here are some standout features:
- Component-Based Architecture: Angular organizes code into reusable components, enhancing modularity and maintainability.
- TypeScript Integration: Built with TypeScript, Angular provides strong typing and object-oriented programming features, reducing errors and improving code quality.
- Dependency Injection: This built-in system manages component dependencies, promoting loose coupling and easier testing.
- Reactive Programming: Angular leverages RxJS for handling asynchronous data streams, enabling efficient management of complex data flows.
- Angular Universal: This feature allows server-side rendering, improving initial load times and SEO performance.
- Robust Ecosystem: Angular comes with a comprehensive set of tools and libraries, including Angular CLI, Angular Material, and NgRx for state management.
- Ahead-of-Time Compilation: AOT compilation improves application performance by converting Angular HTML and TypeScript code into efficient JavaScript during the build process.
Benefits of Angular for Windows Developers
Angular offers several advantages specifically for Windows developers:
- Seamless Integration: Angular works smoothly with popular Windows development tools like Visual Studio Code, providing a familiar environment.
- Cross-Platform Development: While developing on Windows, Angular allows creation of applications that run on multiple platforms, including web, desktop, and mobile.
- Large Community Support: Windows developers benefit from Angular’s extensive community, with numerous resources, tutorials, and third-party tools available.
- Enterprise-Ready: Angular’s structure and features align well with enterprise-level application requirements, making it a preferred choice for many Windows-based businesses.
- Consistent Updates: Regular updates ensure Windows developers always have access to the latest features and security improvements.
- Performance Optimization: Angular’s architecture and tools help create high-performance applications, crucial for resource-intensive Windows environments.
- Testing Capabilities: Built-in testing tools make it easier for Windows developers to implement robust testing practices in their development workflow.
Conclusion
Installing Angular on Windows is a straightforward process that opens up a world of possibilities for web development. By following the steps outlined in this guide installing Node.js with npm on Windows then install the Angular CLI so developers can quickly set up their Angular development environment Windows. This process not only equips you with the necessary tools but also ensures you’re ready to leverage Angular’s powerful features and capabilities.
The installation of Angular Windows setup marks the beginning of an exciting journey into modern web development. With Angular’s robust ecosystem, component-based architecture, and powerful CLI tools at your disposal, you’re well-equipped to create sophisticated, scalable web applications.
Once you’ve completed these steps, Angular will be successfully installed on your Windows system, and you will be ready to start building robust websites. To make sure optimal performance and smooth development, always follow best practices and keep your software up to date. consider using Ultahost Windows hosting. You get reliable and high-speed hosting tailored to your needs.
FAQ
What are prerequisites for installing Angular on Windows?
The prerequisites are Node.js, npm, and Git.
How do I check if Node.js and npm are installed correctly?
Open Command Prompt or PowerShell and run the following commands:
- node -v
- npm -v
How do I install Angular CLI?
Angular CLI (Command Line Interface) is a tool that helps in creating and managing Angular projects. To install it globally, run:
npm install -g @angular/cli
How can I verify the installation of Angular CLI?
After installation, you can check if Angular CLI is installed by running:
ng version
What should I do if I encounter permission errors during installation?
If you face permission issues, try using the –force flag with npm:
npm install -g @angular/cli –force
How do I create a new Angular project?
Once Angular CLI is installed, you can create a new project using the following command:
ng new my-angular-app
How do I serve the Angular application locally?
Navigate to your project directory and run:
- cd my-angular-app
- ng serve