
Оснастка Active Directory Users and Computers (или ADUC) – это одна из наиболее часто используемых консолей управления объектами в домене Active Directory. Вы можете установить mmc оснастку ADUC как на Windows Server, так и на десктопные Windows 10 и 11. Консоль ADUC входит в состав набора компоненту администрирования Microsoft Remote Server Administration Tools (RSAT). В этой статье мы покажем, как установить и использовать консоль управление Active Directory Users and Computers в Windows.
Содержание:
- Установка оснастки RSAT Active Directory в Windows 10 и 11
- Как пользоваться консолью Active Directory?
- Подключение консоли ADUC к домену из рабочей группы
Установка оснастки RSAT Active Directory в Windows 10 и 11
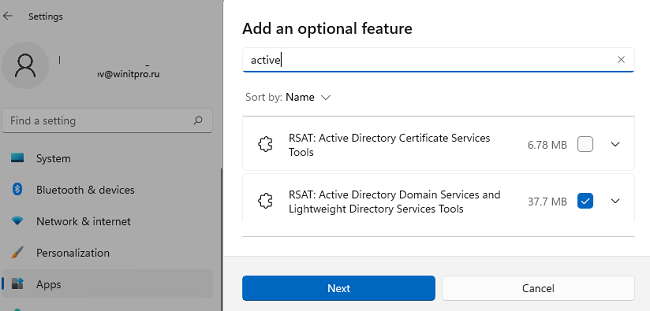
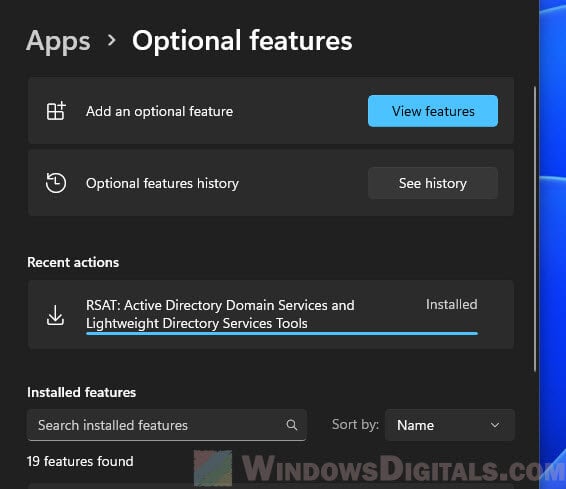
В современных версиях Windows 10 (начиная с билда 1809) и в Windows 11 инструменты администрирования RSAT устанавливаются онлайн в виде Features on Demand. Чтобы установить инструменты администрирования RSAT Active Directory в Windows 10/11, перейдите в Settings -> Apps -> Optional Features -> Add an optional feature (View features).
Наберите в поисковой строке Active Directory и выберите для установки компонент RSAT: Active Directory Domain Services and Lightweight Directory Services Tool.
Нажмите Next-> Install для начала установки.
Windows подключится к серверам Microsoft, скачает и установит набор инструментов для управления Active Directory (включает в себя графические консоли Active Directory, утилиты командной строки и модуль Active Directory PowerShell).
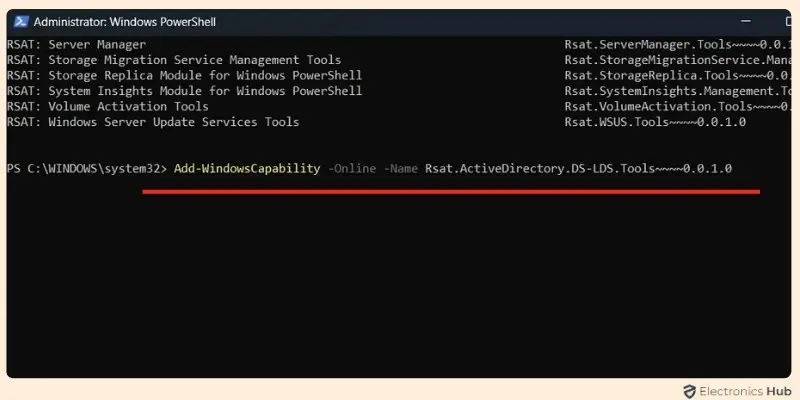
Либо вы можете установить набор компонентов администрирования AD с помощью PowerShell:
Add-WindowsCapability –online –Name Rsat.ActiveDirectory.DS-LDS.Tools~~~~0.0.1.0
В изолированных сетях, в которых нет доступа в интернет, вы можете установить инструменты RSAT Active Directory с помощью ISO образа Windows 10 Features on Demand (образ FoD можно скачать из кабинета лицензирования Microsoft).
Для установки инструментов Active Directory, из сетевого каталога с содержимым образа FoD выполните команду:
Add-WindowsCapability -Online -Name Rsat.ActiveDirectory.DS-LDS.Tools~~~~0.0.1.0 -LimitAccess -Source \\fs01\Distr\Windows10-FOD\
В предыдущих билдах Windows 10, а также в Windows 8.1, установить RSAT можно с помощью MSU обновления. Скачать RSAT можно здесь:
- RSAT для Windows 10 1803/1709 — https://www.microsoft.com/en-us/download/details.aspx?id=45520
- RSAT для Windows 8.1 — https://www.microsoft.com/en-us/download/details.aspx?id=39296
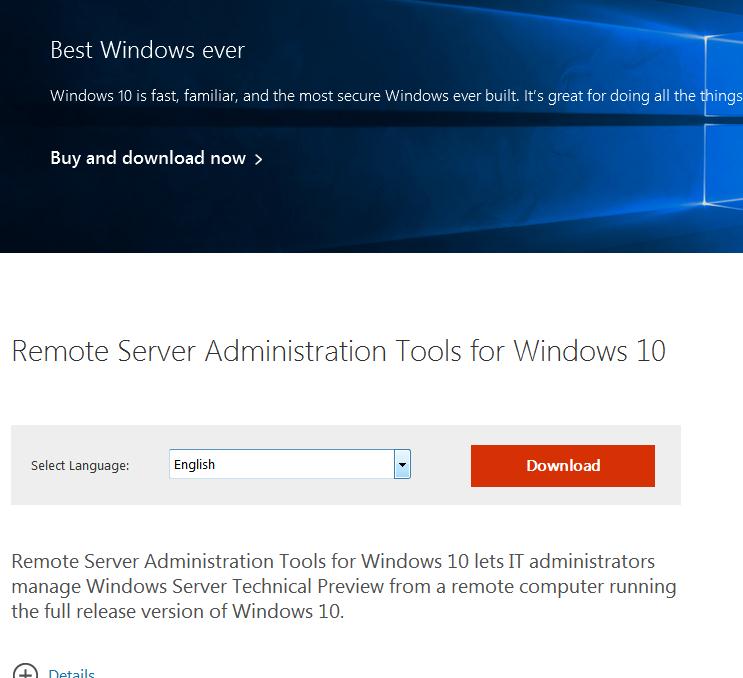
Скачайте версию файла RSAT в зависимости от разрядности вашей операционной системы и установите его. Дважды щелкните по файлу для начала установки:
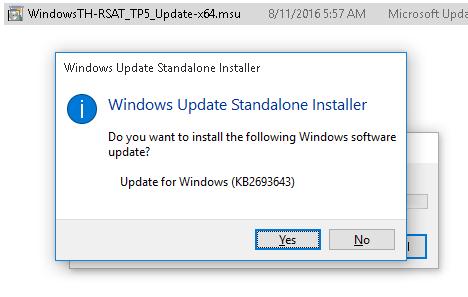
Или установите MSU файл RSAT из командной строки в «тихом» режиме:
wusa.exe c:\Install\WindowsTH-RSAT_TP5_Update-x64.msu /quiet /norestart
После окончания установки RSAT нужно перезагрузить компьютер.
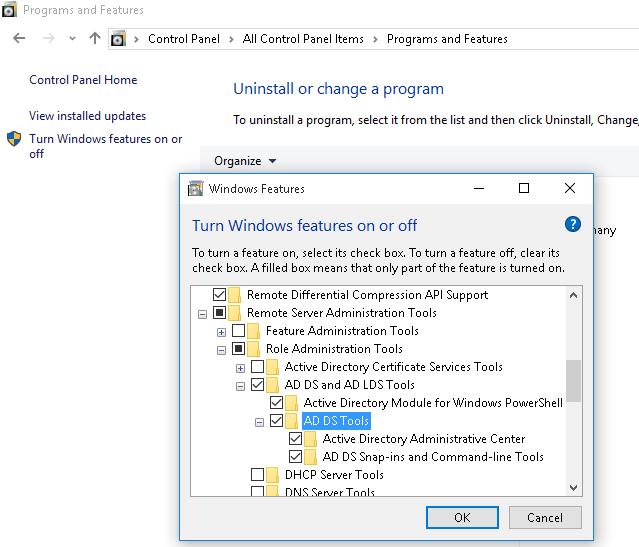
Осталось активировать необходимый функционал RSAT. Для этого:
- Щелкните ПКМ по кнопке Start и выберите Control Panel (Панель управления)
- Выберите Programs and Features (Программы и компоненты)
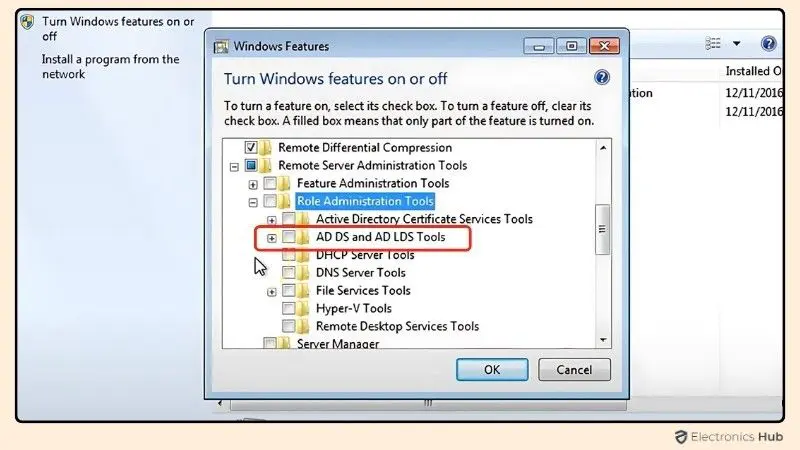
- В левой панели нажмите кнопку Turn Windows features on or off
- В дереве компонентов разверните Remote Server Administration Tools-> Role Administration Tools -> AD DS and AD LDS Tools
- Отметьте раздел AD DS Tools и нажмите OK.

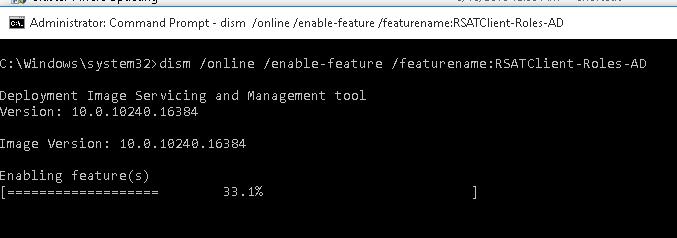
Установка оснастки ADUC также может быть выполнена из командой строки. Последовательно выполните 3 команды:
dism /online /enable-feature /featurename:RSATClient-Roles-AD
dism /online /enable-feature /featurename:RSATClient-Roles-AD-DS
dism /online /enable-feature /featurename:RSATClient-Roles-AD-DS-SnapIns
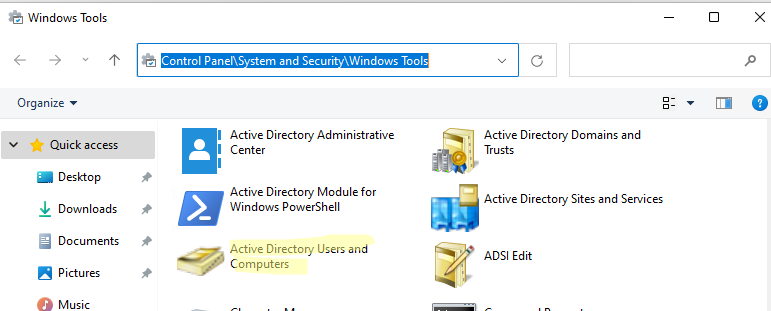
После установки оснасток управления, в разделе Administrative Tools панели управления (Control Panel\System and Security\Windows Tools) появится ссылка на консоль Active Directory Users and Computers.
Как пользоваться консолью Active Directory?
Чтобы запустить консоль ADUC, щелкните по ярлыку в панели управления или выполните команду:
dsa.msc
Все аутентифицированные пользователи домена могут использовать консоль ADUC для просмотра объектов Active Directory.
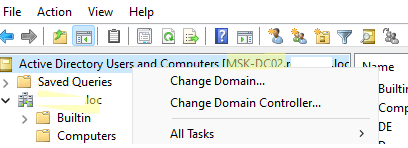
Если ваш компьютер состоит в домене Active Directory, то консоль ADUC подключится к контролеру домена, на основании текущего Logon сервера. Имя контроллера домена, с которого вы получаете информации указано в верху.
Вы можете подключиться к другому контроллеру домена AD или другому домену, щелкнув по корню консоли и выбрав пункт в контекстном меню.
В консоли Active Directory отображается древовидная структура организационных юнитов (Organizational Unit, OU) вашего домена (и отдельный раздел с сохраненными запросами/ Saved Queries AD).
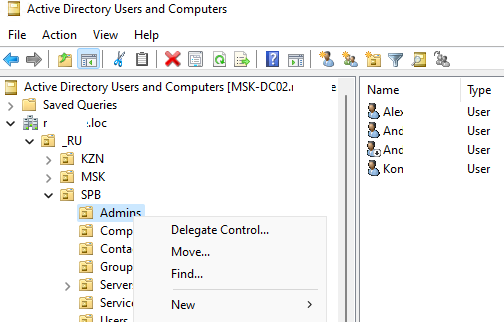
Администратор домена может создавать контейнеры (OU) в соответствии с физической или логической структуры предприятиями. С помощью контекстного меню можно создать новые объекты в AD (пользователей, группы, компьютеры, OU, контакты), переименовать, переместить или удалить объекты. В зависимости от типа объекта, который вы выбрали пункты контекстного меню могут отличаться.
Например, у пользователя есть опции на сброс пароля в AD или блокировку/разблокировку учетной записи.
Вы можете использовать контекстное меню Search для поиска объектов в AD.
Администратор может делегировать права на создание/редактирование/удаление объектов в Active Directory другим пользователям или группам.
С помощью меню View -> Add/Remove columns можно добавить атрибуты объектов, которые вы хотите отображать в консоли ADUC.
В консоли ADUC можно посмотреть или изменить свойства объектов домена. Например, можно открыть свойства пользователя и изменить его настройки. Часть свойств пользователя находится на соответствующих вкладках, а полный список атрибутов пользователя доступен на вкладке редактора атрибутов AD (Attribute Editor).
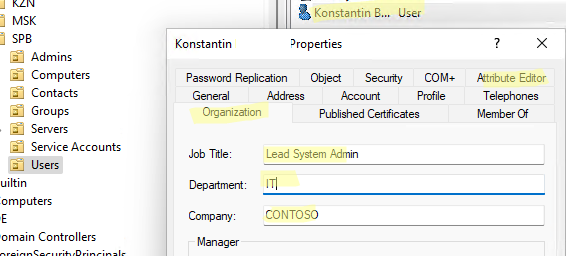
Можно добавить отдельную вкладку с фотографией пользователя AD.
Чтобы показывать системные контейнеры и свойства объектов в оснастке AD (по умолчанию скрыты), включите опцию View -> Advanced features.
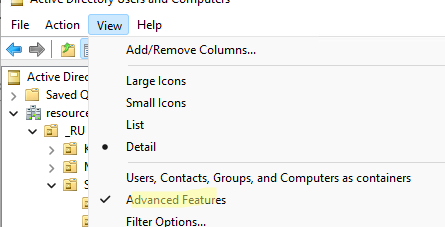
После этого у всех объектов появится ряд системных вкладок. Например, на вкладке Object можно получить каноническое имя объекта, дату создания учетной записи и включить опцию защиты от удаления (protect object from accidental deletion).
Подключение консоли ADUC к домену из рабочей группы
Если вы хотите подключится консолью ADUC к контроллеру домена с компьютера, который не включен в домен (состоит в рабочей группе), воспользуйтесь таким методом:
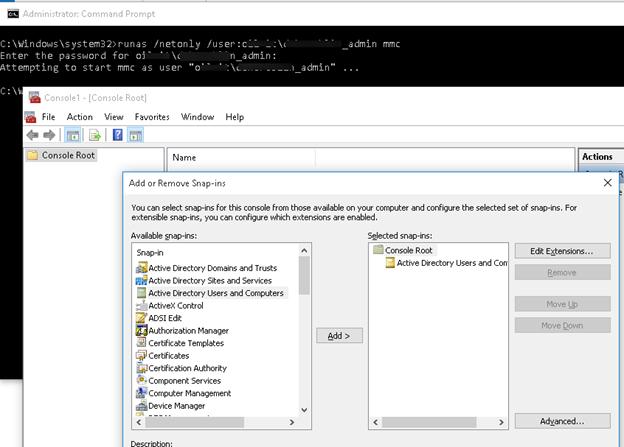
- Запустите командную строку и выполните команду запуска оснастки от имени другого пользователя:
runas /netonly /user:winitpro\aaivanov mmc - В пустой консоли MMC выберите File->Add/Remove Snap-In
- Перенесите оснастку Active Directory Users and Computers в правую панель и нажмите Add;

- Чтобы подключится к домену, щелкните по корню консоли и выберите Change domain. Укажите имя домена.

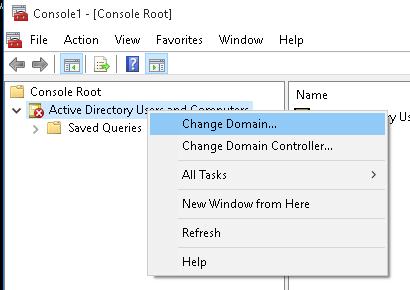
В результате консоль ADUC подключится к контроллеру домена, получит и отобразит структуру контейнеров (OU) данного домена Active Directory.
Many people struggle with installing Active Directory Users and Computers (ADUC), often feeling lost in the technical details and worried about the impact of potential mistakes. It’s a common concern that the setup might be too complex or that one error could jeopardize the whole network.
This blog post is here to ease those fears. We’ll provide you with a straightforward, step-by-step guide to installing ADUC, ensuring you can handle the setup confidently and correctly. Let’s simplify this technical task together, making it accessible for everyone.
What Is Active Directory Users And Computers (ADUC)?
Active Directory Users and Computers (ADUC) is a tool included in the Remote Server Administration Tools (RSAT), specifically designed for managing users, computers, groups, and organizational units within a Windows Active Directory environment. Administrators use ADUC to perform various tasks like creating user accounts, managing group memberships, assigning permissions, and configuring policies for computers and users.
ADUC provides a user-friendly interface, allowing IT administrators to manage access controls, ensuring that each user or system has the right level of access to the network’s resources. In a networked environment, administrators rely on ADUC to add new users, reset passwords, disable accounts, and control the overall structure of the Active Directory.
By accessing ADUC, network administrators can apply security policies across the organization, enforce compliance, and organize network resources. It’s particularly helpful in large organizations where central control of user accounts, computers, and group policies becomes necessary. ADUC is part of the broader Active Directory management framework, helping IT professionals organize and manage the network’s infrastructure, keeping resources and user roles in sync.
Note: RSAT can be installed only on computers that are running the Professional or Enterprise versions of Windows.
How To Install Active Directory Users And Computers (ADUC)?
Installing Active Directory Users and Computers (ADUC) is a necessary step if you need to manage users, computers, and groups in a Windows network environment. The process involves enabling the RSAT (Remote Server Administration Tools) feature, which includes ADUC, on your system. Whether you’re using Windows 10 or Windows 11, you can follow these steps to get ADUC up and running.
Install ADUC On Windows 10 Pro 1809+ And Above Versions
In Windows 10 Pro (version 1809 and above), you can install Active Directory Users and Computers (ADUC) by using either the graphical user interface (GUI) or PowerShell. The process is quite efficient, and both methods are fairly simple. You can choose whichever method suits your preference.
Below are step-by-step instructions for both methods.
Using PowerShell:
PowerShell offers a quick and efficient way to install ADUC on Windows 10 Pro 1809+ versions.
- Open PowerShell As Admin: Click on the “Start” button and search for “Windows PowerShell (Admin)”. Then Right click on it and select “Run as administrator”.
- Check For RSAT Capabilities: Run the following command to list the available RSAT features:
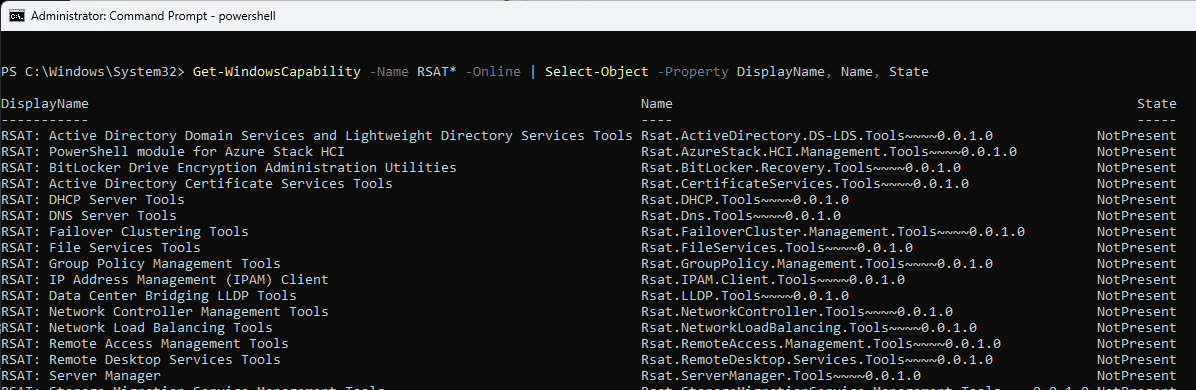
Get-WindowsCapability -Name RSAT* -Online | Select-Object -Property DisplayName, Name, State

- This command will return a list of RSAT versions available for your system.
- Choose The RSAT Version: From the list, find the RSAT: Active Directory Domain Services and Lightweight Directory Tools and note the name of the feature.
- Install ADUC via PowerShell: Run the following command to install the ADUC feature:
Add-WindowsCapability -Online -Name Rsat.ActiveDirectory.DS-LDS.Tools~~~~0.0.1.0
- The installation will begin, and once complete, you’ll see a success message.
- Verify Installation: After installation, type Active Directory Users and Computers in the Windows search bar to confirm that ADUC is installed.
Without PowerShell:
If you prefer not to use PowerShell, you can install ADUC using the standard Windows Settings app.
- Open Settings: Click the “Start” menu and select “Settings.”
- Search For Optional Features: In the Settings window, type “Optional Features” in the search bar and select it from the list.
- Add RSAT Feature: Click on “Add a feature.” In the search bar, type “RSAT” to display the list of available tools.

- Select And Install ADUC: From the list, select “RSAT: Active Directory Domain Services and Lightweight Directory Tools.”

- Then click “Install.”

- Confirm Installation: Once the installation is complete, type Active Directory Users and Computers in the search bar to access ADUC.
Install ADUC On Windows 10 Version 1803 And Below Versions
For Windows 10 versions 1803 and below, the installation process for Active Directory Users and Computers (ADUC) is different from later versions. These versions require you to manually download the Remote Server Administration Tools (RSAT), as they aren’t included as an optional feature in the system settings.
Here’s how you can install ADUC on Windows 10 version 1803 or earlier:
- Download RSAT From Microsoft: Go to the Microsoft Download Center and search for the correct version of RSAT that matches your Windows version. Ensure you select the package specific to Windows 10 version 1803 or below.
- Run The Installer Package: Once you have downloaded the RSAT installer, open the file and follow the on-screen instructions to begin the installation. The setup process is straightforward, and you’ll need to follow each prompt to complete it.
- Enable ADUC Through Windows Features: After the installation is complete, you will need to enable ADUC manually:
- Click the “Start” button and go to the “Control Panel.”

-
- Navigate to “Programs > Programs and Features,” then select “Turn Windows features on or off.”

- Activate AD DS Tools: In the Windows Features window:
- Scroll down and expand the “Remote Server Administration Tools” section.
- Expand “Role Administration Tools.”
- Further expand the section labeled “AD DS and AD LDS Tools.”
-
- Check the box for “AD DS Tools” and click “OK” to confirm.
By following these steps, you’ll successfully install and enable ADUC on Windows 10 version 1803 or earlier.
How To Use Active Directory Users And Computers?
Active Directory Users and Computers (ADUC) is a central tool used by IT administrators to manage network resources like users, computers, and groups within an organization. Below, we’ll go through how to use ADUC for some of the most common tasks, such as creating users, managing groups, and resetting passwords.
1. Opening Active Directory Users And Computers
Before you can start managing your network, you need to access ADUC. It’s easy to locate, and once open, you’ll have a view of all the users, computers, and organizational units (OUs) in your domain.
- Go to the Windows search bar and type Active Directory Users and Computers.
- Select it from the search results to open the console.
- The left pane of the console shows your domain structure, including folders like Users, Computers, and OUs.
2. Creating A New User
Creating user accounts is one of the most frequent tasks in ADUC. New accounts give employees access to network resources and services.
- In ADUC, navigate to the Users container or any OU where you want to create the new account.
- Right-click the container, then select New > User.
- A wizard will guide you through entering the user’s details like first name, last name, and logon name.
- Set a password for the user and configure options like whether the user needs to change their password upon first logon.
- Click Next and then Finish to complete the user creation.
3. Creating A New Organizational Unit (OU)
An Organizational Unit (OU) helps group resources like users or computers for easier management. OUs are useful for applying policies and managing permissions on specific sections of your network.
- In ADUC, right-click your domain or an existing OU and select New > Organizational Unit.
- Name the new OU based on its purpose (e.g., “Sales” or “IT Department”).
- Click OK to create the OU. You can now move users, computers, or groups into this OU for better organization and management.
4. Managing User Properties
You may need to update or change details for existing user accounts, such as group memberships, logon restrictions, or contact information.
- In the ADUC console, navigate to the Users container or OU where the user is located.
- Right-click the user account and select Properties.
- The Properties window allows you to modify various details, including:
- General Information (name, description)
- Group Membership (which groups the user belongs to)
- Account Settings (logon restrictions, password settings)
- Once changes are made, click OK to save them.
5. Resetting User Passwords
When a user forgets their password, you can easily reset it through ADUC, allowing them to regain access to their account.
- Locate the user account in ADUC.
- Right-click on the user account and choose Reset Password.
- Enter the new password, confirm it, and choose whether the user must change their password upon next login.
- Click OK to reset the password.
6. Managing Computers
ADUC isn’t just for managing users; you can also add and manage computers in your network. This ensures that all devices are properly tracked and managed within your organization.
- In ADUC, navigate to the Computers container or an OU where you want to add a new computer.
- Right-click the container, then select New > Computer.
- Enter a name for the computer and click Next.
- Click Finish to complete the process. The computer is now part of the Active Directory.
7. Deleting Users Or Computers
When users leave the organization or computers are no longer in use, it’s important to remove them from Active Directory to maintain an organized and secure network.
- Navigate to the Users or Computers container, or find the object in its OU.
- Right-click on the user or computer you want to remove and select Delete.
- Confirm the deletion when prompted. The object is permanently removed from Active Directory.
8. Group Management
Groups help simplify the management of access permissions by allowing you to assign roles or permissions to multiple users at once.
- In ADUC, right-click on a container or OU and select New > Group.
- Name the group, choose the group scope (Global, Domain Local, or Universal), and select the group type (Security or Distribution).
- Click OK to create the group.
- To add users to the group, right-click on the group, select Properties, go to the Members tab, and click Add to include the relevant users.
By using ADUC effectively, network administrators can manage user accounts, computers, and permissions in an organized and secure manner. Each of these tasks plays a key role in maintaining a well-structured and efficient network environment.
Other Tools In RSAT Package
The Remote Server Administration Tools (RSAT) package includes a variety of tools that provide administrators with the ability to manage different aspects of Windows Server environments. Along with Active Directory Users and Computers (ADUC), many other useful tools are included in RSAT. Below are some key tools that help streamline network and system administration:
- Active Directory Administrative Center (ADAC): ADAC offers a modern, user-friendly interface for managing users, groups, and computers within the Active Directory environment. It includes advanced features like fine-grained password policies and the Active Directory Recycle Bin, which allows for the recovery of deleted objects.
- Active Directory Module For Windows PowerShell: This module enables administrators to manage Active Directory through PowerShell. It allows for automation of tasks like user creation, group management, and configuring policies via scripts. Administrators can run PowerShell cmdlets to perform bulk operations, making the management of large networks more efficient.
- Active Directory Sites And Services: This tool is used to manage site topology within an Active Directory environment. It allows administrators to configure replication between domain controllers in different physical locations, ensuring that data is synchronized across all sites efficiently. It’s especially important for large organizations with geographically distributed offices.
- DNS Manager: This tool allows for the management of Domain Name System (DNS) settings. It helps administrators create, configure, and maintain DNS zones and records, and troubleshoot name resolution issues. DNS is critical for mapping domain names to IP addresses, ensuring network stability and performance.
- DHCP Manager: With Dynamic Host Configuration Protocol (DHCP) Manager, administrators can manage DHCP servers to configure IP address scopes, reservations, and settings for devices in the network. This tool ensures that all devices receive the correct IP configurations automatically.
- File Services Tools: These tools allow for the management of file servers, enabling administrators to configure shared folders, storage quotas, and Distributed File System (DFS) namespaces. They help maintain control over file access and resource sharing across the network.
- Group Policy Management Console (GPMC): GPMC is used to create, manage, and apply Group Policy Objects (GPOs). Administrators can enforce security settings, configure software installations, and apply system configurations network-wide, ensuring uniformity and compliance across all devices.
- Hyper-V Manager: This tool is essential for managing virtual machines (VMs) on Hyper-V hosts. It allows administrators to create, configure, and monitor virtual environments, making it a critical tool for virtualized infrastructure.
- Windows Server Update Services (WSUS): WSUS tools help manage software updates across Windows Server environments. Administrators can approve or decline updates, schedule installations, and generate reports on update compliance to ensure that systems are patched and secure.
- Failover Cluster Manager: This tool is used to manage failover clusters in Windows Server environments. It allows administrators to monitor cluster nodes, configure high-availability services, and ensure continuous uptime by providing redundancy in case of server failure.
- IP Address Management (IPAM): IPAM helps administrators monitor and manage IP address spaces, DHCP server configurations, and DNS settings across the network. It’s especially useful for large networks with a complex address structure.
- Certificate Authority Management Tools: These tools help manage Public Key Infrastructure (PKI), allowing administrators to issue, manage, and revoke digital certificates, which are critical for securing communication in a network.
Each tool included in RSAT plays a significant role in the day-to-day management and maintenance of network infrastructure. Having access to these tools makes it easier to perform tasks like monitoring servers, managing resources, and enforcing policies across the network.
Also Check:
- How To Use PowerShell Loops?
- How To Force Group Policy Update Remotely?
- How To Backup A Server?
- How Do I Fix Windows Update Assistant Not Working?
- Fix TPM Device Is Not Detected In Windows
Tips To Manage ADUC Effectively
Managing Active Directory Users and Computers (ADUC) can become complex, especially in larger environments. However, there are strategies and best practices that can simplify this process and help ensure the network runs smoothly. Below are some tips to manage ADUC more efficiently, making your administrative tasks easier and more organized.
- Use Organizational Units (OUs) For Structure: Organize users, computers, and groups into OUs based on department, location, or role. This simplifies management and allows for easy application of Group Policies.
- Leverage Group Policies: Apply Group Policy Objects (GPOs) at the OU level to enforce security settings, manage software deployments, and configure system settings across multiple users or computers.
- Implement Naming Conventions: Use clear, consistent naming conventions for users, computers, and OUs. This makes it easier to search, organize, and manage Active Directory objects.
- Set Password Expiration Policies: Regularly enforce password changes by setting expiration policies through ADUC. This ensures stronger security and reduces the risk of compromised accounts.
- Use Security Groups For Access Control: Assign users to Security Groups to manage access permissions efficiently. Rather than assigning permissions individually, you can grant access to resources based on group membership.
- Audit And Clean Up Unused Accounts: Periodically review and disable inactive user and computer accounts. This reduces clutter in the Active Directory and prevents security risks from unused or outdated accounts.
- Delegate Administrative Tasks: Delegate specific administrative responsibilities to other users, such as resetting passwords or managing specific OUs, using Delegate Control in ADUC. This reduces the workload for primary administrators and improves efficiency.
- Enable Account Lockout Policies: Set policies that lock out user accounts after a certain number of failed login attempts. This helps to prevent brute-force attacks on user credentials.
- Monitor Group Membership Changes: Regularly review changes in group membership to ensure that users have the correct level of access. This helps prevent unauthorized access to sensitive resources.
- Use Logon Hours For Enhanced Security: Set logon hours for users who should only have access to the network during specific times. This adds an extra layer of security by limiting when users can log in.
Following these tips can significantly enhance the way you manage your Active Directory environment, ensuring both efficiency and security.
FAQs:
Can I install ADUC on a non-Windows machine?
No, ADUC is only available for Windows systems. However, you can manage Active Directory remotely using third-party tools or a Windows virtual machine.
Do I need to be connected to a domain to install ADUC?
No, you don’t need to be connected to a domain to install ADUC, but you will need to be connected to a domain if you want to manage Active Directory objects such as users and computers.
What permissions do I need to install ADUC?
You need to be an administrator on your local machine to install ADUC. Additionally, to manage Active Directory objects after installation, you need sufficient administrative privileges in the domain.
Can I use ADUC to manage users and computers in Azure Active Directory?
No, ADUC is used to manage on-premises Active Directory objects. To manage Azure Active Directory (AAD), you will need to use the Azure portal or Azure AD PowerShell.
How do I access ADUC from a command line?
You can open ADUC from the command line or Run prompt by typing dsa.msc and pressing Enter.
Conclusion
We hope this guide has made the process of installing Active Directory Users and Computers (ADUC) clearer and more manageable for you. By breaking down each step, our goal was to help you navigate the setup with confidence, ensuring your network runs smoothly. Did you find the instructions helpful? Let us know if there are any additional details you’d like us to cover or if there’s anything else we can assist you with!
Related Posts:
- How To Add Alias Email In Active Directory?
- What Is Group Policy In Active Directory? A Complete Guide
- How To Install Remote Server Administration Tools (RSAT)?
- Active Directory (AD) VS Azure Active Directory…
- How To Force Group Policy Update Remotely?
- What is the PS4 Emulator?
Active Directory Users and Computers (ADUC) is part of Microsoft’s Active Directory (AD). This system manages all the critical user details, such as names, emails, addresses, and crucial login information like passwords. In the IT world, when people talk about “Active Directory”, they’re often referring to ADUC. It’s the go-to tool for organizing and controlling access within your network.
If you want to learn more about Active Directory Users and Computers, consider enrolling in our free Active Directory Fundamentals course at the link below:
Course: Active Directory Fundamentals
This free course will teach you the fundamentals of Active Directory. You’ll learn how to create and…
10 Lessons
1 Quizzes
1 Labs
1 Hr
How to Install Active Directory Users and Computers on Windows 10
Installing Active Directory Users and Computers (ADUC) on Windows 10 is straightforward. The process varies slightly depending on your version of Windows 10, but it’s nothing too complicated. Let’s break it down into two parts based on the Windows 10 version you’re using.
Verify Your Version of Windows
Before proceeding with the installation steps outline below, be sure to confirm which version of Windows you have. It’s also important to note what edition of Windows you have since that will require different steps.
To verify your version of Windows, click the windows button, and search for “system info,” and select “System Information” from the search results:
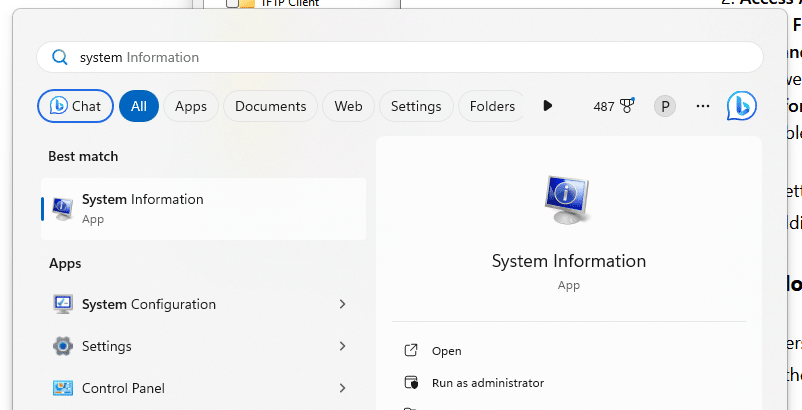
Look for “OS Name” and “Version”.

Install ADUC on Windows 10 Pro 1809+, and Windows 11 with PowerShell
If you’re using Windows 11 (Home or Pro), execute the following PowerShell command to see what you have available:
Get-WindowsCapability -Name RSAT* -Online | Select-Object -Property DisplayName, Name, StateThis returns a list shown below. I want to install the first option, which for my computer is “Rsat.ActiveDirectory.DS-LDS.Tools~~~~0.0.1.0”.
I can install this with the following PowerShell command:
Add-WindowsCapability -Online -Name Rsat.ActiveDirectory.DS-LDS.Tools~~~~0.0.1.0For Windows 10 Pro Version 1809 and Above without PowerShell
If you’re using Windows 10 Pro version 1809 or later, installing ADUC is part of adding the ‘RSAT: Active Directory Domain Services and Lightweight Directory Tools’ feature. Here’s how to do it:
- Open Settings: Click on the Start menu and select ‘Settings’.
- Access Apps & Features: Navigate to ‘Apps’ and then to ‘Optional Features’.
- Add a Feature: Click on ‘Add a feature’ at the top of the page.
- Find and Install RSAT Tools: Scroll or search for ‘RSAT: Active Directory Domain Services and Lightweight Directory Tools’. Select it and click ‘Install’.
- Wait for Installation: The installation might take a few minutes. Once done, you’ll have ADUC available to use.
This is a pretty hassle-free process, and it’s nice that Microsoft made these tools readily available without needing additional downloads.
For Windows 10 Version 1803 and Below
For older versions of Windows 10 or for Windows 10 Home, like version 1803 and below, you’ll need to download the RSAT package manually. Here’s how:
- Visit Microsoft’s Download Center: Search for ‘RSAT for Windows 10’ in your web browser and visit the Microsoft Download Center link.
- Download the RSAT Installer: Choose the correct version of the RSAT installer based on your Windows 10 version.
- Run the Installer: Once downloaded, run the installer and follow the on-screen instructions.
- Enable ADUC: After installation, go to ‘Control Panel’, select ‘Programs’, then ‘Turn Windows features on or off’. Here, check the box for ‘AD DS and AD LDS Tools’.
How to Start Active Directory Users and Computers (ADUC)
Once you’ve successfully installed Active Directory Users and Computers (ADUC) on your Windows 10 machine, the next step is to actually start using it. Launching ADUC is a breeze, and once you’re in, you’ll find a range of options to manage your network’s users and computers effectively. Let’s walk through how to get it up and running.
Accessing ADUC
To open ADUC, you’ll typically use the Windows search function:
- Open the Start Menu: Click the Windows icon on your taskbar.
- Search for ADUC: In the search bar, type “Active Directory Users and Computers”.
- Launch the Tool: Click on the ADUC application that appears in the search results.
If it’s your first time using ADUC, you might want to pin it to your Start menu or taskbar for quick access in the future. Simply right-click on the ADUC app in the search results and choose ‘Pin to Start’ or ‘Pin to Taskbar’.
Navigating the ADUC Interface
When you first open ADUC, you’ll be greeted with a tree-view of your Active Directory environment.

Here, you’ll see your domain and a series of folders representing various organizational units (OUs) and groups.
Navigating through this interface is straightforward. You can expand each OU to see the objects (like user accounts and groups) within them. Right-clicking on objects or the space in the console gives you a context-specific menu, offering various administrative tasks you can perform, like resetting passwords or creating new users.
Some Quick Tips
- Use the ‘Find’ Feature: If you’re looking for a specific user or group, the ‘Find’ function is incredibly handy. It’s a bit like using the search function on your computer – simple and efficient.
- Familiarize Yourself with Context Menus: Right-clicking on different items in the ADUC gives you a lot of options. Spend some time getting to know these – they’re great time-savers.
Basic Features and Functionalities of Active Directory Users and Computers
Active Directory Users and Computers (ADUC) is chock-full of features that can simplify the life of a network administrator. Understanding its core functionalities is key to leveraging its full potential. Let’s delve into some of the basic yet powerful features of ADUC.
User Account Management
At its core, ADUC is about managing user accounts. Here are some of the things you can do:
- Create New User Accounts: You can set up new user accounts, complete with detailed personal information and login credentials.
- Modify Existing Accounts: Need to update a user’s details or change their group memberships? It’s just a few clicks away in ADUC.
- Delete or Disable Accounts: When a user leaves or needs to be temporarily removed from the network, you can either disable or delete their account.
Group Management
Groups help organize your AD objects like Users and Computers. Create groups based on department, role, access needs, or anything else you can think of. This allows you to apply Group Policies Objects (or GPOs) to the specific groups and configure specific settings for that group.
Organizational Units (OUs)
OUs are like folders that help you organize and manage users, groups, and other AD objects more efficiently. Once you create an OU, like groups, you can apply specific Group Policy Objects to that organizational unit.
You can create OUs any way you see fit and whatever makes sense to you while organizing your domain, but it should be created with the idea that later you’ll come back and apply GPOs and apply security settings.
Finding and Managing Objects
ADUC comes with a robust search feature that lets you quickly find any object in your directory. It’s particularly useful when you’re managing a large number of users and groups.
Security and Permissions
Managing security settings and permissions is a big part of ADUC. You can:
- Set Permissions: Define what users can and cannot access.
- Manage Security Groups: Use security groups to apply permissions to a set of users.
Conclusion
That provides a basic overview of Active Directory Users and Computers including it’s installation. If you want a more indepth tutorial on Active Directory, you can check out our other blog post titled Active Directory 101: A Step-by-Step Tutorial for Beginners. If you want more formal training, consider our free Active Directory Fundamentals course below:
Course: Active Directory Fundamentals
This free course will teach you the fundamentals of Active Directory. You’ll learn how to create and…
10 Lessons
1 Quizzes
1 Labs
1 Hr
Leave a comment below and let us know what you thought in the comments below!
To install Active Directory Users and Computers (ADUC) on Windows 10, you’ll need to enable certain features, download required tools, and set up the necessary components to manage AD users and computers. This guide will provide a step-by-step tutorial on how to get ADUC up and running on your Windows 10 machine with ease. By the end, you’ll be fully equipped to manage user accounts, groups, and computers within a Windows domain.
Installing AD Users and Computers on your Windows 10 computer will allow you to manage users, groups, and computers within a Windows domain environment. This section will guide you through the process step by step.
Step 1: Ensure Your Windows 10 Version Supports ADUC
Make sure your version of Windows 10 is either Professional, Enterprise, or Education, as these versions support the installation of ADUC.
If you’re using a Windows 10 Home edition, you won’t be able to install ADUC since it lacks the necessary features. Consider upgrading your version if needed.
Step 2: Open the Control Panel
Access the Control Panel by typing “Control Panel” into the search bar and clicking on the application to open it.
The Control Panel is your gateway to managing various system settings, including enabling or disabling Windows features.
Step 3: Navigate to Programs and Features
Within the Control Panel, find and click on “Programs,” then choose “Programs and Features.”
In this section, you can manage installed programs and features, including adding Windows features like ADUC.
Step 4: Turn Windows Features On or Off
Click on “Turn Windows features on or off,” which will open a list of Windows features you can enable or disable.
This list contains optional features that you can turn on, including the RSAT (Remote Server Administration Tools), which contains ADUC.
Step 5: Enable RSAT: Active Directory Domain Services and Lightweight Directory Tools
Scroll down to find “RSAT: Active Directory Domain Services and Lightweight Directory Tools” and check the box next to it.
By enabling this feature, you are allowing the installation of the tools needed to manage Active Directory, including ADUC.
Step 6: Apply Changes and Restart
Click “OK” to apply the changes. Your computer may prompt you to restart to complete the installation.
Restarting your computer ensures that all necessary components are correctly installed and configured.
Once you’ve completed these steps, AD Users and Computers will be available in your Administrative Tools. You can now manage your domain’s users and computers effectively from your Windows 10 computer.
Tips for Installing AD Users and Computers on Windows 10
- Ensure your Windows 10 edition is compatible with RSAT before attempting the installation.
- Keep your system updated to avoid compatibility issues with newer RSAT features.
- If you struggle with enabling features via the Control Panel, consider using PowerShell for automation.
- Familiarize yourself with ADUC’s interface to quickly navigate its functionalities.
- Regularly back up your system before making significant changes, such as installing new features.
Frequently Asked Questions
What is Active Directory Users and Computers?
Active Directory Users and Computers (ADUC) is a Microsoft Management Console (MMC) that allows administrators to manage directory objects, including users, computers, and organizational units, within a Windows domain.
Can I install ADUC on Windows 10 Home?
No, Windows 10 Home does not support the installation of ADUC. Only Windows 10 Professional, Enterprise, and Education editions support this feature.
Why can’t I find the RSAT option in Windows Features?
If you can’t find RSAT in Windows Features, ensure your Windows is updated. Also, double-check that you are using a compatible edition of Windows 10.
How do I access ADUC after installation?
After installation, you can access ADUC by going to the Start menu, selecting Windows Administrative Tools, and then clicking on Active Directory Users and Computers.
Is ADUC available on Windows 11?
Yes, ADUC is available on Windows 11, but just like Windows 10, it requires enabling through the RSAT tools on compatible editions.
Summary
- Verify Windows 10 version compatibility.
- Open Control Panel.
- Go to Programs and Features.
- Turn Windows features on or off.
- Enable RSAT.
- Apply changes and restart.
Conclusion
Managing a Windows domain might sound like trying to solve a complex puzzle. However, with the right tools, like Active Directory Users and Computers on Windows 10, it becomes as simple as assembling a LEGO set. Once you know how to install AD Users and Computers, you unlock a world of efficient user and computer management. This setup not only saves time but also streamlines administrative tasks in your network environment. Remember, the key to mastering any tool is practice and exploration. So, dive into ADUC, explore its functionalities, and become the administrator your network deserves. For further reading, consider exploring Microsoft’s comprehensive documentation on Active Directory or join community forums to connect with other IT enthusiasts. Your journey into the vast world of network management is just beginning, and with ADUC, you’ve taken a significant first step. Happy administrating!
Matt Jacobs has been working as an IT consultant for small businesses since receiving his Master’s degree in 2003. While he still does some consulting work, his primary focus now is on creating technology support content for SupportYourTech.com.
His work can be found on many websites and focuses on topics such as Microsoft Office, Apple devices, Android devices, Photoshop, and more.
Active Directory Users and Computers (ADUC) lets you take care of user accounts, groups, and other stuff in Active Directory (AD) through a nice visual setup. In the past, to get this tool, you had to download something called the Remote Server Administration Tools (RSAT) separately. But now, if you’re using Windows 11 or Windows 10, you don’t have to do that. RSAT is part of the “Features on Demand,” so you can just add it straight from the system itself.
This guide will show you how to add RSAT Active Directory Users and Computers and the Active Directory PowerShell module using either PowerShell or Command Prompt.

Install Active Directory Users and Computers in Windows 11 or 10 via PowerShell
PowerShell is likely the easiest way to add different features in Windows thanks to its easy yet powerful commands. The following steps will show you how to use it to install Active Directory Users and Computers on your Windows 11 or 10 PC.
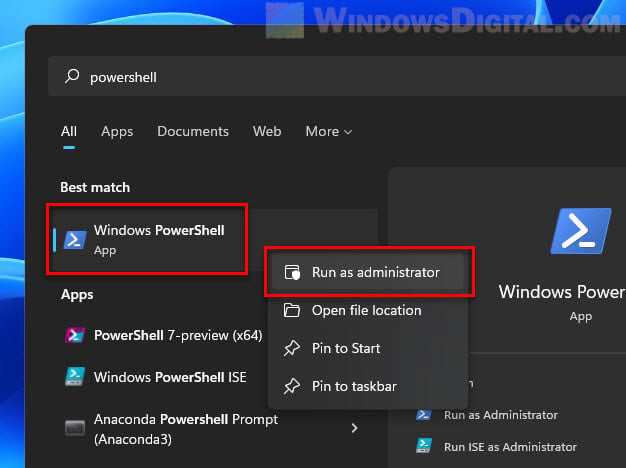
- First, you need to open PowerShell as an admin. Press the Windows key, type “PowerShell,” right-click on “Windows PowerShell,” and pick “Run as administrator”.

- Make sure your PC is online before you start adding features with PowerShell.
- To add ADUC, type in this command:
Add-WindowsCapability -Online -Name Rsat.ActiveDirectory.DS-LDS.Tools

- After you run the command, it will check with Windows Update to download and add what’s needed. You’ll see a message when it’s done.

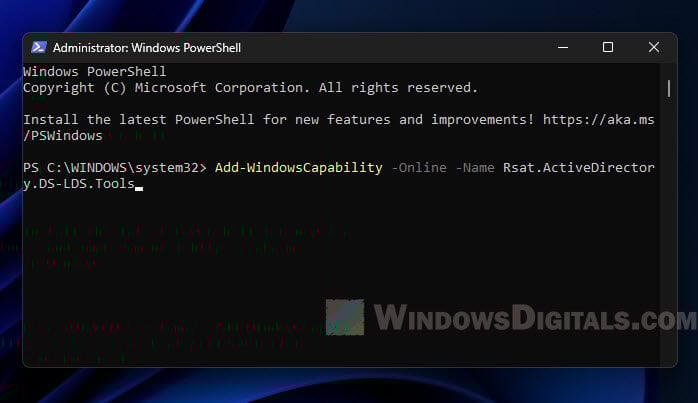
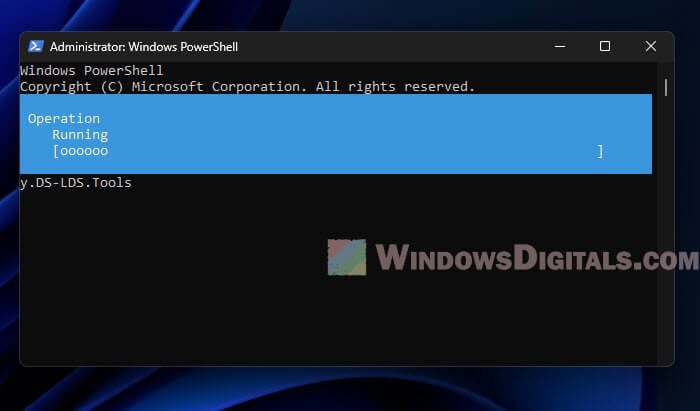
It’s okay to skip adding a version number when you run the command. If you don’t add it, Windows will just get the newest version available.
Also see: Run CMD, PowerShell or Regedit as SYSTEM in Windows 11
Install Active Directory PowerShell Module
The Active Directory PowerShell Module is very useful for managing AD right from the command line. But it doesn’t come with the ADUC GUI tools, so you need to install it separately.
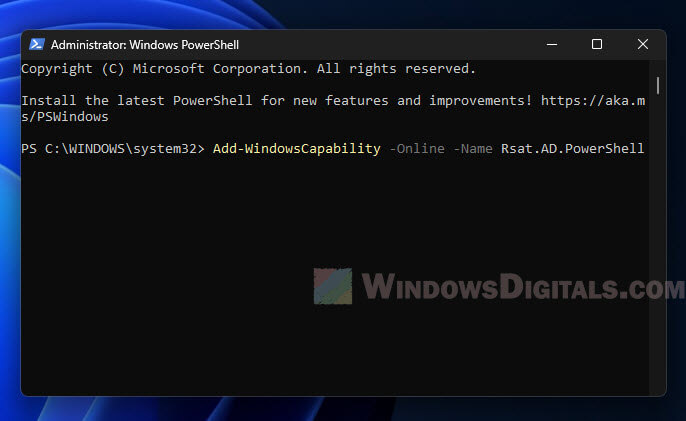
- Open PowerShell as an admin and run this command:
Add-WindowsCapability -Online -Name Rsat.AD.PowerShell

- Wait a bit, and you’ll see a message saying it’s done.
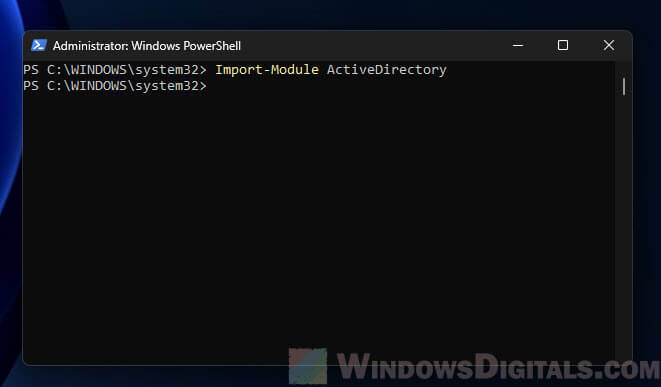
- Right after installing, you can start using the AD commands in your current session by typing:
Import-Module ActiveDirectory

This loads the Active Directory module so you can use commands like
Get-ADUserandGet-ADComputerfor AD tasks.
Useful tip: How to Install Telnet via CMD or PowerShell in Windows 11
Install ADUC in Windows 11 or 10 via CMD
Although PowerShell is amazing for a lot of Windows admin tasks, some users might still prefer to use the old-school Command Prompt (CMD). Even though CMD doesn’t have as many fancy commands as PowerShell, you can still use DISM (Deployment Image Servicing and Management) to add features like ADUC.
- Open Command Prompt as an admin by pressing the Windows key, typing “cmd,” right-clicking on “Command Prompt,” and picking “Run as administrator”.
- Being online is important here too, since the features come from Windows Update.
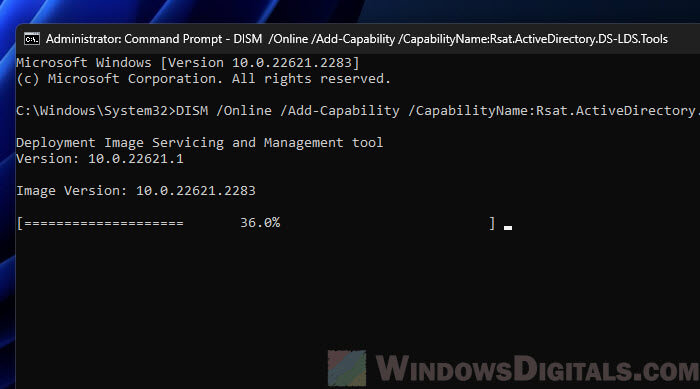
- To add ADUC with CMD, enter this command:
dism /online /add-capability /capabilityname:Rsat.ActiveDirectory.DS-LDS.Tools

This also reaches out to Windows Update to download and add what you need. You’ll know it’s done when you see a message.

- If you want the Active Directory PowerShell Module too, use this command:
dism /online /add-capability /capabilityname:Rsat.AD.PowerShell
After that, you’re set to use the AD-specific commands in PowerShell.

Just like with PowerShell, you don’t have to specify a version number. Leaving it out means Windows will pick the latest version for you.
Related resource: Using PowerShell to Test Port Connection Without Telnet
What to do after installing them
After you’ve added ADUC, below are some tips to get familiar with it and make sure everything’s running as intended.
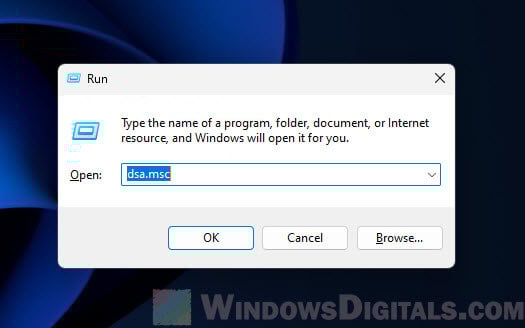
Launch ADUC
Press Windows + R, type “dsa.msc”, and hit Enter. This opens the Active Directory Users and Computers interface.
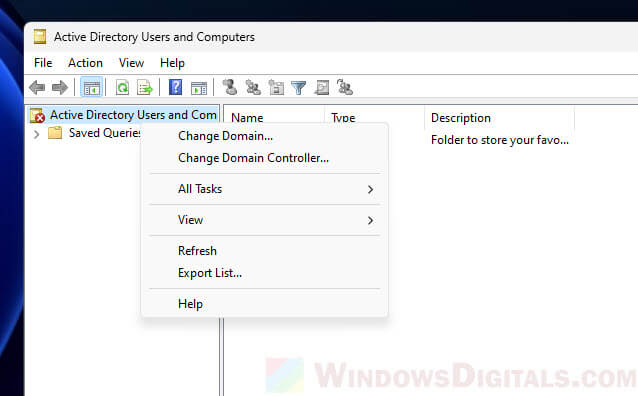
Connect to a Domain or a specific Domain Controller
If your PC is part of an Active Directory domain, ADUC will usually find a domain controller by itself. But if you need to hook up to a different domain, right-click on “Active Directory Users and Computers” at the top left and pick “Change Domain”.
For connecting to a specific domain controller in your current domain, choose “Change Domain Controller”.
Trying out ADUC
Take some time to check out the different areas and organizational units (OUs) in the domain. This is where you manage all the users, groups, computers, and more.
PowerShell module
If you added the Active Directory PowerShell module, open PowerShell and type Import-Module ActiveDirectory to dive into using Active Directory commands.
Some common issues when installing ADUC
In most cases, there shouldn’t be any problem if you add ADUC using one of the ways described above. Below are some common problems you might see when installing ADUC and how to fix them.
Installation failures
Check you’re online since some parts might need to come from Windows Update. Make sure you have admin rights to run the commands.
ADUC not connecting to domain
Check your PC’s connection to the domain controller.
Make sure your domain login details are correct; you might need more rights to see or change certain things.
Missing tabs or features in ADUC
If you’re missing some options, it might be because you need more Windows features or the right permissions in Active Directory. For instance, the “Attribute Editor” tab shows up only if “Advanced Features” is turned on from the “View” menu.
PowerShell module errors
Double-check you’ve got the Rsat.AD.PowerShell feature added. Make sure you’re using PowerShell with admin rights too.
Some final notes
Usually, tools like Active Directory Users and Computers are set up on client PCs, not directly on servers. If you’re adding Active Directory Users and Computers to a client machine, the normal way is through the system settings: “Settings” > “Apps” > “Optional features”. This method is pretty straightforward and what most users would use because it’s visual and easy to understand.
But, if you’re looking to add ADUC through the command line, either using PowerShell or Command Prompt, this guide will be of help for that. You should try these things on a test machine first before using them in a work environment.