
Windows Server 2019 users find that when searching in RDS, the search indexing on the terminal server do not work while searching in remote desktop and in Outlook.
Symptom
Windows Server 2019 users reported that searching in Remote Desktop on the Terminal Server and searching in Outlook doesn’t showing any search results. The status “Indexing is not running” is displayed in the indexing options.

After checking the search indexing service “services.msc”, it is shown that Windows Search is running on the RDS Server 2019. When trying to Rebuild the index under Advanced “Rebuild”, the indexing remains unsuccessful even after this action.
Cause
Starting with Windows Server 2019, Microsoft has made changes to the Windows Search service. The per-user search index is now enabled by default. This search indexing also applies to RDS and Windows Server 2022.
That’s why, as an administrator, you won’t see any locations under Indexing Options > Change > Show all locations.
Administrators can disable the setting and restore the older indexing method for Windows Server and RDS by using the EnablePerUserCatalog registry key:
HKEY_LOCAL_MACHINE\SOFTWARE\Microsoft\Windows Search
DWORD EnablePerUserCatalog 0
Solution: Search Indexing for RDS server
The traditional indexing option “per user search indexing” is restored with the following action.
To do this, open a command prompt on the windows server as an administrator and execute the following command to add the registry DRWOD key EnablePerUserCatalog with the value 0.
REG ADD "HKLM\SOFTWARE\Microsoft\Windows Search" /v "EnablePerUserCatalog" /t REG_DWORD /d "0" /fNow restart the “Windows Search” service or Reboot the Windows Server.
Now all locations are displayed (such as Outlook and/or OneNote). In addition, the number of indexed items should increase significantly.

Note: In Indexing Options > Advanced, the locations of the index can be specified and Rebuild if necessary.
Windows Search Indexing in Server 2019, 2022 using Multi-Session
Now, the default Windows Search service is able to roam all Windows Search index data on a per-user basis. The most significant change of per-user search indexing is that the Windows Search index is now stored per user in the user profile, under the following path:
C:\Users\%Username%\AppData\Roaming\Microsoft\Search\Data\Applications{UserSID}{UserSID}.edbOn each login, the Windows Search process creates a new instance of the search database for the user based on the existing EDB. If no EDB file exists, a new one is created by the Operating System.
Enable Windows Search Service on RDS Server
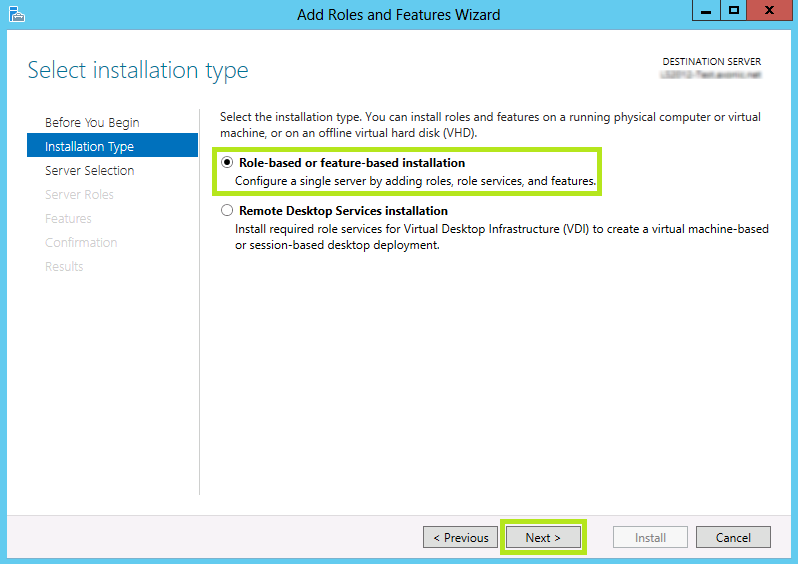
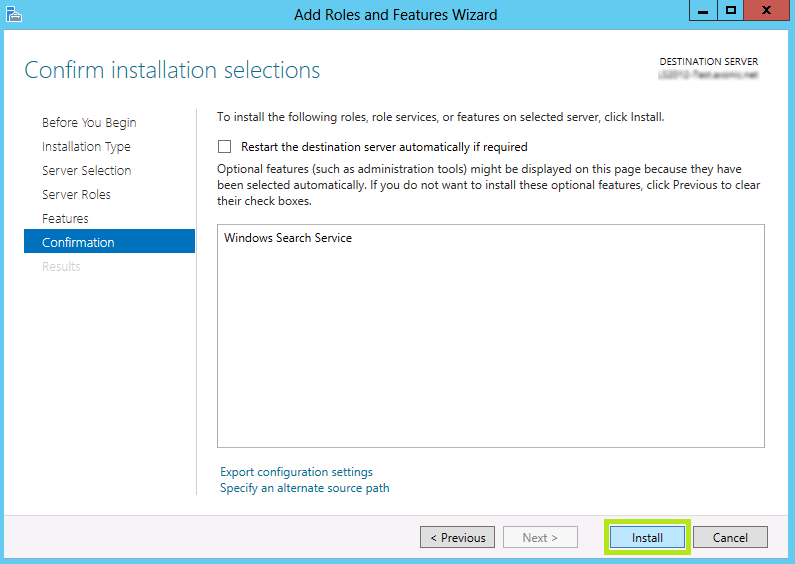
Log in to the Windows Server 2019 or 2022 and launch the Server Manager. Click Manage and select Add Roles and Features. Select Role based or feature-based installation option and click Next, walk through until the Features page, select the Windows Search Service checkbox and click Next. On the Confirmation page, click Install.
Now the windows search service just needs to be started, this is done from services.msc, open windows search properties, select startup type Automatic (Delayed Start), then click the Start button.

Install Windows Search Service in PowerShell
Using PowerShell is probably the quickest way to install the Windows Search service on a server. Launch the PowerShell as administrator. Run the following PowerShell command to install the Windows Search service on Windows Server.
Install-WindowsFeature Search-ServiceOpen Windows Indexing Options
To access the indexing options, enter “indexing” in the search field.
Alternatively, you can press the key combination Windows-Logo+R.
A new “Run” window will then open. Type the command control srchadmin.dll and select OK.

Windows Search Indexing
Indexing is the process of looking at files, email messages, and other content on your PC and RDS Server and cataloging their information, such as the words and metadata in them. When you search your Computer after indexing, it looks at an index of terms to find results faster.
When you first run indexing, it can take up to a couple hours to complete. After that, indexing will run in the background on your PC or RDS Server as you use it, only re-indexing updated data.
Note. if you are considering using single user search roaming or multi-user search roaming, follow this Microsoft article.

Need a more powerful search software for your Windows Server? Learn more here…
Windows Search Server vs. Search Service
The Windows Search Protocol allows communication with a server that hosts a Windows Search Service. The Windows Search Service can issue queries and it also allows an administrator to manage an indexing server. The indexing process runs within the LocalSystem account and constantly runs for all users. This allows Windows Search to:
- Maintain an index that can be shared among all of the users.
- Maintain security restrictions and access to content.
- Process remote queries from computers on the network.
Don’t confuse the Windows Search Service with Microsoft Search Server Express. Microsoft Search Server Express is a free enterprise-class search server, which enables high performance searches of corporate data across multiple systems. Search Server Express has a similar appearance to a Windows SharePoint Services site. The main difference between Windows Search and Search Server Express is that Windows Search can search on a desktop and a server, where Search Server Express can only search on the server.
Windows Search Service on Windows Server 2008
If you are already using a Windows Server based computer, and are currently using Windows Server 2008 then you should know that the Windows Search Service might not be installed by default. You can install and configure the Windows Search Service manually, but it takes some time, patience, and a bit of knowledge to get it done. Here are the steps that you will need to follow:
- Click Start > All Programs > Administrative Tools and then Server Manager
- You will see a console tree in Server Manager, right click on Roles and then choose Add Roles.
- When the Add Roles Wizard opens, click Next.
- Add the Windows Search Service.
- You will need to choose the Volumes with shared folders to be indexed.
- Now you can finish & close the wizard. This should have the search service up and running.
Enable Windows Search Service on Windows Server 2012
While the steps are similar to enabling the search service on previous server versions, there are enough differences to write up the steps you need to follow to enable the Windows search service on Windows Server 2012. Here’s what you need to do:
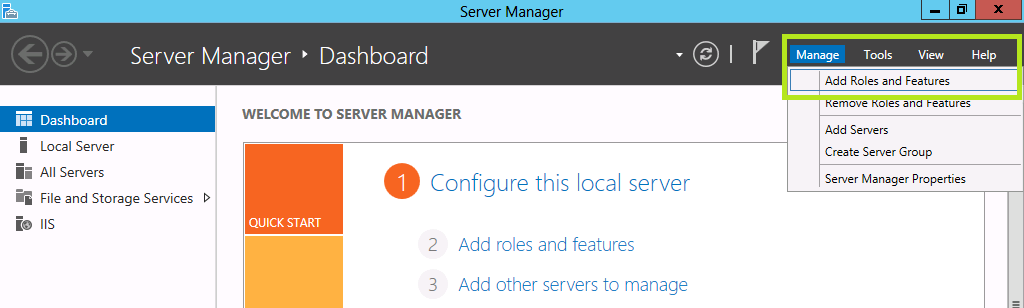
Open the Server Manager tool, then click Manage.
Go to Add Roles and Features to open the Add Roles and Features Wizard window.
Click Next to open the wizard to the Installation type page.
Select Role based or feature based installation option, and click Next.
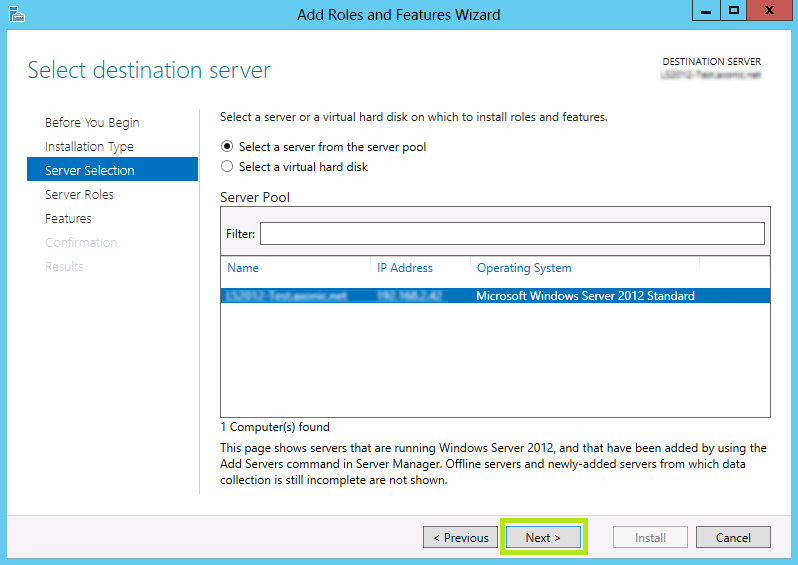
Now you are on the server selection page. Select the server you want the service installed on. If you only have one server, it will automatically select it. Click Next.
Now you are in the Server Roles page. Just click Next, because you are installing a feature, not a role.
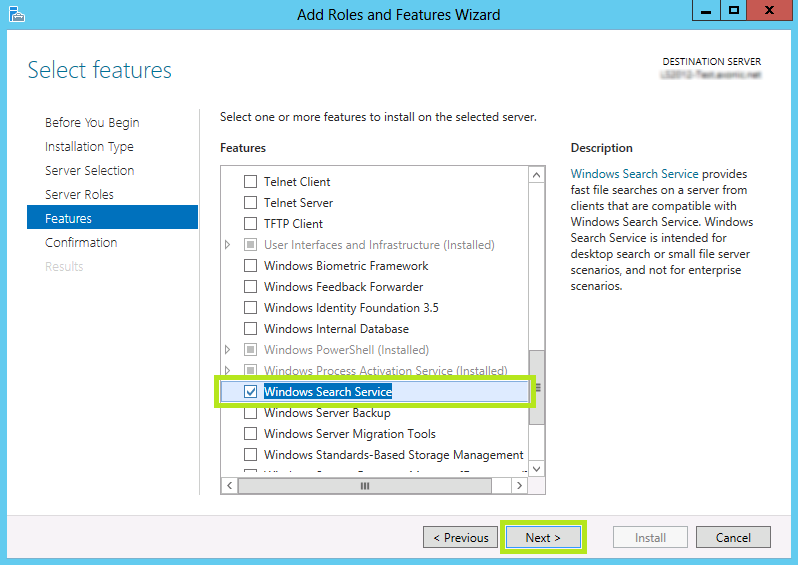
This will open the Features page, here is where you can choose Windows Search Service (make sure the check box is checked) click Next.
You are now in the confirmation page. To confirm the selection, just click Install. Please note that it will take some time to install the Windows Search Service.
The installation should now be complete.
Adding a New Location to be Indexed
A common problem that users on a network face is that when they try to add a network drive to their Library, an error message suddenly pops up that says “this network location can’t be included because it is not indexed”. There’s no need to worry though, this problem is easy to solve. The following steps require Windows Server 2008 or higher, and will work directly with Windows 7, 8, and 10 Libraries.
When the Windows Search Server is enabled, the server generates an index which is then stored on a Network Share. The clients that have this share mounted can use the search index to find the files they need.
The first step is to create a Shared Folder to host the search index. This can easily be done by going to the Server Manager > File and Storage Services > Shares and setting the appropriate User and File permissions.
Next you should enable Windows Search Service from your server. See the steps outlined above to do so on Windows Server 2008 and 2012.
With Windows Search Service installed and the shared folder created, you will then need to add that shared folder to the index. On the server, go to Control Panel > Indexing Options then click Modify to add the folder or even an entire drive to the index.
Now you will be able to add the network share to the library without the error message appearing.
This article explains how to enable Windows search service on Windows server. The Windows Search service allows clients that are compatible with the search service to perform fast file searches on a server.
When you install the Windows Search service on a server, you can use the Windows File Explorer to quickly search for files and file contents. The Windows Search service must be running to enable quick searching.
The search service is also available for Windows 10 and Windows 11 users. This service provides content indexing, property caching, and search results for files, e-mail, and other content.

On Windows 10/11, if you’re using Microsoft Visio to lookup for newly installed stencils, the Windows Search service should be running. Otherwise, you’ll encounter the error “Visio cannot provide fast search results because Windows Search is not running or is not configured properly for Visio. Please contact your system administrator.”
Also Read: Install Windows Server 2022 Core: A Step-by-Step Guide
What is Windows Search Service?
The Windows Search Service (WSS) can search files and documents for useful information. Indexing can be quite CPU-intensive, depending on the number of files on your system, but Microsoft has ensured that the service will throttle or even pause indexing if it may negatively impact the user experience. By using indexing, users will experience faster file-server searches. For more information, read the article by Microsoft on Windows Search Overview.
Ways to install Windows Search on Server
There are two ways to install the Windows Search service on Windows server:
- Using the Add Roles and features wizard
- Using PowerShell
We’ll cover both the above methods in this article.
Also Read: Patch Server Core Installation with latest Windows Updates
Steps to enable Windows Search Service on Windows Server
Here are the steps that you need to follow to install the Windows Search service on Windows Server 2022.
Log in to the Windows Server and launch the Server Manager. Click Manage and select Add Roles and Features.

On the Installation Type page, select Role based or feature-based installation option and click Next.

Select the destination server on which you want to install the Windows Search service. If this is a local server, click Next.

On the Server Roles page, click Next. On the Features page, select the Windows Search Service checkbox and click Next.

On the Confirmation page, click Install.

The Windows Search service installation is now complete. You don’t have to restart the server after installing the Windows Search service. Close the Add Roles and Features Wizard.

Fix Windows Search is disabled in Windows Server 2016
By default, the Windows Search service is set to Disabled in Windows Server 2016. That’s because the indexing of the volumes can cause problems in certain scenarios, including
- Cluster Shared Volumes (CSV)
- Running Remote Desktop Session Host (RDSH) with multiple simultaneous sessions.
If you need the search functionality on Windows Server 2016 from the start menu, you can re-enable the Windows search service using the following steps:
- Press Windows + R to open the Run box.
- Type services.msc, and then press Enter.
- Right-click Windows Search, and then select Properties.
- Change the startup type to Automatic (Delayed Start).
- Select Apply, and then select Start.
- Select OK, and then close the Services console.
After making the above changes, you may want to restart the Server once. Now the Windows Search service starts along with other services.

Install Windows Search Service using PowerShell
Using PowerShell is probably the quickest way to install the Windows Search service on a server. Launch the PowerShell as administrator. Run the following PowerShell command to install the Windows Search service on Windows Server.
Install-WindowsFeature Search-Service

Install Windows Search Service on Server 2008 R2
On older versions of Windows Server, such as 2008 R2, the procedure for installing the search service slightly varies. To enable the Windows Search service in Windows Server 2008 R2, follow these steps:
- Launch the Server Manager and click Roles in the left navigation pane.
- Click Add Roles in the Roles Summary pane.
- On the Server Roles page, select the File Services role, and then click Next.
- On the Role Services page, select the Windows Search Service role service, and then click Next.
- On the Confirmation page, verify that Windows Search Service is listed, and then click Install.
Restart Windows Search Service on Windows Server
Recently, one of our customers reported that the search service was taking up a lot of CPU resources on their server. This can happen when you have a large volume of files to index or your search operation involves searching too many files.
On a Windows server, if you notice that Windows Search is not functioning properly, you can try restarting the service using the following steps:
If you need the search functionality on Windows Server 2016 from the start menu, you can re-enable the Windows search service using the following steps:
- Press Windows + R to open the Run box.
- Type services.msc, and then press Enter.
- Right-click Windows Search service and select Restart.
- Close the Services console.

Still Need Help?
If you need further assistance on the above article or want to discuss other technical issues, check out some of these options.
From Wikipedia, the free encyclopedia
Indexing Service
|
The Indexing Service Query Form, used to query Indexing Service catalogs, hosted in Microsoft Management Console. |
|
| Developer(s) | Microsoft |
|---|---|
| Operating system | Microsoft Windows |
| Successor | Windows Search |
| Service name | Indexing Service |
| Type | Desktop search |
Indexing Service (originally called Index Server) was a Windows service that maintained an index of most of the files on a computer to improve searching performance on PCs and corporate computer networks. It updated indexes without user intervention. In Windows Vista it was replaced by the newer Windows Search Indexer. The IFilter plugins to extend the indexing capabilities to more file formats and protocols are compatible between the legacy Indexing Service how and the newer Windows Search Indexer.
Indexing Service was a desktop search service included with Windows NT 4.0 Option Pack[1] as well as Windows 2000 and later.[2][3][4] The first incarnation of the indexing service was shipped in August 1996[1] as a content search system for Microsoft’s web server software, Internet Information Services.[citation needed] Its origins, however, date further back to Microsoft’s Cairo operating system project, with the component serving as the Content Indexer for the Object File System. Cairo was eventually shelved, but the content indexing capabilities would go on to be included as a standard component of later Windows desktop and server operating systems, starting with Windows 2000, which includes Indexing Service 3.0.[5]
In Windows Vista, the content indexer was replaced with the Windows Search indexer which was enabled by default. Indexing Service is still included with Windows Server 2008 but is not installed or running by default.[6]
Indexing Service has been deprecated in Windows 7 and Windows Server 2008 R2.[7] It has been removed from Windows 8.[5]
Comprehensive searching is available after initial building of the index, which can take up to hours or days, depending on the size of the specified directories, the speed of the hard drive, user activity, indexer settings and other factors. Searching using Indexing service works also on UNC paths and/or mapped network drives if the sharing server indexes appropriate directory and is aware of its sharing.
Once the indexing service has been turned on and has built its index it can be searched in three ways. The search option available from the Start menu on the Windows Taskbar will use the indexing service if it is enabled and will even accept complex queries. Queries can also be performed using either the Indexing Service Query Form in the Computer Management snap-in of Microsoft Management Console, or, alternatively, using third-party applications such as ‘Aim at File’ or ‘Grokker Desktop’.[citation needed]
- ^ a b Nareddy, Krishna (15 October 1997). «Introduction to Microsoft Index Server». Microsoft Developer Network. Microsoft Corporation. Retrieved 1 February 2011.
- ^ «Indexing Service Version 3.0». Microsoft Developer Network. Microsoft Corporation. 6 November 2009. Retrieved 1 February 2011.
- ^ Danseglio, Mike; Dillard, Kurt; Maldonado, José; Robichaux, Paul (December 2005). Bannecker, Reid; Cobb, John; Tobey, Jon; et al. (eds.). Threats and Countermeasures: Security Settings in Windows Server 2003 and Windows XP (Microsoft Word) (2.0 ed.). Microsoft Corporation. p. 144.
- ^ «What is Indexing Service?». Microsoft Developer Network. Microsoft Corporation. 6 November 2009. Retrieved 1 February 2011.
- ^ a b «About the Indexing Service». Microsoft. 31 May 2018. Retrieved 10 August 2018.
- ^ «How to install and configure the Indexing Service on a Windows Server 2008-based computer (Revision: 3.0)». Microsoft Support. Microsoft Corporation. 3 May 2010. Retrieved 1 February 2011.
- ^ «Deprecated Features for Windows 7 and Windows Server 2008 R2». Windows 7 Technical Library. Indexing Service: Microsoft Corporation. 16 October 2009. Retrieved 8 November 2011.
Опубликовано:
22 января 2016 в 09:41
7
9
По умолчанию полнотекстовый поиск в системе DIRECTUM не учитывает тексты документов в файловых хранилищах. Для поиска по файловым хранилищам необходимы дополнительные настройки операционной системы и системы DIRECTUM. Ранее полнотекстовый поиск осуществлялся
только с помощью службы Indexing Service, в версии 5.2 мы добавили возможность настраивать поиск с помощью службы Windows Search.
Для чего нужна служба Windows Search?
Причина связана с внешними факторами. С выходом Windows Server 2012 компания Microsoft отказалась от поддержки службы Indexing Service, которая использовалась в IS-Builder для полнотекстового поиска по документам в файловых хранилищах. Чтобы поиск по тексту
документов работал на компьютерах с новыми операционными системами, мы реализовали интеграцию с другой службой полнотекстового поиска – Windows Search.
Клиенты, использующие службу Indexing Service, при переходе на версию 5.2 не испытают никаких неудобств. По умолчанию, как и прежде, будет устанавливаться служба Indexing Service. Если у клиента нет никаких ограничений на ее использование, после всех настроек
системы полнотекстовый поиск будет работать.
Если файловые хранилища находятся на компьютерах с операционной системой Windows Server 2008/2008R2 и выше, то для работы полнотекстового поиска настройте службу Windows Search. Обращаем внимание, что ее нельзя установить на компьютер с установленной службой
Indexing Service. Поэтому перед установкой убедитесь, что служба Indexing Service удалена. После этого можно приступать к установке и
настройке новой службы.
Таким образом, выбор службы зависит только от установленной операционной системы и от ваших личных предпочтений. Однако можно отметить и некоторые достоинства службы Windows Search:
- Во-первых, ее универсальность. Служба стабильно работает на всех версиях ОС, которые поддерживает компания .
- Во-вторых, при использовании службы можно более гибко регулировать, в каких папках файловых хранилищ производить поиск. Права на папки задаются при настройке службы. Таким образом, можно исключить из поиска папки с конфиденциальной информацией.
Настройки служб Indexing Service и Windows Search значительно отличаются друг от друга. Подробнее о настройке и отключении полнотекстового поиска читайте в
справке.