
Hello fellow sys admins! In the following article, we will walk through an in-place upgrade from Windows Server 2008 R2 to 2012 R2. So let us dive right in.
The first step in any upgrade is to get the Installation Media. If you are using a Virtual Machine, then it’s as simple as adding the ISO to the Virtual CD-R Drive, either using the Hyper-V machine settings or the VMware console. If you are upgrading a physical server, then just unpack the ISO and copy it to either a secondary drive or flash drive, or you can just run it from a network share.
In our scenario, I am running the installation from a network share. In both cases, the upgrade process is the same; there is no difference between the VM OS or physical server OS as we all know so well.
Therefore, as I mentioned before. I have unpacked the ISO using WinRAR.
Afterwards, I just ran the setup.exe from inside the OS. A small tip is to make sure you don’t have any other users logged into the server in any way, RDP or console, since the prerequisite check will fail and you will have to go through the setup again.
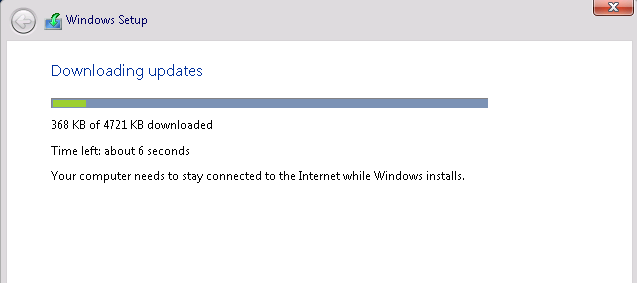
Once in the Setup Wizard, we will download the latest updates, which are required in order to bring the server to the latest compatible state for upgrading to Windows Server 2012 R2. This is a very important step, which most people choose to ignore, but it will save you a lot of hassle after you upgrade.
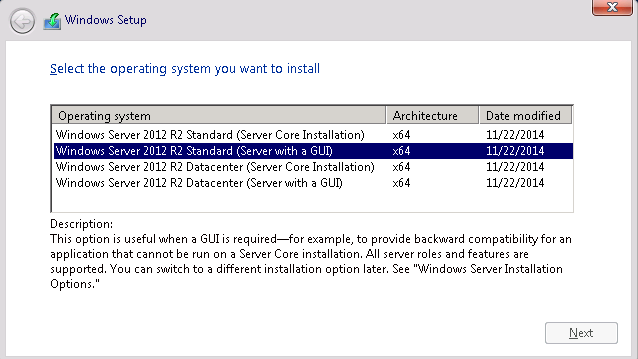
Next, we will choose the version of Windows Server 2012 R2. In our case, we are going from Windows Server 2008 R2 Standard Edition to Windows Server 2012 R2 Standard Edition.
Afterwards, we read the EULA from top to bottom, since it is very important. Hit Next and we then get to the eternal crossroad, where we have to choose whether to upgrade or to format. Since we want to upgrade, we will of course choose Upgrade!

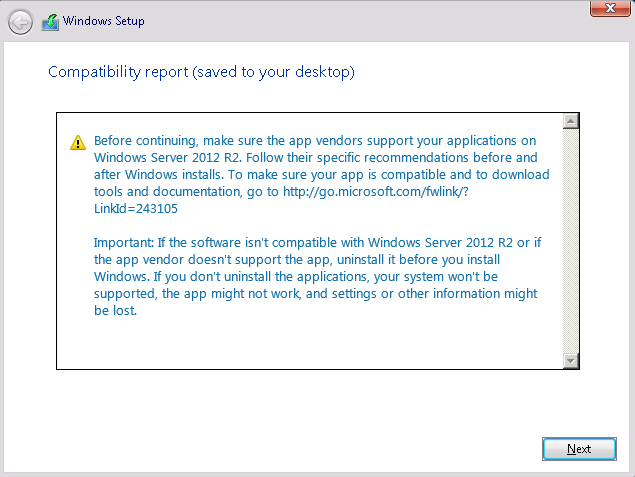
Once Upgrade is selected, there is no going back. The train has left the station. The Upgrade process has commenced. Well, not really. First, it’s going to do the compatibility check, and if all goes well, you will be greeted with the following screen.
Then we hit Next, take a deep breath and watch and wait as the new version of Windows is being installed on top of our old one.
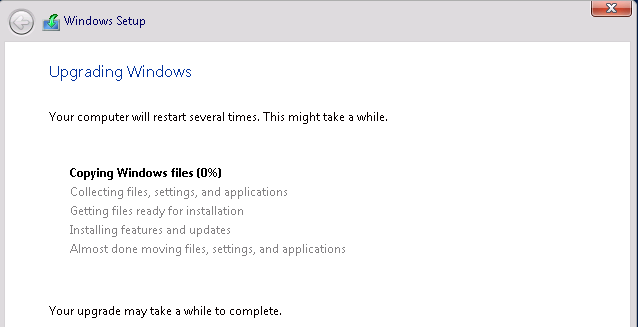
If everything goes well, we will be greeted with the Windows Server 2012 R2 loading screen and the Finalizing Settings window. This process will take a while, so even if at times it appears to be doing nothing, go take a break, come back later and then login to your new OS.
Thank you for taking this journey with me through the Upgrade of Windows Server 2008 R2 to Windows Server 2012 R2. Until next time! Enjoy!
Windows Server 2008 R2 will reach to end of life on January 14, 2020. It is essential that all users who are using Windows Server 2008 R2 upgrade their server to Windows Server 2012 R2 or migrate to other higher operating system (i.e. Windows Server 2016).
In this knowledgebase article, we will illustrate how can you perform in-place upgrade Windows Server 2008 R2 to Windows Server 2012 R2. Since this is major version upgrade, you have to read and understand the upgrade instructions properly.
Before you start upgrading your server, please ensure that you have necessary license for Windows Server 2012 R2. For more information about license upgrade, you can refer the following URL:
https://docs.microsoft.com/en-us/previous-versions/windows/it-pro/windows-server-2012-R2-and-2012/dn303416(v=ws.11)
It is essential that you have secured full backup of your data and you should be able to perform bare metal restore in case if the upgrade is failed. If upgrade is failed, you will have to restore the server from backup to boot from the old Windows Server 2008 R2. Also, if you have installed third party software or applications, please ensure that they are compatible with Windows Server 2012 R2.
Important Note: We are considering that you do not have any additional server role (i.e. IIS, FTP, DNS, Active Directory etc.) on the server. If you have additional server role, kindly refer their compatibility to perform in-place upgrade.
Upgrade Windows Server 2008 R2 to Windows Server 2012 R2
Before starting upgrade, please ensure that you have installed all pending updates for Windows Server 2008 R2. If there is any pending update, kindly install it first. Once all updates are installed, we are ready to perform this upgrade.
[1] Insert Windows Server 2012 R2 ISO in your server and start the installation. It will ask you to accept license terms. Select “I accept the license terms” and click on Next button as shown in the following image:

[2] On next step, it will ask you which type of installation do you want. You need to select “Upgrade: Install Windows and keep files, settings and applications” option to upgrade the existing operating system as shown in the following image:

[3] Next step will check the compatibility and it will provide you report. Kindly the compatibility report. If it does not report any issue, you can click on Next button as shown in the following image:

If this is Hyper-V virtual machine, you may see the following warning:
Installing Windows will affect these devices:
These devices might not work properly in Windows. We recommend updating the drivers for these devices before you continue. ? System devices: Microsoft Hyper-V S3 Cap
You can ignore this message and continue with upgrade. This will not cause any issue.
[4] Now it will start copying Windows files to upgrade the server’s operating system. During this process your system may restart several times. Please do not interrupt this process.


[5] On last step, you will see a screen with “Finalizing your settings” after reboot. Once again, do no interrupt or reboot your server while it is performing this. It may take some time. Once this step is complete, you should see that login screen.

After login, you should verify your installed software and data to ensure that they are available after upgrade.
I would never recommend an in place upgrade of any Windows version, but
sometimes it may be required in certain situations. Should this be necessary
I figured we could take a few minutes to walk through it. Note that doing
this on a Domain Controller presents additional challenges listed at the end
of this article. (TLDR: Don’t do an in-place upgrade of a core 2k8r2 DC to
2012)
Let’s do a core upgrade from 2008r2 to 2012:
Assumptions
- Your 2008r2 Filesystem is healthy and you don’t have any major issues
with the services on the node. - Local Admin Access
- A valid license
Upgrade
- Insert the 2012 disk in the physical machine or VM you intend to
upgrade. - Change directory to the disk and execute setup.exe, i.e. «j:»
(ENTER) «setup.exe« - When prompted, choose «go online and install updates now» if
you’ve got internet access on this machine. If not, more forward without
updating. - Enter your product key for this install. Most enterprise customers
will either use a volume license key or datacenter key. - Here you can select to either stick with the core install or install
the GUI as part of the upgrade. I’m assuming that because you are
upgrading the core version you’ll want to stick with core. - Accept the license terms.
- Select «Upgrade» unless you want to do a custom install. I
won’t cover that here since the options would be specific to your
implementation. - At the next screen you will be warned if there are any compatibility
issues; often times virtualization components will be flagged. Oft times
you can ignore this warning, but be sure you read it in full and
consider how easy it would be to double back now and correct the
issue. - The upgrade process will now proceed; there will be a few
reboots. - After the upgrade is complete, ensure you update virtualization
components if applicable and run Windows Update.


Upgrading a domain controller on a core installation of 2008r2 to 2012
doesn’t really work without relatively major workarounds. See this Microsoft support article for more information.
This fix took quite awhile to be developed, and leaves a bit to be desired.
It’s probably easier to do the right thing anyhow; stand up new 2012 DCs and
decommission the old 2008r2 servers. After you decommission the old ones, make sure you
ensure the AD sites as well as the _msdcs and primary DNS zones are cleaned
up correctly. (that’s an article in and of itself) There is a long
discussion thread regarding this workaround on the Technet
forums.

|
| The Dreaded Black Screen of Life! |
It should also be noted that the Win2012 certification exams (70-41x) are
not aware of this issue. Until next time!
1. Make sure that your current hardware supports Windows server 2012 as per the MS recommendation.
Important: Make sure that the replication between all your DC are working properly, else you will fails to complete the below operations.
2. Before performing the upgrade, you must prepare your forest and domain for the changes. It can be achieved by using the command ‘ADPREP‘. ADPREP is a command line utility which will extends the Active Directory schema, and updates permissions as necessary to prepare a forest and domain for a domain controller. In order to run the commands you must locate it from your server installation CD. Insert your Windows server 2012 installation CD and locate the directory using command prompt. In my case the installation CD is located in D drive and command will be cd D:\support\adprep press ENTER or open the directory and drag and drop the tool adprep from the location(D:\support\adprep) into command prompt.
a) Now run this command in your forest root server and prepare the forest for upgrade. adprep /forestprep press ENTER. You will have warning message before this operation, type C and press ENTER to continue with the operation( You must be a member Schema Admins and Enterprise Admins groups to perform this action)
Once the operation is completed you will have the below screen.
b) Now prepare your domain for upgrade. On the same command prompt type adprep /domainprep and press ENTER. This operation will complete comparatively faster than the forest preparation.
3. Replicate these changes to your additional domain controllers as well. On command prompt type RepAdmin /SyncAll /AdePand press ENTER. Wait few seconds to complete and make sure succeeds.
4. Completing the above steps makes your server to be capable for upgrade. Now reboot your server from Windows server 2012 installation CD or open the CD drive and double click on SETUP.EXE to start with OS installation/upgrade.
5. Click on Install now and continue.
6. Here you need to specify either you want to perform a windows update before upgrade process or not. It is recommended to perform windows update before upgrade process, else you can skip this. I have my latest update installed so skipping this operation by selecting No Thanks.
7. Enter the product key and click Next to continue.
8. Select the operating system that you want to install and click Next. Note that you will not be able to upgrade from a lower edition to higher edition of OS. Means, if you have windows server 2008 R2 standard edition installed then you will not be able to upgrade to Datacenter edition of 2012. Here my existing server is datacenter edition so I will select as Windows server 2012 datacenter(Server with GUI).
9. Accept the License terms and click Next.
10. Next step actually determines whether it’s an installation or Upgrade. Click Upgrade: Install windows and keep files, settings and application.
11. Now it will perform a compatibility check and this must be passed in order to continue. If it detects any applications to be uninstalled or any other changes requires it will show and you need to exit and make the necessary changes.
Note: Upgrade process will fail if we need to make any changes before upgrade and it can be viewed on Compatibility report window. Also the report will be saved automatically on your desktop for you reference.
Assuming everything is OK and click Next to continue,
12. The upgrade process will start and we need to wait until the operation completes. The server will restart multiple times during this process.
13. Now that’s it the upgrade process. Please note that this may take few hours to complete based on the features and application that is already existing on your server. For me it has taken about 1.5 hours to complete this operation but again it depends on your hardware efficiency. Please note that during the automatic reboot of your server it will prompt with Windows boot manager, you do not want to interrupt the operation and it will continue automatically.
Have a comment or points to be reviewed? Let us grow together. Feel free to comment.
ConfigMgr Current Branch 1602 has been out for six months now. One of the supported features of this release is the ability to upgrade the site server from Windows Server 2008 R2 to Server 2012 R2. Here’s the support statement from Microsoft https://technet.microsoft.com/en-us/library/mt757351.aspx.
If you have upgraded to ConfigMgr Current Branch and are still running Windows Server 2008 R2 then your support for this O/S will end with the first update released after 31/12/2016. This is also true for most site system roles, however note that Distribution Points are exempt from this deprecation. All the details are here https://technet.microsoft.com/en-us/library/mt628077.aspx.
So time is running out for you to get into a supported state. Hopefully this guide will help you make the transition smoothly.
I’m running this in my home lab. Currently this consists of 1 x site server with all the roles installed on it. SQL is local. At present SQL is running SQL Server 2008 R2 SP2. This isn’t supported in SCCM Current Branch and I need to be running at least SP3 (https://technet.microsoft.com/en-us/library/mt589592.aspx). Well SQL Server upgrade is an upgrade for another day and I’ll just run with this for now, however in a production environment I would ensure that I was running a supported release before performing any upgrades.
Since I have a Software Upgrade Point running in my environment…

I need to take note of Microsoft’s Warning message in the article https://technet.microsoft.com/en-us/library/mt757351.aspx ‘Before you upgrade to Windows Server 2012 R2, you must uninstall WSUS 3.2 from the server.’
Uninstall WSUS 3.0SP2 or the WSUS Admin Console from the Site Server
Uninstall WSUS 3.0SP2
Let’s start by removing the SUP role from the Site Server. Go to the Administration workspace>Site Configuration>Servers and Site System Roles. Highlight the site server hosting the SUP and right click the Software update point. Right click and choose Remove Role.

Click Yes when prompted to remove the SUP.

Keep an eye on the SUPSetup.log. This will let you know when the SUP has been removed.

Now I can remove WSUS. To do this load up Server Manager, right click on Roles and select Remove Roles.
Deselect ‘Windows Server Update Services’ and click Next.

Click Remove

I’m going to tidy up the WSUS install by removing all the components. Note that this will remove SUSDB from your SQL Server. Continue through the wizard.

When the WSUS removal is complete click Finish, then close the Roles Wizard.

Uninstall the WSUS Admin Console
If you are running a remote SUP then you will only have the WSUS Administration Console installed on the site server. This will need to be removed if you are planning to upgrade to Windows Server 2012 R2. To do this go into Control Panel\Programs and Features. Highlight the Windows Server Update Services 3.0Sp2 Console and click Uninstall.

Remove any log files if required and click Next. Continue through the wizard until complete.

Now that WSUS 3.0SP2 is removed from the site server I can start the upgrade process.
Before you start the process to upgrade the server make sure that you have a backup of ConfigMgr. Makes sense huh!
As a pre-caution I have disabled all ConfigMgr and SQL services before running the upgrade.


Once complete restart the site server and then mount Windows Server 2012 R2 media.
At OS level run setup.exe from the Server 2012 install media.

Run through the standard Windows 2012 R2 install

Interestingly on my VM at the point I got to ‘Setup is starting’ I was thrown out of the install process and back to the ‘Install Now’ window above.

To remedy the problem I had to run the following command (with D:\sources pointing to my Windows 2012 R2 media):
C:\$WINDOWS.~BT\Sources\setup.exe /runlocal /BTFolderPath:C:\$WINDOWS.~BT /OSImagePath:"D:\Sources" /HideWelcome /uilanguage:en-US /targetlanguage:en-US
Choose whether to update the OS or not at this stage. I have chosen not to. Enter the product key and version when prompted.

Now the most important part of the process is that Upgrade is selected.

The upgrade process will begin.

Once the upgrade is complete then it’s time to enable and start up the ConfigMgr and SQL services.


A quick check of the Site Status and it shows things are looking good.

Next up the installation of the WSUS services, either full or Admin Console depending on which was installed previously, needs to be performed. In this instance I am going to install the full WSUS.
Open up Server Manager and click Add Roles and Features.

Click through to Server Roles and select ‘Windows Server Update Services’.

A pop up will appear. Click Add Features

Click through to to the WSUS Role Services screen and deselect WID Database and choose Database to be able to use the SQL server for the SUSDB.

Enter a location to store WSUS updates. I am using the same path I had used when running WSUS 3.0Sp2.

Enter the hostname of the server hosting the SQL server, in my case the site server itself and click Check Connection to connect successfully.

Remember to run the post installation tasks once the Role is added.

If you are looking to support Windows 10 feature upgrades in your environment then you will need to install KB3095113 Update to enable WSUS support for Windows 10 feature upgrades at https://support.microsoft.com/en-us/kb/3095113
When downloaded execute the Windows8.1-KB3095113-v2-x64.msu file.

If you get a ‘Update is not applicable to your computer‘ message when attempting to install KB3095113 then follow this guide.
Click Yes to install the KB
When complete restart the server

When WSUS is patched then add the SUP role back onto the server.

Again the SUPSetup.log reports all is good.

I’ll keep an eye on the site server and report back with any issues that were encountered post the OS upgrade.
Next up I’ll need to get my SQL Server into a supported state, so I’ll upgrade it to a later release. Look out for that blog post soon.
** Post update – 11.01.2018 **
Note that it has come to our attention, via the SCCM Product Group, that a site reset is required post upgrade to reinstall the site provider. This isn’t documented, at present, but has now been highlighted. More info on that here.