
PowerShell is a phenomenal robust scripting language. But to unlock its potential, you must know how to import the right modules.
In this tutorial, you will learn everything you need to know to import PowerShell modules like a pro. With a deep understanding of cmdlets, parameters, and modules, you can create faster, more efficient, and more effective scripts than ever before.
Read on to supercharge your PowerShell skills and elevate your scripting game to new heights!
Prerequisites
This tutorial will be a hands-on demonstration. To follow along, be sure you have a system with PowerShell installed. This tutorial uses Windows 10 and PowerShell 5.1 as an example, but the same commands should work with most versions of Windows and PowerShell.
Importing a Single Module
PowerShell modules contain pre-built code you can use in your PowerShell scripts, saving you time and effort. When you import PowerShell modules, you take advantage of pre-built codes instead of starting from scratch.
But how do you import PowerShell modules? The Import-Module cmdlet is the primary way to import modules in PowerShell. Importing a single module is one of the most basic uses of the Import-Module cmdlet, which is the first thing you will learn in this tutorial.
Open PowerShell as administrator, and run the below Import-Module command to search for the PSDiagnostics module and load it into memory. If successful, the module gets imported, but the command does not produce output.
Import-Module PSDiagnosticsImporting modules from online repositories via the Install-Module cmdlet is highly recommended whenever possible. This cmdlet takes care of dependencies and version management for you.
Once you have imported the module, you can use any of the module’s cmdlets or functions to help you diagnose and troubleshoot issues. The Enable-PSTrace cmdlet is just one example of cmdlets provided by the PSDiagnostics module, which enables diagnostic tracing in PowerShell.
Now, run the following Enable-PSTrace command to perform diagnostic tracing and save the results to the specified -TraceFilePath (C:\\MyTrace.log). This command does not provide output to the console since the results are committed to a file instead.
Enable-PSTrace -TraceLevel 1 -TraceFilePath C:\MyTrace.logSome modules may require additional configuration or setup before you can use them. Be sure to read the documentation provided with the module to understand any prerequisites or requirements.
Importing Multiple Modules at Once
Importing a single module works fine. But when you often need to import multiple modules in one go, the task is also within the powers of the Import-Module cmdlet.
Importing multiple modules is a great way to save time and effort in PowerShell. But how exactly? You will specify the module names separated by commas.
Run the below command to search for multiple modules (Dism, PowerShellGet, PSReadline) and load them into memory. Like importing a single module, this command does not provide output.
Import-Module Dism, PowerShellGet, PSReadlineDisplaying Module Import Details
As previously mentioned, successful module import does not provide output. But admit it. You would be skeptical whether the module was indeed imported or not.
The -Verbose parameter is a useful option that you can use with many PowerShell cmdlets and functions, including the Import-Module cmdlet. This parameter tells PowerShell to display detailed information about the command as it is being executed. In turn, you get the valuable feedback you can use for troubleshooting and debugging.
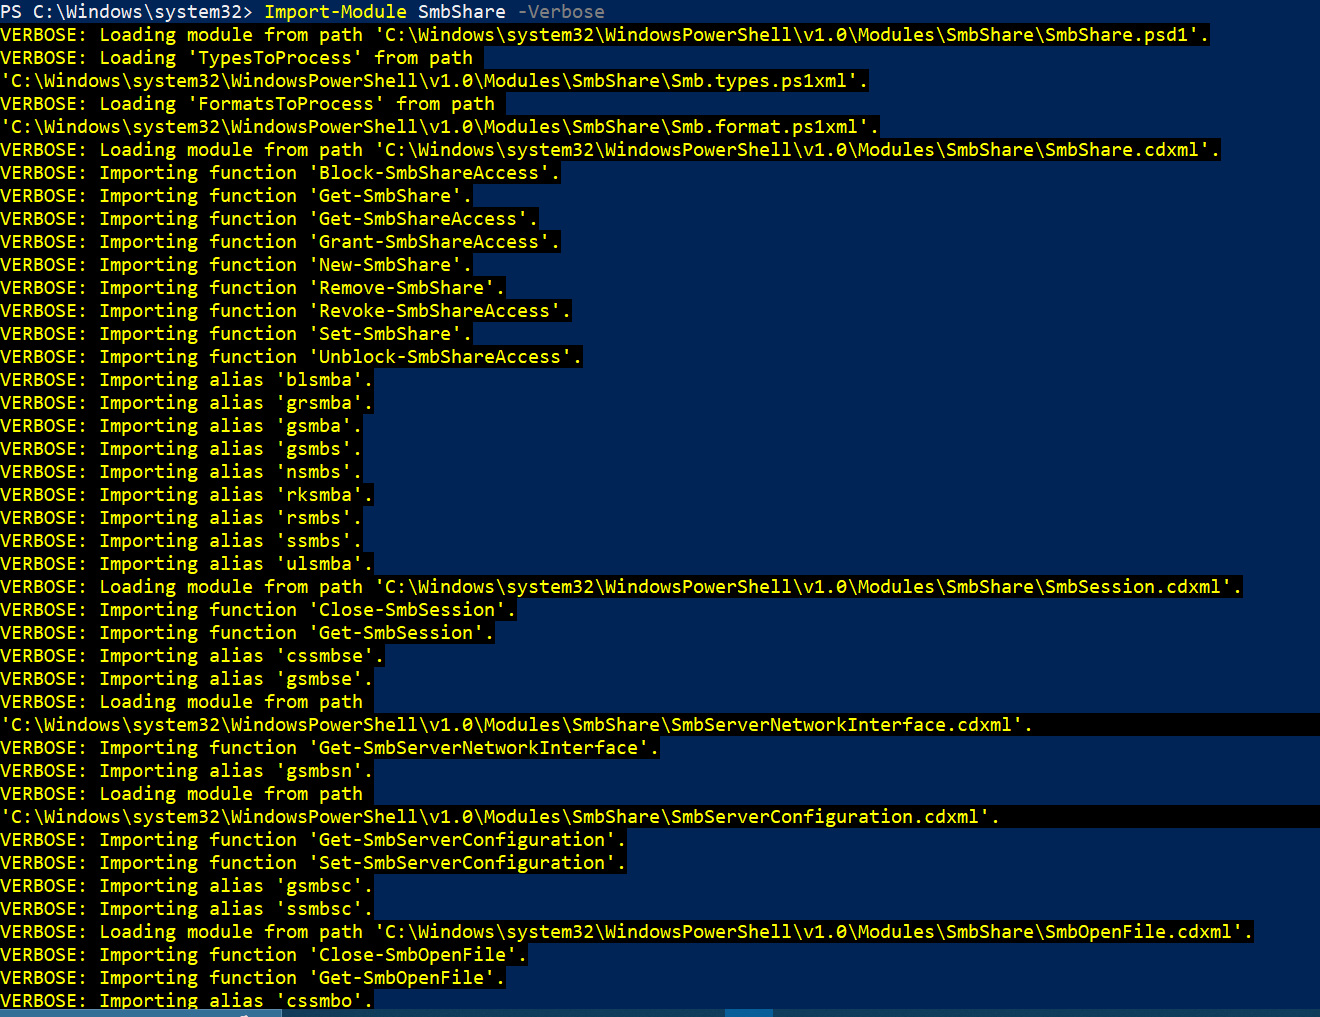
Run the following command to import the SmbShare module, appending the -Verbose parameter to print the module import details.
Import-Module SmbShare -VerboseAs you can see below, the -Verbose parameter provides detailed information about the module file being loaded and various functions being imported from the module. This information can help understand the inner workings of the module.
In this case, the SmbShare module provides cmdlets for managing SMB shares on Windows machines. These cmdlets include but are not limited to New-SmbShare (creating new shares) and Remove-SmbShare (removing existing shares).
Reimporting a Module into the Same Session
Whether your module is acting up or you just want to ensure you are using the most up-to-date version of your module, reimporting a PowerShell is conducive. How? By appending the -Force parameter to the Import-Module command.
This -Force parameter allows you to continue using the cmdlets and functions provided by the module without having to close and reopen your PowerShell session.
One common use case for reimporting a module is when you are developing and making changes to a module. You can reimport the module into your current session to test those changes before finalizing them.
Run the following command to -Force PowerShell to remove, and reimport the SmbShare module from its original location.
The -Prefix parameter allows you to specify a prefix for the cmdlets and functions imported from the module. In this case, all imported cmdlets and functions will be preceded by New. This parameter can be useful for avoiding conflicts with existing cmdlets or functions in your session.
For example, the Get-SmbShare cmdlet in the original module will become Get-NewSmbShare in the reimported module.
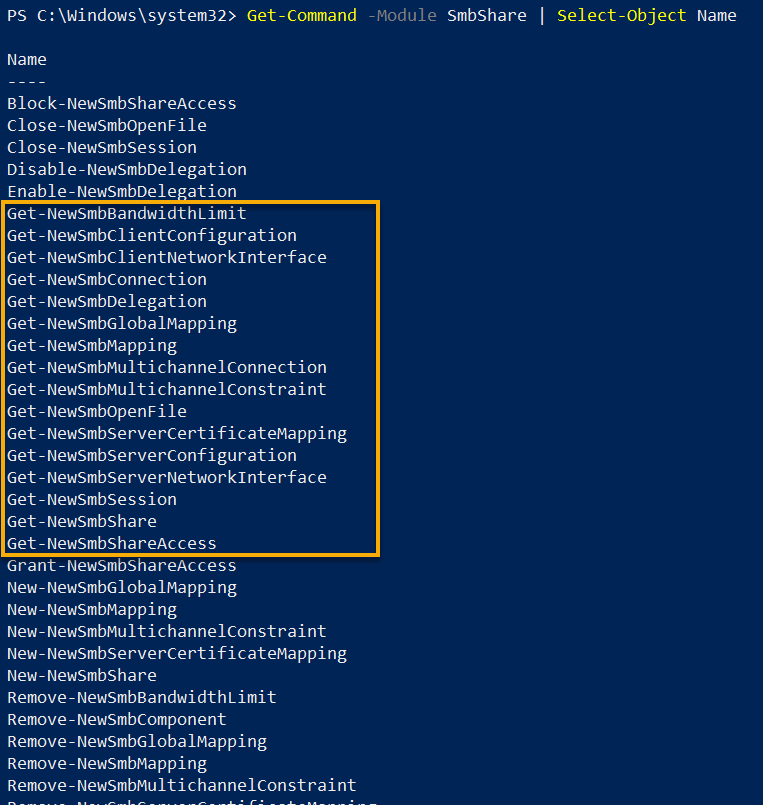
Import-Module SmbShare -Force -Prefix NewNow, run the Get-Command below to retrieve a list of all the cmdlets and functions provided by the SmbShare module selected (Select-Object) by Name.
Get-Command -Module SmbShare | Select-Object NameBelow, you can see that the SmbShare module’s cmdlets now have the prefix New added to their names. This output confirms the module has been reimported successfully.
Using NuGet Packages to Import PowerShell Modules Manually
So far, you have successfully imported modules from the PowerShell Gallery. But what if the module you are looking for is not there?
You can manually install and import PowerShell modules from a NuGet package. In the PowerShell context, a NuGet package is a collection of files that include a PowerShell module along with any dependent modules or libraries required for the module to work.
To import a module from a NuGet package, you need to manually download, extract, and install the NuGet package with the following steps:
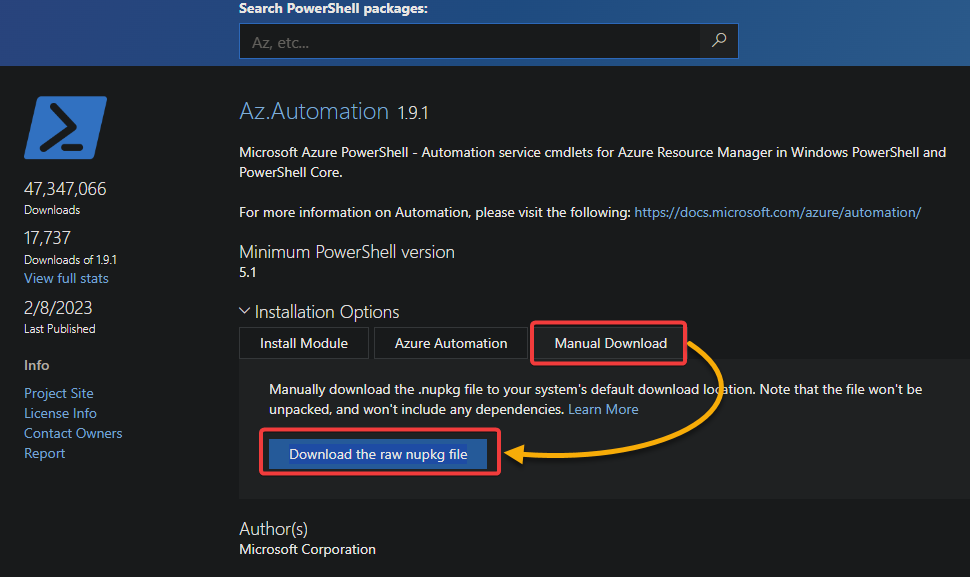
1. Navigate to the Azure PowerShell Gallery page of the Az.Automation module.
2. Next, click the Manual Download tab → Download the raw nupkg file to download the package. This tutorial uses the Az.Automation 1.9.1 module from the Azure PowerShell gallery as an example. But the same steps apply to other NuGet packages.
3. Once downloaded, run the below Unblock-File command, which does not provide output, but unblocks the downloaded .nupkg file. Be sure to change the file path with the one where you downloaded the package.
Unblocking the package is necessary. Why? PowerShell may not allow the execution of files downloaded from the internet as a security measure to prevent the execution of potentially harmful script
Unblock-File -Path C:\PSModules\az.automation.1.9.1.nupkg4. Now, unzip the downloaded .nupkg file to a folder on your local machine. You may need a compression/decompression tool such as 7-zip or WinRAR to unzip the package. A NuGet package is a ZIP archive containing a collection of files that comprise a module.
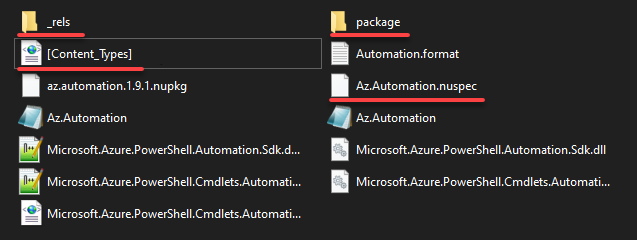
5. Delete the following contents from the extracted folder.
Extracted contents of a NuGet package include some metadata and files that are not needed for manual module installation.
| Name | Type |
|---|---|
| _rels | Folder |
| Package | Folder |
| [Content_Types].xml | XML File |
| Az.Automation.nuspec | XML Manifest File |
6. Rename your extracted folder with a more descriptive name like az.automation to avoid any errors that might come up. Remember to keep all letters lowercase and refrain from using special characters in its name.
7. Next, run the $env:PSModulePath command below to find your current shell module’s paths. This command returns a list of all default module paths on your system. PowerShell searches these paths to load modules automatically when the module name is specified in a script or command.
Take note of the paths, as you will need them in the following step.

8. Copy the newly-named folder (az.automation) to one of the directories you noted in step seven. Doing so defines the module’s scope (specific or all users).
| Path | Function |
|---|---|
| C:\Users\admin\Documents\WindowsPowerShell\Modules | Makes the module available for the specific user account (admin). This tutorial uses this location as an example. |
| C:\Program Files\WindowsPowerShell\Modules | Makes the module available for all user accounts on your local machine. |
9. Now, run the below command to install and import the module (az.automation) into your PowerShell session. Be sure to replace az.automation with the actual name of your module.
Import-Module -Name az.automation -Verbose
10. Finally, run the following Get-Module command to verify if the module (az.automation) has been imported successfully.
Get-Module -Name az.automation
Perhaps you do not want to rely on auto-discovery. If so, specify the exact file location (C:\az.automation) when importing the module.
Import-Module -Name C:\az.automation -Verbose
Conclusion
With conjoined functions or grouped code, PowerShell modules are game changers. And in this tutorial, you have learned ample ways to import PowerShell modules into your sessions, including manually importing modules from a NuGet package. You have also touched on different parameters controlling the importing process.
By mastering these techniques, you can easily import and use modules to enhance your automation scripts. But the learning does not have to stop there. Why not take your PowerShell module management skills to the next level by learning to export module members?
The `Import-Module` cmdlet in PowerShell is used to load a module into the current session, allowing you to access its functions and cmdlets.
Import-Module ModuleName
Replace `ModuleName` with the name of the module you want to import.
What is a PowerShell Module?
A PowerShell module is a package that contains available functions, cmdlets, and other tools to simplify the process of managing complex tasks in PowerShell. Modules can be script-based (with a `.psm1` file extension), or they may be compiled as binary assemblies (with a `.dll` file).
Using modules allows you to manage code more effectively by organizing related functions into a single package. This encapsulation improves code reusability and makes it easier to share and maintain scripts.

Import-Module PnP.PowerShell: Quick Start Guide
Understanding the Import-Module Command
The `Import-Module` command is essential when you want to load a specified module into the PowerShell environment for use. The basic syntax is:
Import-Module <ModuleName>
This command loads the module, making all its functions and cmdlets available in your current session.
Commonly Used Parameters
-
Force: This parameter allows you to import a module even if it is already loaded. This is particularly useful when updates or changes have been made.
Import-Module ActiveDirectory -Force -
Scope: This parameter specifies the scope at which the module should be available. Using `-Scope Global` makes the module accessible from any PowerShell session.
Import-Module Az -Scope Global -
PassThru: When you use this parameter, the command returns the imported module object for further reference.
$module = Import-Module Az -PassThru
Mastering Import Az Module PowerShell: A Quick Guide
How to Import a Module
Importing Built-in Modules
PowerShell comes with several built-in modules. For example, to import the `Microsoft.PowerShell.Management` module, you can use the command:
Import-Module Microsoft.PowerShell.Management
This module provides access to various management-related cmdlets that are crucial for administrative tasks.
Importing Custom Modules
Creating a custom module can significantly enhance your workflow. To import your custom module, ensure that it is saved as a `.psm1` file. You can then use the following command:
Import-Module "C:\Path\To\YourModule.psm1"
This command makes the functions defined in your custom module available for use in your current session.
Import Excel in PowerShell: A Simple Guide
Listing Available Modules
Using Get-Module
To see a list of available modules installed on your system, use the `Get-Module` cmdlet with the `-ListAvailable` parameter:
Get-Module -ListAvailable
This command will provide a comprehensive list of all modules that can be imported into your PowerShell session.
Get Module PowerShell: A Simple Guide to Mastery
Verifying Imported Modules
Checking Loaded Modules
You can verify which modules are currently loaded into your PowerShell session using the `Get-Module` command without any parameters:
Get-Module
This will show you a list of modules that are active in your session, allowing you to confirm the successful import of the required modules.
Understanding Microsoft.PowerShell.Commands.Internal.Format.FormatStartData
Troubleshooting Common Issues
Even with a straightforward command like `Import-Module`, issues can arise. Here are some common problems and how to resolve them:
-
Module Not Found: This error may occur if the module you’re trying to import does not exist on your system or the path is incorrect. Verify the module’s existence and check the path you specified.
-
Module Version Conflicts: If different versions of a module are loaded, you might encounter issues. You can use the `-Name` parameter along with the version number to specify which version to import.
-
Permissions Issues: Sometimes, access restrictions prevent module import. Ensure you have permission to access the directory where the module is stored.
Mastering Microsoft.PowerShell.Commands.WriteErrorException
Best Practices for Using Import-Module
To harness the full power of `Import-Module` efficiently, consider these best practices:
-
Import Only Necessary Modules: Avoid importing unnecessary modules that can consume system resources and clutter your environment. Only load the modules you need for your current tasks.
-
Use Global Scope Sparingly: While `-Scope Global` can be useful, it can also lead to conflicts when multiple modules contain functions with the same names. Use it judiciously to maintain module integrity.
Invoke-PowerShell: Mastering Command Execution Effortlessly
Conclusion
The `Import-Module` command in PowerShell is a powerful tool that enhances your scripting capabilities by enabling the use of modules, both built-in and custom. By understanding how to import modules correctly, troubleshoot potential issues, and follow best practices, you can significantly improve your efficiency and effectiveness in PowerShell scripting.
Find Module PowerShell: Your Quick Start Guide
FAQs
Can I import multiple modules at once?
Yes, you can import multiple modules in a single command by separating the module names with commas:
Import-Module Module1, Module2
How can I remove an imported module?
You can remove an imported module using the `Remove-Module` cmdlet:
Remove-Module ModuleName
What is the difference between Import-Module and using dot sourcing?
`Import-Module` loads functions and cmdlets defined in a module, making them available in the session. Dot sourcing, on the other hand, allows you to run a script in the current scope, which can be useful for scripts that define functions you want to use immediately. An example of dot sourcing is:
. "C:\Path\To\YourScript.ps1"
Citrix Module PowerShell: Your Quickstart Guide
Additional Resources
For further learning and resources on PowerShell, please refer to the official PowerShell documentation and consider checking out recommended books and online courses dedicated to PowerShell mastery.
In this article, we will provide a step-by-step guide on how to install PowerShell modules.
Technology Advisor | Cybersecurity Evangelist
Updated: November 14, 2024
PowerShell is a powerful scripting language and automation framework developed by Microsoft. Its flexibility and extensive library of commands (cmdlets) make it an essential tool for IT professionals, system administrators, and developers. However, the true power of PowerShell lies in its modularity. Through PowerShell modules, users can extend its functionality to manage systems, interact with cloud services, and automate complex workflows.
Modules are collections of cmdlets, scripts, and functions designed to perform specific tasks. Whether you’re managing Active Directory, configuring Azure resources, or monitoring network devices, there’s likely a PowerShell module that fits your needs. Installing these modules allows you to streamline your work, saving time and reducing the risk of human error.
In this step-by-step guide, we’ll explore various methods for installing PowerShell modules, including through the PowerShell Gallery, manual installation and using NuGet packages. We’ll also cover best practices for managing module dependencies, updating installed modules, and troubleshooting common installation issues.
By the end of this guide, you’ll be equipped to efficiently install and manage PowerShell modules, unlocking new capabilities for your scripts and administrative tasks. Whether you’re new to PowerShell or looking to expand your expertise, this guide will help you get the most out of this versatile tool. Let’s get started!

The PowerShell that is shipped with Windows comes with a few hundred cmdlets that can help you do basic tasks like reading files, creating registry keys, pinging computers, connecting to remote systems, and so on. However, this out-of-the-box PowerShell cmdlet cannot support all that you want to do with the language. To perform tasks outside of the built-in PowerShell commands, you must install modules that contain commands that give you that functionality.
PowerShell Module Components and Types
A module comprises four essential components, which include a PowerShell script or a managed cmdlet assembly, additional assemblies or scripts, a manifest file, and a directory that contains all of those components. The following sections describe the results you can get by mixing and matching the different possible parts of a module together:
- Script Modules: A script module is simply a Windows PowerShell script with a .psm1 extension, which allows administrators to use import, export, and management functions on it. A script module contains valid Windows PowerShell code. It can be saved or installed on the PowerShell module path or any path that you explicitly describe so that PowerShell can reasonably discover it.
- Binary Modules: A binary module is a .NET Framework assembly (.dll) that contains compiled code. Compared to a script module, a binary module allows you to create cmdlets faster or use features such as multithreading that are not as easy to code in Windows PowerShell scripts. In addition, a binary module can be saved or installed in a folder along the PowerShell module path.
- Manifest Modules: A manifest module is a module that uses a manifest file to describe all of its component binary modules but doesn’t have any sort of core assembly or script.
- Dynamic Modules: A dynamic module is a module that is not loaded from, or saved to, a file. Instead, they are created dynamically by a script, using the New-Module cmdlet. This module enables a script to create a module on demand that does not need to be loaded or saved to persistent storage. Dynamic modules do not require permanent folders to store their related assemblies.
How to Install a PowerShell Module
Once you have created a script, binary, or manifest module, you can save your work in a location such as a system folder where Windows PowerShell is installed, or a user folder, so that others may have access to it. First, you need to install the module. Secondly, you need to find the PowerShell commands that the module added using the cmdlet Get-Command, and lastly, you need to use the commands that the module added.
There are two main methods for installing PowerShell Module: PowerShell gallery method and manual method (if the modules are not available in the PowerShell gallery). The following section describes each of these methods in detail.
Method 1—Install Module from PowerShell Gallery
The PowerShell Gallery is an online package repository for PowerShell containing scripts, modules, and DSC resources you can download and leverage. Microsoft and the PowerShell community have authored these. You can find packages in the PowerShell Gallery by:
- Using the Search control on the PowerShell Gallery’s home page
- Browsing through the Modules and Scripts from the Packages page
- Running the Find-Module, Find-DscResource, and Find-Script cmdlets, depending on the package type
Once you’ve identified a package that you’re interested in, you can learn more about it by examining the metadata uploaded with the package at the package’s specific page on the Gallery. You may also want to download the package from the Gallery for further inspection. To do that, run either the Save-Module or Save-Script cmdlet, depending on the package type. This allows you to save the package locally for inspection of the contents without installing it.
Installing PowerShell modules from the PowerShell Gallery is the easiest way to install modules.
To install a package or module from the Gallery, we use the command: Install-Module or Install-Script cmdlet, depending on the package type.
The Install-Module and Install-Script command, by default, install the most current version of a package.
| Command | Location | Notes |
|---|---|---|
| Install-Module | $env: ProgramFiles\WindowsPowerShell\Modules by default. If you use this parameter: -Scope CurrentUser, the location will be: $env: USERPROFILE\Documents\WindowsPowerShell\Modules |
This requires an administrator account. |
| Install-Script | $env: ProgramFiles\WindowsPowerShell\Scripts by default. If you use this parameter: -Scope CurrentUser the location will be: $env: USERPROFILE\Documents\WindowsPowerShell\Scripts |
This requires an administrator account. |
| For either command, if you require an older version of the package: -RequiredVersion |
Furthermore, before installing a module, you need to know the module’s name and the command to install it. The Gallery page will tell you what the command is to install the module. In this example, we will install a module we found on the Gallery named NetworkingDsc. To do that, run the following command:
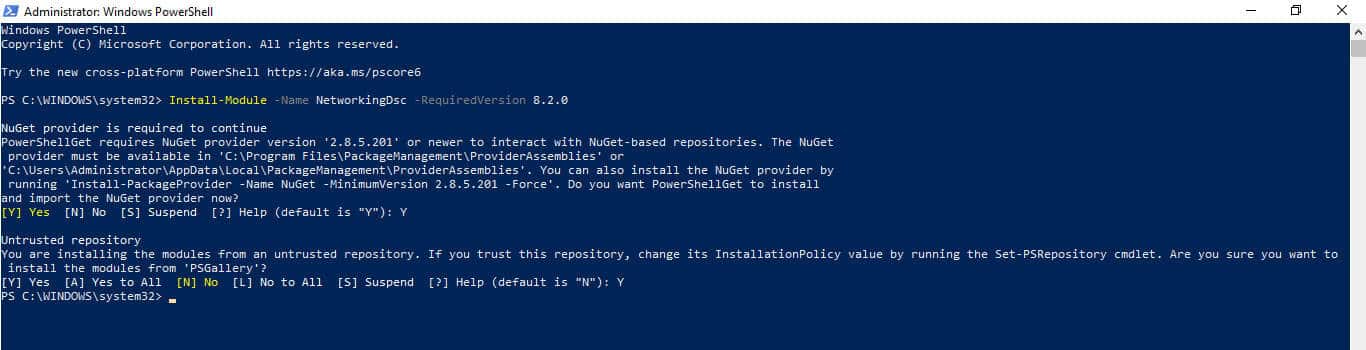
Install-Module -Name NetworkingDsc -RequiredVersion 8.2.0
Depending on the NuGet provider you are running, you may receive the notification that the NuGet provider is required to continue. PowerShellGet relies on the provider named Nuget, and you may be required to install the newest version before proceeding. Type Y and press the Enter key if you see, “Do you want PowerShellGet to install and import the NuGet provider now?”. Again, depending on your settings, you may receive another notification, “Are you sure you want to install the modules from ‘PSGallery’?”. Type Y and press the Enter key to continue. This will commence installing the NetworkingDsc module, which you can see visually by the loading text at the top of the PowerShell window. After the installation is completed, you can verify it by running the command: Get-Module -ListAvailable.
If you want to deploy the installed package from the PowerShell Gallery to Azure Automation, click Azure Automation, then click Deploy to Azure Automation on the package details page. When clicked, it will redirect you to the Azure Management Portal, where you sign in using your Azure account credentials. If the package includes dependencies, all the dependencies will be deployed to Azure Automation as well.
From Gallery Recap
- Navigate to the PowerShell Gallery online to find modules or scripts to download.
- Identify the package you’re interested in and examine the metadata on its specific page on the Gallery. Optionally, download it for local inspection using the ‘Save-Module’ or ‘Save-Script’ cmdlet.
- Install the module or package using the ‘Install-Module’ or ‘Install-Script’ cmdlet.
- For module:
Install-Module -Name [ModuleName] -RequiredVersion [Version] - For script:
Install-Script -Name [ScriptName] -RequiredVersion [Version]
- For module:
- Note: The module/script is installed in the ProgramFiles directory by default. To install in the USERPROFILE directory, add
-Scope CurrentUserto the command. - If you require an older version of the package, add
-RequiredVersionparameter. - During installation, confirm any prompts to install the NuGet provider or from the PSGallery by typing ‘Y’ and pressing Enter.
- Post-installation, verify the installation by running
Get-Module -ListAvailable. - To deploy the installed package to Azure Automation, click ‘Azure Automation’ and ‘Deploy to Azure Automation’ on the package details page. Sign in using your Azure account credentials. All dependencies will be deployed as well.
Method 2—Install PowerShell Modules Manually
If the module is not available in the PowerShell Gallery, you must use the manual method to install it. To install PowerShell modules manually, you first need to determine your current PowerShell module directory path, download your new module to that path, and invoke the import-module command to let windows know it’s there. Then, follow the steps below to install PowerShell modules manually:
1. Determine the install Path: You need to determine the install path for your PowerShell modules, so you know where to put new ones. This helps ensure that the new module is installed in a path listed in the PSModulePath environment variable. You can determine where to install your module using one of the paths stored in the $ENV: PSModulePath variable. To do this, open a PowerShell window and run the command: $Env: PSModulePath.
The output displays the following path as shown in Figure 3.0 below:
- C:\Users\Administrator\Documents\WindowsPowerShell\Modules
- C:\Program Files\WindowsPowerShell\Modules
- C:\WINDOWS\system32\WindowsPowerShell\v1.0\Modules\

Use the first path if you want the module to be available for a specific user account on the computer. Use the second path if you’re going to make the module available for all users on the computer. The third path is the path Windows uses for built-in modules already installed with the Windows OS. Microsoft recommends you avoid using this location. So you are left with the first or second path.
Using one of these paths means that PowerShell can automatically find and load your module when a user calls it in their code. However, you may also wish to add your paths but stick with the first two paths unless necessary. If you store your module somewhere else, you can explicitly let PowerShell know by passing in the location of your module as a parameter when you call Install-Module. If you see other paths listed in your environment variable, it may be from your installed applications. Some applications install PowerShell commands and automatically add those to the variable. Now that we know where to put new modules let’s proceed to the next step.
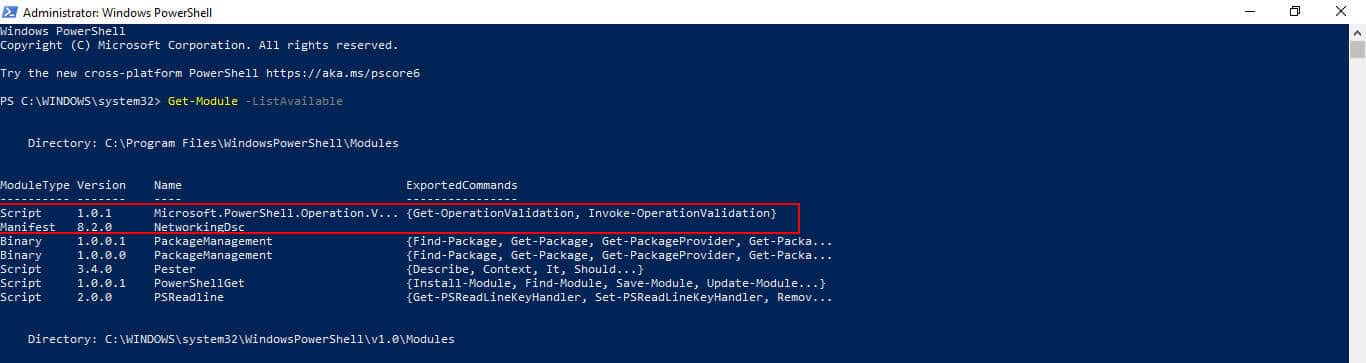
2. Copy the new module to the path: Now download the PowerShell module from your preferred site and copy it into one of the two paths identified in step 1 above. In this example, we will make it available to all users on the computer to copy it to the directory C:\Program Files\WindowsPowerShell\Modules. Once completed, you can check if the new module is listed as available to PowerShell by running the command: Get-Module -ListAvailable.
3. Import new module: With the new module in place, we just need to tell Windows to load it to use it in our current PowerShell session. To this, use the following command syntax: Import-module -name ModuleName
For example, let’s say you want to import the command NTFSSecurity (PowerShell Module for managing file and folder security on NTFS volumes), you’ll run the command: Import-module NTFSSecurity. If you receive a notification to confirm if you trust the script or module and want to run it, type R to run once (assuming you’re sure you want to run it). And that does it, and the new module is now ready for use.
Although Microsoft allows you to install PowerShell modules from third-party sites, there are also security implications. Malicious actors may take advantage of this loophole to develop and provide scripts containing malicious codes. Therefore, ensure that you load only trustworthy modules or those from a reliable source.
Manual Install Recap
- Determine install path: Determine the path for your PowerShell modules by running the command:
$Env:PSModulePath.- Use the first path for a specific user account.
- Use the second path for all users on the computer.
- Avoid using the third path as it’s reserved for built-in Windows modules.
- Download and copy the module: Download the module and copy it to the chosen path from step 1. For instance, to make it available for all users, copy it to
C:\Program Files\WindowsPowerShell\Modules.- Verify the module availability by running
Get-Module -ListAvailable.
- Verify the module availability by running
- Import the module: Load the module for the current PowerShell session using
Import-module -name [ModuleName].- For instance, for the NTFSSecurity module, use
Import-module NTFSSecurity. - Confirm any prompts to trust the script or module by typing ‘R’ to run once.
- For instance, for the NTFSSecurity module, use
- Keep in mind the security implications of third-party modules. Always ensure the source is reliable to avoid potential security threats.
PowerShell installation FAQs
How do I get PowerShell modules?
The PowerShell system is already available within the Windows operating system and you probably already have many modules available. At the PowerShell prompt, type Get-Module -ListAvailable to see which modules are active. To install a module, use the Get-InstalledModule cmdlet.
Where PowerShell modules are installed?
In Windows, there is an environment variable that holds the storage location for PowerShell modules within the disk’s directory structure. For AllUsers this is $env:PROGRAMFILESPowerShellModules. On Linux and macOS, modules are stored in /usr/local/share/powershell/Modules.
How do I install Windows Update PowerShell module?
You should open the PowerShell prompt as the Administrator to install the PSWindowsUpdate module.
- Enter Set-ExecutionPolicy -ExecutionPolicy RemoteSigned to enable remote script execution.
- Enter Install-Module -Name PSWindowUpdate -Force to download and install the PSWindowUpdate module.
- Enter Import-Module -Name PSWindowUpdate to bring PSWindowsUpdate into the current PowerShell session.
- Enter Get-Command -Module PSWindowsUpdate to check that the installation worked and to see what commands are available within the module.
In PowerShell, modules are used to extend the functionality of the shell by providing additional cmdlets, functions, and variables. Importing a module allows you to access these extra features.
To import a module in PowerShell, you can use the ‘Import-Module’ cmdlet followed by the name of the module. For example, if you have a module named ‘MyModule’, you can import it by running:
If the module is not located in one of the default module directories, you may need to specify the full path to the module file, like this:
1
|
Import-Module C:\Path\To\MyModule.psm1
|
Once the module is imported, you can start using its cmdlets, functions, and variables in your PowerShell session.
Best PowerShell Books to Read in May 2025
1
Rating is 5 out of 5
Mastering PowerShell Scripting: Automate and manage your environment using PowerShell 7.1, 4th Edition
2
Rating is 4.9 out of 5
Windows PowerShell Cookbook: The Complete Guide to Scripting Microsoft’s Command Shell
3
Rating is 4.8 out of 5
PowerShell Cookbook: Your Complete Guide to Scripting the Ubiquitous Object-Based Shell
4
Rating is 4.7 out of 5
Learn PowerShell in a Month of Lunches, Fourth Edition: Covers Windows, Linux, and macOS
5
Rating is 4.6 out of 5
PowerShell for Beginners: Learn PowerShell 7 Through Hands-On Mini Games
6
Rating is 4.5 out of 5
PowerShell for Sysadmins: Workflow Automation Made Easy
7
Rating is 4.4 out of 5
Learn PowerShell Scripting in a Month of Lunches
8
Rating is 4.3 out of 5
Windows PowerShell Step by Step
9
Rating is 4.2 out of 5
PowerShell 7 for IT Professionals: A Guide to Using PowerShell 7 to Manage Windows Systems
10
Rating is 4.1 out of 5
Windows Server Automation with PowerShell Cookbook: Powerful ways to automate, manage and administrate Windows Server 2022 using PowerShell 7.2, 5th Edition
11
Rating is 4 out of 5
PowerShell Automation and Scripting for Cybersecurity: Hacking and defense for red and blue teamers
What is the command to import a module in PowerShell?
In PowerShell, you can use the Import-Module command to import a module. The syntax is:
1
|
Import-Module <ModuleName>
|
Replace <ModuleName> with the name of the module you want to import.
What is the difference between importing and installing a module in PowerShell?
In PowerShell, there is a difference between importing and installing a module.
Importing a module:
- When you import a module, you make the cmdlets, functions, and variables defined in that module available for use in your PowerShell session or script.
- Importing a module is done using the Import-Module cmdlet followed by the name of the module.
- Once imported, you can use the cmdlets and functions provided by the module as if they were built-in to PowerShell.
Installing a module:
- Installing a module means downloading and installing it on your system so that it is available for use.
- Installing a module is done using the Install-Module cmdlet followed by the name of the module.
- The module is typically downloaded from an online repository like the PowerShell Gallery.
- Once installed, you can then import the module using the Import-Module cmdlet to make its functionality available.
In summary, importing a module in PowerShell refers to making the module’s functionality available for use, while installing a module refers to downloading and installing the module on your system.
How to set automatic module import options in PowerShell?
To set automatic module import options in PowerShell, you can use the $PSModuleAutoLoadingPreference variable. This variable determines whether PowerShell automatically imports modules when they are used for the first time in a session.
By default, the $PSModuleAutoLoadingPreference variable is set to «All,» which means that modules are automatically imported. However, you can change this behavior to one of the following options:
- All: This is the default behavior where all modules are automatically imported when first used.
$PSModuleAutoLoadingPreference = ‘All’ - ModuleQualified: In this mode, only modules that are explicitly qualified by their module name are automatically imported. You need to specify the module name in the full form (ModuleName/ImportModule).
$PSModuleAutoLoadingPreference = ‘ModuleQualified’ - None: With this setting, no modules are automatically imported, and you need to manually import modules using the Import-Module cmdlet.
$PSModuleAutoLoadingPreference = ‘None’
It’s important to note that changing the $PSModuleAutoLoadingPreference variable affects the current PowerShell session. If you want to make the change permanent, you can add the variable assignment to your PowerShell profile script (e.g., $PROFILE).
To view the current value of the variable, you can use the following command:
1
|
$PSModuleAutoLoadingPreference
|
For more information on module auto-loading in PowerShell, you can refer to the official Microsoft documentation: About Module Auto-Loading.
How to remove an imported module in PowerShell?
To remove an imported module in PowerShell, you can use the Remove-Module cmdlet. Here’s how:
- Open PowerShell.
- Use the Get-Module cmdlet to view all currently imported modules:
Get-Module
This will display a list of all loaded modules. - Identify the module you want to remove from the list of imported modules.
- Use the Remove-Module cmdlet followed by the name or path of the module to remove it:
Remove-Module -Name ModuleName
Replace «ModuleName» with the actual name of the module you want to remove.
Note: If the module is not installed in the «Program Files\WindowsPowerShell\Modules» directory or any of the paths specified in the PSModulePath environment variable, you may need to provide the full path to the module instead of just the name in the Remove-Module cmdlet.
How to import a module from a ZIP file in PowerShell?
To import a module from a ZIP file in PowerShell, you can follow these steps:
- Verify that the ZIP file contains a valid PowerShell module.
- Extract the ZIP file to a directory of your choice.
- Open a PowerShell session.
- Use the Import-Module cmdlet to import the module by specifying the full path to the module’s .psd1 file.
Here’s an example:
- Suppose you have a ZIP file named «MyModule.zip» located at «C:\Path\To\MyModule.zip» which contains a valid PowerShell module.
- Extract the contents of the ZIP file to a directory of your choice, let’s say «C:\ModuleDirectory».
- Open PowerShell.
- Execute the following command to import the module:
1
|
Import-Module -Name 'C:\ModuleDirectory\MyModule\MyModule.psd1'
|
Note: In the above command, you will need to replace ‘C:\ModuleDirectory\MyModule\MyModule.psd1’ with the appropriate path to the module’s .psd1 file on your system.
After executing the above command, the module will be imported and you can start using its cmdlets and functions in your PowerShell session.
It’s no secret that PowerShell is a very powerful and useful tool. That usefulness, though, can be expanded by adding modules such as Active Directory and Office 365 modules. There are even non-Microsoft modules that can be installed such as VMWare’s PowerCLI, which let you take administrating vSphere to another level.
Though, I’m going to go out on a limb and guess that because you’re here, you already know this and you want to know HOW to install those modules.
Am I right?
Well let’s jump in then!
Downloading and Installing PowerShell Modules
There are several ways to install PowerShell modules but we are going to look at the easiest way first. The basic steps are to determine your current PowerShell module directory path, download your new module to that path, and then invoke the import-module command to let windows know it’s there.
Let’s see it in action.
List PowerShell Module Environment Variable Path
We need to determine the install path for our PowerShell Modules so we know where to put new modules. To do this, open a PowerShell window on your Windows 10 or Windows Server machine and run the following command:
$ENV:PSModulePath
The output should look similar to:
PS C:\WINDOWS\system32> $ENV:PSModulePath

C:\Users\UserName\Documents\WindowsPowerShell\Modules;C:\Program Files\WindowsPowerShell\Modules;C:\WINDOWS\system32\WindowsPowerShell\v1.0\Modules
You’ll see two important paths here:
C:\Users\UserName\Documents\WindowsPowerShell\Modules
C:\Program Files\WindowsPowerShell\Modules
Make a mental note of these paths, we’ll use one or both of them later. The first path is that path you would place a new PowerShell module that you only want that specific user to have access to. The second path would make the module available for all users on the computer.
The third path we received with the $ENV:PSModulePath command is the path Windows uses for built-in modules that are already installed when you install Windows.
Download New PowerShell Module to Environment Variable Path
Armed with the path we wish to use (from above) we can source our PowerShell Module and copy it to the location specified in the path.
Here I’ve downloaded the PowerNet PowerShell module from CodePlex and placed it in the directory that will allow all users on the computer to load the module.

I then run the following command to make sure the module is listed as available:
Get-Module -ListAvailable
Which gives me the following output, where we can clearly see the PowerNet module listed:
PS C:\WINDOWS\system32> get-module -listavailable

    Directory: C:\Program Files\WindowsPowerShell\Modules

ModuleType Version    Name                                ExportedCommands
---------- -------    ----                                ----------------
Script     1.0.1      Microsoft.PowerShell.Operation.V... {Get-OperationValidation, Invoke-OperationValidation}
Binary     1.0.0.1    PackageManagement                   {Find-Package, Get-Package, Get-PackageProvider, Get-Packa...
Script     3.4.0      Pester                              {Describe, Context, It, Should...}
Script     0.0        PowerNet                            {Test-TCPPort, Enable-Monitoring, Disable-Monitoring, Writ...
Script     1.0.0.1    PowerShellGet                       {Install-Module, Find-Module, Save-Module, Update-Module...}
Script     1.2        PSReadline                          {Get-PSReadlineKeyHandler, Set-PSReadlineKeyHandler, Remov...
Import New PowerShell Module
With our new module in place we just need to tell Windows to load it so that we can use it in our current PS Session.
To this, I will run this command:
Import-Module -Name PowerNet
You may receive the following warning:
Security warning
Run only scripts that you trust. While scripts from the internet can be useful, this script can potentially harm your
computer. If you trust this script, use the Unblock-File cmdlet to allow the script to run without this warning
message. Do you want to run C:\Program Files\WindowsPowerShell\Modules\PowerNet\PowerNet.psm1?
[D] Do not run  [R] Run once  [S] Suspend  [?] Help (default is "D"):
Type R to run once, assuming you’re sure this is a safe module.
If you receive the following error when trying to load your module:
import-module : File C:\Program Files\WindowsPowerShell\Modules\PowerNet\PowerNet.psm1 cannot be loaded because running scripts is disabled on this system.
You may need to run the following command to allow loading the module:
Set-ExecutionPolicy Unrestricted
Be sure to set it back to restricted when you’re finished, using the following command:
Set-ExecutionPolicy Restricted
It should be obvious, but I’ll state it anyway, be careful loading PowerShell modules from the internet. These are scripts and can contain malicious code. Only load modules you trust and that are from a trusted source.
With that said, we are finished with this method of loading PowerShell Modules. Try it out and let me know if you have any trouble with it!
The other way we can install PowerShell modules is to use the PowerShell Gallery. These will be modules that have been authored by Microsoft and the PowerShell community. You’ll install them through PowerShell directly from the internet. That also means you’ll need to make sure that your firewall and content/web filter allow connections from your computer to the internet through PowerShell. I won’t get into that here, though.
The process is simple but we need to step through a couple prerequisites first.
Verify You Have the PowerShellGet Module
Windows 10, Windows Server 2019, Windows Management Framework (WMF) 5.0, and PowerShell 6 are all shipped with PowerShellGet. If you’re running any of those you’re good to go here.
If you are running an OS older than Windows 10 or using a PowerShell older than 6.0 you’ll need to download the PowerShellGet msi here.
Update Nuget
PowerShellGet relies on the provider named Nuget. Always start with the latest version by running the following command:
Install-PackageProvider Nuget –Force
Update PowerShellGet
We also need to make sure your PowerShellGet install is on the latest update. Do this by running:
Install-Module –Name PowerShellGet –Force
Install PowerShell Module from Gallery
To install a module we just need to know it’s name. The gallery page will tell you what the command is to install the module. I’ve found a module on the gallery named SqlServer that I wish to install so I’ll run the following command:
Install-Module -Name SqlServer
After which I receive the following message:
Untrusted repository
You are installing the modules from an untrusted repository. If you trust this repository, change its
InstallationPolicy value by running the Set-PSRepository cmdlet. Are you sure you want to install the modules from
'PSGallery'?
[Y] Yes  [A] Yes to All  [N] No  [L] No to All  [S] Suspend  [?] Help (default is "N"):
I will answer Y which will commence installing the module which I can see visually by the loading text at the top of the window:

And that’s it! Pretty slick huh? Try it out and let me know if you have any issues!
Recommended Tool: ManageEngine OpManager

- Multi-vendor Network Monitoring
- Simple Installation & Setup
- Intuitive UI
- Complete Visibility
- Intelligent Detections
- Easy Resolutions
Network Engineer III
I am a Senior Network Engineer who has spent the last decade elbow deep in enterprise System Administration and Networking in the local government and energy sectors. I can usually be found trying to warm up behind the storage arrays in the datacenter.