
Время на прочтение5 мин
Количество просмотров194K

Сейчас все вокруг настраивают VPN для удаленных сотрудников. Мне больно смотреть, как люди устанавливают монструозные глючные программы, настраивают какие-то сертификаты, устанавливают драйвера TUN/TAP и делают множество сложных операций, в то время как лучшее решение уже встроено в операционную систему.
IKEv2 — это современный протокол VPN, разработанный Microsoft и Cisco. Он используется по умолчанию для новых VPN-подключений в Windows, macOS, iOS. Он быстрее и безопаснее большинства VPN-протоколов и может легко настраиваться на стороне клиента в два клика без использования сторонних программ.
Я считаю, что IPsec IKEv2 отлично подходит не только для соединения серверов, но и для обычных VPN-подключений конечных пользователей. В этом посте я постараюсь убедить вас использовать IPsec IKEv2 для обычных домашних пользователей вместо OpenVPN.
IKEv2 быстрее
При прочих равных условиях, IKEv2 будет всегда быстрее OpenVPN. Это особенно заметно на маломощных системах с медленной памятью, например на роутерах или одноплатных компьютерах.
Дело в том, что IPsec работает в контексте ядра операционной системы, а OpenVPN в контексте пользователя (userspace), и на обработку каждого пакета происходит переключение контекста между процессами ядра и процессами пользователя. Это влияет как на пропускную способность, так и на задержки.
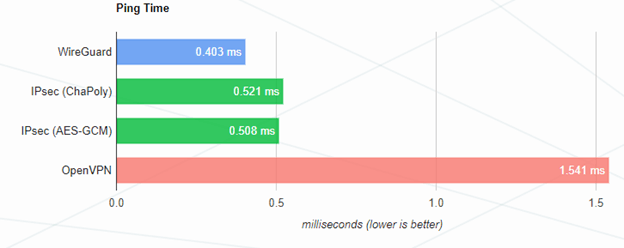
Сравнение задержек для разных протоколов VPN.
Скриншот выше показывает разницу в задержке в два раза между IPsec и OpenVPN. Разумеется, разницу в 1мс невозможно заметить на глаз, но при нагрузке на систему эти значения могут значительно изменяться. Кроме того, реальные показатели сильно зависят от характеристик конкретной системы, поэтому я не буду приводить абсолютные цифры для сравнения двух протоколов. Задержки очень важны при использовании голосовой и видеосвязи через VPN.
По моим субъективным ощущениям IKEv2 на Windows 10 работает заметно отзывчивее чем OpenVPN. Ведь реальное использование десктопного компьютера сильно отличается от синтетических тестов VPN-протоколов. Нагрузка на процессор и память непостоянная, пользователь может запускать ресурсоемкие программы, все это будет влиять на показатели.
IKEv2 проще в настройке
Все современные операционные системы (кроме Android) поддерживают IPsec IKEv2 прямо из коробки. Не нужно устанавливать никакие программы, драйвера виртуальных адаптеров TUN/TAP и прочее. Всё управление VPN происходит из системного меню.
При этом настройку на клиенте можно упростить до трех строчек:
- Домен — для IPsec домен обязателен, так как для него выпускается SSL-сертификат
- логин
- пароль
Не нужно больше передавать клиенту файлы с сертификатами и ключами, заставлять его импортировать корневые сертификаты в системное хранилище. Достаточно логина и пароля, при этом соединение будет так же надежно защищено, как и в OpenVPN при использовании сертификатов, ведь для установки соединения используется такой же x.509 сертификат, как и для веб-сайтов с HTTPS.
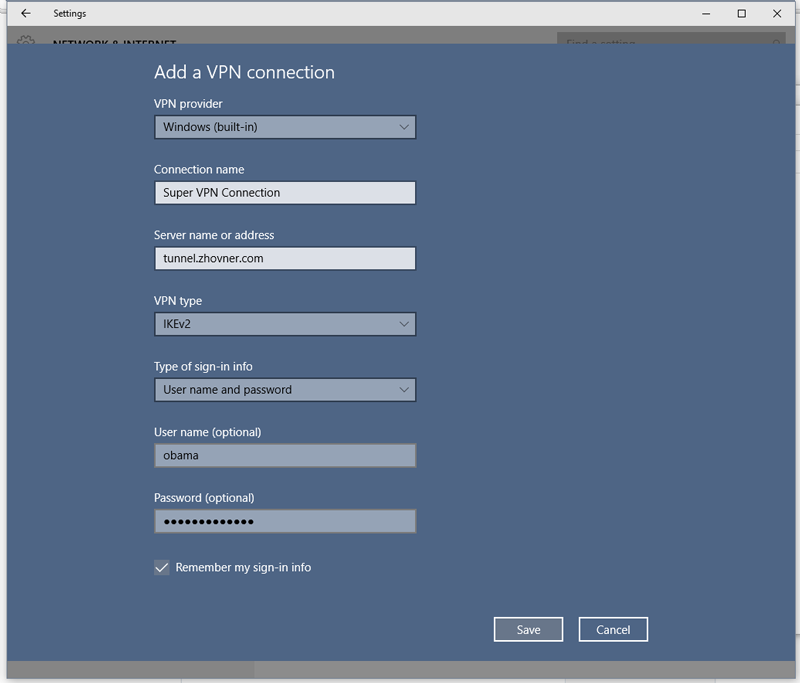
Настройка на Windows 10
Мастер настройки VPN вызывается из меню подключения к WiFi. С настройкой одного окна справится пользователь любой квалификации. Созданное подключение активируется из меню со списком WiFi-сетей.
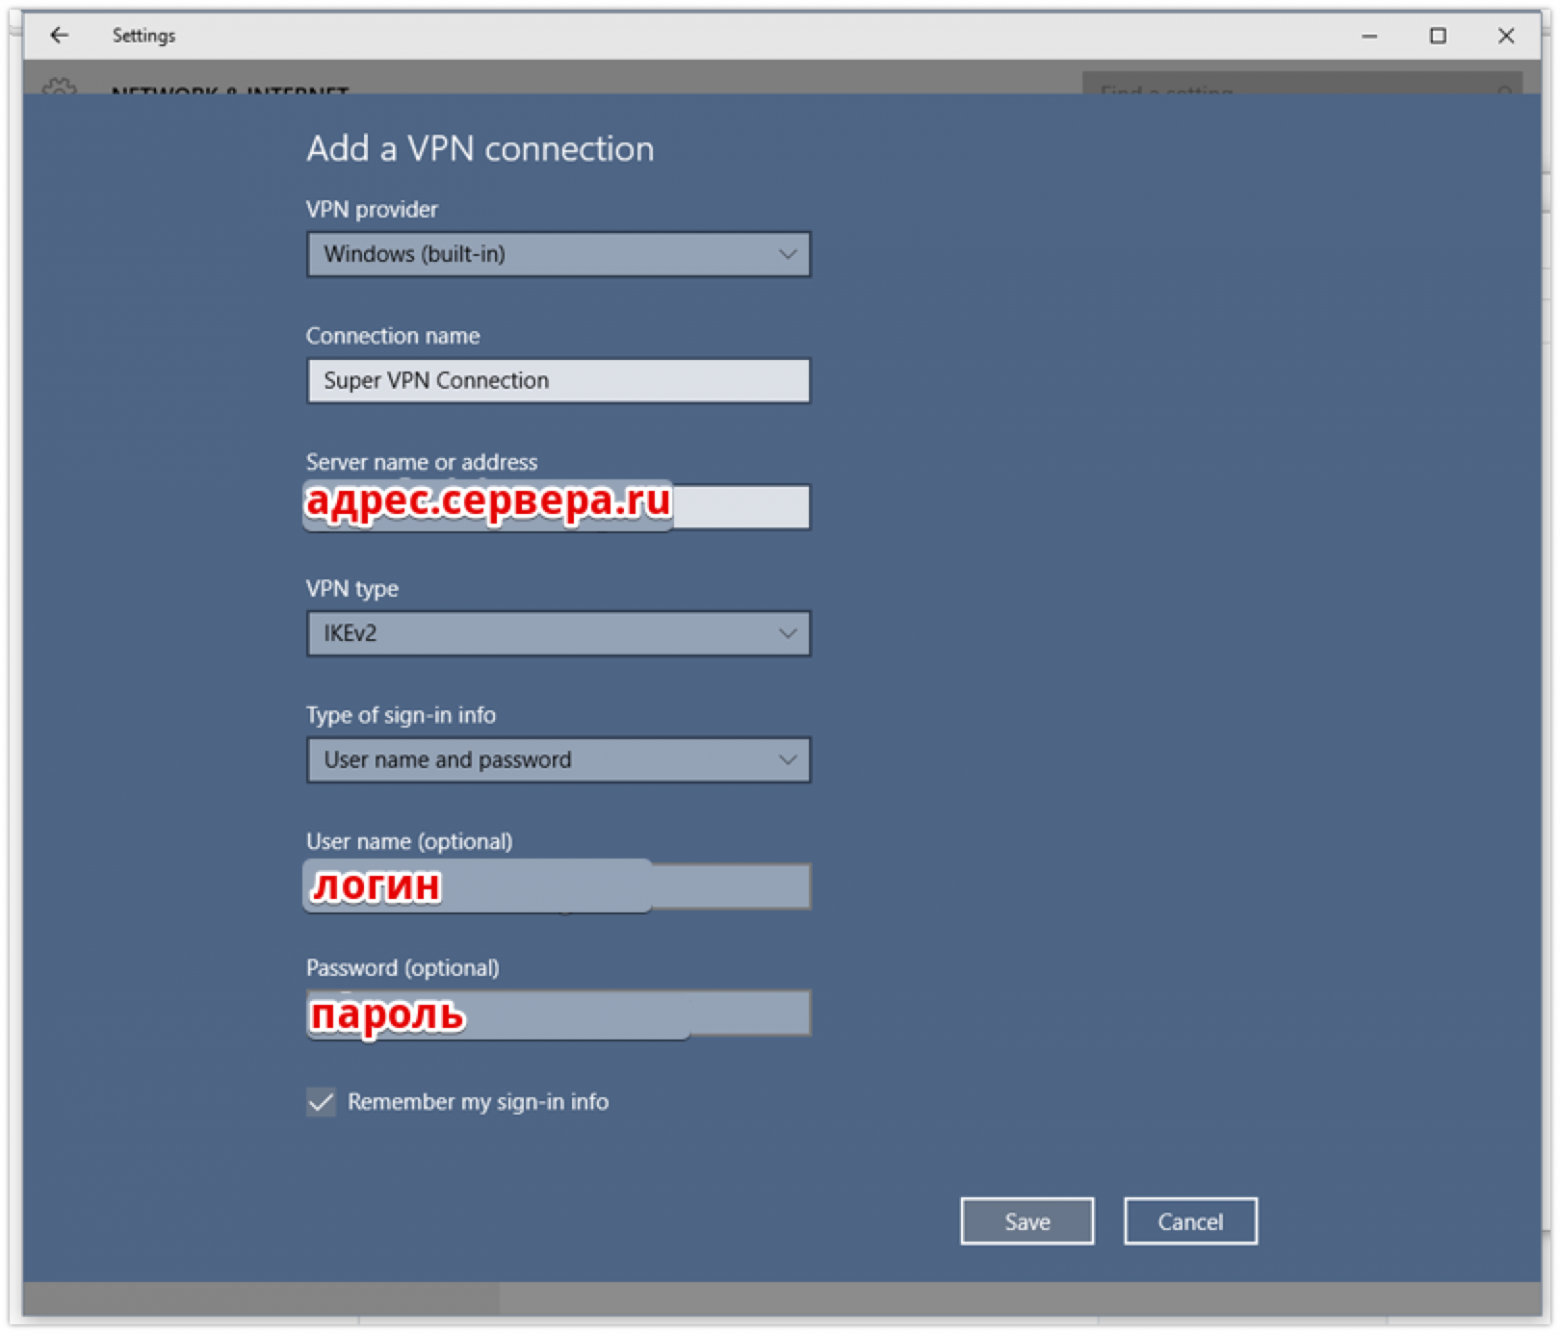
Интерфейс настройки нового IKEv2 подключения в Windows 10
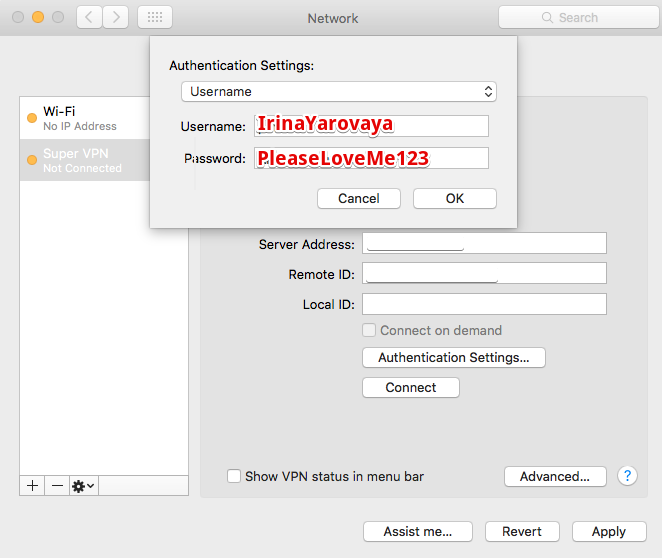
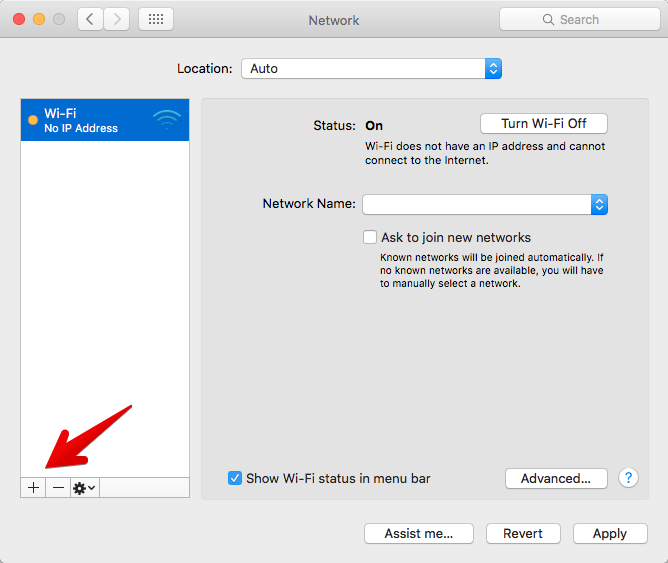
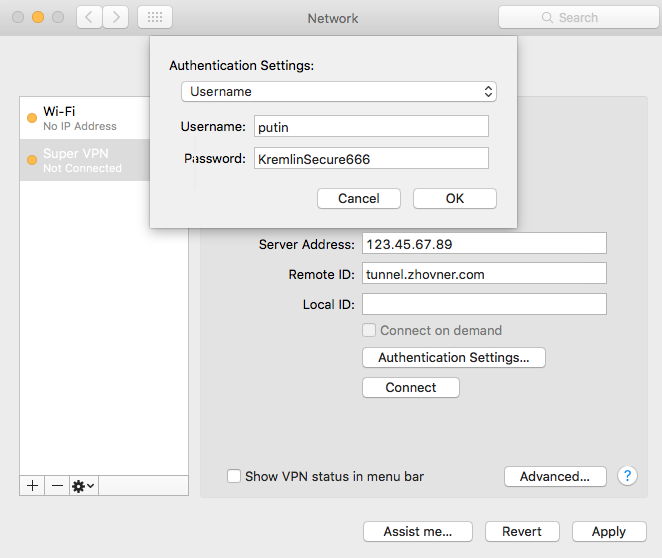
Настройка macOS
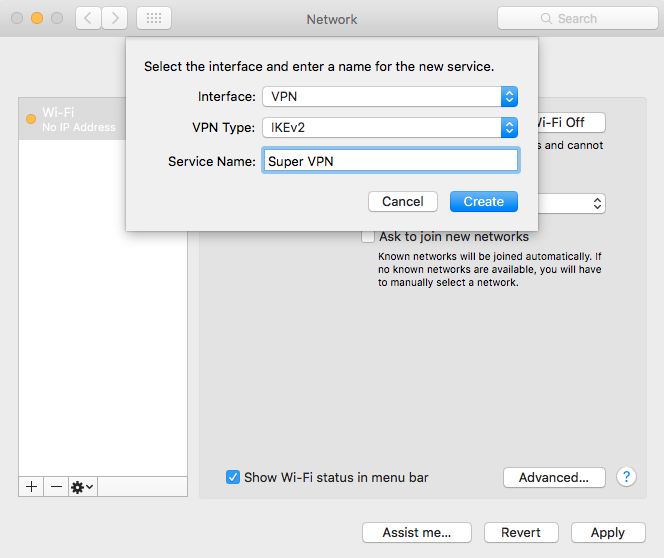
В macOS поддерживается IKEv2 начиная с версии 10.11 (El Capitan). Создание подключения происходит через меню настроек сети.

Добавляем новое подключение. В качестве имени подключения задаем любое произвольное имя.
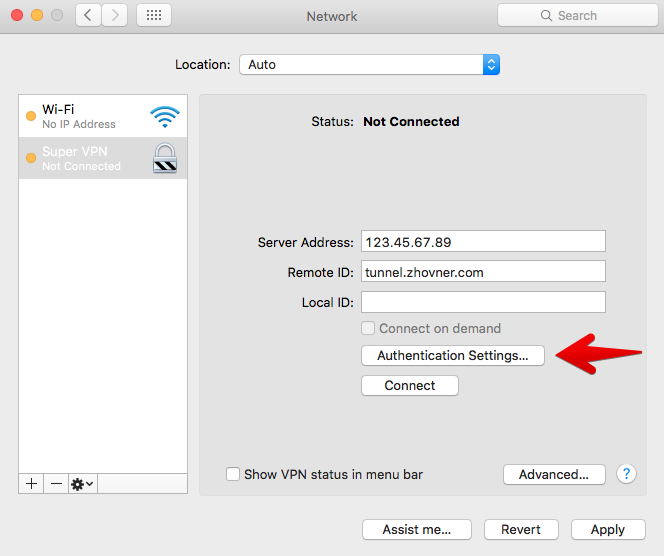
Для проверки подлинности сертификата, нужно указать доменное имя. При этом в поле «Server Address» можно указать IP-адрес сервера, а домен только в «Remote ID», тогда для подключения не будет выполняться DNS-резолв, и оно будет происходить чуть быстрее.
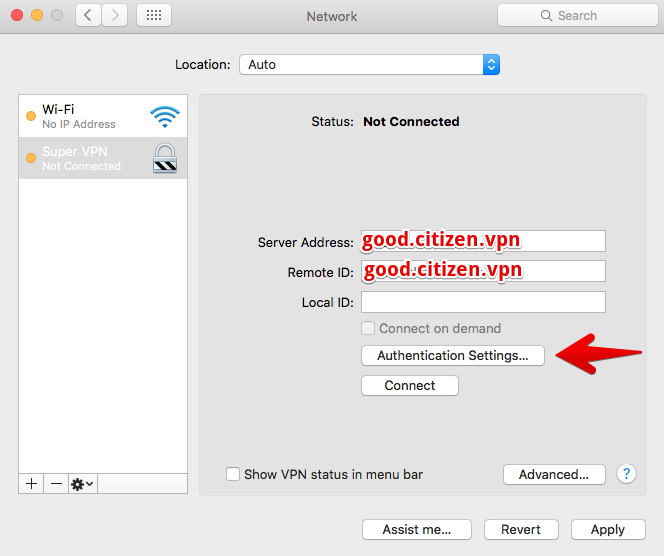
Логин и пароль пользователя указываем из файла /etc/ipsec.secrets
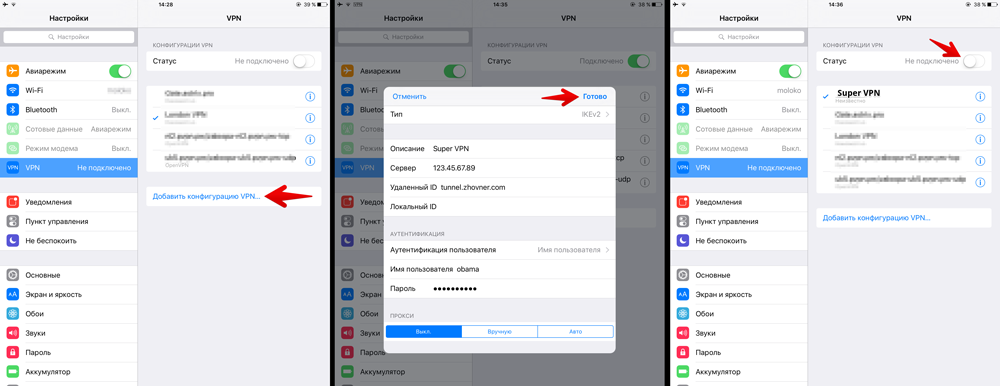
Настройка iOS
Настройку iOS можно выполнить вручную через мастер, но намного удобнее использовать профиль автоконфигурации mobileconfig.
Ручная настройка по смыслу аналогична десктопной macOS:
Настройки -> VPN -> Добавить конфигурацию VPN
IKEv2 это безопасно
На предыдущем шаге мы выяснили, что для настройки подключения достаточно логина и пароля. Но как клиенту проверить, что подключение не прослушивается, не подменяются данные и сервер действительно тот, за кого себя выдает? Для этого используются обычные SSL-сертификаты, которые мы привыкли использовать для веб-сайтов и HTTPS.
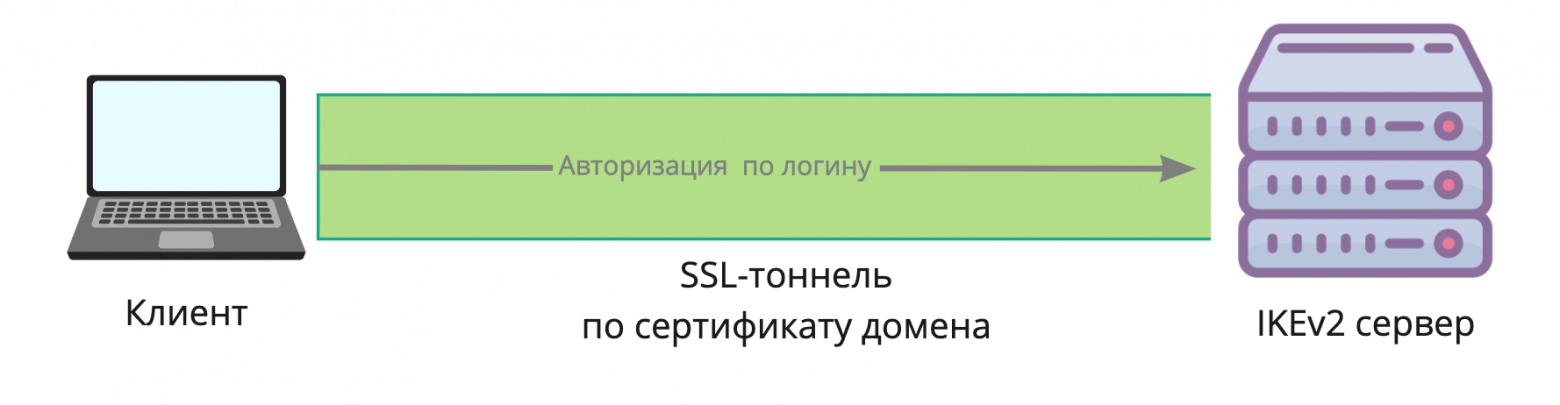
Клиент устанавливает защищенный SSL-тоннель с сервером, и уже внутри него передается логин-пароль. По умолчанию в Windows и macOS для передачи пароля используется алгоритм mschapv2. Таким образом с помощью SSL-сертификата клиент проверяет подлинность сервера, а по логину-паролю сервер проверяет подлинность клиента.
Сервер IKEv2 может использовать один и тот же сертификат вместе с веб-сервером, например от популярного Let’s Encrypt. Это сильно упрощает управлением сертификатами.
Такая же модель используется в OpenVPN, и при желании в нем можно использовать сертификат от Lets Encrypt, однако администратору в любом случае потребуется передать пользователю файл для настройки VPN.
Настраиваем IKEv2 сервер
Развернуть свой IKEv2 сервер можно за пару минут с помощью скриптов автоматической установки или используя готовые контейнеры. Использовать docker не рекомендуется, так как его сетевая подсистема снижает производительность IPsec на дешевых тарифах VPS. Вы также можете настроить IKEv2-сервер вручную, на Хабре есть статьи с примерами настройки сервера Strongswan.
Мы будем использовать один из наиболее удачных вариантов скриптов автонастройки github.com/jawj/IKEv2-setup
Этот скрипт хорош тем, что использует сертификаты от Lets Encrypt и автоматически генерирует валидный сертификат.
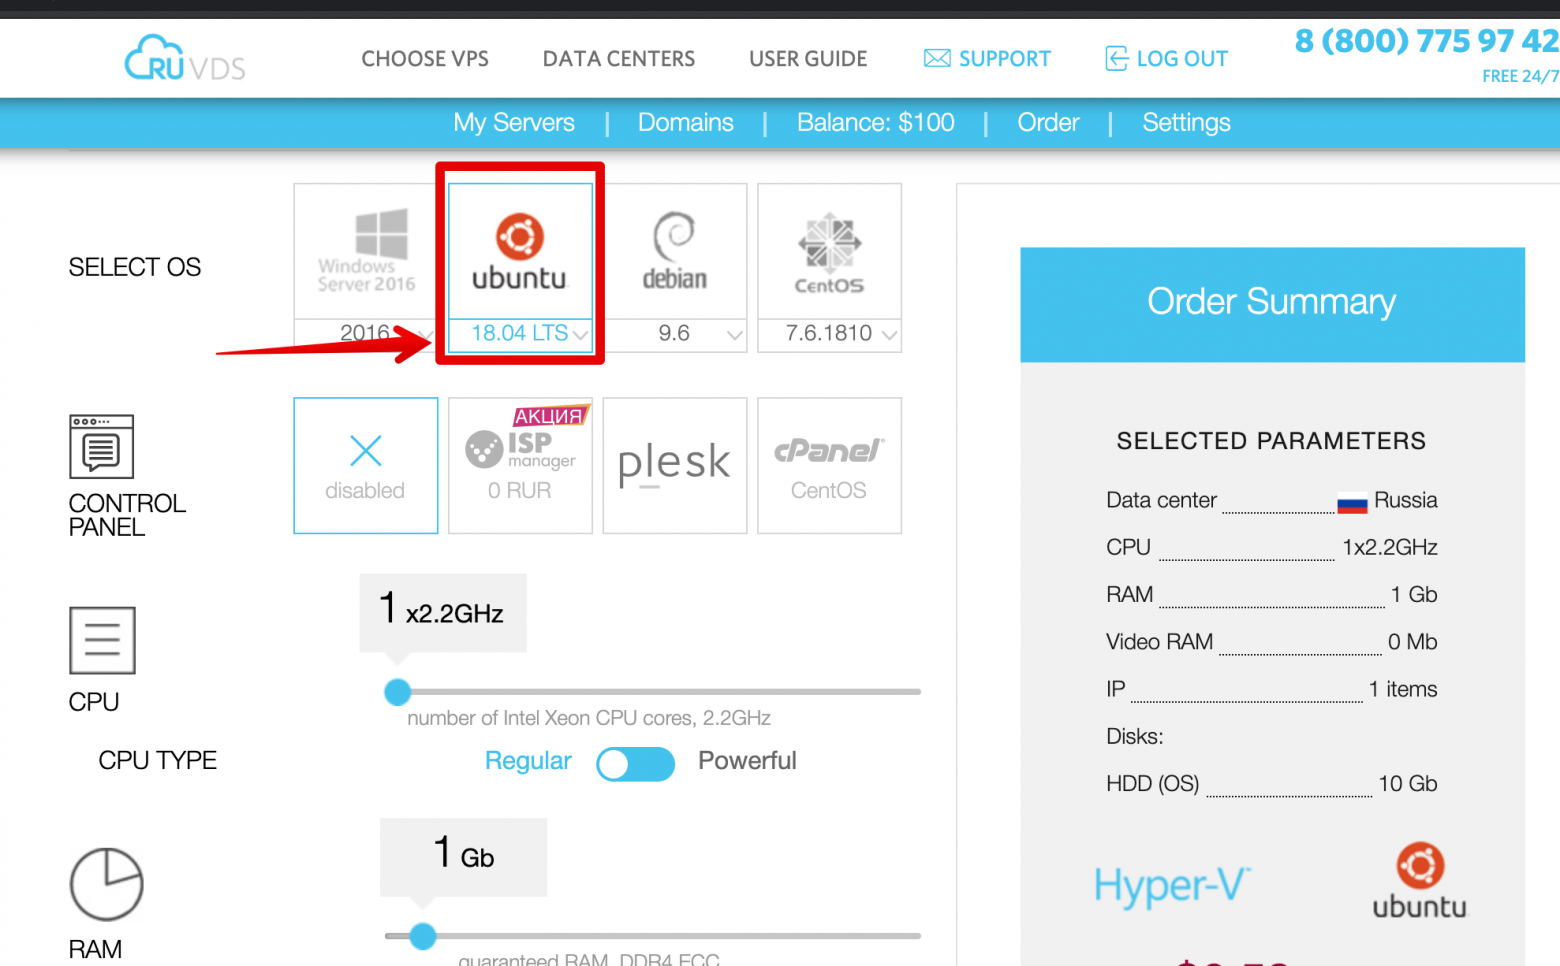
Шаг 1: Выбор сервера
Для запуска VPN сервера нам потребуется VDS. Подойдет самая простая конфигурация с одним ядром процессора. Скрипт из нашего примера лучше всего протестирован на Ubuntu 18.04, поэтому при создании сервера выбираем этот образ ОС.
Ждем окончания установки сервера и копируем реквизиты для подключения. Пароль root придет на почту, либо его можно задать вручную через веб-интервейс. Далее все команды мы вводим

Шаг 2: Установка Strongswan
Подключаемся SSH-клиентом и запускаем скрипт установки:
# запуск автоматической установки сервера IKEv2
wget https://raw.githubusercontent.com/jawj/IKEv2-setup/master/setup.sh
chmod u+x setup.sh
./setup.sh
....
# Введите имя домена направленного на IP-адрес сервера
# используйте сервис sslip.io если у вас нет домена
Hostname for VPN: 123-45-67-89.sslip.io
# Имя пользователя VPN
VPN username: coolguy
# пароль
VPN password (no quotes, please):
....
# скрипт запрос создать нового SSH-пользователя, этот шаг нельзя пропускать.
Шаг 3: Настройка клиента
Введенные реквизиты пользователя VPN теперь нужно использовать для настройки на клиенте. Важно использовать именно то доменное имя, которое вы вводили в Hostname for VPN.
Шаг 4: Добавление новых пользователей
Чтобы добавить нового пользователя в уже созданный сервер, отредактируйте файл /etc/ipsec.secrets.
# nano /etc/ipsec.secrets
123-45-67-89.sslip.io : RSA "privkey.pem"
coolguy : EAP "C00lPassword"
badguy : EAP "bAdP$$word"
После добавления пользователя выполните команду ipsec secrets чтобы Strongswan перечитал конфиг.
Заключение
Мы рассмотрели удобство IKEv2 со стороны пользователя. Администрирование такого сервера не сложнее, а иногда даже проще чем OpenVPN. Если вы только планируете организовать удаленный доступ для своих сотрудников, обязательно посмотрите в сторону IKEv2. Не заставляйте своих пользователей устанавливать лишние программы, если все необходимое уже есть на их компьютере. Это удобнее, безопаснее и намного прогрессивнее.

This guide covers how to download, install, and set up IKEv2 VPN (strongSwan) for Windows devices.
1. Open the Settings menu from the Windows icon on the bottom left of your device
2. Select the Network&Internet option from the Settings menu
3. Select the VPN tab from the Network & Internet menu on the left side
4. Click on the Add a VPN connection button below VPN
5. VPN Provider: Windows (built-in)
6. Connection Name: any name you prefer. For example: UK-1
7. Server name or address: enter the Server address: See all VPN servers addresses
8. VPN Type: IKEv2
9. Type of sign-in info: Username and password
10. Username: your username
11. Password: your password
12. Once all the settings are configured, click the Save button
13. Navigate back to the VPN tab and click Change adapter options listed below Related settings
14. You will be redirected to the Network Connections. Find the IKEv2 VPN connection you established and right click it. Select Properties >> Networking >> IPv4 >> Properties >> Advanced and put the check mark next to Use default gateway on remote network
15. Click OK and close the Network Connections window
16. Click the Connect button to establish the IKEv2 VPN connection from your VPN settings window
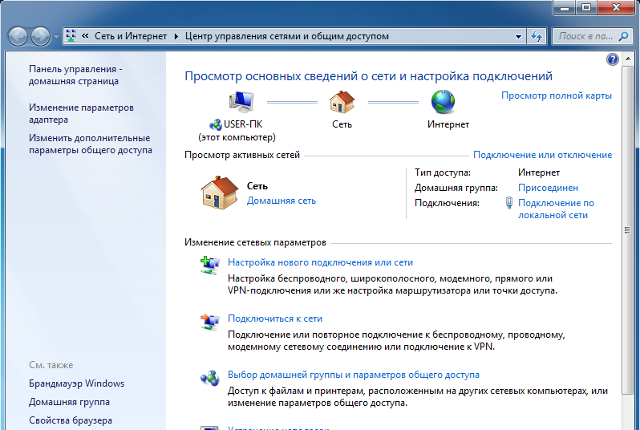
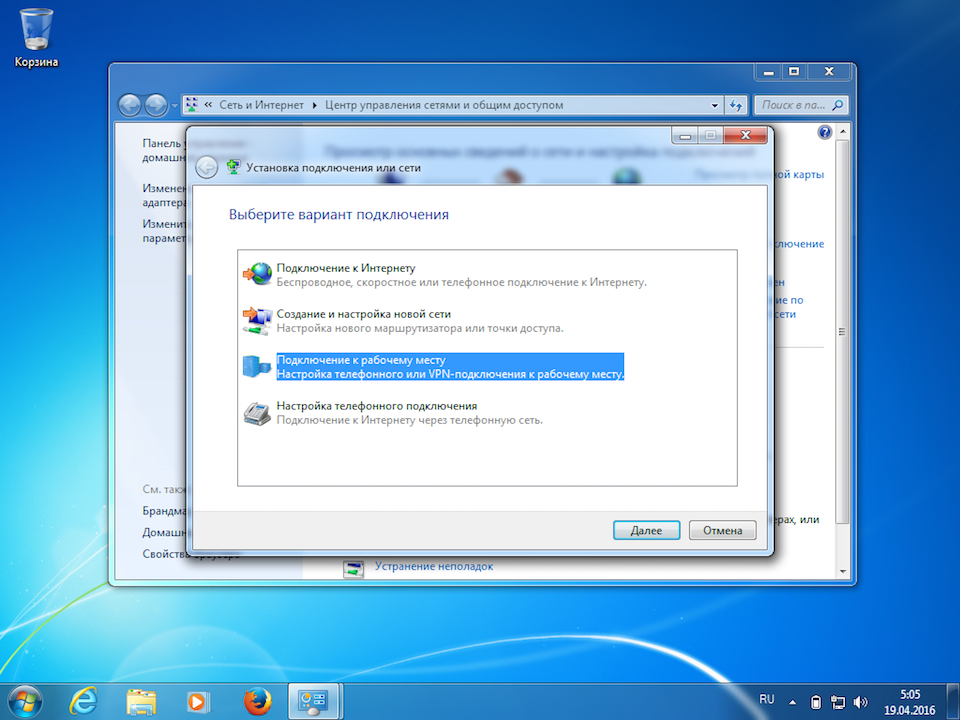
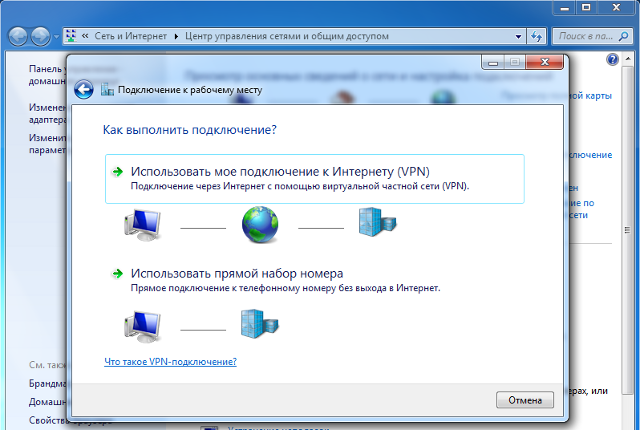
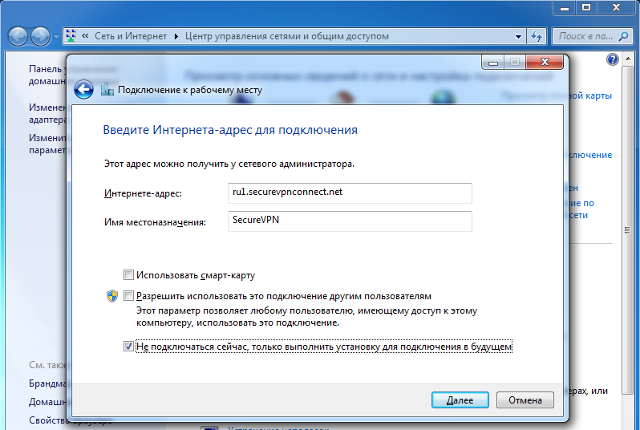
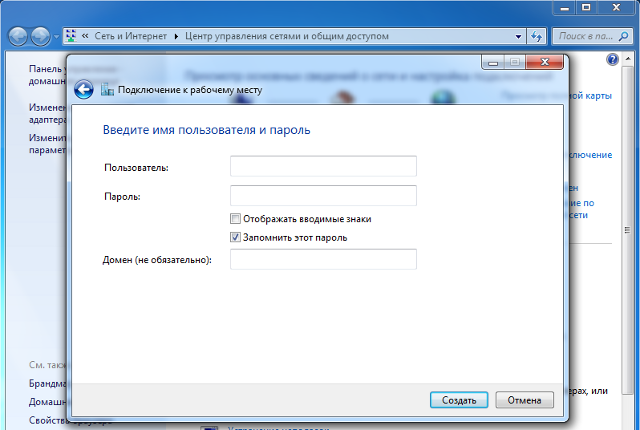
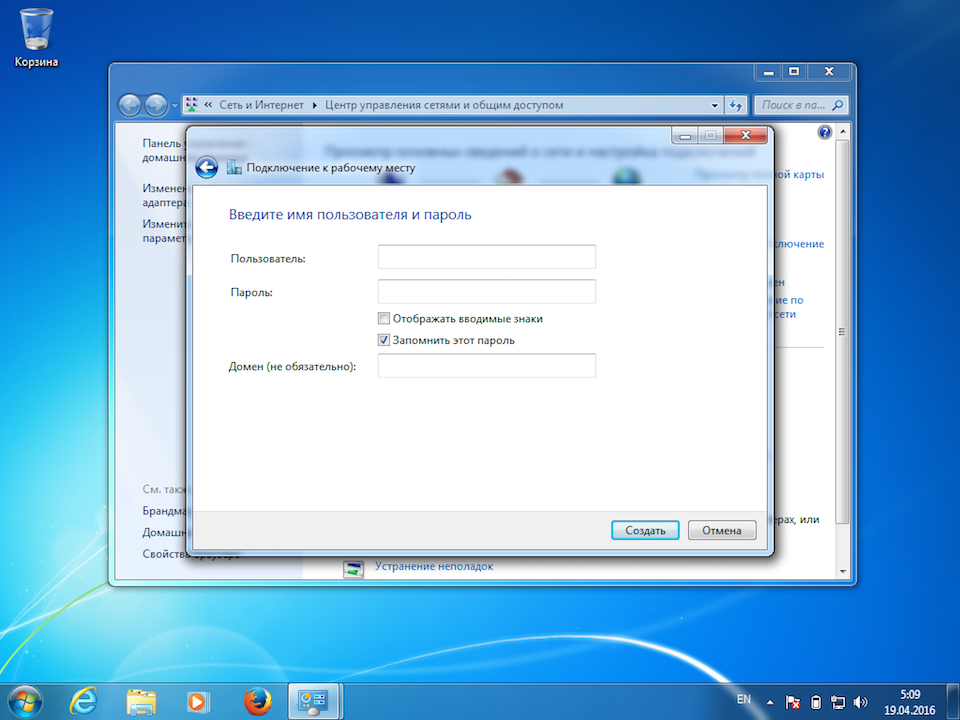
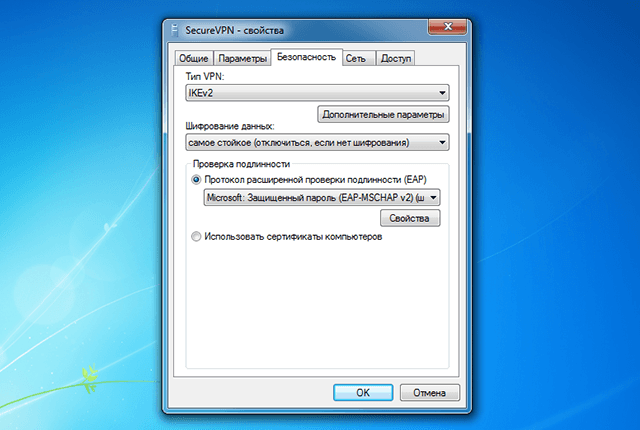
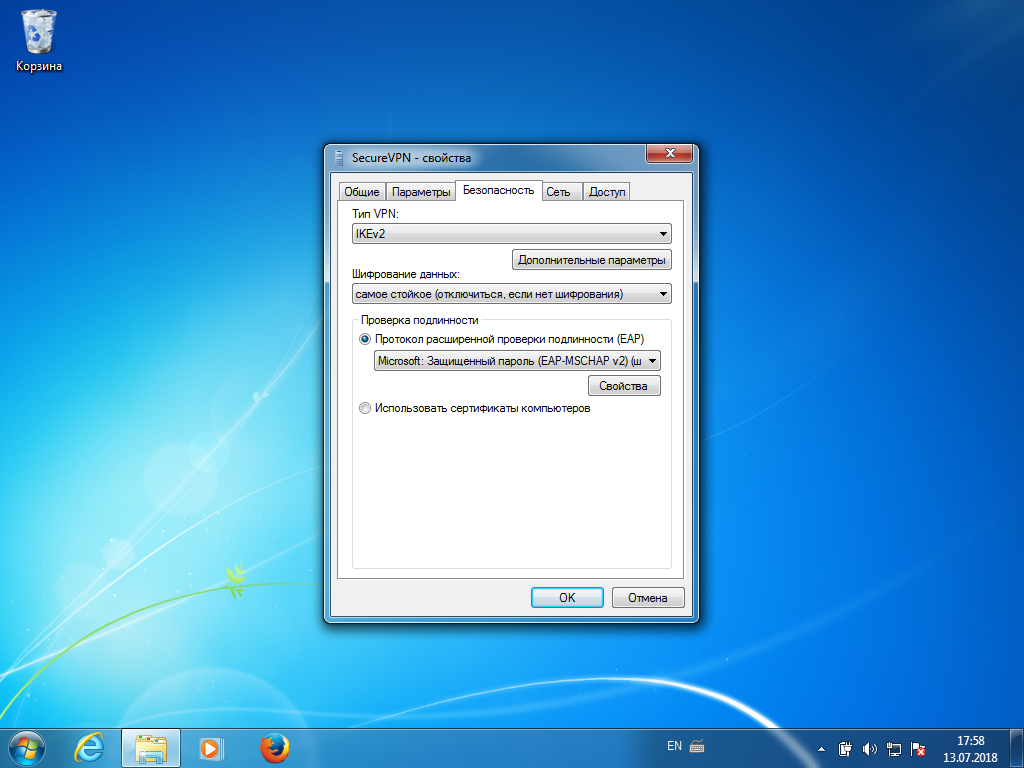
Настройка VPN для Windows 7 не представляет собой ничего сложного — поддержка протокола IKEv2 интегрирована в самой операционной системе. Достаточно выполнить действия, как показано на картинках, и уже через минуту вы можете просматривать интернет-сайты анонимно, не беспокоясь за безопасность передаваемых данных.


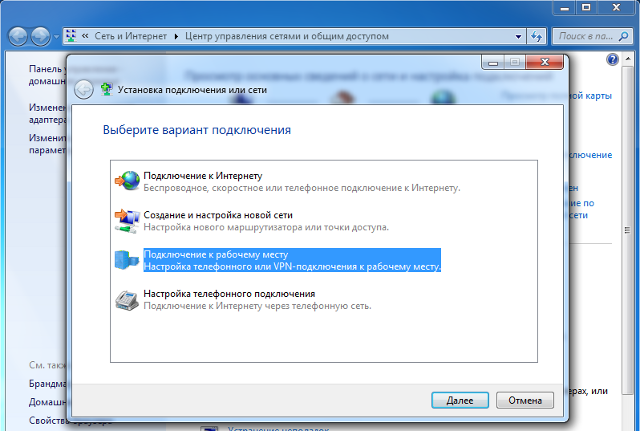


6
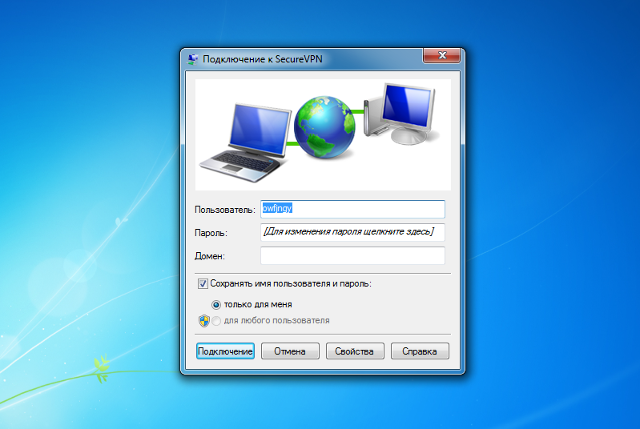
Указать идентификационные данные:
- Пользователь — username
- Пароль — password
Отметить пункт Запомнить этот пароль и нажать кнопку Создать.
Важное замечание: имя пользователя и пароль находятся в файле readme.txt, отправленном на Вашу почту после заказа подписки.
Далее
username
password
8
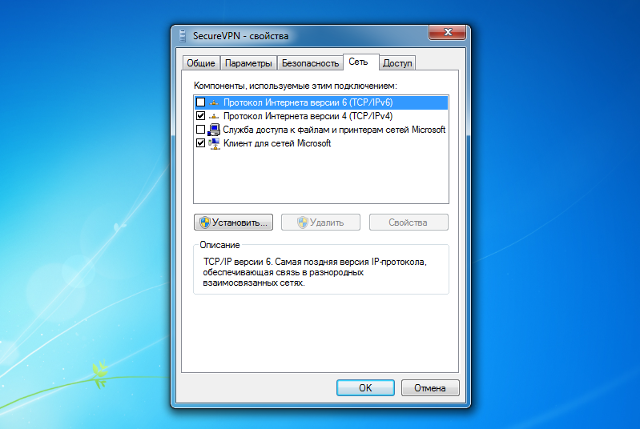
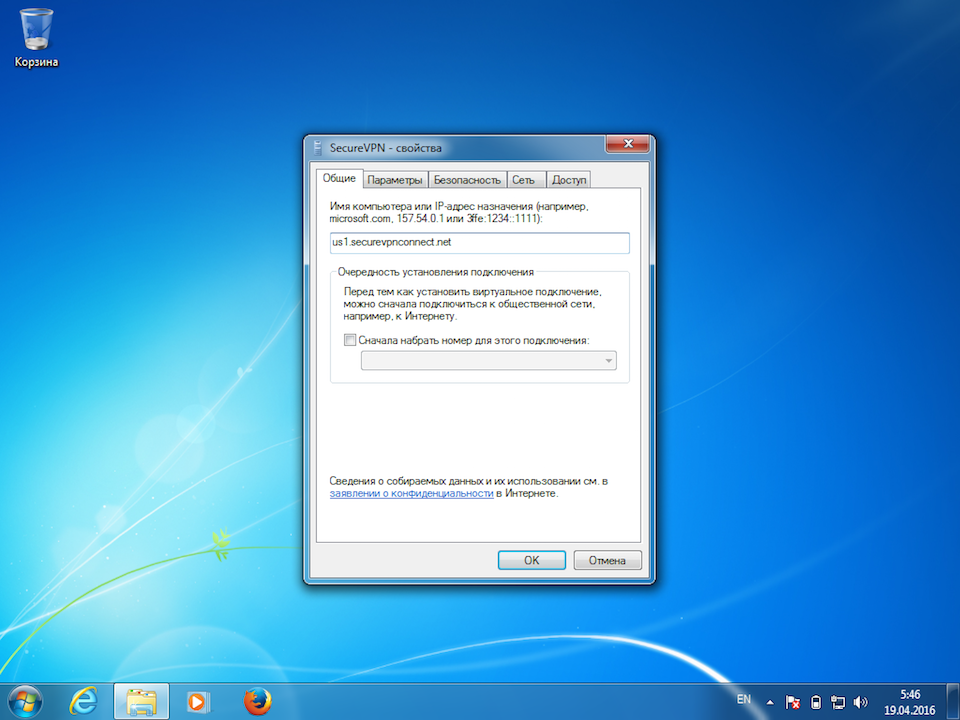
Кликнуть по значку сетевого соединения в системном трее, в появившемся окне нажать правой кнопкой мыши на созданном VPN-подключении и выбрать Свойства.
Далее


11
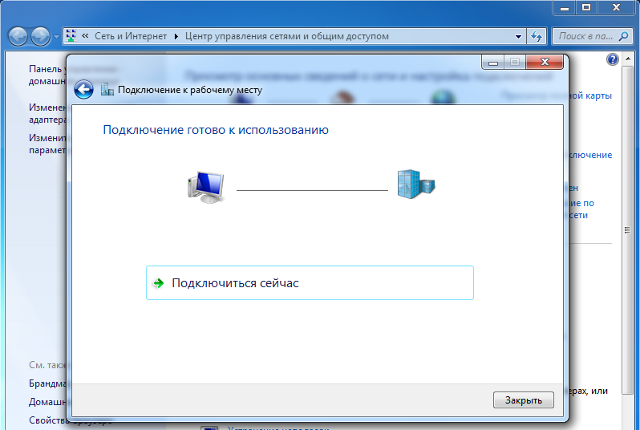
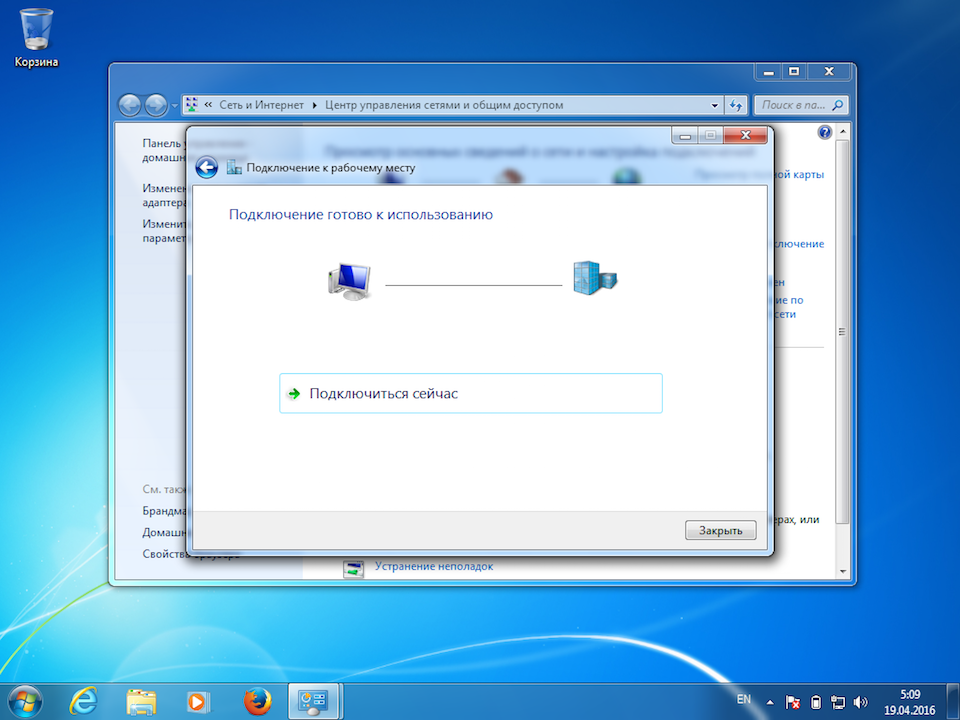
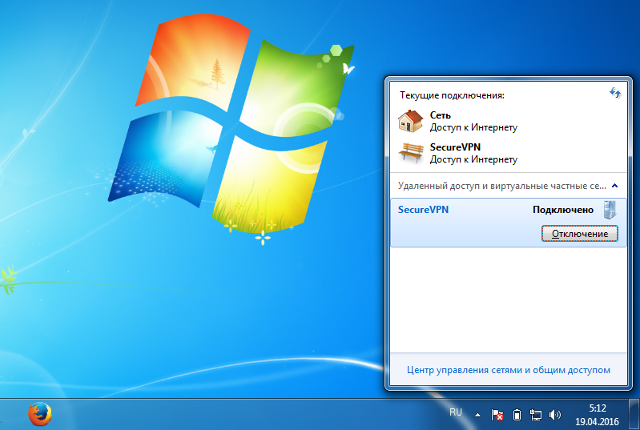
Для использования созданного VPN-подключения кликнуть по значку сетевого соединения в системном трее, в появившемся меню выбрать требуемое соединение, после чего нажать кнопку Подключение.
Далее


13
На экране отобразится окно подключения к серверу.
Далее


14
Для отключения кликнуть по значку сетевого соединения в системном трее, выбрать VPN-соединение и нажать Отключение.
Далее

15
Для смены VPN-сервера открыть свойства соединения (повторить шаг 8), на вкладке Общие указать новый адрес сервера, и нажать OK.
Актуальный список VPN-серверов здесь.
В начало

How To:
Harden Windows Server 2012R2 Routing and Remote Access (RRAS) VPN server. Implement strong IKEv2 VPN cryptography:
• Diffe-Hellman Group (DH) 14 or DH Group 19
• Enable AES256 and SHA256 L2TP/IPsec and IKEv2 on Windows Server VPNs.
This simple method significantly improves security strength for Windows 2012 IPsec VPNs.
Problem:
Windows RRAS server negotiates insecure IKEv2 and L2TP/IPsec cryptographic algorithms:
- DH2-3DES-SHA1.
Weak security strength risks data integrity and confidentiality. IKE SA authenticates with RSA certificates.
This problem impacts all RRAS VPN clients: Windows 10 phones, iPhones, Android, Cisco, Juniper and Sawn.
Solution:
Enable strong IPsec security algorithms in the Windows server registry:
- IKEv2 DH14-AES256-SHA256
This (mostly) original approach is hands-down the easiest way to secure a Windows 2012 IKEv2 or L2TP/IPsec VPN.
Step 1: Regedit:
HKLM\SYSTEM\CurrentControlSet\Services\RemoteAccess\Parameters\IKEV2\
Step 2: Create new key:
\IKEv2CustomPolicy\
Step 3: Create new DWORDs (Table 1):
|
Table 1 IKEv2CustomPolicy DWORD Attributes |
||
| IntegrityMethod | 1 | Integrity check algorithm to be negotiated during MM SA negotiation [RFC4306]. INTEGRITY_SHA1 (0x1) INTEGRITY_SHA_256 (0x2) |
| EncryptionMethod | 4 | Encryption algorithm to be negotiated during MM SA negotiation [RFC4306]. CIPHER_AES_128 (0x2) CIPHER_AES_256 (0x4) |
| CipherTransformConstant | 5 | Encryption algorithm to be negotiated during QM SA negotiation [RFC4306]. (0x3) CIPHER_CONFIG_CBC_AES_128 (0x5) CIPHER_CONFIG_CBC_AES_256 |
| AuthTransformConstant | 1 | Specifies the hash algorithm to be negotiated during QM SA negotiation [RFC4306]. AUTH_CONFIG_HMAC_SHA_1_96 (0x1) HMAC secret key authentication algorithm. SHA-1 (Secure Hash Algorithm) data integrity and data origin authentication algorithm. [RFC2404]. AUTH_CONFIG_HMAC_SHA_256_128 (0x2). HMAC secret key authentication algorithm. SHA-256 data integrity and data origin authentication algorithm. |
| DHGroup | 3 | Type of Diffie-Hellman group used for Internet Key Exchange (IKE) key generation during MM SA negotiation [RFC4306]. DH_GROUP_2 (0x2) DH_GROUP_14 (0x3) DH_GROUP_2048 (0x3) — IKE for DH-14. Name change to match standard terminology |
| PfsGroup | 0 | Diffie-Hellman algorithm to be used for Quick Mode Perfect Forward Secrecy (PFS) [RFC4306]. PFS_NONE (0x0) PFS_2 (0x2) PFS_2048 (i.e., DH-14) (0x3) PFS_MM (0x6) — Uses same DH as MM that contains this QM. |
| Note: DWORD values for IKEv2 Custom Policy Key: HKLM\SYSTEM\CurrentControlSet\Services\RemoteAccess\Parameters\IKEV2\IKEv2CustomPolicy\ This method also supports stronger security (e.g., DH-EC and GCM). See MSDN MS-RRASM for additional options. |
Additional Thoughts:
- This method works great with Windows Server 2012R2 and 2016.
- This method may or may not work for 2012 -I haven’t test it.
- Do not use pre-shared keys (PSK).
- Use RSA certificates with a 3072-bit key length:
http://www.stevenjordan.net/2016/09/ipsec-security-levels.html
Client Requirements:
VPN clients must support the same cryptography in order to connect. Consider how Windows clients use DH2-3DES-SHA1 by default (yikes). I’ll provide instructions on how to update Windows 10, iPhones, and Android IPsec clients in an upcoming article.
PowerShell:
PowerShell can implement stronger IKEv2 secuirty targets for both Windows 8.1 and 2012R2:
New-NetIPsecMainModeCryptoProposal -Encryption AES256127 -Hash SHA256 -KeyExchange DH19
Be warned, the process is challenging. If you go this route don’t test it out on production servers. Also, the TechNet examples create new GPO policy specific to IKEv2. It does not account for all the other firewall rules. In other words, it creates a new firewall policy that only permits IKEv2 traffic -it’s easy to get locked out without console access.
The trick is to copy ALL firewalls rules and IPsec rules, crypto-sets, and IPsec rules (and anything else I haven’t thought of) to the new GPO -all through PowerShell. Alternately, use the GUI to copy the existing firewall settings to a separate firewall policy (i.e., separate from the PowerShell IKEv2 GPO). Do not use the GPO GUI to edit the IKEv2 (i.e., PowerShell) firewall or you risk corrupting it. You can then apply both GPOs to the VPN server.
Also, we may be able to accomplish the same thing by saving the object to the local policy store. Don’t take my word on this because I haven’t tried it yet. So yeah, this is a bit more work but the benefits should provide solid security and greater interoperability.
If anyone completes this script before I get around to it please forward me your work! Either way, I’m sure it will be good material for another blog article.
That’s it!
References:
https://msdn.microsoft.com/en-us/library/hh536658.aspx
https://technet.microsoft.com/en-us/library/jj573824(v=wps.630).aspx
https://technet.microsoft.com/en-us/library/jj554897(v=wps.630).aspx
Network Security
Routing
Windows Server

IKEv2 is a modern protocol developed by Microsoft and Cisco which was chosen as a default VPN type in OS X 10.11 (El Capitan) and Windows since 7. It supports strong encryption, auto reconnection on network change (MOBIKE), easy configuration and more.
This manual describes minimal IKEv2 server configuration for the most simple client setup based on username/password authentication.
No 3rd party software required on client side Only native OS tools used on client devices with Windows, MacOS, iOS.
No certificates importing on client Simple configuration. Just type login/passowrd and server address like any other VPN connection.
IKEv2 supported platforms
| Platform | Version | Ciphers | DH groups |
|---|---|---|---|
| Windows | ≥ 7 | 3DES, AES | 1024 |
| Windows Phone | ≥ 8.1 | 3DES, AES | 1024 |
| OS X | 10.11 El Capitan | DES 3DES (Default) AES-128/256(GCM) |
768 — 8192 1024 (Default) |
| iOS | ≥ 9 8 (no GUI) |
same as OS X | |
| Android | StrongSwan app | AES, AES-GCM | |
| Blackberry | 10 | DES 3DES AES-128/256 |
|
| Linux / FreeBSD | strongSwan ≥ 5 | any | any |
X.509 Certificates intro
In order to prevent man-in-the-middle attacks IPsec IKEv2 server always authenticates itself with an X.509 certificate using a strong RSA or ECDSA signature. After a secure communication channel has been established, clients authenticate themselves using the EAP-MSCHAPv2 protocol based on user name and password (or other authentication protocol). This means that client needs to verify X.509 certificate authenticity using CA in system keychan. Just as for HTTPS connections in a web browser. Server certificate must be valid for successful client authentication.
There are two ways of getting server certificate:
1. Use certificate issued by CA trusted by most operating systems. 2. Issue self-signed certificate and distribute your own CA to every clients’ system.
The First way makes connection setup much easier on client side because it does not require importing any certificates in the system. This way is recommended. Self-signed certificates are more complicated. Follow this way only if you know exactly what you need them for and how to manage your own PKI.
Fortunately X.509 certificates that we used to deploy as SSL certificates for HTTPS web servers are also suitable for IKEv2. You can get free certificate from Wosign, StartSSL, or LetsEncrypt, or any of your favorite CA.
The only few requirements wich certificate must comply with:
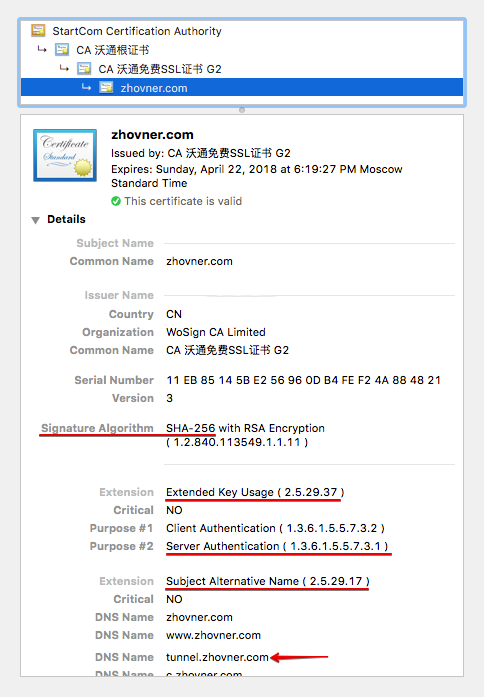
-
Have an Extended Key Usage (EKU) flag explicitly allowing the certificate to be used for authentication purposes. OID 1.3.6.1.5.5.7.3.1 (often called TLS server authentication) All certificated issued for web servers authenitcation have this flag.
-
Subdomain wich will be used as IKEv2 server adress must be in Subject Alternative Name. Needed domain must be added as a additional domain, not as general one when issuing SSL certificate. I will use
tunnel.zhovner.comas example. -
(Optional) If possible choose SHA-256 instead of SHA-1 signature algorithm, because SHA-1 is weak and deprecated.
Selfsigned certificates
Selfsigned certificates requires to deploy complete PKI. Issue your own Root Certificate Authority (CA), destribute this CA to all clients systems, issue server certificate, manage CLR (Certificate Revocation List) and OCSP. This subject is very complicated and goes out this manual, so I won’t describe it here. In most cases you don’t need selfsigned certificates. It is required only if you are planning to use client certificate authentication (without username/password). If you decided to use selfsigned certificates, take a look at EasyRSA fork than allows to issue certificates suitable both for OpenVPN and IKEv2 and simplifies PKI management.
strongSwan — powerfull and open source IPsec/IKEv2 server and client solution. You will need any Linux box with 2.6 or 3.x kernel to run strongSwan server. Check that your favorite distro have strongSwan ≥ 5.x package in repo. If you run Linux in virtual container, make sure that you have XEN or KVM virtualization but not OpenVZ, because OpenVZ not supporting kernel IPsec.
I recommend Linode as VPS hosting bacause they provide additional /64 IPv6 routable subnet that easely can be assigned to IPsec clients.
In this example I will use Debian 8.2 jessie as most common distro. Make sure that your stongSwan package not older than 5.2.1-6+deb8u2
Installing strongSwan and extra plugins:
apt-get install strongswan libcharon-extra-plugins
On this step you must have all necessary certificates and key files.
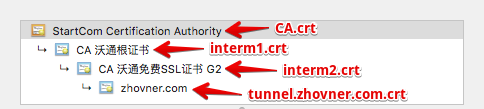
List of required files:
privatekey.pem — RSA private key which was used for CSR when issuing certificate. Key must be non-encrypted.
CA.crt — Root Certificate of your Certificate Authority. It can be downloaded from web or exported from system keychain.
intermediate1.crt — intermediate certificate of your Certificate Authority. If you get certificate from WoSign look at for Other Server.zip archive.
intermediate2.crt — (optional) Number of intermediate certificates may be varied, depending on your CA.
my.crt — your certificate. In the example this file will be named tunnel.zhovner.com.crt
How this chain looks from Google Chrome certificate information
Place each file to the proper path:
/etc/ipsec.d/private/privatekey.pem
/etc/ipsec.d/cacerts/ca.crt
/etc/ipsec.d/cacerts/intermediate1.crt
/etc/ipsec.d/cacerts/intermediate2.crt
/etc/ipsec.d/certs/tunnel.zhovner.com.crt
Edit /etc/ipsec.secrets that contains users and private keys credentionals:
# This file holds shared secrets or RSA private keys for authentication.

# RSA private key for this host, authenticating it to any other host
# which knows the public part.

# this file is managed with debconf and will contain the automatically created private key
# this string can be removed if you not use debconf for strongswan like in our case
include /var/lib/strongswan/ipsec.secrets.inc

# This is private key located at /etc/ipsec.d/private/piratekey.pem
: RSA privatekey.pem

# Create few VPN users for testing
obama : EAP "SuperPassword123"
putin : EAP "KremlinSecure666"
Edit /etc/ipsec.conf:
config setup

    #  Allows few simultaneous connections with one user account.
    #  By default only one active connection per user allowed.
    #  This option also usefull if you have limited rightsourceip pool and want to kick your ghost connection while reconnecting.
    uniqueids=no

    # Increase debug level
    # charondebug = ike 3, cfg 3

conn %default

    # Most universal cypher list for all platforms
    # Comment this line if connection fails
    ike=aes256-sha256-modp1024,aes256-sha256-modp2048

    # Dead peer detection will ping clients and terminate sessions after timeout
    dpdaction=clear
    dpddelay=35s
    dpdtimeout=2000s

    keyexchange=ikev2
    auto=add
    rekey=no
    reauth=no
    fragmentation=yes
    #compress=yes

    # left - local (server) side
    leftcert=tunnel.zhovner.com.crt # Filename of certificate located at /etc/ipsec.d/certs/
    leftsendcert=always
    # Routes pushed to clients. If you don't have ipv6 then remove ::/0
    leftsubnet=0.0.0.0/0,::/0

    # right - remote (client) side
    eap_identity=%identity
    # ipv4 and ipv6 subnets that assigns to clients. If you don't have ipv6 then remove it
    rightsourceip=10.1.1.0/24,2a00:1450:400c:c05::/112
    rightdns=8.8.8.8,2001:4860:4860::8888

# Windows and BlackBerry clients usually goes here
conn ikev2-mschapv2
    rightauth=eap-mschapv2

# Apple clients usually goes here
conn ikev2-mschapv2-apple
    rightauth=eap-mschapv2
    leftid=tunnel.zhovner.com

# If you need assign static IP to some clients for example for port forwarding
# it can be matched by specific rightid
# conn static-ip-for-putin
#   also="ikev2-mschapv2-apple"
#   rightid=putin
#   rightsourceip=10.1.1.99,2a00:1450:400c:c05::1337
#   rightdns=8.8.8.8,2001:4860:4860::8888
Restart strongSwan to read new config files:
systemctl restart strongswan
Verify that all cerifitaces configured correctly by executing ipsec listall Notice that output is very long and must be readed from the top. Full certificates chain must be presented and Entity Certificate must contain “has private key”.
List of X.509 End Entity Certificates:

  altNames:  zhovner.com, www.zhovner.com, hub.zhovner.com, tunnel.zhovner.com, ....
  subject:  "CN=zhovner.com"
  issuer:   "C=CN, O=WoSign CA Limited, CN=CA CA 沃通免费SSL证书 G2"
  serial:    11:eb:85:14:5b:e2:56:96:0d:b4:fe:f2:4a:88:48:21
  validity:  not before Apr 22 17:19:27 2015, ok
             not after  Apr 22 18:19:27 2018, ok
  pubkey:    RSA 2048 bits,

<font color="red"><b>has private key</b></font>
  keyid:     0a:c6:c8:96:59:73:2c:6c:6f:7d:03:d0:35:da:e8:49:db:86:6e:fb
  subjkey:   f8:b0:bb:e9:9b:2c:8c:a2:90:b2:c0:77:b5:2b:c1:1f:d0:98:7e:d7
  authkey:   30:da:74:86:f3:28:90:56:9e:d7:31:31:c2:bd:59:cd:93:12:39:1d

List of X.509 CA Certificates:

  subject:  "C=CN, O=WoSign CA Limited, CN=CA 沃通免费SSL证书 G2"
  issuer:   "C=CN, O=WoSign CA Limited, CN=CA 沃通根证书"
  serial:    01:58:8c:3a:35:07:b3:f8:97:23:1c:76:b7:ef:85:dd
  validity:  not before Nov 08 03:58:58 2014, ok
             not after  Nov 08 03:58:58 2029, ok
  pubkey:    RSA 2048 bits
  keyid:     7b:07:23:98:e4:9f:25:2f:19:3f:76:4d:cd:0f:70:f6:4b:fc:b0:e6
  subjkey:   30:da:74:86:f3:28:90:56:9e:d7:31:31:c2:bd:59:cd:93:12:39:1d
  authkey:   e0:4d:bf:dc:9b:41:5d:13:e8:64:f0:a7:e9:15:a4:e1:81:c1:ba:31
  pathlen:   0

  subject:  "C=CN, O=WoSign CA Limited, CN=CA 沃通根证书"
  issuer:   "C=IL, O=StartCom Ltd., OU=Secure Digital Certificate Signing, CN=StartCom Certification Authority"
  serial:    1f:ce:a7:f6:a9:7f:e9
  validity:  not before Sep 18 02:46:36 2006, ok
             not after  Jan 01 02:59:59 2020, ok
  pubkey:    RSA 4096 bits
  keyid:     c2:06:fb:d5:3b:ba:0c:ee:f2:d2:d2:45:3d:07:52:26:3a:9f:e7:5f
  subjkey:   e0:4d:bf:dc:9b:41:5d:13:e8:64:f0:a7:e9:15:a4:e1:81:c1:ba:31
  authkey:   4e:0b:ef:1a:a4:40:5b:a5:17:69:87:30:ca:34:68:43:d0:41:ae:f2
  pathlen:   2

  subject:  "C=IL, O=StartCom Ltd., OU=Secure Digital Certificate Signing, CN=StartCom Certification Authority"
  issuer:   "C=IL, O=StartCom Ltd., OU=Secure Digital Certificate Signing, CN=StartCom Certification Authority"
  serial:    01
  validity:  not before Sep 17 23:46:36 2006, ok
             not after  Sep 17 22:46:36 2036, ok
  pubkey:    RSA 4096 bits
  keyid:     23:4b:71:25:56:13:e1:30:dd:e3:42:69:c9:cc:30:d4:6f:08:41:e0
  subjkey:   4e:0b:ef:1a:a4:40:5b:a5:17:69:87:30:ca:34:68:43:d0:41:ae:f2
That’s all. If everything looks right try connect to server. For debbuging connection problems run live logs stream journalctl -f -u strongswan
NAT
For let out VPN clients into Internet you need configure NAT. This subject is not covered in this manual.
For testing porpose (insecure):
echo 1 > /proc/sys/net/ipv4/ip_forward iptables -t nat -A POSTROUTING -o eth0 -j MASQUERADE
IPv6 issues
It is possible to assign native IPv6 addresses as well as IPv4 to VPN clients. For this you will need additional IPv6 subnet routed to you machine but not assigned on server interface. Unfortunately from lots of VPS providers that I’ve used, only Linode provide additional /64 IPv6 subnet for free.
For DigitalOcean and others providers you will need setup NDP proxy. Related thread https://lists.strongswan.org/pipermail/users/2015-July/008365.html
Client configuration
macOS >10.11 and iOS 9 autconfiguration profile
A configuration profile is an XML file that allows you to distribute configuration information. If you need to configure a large number of devices or to provide lots of custom email settings, VPN profiles, network settings, or certificates to a large number of devices, configuration profiles are an easy way to do it. In our case we will use VPN payload for one click configuration. For IKEv2 VPN connections the configuration profile is the only way to set advanced options like ciphers, DH groups, PFS, rekey timeout and so on. More about it https://developer.apple.com/library/ios/featuredarticles/iPhoneConfigurationProfileRef/Introduction/Introduction.html
Configuration profile can be created manually or via Apple Configurator 2 utility. Syntax is same for OS X and iOS. Profile can be distributed as mail attachments or via http link. Profile name must end with .mobileconfig and if you plan to share it over HTTP web server should response with Content-Type application/octet-stream.
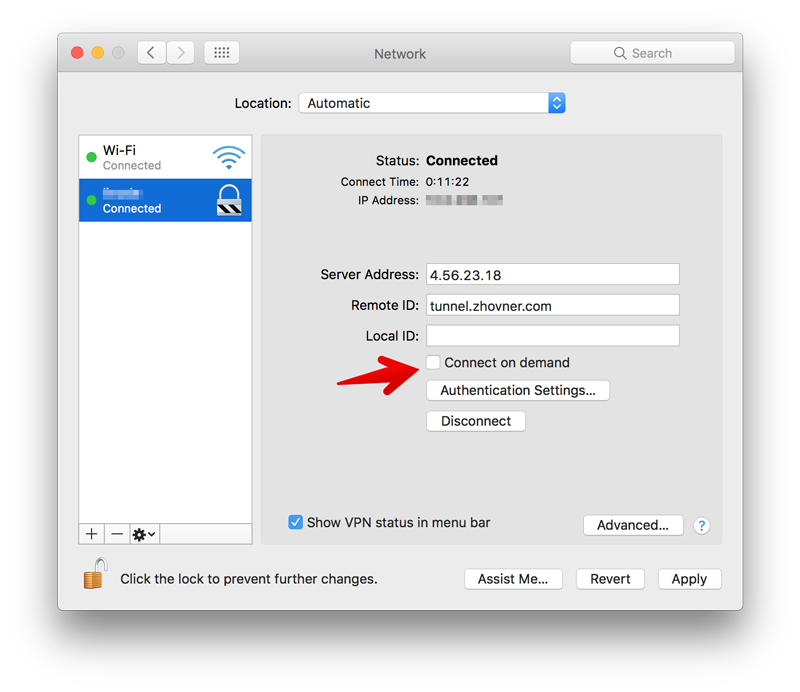
Always On Mode
In Apple terms “Always On” mode prevents user from disconnect VPN manually. This mode can be configured only on device that in supervision mode. But you can do the same without supervision mode in more flexible way by usign rule that connects VPN automatically every time when you have internet connection. And reconnect it when connection lost. “On demand” mode can be configured only via .mobileconfig profile.
This mode can cause a problems when you can’t connect to the VPN server, becuase it will block internet access without VPN connection. To disable Always On mode unchek On Demand options in VPN connection preferences.
Debug log in macOS
If your connection doesn’t work in macOS, it silently disconnect without any error code. Debug log can be viewed in system utility Console.app. Type networkextension in search and try to connect.
To increase verbosity: sudo defaults write /Library/Preferences/com.apple.networkextension.control.plist LogLevel 6 Back to default: sudo defaults write /Library/Preferences/com.apple.networkextension.control.plist LogLevel 5
Also read this: https://forums.developer.apple.com/thread/31375
Autoconfig profile template
The easiest way to get working profile is to edit 4 variables in this template: RemoteAddress, RemoteIdentifier, AuthName, AuthPassword. Edit the rest of template following comments. Example profile of our VPN server supervpn.mobileconfig:
<?xml version="1.0" encoding="UTF-8"?>
<!DOCTYPE plist PUBLIC "-//Apple//DTD PLIST 1.0//EN" "http://www.apple.com/DTDs/PropertyList-1.0.dtd">
<plist version="1.0">
<dict>
    <key>PayloadContent</key>
    <array>
        <dict>
            <key>IKEv2</key>
            <dict>

                <!-- Username and password from ipsec.secrets -->
                <key>AuthName</key>
                <string>obama</string>
                <key>AuthPassword</key>
                <string>SuperPassword123</string>

                <!-- Hostname or IP address of VPN server.
                 Chosing IP address instead of DNS name can avoid issues with client DNS resolvers and speed up connection process. -->
                <key>RemoteAddress</key>
                <string>43.12.22.134</string>

                <!-- leftid in ipsec.conf -->
                <key>RemoteIdentifier</key>
                <string>tunnel.zhovner.com</string>

                <key>AuthenticationMethod</key>
                <string>Certificate</string>
                <key>ChildSecurityAssociationParameters</key>
                <dict>

                <!-- in ipsec.conf this proposal is: ike=aes256-sha256-modp2048 -->
                    <key>DiffieHellmanGroup</key>
                    <integer>14</integer>
                    <key>EncryptionAlgorithm</key>
                    <string>AES-256</string>
                    <key>IntegrityAlgorithm</key>
                    <string>SHA2-256</string>
                    <key>LifeTimeInMinutes</key>
                    <integer>1440</integer>
                </dict>
                <key>DeadPeerDetectionRate</key>

                <!--
                    None (Disable)
                    Low (keepalive sent every 30 minutes)
                    Medium (keepalive sent every 10 minutes)
                    High (keepalive sent every 1 minute)
                -->
                <string>High</string>
                <key>ExtendedAuthEnabled</key>
                <true/>
                <key>IKESecurityAssociationParameters</key>
                <dict>
                    <key>DiffieHellmanGroup</key>
                    <integer>14</integer>
                    <key>EncryptionAlgorithm</key>
                    <string>AES-256</string>
                    <key>IntegrityAlgorithm</key>
                    <string>SHA2-256</string>
                    <key>LifeTimeInMinutes</key>
                    <integer>1440</integer>
                </dict>

                <!--
                Always On OnDemand Rule
                Cen be disabled in connection preferences by "On Demand" checkbox
                http://www.v2ex.com/t/137653
                https://developer.apple.com/library/mac/featuredarticles/iPhoneConfigurationProfileRef/Introduction/Introduction.html
                https://github.com/iphoting/ovpnmcgen.rb
                -->
                <key>OnDemandEnabled</key>
                    <integer>1</integer>
                    <key>OnDemandRules</key>
                    <array>
                        <dict>
                            <key>Action</key>
                            <string>Connect</string>
                        </dict>
                    </array>
            </dict>
            <key>IPv4</key>
            <dict>
                <key>OverridePrimary</key>
                <integer>1</integer>
            </dict>
            <key>PayloadDescription</key>
            <string>Configures VPN settings</string>
            <key>PayloadDisplayName</key>
            <string>VPN</string>
            <key>PayloadIdentifier</key>
            <string>com.apple.vpn.managed.96C1C38F-D4D6-472E-BA90-9117ED8896B5</string>
            <key>PayloadType</key>
            <string>com.apple.vpn.managed</string>
            <key>PayloadUUID</key>
            <string>96C1C38F-D4D6-472E-BA90-9117ED8896B5</string>
            <key>PayloadVersion</key>
            <integer>1</integer>

            <!-- VPN connection name in Network Preferences -->
            <key>UserDefinedName</key>
            <string>London VPN</string>
            <key>VPNType</key>
            <string>IKEv2</string>
        </dict>
    </array>

    <!-- Set the name to whatever you like, it is used in the profile list on the device -->
    <key>PayloadDisplayName</key>
    <string>My Super IKEv2 VPN</string>

    <!-- A reverse-DNS style identifier (com.example.myprofile, for example) that identifies the profile. This string is used to determine whether a new profile should replace an existing one or should be added. -->
    <key>PayloadIdentifier</key>
    <string>com.zhovner.tunnel</string>

    <!-- A globally unique identifier, use uuidgen on Linux/Mac OS X to generate it -->
    <key>PayloadUUID</key>
    <string>F3FAD91C-019C-4A79-87A1-CF334C583339</string>
    <key>PayloadType</key>
    <string>Configuration</string>
    <key>PayloadVersion</key>
    <integer>1</integer>
</dict>
</plist>
iOS manual configuration
OS X 10.11 manual configuration
It’s impossible to set advanced options (like ciphers, DH groups, PFS, rekey timeout) via GUI. If you need it use configuration profile method.
-
Create new VPN connection in network preferences

-
Choose type IKEv2 and name of connection
-
Set server address and RemoteID (leftid in ipsec.conf)
-
Enter username and password from ipsec.secrets file
-
Connect to VPN

Windows 7/8/10 IKEv2 manual configuration
In windows you can’t define RemoteID separately from server address, so FQDN should be used. Also keep in mind that IPv6 will not work in windows.
Linux roadwarrior client
This also works on MacOS/FreeBSD
Install strongswan
Configure CA’s
Openssl and ca-certs must be installed.
rmdir /etc/ipsec.d/cacerts
ln -s /etc/ssl/certs /etc/ipsec.d/cacerts
Setup config /etc/ipsec.conf
conn my-super-vpn

    keyexchange=ikev2
    #forceencaps=yes
    dpdaction = restart
    dpddelay = 30s
    keyingtries=%forever

    # start at boot
    auto=start

    rekey=no
    reauth=no
    fragmentation=yes
    #compress=yes

    # left - local  side
    left=%any
    eap_identity=x220
    leftsourceip=%any,%any6
    leftauth=eap-mschapv2

    # right - remote side
    right=q.zhovner.com
    rightsubnet=0.0.0.0/0,::/0
Connect to server