
Одна из самых необходимых вещей, которую веб-разработчики захотят установить в Windows 10 для работы веб сервера – это службы IIS (Internet Information Services) . Подробнее про IIS и его сравнение с Apache, другим популярным веб сервером, можно прочесть в нашей статье.

Установка IIS
На самом деле это даже не установка, как таковая, а включение службы, потому что в Windows 10 этот компонент есть сразу, но он просто выключен.
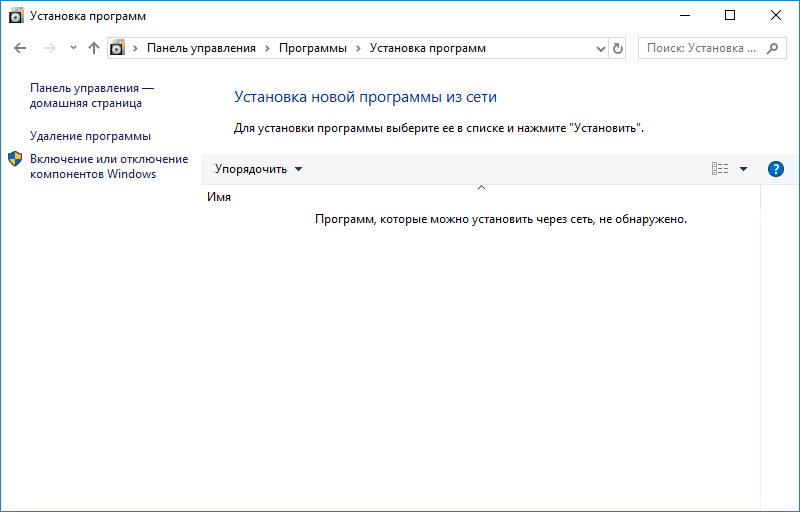
Первым делом нам нужно нажать комбинацию клавиш Win + R, и после того как появится окно “Выполнить”, нам нужно набрать “appwiz.cpl” и нажать OK. Либо мы просто можем пойти в Панель управления и там выбрать пункт Программы – Программы и компоненты – Установка и удаление программ.

Тут нам нужно выбрать пункт “Включение или отключение компонентов Windows”.

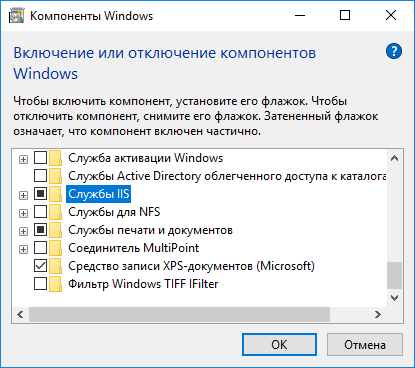
Тут находим пункт “Службы IIS”, ставим на против него галочку и нажимаем ОК, после чего служба будет включена.

Если вам, как разработчику, нужны дополнительные параметры, то мы можете раскрыть этот пункт, нажав на плюсик, и включить или отключить те функции, которые вам необходимы.

После того как все сделано можно запустить браузер, и вбить в адресной строке localhost, чтобы убедиться, что все работает. Также в меню Пуск и в папке «Средства администрирования» появится пункт «Диспетчер служб IIS». Также туда можно попасть снова нажав Win + R и набрав inetMgr.

Служба IIS (Internet Information Services) необходима для работы ASP.NET серверной части СпрутМонитор.
1. Перейдите в Панель Управления -> Программы -> Установка программ. Щелкните на пункт меню (слева) Включение и отключение компонентов Windows.
2. Отметьте пункт Службы IIS, и нажмите кнопку ОК:
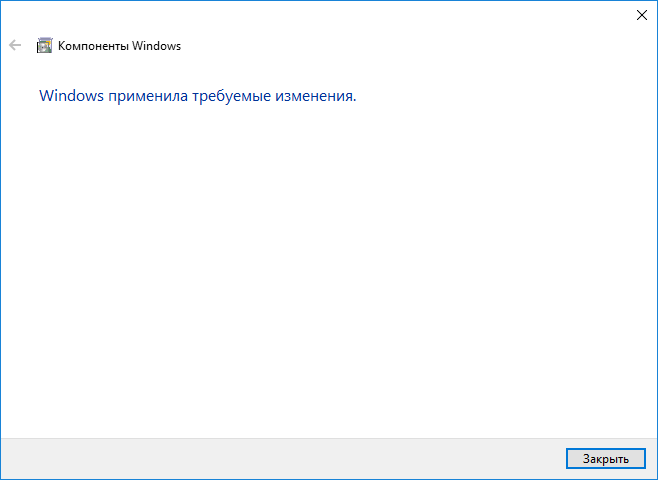
3. Дождитесь окончания установки всех необходимых компонентов:
4. После завершения установки, рекомендуется перезагрузить компьютер.
5. Запустите браузер и перейдите по адресу http://localhost/. Если открылась тестовая страница IIS, значит установка произведена успешно.
См. также: Установка серверной версии СпрутМонитор.
Microsoft’s Internet Information Services (IIS) is a versatile and robust web server for hosting websites and applications. If you’re a developer or a website admin looking to host your web application on your local machine or start experimenting with web development, you’ll find that installing IIS on Windows 10 is an indispensable skill. This article will guide you through every step to install and configure IIS on your Windows 10 system.
Understanding IIS
IIS is a web server software created by Microsoft, allowing you to host and serve web content to users over the internet or through intranets. Its numerous features include support for dynamic website content, security mechanisms such as authentication, and more. IIS supports various web standards like HTTP, HTTPS, FTP, FTPS, and SMTP, making it a great choice for developers working with ASP.NET and other frameworks.
Why Use IIS On Windows 10?
Installing IIS on Windows 10 comes with a plethora of benefits:
- Integrated Environment: If you’re developing web applications using Microsoft technologies, IIS provides an environment optimized for those apps.
- Local Testing: You can test your applications locally before deploying them to a live server.
- Free: IIS is included with the Windows operating system, making it a cost-effective solution.
- User-friendly: The graphical interface provides an intuitive way to configure and manage your web applications.
- Advanced Features: IIS supports a wide array of features such as application pools, security settings, and logging tools, giving you deep control over your web server.
With these advantages in mind, let’s dive into the installation process.
Prerequisites
Before you install IIS on Windows 10, ensure that you meet the following prerequisites:
- Windows 10 Version: IIS is available for Windows 10 Professional, Enterprise, and Education versions. It isn’t available on Windows 10 Home editions.
- Administrator Access: You must have administrative rights to your computer to install IIS.
Step-by-Step Installation Guide
Step 1: Access Windows Features
To start the installation of IIS, you’ll need to access the Windows Features dialogue box. Here’s how to do that:
- Press the Windows key on your keyboard or click on the Start menu button.
- Type
Control Paneland press Enter to open it. - In the Control Panel, select Programs and then select Turn Windows features on or off.
Step 2: Enable IIS
- In the Windows Features dialogue, scroll down until you see Internet Information Services.
- Check the box next to it to select the main IIS feature.
- To enable specific components, expand the Internet Information Services dropdown by clicking the little arrow. Here, you’ll find options grouped into two categories:
- Web Management Tools: Includes features like the IIS Management Console.
- World Wide Web Services: Contains features like Application Development Features, Common HTTP Features, Security, and so on.
- Enable the components that are relevant to your needs. For instance:
- Under Application Development Features, check options such as ASP.NET, CGI, and Management Compatibility if you’re planning on developing .NET applications.
- Under Common HTTP Features, make sure Static Content and Default Document are checked.
- Click OK to proceed.
Step 3: Wait for the Installation
After clicking OK, Windows will take a few moments to install the necessary components. During the installation, you’ll see a status indicator, and once it’s complete, a confirmation window will appear.
Step 4: Check the Installation
To ensure that IIS is installed correctly, follow these steps:
- Press the Windows key + R simultaneously to open the Run dialog.
- Type
inetmgrand hit Enter. This should launch the IIS Manager. If it opens without any error, it means IIS is installed successfully on your system. - Alternatively, you can open a web browser and type in
http://localhost. If you see the default IIS welcome page, then your installation was successful.
Configuring IIS
Default Website Configuration
IIS comes with a default website that runs on port 80. You can configure this or create a new website.
Step 1: Open IIS Manager
- Open the IIS Manager again (press Windows + R, type
inetmgr, and hit Enter). - In the left pane, you should see your computer’s name along with the entries for Sites.
Step 2: Managing Your Default Website
- To manage the default website, expand the Sites node and click on Default Web Site.
- Here, you can edit settings such as bindings, basic authentication, and more, by right-clicking on it and selecting Edit Bindings or Edit.
- You can also start, stop, or restart your site. Use these options wisely, especially on production servers.
Creating a New Site
If you prefer to create a new site, follow these steps:
- Right-click on Sites and click Add Website.
- Give your site a name and select the physical path for your site content (the folder where your website files are stored).
- Assign a unique binding. The default is
httpon port80. - Click OK to create the site. Now you should see it listed in the Sites section.
Setting Up Application Pools
Application pools are essential in separating different web applications to ensure they run under different instances of IIS. Here’s how to create or configure an application pool:
- Under the left sidebar of IIS Manager, click on Application Pools.
- Right-click on the Application Pools node, and you’ll find options to create a new pool.
- When creating a new pool, specify options like .NET CLR version based on your application’s requirements.
- Once ready, associate your website with the application pool by right-clicking the site -> Manage Application -> Advanced Settings, and set the application pool accordingly.
Security Configurations
Security is crucial in web applications. To harden your IIS environment:
- Use HTTPS: Enable SSL to secure data transmission. You can do this via the Certificates management tool in IIS.
- Authentication Methods: Configure and enable authentication mechanisms according to your security requirements.
- Authorization Rules: Implement authorization rules to control who can access certain parts of your site.
Logging and Monitoring
IIS provides robust logging options to help you monitor your web server:
- Enable detailed logging by selecting your site, navigating to the Logging feature, and configuring log file settings.
- Set up Performance Monitoring to keep track of application performance.
Troubleshooting Common Issues
Even after a successful installation, you may encounter some issues. Here’s how to deal with common problems:
- Access Denied Errors: Ensure that your site folder permissions allow the IIS user (usually
IUSRorApplicationPoolIdentity) permission to access that directory. - Application Not Running: Check your application pool settings to ensure they correspond with your site’s requirements.
- Configuration Errors: If the site isn’t running as expected, reviewing the Event Viewer logs may reveal more information.
Conclusion
Installing IIS on Windows 10 is a great way to gain a deeper understanding of web server management and web development. Whether you’re building a personal project or developing applications for production, IIS provides a rich variety of features designed to support your needs.
By following this guide, you can easily install and configure IIS, set up your websites, and manage application pools and security settings to ensure that your web applications run efficiently and securely. With practice, you’ll find that managing IIS becomes second nature, allowing you to focus more on development and less on configuration.
Feel free to explore the advanced features of IIS as you grow in your web development journey. IIS remains a powerful tool in a developer’s arsenal, especially when leveraging Microsoft technologies. Happy hosting!
In this tutorial, we’ll explain, step by step, how to install IIS on Windows 10 so that you can test code or even publish web content from your desktop.
IIS is Microsoft’s web and FTP server and it is widely used by IT professionals around the world. This is mainly for two reasons. Firstly, it is already included with Microsoft Windows and is very easy to install, and secondly, it’s extremely simple to use.
It can also be installed on any Windows desktop or laptop, which means that you can even test changes or web content without needing to set up a special pilot or test environment.
NOTE: This tutorial will focus just on the installation process for Windows 10. We’re not going to go into any detail about how to use IIS today. If you’re like to learn how to install IIS on Windows Server, check out the tutorial on our blog, “How to Install IIS Web Server”.
Part 1 – Installing IIS on Windows 10
To install Internet Information Services (IIS) on a Windows 10 client device, first, click on the search bar and type «Control Panel» (1) and click on the app that appears in the results (2).

Next, double-click on Programs and Features (3).

A new window will appear. Click on «Turn Windows features on or off» (4).

Another window will now appear showing a list of features. Search the list to find Internet Information Services, expand the options and select the options you wish to install (5). The following options will be selected by default:
- Web Management Tools.
- World Wide Web Services.
«FTP Server» will be unchecked by default, but you can select it if you want to include it.
Once you’ve selected the options you want to install, click on OK (6) to begin the installation. You will then see a window with a progress bar until the process has finished.
There’s no need to restart your system to begin using the service, but we recommend it to clear the installation buffers, etc. and ensure the best performance.

Part 2 – Checking That IIS Has Been Installed Correctly
Now that the installation process has finished, it’s time to check that it has been installed correctly. First, open your web browser and type «127.0.0.1» in the address bar (7), which, if everything has run smoothly, will show the information loaded from the web server.

Another way of checking that IIS is running correctly is to open the Internet Information Services (IIS) Manager. Simply type «IIS» in the search bar (8) and click on Internet Information Services (IIS) Manager (9).

This will open the IIS Manager, which you can use to carry out all configuration and administration tasks for the web server.

If either of these two checks work correctly, you can safely say that you have installed IIS on your Windows 10 device. Congratulations!
Summary
In this tutorial, we’ve shown how you can quickly install IIS (Internet Information Services) on your Windows 10 device so that you can test out web content and changes from your desktop.
The process is really simple, and you should find everything you need in this tutorial, but if you have any problems, don’t hesitate to contact us.
And if you’re interested in learning about other things you can do on Windows 10, check out our article on How to Install Hyper-V on Windows 10.
Thanks for choosing Jotelulu!
Поднимаем IIS на Windows 10. Мне эту штука нужна для выкладки файликов по HTTP в своей подсети.
IIS (Internet Information Services, до версии 5.1 — Internet Information Server) — проприетарный набор серверов для нескольких служб Интернета от компании Microsoft. IIS распространяется с Windows NT. Основным компонентом IIS является веб-сервер, который позволяет размещать в Интернете и локальной сети сайты. Это служба WWW (называемая также W3SVC), которая предоставляет клиентам доступ к сайтам по протоколам HTTP и, если произведена настройка, HTTPS.
IIS поддерживает протоколы HTTP, HTTPS, FTP, POP3, SMTP, NNTP.
Открываем Панель управления → Программы → Установка программ.

Кликаем на «Включение или отключение компонентов Windows».

Ставим галку на «Службы IIS», OK.

Начинается установка.

Применяются изменения.

IIS заработал:

Даже не пришлось ребутать сервер.
Ранее писал похожую статью, для серверной ОС: Установка IIS в Windows Server 2012 R2