

Установка IIS
На самом деле это даже не установка, как таковая, а включение службы, потому что в Windows 10 этот компонент есть сразу, но он просто выключен.
Первым делом нам нужно нажать комбинацию клавиш Win + R, и после того как появится окно “Выполнить”, нам нужно набрать “appwiz.cpl” и нажать OK. Либо мы просто можем пойти в Панель управления и там выбрать пункт Программы – Программы и компоненты – Установка и удаление программ.

Тут нам нужно выбрать пункт “Включение или отключение компонентов Windows”.

Тут находим пункт “Службы IIS”, ставим на против него галочку и нажимаем ОК, после чего служба будет включена.

Если вам, как разработчику, нужны дополнительные параметры, то мы можете раскрыть этот пункт, нажав на плюсик, и включить или отключить те функции, которые вам необходимы.

После того как все сделано можно запустить браузер, и вбить в адресной строке localhost, чтобы убедиться, что все работает. Также в меню Пуск и в папке «Средства администрирования» появится пункт «Диспетчер служб IIS». Также туда можно попасть снова нажав Win + R и набрав inetMgr.

IIS (internet information services manager) on Windows 10/7 Desktop or server is basically a flexible and secure Web server provided by Microsoft on its desktop and server operating systems. Just like Apache and Nginx in Linux Distros on WIndows we have IIS.
Install and configure the webserver (IIS) in Windows 10Step 1: Enable Internet Information Services -IIS on Windows 10 Step 2: Start Internet information service (IIS) ManagerStep 3: Test IIS WebserverStep 4: Configure and install WordPress with IIS ManagerHow to Disable IIS web server on Windows 10
Install and configure the webserver (IIS) in Windows 10
Microsoft didn’t integrate only the desktop version of Windows with IIS- Internet Information Services instead with this even Windows 10 Home can be turned in to a web server with the help of this feature.
However, as compared free and open-source server such as Apache, the configuration and the dealing with IIS web server could be a little complex, yet if you are a Windows Desktop or server user, the usage of IIS would be best because of better integration into the system.
The IIS, which also contain an FTP server, is not intended on the client to provide company websites or heavily used web applications. The Windows 10 desktop IIS is mainly for developing or for the demonstration of web applications.
So, if you want to set up and run some application on Windows 10 PC using IIS, for example, WordPress, then here is the step by step guide to install and configure this web server.
Step 1: Enable Internet Information Services -IIS on Windows 10
So, to install the Windows 10 web server feature, we don’t have to download some special packages, it is already in our system and just we need to activate.
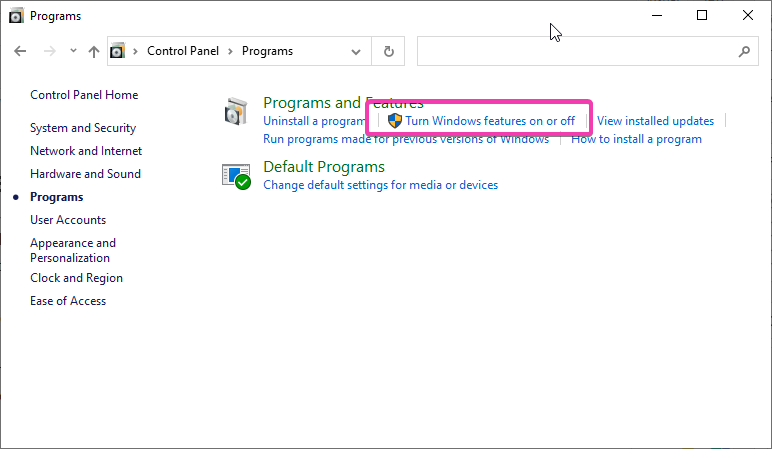
Go to Control panel-> Select Program-> Turn Windows features on and off.
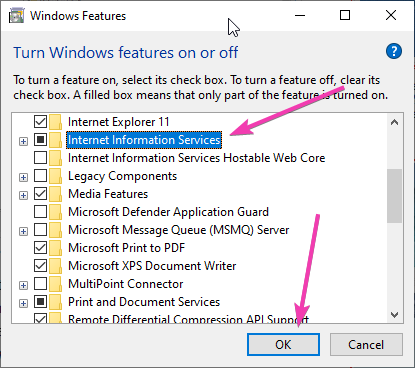
Now, scroll down and select “Internet Information Services” and press OK button to get it installed. Later restart the PC to make changes into effect.
The installation of it is very easy, by default when we select the IIS management console the Web Management Tools and Word Wide services along with HTTP features, performance features, security, system status and diagnostics are automatically going to be install. If you want FTP server as well then click on the + icon given in front of Internet information services and select FTP server option too.
Step 2: Start Internet information service (IIS) Manager
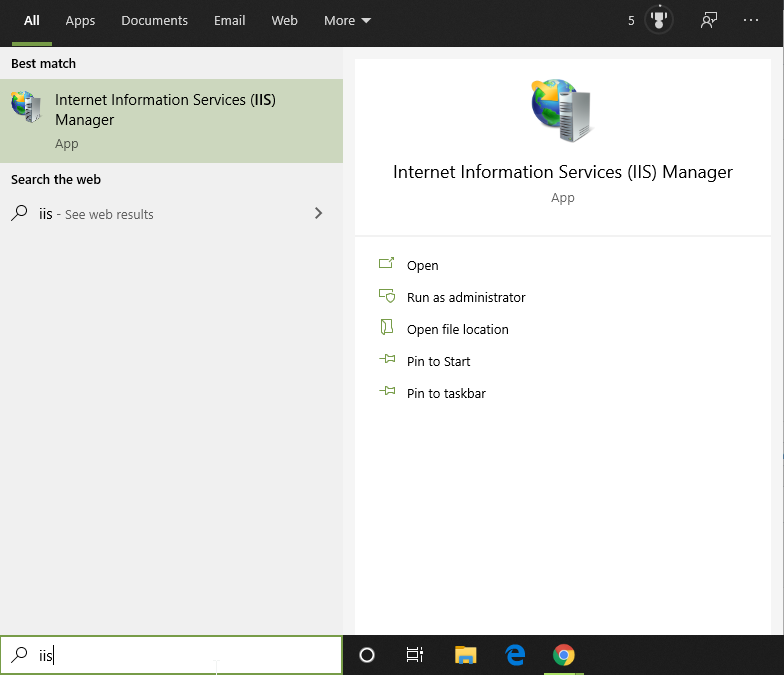
Go to Windows 10 Search box and simply type IIS and you will get installed webserver Manager application, click on it to start.
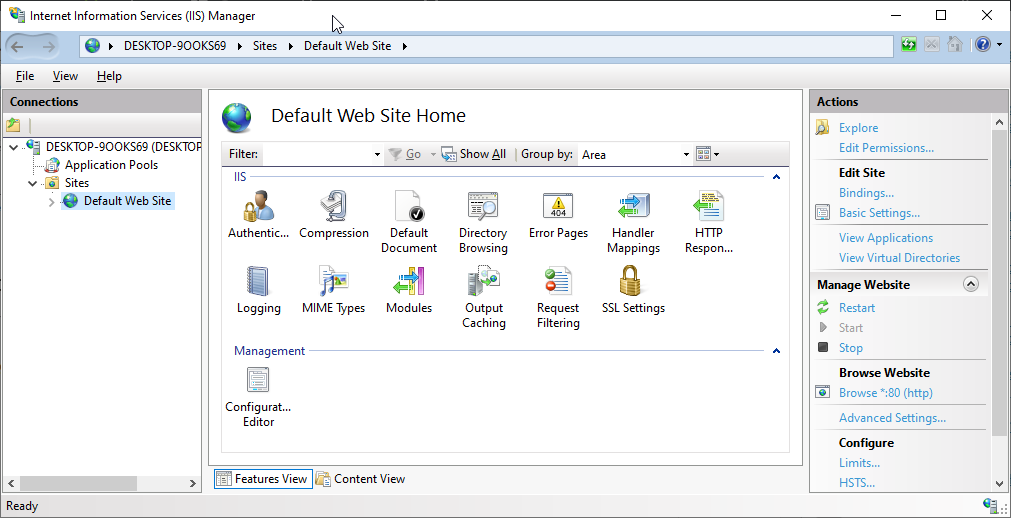
Finally, you will see the IIS manager with so many options to operate and handle different Web server application tasks.
Step 3: Test IIS Webserver
After the installation of IIS, Windows will automatically start the webserver services on default port number 80. Thus, to check whether it is functioning properly or not, open your system browser and type http://localhost to see.
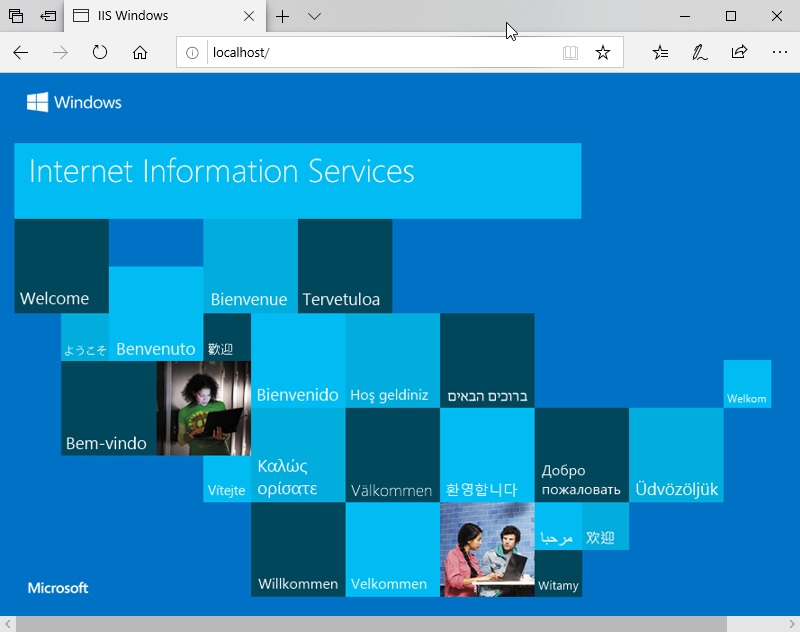
By default, the IIS shows the local HTML page to show everything is working fine. In case not then check whether the HTTP server (localhost) is listening on port 80. Run the following command in command prompt.
netstat -a -p tcp -n
However, for newly installed IIS webserver such problem would not appear.
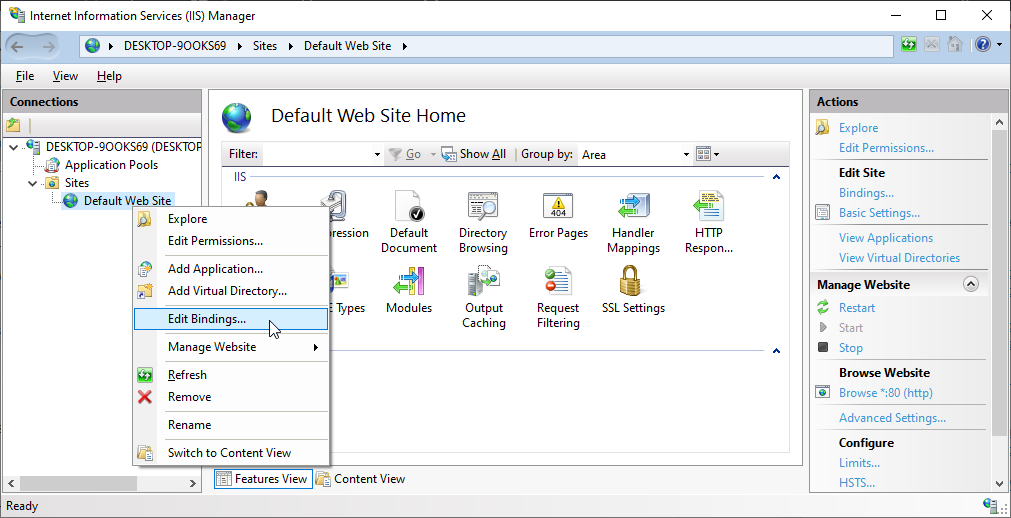
In case, your port 80 is already bound to some other application then you can change the default website or Http listening port on IIS.
Right-click on Default web site option given under the Sites and select Edit Bindings.
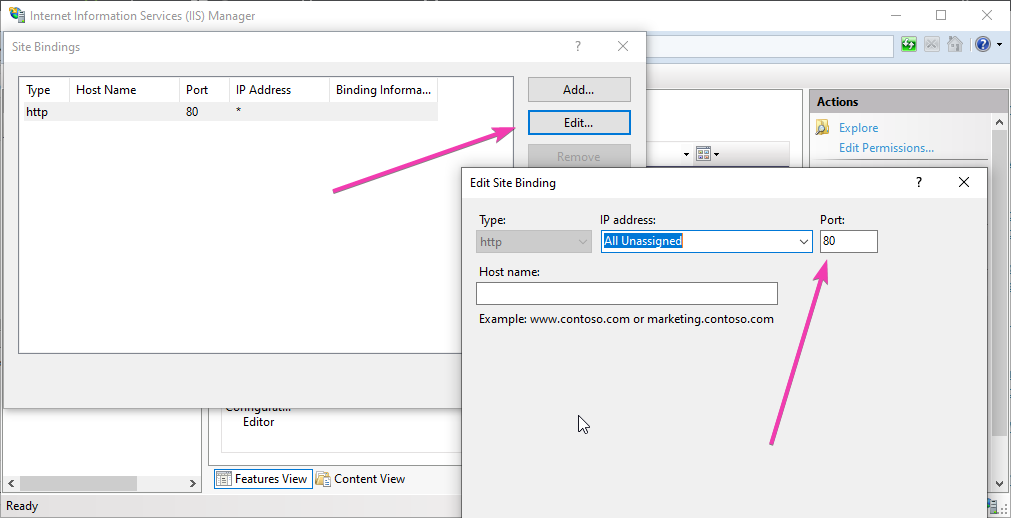
Now Click on Edit button and change the port number to one which you want to use. You can also specify any particular IP-address you want to use that port number.
Step 4: Configure and install WordPress with IIS Manager
So, to give you an idea of how to host an HTML website or web application like WordPress on IIS, we are going to configure it.
However, hosting a website on IIS, the steps will be the same for both WordPress or just a simple HTML one. Yet being a web application WordPress needs PHP support too.
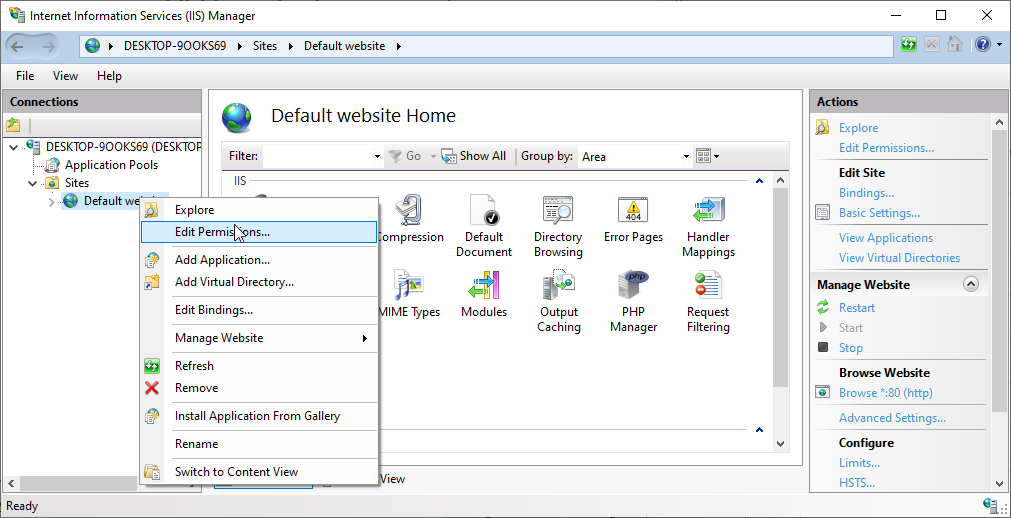
Right-click on the default website and select Explore.
The root directory at %SystemDrive% \inetpub\wwwroot will open. Now simply extract all your WordPress file there. If it asks for permission give it.
Now, Select your newly created website and click on the restart option given in the right-side panel.

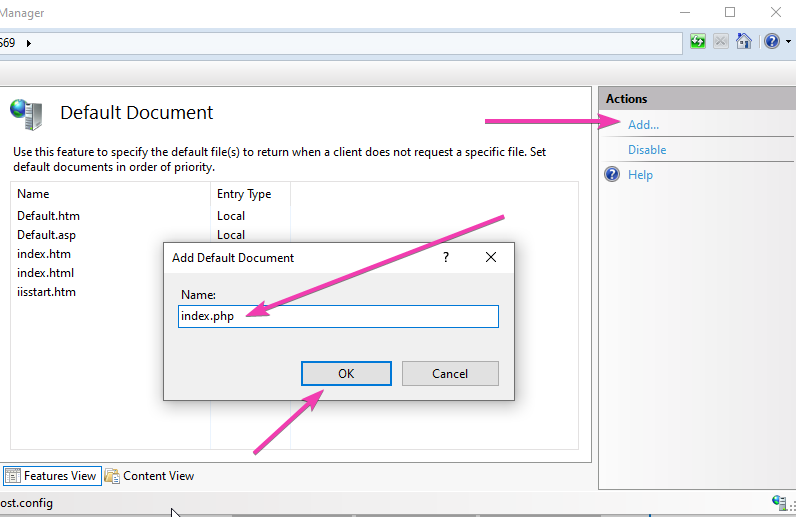
Add index.php to the Default Document.
Select Default website and double click on Default Document icon then Add link given on the right-side panel. Type index.php and save it.
Open the browser and point it to http://localhost, this time it will show the hosted website. However, in case of WordPress, it gives an error because we haven’t yet configured its Wp-config file.
Again right-click on the Default website ->Explore and then rename wp-config-sample.php to wp-config.php.
Now edit the wp-config.php file and change the following things given in red colour… In short, add the database details.
// ** MySQL settings - You can get this info from your web host ** //
/** The name of the database for WordPress */
define( 'DB_NAME', 'database_name_here' );

/** MySQL database username */
define( 'DB_USER', 'username_here' );

/** MySQL database password */
define( 'DB_PASSWORD', 'password_here' );

/** MySQL hostname */
define( 'DB_HOST', 'localhost' );
In case, it will say you don’t have permission to write a wp-config file, then simply right click on the Default website in IIS manager and select Edit Permissions.
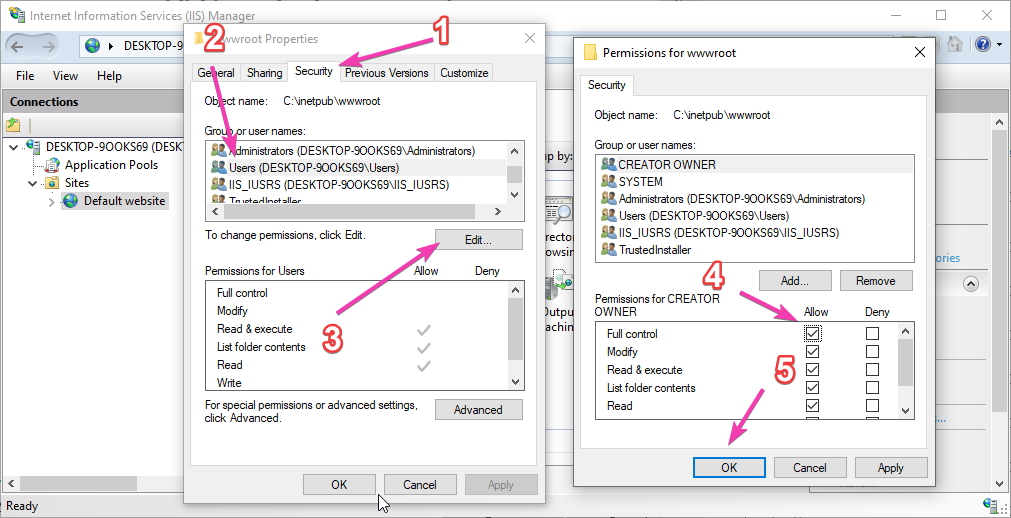
Go to Security Tab and select your Windows system user. Then Edit button-> Give all permissions to it and then press OK button.
Now, type http://localhost/index.php and you would be able to access your WordPress installation.
In the same way, if you have hosted some HTML based website file for development in the root directory of Default website you will get to see that.
How to Disable IIS web server on Windows 10
In case you don’t require IIS Manager and want to disable it. Again open “Turn Windows feature On or OFF” and unselect the option “Internet Information Services“. This will remove the IIS web server from your Windows 10 or Windows 7 PC, laptop or server.
Other Articles:
- How to install Kali Linux with GUI on WSL Windows 10
- How to install Apache web server on CentOS 8 or Stream
- Install Apache Cassandra on Windows 10/8/7 without datastax
- How to install Apache, MySQL, PHP & PhpmyAdmin on Windows 10 WSL
Installing IIS on Windows 10 is pretty straightforward. First, you access the «Turn Windows features on or off» menu, then find and enable Internet Information Services (IIS). Finally, hit OK and let Windows do its magic. Voilà, you’ve got yourself a running web server!
Let’s walk through the steps to get IIS up and running on your Windows 10 computer. This will allow you to use your machine as a web server, enabling you to host websites, applications, and more locally.
Step 1: Open Control Panel
Go to the Start menu, type «Control Panel,» and click on it.
The Control Panel is where you can manage various system settings and features on your computer.
Step 2: Access Programs and Features
In the Control Panel, select «Programs,» then click on «Programs and Features.»
«Programs and Features» is the place to go when you want to install, uninstall, or manage different software components on your computer.
Step 3: Turn Windows Features On or Off
On the left sidebar, click «Turn Windows features on or off.»
This menu allows you to enable or disable various Windows components, including IIS.
Step 4: Locate Internet Information Services
In the Windows Features window, scroll down and find «Internet Information Services.»
IIS is listed among many other optional features you can enable or disable in Windows.
Step 5: Enable Internet Information Services
Check the box next to «Internet Information Services» and click OK.
By enabling this feature, you’re telling Windows to install IIS and make it available on your computer.
Step 6: Wait for the Installation
Windows will take a few moments to install IIS. Just be patient.
During this time, Windows is adding necessary files and configuring settings to enable IIS on your system.
Step 7: Verify the Installation
Open a web browser and type «http://localhost» in the address bar.
If everything is installed correctly, you should see the IIS welcome page, confirming that IIS is now up and running on your computer.
After completing these steps, IIS will be installed on your Windows 10 machine. You can now use it to host websites, develop web applications, and perform various other tasks related to web servers.
Tips for Installing IIS in Windows 10
- Check System Requirements: Make sure your version of Windows 10 supports IIS. Most versions do, but it’s always good to double-check.
- Enable Additional Features: Within IIS, you can enable additional features like FTP Server or Web Management Tools for more functionality.
- Keep It Updated: Regularly check for updates to keep IIS running smoothly and securely.
- Use a Firewall: Ensure your firewall settings allow traffic through port 80 and 443 for HTTP and HTTPS, respectively.
- Backup Your System: Before making major changes, it’s always wise to have a backup of your system.
Frequently Asked Questions
What is IIS?
IIS stands for Internet Information Services. It’s a web server software package designed by Microsoft for Windows systems.
Is IIS free?
Yes, IIS is included as a part of Windows, so there is no additional cost to use it.
Can I run IIS on Windows 10 Home?
No, IIS is not available on Windows 10 Home. You’ll need Windows 10 Pro or Enterprise.
How do I access the IIS Manager?
After installing IIS, type «IIS» in the Start menu and select «Internet Information Services (IIS) Manager.»
What can I do with IIS?
IIS allows you to host websites, develop web applications, and manage server settings, among other things.
Summary of Steps
- Open Control Panel.
- Access Programs and Features.
- Turn Windows Features On or Off.
- Locate Internet Information Services.
- Enable Internet Information Services.
- Wait for the Installation.
- Verify the Installation.
Conclusion
There you have it—installing IIS in Windows 10 is like a walk in the park once you know the steps. This guide should make it clear and straightforward for you. With IIS, you can transform your personal computer into a versatile web server, opening up a world of possibilities for web development and hosting.
Still curious about what IIS can do? Dive deeper by exploring Microsoft’s documentation or join online forums to see how others are utilizing this powerful tool. Installing IIS in Windows 10 is a great starting point, but it’s just the beginning. So go ahead, take the plunge, and start creating amazing web applications right from your own machine!
Kermit Matthews is a freelance writer based in Philadelphia, Pennsylvania with more than a decade of experience writing technology guides. He has a Bachelor’s and Master’s degree in Computer Science and has spent much of his professional career in IT management.
He specializes in writing content about iPhones, Android devices, Microsoft Office, and many other popular applications and devices.
Read his full bio here.
Are you looking to install IIS on your Windows 10 machine? With IIS, you can host and manage websites on your local computer, making it an essential tool for web developers and system administrators. But how do you go about installing it? Let’s explore the steps to set up IIS on your Windows 10 operating system.
To install IIS on Windows 10, you can follow a simple process. First, open the «Control Panel» and click on «Programs.» From there, select «Turn Windows features on or off.» In the popup window, scroll down until you find «Internet Information Services» and check the box next to it. Click on «OK» to start the installation process. Once completed, you can access the IIS Manager to configure and manage your websites.
To install IIS on Windows 10, follow these steps:
- Open the Control Panel and click on «Programs.»
- Select «Turn Windows features on or off.»
- Scroll down and locate «Internet Information Services.»
- Expand the menu and check the box next to «Internet Information Services.»
- Click «OK» to begin the installation.
- Wait for the installation to complete.

Why Install IIS on Windows 10?
Installing Internet Information Services (IIS) on Windows 10 provides a powerful web server platform that allows you to host and manage websites on your own computer. Whether you are a developer looking to test web applications locally or a system administrator needing a local testing environment, installing IIS on Windows 10 is essential. This comprehensive guide will walk you through the process of installing IIS on your Windows 10 machine and provides insights into its features and benefits.
Step 1: Enable IIS in Windows Features
The first step to installing IIS on Windows 10 is enabling it in the Windows Features settings. To do this, follow these steps:
- Press the Windows Key + R to open the Run dialog box.
- Type «appwiz.cpl» in the text box and press Enter to open the Programs and Features window.
- In the Programs and Features window, click on the «Turn Windows features on or off» link on the left-hand side.
- In the Windows Features window, scroll down and locate «Internet Information Services». Expand it and select the desired components you want to install, such as Web Management Tools or FTP Server.
- Click OK and wait for the installation to complete. This may take a few minutes.
Once the installation is complete, you have successfully enabled IIS on your Windows 10 machine. This will allow you to host and manage websites locally.
Step 2: Verify the Installation
After enabling IIS, it is important to verify that the installation was successful. To do this, follow these steps:
- Open a web browser on your Windows 10 machine.
- Type «http://localhost» in the address bar and press Enter.
- If the IIS welcome page is displayed, it means that the installation was successful. You can now start creating and hosting websites on your local server.
It’s important to note that the default port for IIS is port 80. If you have any conflicts with other applications using port 80, you may need to adjust the port settings in IIS to resolve the conflict.
Step 3: Configuring IIS
Once IIS is installed and verified, you can configure its settings to suit your specific needs. Here are some important areas to consider:
Website Configuration
To create a website in IIS, follow these steps:
- Open the Internet Information Services (IIS) Manager by searching for it in the Windows search bar.
- In the IIS Manager, right-click on the Sites node in the left-hand tree view and select Add Website.
- In the Add Website window, provide a Site Name and specify the Physical Path where the website files will be stored.
- Configure the Bindings for the website, including the IP Address and Port (default is 80).
- Click OK to create the website.
Once the website is created, you can further configure its settings, such as adding additional hostnames, enabling SSL, or setting up authentication.
Application Pool Configuration
IIS uses application pools to isolate websites and web applications from each other, providing better reliability and performance. To configure application pools in IIS, follow these steps:
- In the IIS Manager, navigate to the Application Pools node.
- Right-click on an existing application pool or select Add Application Pool to create a new one.
- In the Add Application Pool window, provide a Name for the application pool, select the .NET CLR version, and configure any other desired settings.
- Click OK to create the application pool.
After configuring the application pool, you can assign websites or applications to it to ensure proper resource allocation and isolation.
Additional Configuration
IIS offers a wide range of additional configuration options to optimize and customize your web server. Some important areas to explore include:
- Security: Configure security settings, access permissions, and request filtering to protect your server and hosted websites.
- Logging: Enable logging and configure log file locations, formats, and retention policies to track server activity and troubleshoot issues.
- Performance: Optimize IIS performance by adjusting settings such as connection limits, caching, compression, and dynamic content handling.
- URL Rewrite: Use the URL Rewrite module to create custom URL rules, redirects, and rewrite requests for improved SEO and user experience.
- Modules and Extensions: Install and configure additional modules and extensions to extend the functionality of IIS, such as PHP, ASP.NET, or media streaming.
Exploring Advanced Features of IIS on Windows 10
In addition to the basic installation and configuration of IIS, Windows 10 offers a range of advanced features and tools that can enhance your web server capabilities. Here are some of the notable features:
Windows Authentication
Windows Authentication is a built-in authentication method in IIS that allows you to secure your websites and web applications using Windows user accounts. It provides a seamless and secure login experience for users by leveraging their Windows credentials. To enable Windows Authentication in IIS on Windows 10, follow these steps:
- In the IIS Manager, select the website or application for which you want to enable Windows Authentication.
- Double-click on the Authentication feature.
- Enable Windows Authentication and disable any other authentication methods if not needed.
- Click OK to save the changes.
With Windows Authentication enabled, users accessing your website or application will be prompted to enter their Windows credentials, providing secure access to restricted resources.
URL Rewrite Module
The URL Rewrite module is a powerful tool that allows you to define custom URL rules and rewrite requests at the server level. It is particularly useful for improving SEO, managing dynamic URLs, and redirecting requests. To install and enable the URL Rewrite module in IIS on Windows 10, follow these steps:
- Download the URL Rewrite module from the official Microsoft website.
- Run the installer and follow the on-screen instructions.
- Open the IIS Manager.
- Double-click on the website or application for which you want to configure URL rewriting.
- Double-click on the URL Rewrite feature.
- Click on the Add Rule(s) link to create your desired URL rewrite rules.
- Configure the necessary pattern, conditions, and actions for your URL rewrite rules.
- Click OK to save the changes.
The URL Rewrite module provides a flexible and intuitive way to manage complex URL structures and improve the user experience of your website.
Centralized Certificate Management
Windows 10 introduces the Centralized Certificate Management feature, which simplifies the management of certificates used by IIS. With this feature, you can request, install, and renew SSL/TLS certificates directly from within the IIS Manager, eliminating the need to use external certificate management tools. To use Centralized Certificate Management in IIS on Windows 10, follow these steps:
- Open the IIS Manager.
- Double-click on the website or application for which you want to manage the certificate.
- Double-click on the SSL Settings feature.
- Enable the Centralized Certificate option.
- Click on the Request a Certificate link to obtain a new certificate or Renew Certificate link to renew an existing one.
- Follow the on-screen instructions to complete the certificate request or renewal process.
Centralized Certificate Management simplifies the process of obtaining and managing SSL/TLS certificates, ensuring secure communication between your website and its visitors.
FTP Server and Publishing
IIS on Windows 10 includes a built-in FTP server that allows you to easily publish and manage files on your website. To configure FTP server and publishing in IIS, follow these steps:
- Open the IIS Manager.
- Click on the server node in the left-hand tree view.
- Double-click on the FTP Firewall Support feature.
- Enable the Enable FTP over SSL/TLS option to secure your FTP connections.
- Configure any other desired settings for FTP server and publishing, such as FTP user isolation or virtual directories.
Once the FTP server is configured, you can use FTP clients to connect to your server and publish files to your website.
By exploring and utilizing these advanced features of IIS on Windows 10, you can take full advantage of the capabilities and flexibility it offers for hosting and managing your websites and web applications.
Conclusion
Installing IIS on Windows 10
Are you looking to install IIS (Internet Information Services) on your Windows 10 machine? IIS is a web server that allows you to host your own websites and web applications. Here is a step-by-step guide on how to install IIS on Windows 10.
Step 1: Open Control Panel
Click on the Start menu and search for «Control Panel». Open the Control Panel application.
Step 2: Turn on Windows Features
In the Control Panel, click on «Programs» and then «Turn Windows features on or off».
Step 3: Enable Internet Information Services
In the Windows Features window, scroll down and find «Internet Information Services». Check the box next to it and click «OK».
Step 4: Install IIS
Windows will now install the necessary files for IIS. This may take a few minutes. Once the installation is complete, you will see a message confirming the successful installation of IIS.
Step 5: Test IIS
To test if IIS is working correctly, open a web browser and type «localhost» in the address bar. If you see the default IIS welcome page, then congratulations! You have successfully installed IIS on your Windows 10 machine.
Key Takeaways — How to Install IIS on Windows 10
- Internet Information Services (IIS) can be installed on Windows 10 to host web applications.
- Open the Control Panel and navigate to «Programs» and then «Turn Windows features on or off».
- Enable «Internet Information Services» by checking the box and click on «OK».
- IIS will start installing, and it may take a few minutes to complete.
- Once the installation is complete, you can access IIS from the Start menu or by typing «inetmgr» in the Run dialog box.
Frequently Asked Questions
Welcome to our FAQ section on how to install IIS on Windows 10. Below, we have compiled a list of commonly asked questions regarding this topic. Read on to find answers to all your queries.
1. Why should I install IIS on Windows 10?
Installing Internet Information Services (IIS) on your Windows 10 machine enables you to create and manage websites locally. It’s an essential tool for web developers, as it allows testing websites and web applications without the need for a separate server. Moreover, IIS provides a reliable and secure environment for hosting websites, making it a popular choice among organizations and individuals.
If you are a developer or simply want to explore web development, installing IIS on Windows 10 is a valuable step that opens up a range of possibilities.
2. How do I install IIS on Windows 10?
To install IIS on Windows 10, follow these steps:
Step 1: Open the Control Panel on your Windows 10 machine.
Step 2: Click on «Programs» and then «Turn Windows Features On or Off.»
Step 3: In the «Windows Features» window, scroll down and locate «Internet Information Services.» Check the box next to it.
Step 4: Expand the «Internet Information Services» option and select the features you want to install. You can choose from options like Web Management Tools, FTP Publishing Service, and more.
Step 5: Click «OK» and wait for the installation process to complete. Your Windows 10 machine will now have IIS installed and ready to use.
3. Can I install IIS without the Windows installation disk?
Yes, you can install IIS on Windows 10 without the Windows installation disk. Windows 10 comes with IIS installation files preloaded, allowing you to enable it directly from your system.
Simply follow the steps mentioned in the previous question to enable IIS on your Windows 10 machine. You don’t need any additional installation sources or disks.
4. Are there any prerequisites for installing IIS on Windows 10?
Before installing IIS on Windows 10, ensure that you meet the following prerequisites:
— Windows 10 Professional, Enterprise, or Education edition (IIS is not available on Windows 10 Home edition).
— Sufficient disk space to accommodate the IIS installation files and the websites or applications you plan to host.
— System administrator privileges to enable and configure IIS.
5. How can I verify if IIS is successfully installed on Windows 10?
To verify if IIS is successfully installed on Windows 10, follow these steps:
Step 1: Open a web browser on your Windows 10 machine.
Step 2: In the address bar, type «localhost» and hit Enter.
Step 3: If IIS is installed correctly, a default IIS page or a list of websites hosted on your local machine should appear. This confirms that IIS is up and running on your Windows 10 system.
Alternatively, you can also check the «Internet Information Services (IIS) Manager» in the Windows Administrative Tools folder to verify the installation and configure IIS settings.
Installing IIS on Windows 10 is a straightforward process that allows you to set up a web server on your local machine. By following the steps outlined in this article, you can have IIS up and running in no time. First, ensure that you have the necessary permissions and prerequisites, such as administrative access and the correct version of Windows 10. Then, through the Windows Features panel, enable the Internet Information Services option and select the additional features you need.
Once the installation is complete, you can configure IIS to suit your specific needs, such as creating websites, setting up SSL certificates, and managing application pools. Remember to regularly update IIS to benefit from security patches and new features. With IIS installed on your Windows 10 machine, you have a powerful tool at your disposal for web development and hosting purposes.
In this tutorial, we’ll explain, step by step, how to install IIS on Windows 10 so that you can test code or even publish web content from your desktop.
IIS is Microsoft’s web and FTP server and it is widely used by IT professionals around the world. This is mainly for two reasons. Firstly, it is already included with Microsoft Windows and is very easy to install, and secondly, it’s extremely simple to use.
It can also be installed on any Windows desktop or laptop, which means that you can even test changes or web content without needing to set up a special pilot or test environment.
NOTE: This tutorial will focus just on the installation process for Windows 10. We’re not going to go into any detail about how to use IIS today. If you’re like to learn how to install IIS on Windows Server, check out the tutorial on our blog, “How to Install IIS Web Server”.
Part 1 – Installing IIS on Windows 10
To install Internet Information Services (IIS) on a Windows 10 client device, first, click on the search bar and type «Control Panel» (1) and click on the app that appears in the results (2).

Next, double-click on Programs and Features (3).

A new window will appear. Click on «Turn Windows features on or off» (4).

Another window will now appear showing a list of features. Search the list to find Internet Information Services, expand the options and select the options you wish to install (5). The following options will be selected by default:
- Web Management Tools.
- World Wide Web Services.
«FTP Server» will be unchecked by default, but you can select it if you want to include it.
Once you’ve selected the options you want to install, click on OK (6) to begin the installation. You will then see a window with a progress bar until the process has finished.
There’s no need to restart your system to begin using the service, but we recommend it to clear the installation buffers, etc. and ensure the best performance.

Part 2 – Checking That IIS Has Been Installed Correctly
Now that the installation process has finished, it’s time to check that it has been installed correctly. First, open your web browser and type «127.0.0.1» in the address bar (7), which, if everything has run smoothly, will show the information loaded from the web server.

Another way of checking that IIS is running correctly is to open the Internet Information Services (IIS) Manager. Simply type «IIS» in the search bar (8) and click on Internet Information Services (IIS) Manager (9).

This will open the IIS Manager, which you can use to carry out all configuration and administration tasks for the web server.

If either of these two checks work correctly, you can safely say that you have installed IIS on your Windows 10 device. Congratulations!
Summary
In this tutorial, we’ve shown how you can quickly install IIS (Internet Information Services) on your Windows 10 device so that you can test out web content and changes from your desktop.
The process is really simple, and you should find everything you need in this tutorial, but if you have any problems, don’t hesitate to contact us.
And if you’re interested in learning about other things you can do on Windows 10, check out our article on How to Install Hyper-V on Windows 10.
Thanks for choosing Jotelulu!