
By default, when you create a new Internet Information Services (IIS) website, it’s open to everyone with anonymous access enabled — anyone can access and view the data being hosted by that site. Obviously, this is a security concern for most organizations. Indeed, I’m often asked by clients and colleagues how to lock down an IIS site so only the desired people can access it.
The answer is pretty simple: In order to secure an IIS site, all one needs to do is change the default permissions, enable Windows Authentication for user accounts, and disable Anonymous Authentication in IIS Manager. Here are the steps:
How to secure your IIS site
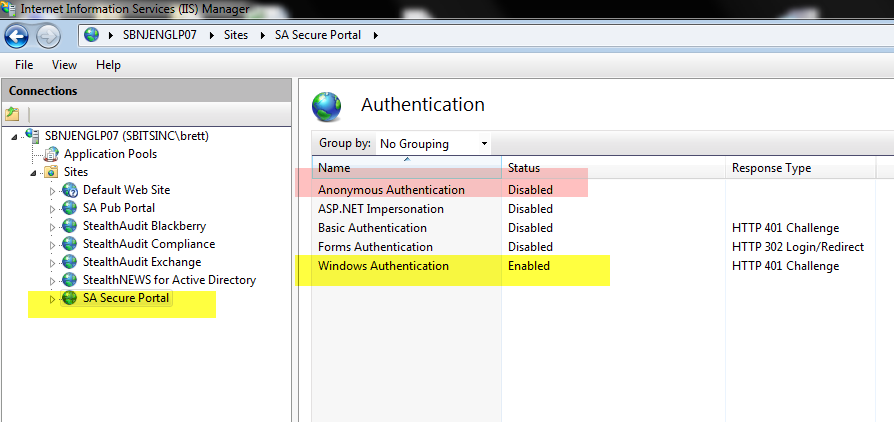
1.Select your site and click “Authentication”, In the screenshot below, you can see that I have many IIS sites, including one named “Default Web Site”.

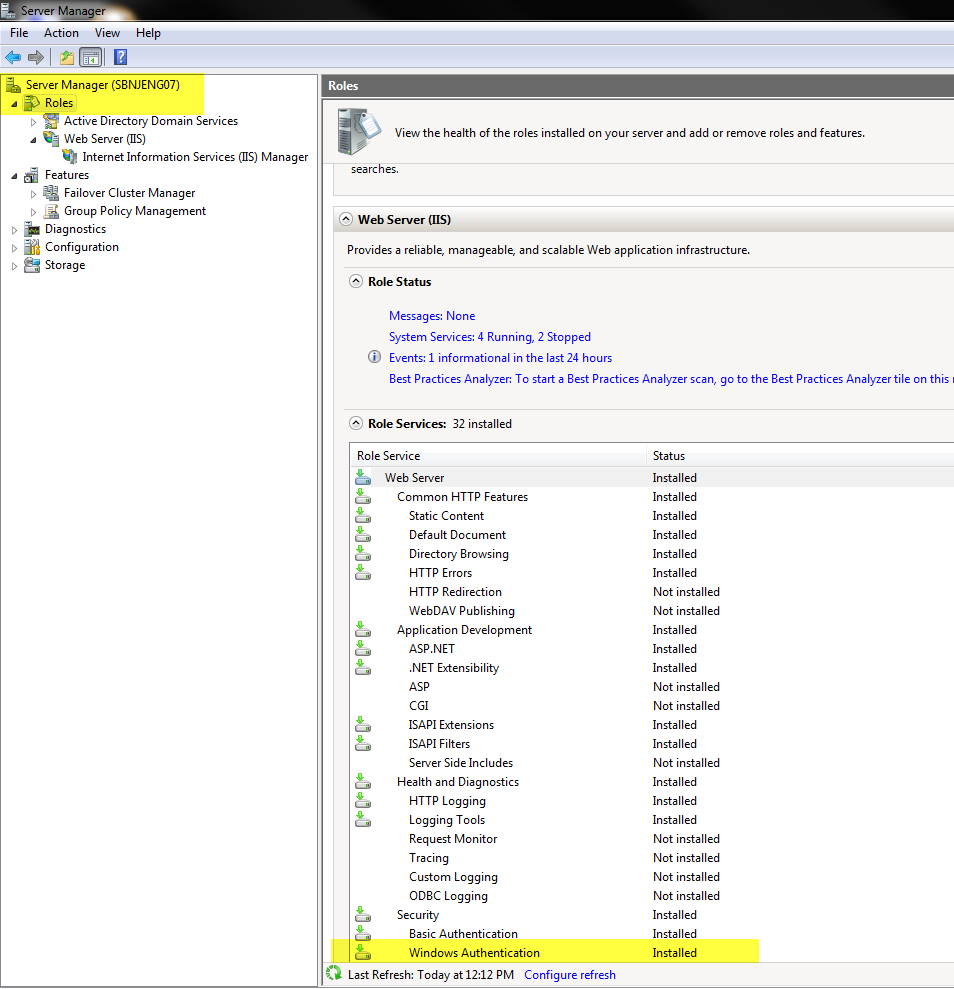
2. If you have Windows Authentication installed for IIS, proceed to step 3. If you don’t have Windows Authentication integrated in IIS, add this feature from Server Manager under “Roles / Services” for IIS”EX. IIS Windows Authentication Feature of IIS.
3. Enable the Windows Authentication option for your site:
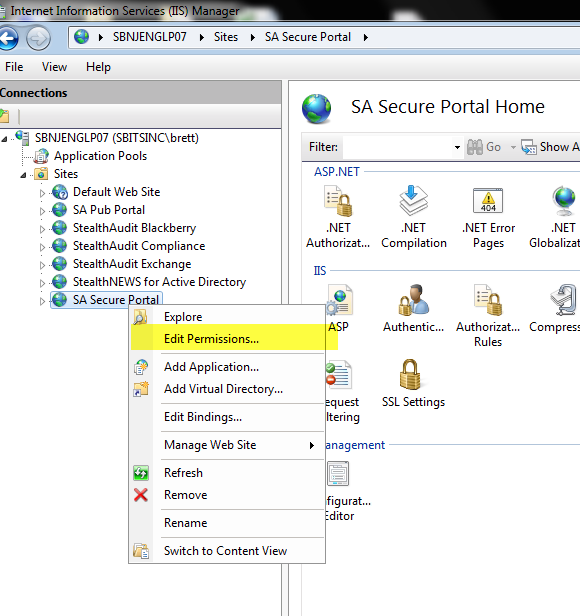
4. Reconfigure the permissions of the web site. First, we will break inheritance and then we will remove “Users” from having any access:
4.1 Right-click the site select “Edit Permissions”
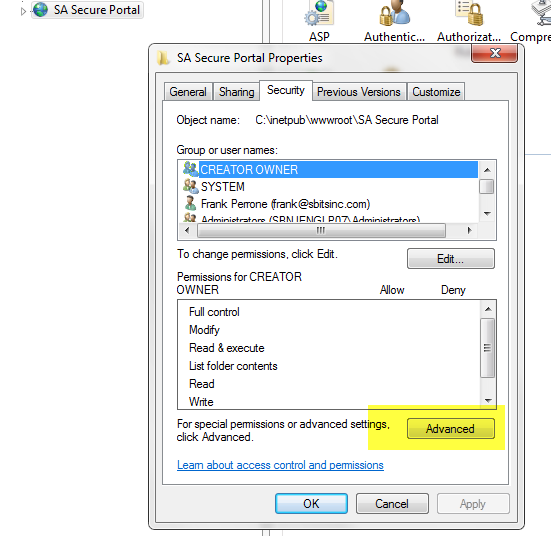
4.2 Click “Advanced.”
4.3 Click “Change Permissions.”
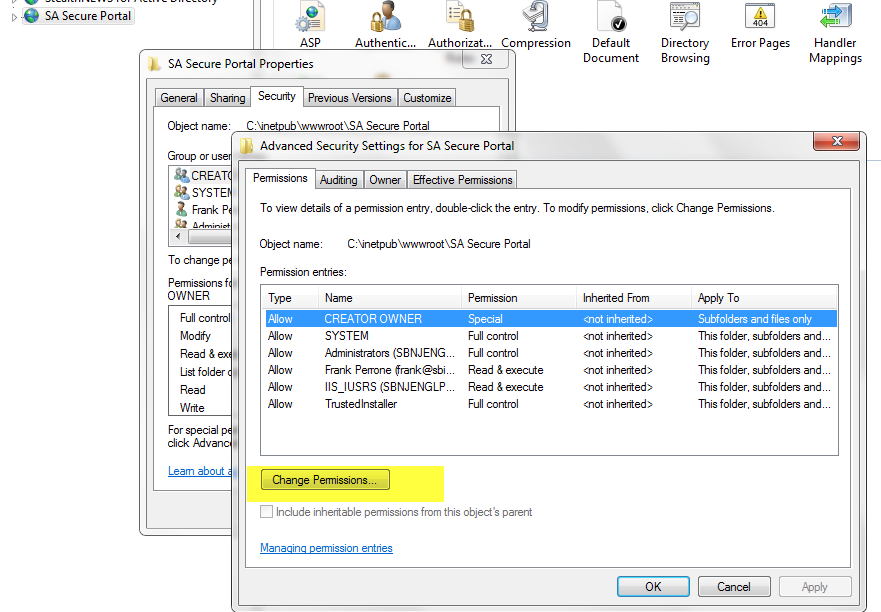
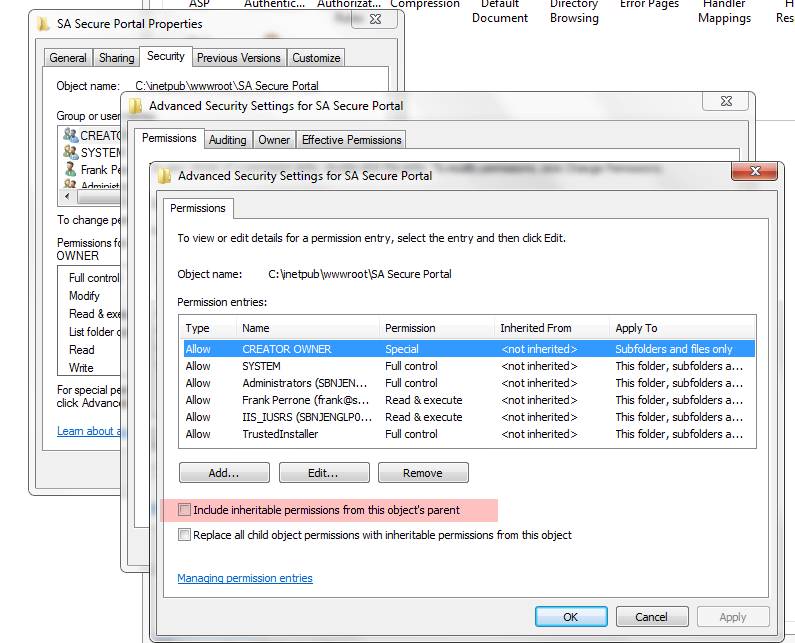
4.4 Uncheck the box “Include inheritable permissions from this objects parent”. When prompted with a warning, select ADD. This simply copies the existing permissions back without inheritance; this is very important as to not break the website for yourself and the system at large.
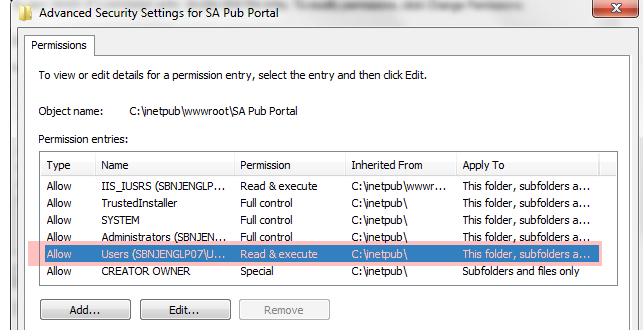
4.5 Delete the permission for Users. This will disable the ability for any domain users to simply authenticate to your site to view the reports, while allowing local administrators and members of IIS_IUSRS to log in and view reports. (The set of base permissions can vary from OS to OS.) Also make sure that security principals like “Everyone” and “Authenticated Users” do not have any access.
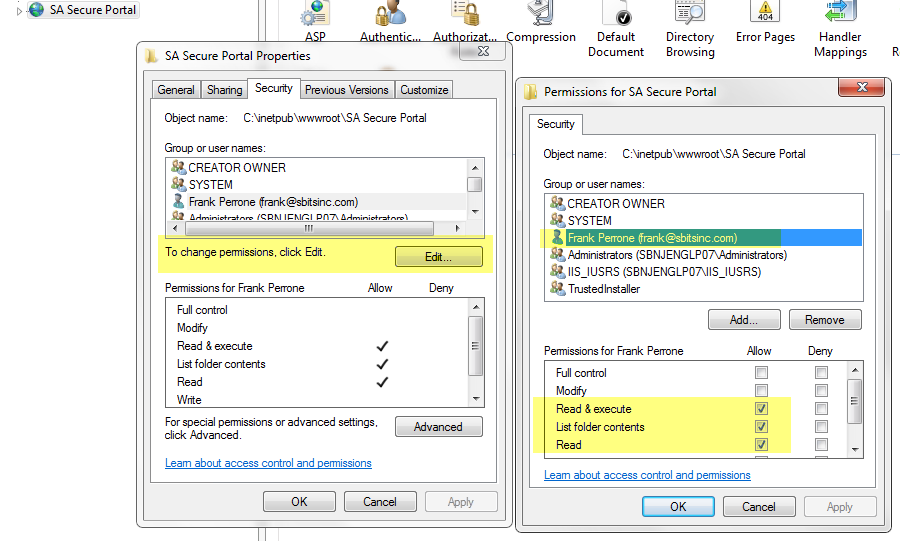
4.6 Last, you can now use the basic “Edit” button to add Read Only access for select users and groups. In my case, I gave Read access to my reports to Frank. For basic site usage, nothing more then Read access is really needed; don’t give anyone Modify or Full Control access unless there is some special need.
Note that I did this testing on Windows 2008 and Win 7, and I did not need to bounce IIS for any of these configuration changes to start working.
How can Netwrix help?
Netwrix Access Analyzer can help you enhance the security of your Windows infrastructure and minimize the risk of a data breach. It empowers you to:
- Identify vulnerabilities that can be used by attackers to compromise Windows systems and get to your data.
- Enforce security and operational policies through baseline configuration analysis.
- Audit and govern privileged accounts.
- Prove compliance more easily with prebuilt reports and complete system transparency.
FAQ
What is Windows Authentication in IIS?
Windows Authentication in IIS is a secure type of authentication in which user account credentials are hashed before being transmitted over the network.
Is Windows Authentication the same as Active Directory?
No. You can use Windows Authentication even if your server is not a member of an Active Directory domain.
Does IIS Windows Authentication use LDAP?
No. IIS Windows Authentication supports only the Kerberos and NTLM protocols.
Security Researcher at Netwrix and member of the Netwrix Security Research Team. Joe is an expert in Active Directory, Windows, and a wide variety of enterprise software platforms and technologies, Joe researches new security risks, complex attack techniques, and associated mitigations and detections.
In this hint, I will explain how to enable Windows Authentication in IIS? Additionally, we will answer the below IIS related questions:
-
1
What’s IIS?-
1.1
Is it possible to install IIS on Linux?
-
1.1
-
2
What’s Windows Authentication?-
2.1
What’re the Supported Authentication protocols in Windows Authentication? -
2.2
Enable Windows Authentication-
2.2.1
Using Command Prompt -
2.2.2
Using IIS GUI
-
2.2.1
-
2.1
What’s IIS?
IIS stands for Internet Information Services, it’s a webserver role that mainly runs on Windows Operating Systems and provides secure and management tools to manage web, application, and services hosting.

Is it possible to install IIS on Linux?
The IIS can also run on Linux. however, it is not recommended for production use!
Windows Authentication in IIS is a secure form of authentication where the user credential (UserName and password) is hashed before being sent over the network.
Windows authentication is not appropriate for use in an Internet environment, because that environment does not require or encrypt user credentials.
What’re the Supported Authentication protocols in Windows Authentication?
There are two authentication protocols supported in Windows Authentication:
- Kerberos.
- NTLM.
Enable Windows Authentication
Using Command Prompt
In my scenario, I tried to publish an ASP.Net web application on IIS 7 that only enables anonymous authentication by default.
Actually, I need to use Windows authentication to allow users to be authenticated using the NTLM.
Steps
- Run command prompt from the start menu.
- Type the below cmdlet to install IIS Windows Authentications.
pkgmgr.exe /iu:IIS-WindowsAuthentication - Again, Type “inetmgr” to open IIS and click ok.
- The IIS should be opened.
- Select your site > Click on the Authentication icon.
- Enable Windows authentication.
Note: The default setting for Windows authentication is Negotiate. This setting means that the client can select the appropriate security support provider.
To force NTLM authentication, you must change the value of the <Provider> element under the <windowsAuthentication> element in the ApplicationHost.config file.
<windowsAuthentication enabled="true">
<providers>
<add value="Negotiate" />
<add value="NTLM" />
</providers>
</windowsAuthentication>
Using IIS GUI
- First, make sure that the Webserver Role is installed on your server.

- Open IIS.
- Go to “Sites” > select your site > Select “Authentication”.
- Click on “Windows Authentication”, then click on “Enable”.

Conclusion
In conclusion, we have briefly explained how to enable Windows Authentication for a web site in IIS, also we have explored the following:
- What’s IIS?
- Is it possible to install IIS on Linux?
- What’s Windows Authentication?
- What’re the Supported Authentication protocols in Windows Authentication?
- Enable Windows Authentication in IIS.
Applies To
- IIS7.
- IIS8.
References
- Windows Authentication.
You may also like
- Connection Timeout Expired. The timeout period elapsed while attempting to consume the pre-login handshake acknowledgment
Доменная авторизация позволяет выполнять сквозную авторизацию идентифицируясь под своей текущей учётной записью домена. При такой авторизации не нужно вводить логин и пароль пользователя, сквозная авторизация сама выполняет эту проверку. В этой статье мы разберём основные настройки конфигурации и веб-сервера IIS, при которых работает доменная авторизация личного кабинета и веб-клиента.
Важно! Мы не гарантируем работу доменной авторизации, если веб-сервер IIS ранее уже был настроен. Может быть так, что какие-то персональные настройки будут мешать работе доменной авторизации.
1
Убедитесь, что компьютер находится в домене и вход в систему выполнен под учётной записью домена.
2
Настройка публикации.
При публикации информационной базы на веб-сервер IIS должна быть установлен параметр «Использовать аутентификацию операционной системы». Если вы ещё не опубликовывали информационную базу на веб-сервере, то ознакомьтесь с пошаговой инструкцией.

3
Настройка IIS. Проверка подлинности Windows.
1. Перейдите в диспетчер служб «IIS», в списке сайтов найдите опубликованную ранее информационную базу.
2. Перейдите в настройки «Проверка подлинности для сайтов и приложений».
3. В открывшемся списке необходимо включить «Проверка подлинности Windows», при этом отключить все остальные проверки подлинности.
4. Если в списке доступных проверок подлинности нет проверки подлинности Windows, то необходимо перейти в «Компоненты Windows» -> Службы IIS -> Службы интернета -> Безопасность -> активировать «Проверка подлинности Windows»


4
Настройка «Управление IT-отделом 8».
1. Перейдите в настройки пользователя, для которого нужно настроить доменную авторизацию, по пути: Администрирование -> настройки пользователей и прав -> пользователи -> нужный пользователь.
2. На закладке «Главное» активируйте настройку «Аутентификация операционной системы», Выберите домен и пользователя домена.
3. Перейдите в настройки личного кабинета по пути: Администрирование -> Личный кабинет -> Закладка «Настройки» -> Закладка «Дополнительно» -> убрать галочку с настройки «Использовать собственную авторизацию». Эта настройка отключит добавленную нами форму авторизации личного кабинета.
5
Готово. Теперь доменная авторизация работает.
In this post, I share what I have learned about integrated windows authentication and how to enable it in a web application which consists of an angular front-end and ASP.NET core 3 backend.
What is integrated windows authentication?
Let me explain by giving an example. At work, my computer is joined to a domain controller, which is basically a server that runs active directory. Joining a domain controller means the domain controller manages my credentials, not my computer. When I login using my windows credentials, my computer communicates with the domain controller to validate my credentials and allow access. We have .NET applications running on IIS on a set of servers that are joined to the domain controller. IIS can check against the domain controller to ensure I have authenticated before granting access. Furthermore, it can work with the browser do so seamlessly without requiring me to enter my credentials because it has built in integrated windows authentication. This is possible because both the server on which IIS runs and the browser on my machine are joined to a same domain controller, and the browser supports the Negotiate authentication scheme. From the document, this is an advantage of integrated windows authentication.
Built into IIS. – Does not send the user credentials in the request. – If the client computer belongs to the domain (for example, intranet application), the user does not need to enter credentials
Integrated Windows Authentication
Hopefully, you now have some ideas about integrated windows authentication. Next, let’s look at how it works.
How does integrated windows authentication work?
Per the document, integrated windows authentication
works with any browser that supports the Negotiate authentication scheme, which includes most major browsers.
Integrated Windows Authentication
The Negotiate authentication scheme is Microsoft’s authentication mechanism which uses Kerberos which is a system that validates a user’s identity based on shared secrets and provides access by issuing tickets.
Here is how it works.
To access a protected resource, the client must present a valid ticket to the server. To obtain the ticket, the client sends a request to a Key Distribution Center (KDC). The client encrypts the request using the user’s credentials. Upon receiving the encrypted request, the KDC retrieves the user’s password from active directory given the username, and uses the password to decrypt the request. By way of encrypting and decrypting the request using the user’s password which the KDC can get from the database, the KDC can verify the user’s identity without having the client sending over the password. Once the client receives the ticket, which the KDC encrypts using a key that it shares with the resource server, the client sends over the ticket to the resource server, which in turn validates the ticket against the KDC using the shared key. Once all the validations are done, the server returns the resource to the client.
The above is just a high level summary. If you want to learn more about Kerberos and see examples, I suggest you watch this short video, read this blog and IETF article.
Hopefully, you now have some ideas about how integrated windows authentication works, let’s discuss when should you use it.
When should you use integrated windows authentication
As a summarize, you should consider using integrated windows authentication if:
- Both the server and the client machine use Windows and are joined to the same domain controllers.
- The application is for internal use only. Obviously, if it is accessible by the public, it will not work because the client computers may not use Windows and joined to the domain controllers.
- The browser supports Negotiate mechanism (most major browsers supports it).
- The server supports integrated windows authentication. As mentioned in the document, IIS has built in support for integrated windows authentication.
The document mentions integrated windows authentication is susceptible to cross-site request forgery, so just keep this in mind.
Now that you know about integrated windows authentication and how it works, let’s look at how you can implement it in your ASP.NET core application.
In my case, it turns out to be not difficult to configure my application and IIS to use integrated windows authentication. I just have to make a few changes in the app, and enable Windows authentication in IIS.
Changes in applicationhost.config
Set <WindowsAuthentication> to true in applicationhost.config, which is under .vs -> {PROJECT_NAME} -> config directory. The .vs directory is hidden by default, so I enabled the option to show the hidden folders.
      <windowsAuthentication enabled="true">
          <providers>
            <add value="Negotiate" />
            <add value="NTLM" />
          </providers>
        </windowsAuthentication>
See this link for instructions on how to view hidden folder in Windows 10.
Changes in launchSettings.json
In launchSettings.json, which is under Properties folder of the ASP.NET core project, enable WindowsAuthentication under iisSettings:
{
  "iisSettings": {
    "windowsAuthentication": true,
    "anonymousAuthentication": false,
    "iisExpress": {
      "applicationUrl": "http://localhost:61863/",
      "sslPort": 44378
    }
  }
}
Changes in Startup.cs file
- In
Configure(...)method, add these middlewares:
      app.UseAuthentication();
      app.UseAuthorization();
Since the app is an ASP.NET core 3 app, per the document, I put the above middlewares between app.UseRouting() and app.UseEndpoints().
If the app uses authentication/authorization features such as
AuthorizePageor[Authorize], place the call toUseAuthenticationandUseAuthorization: after,UseRoutingandUseCors, but beforeUseEndpoints:Migrate from ASP.NET Core 2.2 to 3.0
If you want to learn more, checkout this post on StackOverflow.
In ConfigureServices() method, I added the following:
  services.AddAuthentication(IISDefaults.AuthenticationScheme);
  services.AddAuthorization();
Changes on IIS site on remote server
- In IIS Manager, under Features View of the site, double-click on Authentication feature.
- Select Windows Authentication and set Status to Enabled.

Changes in angular app
Technically, you don’t need to make any changes in angular for integrated windows authentication to work. Some tutorials online I looked at suggest to add to the header the key and value: withCredentials: true. However, I realized that this is not necessary, and the authentication still work even after I removed the codes.It appears the browser automatically handles the process by the Negotiate authentication scheme.
Optional: Get windows user’s info in angular
It seems as if there is not a way to get info about the windows user from the client app. Therefore, to get the username and status of the windows user, I make the call to the backend.
- In the asp.net core app, I added the following endpoint to return info about the authenticated user.
[Route("GetAuthenticatedUser")]
        [HttpGet("[action]")]
        public IdentityUser GetUser()
        {
            return new IdentityUser()
            {
                Username = User.Identity?.Name,
                IsAuthenticated = User.Identity != null ? User.Identity.IsAuthenticated : false,
                AuthenticationType = User.Identity?.AuthenticationType
            };
        }

        public class IdentityUser
        {
            public string Username { get; set; }
            public bool IsAuthenticated { get; set; }
            public string AuthenticationType { get; set; }
        }
- In angular, I added a guard to load the user’s info and validate the user has access before activating the route.
@Injectable()
export class AuthGuardService implements CanActivate {
  constructor(public router: Router, private apiService: ApiService) { }

  canActivate(): Observable<boolean> | Promise<boolean> | boolean {
    return this.apiService.User.pipe(
      take(1),
      switchMap(currentUser => {
        if (!currentUser) {
          return this.apiService.loadUser().pipe(
            take(1),
            switchMap(user => {
            return of(user && user.isAuthenticated);
            }),
            catchError((err: HttpErrorResponse) => {
              if (err) {
                console.error("Failed to load user: " + JSON.stringify(err));
                if (err.status === 403) {
                  this.apiService.setErrorMessage("You don't have access to use this application.");
                }
                else {
                  this.apiService.setErrorMessage("Something went wrong! :(");
                }
              }
              return of(false);
            }));
        }
        return of(currentUser.isAuthenticated);
      }));
  }
}
References
Integrated Windows Authentication
Enable Windows Authentication In Web API And Angular App
What is the difference between Negotiate and NTLM authentication?
Kerberos – authentication protocol
SPNEGO-based Kerberos and NTLM HTTP Authentication in Microsoft Windows
How to enable Windows authentication for a Web site, Web application, or Web service
On this page we will show you how to configure your Windows and Internet Information Server (IIS) environment in order to use NADI with Kerberos SSO.
Enable Windows Authentication
- Open the IIS Manager and select the site under which your WordPress environment runs. In our case we use the Default Web Site.
- Double click on Authentication:

Now you have to configure the authentication settings of your site.
- Disable Anonymous Authentication
- Enable Windows Authentication
- With Windows Authentication selected, click on the Providers link in the right Action panel
If the Windows Authentication entry is missing, you have to add the feature by using Windows’ Server Manager.
You can enable it below Server Roles > Web Server (IIS) > Web Server > Security > Windows Authentication.

In the now appearing window, add the providers as shown in the following screenshot. The order has to be Negotiate over NTLM! Negotiate equals to use Kerberos authentication.
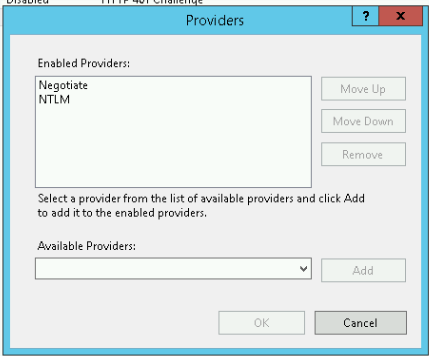
Close the window by pressing OK.
- Select your site on the left panel.
- Double click on Configuration Editor:
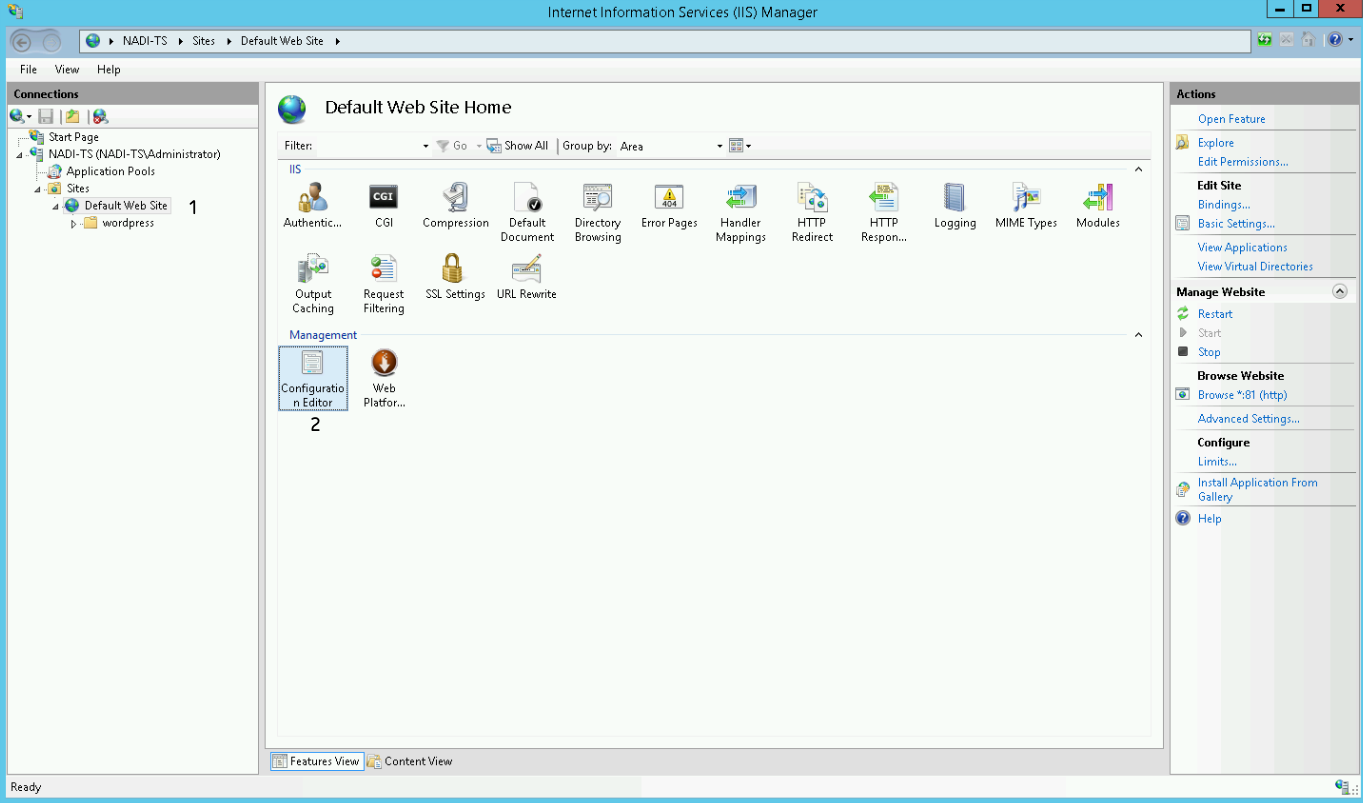
Now select windowsAuthentication from the dropdown menu:
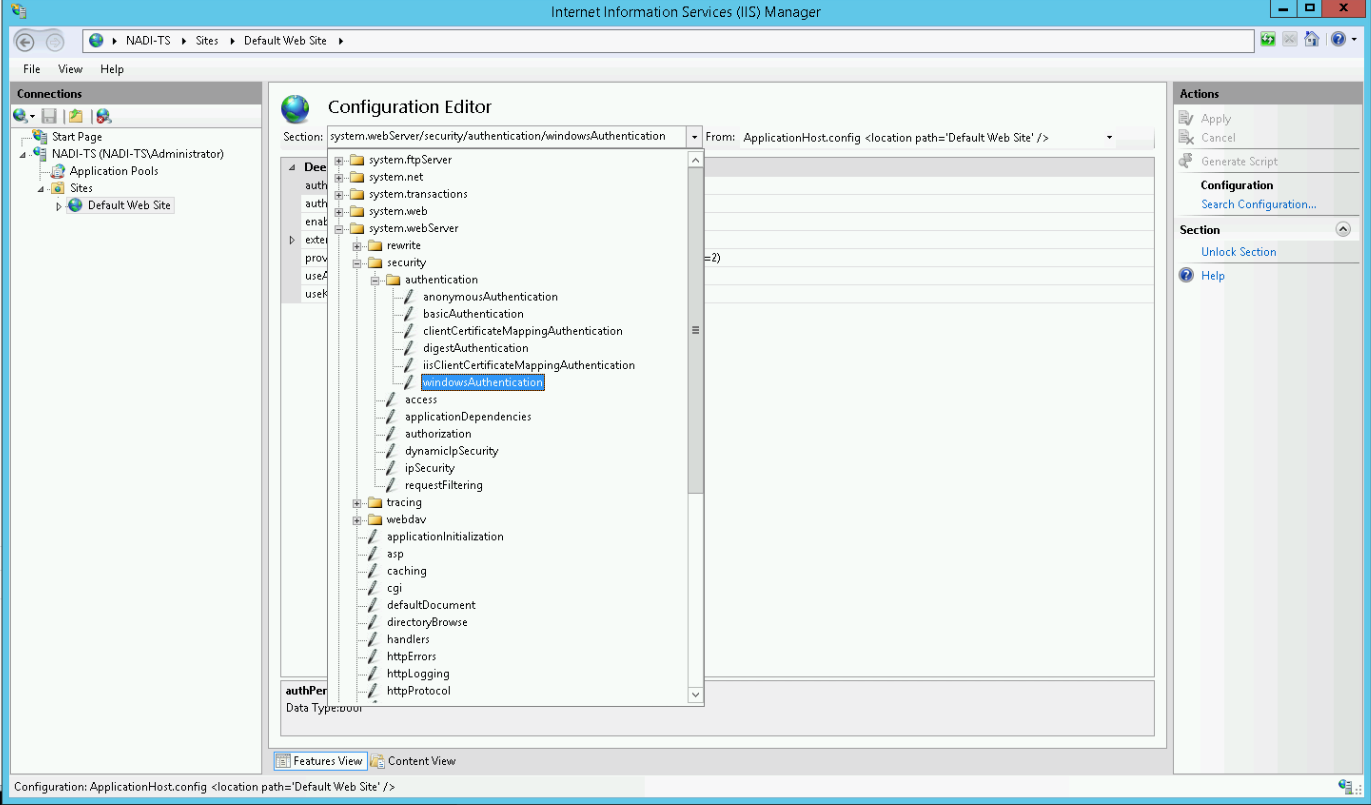
Change useKernelMode to True and save the settings by pressing the Apply button in the upper right corner:
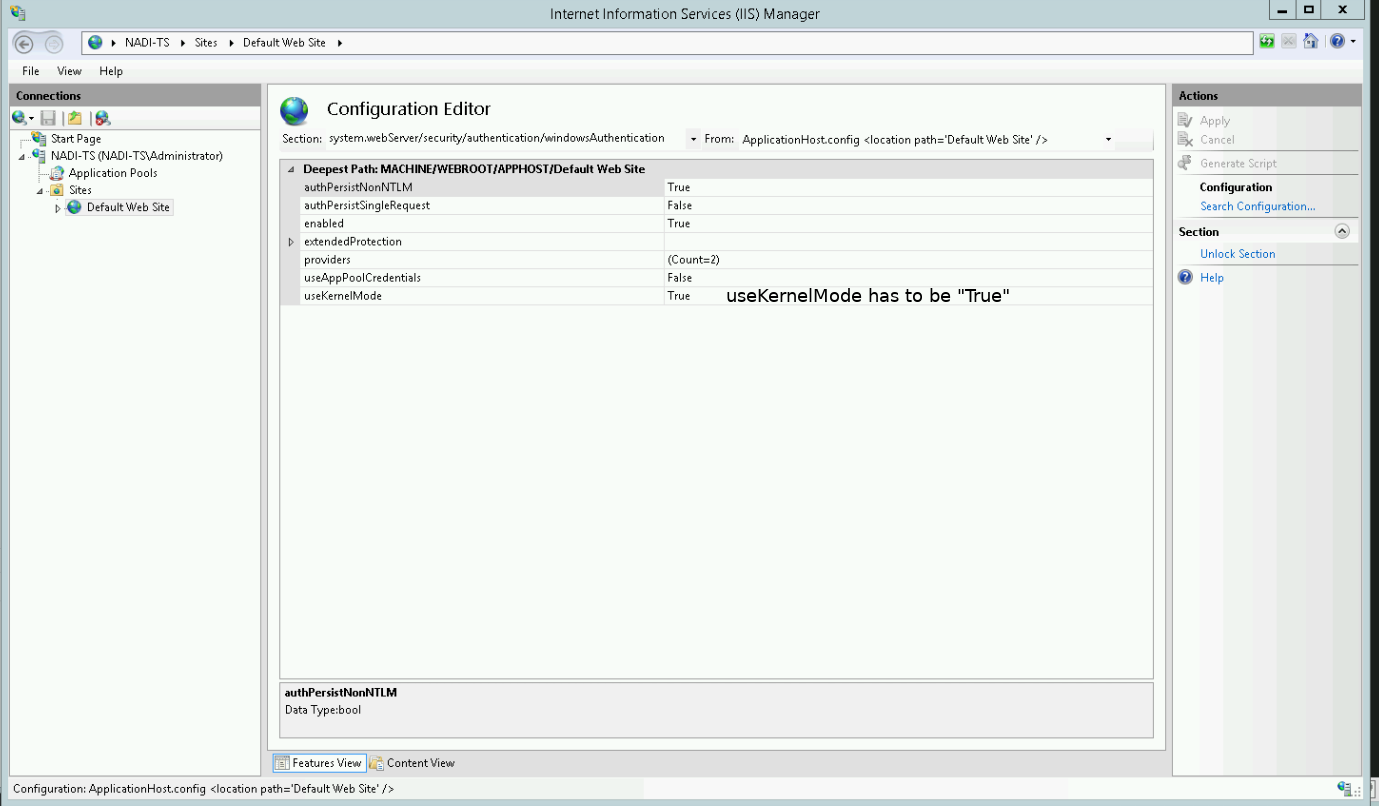
Restart the IIS.
Configure SPNs
In our example we imagine the following scenario:
Host alias (${HOST_ALIAS}) |
Domain | FQDN host (${FQDN_HOST}) |
|---|---|---|
nadi-ts |
test.ad |
nadi-ts.test.ad |
-
Open a console and type in
hostnameto see the name (${MACHINE_NAME}) of your machine.The ${MACHINE_NAME} can be equal to the ${HOST_ALIAS}, but in most cases it isn’t.
-
Now type the following to receive a list of all SPNs registered for your machine
setspn -L ${MACHINE_NAME}This should output a list like

-
You now have to add a
HOSTand anhttpSPN for the address of your WordPress environment which has to equal the machines FQDN. To do this type the following commands:setspn -a HOST/${FQDN_HOST} ${MACHINE_NAME} setspn -a http/${FQDN_HOST} ${MACHINE_NAME} -
Check if the SPNs were added successfully by typing
setspn -L ${MACHINE_NAME}


If your hostname contains a port (e.g. nadi-ts.test.ad:81/wordpress) do not add that port to the SPNs. This is only required for older environments up to Windows 7 and Windows Server 2008.
Configure browsers
You have to configure the browsers you are using.
Test authentication
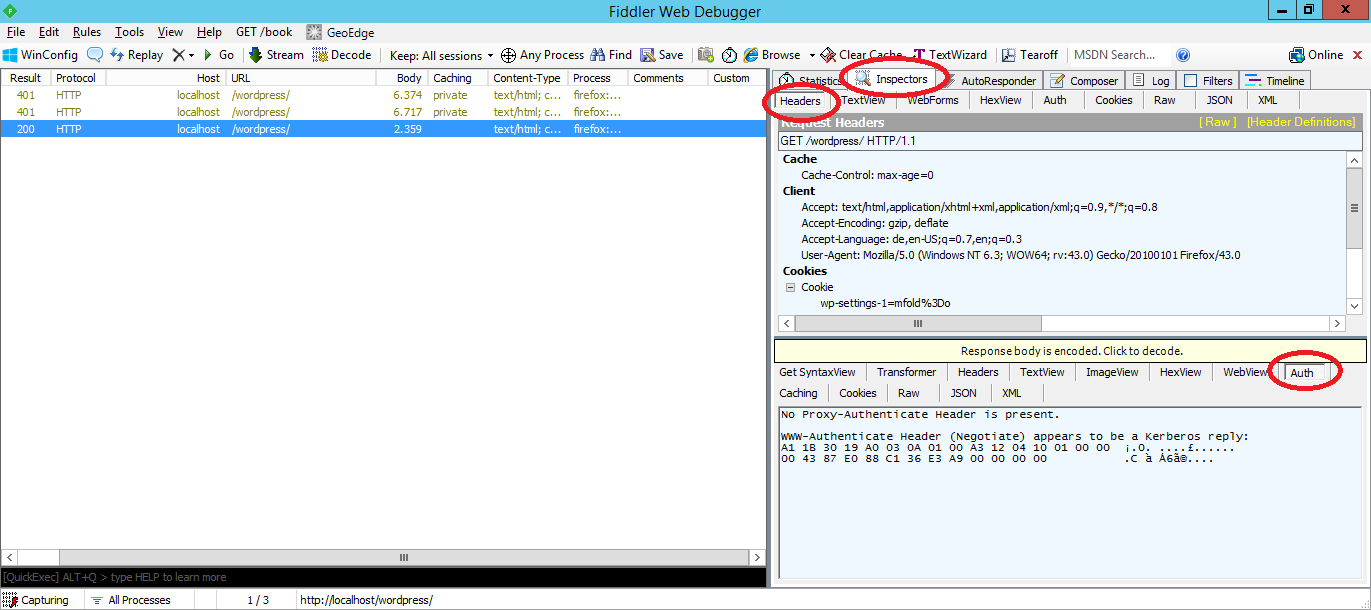
You can use Fiddler to test the Kerberos configuration.
- Start Fiddler
- Open your browser and go your WordPress instance for which have previously enabled Kerberos
- In Fiddler select the last request from the list. In the right panel below Inspectors > Headers > Auth you should see the message
WWW-Authenticate Header (Negotiate) appears to be a Kerberos reply
If you have been successfully logged in into your WordPress environment you should find the following log message in logs/nadi-debug.log:
