
By default, when you create a new Internet Information Services (IIS) website, it’s open to everyone with anonymous access enabled — anyone can access and view the data being hosted by that site. Obviously, this is a security concern for most organizations. Indeed, I’m often asked by clients and colleagues how to lock down an IIS site so only the desired people can access it.
The answer is pretty simple: In order to secure an IIS site, all one needs to do is change the default permissions, enable Windows Authentication for user accounts, and disable Anonymous Authentication in IIS Manager. Here are the steps:
How to secure your IIS site
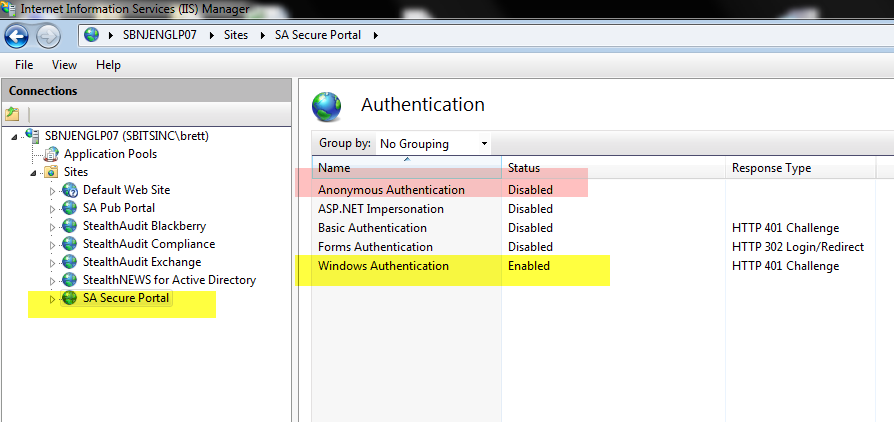
1.Select your site and click “Authentication”, In the screenshot below, you can see that I have many IIS sites, including one named “Default Web Site”.

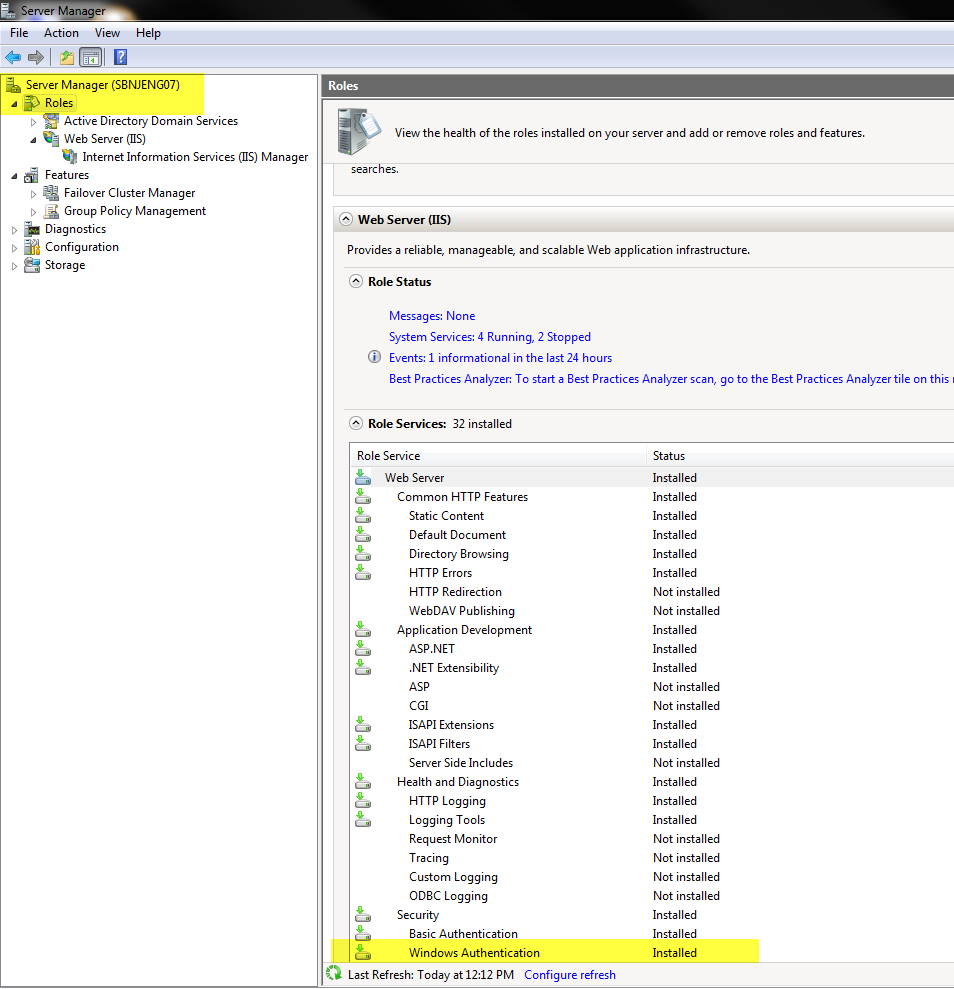
2. If you have Windows Authentication installed for IIS, proceed to step 3. If you don’t have Windows Authentication integrated in IIS, add this feature from Server Manager under “Roles / Services” for IIS”EX. IIS Windows Authentication Feature of IIS.
3. Enable the Windows Authentication option for your site:
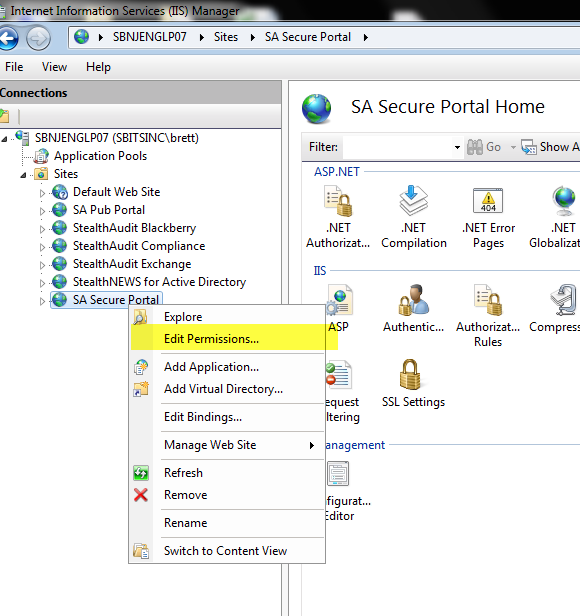
4. Reconfigure the permissions of the web site. First, we will break inheritance and then we will remove “Users” from having any access:
4.1 Right-click the site select “Edit Permissions”
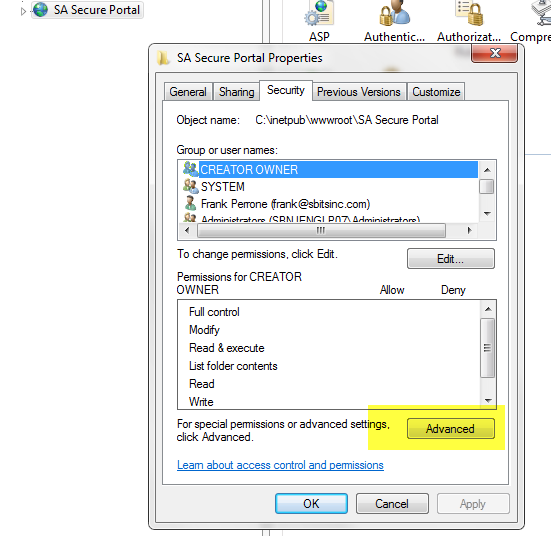
4.2 Click “Advanced.”
4.3 Click “Change Permissions.”
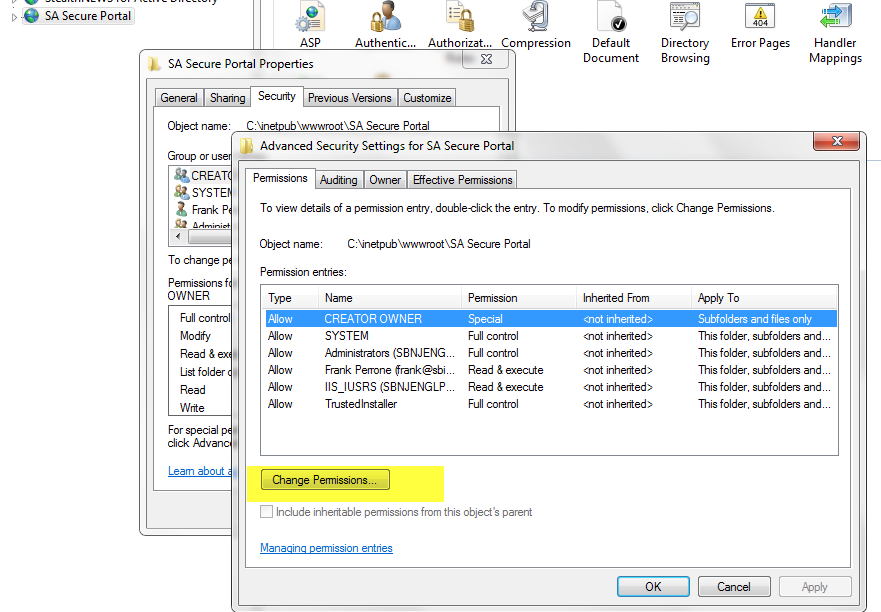
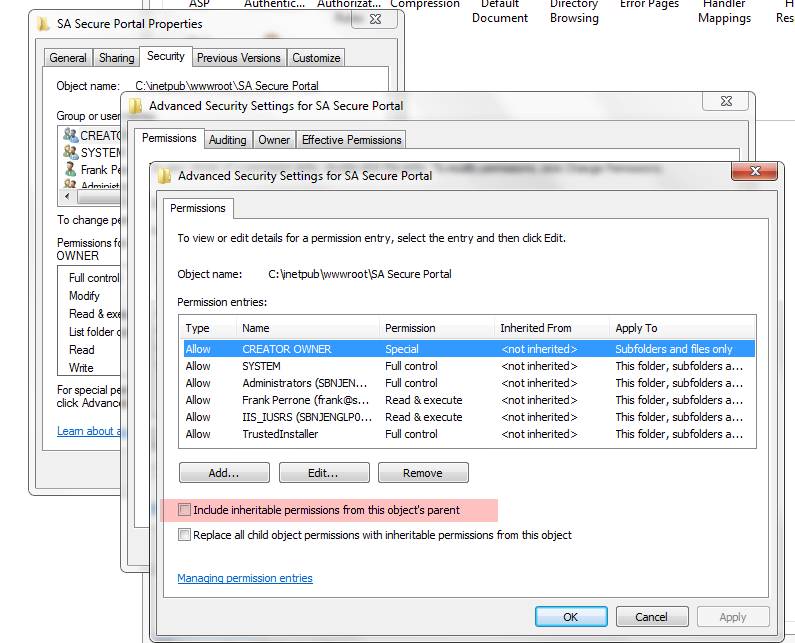
4.4 Uncheck the box “Include inheritable permissions from this objects parent”. When prompted with a warning, select ADD. This simply copies the existing permissions back without inheritance; this is very important as to not break the website for yourself and the system at large.
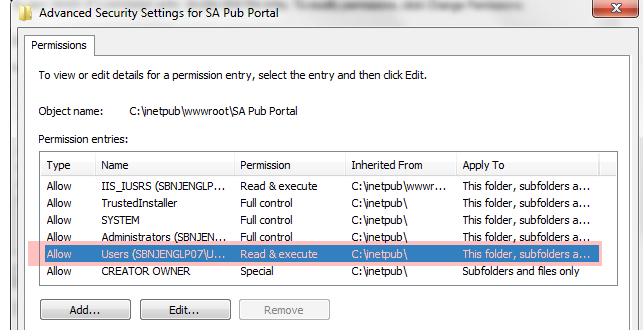
4.5 Delete the permission for Users. This will disable the ability for any domain users to simply authenticate to your site to view the reports, while allowing local administrators and members of IIS_IUSRS to log in and view reports. (The set of base permissions can vary from OS to OS.) Also make sure that security principals like “Everyone” and “Authenticated Users” do not have any access.
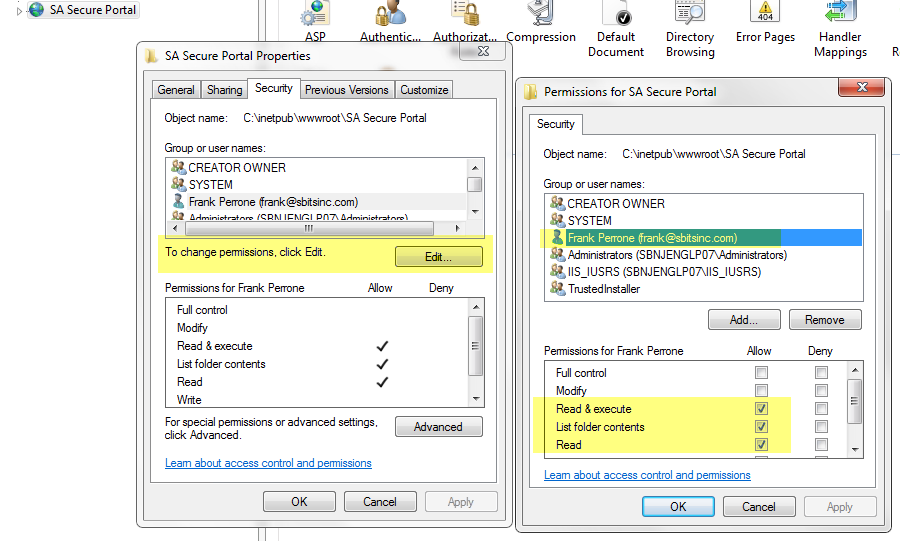
4.6 Last, you can now use the basic “Edit” button to add Read Only access for select users and groups. In my case, I gave Read access to my reports to Frank. For basic site usage, nothing more then Read access is really needed; don’t give anyone Modify or Full Control access unless there is some special need.
Note that I did this testing on Windows 2008 and Win 7, and I did not need to bounce IIS for any of these configuration changes to start working.
How can Netwrix help?
Netwrix Access Analyzer can help you enhance the security of your Windows infrastructure and minimize the risk of a data breach. It empowers you to:
- Identify vulnerabilities that can be used by attackers to compromise Windows systems and get to your data.
- Enforce security and operational policies through baseline configuration analysis.
- Audit and govern privileged accounts.
- Prove compliance more easily with prebuilt reports and complete system transparency.
FAQ
What is Windows Authentication in IIS?
Windows Authentication in IIS is a secure type of authentication in which user account credentials are hashed before being transmitted over the network.
Is Windows Authentication the same as Active Directory?
No. You can use Windows Authentication even if your server is not a member of an Active Directory domain.
Does IIS Windows Authentication use LDAP?
No. IIS Windows Authentication supports only the Kerberos and NTLM protocols.
Security Researcher at Netwrix and member of the Netwrix Security Research Team. Joe is an expert in Active Directory, Windows, and a wide variety of enterprise software platforms and technologies, Joe researches new security risks, complex attack techniques, and associated mitigations and detections.
Пошаговая инструкция по настройке на веб-сайте IIS на Windows Server 2012 R2 прозрачной авторизации доменных пользователей в режиме SSO (Single Sign-On) по протоколу Kerberos.
На веб сервере запустите консоль IIS Manager, выберите нужный сайт и откройте раздел Authentication. Как вы видите, по умолчанию разрешена только анонимная аутентификация (Anonymous Authentication). Отключаем ее и включаем Windows Authentication (IIS всегда сначала пытается выполнить анонимную аутентификацию).

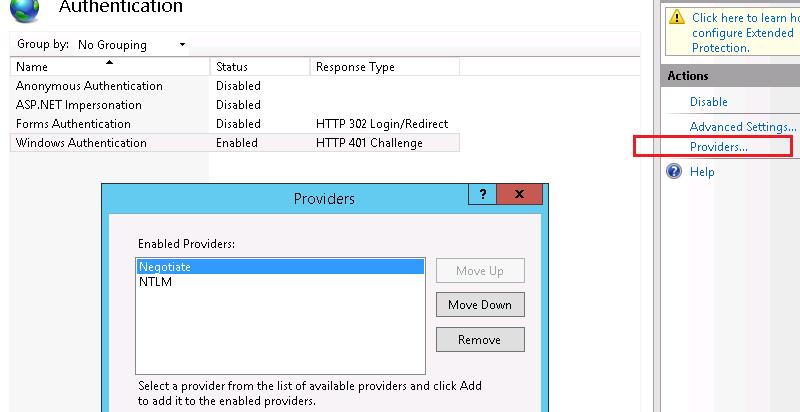
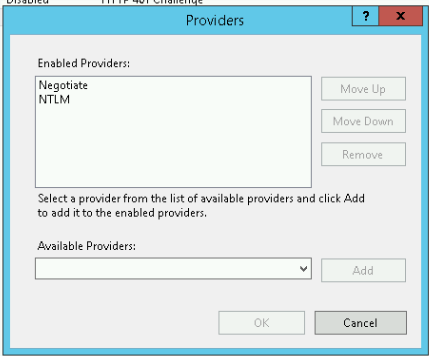
Открываем список провайдеров, доступных для Windows аутентификации (Providers). По умолчанию доступны два провайдера: Negotiate и NTLM. Negotiate – это контейнер, который в качестве первого метода проверки подлинности использует Kerberos, если эта аутентификация не удается, используется NTLM. Необходимо, чтобы в списке провайдеров метод Negotiate стоял первым.
Следующий этап – регистрация Service Principal Name (SPN) записей для имени сайта, к которому будут обращаться пользователи. В том случае, если сайт IIS должен быть доступен только по имени сервера, на котором он расположен (http://server-name или http://server-name.contoso.com), создавать дополнительные SPN записи не нужно (SPN записи уже имеются в учетной записи сервера в AD). При использовании адреса сайта, отличного от имени хоста, или при построении веб-фермы с балансировкой, придется привязывать дополнительные записи SPN к учётной записи сервера или пользователя.
Предположим, у нас имеется ферма IIS серверов. В этом случае оптимально создать отдельную учетную запись в AD и привязать SPN записи к ней. Из-под этой же учетной записи будут запускать целевой Application Pool нашего сайта.
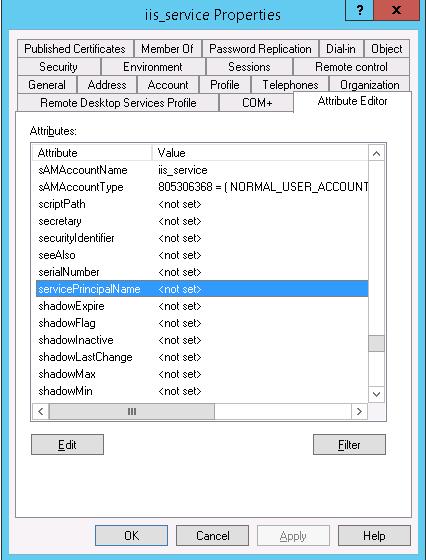
Создадим доменную учетную запись iis_service. Убедимся, что SPN записи для этого объекта не назначены (атрибут servicePrincipalName пустой).
Предположим, что сайт должен отвечать по адресам _http://webportal and _http://webportal.contoso.loc. Мы должны прописать эти адреса в SPN атрибут служебной учетной записи
Setspn /s HTTP/webportal contoso\iis_service
Setspn /s HTTP/webportal.contoso.loc contoso\iis_service
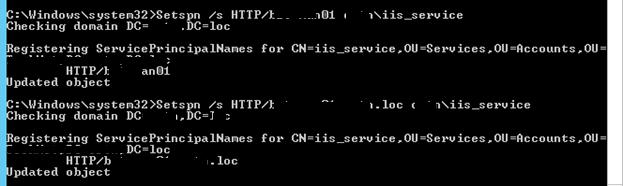
Таким образом, мы разрешим этой учетной записи расшифровывать тикеты Kerberos при обращении пользователей к данным адресам и аутентифицировать сессии.
Проверить настройки SPN у учетной записи можно так:
setspn /l iis_service

Совет. Kerberos не будет работать корректно при наличии дублирующих SPN у разных записей домена. С помощью следующей команды, убедитесь, что дубликатов SPN в домене нет:
setspn –x
Следующий этап – настройка в IIS Application Pool для запуска из-под созданной сервисной учетной записи.
Выберите Application Pool сайта (в нашем примере это DefaultAppPool).

Откройте раздел настроек Advanced Settings и перейдите к параметру Identity.
Измените его с ApplicationPoolIdentity на contoso\iis_service.
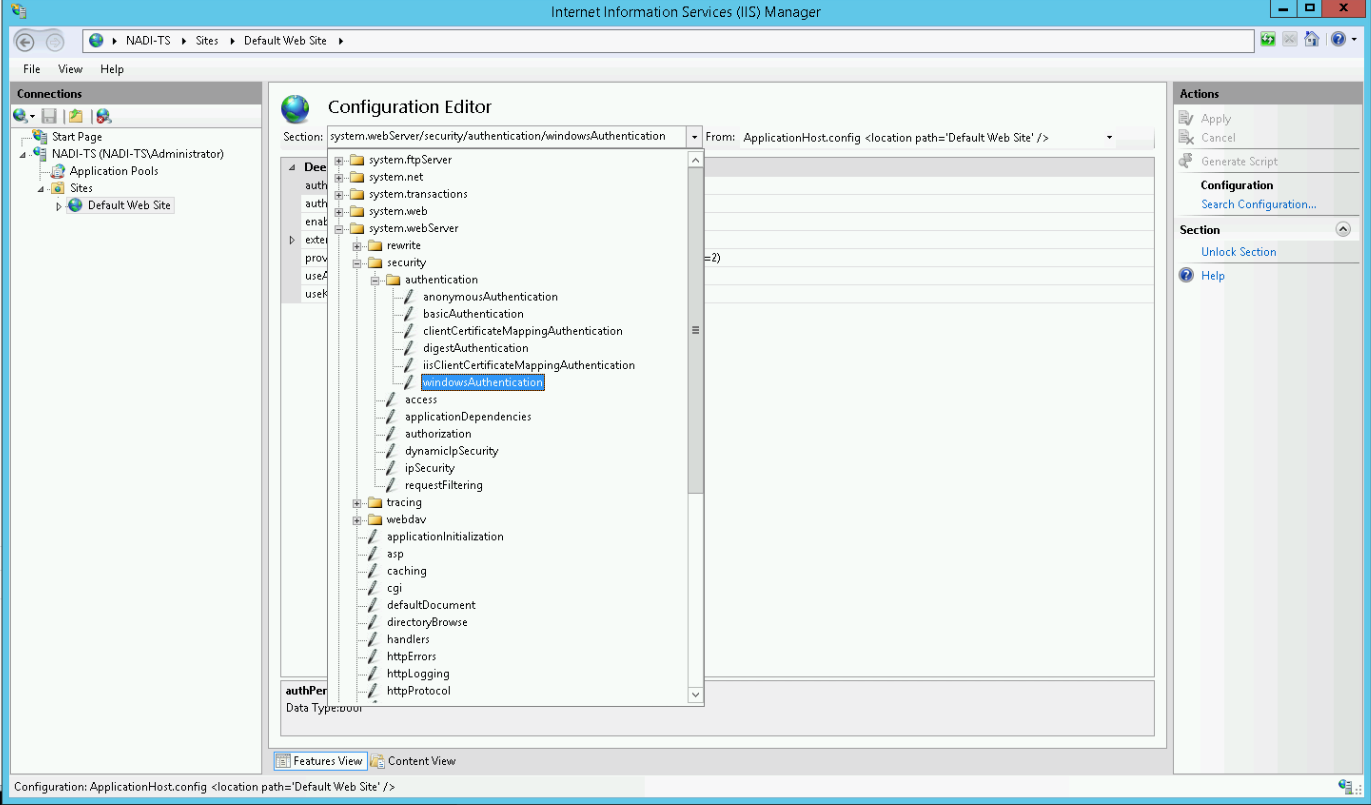
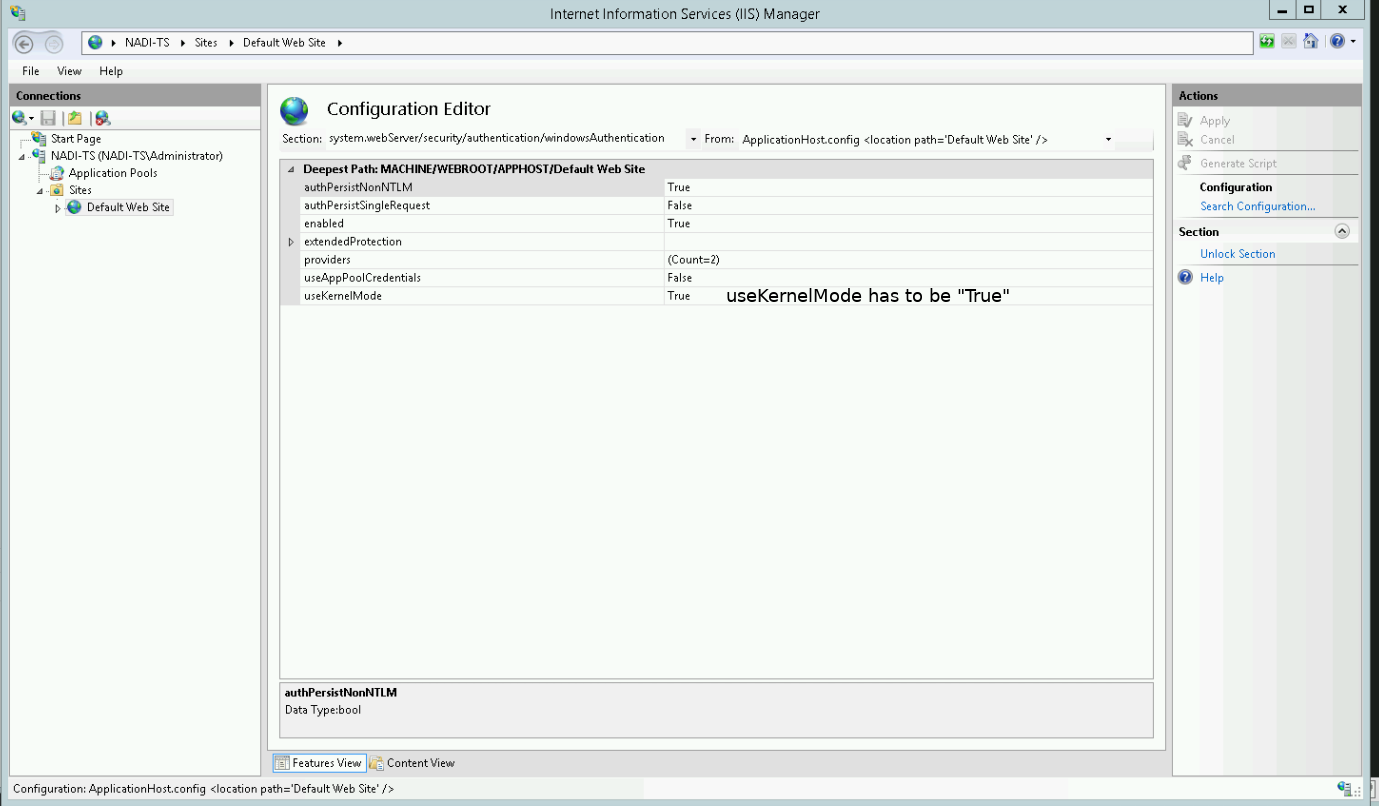
Затем в консоли IIS Manager перейдите на свой сайт и выберите секцию Configuration Editor.
В выпадающем меню перейдите в раздел system.webServer > security > authentication > windowsAuthentication

Измените useAppPoolCredentials на True.
Тем самым мы разрешим IIS использовать доменную учетку для расшифровки билетов Kerberos от клиентов.
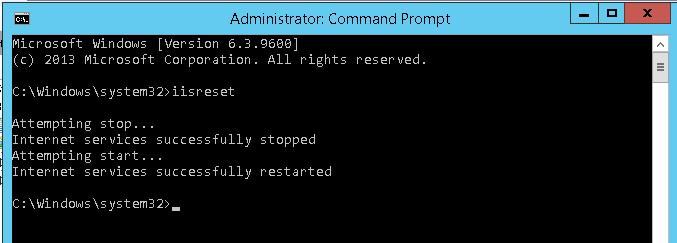
Перезапустим IIS командой:
iisreset
Аналогичную настройку нужно выполнить на всех серверах веб-фермы.
Протестируем работу Kerberos авторизации, открыв в браузере клиента (браузер нужно предварительно настроить для использования Kerberos) адрес _http://webportal.contoso.loc
Примечание. В моем примере, на IE11 сразу авторизоваться не получилось. Пришлось добавить адрес в доверенные и в настройках Trusted Zones Sites выставить значение параметра User Authentication -> Logon на Automatic logon with current user name and password

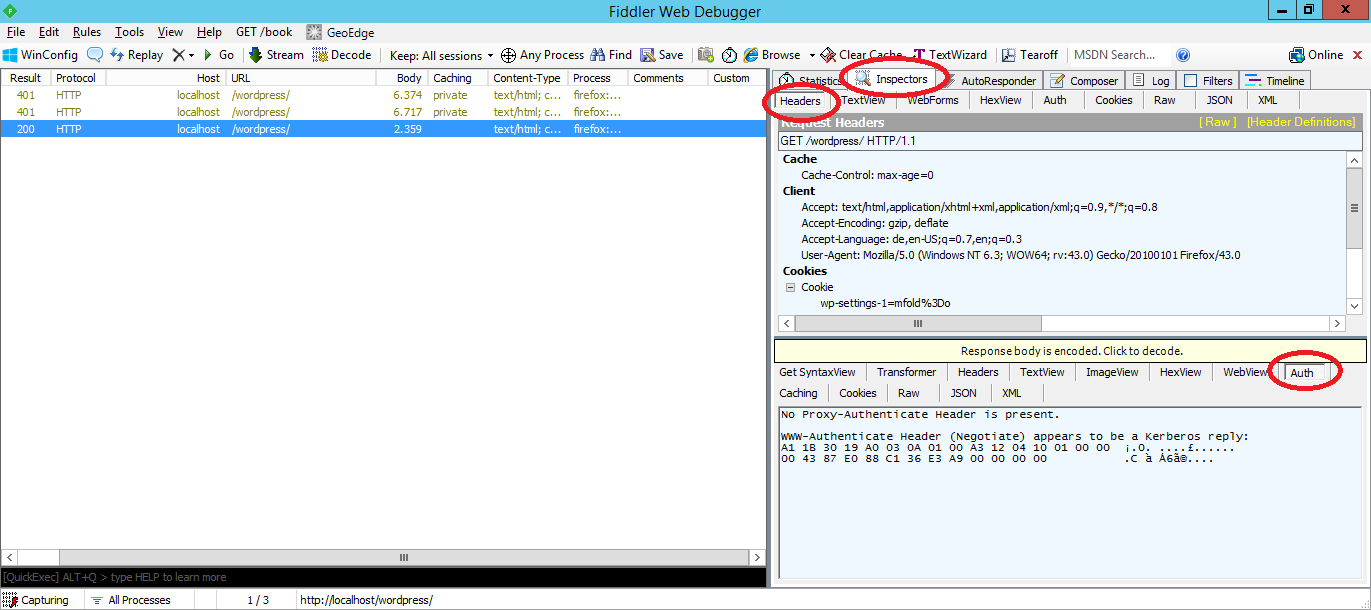
Убедится, что для авторизации на сайте используется Kerberos можно с помощью инспектирования HTTP трафика утилитой Fiddler.
Запускаем Fiddler, в браузере открываем целевой сайт. В левом окне находим строку обращения к сайте. Справа переходим на вкладку Inspectors. Строка Authorization Header (Negotiate) appears to contain a Kerberos ticket, говорит о том, что для авторизации на IIS сайте использовался протокол Kerberos.

In this hint, I will explain how to enable Windows Authentication in IIS? Additionally, we will answer the below IIS related questions:
-
1
What’s IIS?-
1.1
Is it possible to install IIS on Linux?
-
1.1
-
2
What’s Windows Authentication?-
2.1
What’re the Supported Authentication protocols in Windows Authentication? -
2.2
Enable Windows Authentication-
2.2.1
Using Command Prompt -
2.2.2
Using IIS GUI
-
2.2.1
-
2.1
What’s IIS?
IIS stands for Internet Information Services, it’s a webserver role that mainly runs on Windows Operating Systems and provides secure and management tools to manage web, application, and services hosting.

Is it possible to install IIS on Linux?
The IIS can also run on Linux. however, it is not recommended for production use!
Windows Authentication in IIS is a secure form of authentication where the user credential (UserName and password) is hashed before being sent over the network.
Windows authentication is not appropriate for use in an Internet environment, because that environment does not require or encrypt user credentials.
What’re the Supported Authentication protocols in Windows Authentication?
There are two authentication protocols supported in Windows Authentication:
- Kerberos.
- NTLM.
Enable Windows Authentication
Using Command Prompt
In my scenario, I tried to publish an ASP.Net web application on IIS 7 that only enables anonymous authentication by default.
Actually, I need to use Windows authentication to allow users to be authenticated using the NTLM.
Steps
- Run command prompt from the start menu.
- Type the below cmdlet to install IIS Windows Authentications.
pkgmgr.exe /iu:IIS-WindowsAuthentication - Again, Type “inetmgr” to open IIS and click ok.
- The IIS should be opened.
- Select your site > Click on the Authentication icon.
- Enable Windows authentication.
Note: The default setting for Windows authentication is Negotiate. This setting means that the client can select the appropriate security support provider.
To force NTLM authentication, you must change the value of the <Provider> element under the <windowsAuthentication> element in the ApplicationHost.config file.
<windowsAuthentication enabled="true">
<providers>
<add value="Negotiate" />
<add value="NTLM" />
</providers>
</windowsAuthentication>
Using IIS GUI
- First, make sure that the Webserver Role is installed on your server.

- Open IIS.
- Go to “Sites” > select your site > Select “Authentication”.
- Click on “Windows Authentication”, then click on “Enable”.

Conclusion
In conclusion, we have briefly explained how to enable Windows Authentication for a web site in IIS, also we have explored the following:
- What’s IIS?
- Is it possible to install IIS on Linux?
- What’s Windows Authentication?
- What’re the Supported Authentication protocols in Windows Authentication?
- Enable Windows Authentication in IIS.
Applies To
- IIS7.
- IIS8.
References
- Windows Authentication.
You may also like
- Connection Timeout Expired. The timeout period elapsed while attempting to consume the pre-login handshake acknowledgment
On this page we will show you how to configure your Windows and Internet Information Server (IIS) environment in order to use NADI with Kerberos SSO.
Enable Windows Authentication
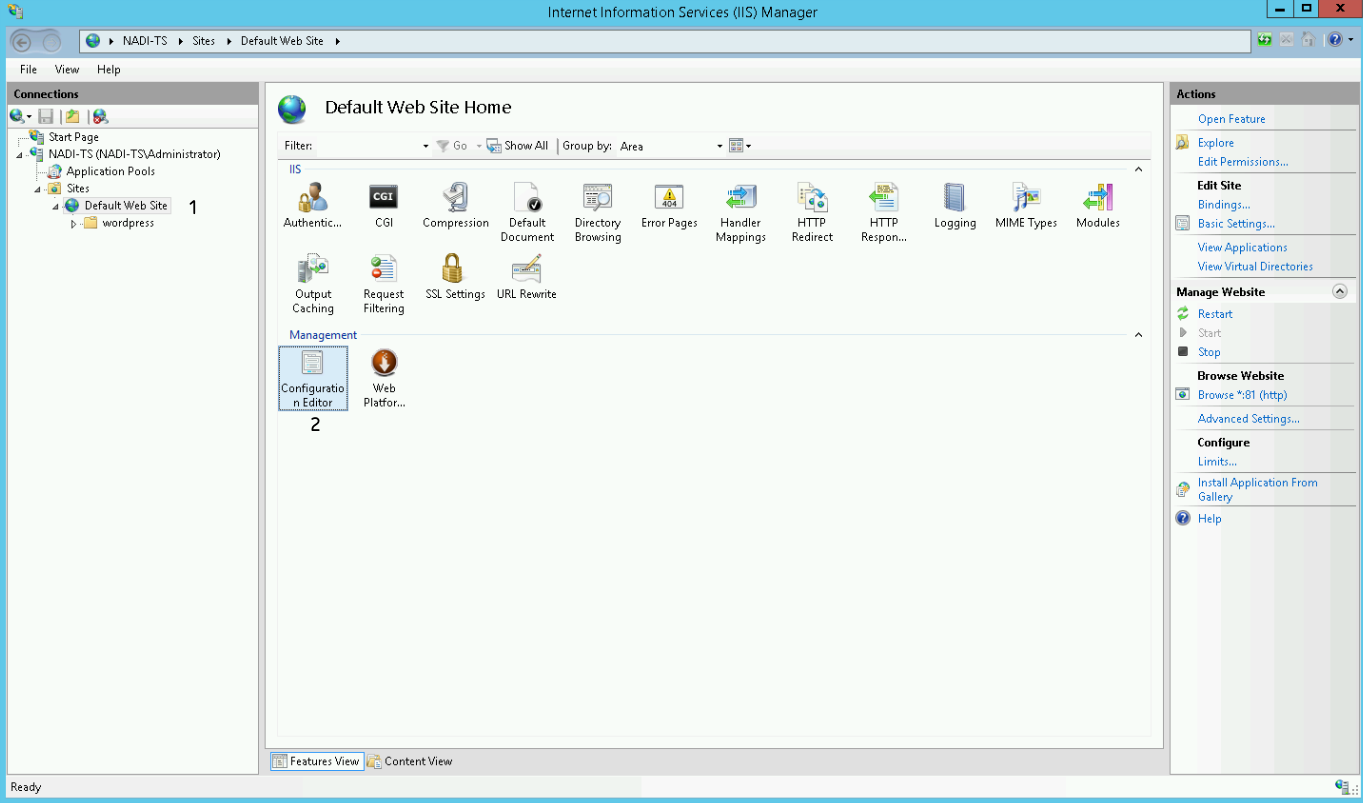
- Open the IIS Manager and select the site under which your WordPress environment runs. In our case we use the Default Web Site.
- Double click on Authentication:

Now you have to configure the authentication settings of your site.
- Disable Anonymous Authentication
- Enable Windows Authentication
- With Windows Authentication selected, click on the Providers link in the right Action panel
If the Windows Authentication entry is missing, you have to add the feature by using Windows’ Server Manager.
You can enable it below Server Roles > Web Server (IIS) > Web Server > Security > Windows Authentication.

In the now appearing window, add the providers as shown in the following screenshot. The order has to be Negotiate over NTLM! Negotiate equals to use Kerberos authentication.
Close the window by pressing OK.
- Select your site on the left panel.
- Double click on Configuration Editor:
Now select windowsAuthentication from the dropdown menu:
Change useKernelMode to True and save the settings by pressing the Apply button in the upper right corner:
Restart the IIS.
Configure SPNs
In our example we imagine the following scenario:
Host alias (${HOST_ALIAS}) |
Domain | FQDN host (${FQDN_HOST}) |
|---|---|---|
nadi-ts |
test.ad |
nadi-ts.test.ad |
-
Open a console and type in
hostnameto see the name (${MACHINE_NAME}) of your machine.The ${MACHINE_NAME} can be equal to the ${HOST_ALIAS}, but in most cases it isn’t.
-
Now type the following to receive a list of all SPNs registered for your machine
setspn -L ${MACHINE_NAME}This should output a list like

-
You now have to add a
HOSTand anhttpSPN for the address of your WordPress environment which has to equal the machines FQDN. To do this type the following commands:setspn -a HOST/${FQDN_HOST} ${MACHINE_NAME} setspn -a http/${FQDN_HOST} ${MACHINE_NAME} -
Check if the SPNs were added successfully by typing
setspn -L ${MACHINE_NAME}


If your hostname contains a port (e.g. nadi-ts.test.ad:81/wordpress) do not add that port to the SPNs. This is only required for older environments up to Windows 7 and Windows Server 2008.
Configure browsers
You have to configure the browsers you are using.
Test authentication
You can use Fiddler to test the Kerberos configuration.
- Start Fiddler
- Open your browser and go your WordPress instance for which have previously enabled Kerberos
- In Fiddler select the last request from the list. In the right panel below Inspectors > Headers > Auth you should see the message
WWW-Authenticate Header (Negotiate) appears to be a Kerberos reply
If you have been successfully logged in into your WordPress environment you should find the following log message in logs/nadi-debug.log:
