
Modified on:
Thu, 10 Nov, 2022 at 4:29 AM
In order to run ShortPoint on your SharePoint 2019 On-Premise environment, it will need the capability to read Multipurpose Internet Mail Extensions (MIME) information from your server’s Internet Information Services (IIS) configuration. This functionality becomes available once IIS 6 Metabase Compatibility is enabled and installed.
You will find the steps on how to configure this in the following support article.
Short walkthrough for advanced users
If you are familiar with the required interface to complete this process, please go ahead and follow these steps:
- Login to your SharePoint 2019 Farm Server
- Open Windows PowerShell as administrator
- Execute the following PowerShell commands:
- import-module servermanager
- install-windowsfeature web-metabase
If done successfully, you are ready to move to the next step in installing ShortPoint on your SharePoint 2019 environment.
Step-by-step Tutorial
Here are key information and detailed steps on how to enable IIS 6 Metabase Compatibility on SharePoint 2019 On-Premise environments.
TABLE OF CONTENTS
- This article is for you if
- How to enable IIS 6 Metabase Compatibility
- Option 1: Enable IIS 6 Metabase Compatibility with PowerShell
- Step 1: Run Windows Management Shell
- Step 2: Execute PowerShell commands
- Option 2: Enable IIS 6 Metabase Compatibility using Windows Server Manager
- Step 1: Launch Server Manager
- Step 2: Open the Add Roles and Features wizard
- Step 3: Enable IIS 6 Management Compatibility
- Step 4: Proceed to Install Selections
- Option 1: Enable IIS 6 Metabase Compatibility with PowerShell
This article is for you if
- You are running ShortPoint SPFx package on SharePoint 2019 On-Premise
- You have local administrator access on your SharePoint Farm Servers and are able to add Server Roles and Features to your environment
There are two ways to configure IIS 6 Metabase Compatibility on your environment. One is through Windows PowerShell and another through Windows Server Manager. Select the option that you are most familiar and comfortable with.
Option 1: Enable IIS 6 Metabase Compatibility with PowerShell
Follow these steps if you wish to enable IIS 6 Metabase Compatibility through Windows PowerShell.
Step 1: Run Windows Management Shell
Look for the Windows PowerShell application through the search box on your Windows taskbar. Right-click on the app and select to Run it as an administrator.

Step 2: Execute PowerShell commands
A PowerShell administrator window will appear. Follow these steps to execute the required commands:
- First, type the command import-module servermanager and hit Enter.

- Then type the command install-windowsfeature web-metabase and press Enter to complete the process.

Once completed you are all set to proceed to the next steps in installing ShortPoint on your ShortPoint 2019 environment.
Option 2: Enable IIS 6 Metabase Compatibility using Windows Server Manager
Follow these steps if you wish to enable IIS 6 Metabase Compatibility through Windows Server Manager.
Step 1: Launch Server Manager
Open the Windows Start Menu, select Administrative Tools, and open Server Manager.

Step 2: Open the Add Roles and Features wizard
On the top left portion of the window, you will find a navigation pane. Click Manage and select Add Roles and features from the dropdown to launch the wizard window.

Step 3: Enable IIS 6 Management Compatibility
On the Add Roles and Features wizard, hit the Next button until you reach the Server Roles options. In the Select Role Services pane, scroll down to the Web Server IIS section, expand Management Tools, and select the tick box to enable IIS 6 Management Compatibility. Also, select to enable all its sub-features.

Step 4: Proceed to Install Selections
Click Next on the succeeding windows until you reach the Confirm Installations Selections pane and press Install.
Once the installation is complete, you can hit Close to exit the Add Roles and Features wizard.
You now have IIS 6 Metabase Compatibility enabled in your environment. Go ahead and continue to do Installation Step 1: Upload ShortPoint SPFx to App Catalog (SharePoint 2019).
Related Articles:
- ShortPoint SPFx Installation for SharePoint 2019 (First Time)
- Prerequisite 1: Setup SharePoint 2019 Farm App Catalog (SPFx)
- Prerequisite 2: Enable Scripting Capabilities with Powershell (SharePoint 2019)
- Installation Step 1: Upload ShortPoint SPFx to App Catalog (SharePoint 2019)
- Installation Step 2: Add ShortPoint SPFx to Site Contents (SharePoint 2019)
- Installation Step 3: Run ShortPoint SPFx Installation from Dashboard (SharePoint 2019)
Did you find it helpful?
Yes
No
Send feedback
Sorry we couldn’t be helpful. Help us improve this article with your feedback.
среда, 20 марта 2024 г.
The ‘IIS 6 Metabase Compatibility’ component is required. Install the component via Server Manager.
Start PowerShell as Administrator and do it:
PS C:\WINDOWS\system32> dism /online /Enable-Feature /FeatureName:IIS-IIS6ManagementCompatibility /all
Автор:
Dmitry Ablov
на
18:12
Комментариев нет:
Отправить комментарий
Следующее
Предыдущее
Главная страница
Подписаться на:
Комментарии к сообщению (Atom)
IIS 6 Metabase Compatibility для exchange tools на windows 10
dism /online /Enable-Feature /FeatureName:IIS-IIS6ManagementCompatibility /all
Ошибка: При выполнении «$error.Clear(); Set-LocalPermissions » произошла следующая ошибка: «System.Security.AccessControl.PrivilegeNotHeldException: Процесс не обладает необходимой для выполнения данной операции привилегией «SeSecurityPrivilege».
https://nbroadcast.blogspot.com/2017/02/exchange-2016-installer-issue.html
Популярные сообщения из этого блога
У вас нет прав для отправки сообщения вместо указанного пользователя. Ошибка: [0x80070005-0x0004dc-0x000524]
Включить выключить кеширование Закрыть outlook Удалить C:\Users\%username%\AppData\Local\Microsoft\Outlook\Offline Address Books Выключить кэширование почтового ящика http://arozhk.ru/soft/outlook-oshibka-0x80070005-00000000-00000000 Соответственно права все проставлены, проверены и внешне всё нормально. Как я решил эту проблему? Первое, поискал в интернете описание подобных проблем, оказывается я не первый у кого Exchange 2016 выдает ошибку при отправки сообщения из другого почтового ящика. Вариантов получилось несколько, очистить кэш клиента, перезагрузить адресную книгу, перебить права чуть ли не лезя ручками в AD. Много чего. Но в одном мало заметном посте прочитал, что всё банально, такая ошибка, при всех правильно проставленных правах, возникает если адресат от имени которого отправляем письмо, скрыт в глобальной адресной книге … Нонсенс, но факт. Вернул аккаунт в адресную книгу — ошибки не стало. Так что, если и у Вас возникает такая ошибка в Exchange 2016, когда В…
KSMG Подготовка конфигурационных файлов для подключения к LDAP
Подготовка конфигурационных файлов для подключения к LDAP Перед тем, как настроить верификацию получателей через LDAP на встроенном MTA, необходимо подготовить конфигурационный файл, содержащий параметры подключения к LDAP-серверу. Если у вас несколько доменов (лесов) Active Directory, для каждого из них необходимо подготовить отдельный конфигурационный файл. Каждый файл с параметрами подключения к LDAP представляет собой обычный текстовый файл в формате Unix (LF переводы строк). Имена файлов должны быть такими: ldap_map1.cf , ldap_map2.cf и т.д. Процедура подготовки конфигурационного файла состоит из следующих шагов: 1) Создайте на контроллере домена сервисную учетную запись со сложным паролем, которая будет использоваться для подключения к LDAP-серверам данного домена (леса доменов). Для примера будем использовать учетную запись с именем ksmg-relay. 2) Определите DN (Distinguished Name) сервисной учетной записи. Это можно сделать, например, при …
Пустое значение виртуального каталога Autodiscover — Object reference not set to an instance of an object (Get-AutodiscoverVirtualDirectory)
https://support.microsoft.com/en-au/topic/autodiscover-event-id-1-after-installing-exchange-server-2019-cu3-or-exchange-server-2016-cu14-93850e62-4cf4-8a76-5fd4-c8ce6f032015 Autodiscover Event ID 1 after installing Exchange Server 2019 CU3 or Exchange Server 2016 CU14 Symptoms After you upgrade to Cumulative Update 3 for Microsoft Exchange Server 2019 or Cumulative Update 14 for Exchange Server 2016 , you receive the following error message: Log Name: Application Source: MSExchange Autodiscover Date: DateTime Event ID: 1 Task Category: Web Level: Error Keywords: Classic User: N/A Computer: ComputerName Description: Unhandled Exception «Object reference not set to an instance of an object.» Stack trace: at Microsoft.Exchange.AutoDiscoverV2.FlightSett…
Objective
Provide process for enabling IIS Compatibility Mode in newer server environments such as Server 2016 utilizing IIS 10
Information
Environments using an SMTP server may need to make changes to the IIS SMTP Server which require Metabase access. This is not enabled by default in later versions of IIS and the role must be added in order for the tools to be used.
Process
- Open Server Manager and click Manage > Add Roles and Features. Click Next.
- Select Role-based or feature-based installation and click Next.
- Select the appropriate server. The local server is selected by default. Click Next.
- Enable Web Server (IIS) and click Next.
- No additional features are necessary to install the Web Adaptor, so click Next.
- On the Web Server Role (IIS) dialog box, click Next.
- On the Select role services dialog box, verify that the web server components listed below are enabled. Click Next.
- IIS Management Console
- IIS 6 Management Compatibility
- IIS 6 Metabase Compatibility
- Verify that your settings are correct and click Install.
- When the installation completes, click Close to exit the wizard.
Once the new roles have been installed we will need to install the IIS 6 Resource Kit which includes MetaBase Explorer. In most cases this is the only portion of the kit we will need to have you install.
- Download the IIS 6 Resource Kit
- Right click on the .exe, go to Properties and Select Unblock (if available)
- Select Next
- Agree to the EULA and select Next
- Fill out User Name and Company Name and Select Next
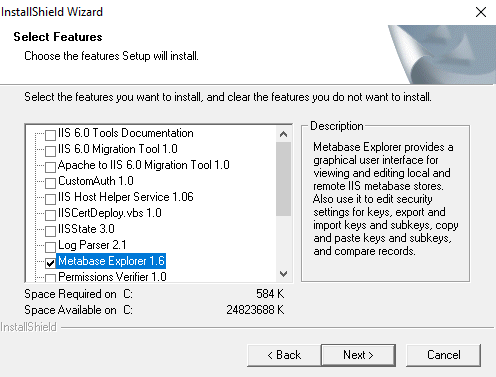
- Select Custom
- Deselect all options except Metabase Explorer 1.6 and Select Next

- Select Next again to complete the install of the desired features
- After the install has completed Select Finish
You can now complete the steps in the articles utilizing Metabase functionality such as removing the SMTP Event Sinks in the manual removal of MailEssentials.
2022-11-27
How do I enable Metabase compatibility in IIS 6?
Enabling IIS 6 Configuration Compatibility
- Click Start and click Control Panel.
- Click Programs.
- Click Programs and Features.
- Click Turn Windows features on or off.
- Expand the Internet Information Services item.
- Expand the Web Management Tools item.
- Expand the IIS 6 Management Compatibility item.
What is IIS Metabase compatibility?
The Metabase Compatibility feature runs inside the Metabase service (IISADMIN). It intercepts all method calls to ABO. If the information in the method call is related to the web server configuration, it is mapped to the new system.
What is IIS 6 Management Compatibility used for?
These instructions apply to users attempting to install a web service on a server running IIS 7 or later. Those services which are compatible with IIS 6 require IIS 7 to be configured so that it can run IIS 6 applications.
How do I install a PowerShell module in IIS?
Installing IIS in the PowerShell
- In the search, type PowerShell, and then click Windows PowerShell.
- In Windows PowerShell, type the following command: Install-WindowsFeature -name Web-Server -IncludeManagementTools.
- Press [ENTER]. The Internet Information Services (IIS) Manager will be installed.
Where is IIS Metabase file located?
%SystemRoot%\system32\inetsrv\ directory
The metabase consists of two files, MetaBase. xml and MBSchema. xml, stored in the %SystemRoot%\system32\inetsrv\ directory.
How do I install Isapi extensions in Windows 2016?
On the Server Roles page, expand Web Server (IIS), expand Web Server, expand Application Deelopment, and then select CGI or ISAPI Extensions. Click Next. On the Select features page, click Next. On the Confirm installation selections page, click Install.
What is Metabase file?
The metabase is an inheritable, hierarchical database that allows for configuration of HTTP/HTTPS, FTP, SMTP, and NNTP at the server, the site, or the folder or file level.
How do I uninstall Metabase compatibility in IIS 6?
You can remove IIS v6 support via “Turn Windows features on or off” if you do not need it:
- Control Panel -> Programs and Features -> Turn Windows features on or off.
- Internet Information Services -> Web management Tools -> IIS 6 Management Compatibility.
How do I manage IIS using PowerShell?
How to use IISAdministration powershell cmdlets to configure IIS configuration settings
- Open Inetmgr.exe.
- Select Default Web Site.
- Go to Configuration Editor page.
- Expand “Section:” dropdown and select “appSettings”
- Click the second column of “(Collection)” listview item.
How do I enable ISAPI in IIS?
In the Web Server (IIS) pane, scroll to the Role Services section, and then click Add Role Services. On the Select Role Services page of the Add Role Services Wizard, select ISAPI Filters, and then click Next. On the Confirm Installation Selections page, click Install. On the Results page, click Close.