
Всем привет Будем разбираться с процессом igfxpers.exe — кто такой и откуда взялся. В общем этот процесс относится к видеокартам от компании Intel, то есть к видеочипу. Раньше такой чип был распаян отдельно на материнской плате, а сейчас уже его умудрились засунуть прямо в процессор
Можно ли процесс igfxpers.exe отключить в диспетчере задач? Да, можно. А ничего не будет, глюкать система не начнет? Нет — не начнет. Но почему тогда он висит в диспетчере, если пользы от него ноль? Ну, в диспетчере задач много что может висеть. И не всегда оно нужно. А рассчитано это все на то, что современные процессоры помимо тех программ, которые вам нужны, могут также тянуть на себе кучу хлама.
Вернемся к igfxpers.exe, вот основные обязанности процесса:
- процесс отвечает за установку графических пунктов в меню правого клика по рабочему столу, то есть если вы его отключите в автозагрузке, то потом когда нажмете мышкой по рабочему столу то там возможно не будет ненужных пунктов про Intel графику; разрешение и прочее вы сможете менять как обычно;
- еще в трее может сидеть иконка Intel, там тоже какие-то могут быть функции, которыми ну мало кто пользуется, но тем не менее оно висит там и надеется что когда-то оно принесет вам пользу;
- товарищ igfxpers.exe обычно сидит не один, а с приятелями в виде igfxtray.exe и hkcmd.exe, они тоже не нужны, не несут никакой пользы, поэтому их можно отключить; что еще интересно, что эти процессы такое чувство что есть почти в каждом рабочем офисном компе;
Сама графика от Интела тут не причем, она неплохая как для встройки:

Но как это все отключить? Спокойно, все возможно!
Зажимаем Win + R, пишем туда магическую команду msconfig и жмем энтер:

Откроется не менее магическое окно, где на вклакде Автозагрузка снимаем галочки со всех засранцев, которые относятся к Intel:

Можно ли как-то это по-другому отключить? Да, можно. Вот смотрите как. Открываете диспетчер задач, там на вкладке процессы смотрите где засранцы:

Нажимаете по процессу правой кнопкой и выбираете открыть расположение. Что произойдет? Откроется папка с выделенным файлом, который и есть процесс! Теперь внимание — быстро завершаете в диспетчере процесс, а сам тот файл выделенный переименуйте во что угодно, но чтобы имя изменилось, например лично я просто добавляю символ такой _ и все
Если есть еще какое-то ПО от Интела, которое вы хотите удалить, но хотите чтобы это сделал мастер? Не проблема! Есть такой мастер — к вашим услугам Revo Uninstaller, который умеет и программы удалить и подметать мусор за ними, рекомендую к ознакомлению!
А вдруг это вирус? А что? Может быть и такое, тогда вперед господа, сканируем систему полностью при помощи:
- AdwCleaner — спец в своем деле, утилита целится по рекламным вирусам, из супер возможностей поиск среди служб, расширений браузеров, и еще в некоторых тайных местах, где прячется вирусня; утилита бесплатная и готова к бою;
- HitmanPro — тоже мистер еще тот, но немного иначе работает и ничуть не хуже, находит все, даже там где вроде бы ничего быть не должно, это я имею ввиду кукисы (данные, оставленные сайтами), подозрительные удаляет; ничего больше не могу написать потому что спец есть спец;
- ну и старый добрый
дядядоктор Dr.Web CureIt!, он мастер на все руки, удаляет все вирусы что находит, а найти он может много, вот разработчики говорят что и рекламные вирусы находит, но тут я думаю что AdwCleaner или HitmanPro все же лучше; в себе уже имеет сигнатурные базы; просит об отправке анонимных данных, опасности в этом нет никакой, поверьте;
Ну что ребята, на этом все, надеюсь что я смог дать вам ответ на вопрос что такое igfxpers.exe в диспетчере задач и теперь мне осталось только пожелать вам удачи
На главную!
неизвестные процессы
12.05.2016
If you have ever looked at the processes running on your Windows computer, you might have noticed a process called Igfxpers.exe. What is this process and what does it do? Is it safe or malicious? Should you remove it or keep it? In this blog post, we will answer these questions and more.

What is Igfxpers.exe?
Igfxpers.exe is a process that belongs to Intel Graphics and Media Control Panel. It is responsible for managing the display settings of your Intel graphics card, such as resolution, color depth, brightness, contrast, etc. It also allows you to access the Intel Graphics and Media Control Panel from the system tray.
Igfxpers.exe is usually located in the C:\Windows\System32 folder. The file size can vary depending on the version of your Intel graphics driver. The process is not essential for Windows to run, but it can improve the performance and functionality of your Intel graphics card.
Should you remove igfxpers.exe or keep it?
If igfxpers.exe is a genuine process from Intel Corporation, then you do not need to remove it. It does not consume a lot of CPU or memory resources and it does not affect your system performance. It can also help you adjust your display settings according to your preferences.
However, if you do not use the Intel Graphics and Media Control Panel or if you have another graphics card installed on your computer, then you can disable igfxpers.exe from running at startup. This can free up some system resources and prevent any potential conflicts with other graphics drivers. To disable igfxpers.exe from running at startup, you can follow these steps:
- Press Windows + R keys to open the Run dialog box.
- Type msconfig and click OK to open the System Configuration window.
- Click on the Startup tab and uncheck the box next to igfxpers.exe.
- Click Apply and OK to save the changes.
- Restart your computer for the changes to take effect.
Alternatively, you can use a third-party program like CCleaner to manage your startup programs and disable igfxpers.exe from there.
Is Igfxpers.exe malware?
Igfxpers.exe is a legitimate process that comes from Intel Corporation. It is not a virus or malware. However, some malware can disguise themselves as igfxpers.exe and run in the background. To check if the process is genuine or not, you can right-click on it in the Task Manager and select Properties. Then, look at the file location and the digital signature. If the file location is not C:\Windows\System32 or if the digital signature is not from Intel Corporation, then you might have a fake igfxpers.exe on your computer.
Should you be uncertain as to whether Igfxpers.exe is malicious or a false positive detection, you can submit the affected file to VirusTotal to be scanned with multiple antivirus engines.
If you suspect that Igfxpers.exe is infected with malware, you can follow the below free malware removal guide to clean up your device.
Remove malware from your Windows device
The below malware removal instructions are for Windows users, however, we also have an Android Guide and a Mac Guide which should help clean up your device.
This malware removal guide may appear overwhelming due to the number of steps and numerous programs that are being used. We have only written it this way to provide clear, detailed, and easy-to-understand instructions that anyone can use to remove malware for free.
Please perform all the steps in the correct order. If you have any questions or doubts at any point, stop and ask for our assistance.
To remove the Igfxpers.exe Trojan and other malware from your computer, follow these steps:
- STEP 1: Uninstall malicious programs from Windows
- STEP 2: Reset browsers back to default settings
- STEP 3: Use Malwarebytes Anti-Malware to remove malware and unwanted programs
- STEP 4: Use HitmanPro to scan your computer for badware
- STEP 5: Use AdwCleaner to remove adware and malicious browser policies
STEP 1: Uninstall malicious programs from Windows
In this first step, we will manually check if any unknown or malicious programs are installed on the computer. Sometimes adware and browser hijackers can have a usable Uninstall entry that can be used to remove them.
Windows 11Windows 10Windows 8Windows 7
-
Press the Windows key + I on your keyboard to open the Settings app.
First, open Windows Settings by pressing Windows+I on your keyboard. You can also right-click your Start button and select “Settings” from the list.

-
In the Settings app, click on “Apps” and then “Apps & features”.
When Settings opens, click “Apps” in the sidebar, then select “Apps & Features”.

-
Find the malicious program in the list of installed apps and uninstall it.
In Apps & Features settings, scroll down to the app list and search for unknown or suspicious programs. To make things easier, you can sort all installed programs by their installation date. To do this, click “Sort by” and select “Install date”.
Look out for any suspicious program that could be behind all the drama – anything you don’t remember downloading or that doesn’t sound like a genuine program. When you find a malicious program, click the three dots button beside it and select “Uninstall” in the menu that appears.
If you have checked your computer for malicious programs and did not find any, you can proceed with the next step in this guide.
-
Follow the prompts to uninstall the program.
In the next message box, confirm the uninstall process by clicking on Uninstall, then follow the prompts to uninstall the malicious program.
Make sure to read all of the prompts carefully, because some malicious programs try to sneak things in hoping that you won’t read them closely.


-
Press the Windows key + I on your keyboard to open the Settings app.
Press the Windows key + I on your keyboard to open the Settings app. You can also ope the Settings app by clicking the Start button on the taskbar, then select “Settings” (gear icon).

-
In the Settings app, click on “Apps”.
When the “Windows Settings” window opens, click on “Apps“. By default, it should open “Apps and Features” but if it doesn’t, select it from the list on the left.

-
Find the malicious program in the list of installed apps and uninstall it.
In Apps & Features settings, scroll down to the app list and search for unknown or suspicious programs. To make things easier, you can sort all installed programs by their installation date. To do this, click “Sort by” and select “Install date”.
Look out for any suspicious program that could be behind all the drama – anything you don’t remember downloading or that doesn’t sound like a genuine program. When you find a malicious program, click on it and select “Uninstall” in the menu that appears.
If you have checked your computer for malicious programs and did not find any, you can proceed with the next step in this guide.
-
Follow the prompts to uninstall the program.
In the next message box, confirm the uninstall process by clicking on Uninstall, then follow the prompts to uninstall the malicious program.
Make sure to read all of the prompts carefully, because some malicious programs try to sneak things in hoping that you won’t read closely.


-
Go to “Program and Features”.
Right-click on the Start button in the taskbar, then select “Programs and Features”. This will take you directly to your list of installed programs.

-
Search for malicious program and uninstall it.
The “Programs and Features” screen will be displayed with a list of all the programs installed on your computer. Scroll through the list until you find any unknown or suspicious program, then click to highlight it, then click the “Uninstall” button.
Look out for any suspicious program that could be behind all the drama – anything you don’t remember downloading or that doesn’t sound like a genuine program.
If you have checked your computer for malicious programs and did not find any, you can proceed with the next step in this guide.

-
Follow the on-screen prompts to uninstall malicious program.
In the next message box, confirm the uninstall process by clicking on Yes, then follow the prompts to uninstall malicious program. Make sure to read all of the prompts carefully, because some malicious programs try to sneak things in hoping that you won’t read closely.


-
Open the “Control Panel”.
Click on the “Start” button, then click on “Control Panel“.
-
Click on “Uninstall a Program”.
When the “Control Panel” appears, click on “Uninstall a Program” from the Programs category.

-
Search for malicious programs and uninstall them.
The “Programs and Features” screen will be displayed with a list of all the programs installed on your computer. Scroll through the list until you find any suspicious or unknown program, then click to highlight it, then click the “Uninstall” button.
Look out for any suspicious program that could be behind all the drama – anything you don’t remember downloading or that doesn’t sound like a genuine program.If you have checked your computer for malicious programs and did not find any, you can proceed with the next step in this guide.

-
Follow the on-screen prompts to uninstall malicious program.
In the next message box, confirm the uninstall process by clicking on Yes, then follow the prompts to uninstall malicious program. Make sure to read all of the prompts carefully, because some malicious programs try to sneak things in hoping that you won’t read closely.


If you are experiencing difficulty while attempting to uninstall a program, you can use Revo Uninstaller to completely remove the unwanted program from your computer.
Now that the malicious programs have been removed from your computer, we can proceed with the next step in this guide.
STEP 2: Reset browsers back to default settings
In this step, we will remove spam notifications, malicious extensions, and change to default any settings that might have been changed by malware.
Please note that this method will remove all extensions, toolbars, and other customizations but will leave your bookmarks and favorites intact. For each browser that you have installed on your computer, please click on the browsers tab below and follow the displayed steps to reset that browser.
ChromeFirefoxMicrosoft EdgeInternet Explorer
Reset Chrome for Windows to default settings
We will now reset your Chrome browser settings to their original defaults. This will reset your startup page, new tab page, search engine, and pinned tabs. It will also disable all extensions and clear temporary data like cookies. Your favorites, history, and saved passwords will not be cleared.
-
Click the three dots in the top-right corner and then click on “Settings”.
Open Chrome and click on the menu button (represented by three vertical dots) in the top right corner of the window. In the dropdown menu that opens, click “Settings“.

-
Click “Advanced”.
Chrome’s “Settings” should now be displayed in a new tab or window, depending on your configuration. In the left sidebar, click on the “Advanced” link.

-
Click “Reset and clean up”.
In the left sidebar, under the “Advanced” section, click on “Reset and clean up“.

-
Click “Reset settings to their original defaults”.
In the main window, the “Reset and clean up” section is visible, as shown in the screenshot below. Click on “Reset settings to their original defaults“.
-
Click “Reset settings”.
A confirmation dialog will now be displayed, detailing the components that will be restored to their default state should you continue with the reset process. To complete the restoration process, click on the “Reset settings” button.

-
(Optional) Reset Chrome Data Sync.
In case a malicious extension reinstalls itself even after performing a browser reset, you have an additional option to reset the data sync for your browser. To do this, navigate to chrome.google.com/sync and click on the Clear Data button.


Reset Firefox for Windows to default settings
We will now reset your Firefox browser settings to their default. The reset feature fixes many issues by restoring Firefox to its factory default state while saving your essential information like bookmarks, passwords, web form auto-fill information, browsing history, and open tabs.
-
Click the three horizontal lines in the top-right corner and then click on “Help”.
Click on Firefox’s main menu button, represented by three horizontal lines. When the drop-down menu appears, select the option labeled “Help“.

-
Click “More troubleshooting information”.
From the Help menu, click on “More troubleshooting information“.

-
Click on “Refresh Firefox”
When the “Troubleshooting Information” page opens, click on the “Refresh Firefox” button.

-
Confirm that you want to reset your browser settings.
To finish the reset process, click on the “Refresh Firefox” button in the new confirmation window that opens.
-
Click “Finish”.
Firefox will now close itself and will revert to its default settings. When it’s done, a window will list the information that was imported. Click on “Finish“.
Your old Firefox profile will be placed on your desktop in a folder named “Old Firefox Data“. If the reset didn’t fix your problem you can restore some of the information not saved by copying files to the new profile that was created. If you don’t need this folder any longer, you should delete it as it contains sensitive information.


Reset Microsoft Edge to default settings
We will now reset your Microsoft Edge browser settings to their default. This will reset your startup page, new tab page, search engine, and pinned tabs. It will also disable all extensions and clear temporary data like cookies. Your favorites, history, and saved passwords will not be cleared.
-
Click the three dots in the top-right corner and then click on “Settings”.
In the top right corner, click on Microsoft Edge’s main menu button, represented by three horizontal dots. When the drop-down menu appears, click on “Settings“.

-
Click on “Reset Settings”.
On the left side of the window, click on “Reset Settings“.
-
Click on “Restore settings to their default values”.
In the main window, click on “Restore settings to their default values“.

-
Click “Reset”.
A confirmation dialog should now be displayed, detailing the components that will be restored to their default state should you continue with the reset process. To complete the restoration process, click on the “Reset” button.
Microsoft Edge will now erase all your personal data, browsing history, and disable all installed extensions. Your bookmarks, though, will remain intact and still be accessible.


Reset Internet Explorer to default settings
We will now reset your Internet Explorer browser settings to their default. You can reset Internet Explorer settings to return them to the state they were in when Internet Explorer was first installed on your computer.
-
Go to “Internet Options”.
Open Internet Explorer, click on the gear icon in the upper-right part of your browser, then select “Internet Options“.
-
Select the “Advanced” tab, then click “Reset”
In the “Internet Options” dialog box, select the “Advanced” tab, then click on the “Reset” button.
-
Click on “Reset”.
In the “Reset Internet Explorer settings” section, select the “Delete personal settings” checkbox, then click on the “Reset” button.
-
Click on “Close”.
When Internet Explorer has completed its task, click on the “Close” button in the confirmation dialogue box.
Close your browser and then you can open Internet Explorer again.
STEP 3: Use Malwarebytes Anti-Malware to remove malware and unwanted programs
In this third step, we will install Malwarebytes to scan and remove any infections, adware, or potentially unwanted programs that may be present on your computer.
Malwarebytes stands out as one of the leading and widely-used anti-malware solutions for Windows, and for good reason. It effectively eradicates various types of malware that other programs often overlook, all at no cost to you. When it comes to disinfecting an infected device, Malwarebytes has consistently been a free and indispensable tool in the battle against malware. We highly recommend it for maintaining a clean and secure system.
-
Download Malwarebytes for Windows
You can download Malwarebytes by clicking the link below.
-
Install Malwarebytes
After the download is complete, locate the MBSetup file, typically found in your Downloads folder. Double-click on the MBSetup file to begin the installation of Malwarebytes on your computer. If a User Account Control pop-up appears, click “Yes” to continue the Malwarebytes installation.

-
Follow the On-Screen Prompts to Install Malwarebytes
When the Malwarebytes installation begins, the setup wizard will guide you through the process.
-
You’ll first be prompted to choose the type of computer you’re installing the program on—select either “Personal Computer” or “Work Computer” as appropriate, then click on Next.

-
Malwarebytes will now begin the installation process on your device.

-
When the Malwarebytes installation is complete, the program will automatically open to the “Welcome to Malwarebytes” screen.

-
On the final screen, simply click on the Open Malwarebytes option to start the program.

-
-
Enable “Rootkit scanning”.
Malwarebytes Anti-Malware will now start, and you will see the main screen as shown below. To maximize Malwarebytes’ ability to detect malware and unwanted programs, we need to enable rootkit scanning. Click on the “Settings” gear icon located on the left of the screen to access the general settings section.

In the settings menu, enable the “Scan for rootkits” option by clicking the toggle switch until it turns blue.

Now that you have enabled rootkit scanning, click on the “Dashboard” button in the left pane to get back to the main screen.
-
Perform a Scan with Malwarebytes.
To start a scan, click the Scan button. Malwarebytes will automatically update its antivirus database and begin scanning your computer for malicious programs.

-
Wait for the Malwarebytes scan to complete.
Malwarebytes will now scan your computer for browser hijackers and other malicious programs. This process can take a few minutes, so we suggest you do something else and periodically check the status of the scan to see when it is finished.
-
Quarantine detected malware
Once the Malwarebytes scan is complete, it will display a list of detected malware, adware, and potentially unwanted programs. To effectively remove these threats, click the “Quarantine” button.

Malwarebytes will now delete all of the files and registry keys and add them to the program’s quarantine.
-
Restart your computer.
When removing files, Malwarebytes may require a reboot to fully eliminate some threats. If you see a message indicating that a reboot is needed, please allow it. Once your computer has restarted and you are logged back in, you can continue with the remaining steps.


STEP 4: Use HitmanPro to scan your computer for badware
In this next step, we will scan the computer with HitmanPro to ensure that no other malicious programs are installed on your device.
HitmanPro is a second-opinion scanner that takes a unique cloud-based approach to malware scanning. HitmanPro scans the behavior of active files and also files in locations where malware normally resides for suspicious activity. If it finds a suspicious file that’s not already known, HitmanPro sends it to its clouds to be scanned by two of the best antivirus engines today, which are Bitdefender and Kaspersky.
Although HitmanPro is shareware and costs $24.95 for 1 year on 1 PC, there is no limit on scanning. The limitation only kicks in when there is a need to remove or quarantine detected malware by HitmanPro on your system and by then, you can activate the one-time 30-days trial to enable the cleanup.
-
Download HitmanPro.
You can download HitmanPro by clicking the link below.
HITMANPRO DOWNLOAD LINK
(The above link will open a new web page from where you can download HitmanPro) -
Install HitmanPro.
When HitmanPro has finished downloading, double-click on “hitmanpro.exe” (for 32-bit versions of Windows) or “hitmanpro_x64.exe” (for 64-bit versions of Windows) to install this program on your computer. In most cases, downloaded files are saved to the Downloads folder.

You may be presented with a User Account Control pop-up asking if you want to allow HitmanPro to make changes to your device. If this happens, you should click “Yes” to continue with the installation.

-
Follow the on-screen prompts.
When HitmanPro starts you will be presented with the start screen as shown below. Click on the “Next” button to perform a system scan.


-
Wait for the HitmanPro scan to complete.
HitmanPro will now begin to scan your computer for malicious programs.
-
Click on “Next”.
When HitmanPro has finished the scan, it will display a list of all the malware that it has found. Click on the “Next” button to have HitmanPro remove the detected items.

-
Click on “Activate free license”.
HitmanPro may now require to activate the free 30-days trial to remove the malicious files. To do this, click on the “Activate free license” button to begin the free 30 days trial and remove all the malicious files from your computer.

When the malware removal process is complete, it will display a screen that shows the status of the various programs that were removed. At this screen, you should click on the Next button and then if prompted you should click on the Reboot button. If HitmanPro does not prompt you to reboot, please just click on the Close button.


STEP 5: Use AdwCleaner to remove adware and malicious browser policies
In this final step, we will use AdwCleaner to remove the malicious browser policies that were set by browser hijackers on your computer and delete malicious browser extensions.
AdwCleaner is a free popular on-demand scanner that can detect and remove malware that even the most well-known anti-virus and anti-malware applications fail to find. This on-demand scanner includes a lot of tools that can be used to fix the side effects of adware. browser hijackers and other malware.
-
Download AdwCleaner.
You can download AdwCleaner by clicking the link below.
-
Double-click on the setup file.
Double-click on the file named “adwcleaner_x.x.x.exe” to start AdwCleaner. In most cases, downloaded files are saved to the Downloads folder.

AdwCleaner program will now open and you will be presented with the program’s license agreement. After you read it, click on the I agree button if you wish to continue. If Windows prompts you as to whether or not you wish to run AdwCleaner, please allow it to run.

-
Enable “Reset Chrome policies” to remove malicious browser policies.
When AdwCleaner starts, on the left side of the window, click on “Settings” and then enable “Reset Chrome policies“.

-
Click on the “Scan” button.
On the left side of the AdwCleaner window, click on “Dashboard” and then click “Scan” to perform a computer scan.

-
Wait for the AdwCleaner scan to finish.
AdwCleaner will now scan your computer for malware. This process can take a few minutes.
-
Click on “Quarantine” to remove malware.
When the AdwCleaner scan is completed it will display all of the items it has found. Click on the “Quarantine” button to remove the malicious programs from your computer.

-
Click on “Continue” to remove the malicious programs.
AdwCleaner will now prompt you to save any open files or data as the program will need to close any open programs before it starts to clean. Click on the “Continue” button to finish the removal process.

AdwCleaner will now delete all detected malware from your computer. When the malware removal process is complete, you may be asked to restart your computer.


Your computer should now be free of the Igfxpers.exe Trojan and other malware.
If your current antivirus allowed this malicious program on your computer, you may want to consider purchasing Malwarebytes Premium to protect against these types of threats in the future.
If you are still having problems with your computer after completing these instructions, then please follow one of the steps:
- Run a computer scan with ESET Online Scanner
- Ask for help in our Windows Malware Removal Help & Support forum.
Here are 10 basic security tips to help you avoid malware and protect your device:
To avoid potential dangers on the internet, it’s important to follow these 10 basic safety rules. By doing so, you can protect yourself from many of the unpleasant surprises that can arise when using the web.
Readers help support Windows Report. We may get a commission if you buy through our links.
Read our disclosure page to find out how can you help Windows Report sustain the editorial team. Read more
Anyone who plays games or does a lot of video editing can tell you what a good graphics card can do and why it is extremely essential. The integrated GPU is okay, but a dedicated GPU is the way to go if you’re looking for excellent performance.
Regarding dedicated GPUs, the igfxpers.exe file is closely associated with these graphics cards. The igfxpers.exe is software that Intel Graphics uses to maintain the graphics card settings, but is it really necessary? Find out here.
What does the Intel persistence module do?
The persistence module, also known as igfxpers.exe, is an executable file belonging to the Intel Graphics Accelerator Driver for Windows, a driver for Intel HD or NVIDIA graphics cards.
It is designed to speed up everything from games to web browsers, as well as any other application you might use on your computer.
This is achieved by changing how the graphics card handles data to process information faster. You will notice a significant increase in your computer’s overall performance when using GPU-intensive programs.
Since the process was designed to help improve your computer’s performance, you’re more likely to run into this file if you’re using a dedicated GPU.
Although it has been said to improve your GPU’s performance, due to its nature, this program can cause some problems if it isn’t working properly or if it has been infected with malware.
Do I need Igfxpers.exe?
You can find the igfxpers.exe file in the C:\Windows\System32 folder, which implies it is a genuine Windows file. However, not all genuine Windows files must run at all times, especially if they consume system resources.
The only circumstances that may necessitate this file are if you have a lower-end or older graphics card.
Such graphic cards may be worn out or are just not powerful enough hence need a little boost to restore the display resolution after a shutdown, restart, or hibernation.
However, if you’re using a discrete GPU, you won’t need it because it can perform these tasks independently without additional software.
Since this file runs on startup, it can slow your PC boot. As such, disabling it is the only way to improve the boot time.
Another reason could be hackers who have found a way to sneak in a malicious file with a similar name to igfxpers.exe file into your system. In such cases, it should be treated as a virus and removed.
How do I remove Igfxpers.exe from Windows?
1. Remove the program from Startup
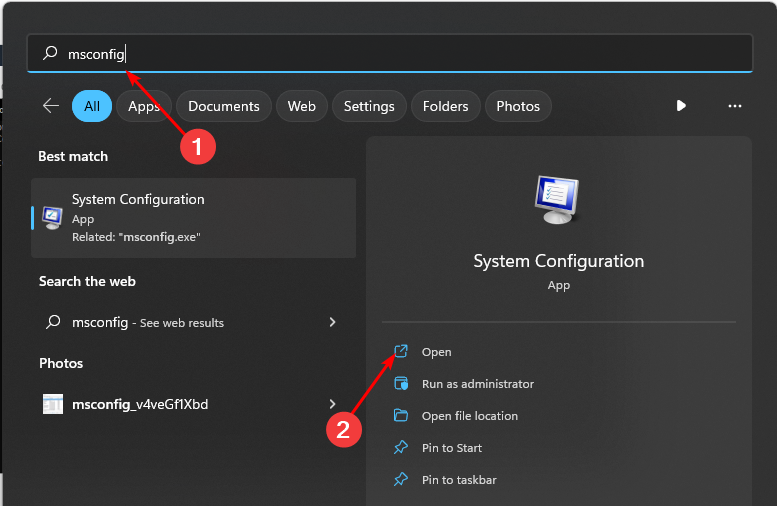
- Hit the Windows key, type msconfig in the search bar, and click Open.

- Navigate to the Startup tab, find Intel common User Interface, and uncheck it.

- Click on Apply then OK to save the changes.

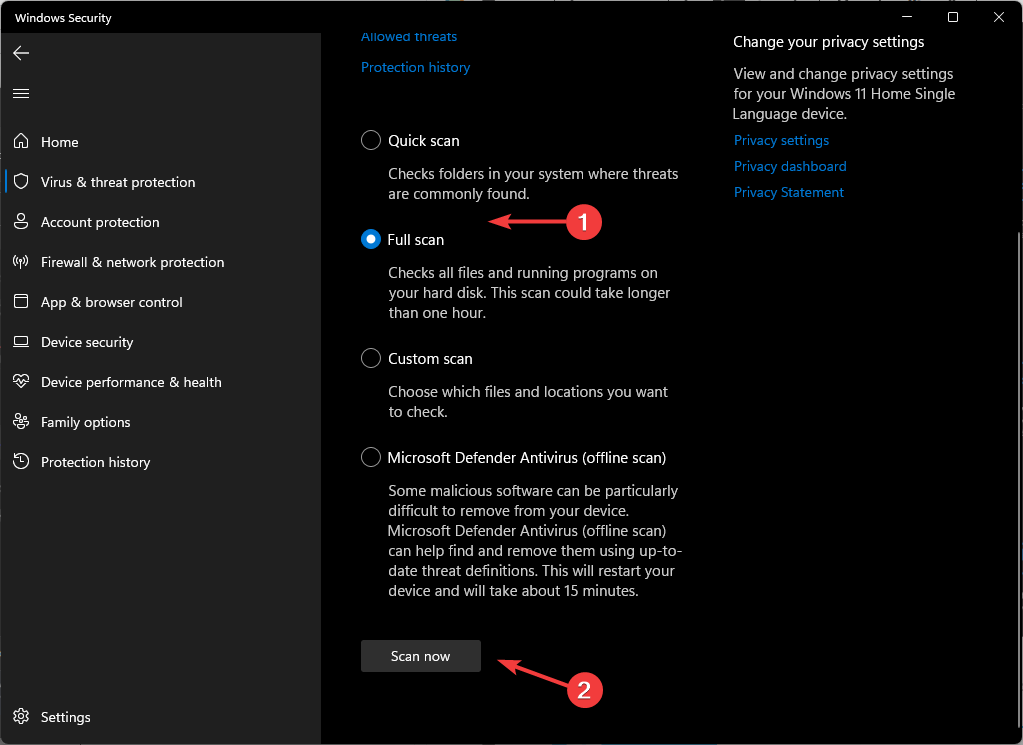
2. Scan for viruses
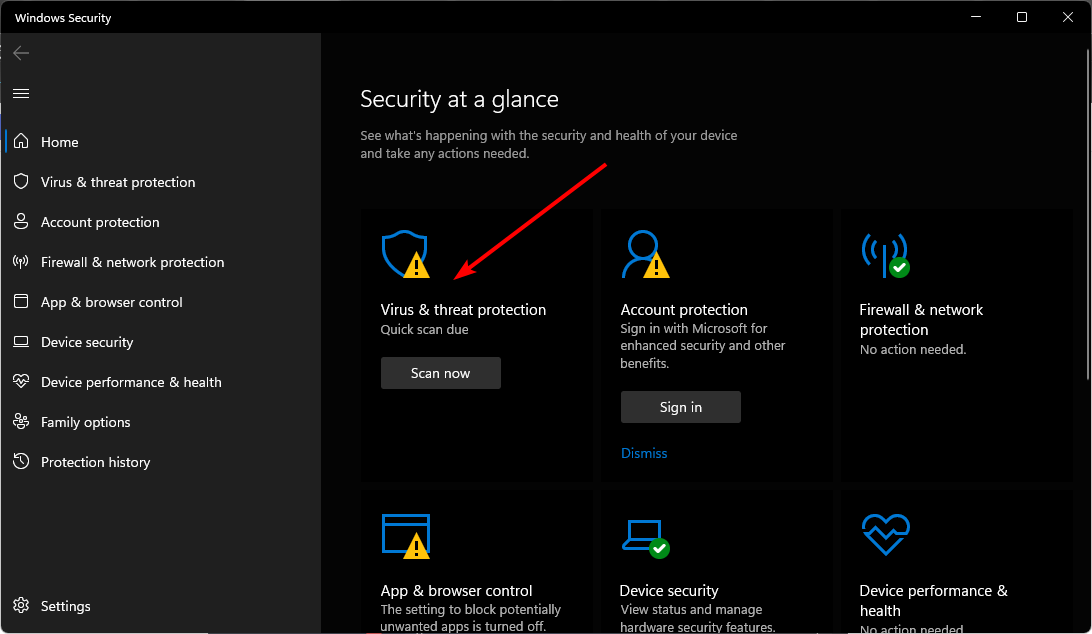
- Press the Windows key, search Windows Security, and click Open.

- Select Virus & threat protection.

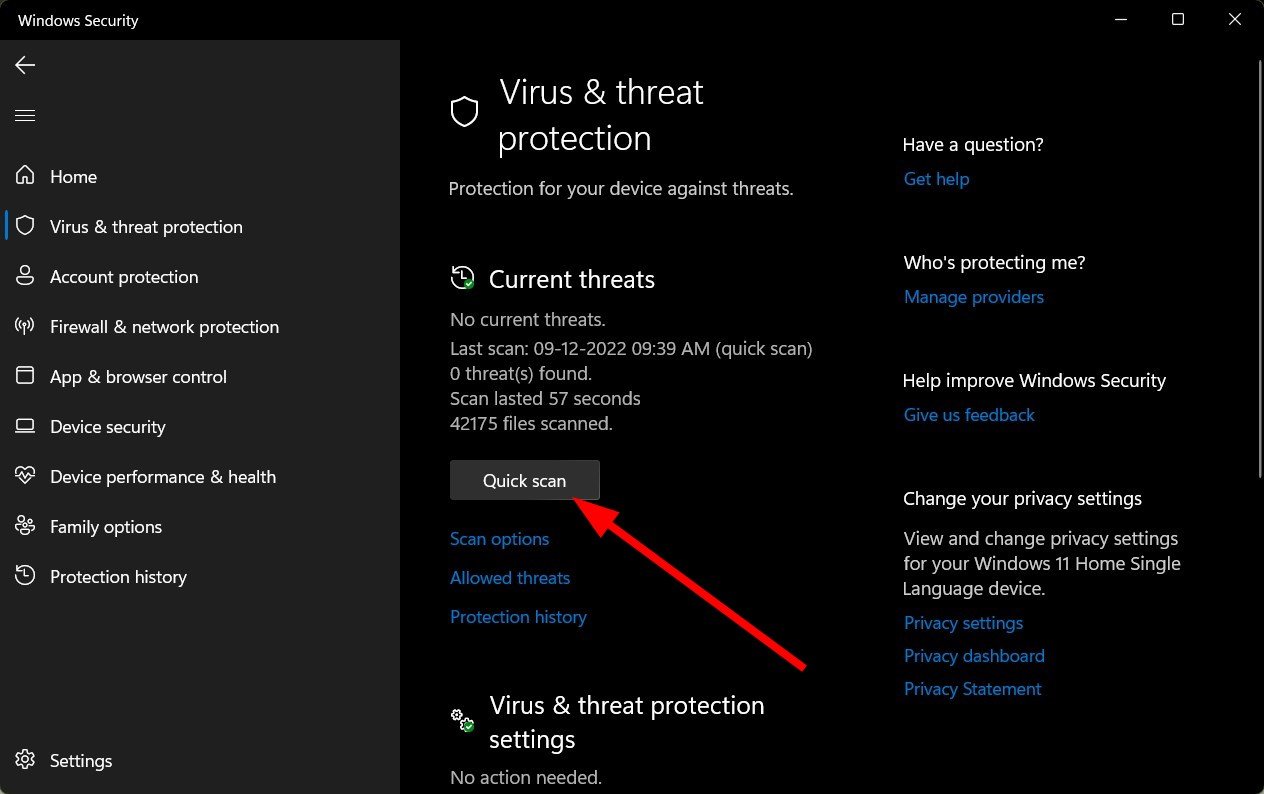
- Next, press Quick scan under Current threats.

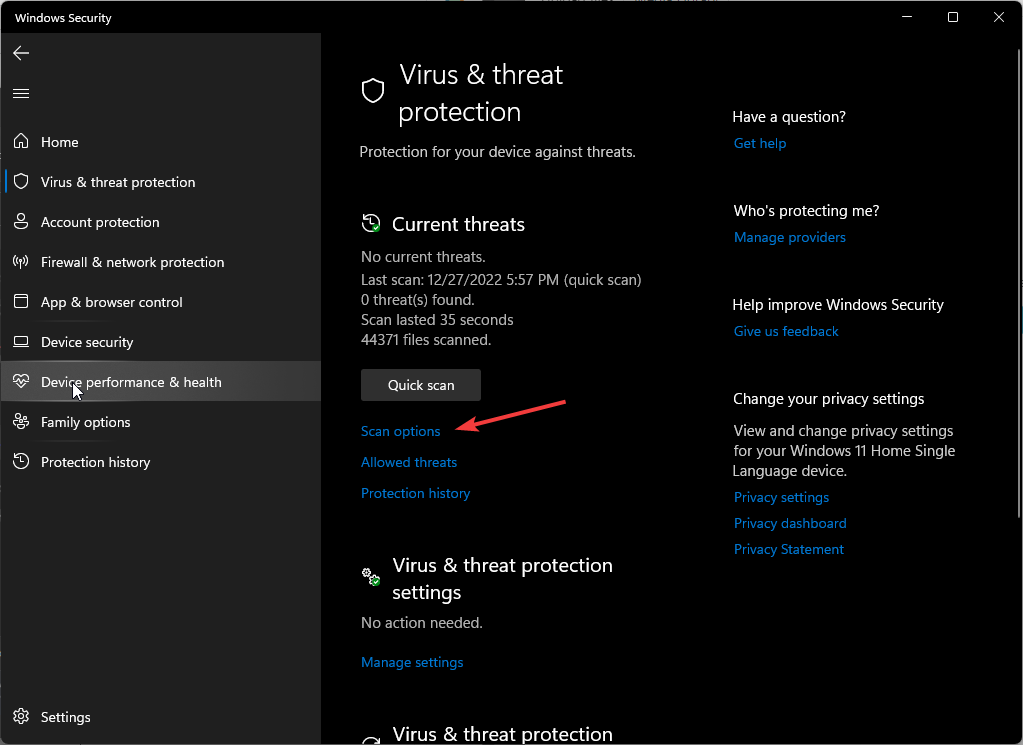
- If you don’t find any threats, proceed to perform a full scan by clicking on Scan options just below Quick scan.

- Click on Full scan, then Scan now to perform a deep scan of your PC.
- Wait for the process to finish and restart your system.

If you are concerned that Igfxpers.exe may contain malware and needs to be removed, it’s more efficient to scan for malware with strong antivirus software.
The main reasons for using antivirus tools instead of standard threat protection are enhanced security against complex digital threats or a higher detection rate.
⇒ Get ESET HOME Security Essential
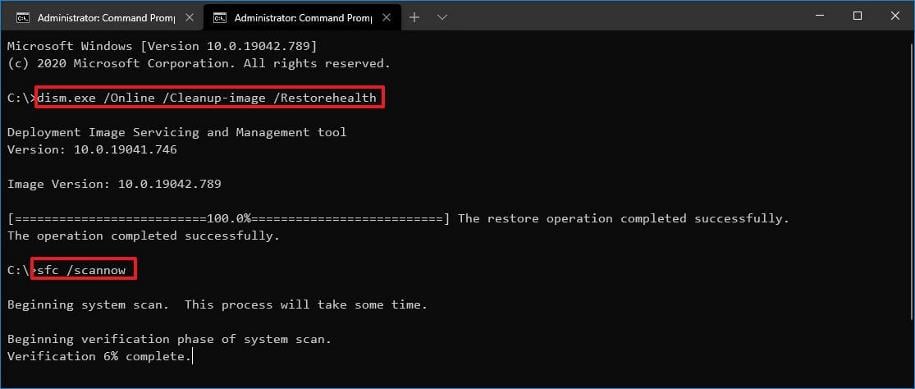
3. Run DISM and SFC scans
- Hit the Start Menu icon, type cmd in the search bar, and click Run as administrator.

- Type the following commands and press Enter after each one:
DISM.exe /Online /Cleanup-Image /Restorehealthsfc /scannow

- NVIDIA launches GeForce RTX 5090, the best gaming GPU, but you won’t like its price
- Should I Turn Lenovo Vantage Hybrid Mode On or Off?
- Microsoft Teams Shared Devices: Everything You Need to Know About Them
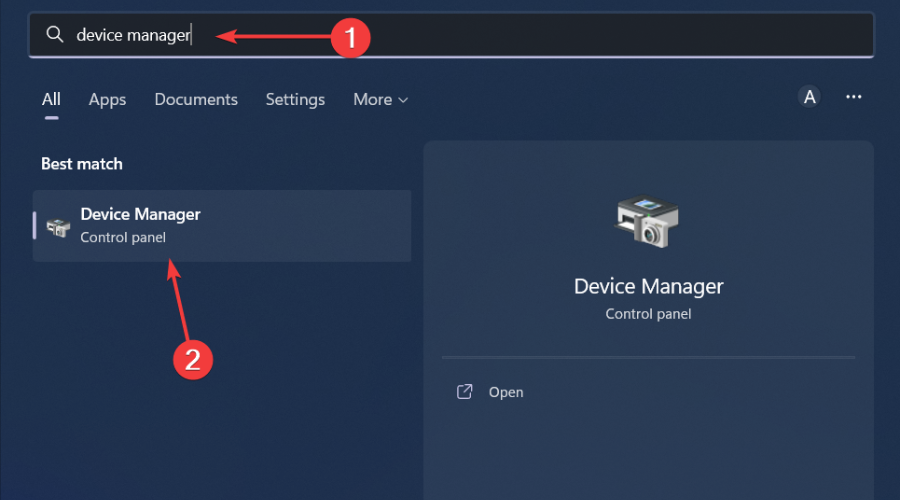
4. Disable graphics card
- Click the Search icon, type Device Manager in the search bar, and click Open.

- Navigate to Display adapters to expand, right-click on your graphics card and select Disable.
This step should only be used under two circumstances. You have a dedicated graphics driver, and your integrated GPU can withstand your activities. When you disable your dedicated graphics card, your computer will use its integrated graphics processor.
The integrated graphics processor is built into your computer’s motherboard and is not as powerful as a dedicated graphics card. However, modern-day GPUs are strong, so you should be fine if your activities are not GPU-intensive.
Alternatively, if the igfxpers.exe file is consuming too many resources but you do not feel like disabling it, you can upgrade your CPU so that it is powerful enough to handle the tasks. A multi-core processor would be better so that your GPU is not exhausted.
For any additional thoughts or queries, drop us a comment down below. If you want to learn about other Intel processes, visit our guide on Jhi_Service.exe.
Claire Moraa
Windows Software Expert
Claire has a knack for solving problems and improving the quality of life for those around her. She’s driven by rationality, curiosity, and simplicity, and always eager to learn more about Microsoft’s products.
With a background in teaching and reviewing, she breaks down complex topics into easily understandable articles, focusing mostly on Windows 11, errors, and software.
В нашей базе содержится 9450 разных файлов с именем igfxpers.exe . You can also check most distributed file variants with name igfxpers.exe. Чаще всего эти файлы принадлежат продукту Intel(R) Common User Interface. Наиболее частый разработчик — компания Intel Corporation. Самое частое описание этих файлов — persistence Module. Совокупная оценка — 5(5) (комментариев: 17).Это исполняемый файл. Вы можете найти его выполняющимся в диспетчере задач как процесс igfxpers.exe.
Подробности о наиболее часто используемом файле с именем «igfxpers.exe»
- Продукт:
- Intel(R) Common User Interface
- Компания:
- Intel Corporation
- Описание:
- persistence Module
- Версия:
- 8.15.10.2932
- MD5:
- 899d435e1c190c204e349ce0e483098b
- SHA1:
- 188cbac1d19ea841a498c1a4812fa3b6fc36fddb
- SHA256:
- fc6e84d7a382fbcbf3b2daa4b75bd78f447359f314c1cd4424759e2ec97fd2de
- Размер:
- 441968
- Папка:
- C:\Windows\System32
- ОС:
- Windows 7
- Частота:
- Высокая
- Цифровая подпись:
- Intel Corporation — pGFX
Процесс «igfxpers.exe» безопасный или опасный?
100% файлов помечены как безопасные .
12% файлов помечены как системные .
Последний новый вариант файла «igfxpers.exe» был обнаружен 4407 дн. назад. В нашей базе содержится 1732 шт. вариантов файла «igfxpers.exe» с окончательной оценкой Безопасный и 2 шт. вариантов с окончательной оценкой Опасный . Окончательные оценки основаны на комментариях, дате обнаружения, частоте инцидентов и результатах антивирусных проверок.
«igfxpers.exe» относится к системным файлам Microsoft Windows. Многие вредоносные программы для самомаскировки используют имена файлов системных процессов. Относитесь с подозрением к любому файлу с системным именем, который находится не в системной папке или содержит неверную информацию о версии. Корректный системный файл содержит полную информацию о версии от Microsoft.
Комментарии пользователей для «igfxpers.exe»
Текущим параметрам фильтрации удовлетворяют несколько файлов. Будут показаны комментарии ко всем файлам.
Комментарии ко всем файлам с именем «igfxpers.exe»
Добавить комментарий для «igfxpers.exe»
Для добавления комментария требуется дополнительная информация об этом файле. Если вам известны размер, контрольные суммы md5/sha1/sha256 или другие атрибуты файла, который вы хотите прокомментировать, то вы можете воспользоваться расширенным поиском на главной странице .
Если подробности о файле вам неизвестны, вы можете быстро проверить этот файл с помощью нашей бесплатной утилиты. Загрузить System Explorer.
Проверьте свой ПК с помощью нашей бесплатной программы
System Explorer это наша бесплатная, удостоенная наград программа для быстрой проверки всех работающих процессов с помощью нашей базы данных. Эта программа поможет вам держать систему под контролем. Программа действительно бесплатная, без рекламы и дополнительных включений, она доступна в виде установщика и как переносное приложение. Её рекомендуют много пользователей.
What is igfxpers.exe doing on my computer?
igfxpers.exe belongs to software Intel® Common User Interface and is sometimes used by nVidia graphic cards drivers. It is responsible for enabling display resolution settings to persist when a monitor is disconnected or turned off. Although it might not be essential for desktop computers, many notebook devices might require this process to run on startup. This process can easily be stopped from running on startup from the msconfig and is not essential to Windows 7 or higher operating systems. This file can be usually found in %windir%\system32
On UMPCs this process is essential if you run the display in a scaled resolution, i.e. any other resolution than the native screen resolution (which is 800×480 for all the 2006 era UMPCs with 7-inch touch screen displays). When you shut down/standby/hibernate the UMPC, this process will return the display resolution to 800×480 so that when it restarts the display will be synchronized with the touch screen resolution. If you disable this process, then the screen will not be dropped to the native resolution and when you restart, your touch screen and display will be scaled differently.
Non-system processes like igfxpers.exe originate from software you installed on your system. Since most applications store data on your hard disk and in your system’s registry, it is likely that your computer has suffered fragmentation and accumulated invalid entries which can affect your PC’s performance.
In Windows Task Manager, you can see what CPU, memory, disk and network utilization is causing the Intel Common User Interface Module process. To access the Task Manager, hold down the Ctrl + Shift + Esc keys at the same time. These three buttons are located on the far left of your keyboard.
igfxpers.exe
The igfxpers.exe is an executable file on your computer’s hard drive. This file contains machine code. If you start the software Intel Common User Interface Module on your PC, the commands contained in igfxpers.exe will be executed on your PC. For this purpose, the file is loaded into the main memory (RAM) and runs there as a Intel Common User Interface Module process (also called a task).
Is igfxpers.exe harmful?
This process is considered safe. It is unlikely to pose any harm to your system.
The igfxpers.exe file should be located in the folder C:\Windows\System32. Otherwise it could be a Trojan.
igfxpers.exe is a safe process
Can I stop or remove igfxpers.exe?
Many non-system processes that are running can be stopped because they are not involved in running your operating system.
igfxpers.exe is used by ‘Intel Common User Interface Module’. This is an application created by ‘Intel Corporation’.
If you no longer use Intel Common User Interface Module, you can permanently remove this software and thus igfxpers.exe from your PC. To do this, press the Windows key + R at the same time and then type ‘appwiz.cpl’. Then find Intel Common User Interface Module in the list of installed programs and uninstall this application.
Is igfxpers.exe CPU intensive?
This process is not considered CPU intensive. However, running too many processes on your system may affect your PC’s performance. To reduce system overload, you can use the Microsoft System Configuration Utility (MSConfig) or the Windows Task Manager to manually find and disable processes that launch upon start-up.
Use the Windows Resource Monitor to find out which processes and applications write/read the most on the hard drive, send the most data to the Internet, or use the most memory. To access the Resource Monitor, press the key combination Windows key + R and then enter ‘resmon’.
Why is igfxpers.exe giving me errors?
Most igfxpers issues are caused by the application executing the process. The surest way to fix these errors is to update or uninstall this application. Therefore, please search the Intel Corporation website for the latest Intel Common User Interface Module update.