Of all the TCP/IP utilities that come with Windows, the IP configuration utilities are probably the most overlooked. These utilities display the current configuration of TCP/IP on that workstation, including the current IP address, DNS configuration, WINS configuration, and default gateway
Using the winipcfg Utility
The IP configuration utility for Windows 95/98 is winipcfg. You use it to display the current TCP/IP configuration on a Windows 95/98 workstation. Follow these two steps to display the IP configuration information using winipcfg
- Choose Start _ Run, type winipcfg, and click OK to display the IP Configuration dialog box.
Click the down arrow to choose the network interface for which you want to view statistics. The screen in the graphic above shows this information for the Intel EtherExpress.
- To display more detailed configuration information, click the More Info button to open the IP Configuration dialog box shown here.
The top of this screen shows the DNS name of the machine and the IP address of the DNS server that this workstation is using. Below that are several lines of NetBIOS over TCP/IP information.
The bottom section contains the same information shown in the first screen but includes such additional information as the addresses of the DHCP and WINS servers (if present) and the lease information (how long the DHCP information is current) for the addresses obtained from a DHCP server.
The winipcfg utility comes in handy when you’re resolving TCP/IP address conflicts and configuring a workstation. For example, if this workstation is experiencing duplicate IP address errors, you can run winipcfg to determine the IP address of this station. Also, if the address was obtained from a DHCP server, you can release it and obtain a new IP address by clicking the Renew All button.
Using the ipconfig Utility
Because Windows NT was designed to be UNIX compatible, Windows NT (as well as its later incarnations, including Windows 2000 Server and Windows Server 2003) and UNIX have several functions and utilities in common. You can use many UNIX command-line utilities at the command prompt of Windows NT and later operating systems, including these:
- ftp
- ping
- tracert
- ipconfig
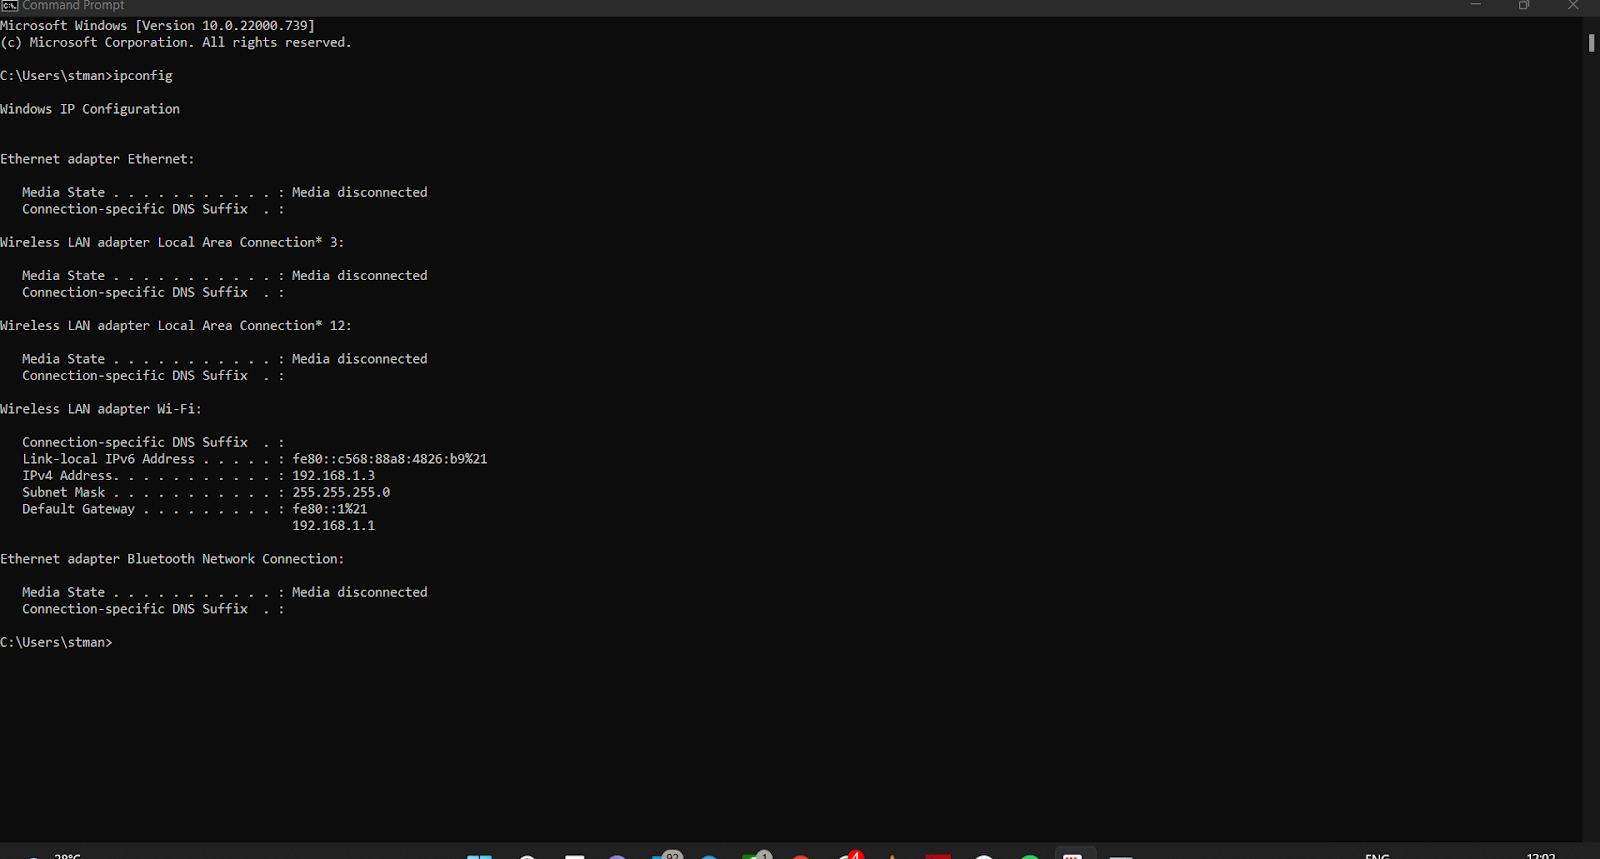
The Windows utility ipconfig does roughly the same job as its Windows 95/98 counterpart, winipcfg. With Windows ipconfig, however, the display is command-line based.
To use ipconfig, follow these steps:
- Choose Start _ Programs _ Accessories _ Command Prompt to display the command prompt.
- Type ipconfig, which produces output similar to the following:
C:>ipconfig
Windows 2000 IP Configuration
Ethernet adapter E100B1:
Connection-specific DNS Suffix . :
IP Address. . . . . . . . . . . : 192.168.1.101
Subnet Mask . . . . . . . . . . : 255.255.255.0
Default Gateway . . . . . . . . : 192.168.1.1
C:>
As you can see, this output is similar to the information in the Windows 95/98 IP Configuration dialog box except that the MAC address is not listed, although with the /all switch you can obtain that as well.
Only four switches can be used with the ipconfig command. Table lists and describes all four switches, and the output that follows Table shows the results of using the /all switch with ipconfig.

The following shows sample output produced by using the ipconfig /all switch:
C:>ipconfig/all
Windows 2000 IP Configuration
Host Name . . . . . . . . . . . . : f0194063
Primary DNS Suffix . . . . . . . : company.com
Node Type . . . . . . . . . . . . : Hybrid
IP Routing Enabled. . . . . . . . : No
WINS Proxy Enabled. . . . . . . . : No
DNS Suffix Search List. . . . . . :
Ethernet adapter Wireless-G Notebook Adapter:
Connection-specific DNS Suffix :
Description . . . . . . . . . . : E100B1
Physical Address. . . . . . . . : 00-A0-C9-D8-7F-17
DHCP Enabled. . . . . . . . . . : Yes
Autoconfiguration Enabled . . . : Yes
IP Address. . . . . . . . . . . : 192.168.1.101
Subnet Mask . . . . . . . . . . : 255.255.255.0
Default Gateway . . . . . . . . : 192.168.1.1
DHCP Server . . . . . . . . . . : 192.168.1.254
DNS Servers . . . . . . . . . . : 192.168.1.253
192.168.1.252
Lease Obtained. . : Wednesday, January 19, 2005 ~CA2:35:07 PM
Lease Expires . . : Thursday, January 20, 2005 ~CA2:35:07 PM
C:>
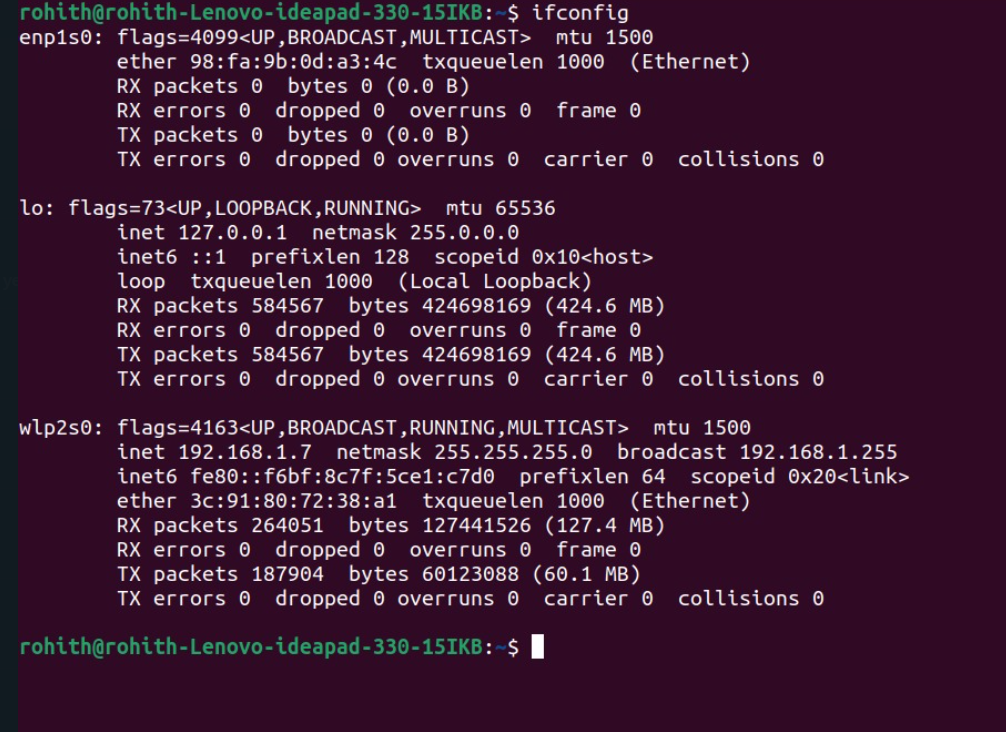
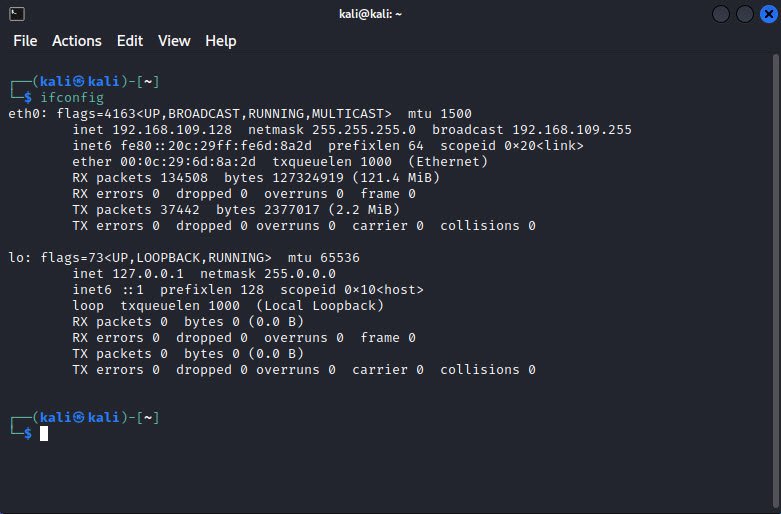
Using the ifconfig Utility
There is a utility in Linux/UNIX that shows information similar to what ipconfig shows. This utility is called ifconfig (short for “interface configuration”). Although ipconfig and ifconfig show similar information, there are major differences between these two utilities. The ipconfig utility is used mainly to view TCP/IP configuration for a computer. You can use ifconfig to do the same thing, but ifconfig can also be used to configure a protocol or a particular network interface.
The general syntax of the ifconfig command is as follows:
ifconfig interface [address [parameters]]
The interface parameter is the UNIX name of the interface, such as eth0. If the optional address parameter is specified, the ifconfig command sets the IP address for the interface to the address specified. When the ifconfig command is used by itself with no parameters, all configured interfaces are reported on. If only the interface name is specified, output similar to the following is produced:
# ifconfig eth0
eth0 Link encap 10Mbps Ethernet HWaddr 00:00:C0:90:B3:42
inet addr 172.16.0.2 Bcast 172.16.0.255 Mask 255.255.255.0
UP BROADCAST RUNNING MTU 1500 Metric 0
RX packets 3136 errors 217 dropped 7 overrun 26
TX ackets 1752 errors 25 dropped 0 overrun 0
The output shows that the eth0 interface is a 10Mbps Ethernet interface. The interface’s MAC and IP address information is displayed in this output as well. The third line of the output begins by listing the state of the various flags an interface can have. The optional parameters field at the end of the ifconfig command can be used to change the state of these flags. The MTU and metric fields are used in making routing decisions, just as they would be used in any router. The values on the RX (receive) and TX (transmit) lines represent, in order, the number of packets that were transmitted or received without errors, how many packets were transmitted or received with errors, how many packets were dropped due to insufficient buffer space, and how many packets were lost due to the packets overrunning the capacity of the kernel to process them. Often the receive value will be higher than the transmit value for these last two properties because transmitted packets can be controlled much more easily than inbound packets.
Last Updated :
27 May, 2024
Network configuration is one of the most essential processes of administering computer systems since it is concerned with the ability to establish or maintain communication or connection between such systems and their respective parts. The two most common utilities for providing this information are ipconfig for the Windows OS and ifconfig for Unix-like systems. These functions include the ability to display and configure network interface information and to diagnose connectivity problems to prevent network glitches. It is therefore important to have a clear comprehension of the features and distinctions between these utilities to ensure experienced network administration.
What is ipconfig?
«ipconfig» stands for Internet Protocol Configuration. «ipconfig» is a command line utility that is designed to help users configure their Internet protocol settings. «ipconfig» stands for a utility that can be run via the command line in all Windows OS by typing this word. It is used to show the local computer’s network configuration settings.
Features
- Displaying IP Configuration: First and foremost, it allows for the display of the present IP configuration of all installed network adapters of the computer system. We are summing these IP addresses, subnet, and default gateway details.
- Renewing IP Addresses: It can apply the renewing of the IP address that is mapped to the network adapter by the DHCP (Dynamic Host Configuration Protocol) server. It is really helpful in the process of trying to fix network connectivity problems.
- Flushing DNS Resolver Cache: «ipconfig» employing a command that allows users to clear the DNS resolver cache would be a solution to some DNS-related issues and DNS resolution problems that might arise.
- Displaying DHCP Configuration: A user may run «ipconfig» to obtain DHCP details on their configuration as well as the date and time when the lease will expire; the IP address of the DHCP server; and the time and date when the IP was assigned.
- Displaying and Releasing IP Addresses: Aside from renumbering IP addresses, config can also free up the current IP address intended for the network adapter. As a result, a further request is submitted to release a new IP address granting them a chance to continue their browsing with a renewed sense of security.
- Displaying Additional Network Information: Besides IP address information, IPv6 status, and MAC (Media Access Control) address, the IPv6 status, IPv6 address, and IPv4 address along with DNS suffix, the IPv6 and the IPv4 address are also available as supplementary information with ipconfig.
What is ifconfig?
«ifconfig» stands for Interface Configuration. ifconfig means easy displaying and change of device interface. ifconfig is a command-line tool that is most commonly utilized in Unix-like operating systems including Linux and macOS, to set up and show details relating to networking interfaces.
Features
- Displaying Interface Configuration: There are several important «ifconfig» functions, and displaying the current configuration of all the installed network interfaces on the system may be one of these. These are the components that can hold IP address, mask, webcast address and also hardware (MAC) address.
- Assigning IP Addresses: «ifconfig» is one of the commands that users can use to manually assign IP addresses to the network interface. This is true in the context where there is neither adequate DHCP nor preferred static IP address assignment which is usually the case.
- Enabling and Disabling Interfaces: With «ifconfig» we can either bring up (enable) or bring down (disable) network gateways. This function is helpful for tasks related to network administration such as the configuration of interfaces for a certain purpose, assigning IP addresses manually or monitoring connection activity.
- Configuring Interface Parameters: In addition to IP addresses, ifconfig lets you manipulate various network interface characteristics such as mask, broadcast address and MTU (Maximum transmission unit). Introducing the adaptability of network settings helps to create a mechanism for adjusting the settings to the unique needs.
- Displaying Additional Interface Information: Apart from standard statements of configuration, «ifconfig» will also work with supplementary data like packet statistics forms. g. , the number of packets received and transmitted( Number of packets), error counters, and interface status (e.g., whether the interface is up or down).
- Setting Interface Promiscuous Mode: The «ifconfig» command can also set up a network interface in promiscuous mode which makes it an all-inclusive capture and process solution for all the traffic passing through the promiscuous interface. This function has successfully been used in network monitoring in which its main application is packet capturing.
Difference Between the ipconfig and the ifconfig
|
Parameters |
ipconfig |
ifconfig |
|---|---|---|
|
Operating System |
Primarily used in Windows OS. |
Primarily used in Unix-like OS (Linux, macOS, etc.). |
|
Displaying IP Configuration |
Displays IP configuration details of network adapters. |
Displays IP configuration details of network interfaces. |
|
Renewing IP Address |
Can renew the IP address assigned by DHCP server. |
Doesn’t support IP address renewal directly; DHCP handles it. |
|
Flushing DNS Cache |
Can clear DNS resolver cache to resolve DNS issues. |
Doesn’t have a built-in command for clearing DNS cache. |
|
DHCP Configuration |
Provides information about DHCP lease and server details. |
Doesn’t have specific parameters for DHCP configuration. |
|
Releasing IP Address |
Can release currently assigned IP address of a network adapter. |
Doesn’t have a built-in command for releasing IP addresses. |
|
Additional Network Information |
Displays MAC address, DNS suffix, and IPv6 status. |
Provides packet statistics, error counters, and interface status. |
|
Graphical User Interface (GUI) |
May have GUI counterparts for network configuration. |
Typically used in command-line interface, no GUI. |
|
Displaying Wireless Info |
Shows details about wireless network adapters if available. |
Typically doesn’t differentiate between wired and wireless. |
|
Built-in Scripting Support |
Supports scripting for automated network configuration tasks. |
Offers scripting capabilities for automation but varies by OS. |
|
Network Adapter Status |
Provides detailed status information for each network adapter. |
Displays interface status (up or down) for configured interfaces. |
|
Configuration Flexibility |
Offers limited flexibility compared to Unix-like counterparts. |
Provides extensive control over network interface parameters. |
Solving network issues is one of the main aspects of a network admin’s job description, and every admin will have a collection of network troubleshooting tools. The simple reason behind this is that they are essential for maintaining a robust network, fixing network issues quickly, making network resources available, and keeping business processes alive.
So, we’re about to explore that tool belt to see which ones are absolutely indispensable — spoiler alert: we found 14 of them, divided into commands and tools. Plus, we’ll take a brief tour on how troubleshoot a network in 7 basic steps.
And now, without further ado, let’s see the top network troubleshooting tools network administrators have come to rely upon.
Why are network troubleshooting tools important?
In this digital transformation era, businesses are rushing to make their operations completely digital. According to a report by Statista, in 2022 alone, the global spending on digital transformation is expected to be around 1.8tn USD; by 2025, this is expected to be 2.8tn USD. And with this rapid transformation, businesses have increasingly come to rely on their computer systems for their daily business activities.
In this situation, even minor downtimes can be costly. According to a 2020 survey, 50% of the respondents reported a loss between $300,000 to $6 million due to network downtime. Aside from the revenue loss, 41% of the respondents reported reduced customer satisfaction, and 34% said data loss.
These numbers showcase the importance of resolving network issues as soon as possible. And network troubleshooting tools play an essential role here.
Let’s look at some commonly used tools for troubleshooting network issues.
7 network troubleshooting commands
These network troubleshooting commands aren’t exactly what you’d expect when you hear the word tool. But these simple commands have helped network administrators diagnose network issues, precisely determine what is wrong, and find a proper fix.
In this section, we’ll be discussing the following tools:
- ping
- tracert/traceroute
- pathping
- ipconfig
- nslookup
- netstat
- route
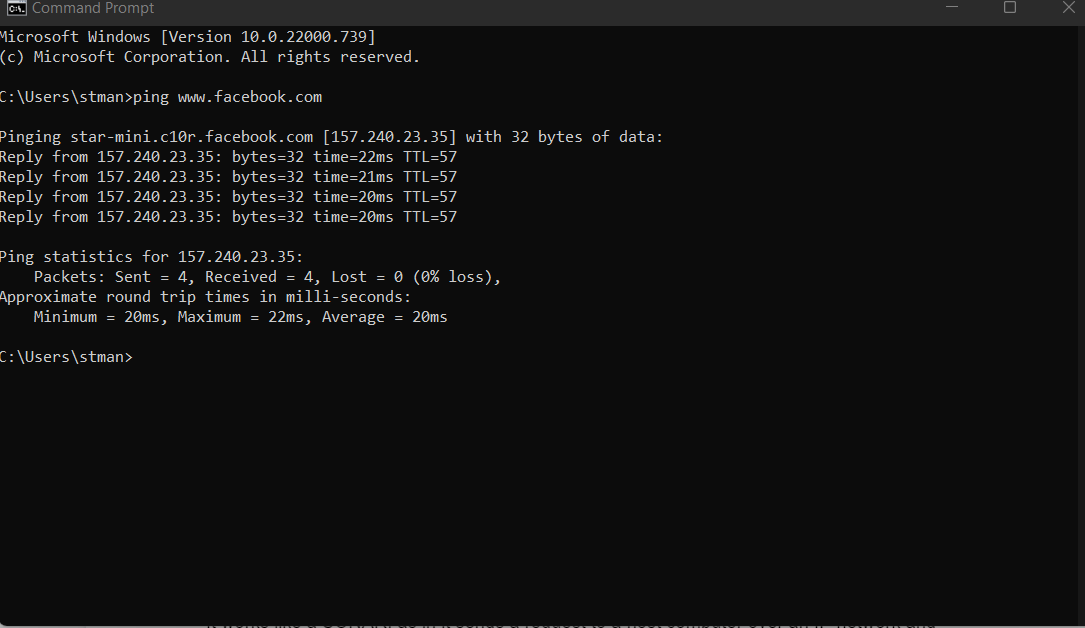
1. ping
Ping (or ping) is the most commonly known network troubleshooting command and is available for all operating systems with networking capabilities.
Ping sends an ICMP echo request to a host computer over an IP network. If the host is reachable, it sends back an ICMP echo reply, and reports the time it took to reach the host and other data such as errors or packet loss.
To use the ping command, go to the command prompt and enter ‘ping’ followed by the IP address or the URL. For example:
ping www.facebook.com
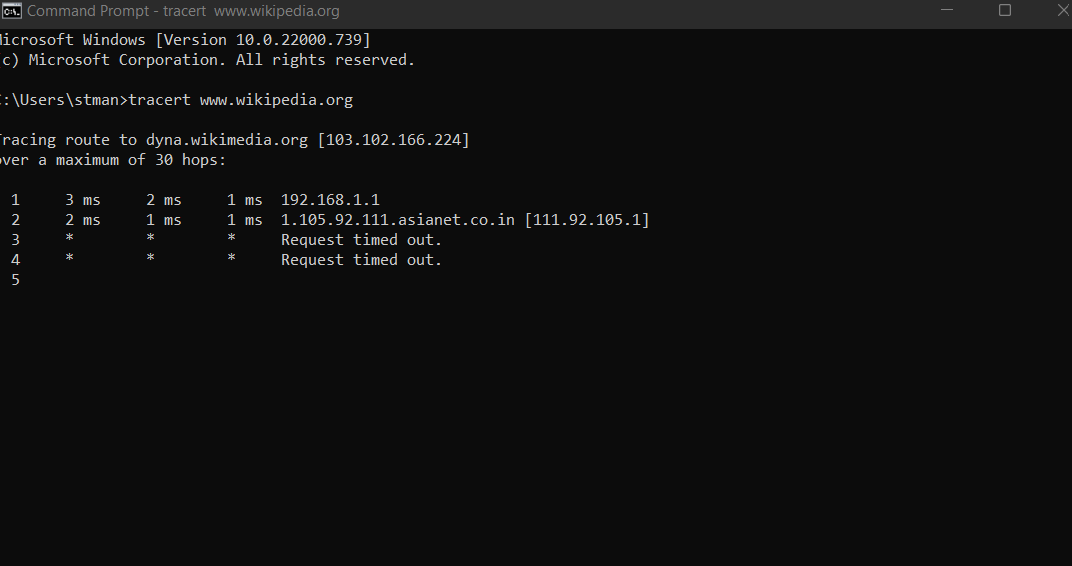
2. tracert/traceroute
As the name suggests, tracert or traceroute traces the route between a source and the destination. It reports back the IP addresses of all the routers involved.
It is available in most operating systems. In some implementations, the command is traceroute, and in others, it is tracert. Like ping, tracert also works using ICMP routers.
To use the tool on Linux systems, open the terminal and type traceroute followed by the hostname (URL or IP address).
In Windows systems, type tracert followed by hostname. For example:
tracert www.wikipedia.com
3. pathping
Pathping combines the functionality of tracert and ping and is used to find routers that may be causing issues in your network. The tool was developed by Microsoft and is available only on Windows systems.
Pathping sends packets to the final destination and the routers on the way and reports the latency and packet loss in every hop. Just like tracert or ping, to use the command, just type pathping followed by the URL or the IP address in the command prompt.
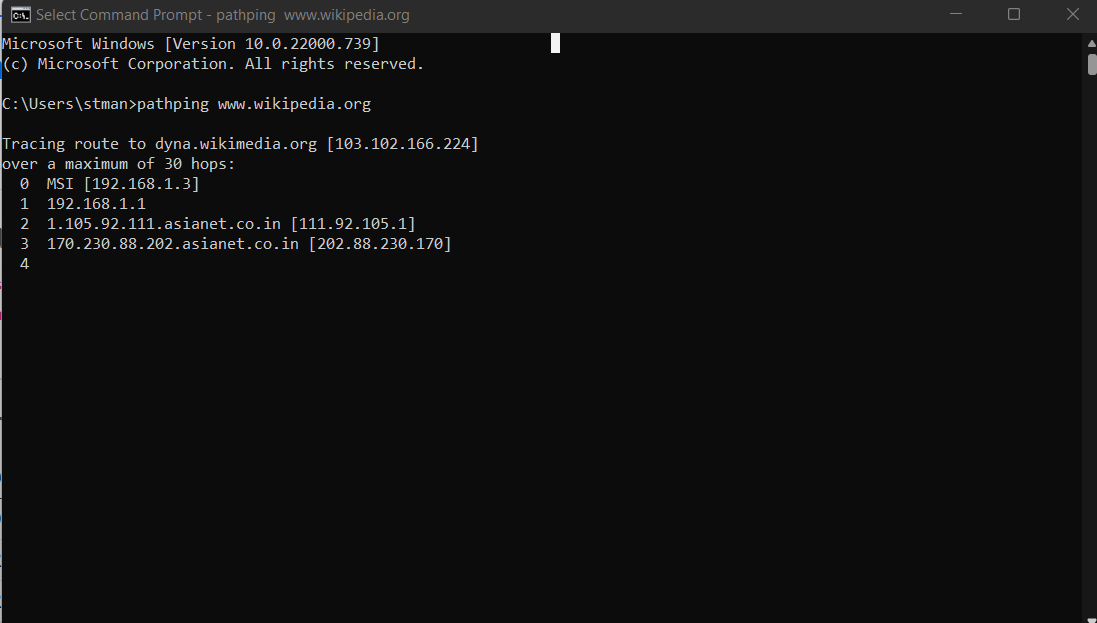
You can tweak the parameters of the command to speed up the process. For example, by using pathping -h 20 the command will stop after 20 hops. Or by using pathping -w 200 the command would try to reach a host again after 200 milliseconds if the host was unavailable on the first try.
4. ipconfig (Windows) / ifconfig (Linux)
ipconfig and ifconfig are tools used to determine the TCP/IP network configuration of Windows or macOS systems and Linux systems, respectively. The command displays the IP address, subnet mask, and the default gateway bound to each adapter.
To use the command on a Windows system, head to the command prompt and type ipconfig
In Linux systems type ifconfig
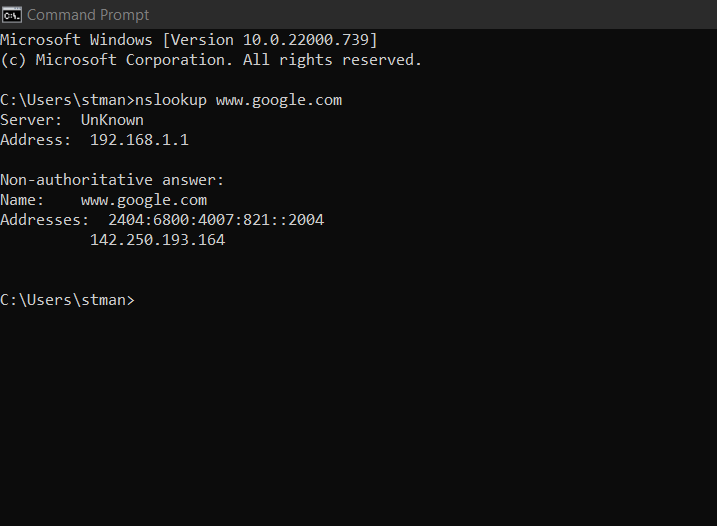
5. nslookup
nslookup is a network administration tool used to diagnose DNS issues. The tool looks up DNS records and how they map to IP addresses. It also has further options to look up the domain admin’s email address, serial number, and other information. The tool is available for Windows, Linux, and ReactOS systems.
To use the tool, simply type nslookup followed by the domain name. For example:
nslookup www.google.com
6. netstat
netstat is another command-line tool to find the network statistics for your entire infrastructure. It displays the network connections for TCP, routing tables, and the network protocols used. The tool is available on almost all systems, including Windows, macOS, Linux, and IBM OS.
To use the protocol, go to the command prompt and type netstat
7. route
route command is another network troubleshooting tool used available in Windows, Linux, Unix-like systems, IBM OS, and ReactOS. It is used to display and make changes to routing tables. The command comes with many parameters, with which you can clear the routing table, set network destination, set the command to use IPv4 or Ipv6, and more.
If you’re planning on using this one, don’t forget that in many Linux distros, the route command may not be installed. In Debian or Ubuntu, you can use the following command to install it:
$sudo apt-get install net-tools
Then, to use the route command, just go to the terminal or command prompt and type route followed by the parameters.
7 top network troubleshooting tools for network administrators
The previous seven tools were all command-line tools that could be used in a jiffy; in most cases, they come installed in the OS. But the following ones are more advanced and pack many more features and functionalities.
In this section, we’ll be exploring:
- Uptrends Uptime Monitor
- Wireshark
- Wifi Explorer
- Subnet and IP calculator
- Datadog network performance monitoring
- Nagios
- Nmap
1. Uptrends Uptime Monitor
Uptrends has a suite of tools for monitoring websites and web performance. These tools help you monitor your website’s performance continuously and will send you alerts in case of any issues.
Their tools can give you a global picture, help you understand if it’s an issue on your end or if it’s affecting an entire region, and help you diagnose and fix problems as soon as possible.
2. Wireshark
Wireshark is a free and open-source packet analyzer available for Linux and other Unix systems, macOS, Windows, and other systems. It comes with a GUI and can analyze hundreds of network protocols. There’s also a non-GUI version called TShark.
Wireshark can capture network data from a live network, break down the encapsulation of different network protocols, and display the information in the various fields.
3. WiFi Explorer
As the name suggests, WiFi Explorer is a tool for scanning and analyzing WiFi networks. It is available for macOS systems in a standard and a pro version. WiFi Explorer can identify configuration issues, channel conflicts, signal overlaps, and other issues. Plus, it gets you network details like Mac address, device manufacturer details, signal strength, noise, and channel info.
4. Subnet and IP calculator
Subnetting is a common strategy to improve performance. It essentially creates smaller networks from a single IP network. Furthermore, it reduces network congestion, enhances security, and makes IP networks easier to manage. And while most admins know how to calculate the subnet masks, it’s easier to use a calculator. There are plenty of subnet calculators available.
5. Datadog Network Performance Monitoring
Datadog Network Performance Monitoring is a network troubleshooting tool used to understand and visualize network components and traffic. The tool works for on-prem, cloud, and hybrid environments, and helps network admins monitor their infrastructure and troubleshoot issues quickly. The Datadog Network Performance Monitoring tool also lets you track metrics across applications, containers, availability zones, and data centers.
6. Nagios
Nagios is a network monitoring tool on Linux and Unix variants. It can continuously monitor switches, applications, and services and alert users if there’s something wrong. It can also monitor database servers like SQL, Oracle, and others.
7. Nmap
Nmap or Network Mapper is used to discover hosts and systems on a computer network; it is essentially a network scanner. The solution is free, open-source, and available on Linux, macOS, Windows, and BSD.
The tool works by port scanning. Users (usually network admins) can use the tool to find out all the devices connected to their network and find all the information about them. Nmap is often used to determine the security of devices, and to see all the network connections that can be made to them.
Now, since 7 seems to be our lucky number, let’s move on to the last part of this article.
7 basic steps to troubleshoot a network
Step one: Identify and understand the problem
This may seem obvious, but the first step to troubleshoot a network is to understand the problem completely. Figure out the extent of it, see what systems and services are affected and to what extent.
Step two: Communicate
This is a step you cannot avoid but can do later. For example, move on to the next step if it’s a minor issue. But if it’s complicated and affects many users, you’ll need to involve your team.
Step three: Figure out the cause
The data you collected earlier, as well as previous event logs, can be of help here. This may be a trial and error process, so once you have a theory, test it in a small environment or a small part of your infrastructure to see if it works. The goal is to minimize the impact of your diagnostic process — or, in other words, to minimize human error.
Step four: Find the solution
Once you have figured out the cause, finding the solution may be pretty straightforward. Maybe it’s a firmware update on one of your hardware creating a problem, or maybe there was some misconfiguration. But as with figuring out the cause, test your solution in a smaller environment before implementing it organization-wide.
Step five: Implement the solution
The next step is to implement the solution across your infrastructure. Even if you have tested the solution well, it’s best to roll it out in steps. The actual rollout can be planned based on the severity of the problem, the impact on the business process, and your risk management protocols.
Step six: Document the issue
Once the problem is resolved, document the entire event, how it began, and the steps taken to resolve the issue. This will help resolve any similar situations in the future.
Step seven: Analyze the issue and implement measures to prevent it
The next step is to analyze the problem, what caused it, and how it was resolved. See if anything could have been done better and how similar situations could be prevented.
Key takeaways
As more businesses increasingly make their operations digital, computer networks are becoming essential for sustaining business processes. In this sense, network troubleshooting tools help teams ensure that their networks are healthy and fix any issues quickly.
Here are some famous command prompt utilities that network admins often use:
- ping: used to identify network latency between two devices.
- Traceroute or tracert: to trace the route a packet takes from a source and a destination.
- pathping: to get information about all the routers a packet goes through from the source to the destination and the time between each hop.
- ipconfig or ifconfig: To display the IP address, subnet mask, and other network configuration data.
- nslookup: for diagnosing network issues and mapping domain names with IP addresses.
- netstat: to display network information like TCP connections, routing tables, and others.
- route: is another command-line tool used to view and modify routing tables.
You can also arm yourself with full-fledged applications and not just commands, such as:
- Uptrends: to continuously monitor websites, servers, and network devices and alerts you in case of any issues.
- Wireshark: for capturing packet data and analyzing it.
- WiFi Explorer: a macOS tool to identify network congestion, signal overlaps, or configuration issues.
- Subnet and IP calculators: to quickly figure out subnet IPs and masks.
- Datadog network performance monitoring tools: to visualize network performance and traffic.
- Nagios: for continuously monitoring servers, switches, and applications and can raise alerts in case of any issues.
- Nmap: a port scanning tool used to find information about the devices in a network.
Whatever you use, don’t forget that the first step to troubleshooting a network problem is identifying and defining it. Once you have the information, communicate it with your team and determine the root cause. After that, figure out a solution and roll it out gradually to mitigate the risks. Once the issue is resolved, document it carefully, analyze it, and implement measures to prevent it.
Frequently Asked Questions
How can you detect network errors?
You can use network monitoring tools to keep track of your IT infrastructure and devices. These tools can alert you in case of any network errors. A robust service desk can also help users alert you if they notice any errors.
What are the steps to troubleshoot network problems?
The first step is to gather all the available information about the issue and its impact. Many tools can help you diagnose the root cause and resolve a network problem quickly. Once you have all the information, communicate with your team, figure out the underlying problem, and devise a solution. Once the issue is resolved, document it and implement preventive measures.
What are the 4 types of troubleshooting?
- Spot-the-difference approach: the malfunctioning parts or sections are compared to similar areas. The differences are eliminated slowly until the issue is resolved, which helps identify the problem.
- Move-the-problem approach: the components that may be causing the issues are moved or replaced. This helps identify the problematic elements and narrow down the problem.
- Follow-the-path approach: the path the data packets are moving in is followed to see where the issue occurs.
- OSI model-based approach: the problem is approached through the OSI model, either top to bottom or bottom-up. The different OSI layers are checked to narrow down the issue.
What are the 4 most common network problems?
The most common network problems are:
- Duplicate IP addresses: You may get an error message saying the IP address is already in use. The solution is to change the IP address on your system.
- IP address exhaustion: In this, you’ll have to adjust the size of the IP address pool in the DHCP settings of your router.
- Unable to connect to the internet: The first step is to reset the router and the system. If this doesn’t fix it, it may be a hardware problem or an issue down the line. tracert may help you diagnose where the connection is breaking up.
- Low performance: This may be due to network congestion on your end or from your ISP’s end. Depending on the problem, you may have to upgrade your hardware or internet connection.

IT security professionals use a lot of tools to keep networks secure. These tools range from go-to utilities that run from the command-line interface of just about every operating system to more complex tools for scanning network activity.
This article covers many of the network related utilities included in Windows and UNIX/Linux systems.
- ping
- ipconfig
- ifconfig
- ip
- arp
- netstat
- netcat
- tracert
- nslookup
- dig
Let’s look at the commands:
1. ping
If you want to know that two TCP/IP systems share the same network, the go-to tool is ping. The ping utility takes advantage of the fact that by design all TCP/IP hosts respond to ICMP requests. When one system successfully pings another host, you automatically know that the other system is connected and is properly IP addressed.
- In Windows, ping runs four times and stops automatically.
- In Linux, ping runs continuously until you press ctrl+c.

To get ping to run continuously in Windows, use the -t switch. The ping utility has uses beyond simply verifying connectivity. Running ping using a DNS name, for example, is a great way to verify you have a good DNS server.

The ping utility offers many more features that IT security professionals use all the time. Here’s a list of some of the more useful switches:
- -a Resolve addresses to hostnames
- -f Set Don’t Fragment flag in packet (IPv4 only)
- -4 Force using IPv4
- -6 Force using IPv6
2. ipconfig
The ipconfig command is the Windows-only reporting utility that shows the current status of the network settings for a host system. Typing ipconfig by itself gives some basic, but important, information.
ipconfig has the following six switches that are particularly useful. Typing ipconfig /all, for example, lists virtually every IP and Ethernet setting on the system.
- /all – Exhaustive listing of virtually every IP and Ethernet setting
- /release – Releases the DHCP IP address lease
- /renew – Renews the DHCP IP address lease
- /flushdns – Clears the host’s DNS cache
- /displaydns – Displays the host’s DNS cache
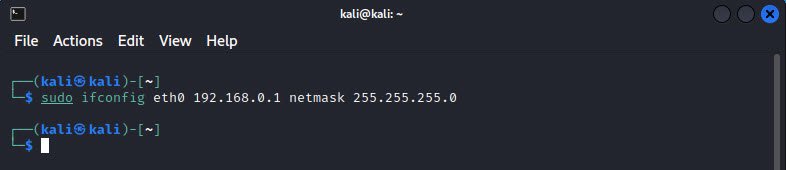
3. ifconfig
The ifconfig command is the functional equivalent to ipconfig for UNIX/Linux operating systems. Unlike ipconfig, ifconfig goes beyond basic reporting, enabling you to configure a system.
The following example sets the IP address and the subnet mask for the Ethernet NIC eth0:
sudo ifconfig eth0 192.168.0.1 netmask 255.255.255.0
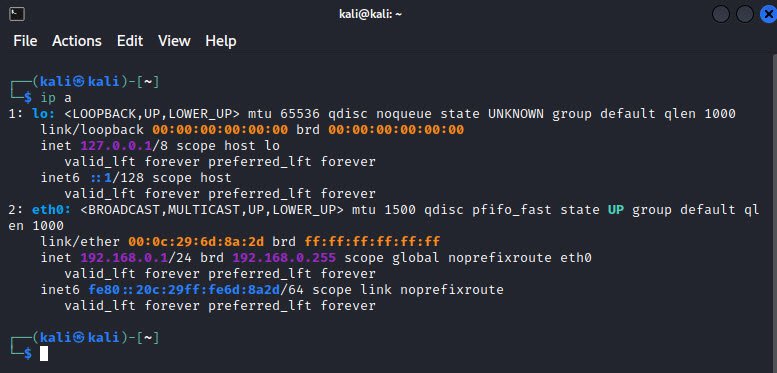
4. ip
If you’re looking to do anything serious in terms of IP and Ethernet information on a Linux system, the cool kid is the ip command. The ip command replaces ifconfig, doing many of the same tasks, such as viewing IP information on a system, checking status of network connections, managing routing, and starting or stopping an Ethernet interface.
The syntax differs from ipconfig and ifconfig, dropping a lot of the extra non-alphanumeric characters and shortening switch names. To see all the Ethernet and IP information for a system, for example, just type this: ip a
5. arp
Every host on a network keeps a cache of mapped IP-to-Ethernet addresses for the local network. The arp command enables you to observe and administer this cache. Interestingly, both the Windows version and the Linux version use the almost same switches. If you want to see the current cache, type the command as follows (Windows version):

The dynamic type shows a listing under control of DHCP. Static types are fixed (the multicast addresses that start with 224 never change) or are for statically assignedIP addresses.
The arp command enables detection of ARP spoofing, when a separate system uses the arp command to broadcast another host’s IP address.
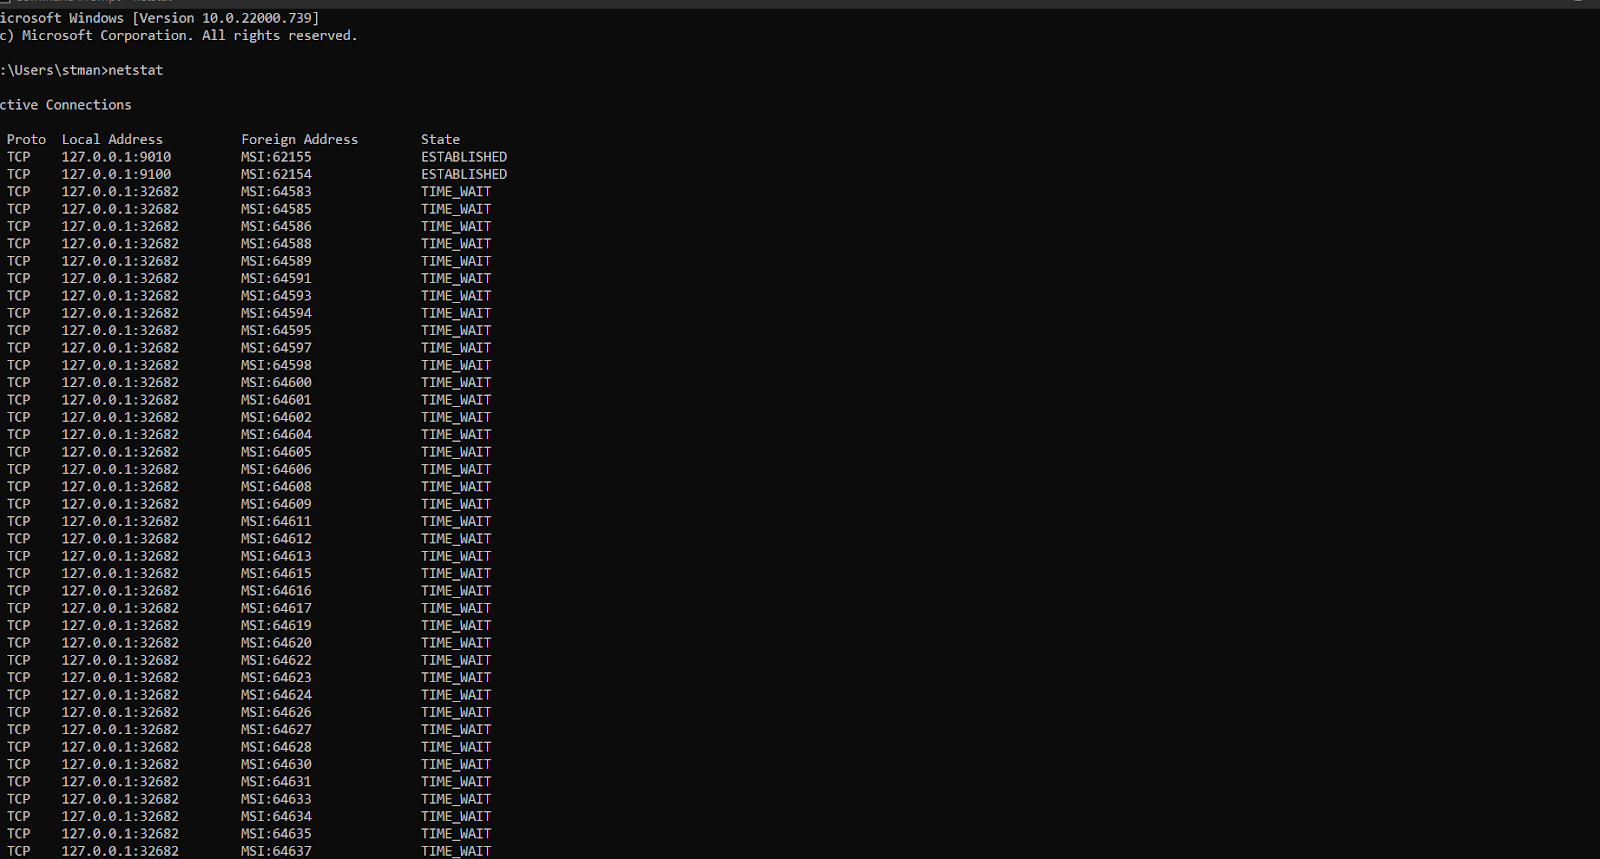
6. netstat
The netstat command is the go-to tool in Windows and Linux to get any information you might need on the host system’s TCP and UDP connections, status of all open and listening ports, and a few other items such as the host’s routing table.
Typing netstat by itself shows all active connections between a host and other hosts:
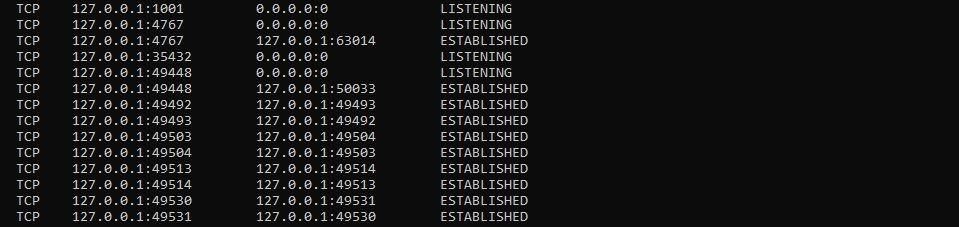
You can see that the first few lines of any netstat show a number of active connections with the loopback address (the 127.x.x.x). These are used by Microsoft for several different information exchanges such as the Cortana voice recognition utility.
Other connections show up as more varied IP addresses:
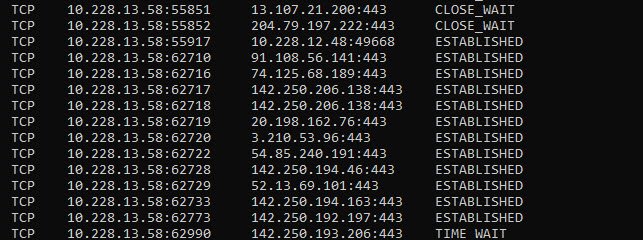
The preceding netstat output shows the open connections on this system, mainly HTTPS connections for Web pages. In the State column on the right, ESTABLISHED identifies active connections and CLOSE_WAIT indicates connections that are closing.
Typing netstat in Linux gives the same information, but in a slightly different format. At the very bottom are the associated UNIX sockets. A socket is an endpoint for connections. This data is very long and not very useful.

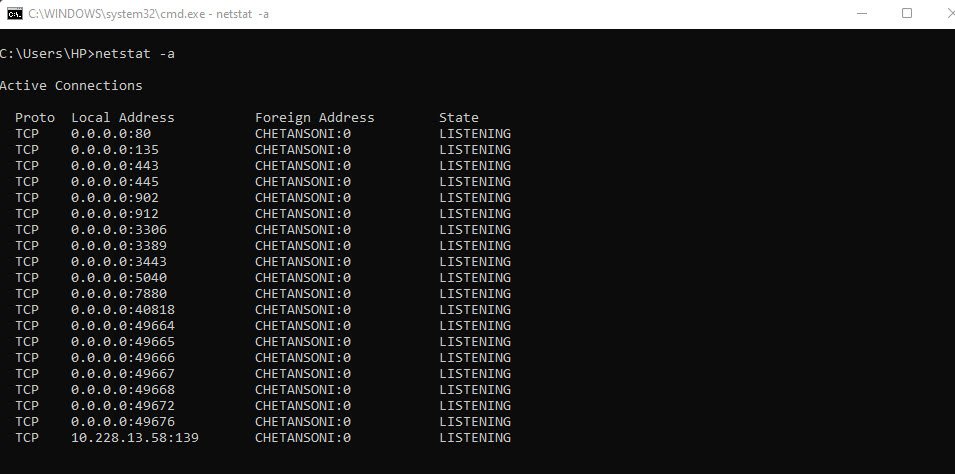
Typing netstat -a in Windows or Linux shows the same information as netstat alone, but adds listening ports.
This is a very powerful tool for finding hidden servers or malware on a host. Look carefully at the following command. Running netstat with the -b option displays the executable file making the connection.
Here’s netstat running in Windows PowerShell using both the -b and -a options:

Netstat is an incredibly powerful tool and this short description barely touched its capabilities. For the CompTIA Security+ exam, you should experiment with netstat both in Linux and in Windows.
7. netcat
netcat (or nc) is a terminal program for Linux that enables you to make any type of connection and see the results from a command line. With nc, you can connect to anything on any port number or you can make your system listen on a port number.

The nc command is a primitive tool. To get any good information from the connection, the user must know the protocol well enough to type in properly formed input data. Since this is a Web page, type get index.html HTTP/1.1, as this is what the Web server is expecting.

The challenge and the power of nc come from the fact that it’s a tool for people who know how to type in the right commands, making it great for penetration testing or, if you’re evil, hacking. Imagine making a connection to a server and typing in anything you want to try to fool the server into doing something it’s not supposed to do!
The nc command even works as a handy scanning command. Find a server, guess on a port number, and try connecting! The nc command works perfectly with scripts. It’s relatively easy to write a script that tries 1024 port numbers one after the other, automating the scanning process.
8. tracert
If you want to know how packets get from a host to another endpoint, the best tool is the Windows tracert command. Linux uses the almost identical command called traceroute. Run tracert as follows:

The power of tracert comes by running it before there are any problems. If you look at the previous example, you see the first two hops use a private IP address. This is correct, because this network has two routers between the host and the ISP—in this case, 14.139.X.X.
9. nslookup
The nslookup tool, built into both Windows and Linux, has one function: if you give nslookup a DNS server name or a DNS server’s IP address, nslookup will query that DNS server and (assuming the DNS server is configured to respond) return incredibly detailed information about any DNS domain.
For example, you can run nslookup to ask a DNS server for all the NS (name server) records for any domain.
This power of nslookup has been used for evil purposes. For that reason, no public DNS server supports nslookup anymore for anything but the simplest queries. But there are still good reasons to use nslookup.
The most basic way to run nslookup is to type the command followed by a domain.

While almost all the features of nslookup no longer work, one feature stands out in that nslookup can tell you if an IP address is a functioning DNS server. Run nslookup interactively by typing nslookup to get a prompt:

Then type in the IP address of the DNS server you want to check:

Note that it returns a DNS name. This means there is a reverse DNS zone; a very good sign, but still not proof.
10. dig
The dig command is a Linux-based DNS querying tool that offers many advantages over nslookup. dig works with the host’s DNS settings, as opposed to nslookup, which ignores the host DNS settings and makes queries based on the variables entered at the command line.
dig also works well with scripting tools. The dig tool is unique to Linux, although you can find third-party Windows dig-like tools. dig is simple to use and provides excellent information with an easy-to-use interface.
dig has some interesting features that are much easier to use than the same functions in nslookup. For example, if you want to know all the mail server (MX) servers for a domain, just add the MX switch.

Linux and Windows use different network commands to run tasks that are common in both environments, such as network connectivity testing. But the commands often share similarities.
Nowadays, administrators work with more diverse platforms than ever. From Windows workstations to Linux servers to macOS laptops, they encounter a dizzying number of environments. Cloud computing and containers take this complexity to another level. It’s tough enough for admins to recall all the shell commands for their platform of choice, let alone those needed for another OS. Add in cloud services, and the task gets even more difficult.
This article presents a list of common commands to manage network services, organized by task rather than by platform. It first identifies the task and then shows the standard Linux and Windows commands to manage the service or utility. The goal is to provide a cross-platform reference that helps all administrators.
First, I show commands that identify the system, followed by Dynamic Host Configuration Protocol (DHCP) lease management commands. Next, I display network connections and test name resolution. Finally, I cover the commands to test network connectivity. Admins can use these commands on their physical and virtual networks to verify the proper configuration and troubleshoot connectivity issues.
1. Identify the system
One of the most fundamental commands for identifying the local system is the hostname command. This command works on both Linux and Windows systems. It may not be exciting, but at least it’s consistent.
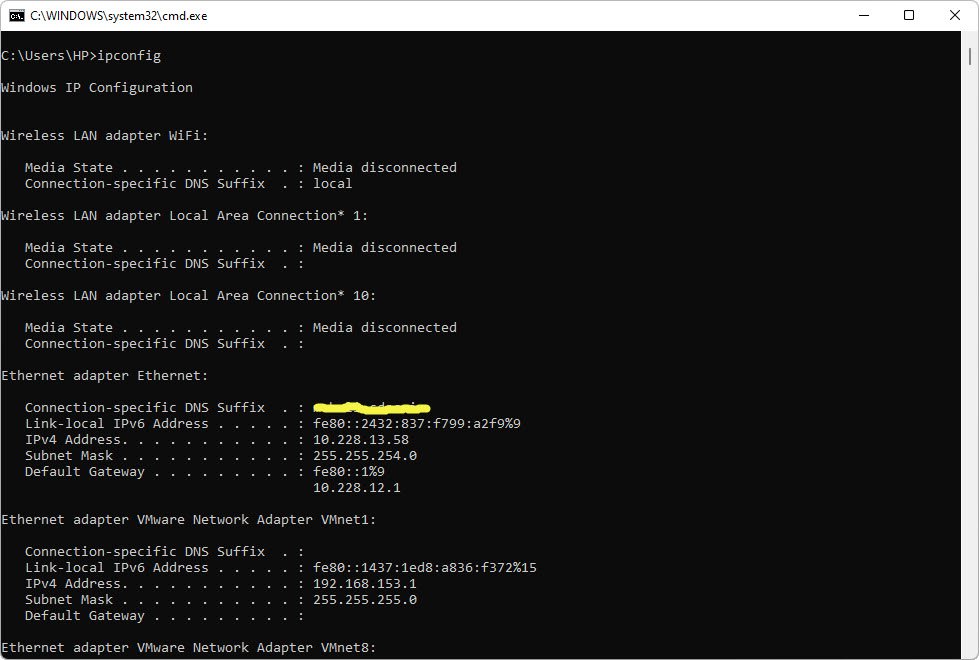
Another common task is displaying the system’s IP address. Linux has changed in the last few years, moving away from the ifconfig command to the ip command — more specifically, ip addr. At the traditional Windows command prompt, ipconfig displays the system’s basic IP address information, though admins can also use the Get-NetIPAddress cmdlet in a PowerShell window.
Linux commands:
hostname
ip addr
Legacy Linux command:
ifconfig
Windows commands:
hostname
ipconfig
Get-NetIPAddress
2. Manage DHCP clients
Admins often need more information about how a system acquired an IP address configuration. Most workstations lease an IP address from a DHCP server. Sometimes, it’s necessary to get a fresh configuration. Linux administrators usually accomplish this with the dhclient command, while their Windows counterparts use ipconfig with the /release and /renew switches.
Linux commands:
Release the current configuration
dhclient -r
Acquire a new lease
dhclient
Windows commands:
Release the current configuration
ipconfig /release
Acquire a new lease
ipconfig /renew
3. Display current network connections
Both platforms recognize the netstat command to display current connections to the system. Many Linux administrators prefer using the ss command, but that’s a personal preference. Plenty of options exist to narrow the output down to just the information admins need. To display these options in Linux, use —help or the manual page. In Windows, try the /? switch.
Linux and Windows command:
netstat
Linux command:
ss
4. Test name resolution
Name resolution is one of the most critical services on the network. Name resolution relates easy-to-remember hostnames to difficult-to-remember IP addresses. The DNS service hosts a dynamic database of resource records that track names and IP addresses.
No matter which platform admins prefer, they should recognize that all network nodes share common configuration requirements and troubleshooting needs.
When clients cannot reach DNS servers, they may not be able to check email, access data stored on remote file servers, print or reach required webpages. Troubleshooting name resolution is a common task.
Interestingly, Linux and Windows systems share one of the key utilities: nslookup. Originally a Linux tool, nslookup is included with Windows. It enables administrators to create manual DNS queries as part of troubleshooting. Linux also relies on two other commands, dig and host, to troubleshoot DNS. Windows administrators can use the Resolve-DnsName PowerShell cmdlet to accomplish the same thing.
Linux commands:
nslookup {remote-system}
dig {remote-system}
host {remote-system}
Windows commands:
nslookup {remote-system}
Resolve-DnsName -Name {remote-system}
5. Test network connectivity
Another common task is testing connectivity and verifying the path traffic takes across the network. The traditional tool for this is ping. Both Linux and Windows recognize the ping command, though Linux sends continuous pings by default, while Windows only sends four, unless told otherwise.
Both platforms also share the traceroute utility, though Windows spells the command tracert. This tool displays the routers, or hops, packets go through while traversing the network. This information enables administrators to see where the packets are going and identify potential network performance problems, saturation or outages. PowerShell can do the same by using the Test-NetConnection -Computername server01 -TraceRoute cmdlet.
Linux commands:
ping {destination}
traceroute {destination}
Windows commands:
ping {destination}
tracert {destination}
Test-NetConnection -Computername {destination} -TraceRoute
Wrap-up
No matter which platform admins prefer, they should recognize that all network nodes share common configuration requirements and troubleshooting needs. Windows networking has its roots in old Unix implementations of TCP/IP, and therefore, many commands are shared or at least similar. In fact, macOS also shares many of the Linux commands listed above.
Whether admins are connecting to a remote Linux server in the cloud from their Windows admin workstation or using Secure Socket Shell from their Linux laptop to hit an on-premises Windows server, they’ll discover many commands that gather network information are similar. Admins can learn these commands to increase their diversity and flexibility as an administrator.
Next Steps
8 things to know when switching from Windows to Linux
83 useful Linux commands
5 techniques to debug network issues in Linux and Windows
How to troubleshoot IP settings with Windows ipconfig
Dig Deeper on Network management and monitoring
-

Troubleshooting the most common issues with Windows 11
By: Brien Posey
-
What is a batch file?
By: Rahul Awati
-
How to troubleshoot IP settings with Windows ipconfig
By: Damon Garn
-
What is a command prompt?
By: Rahul Awati