
В данной статье опишу конфигурацию Радиус сервера, для подключения к нему Mikrotik в качестве клиента.
Данная функция полезна, если у вас есть собственный домен на базе Active Directory, и вы не хотите каждый раз заводить VPN пользователей в ручную. Так же с помощью RADIUS сервера, можно настроить аутентификацию непосредственно на сам Mikrotik с помощью доменных учеток или аутентификацию на Wi-Fi
В общем, штука полезная.
Во время написания статьи все указанные настройки проводил на Windows Server 2019, но думаю она так же актуальна и для Windows Server 2016
Первое что нам нужно — сам Windows Server, в данной статье не описываю его установку. Думаю, раз вы дошли до этого материала, то развернуть WinSrv и выполнить базовую настройку Mikrotik вы в состоянии.
К делу.
Переходим к добавлению компонентов
- Диспетчер серверов — Добавить роли и компоненты
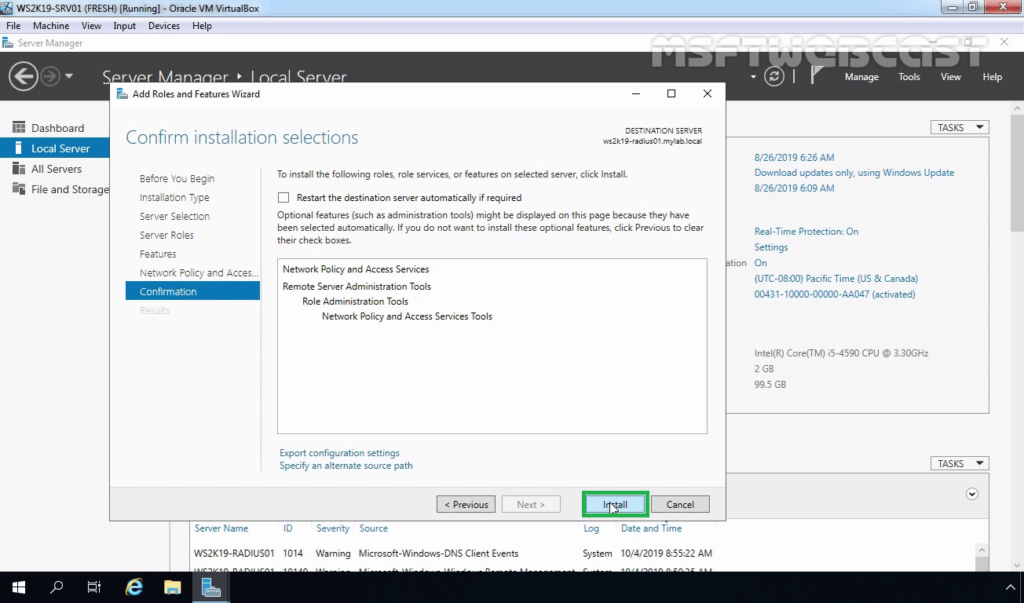
- Далее — Установка Ролей и Компонентов — Выбрать целевой сервер — Службы политики сети и доступы — (Копмпоненты) Далее — Установить
После установки переходим к настройке:
- Средства — сервер политики сети
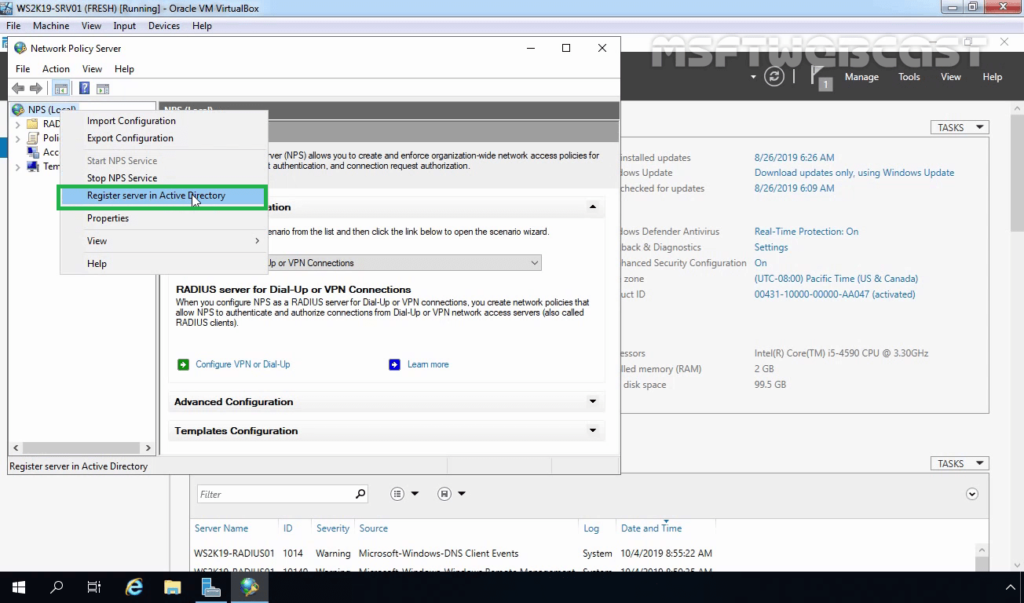
- ПКМ на NPS — Зарегистрировать сервер в Active Directory

- ПКМ на RADIUS-клиенты — Новый документ
- Устанавливаем флаг «Включит этот RADIUS-клиент»
- Понятное имя — Указываем понятное имя
- Адрес (IP или DNS) — указываем IP адрес или DNS имя Mikrotik.
- Общий секрет — Генерируем и сохраняем себе секретный ключ для обмена Mikrotik и RADIUS-сервера. Или используйте свой вариант ключа.

- Развернуть политики — пкм на «Сетевые политики» — Создать новый документ
Задаем имя политики

- Далее — Добавить
- Условие — Группы пользоватей — Добавить группы — Выбираем группу — Доступ разрешен
На самом деле, условий там масса, можете выбрать под свои цели. Самое частое всё таки «группы пользователей», ведь основная задача разгрузить логику добавления пользователей. В соответствии с данным условием — все пользователи, которые являются членами группы openvpn_users будут иметь возможность пользоваться openvpn
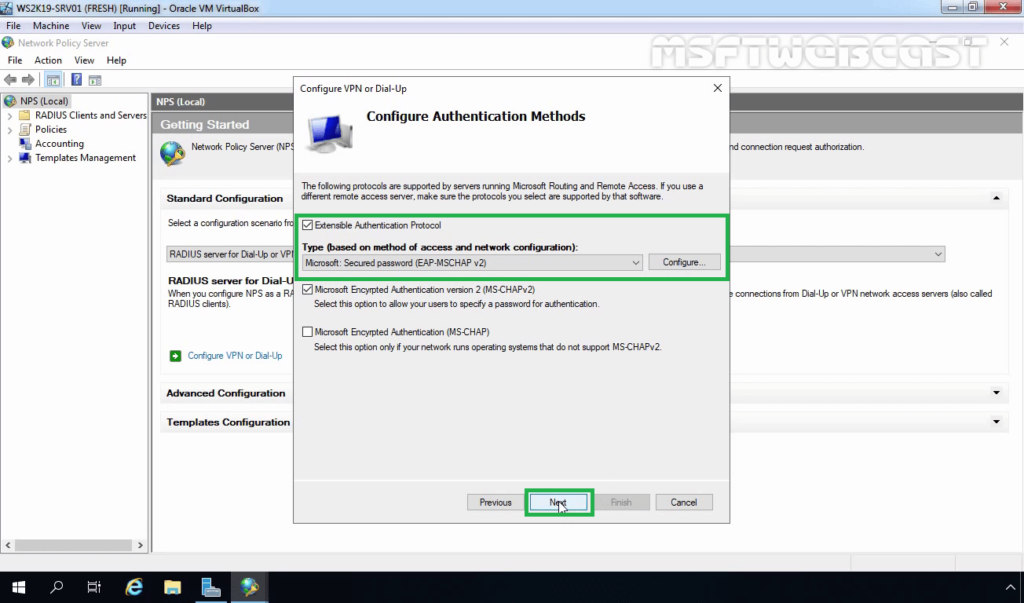
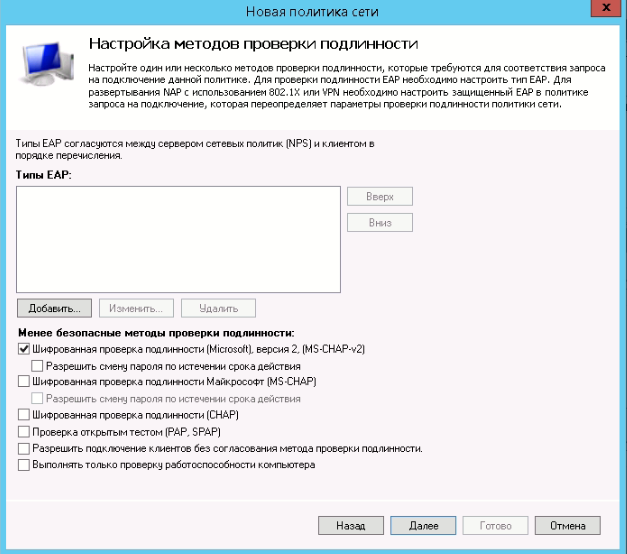
Тип Шифрования ms-chap можно отключить, как устарешвий. Оставить только MS_CHAP_V2
Однако есть нюанс, MS_CHAP_V2 работает только с RouterOS начиная с версии 6.43, если у вас версия моложе — или обновляйтесь, или используйте в политике шифрование PAP

- Далее — Тип порта NAS — Асинхронная (модем)

- Далее — Оставляем только Service-Type = Login

- На последнем окошке проверяем что указали правильные параметры и нигде не ошиблись. Клацаем Готово
- Настраиваем Брандмауэр
- Правила для входящих подключений — Предопределенные — Сервер политики сети

- Выбираем правила с портами 1813/udp и 1812/udp

- Далее — Разрешить подключение.
Переходим к настройке Mikrotik
- PPP — Secrets — PPP Authentication & Accounting – Use Radius
/ppp aaa
set use-radius=yes
В терминале

- Переходим в меню Radius и устанавливаем адрес сервера и секретный ключ
/radius
add address=192.168.X.YYY secret=Radius-PASS service=ppp
В терминале

На этом настройка завершена. Теперь для подключения VPN можно использовать доменную учётку.
Другие стати по теме:
- Генерация сертификатов на Mikrotik для OpenVPN
- Настройка OpenVPN Server на Mikrotik RouterOS
- Сборка opvn.conf для клиента Mikrotik
- Howto
- Mikrotik
- Radius
- WindowsSrv
Overview:
Remote Authentication Dial-In User Service (RADIUS) is a client/server networking protocol that provides centralized authentication, authorization, and accounting (AAA) management for computers that connect and use a network service.
In Windows Server 2019, Network Policy Server is the Microsoft implementation of the RADIUS standard specified by the Internet Engineering Task Force (IETF).
NPS role will install automatically with the installation of Remote Access Service as a prerequisite on Windows Server 2019.
Network Policy Server (NPS) allows you to create and enforce organization-wide network access policies for connection request authentication and authorization.
NPS allows you to centrally configure and manage network access authentication, authorization, and accounting with these three following features:
- RADIUS Server: NPS performs centralized authentication, authorization, and accounting for wireless, remote access dial-up and virtual private network (VPN) connections.
- RADIUS-Proxy: NPS acts as a RADIUS proxy to forward connection requests to a remote NPS or other RADIUS servers for load balancing.
- RADIUS accounting: You can configure NPS to log events to a local log file or to a local or remote instance of Microsoft SQL Server.
In this guide, we will learn the steps to configure the Radius Server on Windows Server 2019. We will configure one NPS as a RADIUS server for VPN connection authentication and authorization.
Test Lab Setup:
Note: For this guide, we will use the virtual test lab created in VirtualBox.
- WS2K19-DC01: Domain Controller and DNS Server.
- WS2K19-RADIUS01: Member Server acts as a RADIUS Server.
- WS2K19-SRV02: Standalone Server acts as a VPN Server.
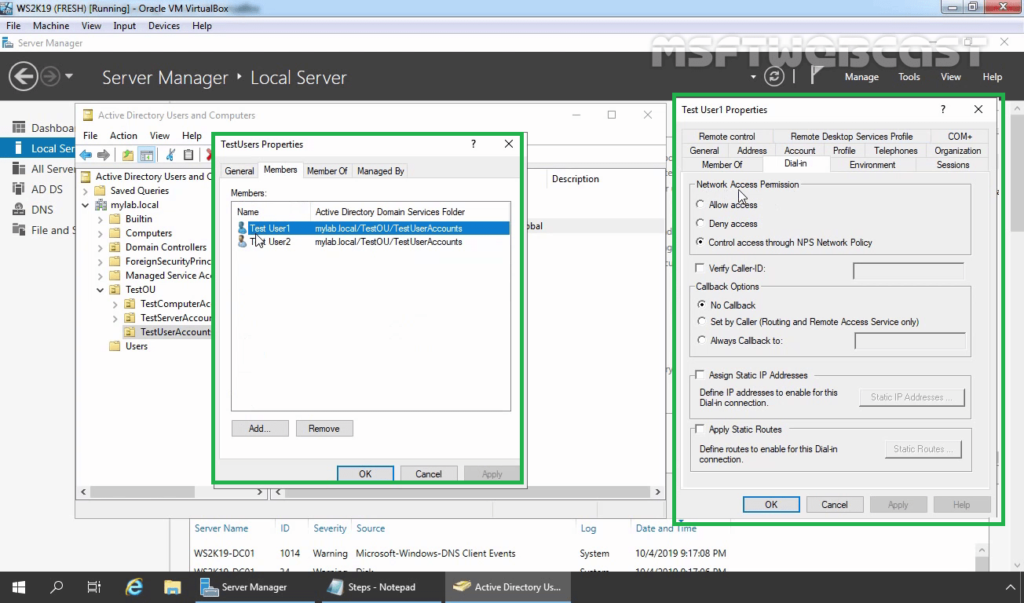
1. At first, we need to create a new security group in the Active Directory domain (for example, TestUsers) in which we will need to add all users that will be allowed to authenticate on VPN Server.
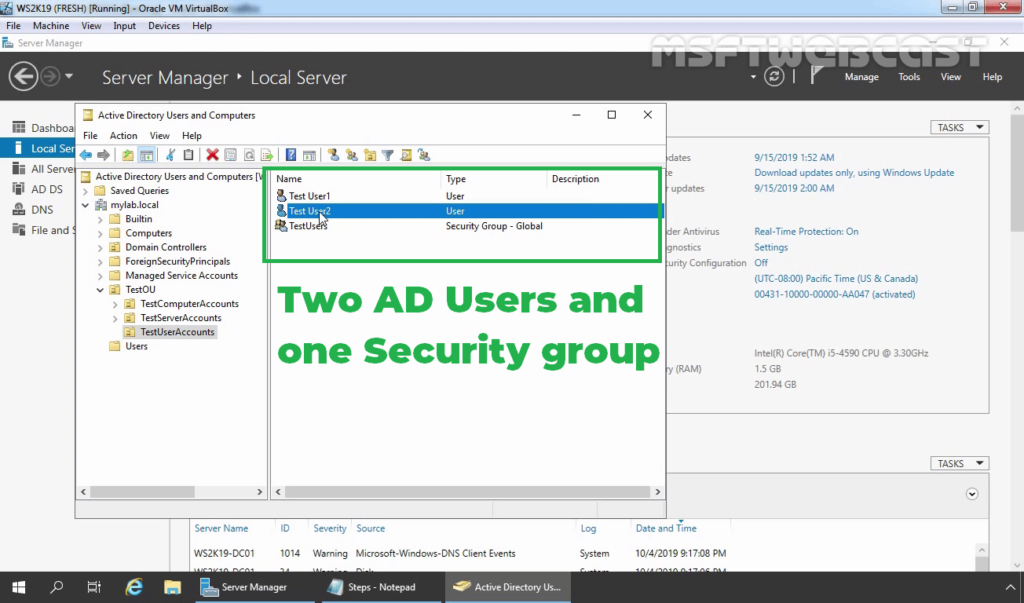
2. Check the users dial-in properties settings.
Install NPS server role on Windows Server 2019:
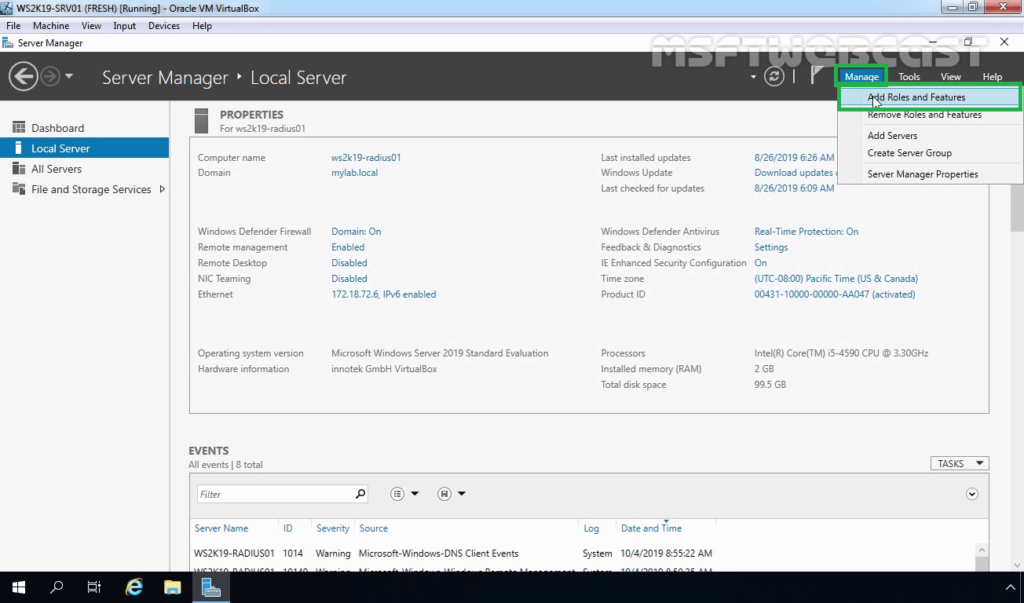
3. Logon to WS2K19-RADIUS01 server with a domain administrator account. Open Server Manager Console.
4. Click on Manage and select Add Role and Features.
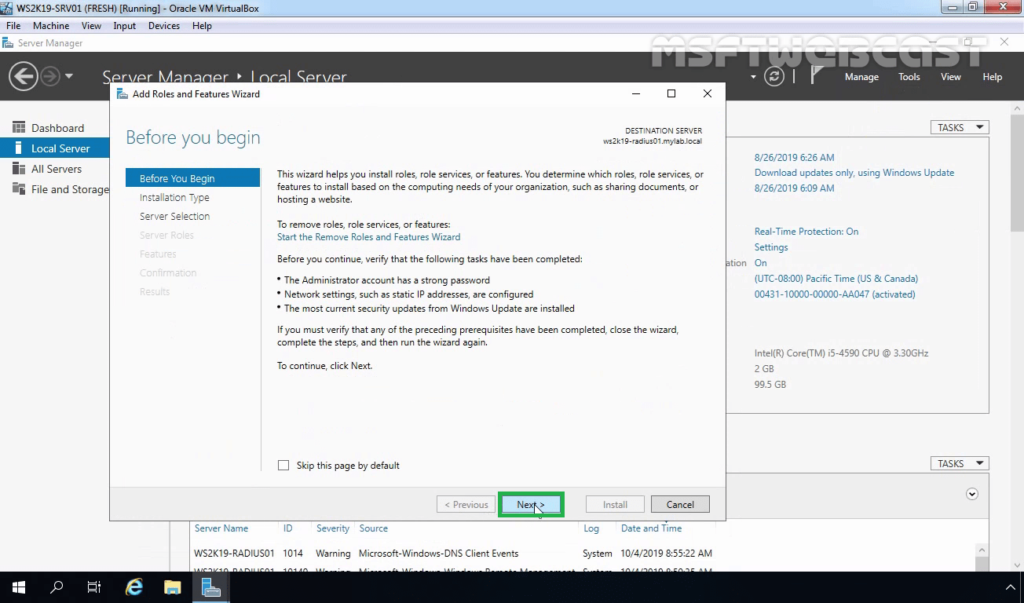
5. On the Before you begin page, click Next.
6. Select Role-based or feature-based installation and click Next.
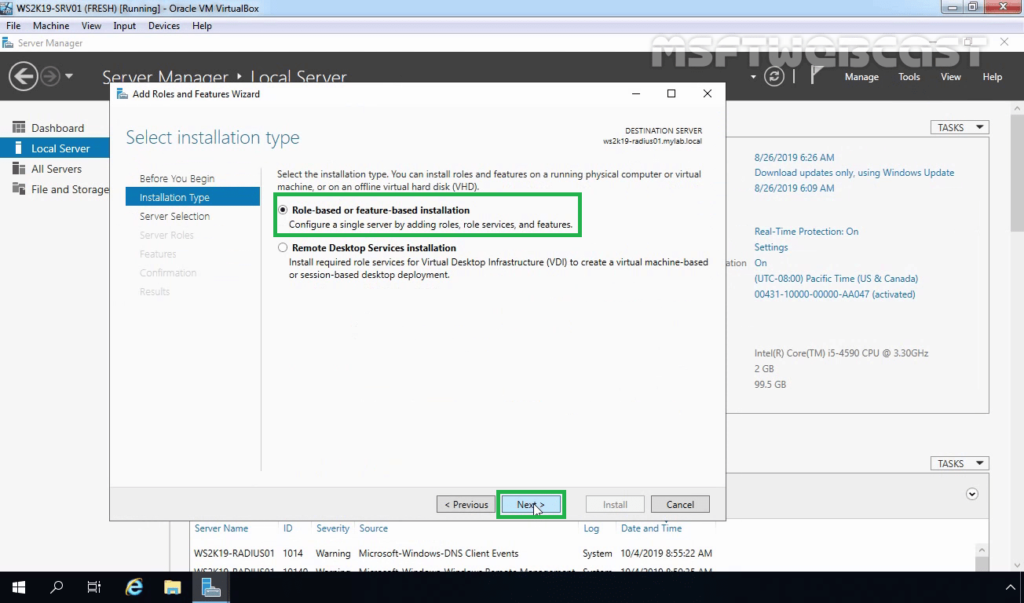
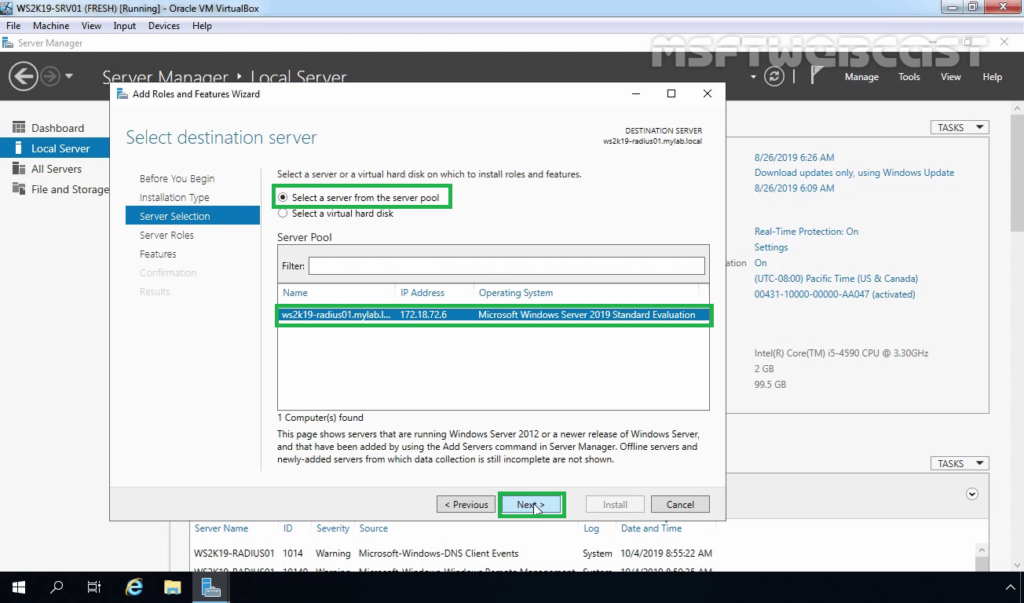
7. Select a server from the server pool on which you want to install the Network Policy and Access Service role, click Next.
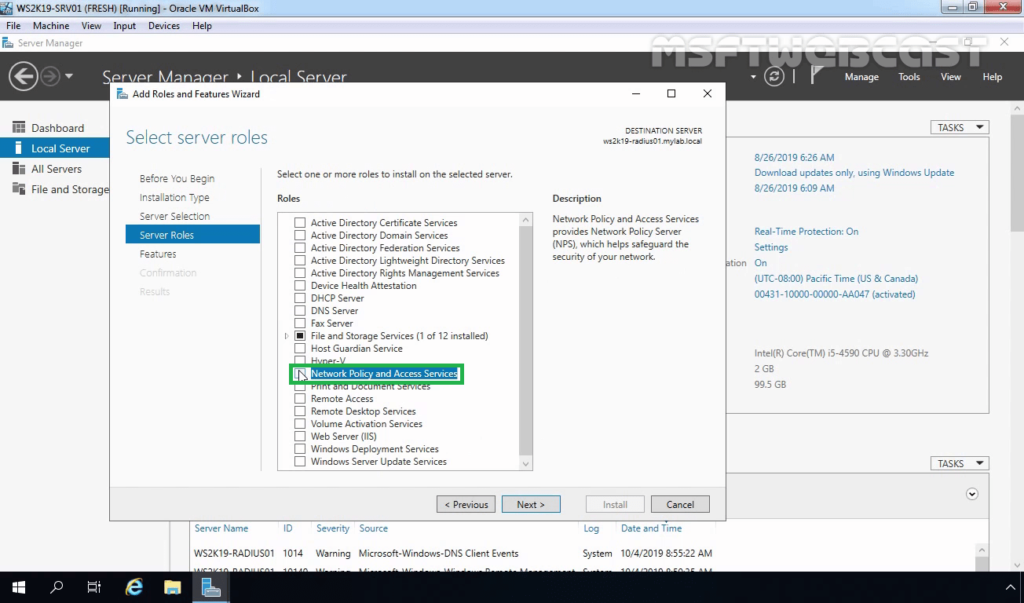
8. On select server roles page, select the Network Policy and Access Services checkbox. Click Next.
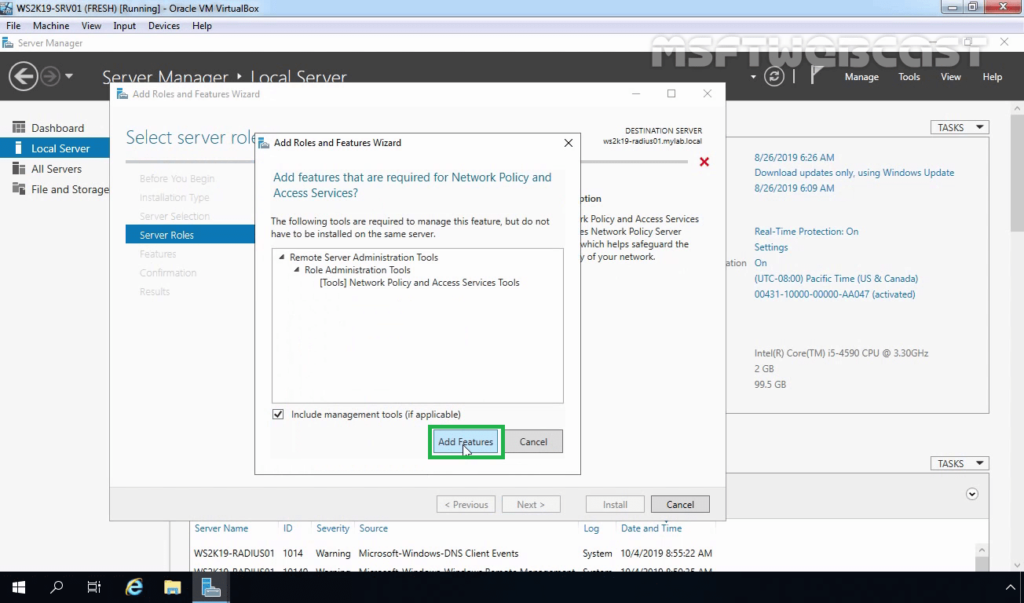
9. Click the Add Features button to add the required feature for NPS. Click Next to continue.
10. On select features, click Next.
11. Read overview information about Network Policy and Access Services and click Next.
12. Click Install and complete the installation process.
Configure RADIUS Server on Server 2019:
Step:1 Register NPS Server in Active Directory:
13. Click Close to finish the installation.
14. After the Network Policy and Access Services role installation is complete, open the Network Policy Server in the Tools menu.
To use the RADIUS server in the Active Directory Domain, we must register it first in the Active Directory.
15. In the NPS management console, right-click on NPS and select Register server in Active Directory.
16. Click OK to confirm the successful registration of the RADIUS server in Active Directory.
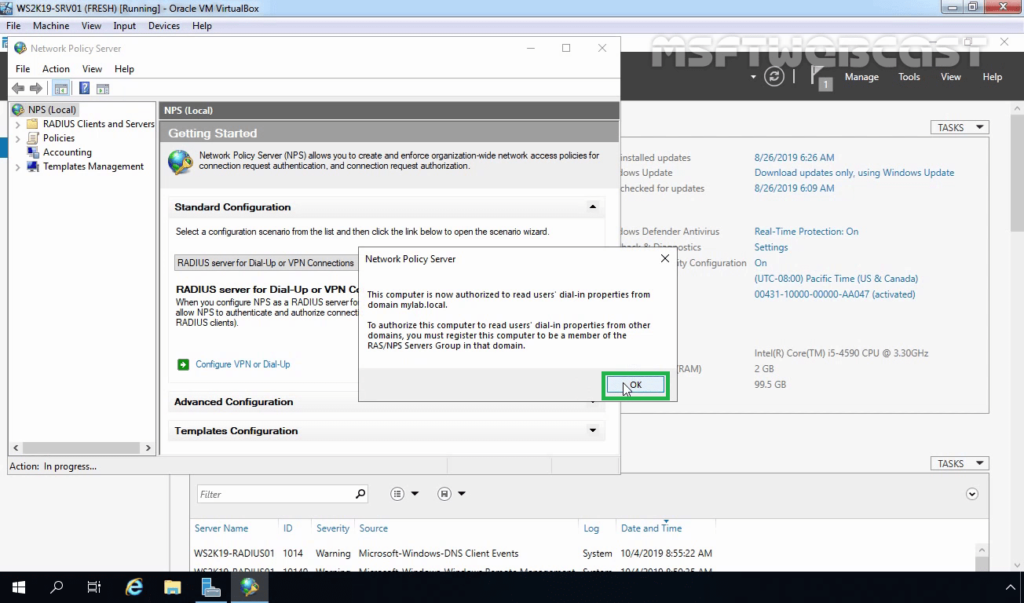
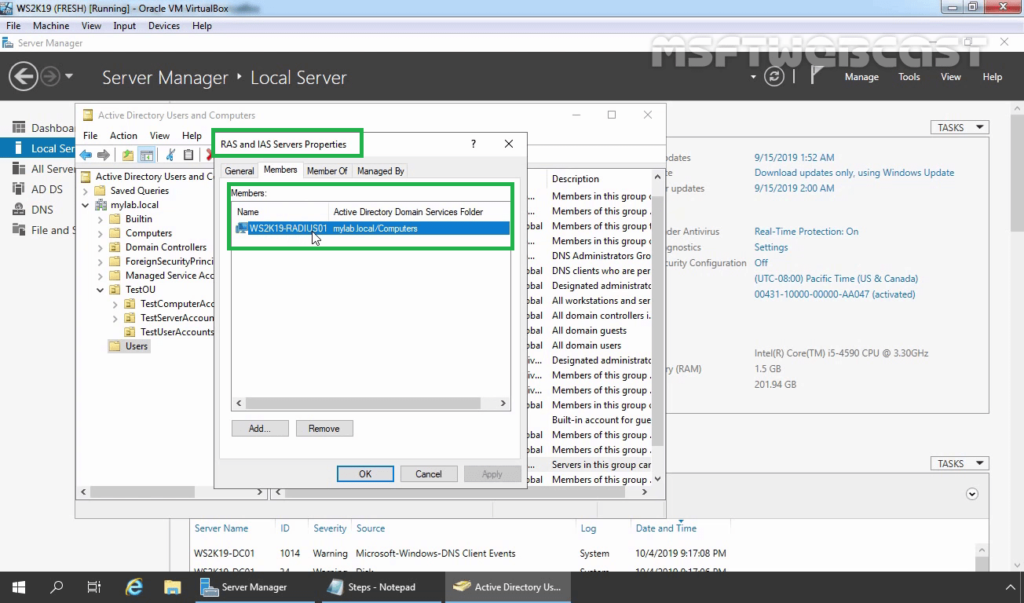
17. Now the RADIUS server has the authority to read the properties of user accounts related to the remote access. The RADIUS server will be added to the built-in domain group RAS and IAS Servers.
Step:2 Add RADIUS Client (VPN) Entry and Create NPS Policies for RADIUS Server:
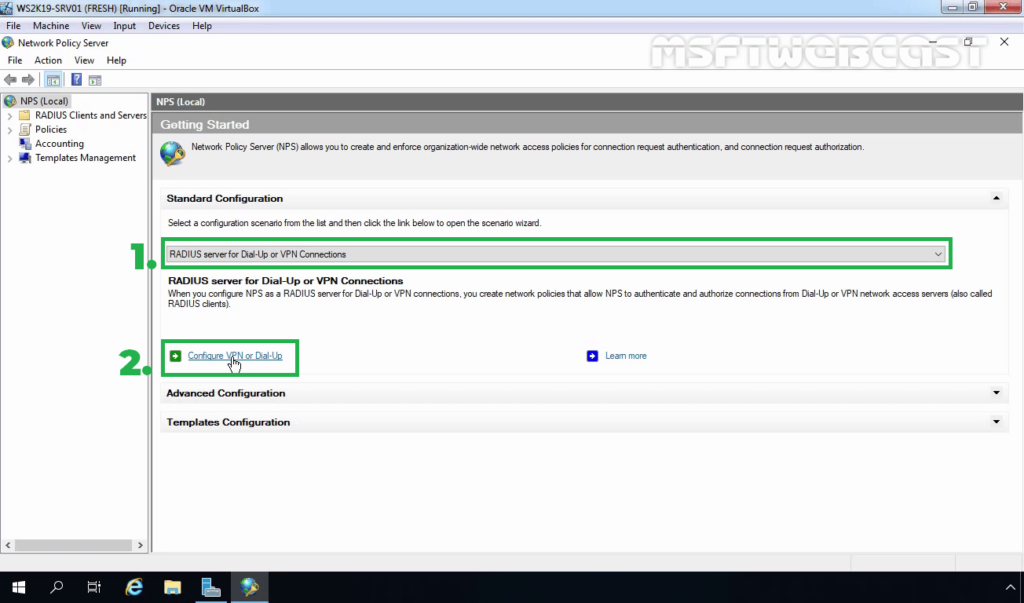
18. Under Getting Started, select RADIUS Server for Dial-Up or VPN Connection from the drop-down menu. Click on Configure VPN or Dial-Up link to add a new RADIUS client.
19. Select VPN Connections and specify a meaningful name. Click Next.

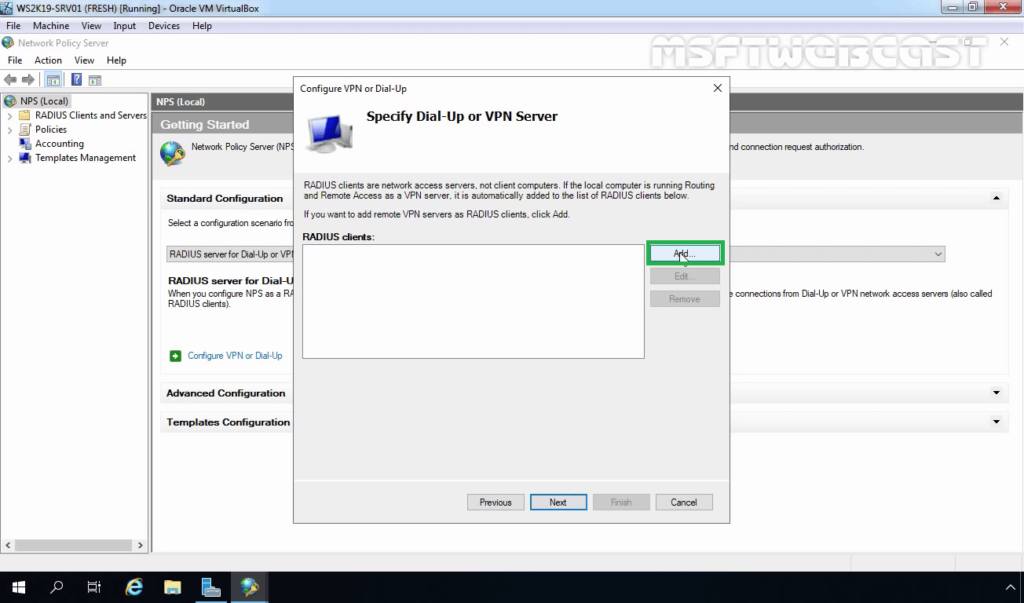
20. Click on the Add button to add remote VPN servers as RADIUS clients.
21. On New Radius Client console, specify the details as mentioned below:
- Friendly Name: To identify the RADIUS client.
- Address: IP Address or FQDN of VPN Server.
- Manual Shared Secret: Type the shared secret password and re-enter to confirm the password.
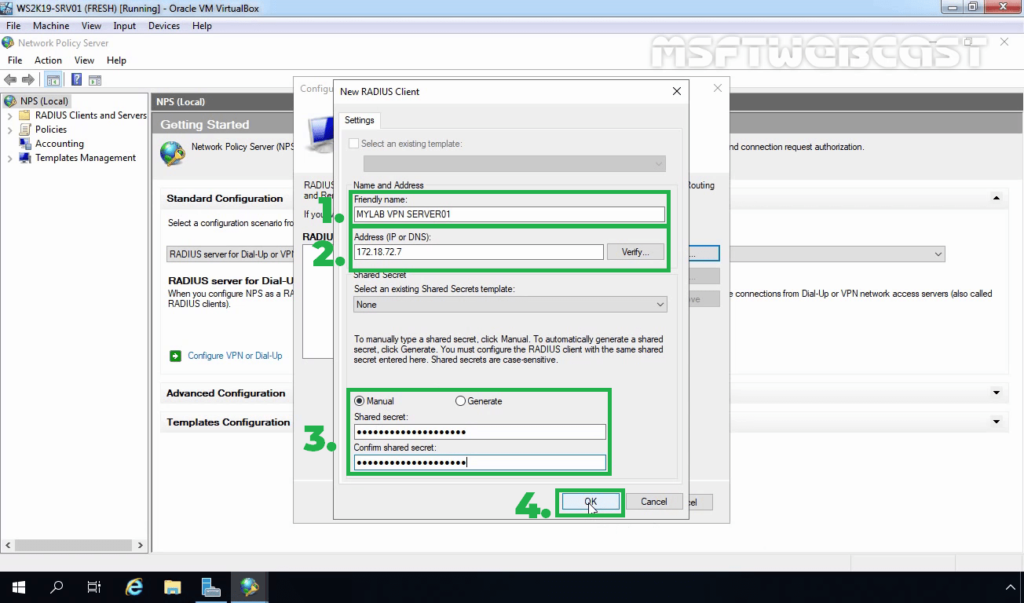
22. Click OK to save the changes.
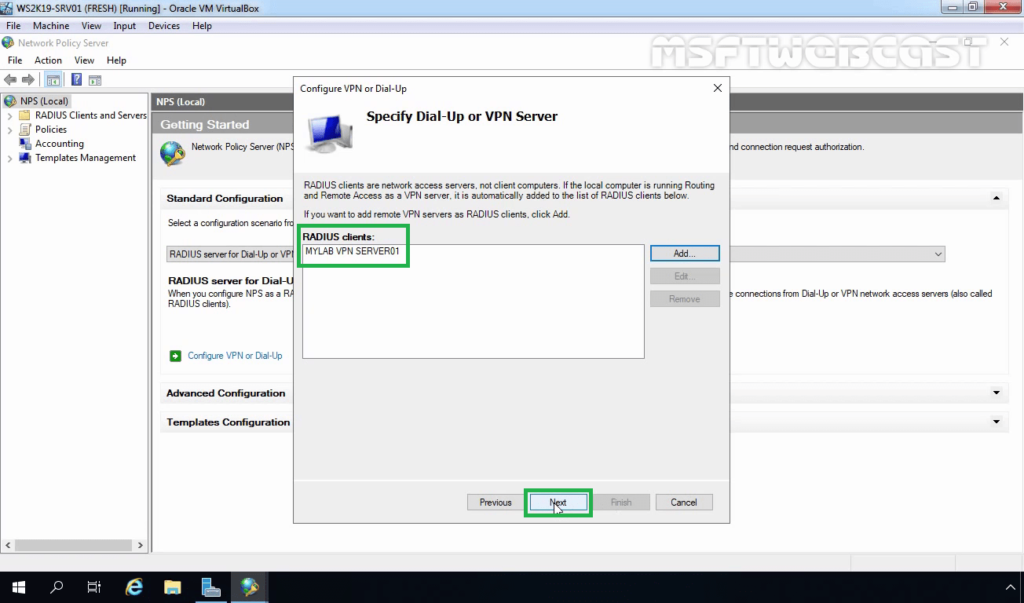
23. Verify Radius client entry and click Next.
24. Select Extensible Authentication Protocol checkbox and from the drop-down menu select Microsoft: Secured password (EAP-MSCHAP v2). Click Next.
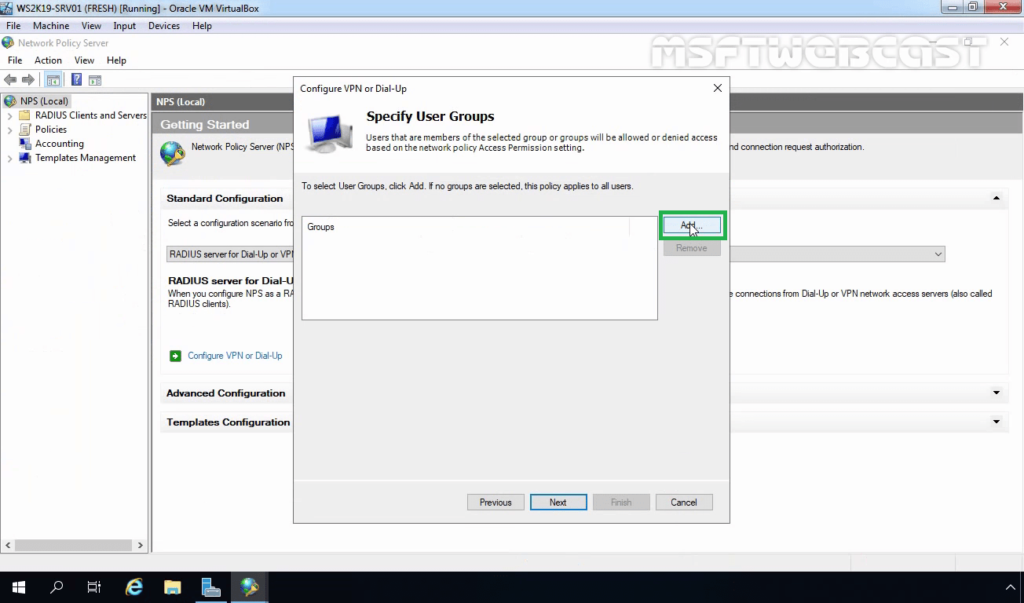
25. Click on Add to specify User Groups as a condition to apply this policy.
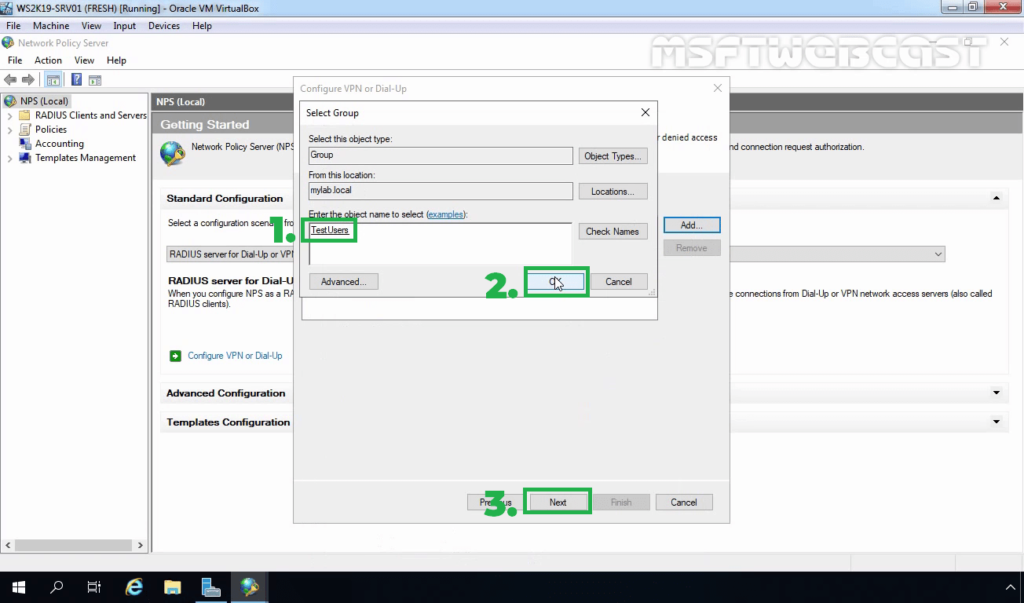
26. Add the security group TestUsers. Click on Next.
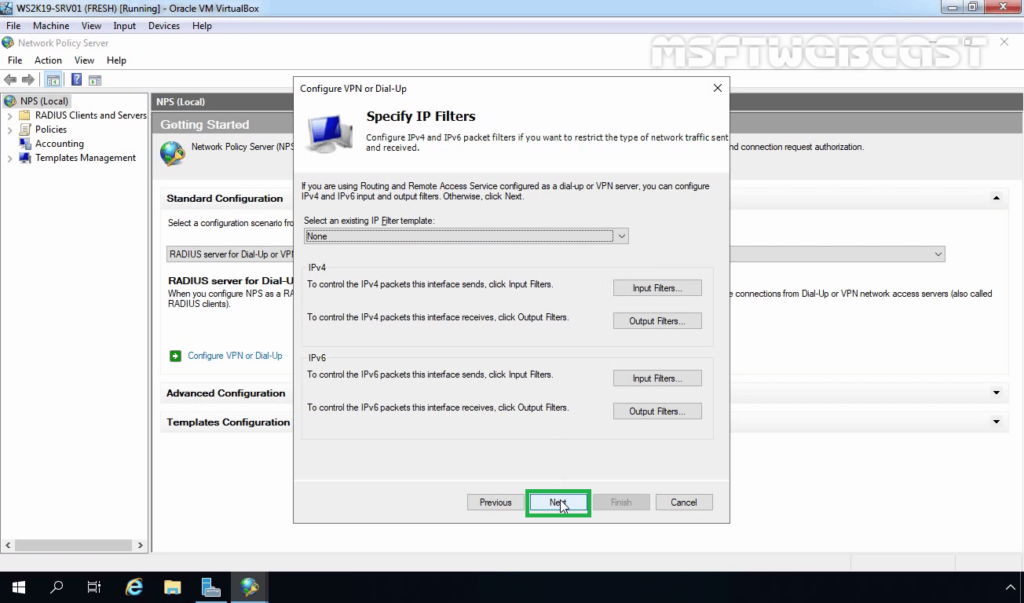
27. On Specify IP Filters console, click Next.
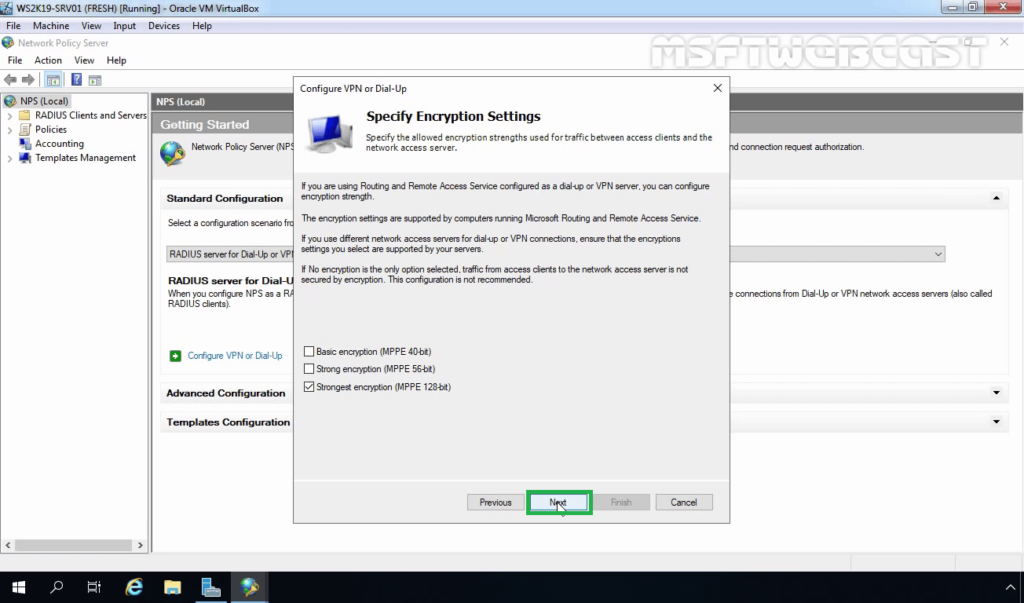
28. Choose the Strongest encryption (128 bit) and click Next.
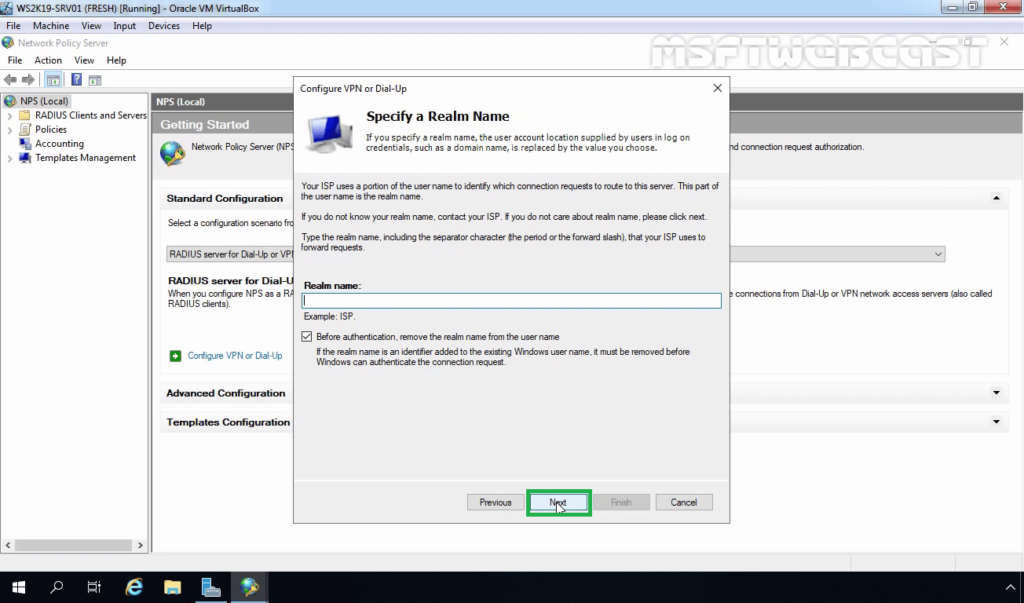
29. Click Next.
30. Click Finish to add create NPS Policies on the RADIUS Server.
Step:3 Configure RADIUS Server Settings on VPN Server:
After creating the NPS policy, we can proceed to configure our VPN server for authentication on the newly installed RADIUS NPS server.
Already we have configured the VPN server role on Windows Server 2019. You can follow this post for How to Install and Configure the VPN server role on Windows Server 2019.
31. On VPN Server, open Server Manager Console. Click on Tools and select Routing and Remote Access.
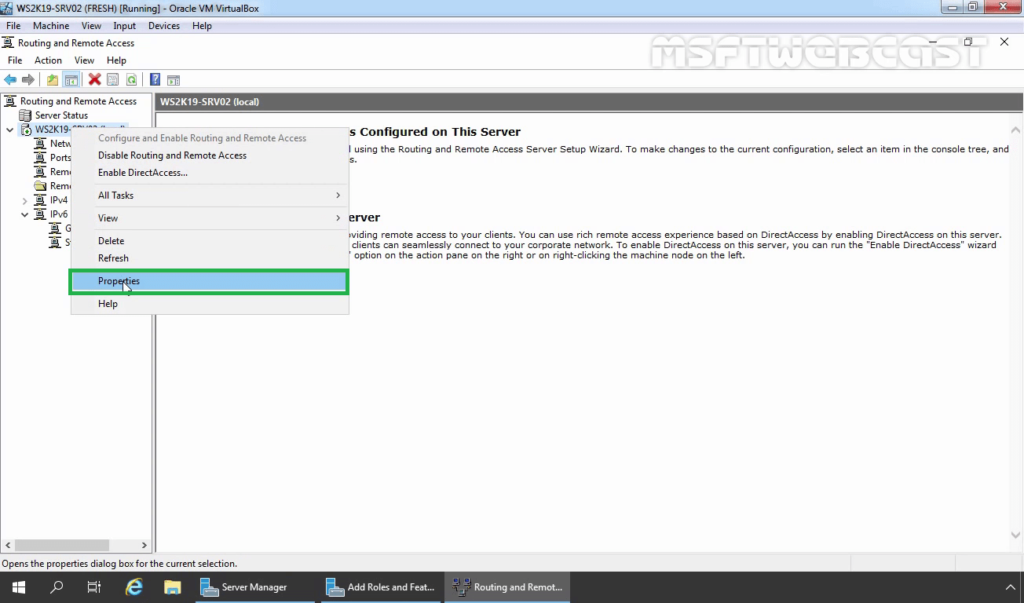
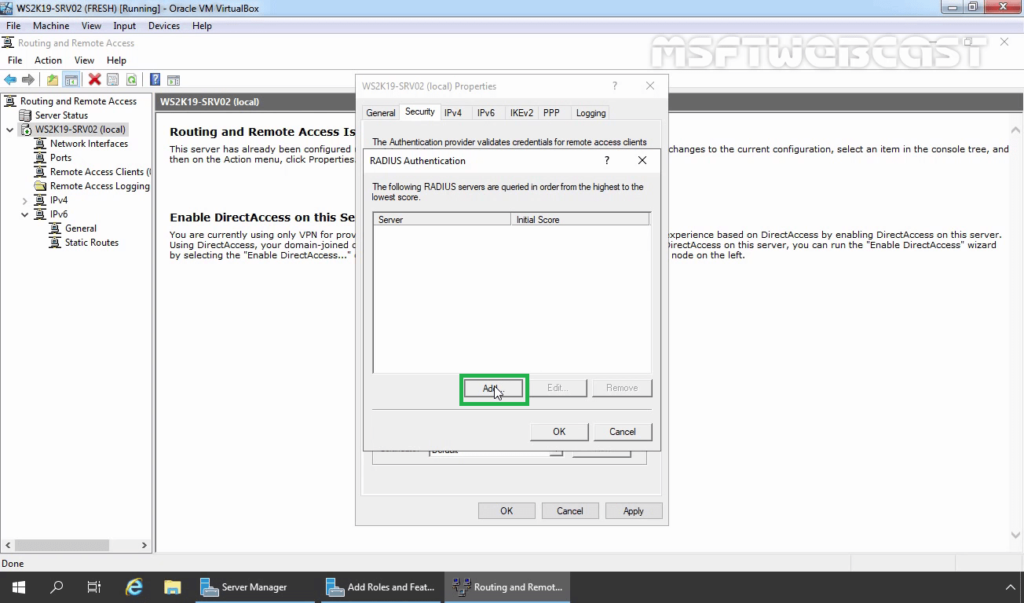
32. Right-click on the server name and select Properties.
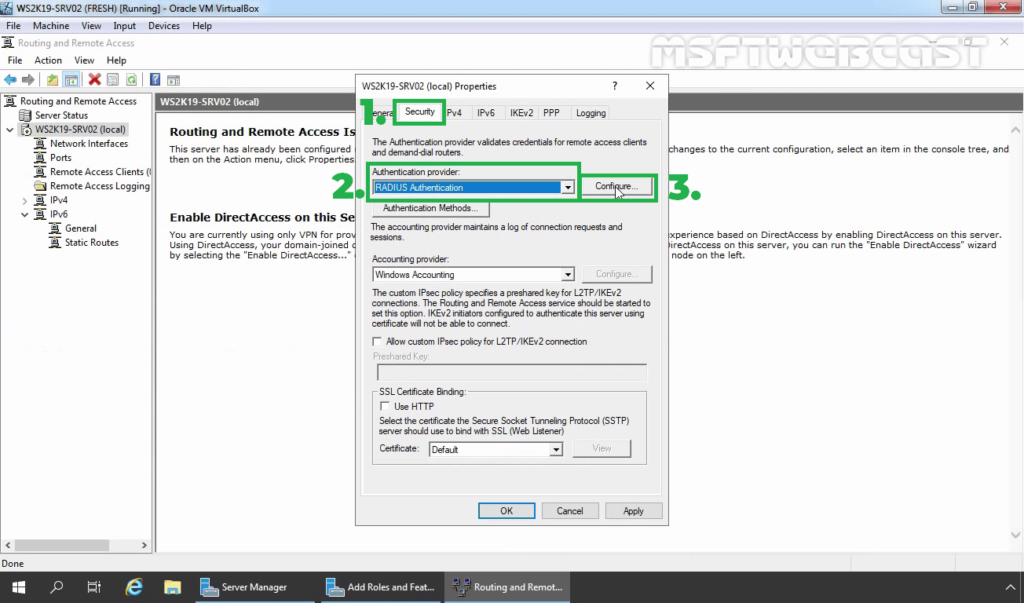
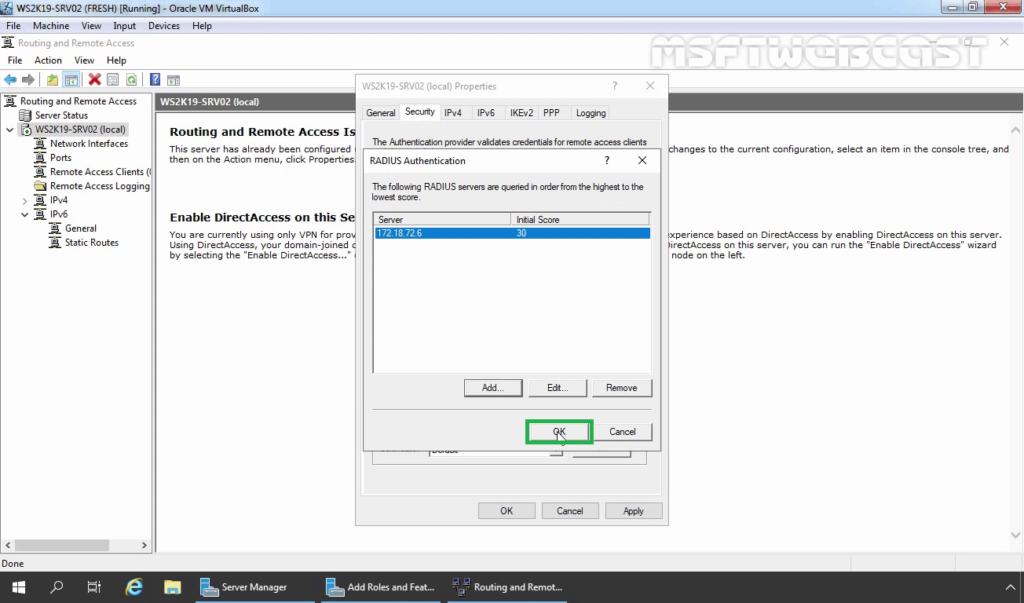
33. Click on Security Tab. Under the Authentication provider, select RADIUS authentication and then click on Configure.
34. Click Add.
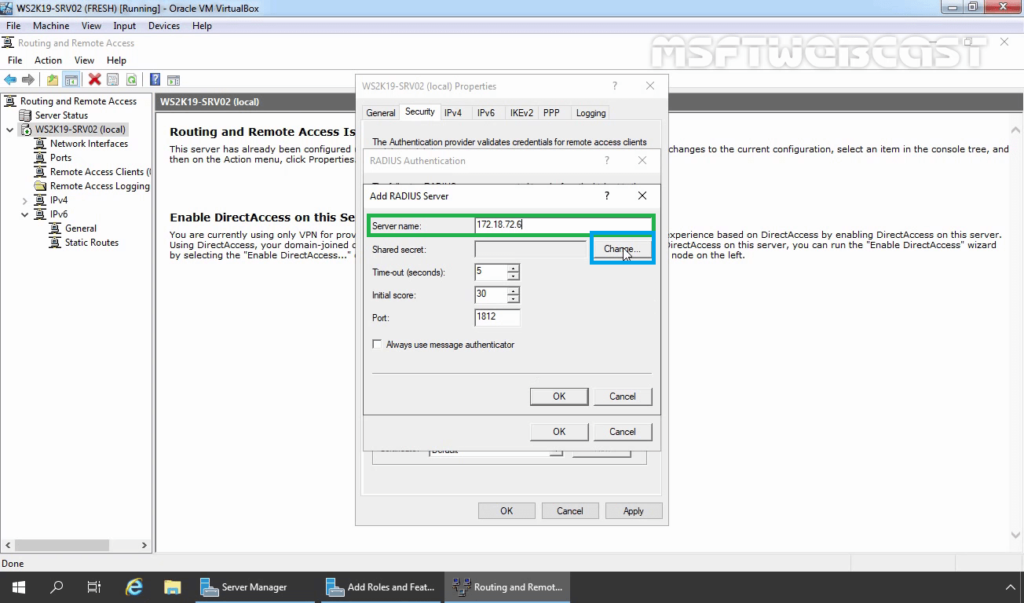
35. Specify RADIUS Server IP Address. Click on Change
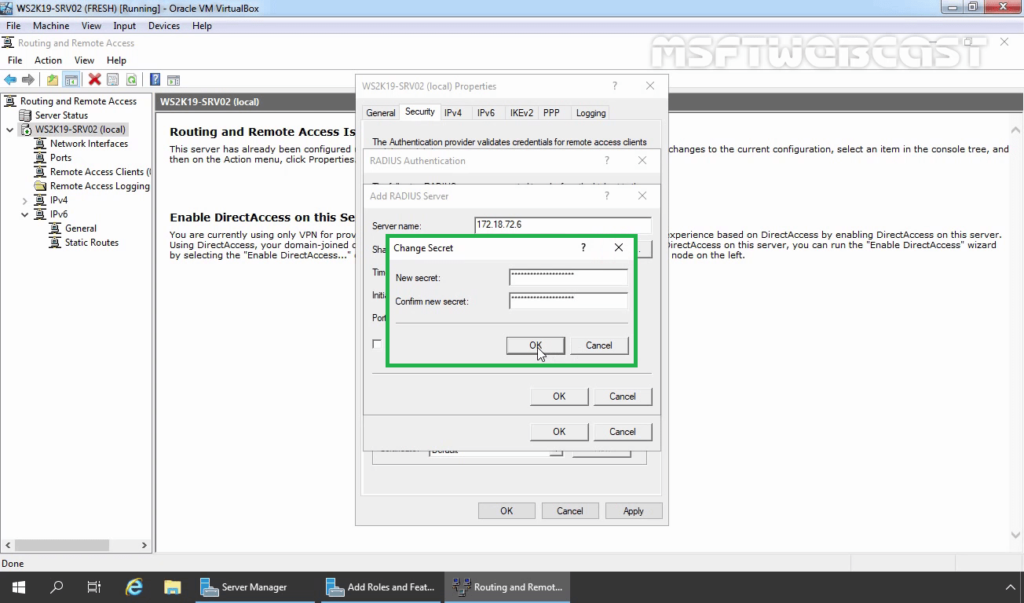
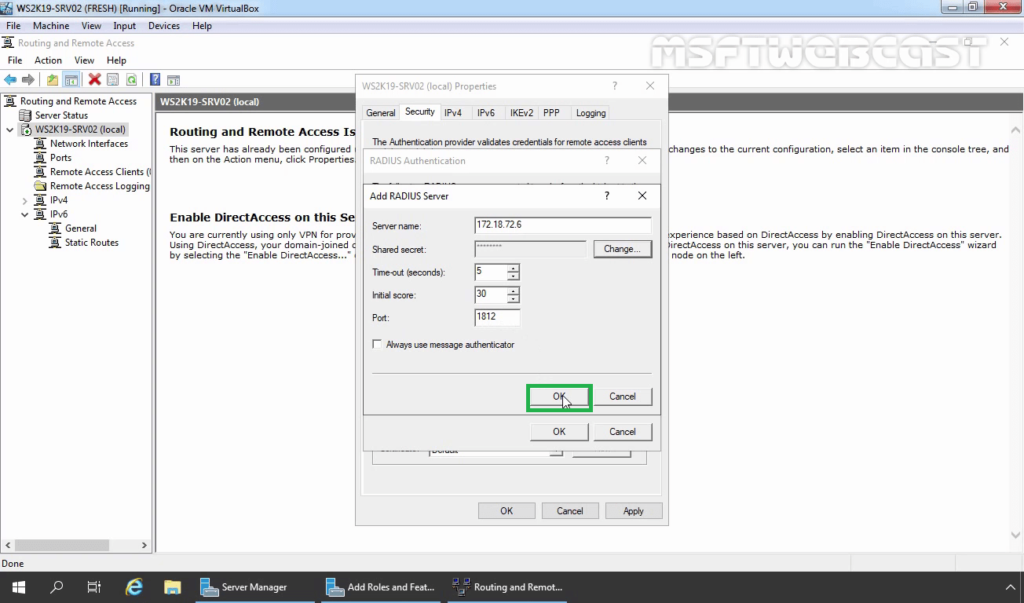
36. Specify Shared Secret password (which we have specified during adding radius client). Click OK.
37. Click OK.
38. Click OK.
39. Under the Accounting provider, select RADIUS Accounting and then click on Configure.
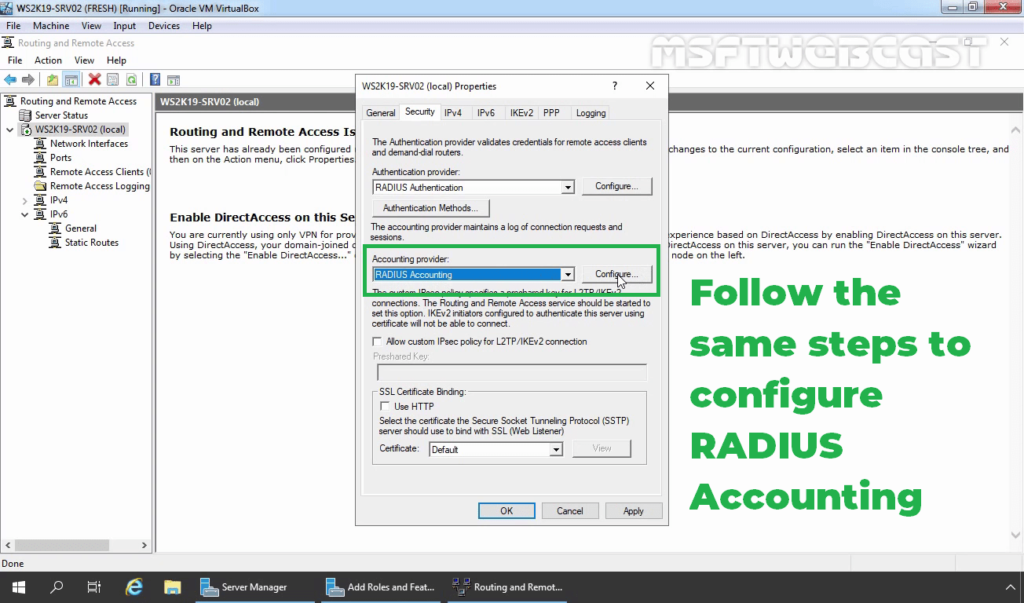
40. Follow the same steps again to specify the RADIUS Server IP Address and Shared Secret password.
41. Click on Apply and OK to save the changes.
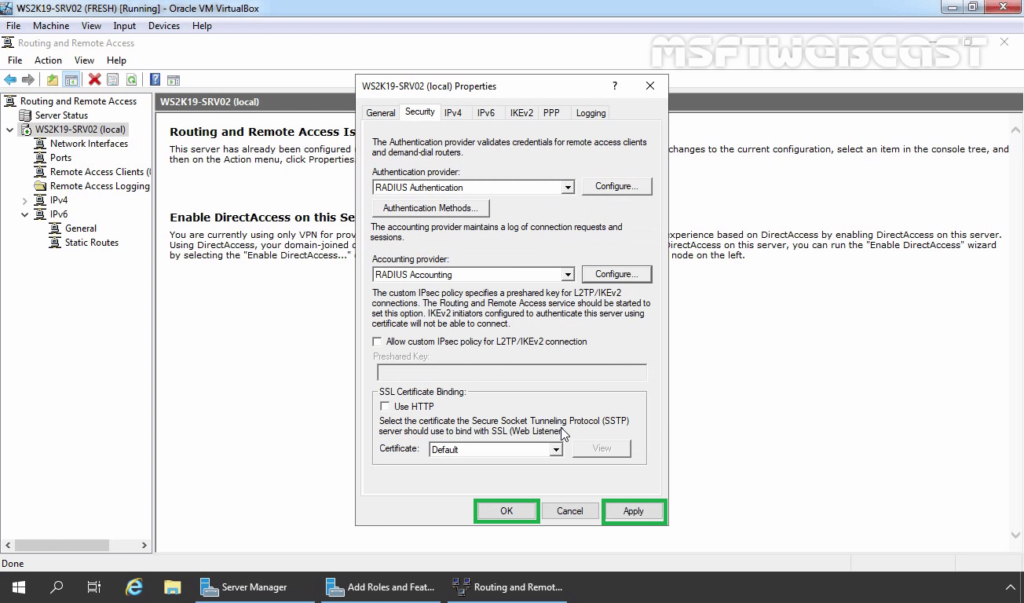
Now our VPN server can use Windows Server 2019 NPS RADIUS server for authentication and accounting without any issue.
That completes the steps on how to configure NPS RADIUS Server for VPN Authentication on Windows Server 2019.
Related Articles:
- How to Install Remote Access Service on Windows Server 2019 Part-1
- How to Install and Configure VPN in Windows Server 2019 Part-2
- Configure NPS for VPN in Windows Server 2019 Part-3
- Configure Port Forwarding and Test VPN Connection on Windows 10 Part-4
Post Views: 5,813
Сегодня расскажу как настроил L2TP на Микротике с авторизацией через Active Directory (AD). Расскажу про 2 схемы реализации доступа к сетям( чуть-чуть про безопасность).
Конечно вы скажите что таких статей куча( пример, пример 2), но я сделал небольшую автоматизацию для пользователей, читайте далее….
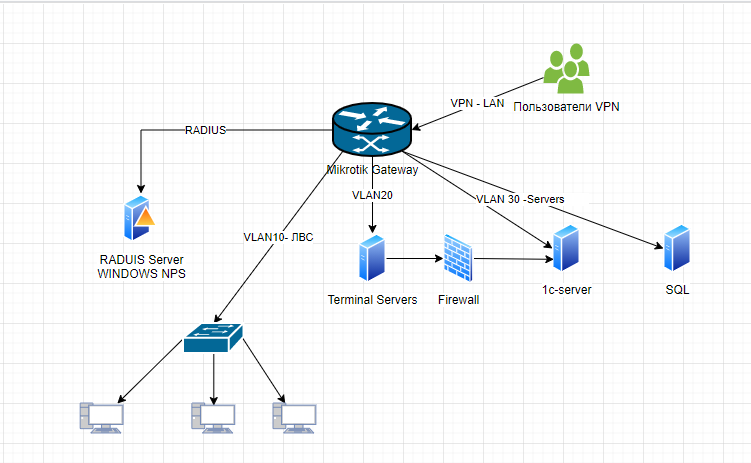
Начнём с описания схемы
Пользователи подключаются к Mikrotik, лучше конечно Mikrotik с аппаратной поддержкой IPsec, это такие модели, как RB730Gr3 или RB4011 или CCR1009, авторизовываясь через AD, для этого нам и потребуется RAIDUS, а далее пользователь должен попадать в сеть для доступа в терминальный сервер( в нашем случаем только в сеть 192.168.10.0/24 vlan 20).
Пользователю запрещено подключаться к нам в сеть и сеть серверов( см. самый последний скриншот).
Начнём создания сети, создаём pool ip которые будем раздавать нашим клиентам
Вот такой диапазон я выбрал, вы же можете взять любой из частных:
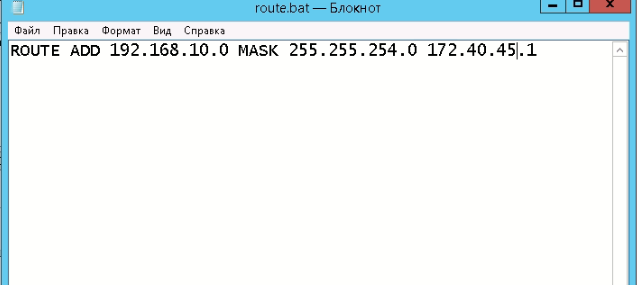
Далее создаём PPP профиль IP->PPP->Profiles, DNS я указал -это тоже ip этого микротика, вы можете исходя из этого примера указать 172.16.45.1( это потом нам пригодится), указываем, имя, адрес нашего микротика 172.16.45.1 и выбираем наш только что созданный пул.
Change TCP MSS — yes
Use UPnP можно выбрать no

во вкладке протоколы убираем возможность использования IPv6 (если она у вас есть)
«В PPP Profile оставили Encryption, Compression в default — привет MPPE внутри IPsec», нам этого не надо, поэтому включаем.

После того как создали профиль возвращаемся в назад и включаем L2TP Server, указываем, всё как на рисунке, только между вторым и третьим шагом нужно выбрать наш только что созданный профиль.
На третьем шаге включаем использование шифрования, что бы наши данные если и смогу перехватить, то не смогли бы расшифровать. на четвёртом шаге указываем наш ключ IPsec (чем длиннее, тем лучше)
«Pre Shared Key для IKE AUTH должен быть не менее 32 символов и создан с энтропией не менее 256 бит.
IKE Aggressive exchange необходимо запретить для избегания Offline Dictionary Attack на ваш PSK.»
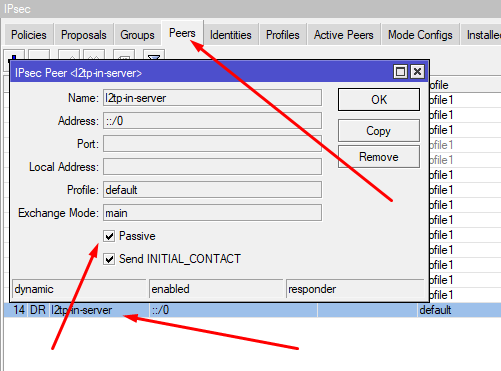
Called ID Type у меня указано ip address, а так же я чуть позже поставил галочку одна сессия на хост (но если работает из под NAT, то больше чем 1 клиент всё равно не подключится)
в Default-Profile указываем наш профиль см. рисунок

«Если вы не уменьшите MTU до fail-safe 1400, то будет выполняться fragmentation after encapsulation, а это приводит к низкой производительности IPsec туннеля.
То есть мы инкапсулируем IP пакет в PPP кадр, далее в L2TP пакет, далее в UDP, потом в ESP, потом если повезёт сразу в IP, если нет снова в UDP и потом в IP, последний этап потребует выполнить фрагментацию поскольку итоговый размер UDP/ESP будет превышать MTU.»
Очевидно, что причина этого — сложный путь обработки трафика, который полностью ложится на плечи CPU. Можно ли этого как-либо избежать? Можно, в RouterOS v6 для этого появилась новая технология — Fast Path (быстрый путь), которая позволяет направить трафик по быстрому пути, без обработки ядром ОС, что позволяет существенно снизить нагрузку на систему.
Основная мысль, положенная в основу этой технологии такова, что пакеты уже установленных соединений, а также тех участков передачи трафика, где не требуется фильтрация и контроль, можно отправить по быстрому пути, тем самым разгружая процессор и ускоряя передачу данных. Fast Path — это расширение драйвера интерфейса, которое позволяет ему напрямую взаимодействовать с некоторыми подсистемами RouterOS и пропускать остальные.
Авторизовывать пользователей мы будем через Windows Active Directory, для этого нам потребуется Radius, переходим
IP->PPP->Secrets и как указано на рисунке включаем Radius аутентификацию

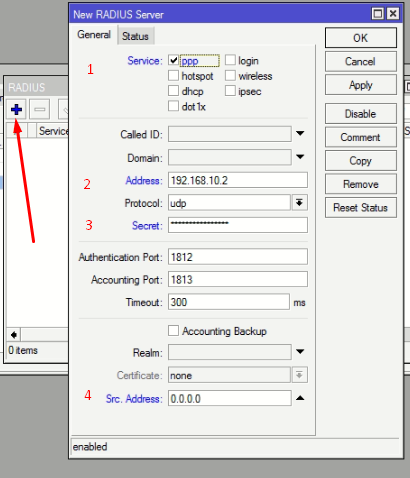
Далее нам потребуется настроить работу Radius, начнём со стороны Микротик, как показано на рисунке ниже, радиус будет использоваться только для PPP соединений,
-
указываем ip нашего сервера с развёрнутой службой NPS на Windows Server, в нашем случае это 192.168.10.2
-
Придумываем ключ для работы Radius ( взаимодействия Mikrotik и NPS) это не тот ключ, что мы придумывали IPsec
-
Source IP address of the packets sent to RADIUS server оставляем 0.0.0.0/0
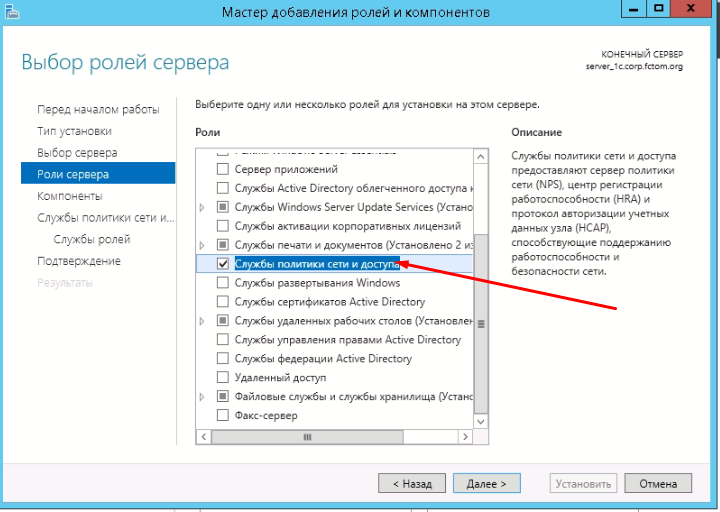
2. Настройка Windows Server
Для начала добавим новую роль, это «Сервер политики сети» (NPS), требуется для разворачивания Radius сервера, пошаговая инструкция ниже.


А так же нам потребуется пакет администрирования CMAK

Запускаем NPS,

Регистрируем сервер а Active Directory

Если работаем с Mikrotik, то достаточно оставить только порты 1812 и 1813

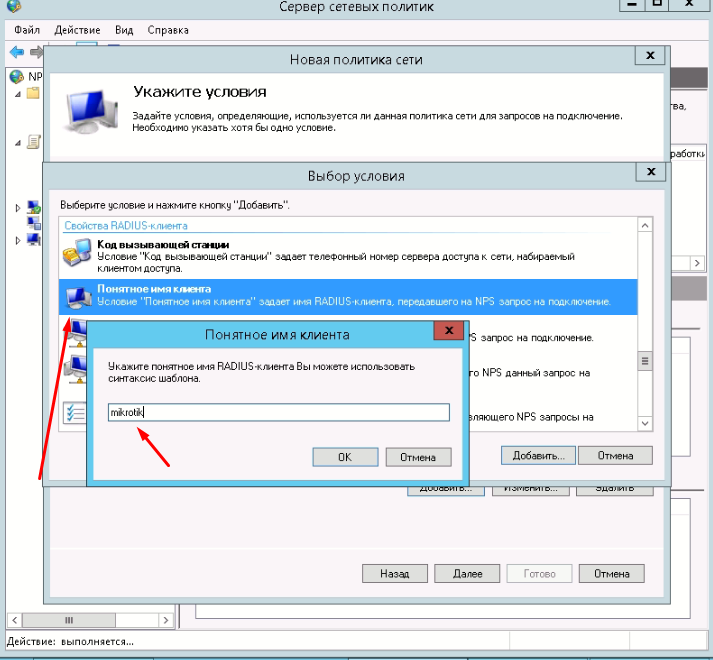
Создаём RADIUS клиента

В нашем случае, это будет Mikrotik, указываем его ip адрес, у нас это шлюз, в пунктах 3,4 (см. рисунок) указываем секретную фразу которую будем использовать для подключения клиента

Идём на контроллер AD, создаём группу доступа к VPN, добавляем в неё пользователей, кто будет иметь доступ к подключению.

Вернёмся в NPS.
Идём в «Политики->Сетевые политики», создаём новую


Указываем в политиках, что пускать будем конкретную группу.


Указываем нормальное имя клиента, что бы боты не подключались

Проверка подлинности будет MS-CHAP-v2, EAP- сертификаты не используем, кто хочет может развернуть центр сертификации и выдавать сертификаты, но это совсем другая история…


Создаём политику запросов

Ограничим работу VPN по дням недели и времени суток( нечего нас ломать пока мы спим)

я запретил работу с 1 ночи до 5 утра и в воскресенье


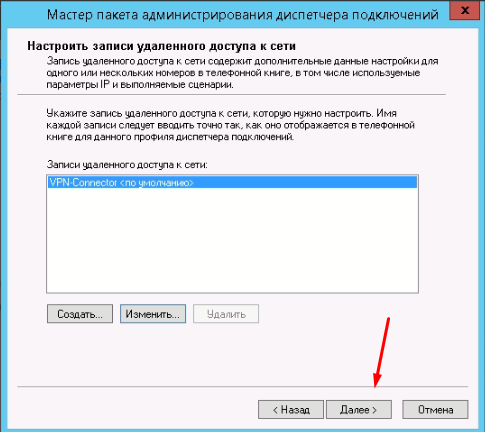
3. Настройка клиентского пакета через CMAK
учтите если требуется создание пакета для 32-bit систем, то потребуется установить CMAK на машинке 32bit и на ней проделать те же самые манипуляции
Далее пошаговые скриншоты по созданию пакета


заходим в настройки
Указываем IPsec ключ в раздел и «общий ключ» тот что из раздела настройки Mikrotik (см.выше)
Придумываем ПИН-код для запуска данного приложения, этот пин мы будем сообщать пользователю вместо длинного пароля IPsec. У меня пин это что-то не сложное например:
#You2021Company!, где YouCompany название вашей компании.


И вот тут как раз та заковырочка, здесь мы указываем «батничек» с маршрутом, что бы пользователь прозрачно попадал и работал с той сетью, которую мы хотим ему предоставить.
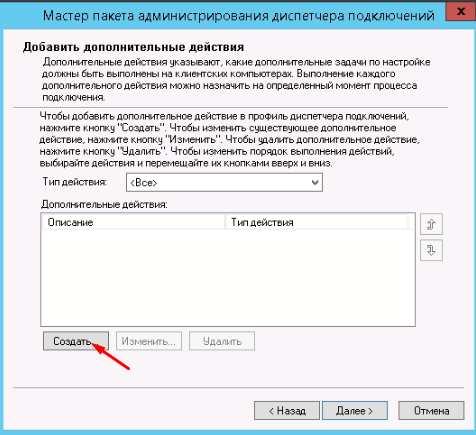
Вот что указано в нашем route.bat
Если хотите, то можно забрендировать, под стиль компании, указать логитип

Указываем файл-соглашение для пользователя (что-то пугающее, что бы свои пароли никому не разглашали!)

По данному пути у нас создаётся рабочий пакет, запаковываем его в zip и закидываем к себе на сайт, и всех пользователей направляем туда, а так же на сайте можно сделать инструкцию, что бы пользователь мог определить нужен ему 32 или 64битный пакет.

Настройка Firewall
Создаём правило в Микротике

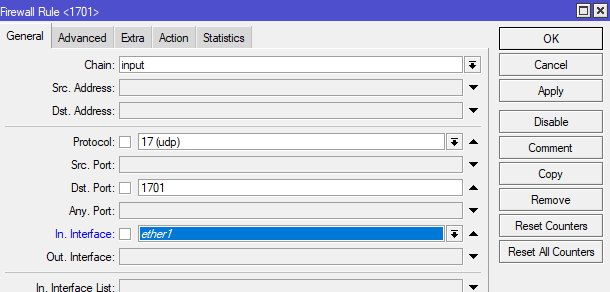
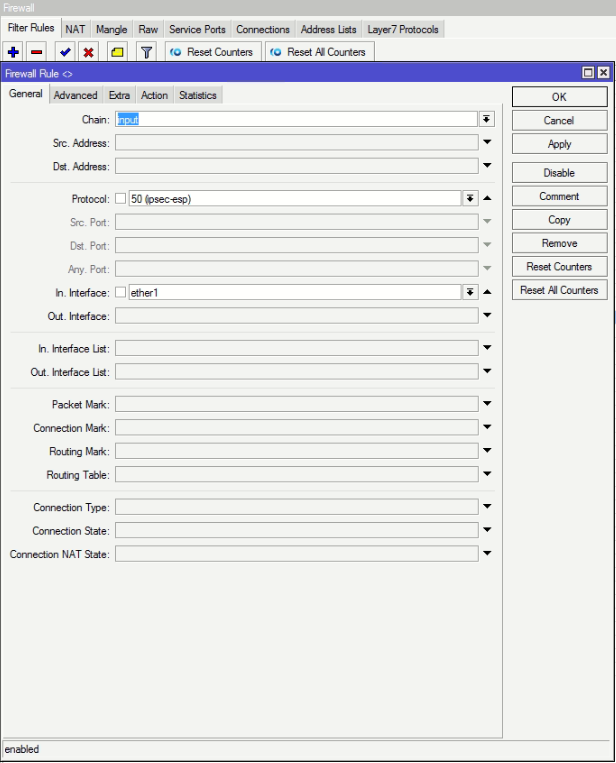
Исключение из NAT L2TP клиентов через ipsec:out не требуется, это актуально только для транзитного трафика и чистого IPsec. Поскольку XFRM lookup выполняется после SNAT, для L2TP клиентов RD выполняется раньше чем SNAT, а после инкапсуляции L2TP в ESP, трафик порождается локально и в SNAT не попадает.»
 указываем что мы \"НЕ НАТИМ\"!")
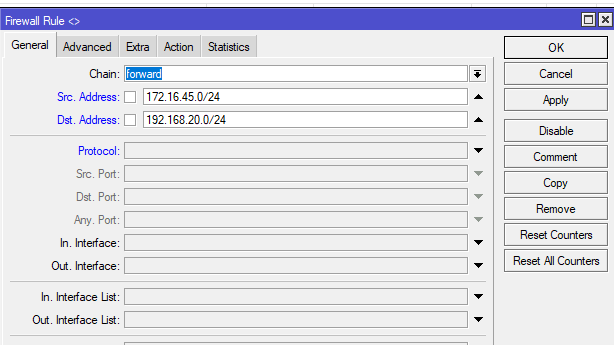
Запрещаем взаимодействие сете между собой ip->firewall->вкладка rules, ставим значение действий «drop».

Вот и всё, теперь можно проверять, закидываем пользователя в доменную группу, скачиваем zip пакет, устанавливаем и пробуем авторизоваться.
Использовал следующие публикации:
-
https://xn—-7sba7aachdbqfnhtigrl.xn--j1amh/nastrojka-mikrotik-ipsec-vpn-tunnel-mezhdu-ofisami/
-
спасибо@zanswer за продуктивную критику, всё что рекомендовали-исправил
В этой статье мы покажем, как внедрить двухфакторную аутентификацию пользователей в домене Windows с помощью open source продукта multiOTP. MultiOTP эта набор php скриптов и утилит, который реализует протокол OATH для HOTP/TOTP (Time-based One Time Password). Возможно использовать как в Windows, так и через RADIUS для реализации 2FA практически в чем угодно.
После внедрения multiOTP для входа пользователя Windows будет запрашивать дополнительный одноразовый пароль (OTP – one time password), который пользователь должен получить со своего мобильного устройства (приложение Microsoft или Google Authenticator, или другого генератора OTP). Вы можете настроить двухфакторную аутенфтикацию для входа на рабочие станции Windows, или для удаленного RDP доступа к хостам RDS на Windows Server.
Основные преимущества multiOTP — ему не нужен доступ в интернет, и можно использовать для внедрения двухфакторной аутентификации пользователей в изолированных сетях. Большинство аналогов платные или требуют прямого доступа к интернету.
Содержание:
- Установка и настройка MultiOTP в домене Active Directory
- Настройка двухфакторной аутентификации MultiOTP для пользователя домена
- Установка multiOTP CredentialProvider в Windows
Установка и настройка MultiOTP в домене Active Directory
В этом разделе мы покажем, как установить MultiOTP в Windows Server 2019 и настроить синхронизацию пользователей из Active Directory.
Также вы можете развернуть MultiOTP с помощью готового образа OVA для VMware, виртуальной машины Hyper-V или Docker контейнера.
Начнем с настройки сервера MultiOTP, который будет получать пользователей из Active Directory, генерировать уникальные QR коды для пользователей и проверять правильность второго фактора.
Создадим в Active Directory отдельную группу и добавим в нее пользователей, для которых мы будет требовать проверку второго фактора при входе в Windows. Создадим группу с помощью PowerShell:
New-ADGroup 2FAVPNUsers -path 'OU=Groups,OU=Moscow,dc=winitpro,DC=ru' -GroupScope Global -PassThru –Verbose
Добавьте пользователей в группу:
Add-AdGroupMember -Identity 2FAVPNUsers -Members kbuldogov, user1, user2
Создайте в AD нового пользователя multiotp_srv, который будет использоваться multiotp для доступа к AD (с минимальными привилегиями).
$passwd = ConvertTo-SecureString -String "P@ssw0rd!" -AsPlainText -Force
New-ADUser -Name "multiotp_srv" -SamAccountName "multiotp_srv" -UserPrincipalName "[email protected]" -Path "OU=ServiceAccounts,OU=Moscow,DC=winitpro,DC=ru" –AccountPassword $passwd -Enabled $true
Скачайте архив с файлами MultiOTP с сайта разработчиков https://download.multiotp.net/.
Откройте архив multiotp_5.8.2.9.zip и извлеките из него каталог windows в папку на локальном диске (C:\MultiOTP).
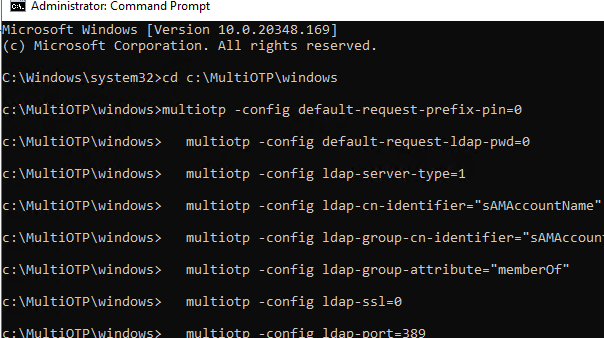
Откройте командную строку и перейдите в каталог с утилитой multiotp.exe:
CD C:\MultiOTP\windows
Следующими командами мы настроим MultiOTP для получения пользователей из LDAP каталога Active Directory.
multiotp -config default-request-prefix-pin=0
multiotp -config default-request-ldap-pwd=0
multiotp -config ldap-server-type=1
multiotp -config ldap-cn-identifier="sAMAccountName"
multiotp -config ldap-group-cn-identifier="sAMAccountName"
multiotp -config ldap-group-attribute="memberOf"
multiotp -config ldap-ssl=0
multiotp -config ldap-port=389
REM Адрес контроллера домена
multiotp -config ldap-domain-controllers=msk-dc03.winitpro.ru,ldap://192.168.13.10:389
multiotp -config ldap-base-dn="DC=winitpro,DC=ru"
REM Учетная запись для аутентификации multiotp в AD:
multiotp -config ldap-bind-dn="CN=multiotp_srv,OU=ServiceAccounts,OU=Moscow,DC=winitpro,DC=ru"
multiotp -config ldap-server-password="P@ssw0rd!"
REM группа пользователей, для которых нужно включить OTP
multiotp -config ldap-in-group="2FAVPNUsers"
multiotp -config ldap-network-timeout=10
multiotp -config ldap-time-limit=30
multiotp -config ldap-activated=1
REM ключ для доступа к MultiOTP серверу
multiotp -config server-secret=secretOTP
Ранее мы создали группу 2FAVPNUsers и добавили в нее 3 пользователей. Выполните синхронизацию пользователей AD в MultiOTP.
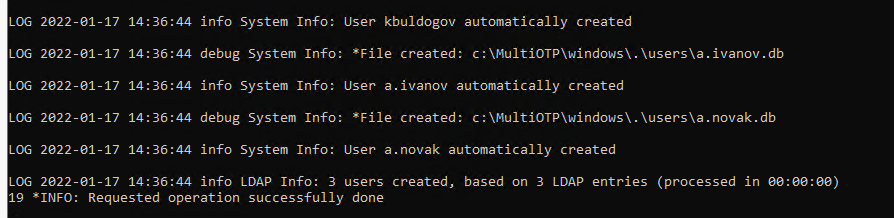
multiotp -debug -display-log -ldap-users-sync
OG 2022-01-17 14:36:44 info LDAP Info: 3 users created, based on 3 LDAP entries (processed in 00:00:00)
LOG 2022-01-17 14:36:44 debug System Info: *File created: c:\MultiOTP\windows\.\users\a.ivanov.db
В данном случае MultiOTP обнаружила трех пользователей и синхронизировала их.
Для регулярной синхронизации новых учетных записей в Active Directory, нужно создать задание планировщика с командой:
multiotp -debug -display-log -ldap-users-sync
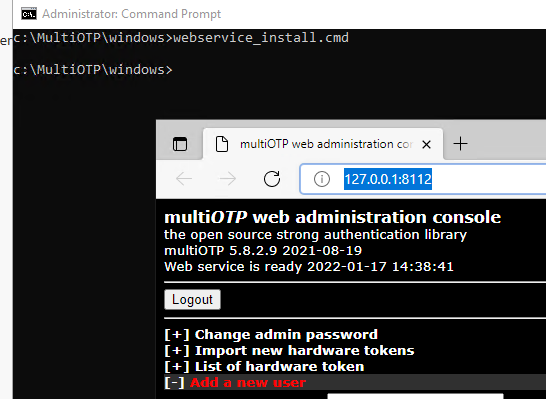
Запустите с правами администратора файл webservice_install.cmd. Это установит веб интерфейс управления MultiOTP.
Зайдите на веб-интерфейс
_http://127.0.0.1:8112/
под учётной запись admin с паролем 1234 (желательно сменить при входе).
Настройка двухфакторной аутентификации MultiOTP для пользователя домена
В разделе List of users будет доступен список пользователей домена, которые были синхронизированы ранее (источник AD/LDAP).
Выберите пользователя и нажмите Print. Перед вами появится QR код пользователя, который нужно добавить в приложение-аутентфикатор.

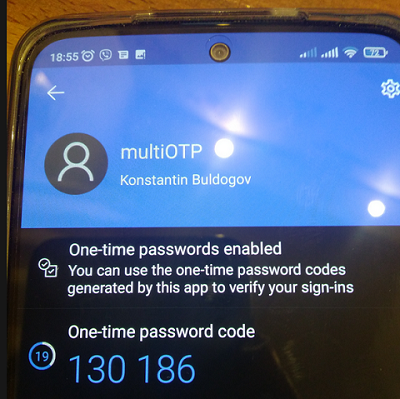
Установите на смартфон пользователя приложение Microsoft Authenticator (или Google Authenticator) из Google Play или App Store. Запустите его и отсканируйте QR код пользователя.
В результате в приложении появится учетная запись пользователя, в которой каждые 30 секунд генерируется новый шестизначный цифровой пароль (тот самый второй фактор).
Из командной строки можно проверить, что MultiOTP позволяет аутентифицировать данного пользователя с помощью OTP:
multiotp.exe -display-log kbuldogov 719854
где
719854
– одноразовый пароль, полученный из приложения.
LOG 2022-01-17 15:13:11 notice (user kbuldogov) User OK: User kbuldogov successfully logged in with TOTP token
Filter-Id += "2FAVPNUsers"

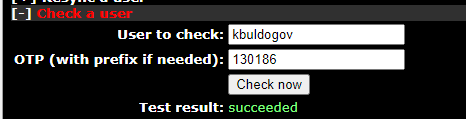
Также можно проверить корректность работы OTP из веб-интерфейса. Перейдите в раздел Check a user, введите имя пользователя и одноразовый пароль.
Установка multiOTP CredentialProvider в Windows
Следующий этап – установка multiOTP-CredentialProvider на компьютеры Windows, на которых вы хотите внедрить двухфакторную аутентификацию пользователей с помощью MultiOTP. CredentialProvider можно установить на все версии Windows 7/8/8.1/10/11 и Windows Server 2012(R2)/2016/2019/2022.
В это примере мы настроим двухфакторную аутентификацию для RDP входа пользователей на RDSH сервер на Windows Server 2019.
Скачайте и установите multiOTP CredentialProvider с GitHub https://github.com/multiOTP/multiOTPCredentialProvider/releases. На момент написания статьи эта версия
5.8.4.0
.
Запустите установку:
- Укажите IP сервера, на котором был установлен multiOTP
- В нижнее поле укажите секретное слово из конфигурации multiOTP (
в нашем конфиге);

- Выберите тип входа в Windows, для которых нужно применять аутентфикацию через OTP. В нашем примере мы ограничимся 2FA только для RDP входов (OTP authentication mandatory for remote desktop only).

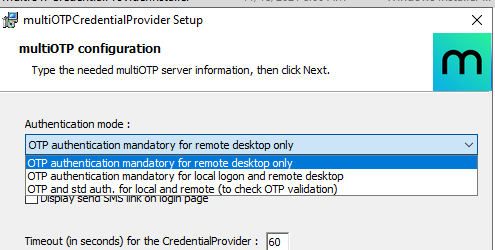
Можно включить использование OTP аутенфтикации как для RDP так и для локальных входов.
MultiOTP CredentialProvider хранит настройки в реестре HKEY_CLASSES_ROOT\CLSID\{FCEFDFAB-B0A1-4C4D-8B2B-4FF4E0A3D978}. Если нужно, вы здесь можете изменить настройки CredentialProvider без переустановки.

Перезагрузите Windows Server RDS и попробуйте через RDP подключиться к нему. Теперь после отправки имени и пароля пользователя появляется дополнительное окно one-time password. Здесь пользователь должен ввести одноразовый пароль из приложения Authenticator на своем смартфоне.
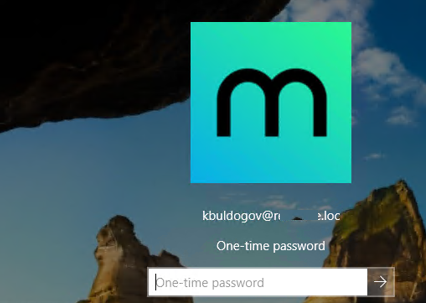
Если на RDS хосте отключен NLA для RDP, пользователь просто увидит три поля для ввода (имя учетной записи, пароль и OTP).
На севере MultiOTP можно включить ведение логов, это полезно при отладке:
multiotp -config debug=1
multiotp -config display-log=1
Your script is running from C:\MultiOTP\windows\
2022-01-17 15:21:07 debug CredentialProviderRequest Info: *Value for IsCredentialProviderRequest: 1 0 SPB-SRV01
2022-01-17 15:21:07 debug Server-Client Info: *CheckUserToken server request. 0 SPB-SRV01
2022-01-17 15:21:07 notice kbuldogov User OK: User kbuldogov successfully logged in (using Credential Provider) with TOTP token 0 SPB-SRV01
2022-01-17 15:21:07 debug Server-Client Info: *Cache level is set to 1 0 SPB-SRV01
2022-01-17 15:21:07 debug Server-Client Info: *Server secret used for command CheckUserToken with error code result 0: secretOTP 0 SPB-SRV01
Не забудьте убедиться, что ваш домен синхронизирует время с тайм-серверами в интернете и время на клиентах не разбегается. Эти критично для работы OTP.
В любом случае перед массовым внедрением 2FA на базе MultiOTP в вашей сети рекомендуем в течении пары недель протестировать все режимы работы и нештатные ситуации (недоступность сервера MultiOTP, DC, ошибки в CredentialProvider и т.д.). Если возникли существенные проблемы со входом через MultiOTP, вы можете удалить CredentialProvider в безопасном режиме.
На этом настройка двухфакторной аутентификации в Windows Server с помощью MultiOTP закончена. Доступны сценарии использования MultiOTP с RADIUS сервером, для аутентификации практически любых типов клиентов через OTP. Также вы можете использовать OTP для дополнительной зашиты RDP серверов в интернете от брутфорса в дополнении к https://winitpro.ru/index.php/2019/10/02/blokirovka-rdp-atak-firewall-powershell/.
In this post I will show how to set up a RADIUS server on Windows Server 2019 to provide 802.1X Wireless Connections through wireless access points.
Actually I want to set up a RADIUS server for IEEE 802.11 wireless networks, but its nearly the same as for wired (Ethernet) networks besides the NAS Port Type (type of media used) is IEEE 802.11 wireless instead of wired Ethernet.
IEEE 802.1X is an IEEE Standard for port-based Network Access Control (PNAC). It is part of the IEEE 802.1 group of networking protocols. It provides an authentication mechanism to devices wishing to attach to a LAN or WLAN.
Source: https://en.wikipedia.org/wiki/IEEE_802.1X
https://en.wikipedia.org/wiki/IEEE_802
- Set up the Network Policy and Access Services (NPAS) Server Role
- Configure an Authentication Method
- Adding Users to allow access for the Network
- Configure Traffic Controls (RADIUS tunnel attributes)
- Configure your WLAN Access Points
- Configure Wireless Network (IEEE 802.11) Policies | Wi-Fi profiles
- Create Wi-Fi profiles using the System Center Configuration Manager (SCCM) or Microsoft Intune.
- Manage Wi-Fi profiles on local computer by using the netsh command
- Troubleshooting
- EAP authentication exchange for wireless clients through the access point and RADIUS server stuck by using a route-based IPSec in pfSense during the SSL handshake and here exactly after the Client Hello
- Links
Set up the Network Policy and Access Services (NPAS) Server Role
Microsoft’s implementation of a Remote Authentication Dial-In User Service (RADIUS) server is for Windows Server operating systems later than Windows Server 2003 the Network Policy and Access Services (NPAS) server role.
NPAS replaces the Internet Authentication Service (IAS) from Windows Server 2003.
Source: https://en.wikipedia.org/wiki/Network_Policy_Server
So first I will install the Network Policy and Access Services (NPAS) server role either on a domain controller or member server.
Now as the Network Policy and Access Services (NPAS) server role is installed you will have a new console named Network Policy Server.
Open the Network Policy Server console and select the RADIUS server for 802.1X Wireless or Wired Connections template to configure NPS by using the wizard.
Click on Configure 802.1X to start the wizard.
Select Secure Wireless Connections
Here I need to add all my WLAN access points as RADIUS clients.
- Friendly name
- IP address or FQDN
- Shared secret
Use a unique RADIUS shared secret for each wireless AP unless you are planning to configure APs as RADIUS Clients in NPS by group. If you plan to configure APs by group in NPS, the shared secret must be the same for every member of the group. In addition, each shared secret you use should be a random sequence of at least 22 characters that mixes uppercase and lowercase letters, numbers, and punctuation.
Source: https://docs.microsoft.com/en-us/windows-server/networking/core-network-guide/cncg/wireless/e-wireless-access-deployment#to-configure-your-wireless-aps
Configure an Authentication Method
For authentication I will use the Protected EAP (PEAP) protocol.
Click on Configure to select a certificate to prove the identity of the RADIUS server to the clients. You can use here the default computer certificate from your internal PKI.
The clients needs to trust that certificate, otherwise the user’s wont be able to connect to the wireless network.
It then creates an encrypted TLS tunnel between the client and the authentication server. In most configurations, the keys for this encryption are transported using the server’s public key. The ensuing exchange of authentication information inside the tunnel to authenticate the client is then encrypted and user credentials are safe from eavesdropping.
Simplifying WPA2-Enterprise and 802.1x
Client / Supplicant
In order for a device to participate in the 802.1x authentication, it must have a piece of software called a supplicant installed in the network stack. The supplicant is necessary as it will participate in the initial negotiation of the EAP transaction with the switch or controller and package up the user credentials in a manner compliant with 802.1x. If a client does not have a supplicant, the EAP frames sent from the switch or controller will be ignored and the switch will not be able to authenticate.Fortunately, almost all devices we might expect to connect to a wireless network have a supplicant built-in. SecureW2 provides a 802.1x supplicant for devices that don’t have one natively.
Thankfully, the vast majority of device manufacturers have built-in support for 802.1x. The most common exceptions to this might be consumer gear, such as game consoles, entertainment devices or some printers. Generally speaking, these devices should be less than 10% of the devices on your network and are best treated as the exception rather than the focus.
Switch / Access Point / Controller
The switch or wireless controller plays an important role in the 802.1x transaction by acting as a ‘broker’ in the exchange. Until a successful authentication, the client does not have network connectivity, and the only communication is between the client and the switch in the 802.1x exchange.The switch/controller initiates the exchange by sending an EAPOL-Start packet to the client when the client connects to the network. The client’s responses are forwarded to the correct RADIUS server based on the configuration in the Wireless Security Settings. When the authentication is complete, the switch/controller makes a decision whether to authorize the device for network access based on the user’s status and possibly the attributes contained in the Access_Accept packet sent from the RADIUS server.
Successful mutual PEAP-MS-CHAP v2 authentication has two main parts:
- The client authenticates the NPS. During this phase of mutual authentication, the NPS sends its server certificate to the client computer so that the client can verify the NPS’s identity with the certificate. To successfully authenticate the NPS, the client computer must trust the CA that issued the NPS certificate. The client trusts this CA when the CA’s certificate is present in the Trusted Root Certification Authorities certificate store on the client computer.
- The NPS authenticates the user. After the client successfully authenticates the NPS, the client sends the user’s password-based credentials to the NPS, which verifies the user’s credentials against the user accounts database in Active Directory Domain Services (AD DS).
If the credentials are valid and authentication succeeds, the NPS begins the authorization phase of processing the connection request. If the credentials are not valid and authentication fails, NPS sends an Access Reject message and the connection request is denied.
The behavior requiring the client to validate the server certificate can be disabled, but disabling server certificate validation is not recommended in production environments.
Source: https://docs.microsoft.com/en-us/windows-server/networking/core-network-guide/cncg/wireless/a-deploy-8021x-wireless-access#authentication
The server running NPS performs authorization as follows:
- NPS checks for restrictions in the user or computer account dial-in properties in AD DS. Every user and computer account in Active Directory Users and Computers includes multiple properties, including those found on the Dial-in tab. On this tab, in Network Access Permission, if the value is Allow access, the user or computer is authorized to connect to the network. If the value is Deny access, the user or computer is not authorized to connect to the network. If the value is Control access through NPS Network Policy, NPS evaluates the configured network policies to determine whether the user or computer is authorized to connect to the network.
- NPS then processes its network policies to find a policy that matches the connection request. If a matching policy is found, NPS either grants or denies the connection based on that policy’s configuration.
If both authentication and authorization are successful, and if the matching network policy grants access, NPS grants access to the network, and the user and computer can connect to network resources for which they have permissions.
Source: https://docs.microsoft.com/en-us/windows-server/networking/core-network-guide/cncg/wireless/a-deploy-8021x-wireless-access#authorization
Keep in mind regarding the communication between the NPS server and client as described in both Microsoft articles about authentication and authorization above.
As mentioned further above in the great article from SECUREW2, the client cannot communicate directly with the RADIUS server to authenticate himself and the server, as it does not have network connectivity until a successful authentication. The communication between the client and RADIUS server is established through the access points (switches for wired networks), which will acting as a broker in the exchange between both.
Adding Users to allow access for the Network
Here I will add all groups which are allowed to access the network through my wlan access points.
For computer authentication you should create a security group which includes all computer accounts they should be able to authenticate against NPS and add it to your network policy (Conditions tab) as windows group. NPS uses then this policy to authorize the connection request.
Further each of those computers needs a computer certificate installed from your internal PKI (CA), which is by default published to the Enterprise NTAuth store.
The computers wlan profile also needs to be configured to enable computer authentication, I will show this further below in the section about configuring a group policy.
Btw. you can also use certificates from a third-party CA, but in that case you need to import the CA certificate into your Enterprise NTAuth store and the computer certificate needs to mapped to the computer account in Active Directory. About how you will find in the following article from Microsoft:
https://docs.microsoft.com/en-us/troubleshoot/windows-server/windows-security/import-third-party-ca-to-enterprise-ntauth-storeThe Enterprise NTAuth store is used by your Active Directory domain to determine which certification authorities to trust for issuing certificates that are used to authenticate and authorize a user or computer.
To check which CAs are stored in the Enterprise NTAuth store, you can use the PKI Tool (PKIVIEW). On your CA server open the tool pkiview.msc, right click on Enterprise PKI and select Manage AD Containers… . Here you will see in the tab NTAuthCertificates which CAs are still trusted.
Configure Traffic Controls (RADIUS tunnel attributes)
In the next dialog you can configure traffic control attributes (RADIUS tunnel attributes) to allow and deny traffic to user’s based on their assigned VLANs.
You can change all of theses settings later directly in the NPS console.
Here you can modify the RADIUS clients.
The wizard will create a Connection Request Policy and a Network Policy.
Connection Request Policies
https://docs.microsoft.com/en-us/windows-server/networking/technologies/nps/nps-crp-crpoliciesConnection request policies are sets of conditions and settings that allow network administrators to designate which Remote Authentication Dial-In User Service (RADIUS) servers perform the authentication and authorization of connection requests that the server running Network Policy Server (NPS) receives from RADIUS clients. Connection request policies can be configured to designate which RADIUS servers are used for RADIUS accounting.
By default the wizard will set to process the authentication request locally on the server.
Network Policy
You can also configure Accounting for the NPS server.
Configure Network Policy Server Accounting
https://docs.microsoft.com/en-us/windows-server/networking/technologies/nps/nps-accounting-configure
The wizard created our Network Policy and we do not need to change here anything.
By adding Windows Groups, it doesn’t matter if they were local groups on the server itself or domain groups, NPS will process both of them.
As mentioned further above you can use here the default computer certificate on the NPS server from your internal PKI.
The clients needs to trust that certificate, otherwise the user’s wont be able to connect to the wireless network.
It then creates an encrypted TLS tunnel between the client and the authentication server. In most configurations, the keys for this encryption are transported using the server’s public key. The ensuing exchange of authentication information inside the tunnel to authenticate the client is then encrypted and user credentials are safe from eavesdropping.
Configure your WLAN Access Points
On the wlan access points we have to configure the IP address from the NPS (RADIUS) server, port and shared secret.
For my access points I will use here from Netgear the WAX218 WiFi 6 WLAN Access Point which is cost effective and intended for heavy internet traffic plus supports a huge amount of connected devices up to 256. This model is meanwhile discontinued by Netgear but a similar model is still available with the WAX620.
The Radius Port for authentication by default is UDP 1812 or 1645.
Further we need to select a security mode our access points will use to authenticate users or devices (computer authentication as mentioned further above). When using a RADIUS server we want that users authenticate themselves by using their username and password for the network, therefore we need to select WPA2 or WPA3-Enterpise, also for computer authentication.
Keep in mind that even in the year 2022 not all devices support WPA3.
You can check the ports in the NPS console by right clicking on NPS(Local) and select properties. Here within the tab Ports, you can see on what ports the NPS server is listening for authentication and if used accounting.
The Radius Port for accounting by default is UDP 1813 or 1646.
Optionally we can also configure Radius Accounting as mentioned.
The RADIUS server also collects a variety of information sent by the NAS that can be used for accounting and for reporting on network activity. The RADIUS client sends information to designated RADIUS servers when the User logs on and logs off. The RADIUS client may send additional usage information on a periodic basis while the session is in progress. The requests sent by the client to the server to record logon/logoff and usage information are generally called accounting requests.
For more information on RADIUS accounting, see RFC 2866.
Source: https://learn.microsoft.com/en-us/windows/win32/nps/ias-radius-authentication-and-accounting
Configure Wireless Network (IEEE 802.11) Policies | Wi-Fi profiles
You can configure group policies in your network to define preferred networks and settings for the WLAN connection to your clients.
To activate default Wireless Network (IEEE 802.11) Policies
https://docs.microsoft.com/en-us/windows-server/networking/core-network-guide/cncg/wireless/e-wireless-access-deployment#to-activate-default-wireless-network-ieee-80211-policies
Computer Configuration -> Policies -> Windows Settings -> Security Settings -> Wireless Network (IEEE 802.11) Policies
Clients should connect automatically to this network when it is in range.
For the network authentication method I have to select Protected EAP (PEAP) as used on the NPS server and for the authentication mode I will use User or Computer authentication.
Even the most common method of authentication with PEAP-MSCHAPv2 is user auth, in which clients are prompted to enter their domain credentials, the Windows NPS server role also supports computer authentication by using the PEAP-MSCHAPv2 protocol.
In order to use computer authentication, you also have to install a computer certificate on the clients and issued from your internal PKI as mentioned further above.
For computer authentication you can configure certificate auto-enrollment for the client computers as shown in my following post: https://blog.matrixpost.net/configure-certificate-auto-enrollment/
In the advanced settings you can enable single sign-on for the wireless network, by checking this your password to logon to your computer will also be passed and used to establish the wireless connection with the access points.
Further if you select Perform immediately before User Logon as show in the figure below, the computer will first try to connect to the wireless access points when the user is entering its password and then subsequently will get logged on to its computer after the wireless connection is established.
In case computer authentication will be performed, the computer already connects at the logon screen to the network, as it doesn’t matter which user will get logged on.
Therefore in both cases the computer can perform a network login against the domain controllers and logon scripts and group policies will be applied to the computer.
If the wireless connection couldn’t be established, the user will get logged on to its computer by using the local cached credentials as usual but without processing the logon scripts and applying the group policies from the domain controller.
At the logon screen you will see the wireless network to which Windows tries to connect after providing your password for the logon.
User vs. Machine Authentication
The most common method of authentication with PEAP-MSCHAPv2 is user auth, in which clients are prompted to enter their domain credentials. It is also possible to configure RADIUS for machine authentication, in which the computers themselves are authenticated against RADIUS, so the user doesn’t need to provide any credentials to gain access. Machine auth is typically accomplished using EAP-TLS, though some RADIUS server options do make it simple to accomplish machine auth using PEAP-MSCHAPv2 (including Windows NPS, as outlined in the example config below).
The following example configuration outlines how to set up Windows NPS as a RADIUS server, with Active Directory acting as a userbase:Add the Network Policy Server (NPS) role to Windows Server.
Add a trusted certificate to NPS.
Add APs as RADIUS clients on the NPS server.
Configure a policy in NPS to support PEAP-MSCHAPv2.
(Optional for machine auth) Deploy PEAP-MSCHAPv2 wireless network settings to domain member computers using Group Policy.Source: https://documentation.meraki.com/MR/Encryption_and_Authentication/Configuring_RADIUS_Authentication_with_WPA2-Enterprise
Create Wi-Fi profiles using the System Center Configuration Manager (SCCM) or Microsoft Intune.
You can also use SCCM or Microsoft Intune to configure Wi-Fi profiles. This topic is well documented from Microsoft in the following articles.
Manage Wi-Fi profiles on local computer by using the netsh command
You can also use the netsh command line tool to manage the Wi-Fi profiles on a local computer.
- netsh wlan show profile -> list profiles located on the local computer
- netsh wlan show profiles interface=”wi-fi” -> list profile for specific interface
- netsh wlan show drivers -> list driver information about the wireless adapter
- netsh wlan show wirelesscapabilities -> list capabilities of the wireless adapter
- netsh wlan show interfaces -> list all wireless interfaces on the local computer
- netsh wlan show profile name=”myAP” key=clear -> will display the security key in plaintext
- netsh wlan set profileparameter name=”myAP” connectionmode=manual -> will disable connect automatically
- netsh wlan set profileparameter name=”myAP” connectionmode=auto -> will enable connect automatically
- netsh wlan delete profile name=”myAP” -> will delete the myAP wlan profile
- netsh wlan delete profile name=* -> will delete all wlan profiles on the local computer
- netsh wlan export profile name=”WiFiNetwork” key=clear folder=”C:path” key=clear -> Export a wlan profile
- netsh wlan add profile filename=”C:pathprofileFile.xml” user=all -> Import a wlan profile for all user’s -> user=current only for the current user
- netsh wlan show wlanreport -> will create a wireless adapter report will ->
Analyze the wireless network report
https://support.microsoft.com/en-us/windows/analyze-the-wireless-network-report-76da0daa-1db2-6049-d154-7bb679eb03ed
Troubleshooting
In case something went wrong and your clients won’t connect to the the wireless network, you can investigate several logs to get more details about the problem.
You can search in two locations for logs to investigate the reason why clients can’t connect to the network.
For general configuration problems between the NPS server and the RADIUS clients, you can investigate the Event Viewer.
Custom Views -> Server Roles -> Network Policy and Access Services
For problems regarding authentication from the user’s itself, you should use the Accounting logs. Here you can see the default path from them.
To investigate them I would suggest to use a specific log viewer like the IAS Log Viewer from DeepSoftware LLC. You can use this viewer also to investigate VPN logging from the Windows Routing and Remote Access servers.
IAS Log Viewer
https://www.deepsoftware.com/iasviewer/
IAS_SUCCESS -> the user or computer authenticated successfully against the NPS server, formerly Internet Authentication Service (IAS)
NPAS replaces the Internet Authentication Service (IAS) from Windows Server 2003.
Therefore you will see IAS_SUCCESS messages in the logs from NPS.
Source: https://en.wikipedia.org/wiki/Network_Policy_Server
Reason for rejecting a user. Can be:
Field (26) Reason-Code Number
- 0 = IAS_SUCCESS
- 1 = IAS_INTERNAL_ERROR
- 2 = IAS_ACCESS_DENIED
- 3 = IAS_MALFORMED_REQUEST
- 4 = IAS_GLOBAL_CATALOG_UNAVAILABLE
- 5 = IAS_DOMAIN_UNAVAILABLE
- 6 = IAS_SERVER_UNAVAILABLE
- 7 = IAS_NO_SUCH_DOMAIN
- 8 = IAS_NO_SUCH_USER
- 16 = IAS_AUTH_FAILURE
- 17 = IAS_CHANGE_PASSWORD_FAILURE
- 18 = IAS_UNSUPPORTED_AUTH_TYPE
- 32 = IAS_LOCAL_USERS_ONLY
- 33 = IAS_PASSWORD_MUST_CHANGE
- 34 = IAS_ACCOUNT_DISABLED
- 35 = IAS_ACCOUNT_EXPIRED
- 36 = IAS_ACCOUNT_LOCKED_OUT
- 37 = IAS_INVALID_LOGON_HOURS
- 38 = IAS_ACCOUNT_RESTRICTION
- 48 = IAS_NO_POLICY_MATCH
- 64 = IAS_DIALIN_LOCKED_OUT
- 65 = IAS_DIALIN_DISABLED
- 66 = IAS_INVALID_AUTH_TYPE
- 67 = IAS_INVALID_CALLING_STATION
- 68 = IAS_INVALID_DIALIN_HOURS
- 69 = IAS_INVALID_CALLED_STATION
- 70 = IAS_INVALID_PORT_TYPE
- 71 = IAS_INVALID_RESTRICTION
- 80 = IAS_NO_RECORD
- 96 = IAS_SESSION_TIMEOUT
- 97 = IAS_UNEXPECTED_REQUEST
Source: https://www.radiusreporting.com/IAS-DB-Attribute-Format-Table.html
EAP authentication exchange for wireless clients through the access point and RADIUS server stuck by using a route-based IPSec in pfSense during the SSL handshake and here exactly after the Client Hello
If you ran into that issue, you can read my following post about how to set up a lean Branch Office Network without any Servers and DCs inside by using an IPSec S2S VPN Tunnel connected with the Headquarters Network.