
Question
“Help! My Windows desktop icons just disappear suddenly! Is that some funny virus or something? What should I do?”
-Question from Quora
We notice that recently many windows users report that their desktop icon just suddenly disappear and don’t know what to do. Don’t worry, we will help you figure out what causes desktop icons missing and how to fix it.
-
Part 1: How to Restore Desktop Icons Missing Error?
- Method 1: Go to Desktop Icons Settings
- Method 2: Turn On Show Desktop Icons
- Method 3: Turn Off Tablet Mode
- Method 4: Run the Command Prompt
- Method 5: Use the System File Checker
- Method 6: Update the Latest Windows 10 Version
- Method 7: Run the Windows Explorer Again
- Method 8: Turn On the Use Start Full Screen Button
- Method 9: Run System Restore Point
- Method 10: Reset the Windows
- Part 2: How to Recoverc Missing Desktop Files on Windows 11/10/8/7?HOT
Even though the user interface (GUI) has improved and Windows is updated often, you might still face problems. The annoying thing that can happen is that you can’t see any icons on your Desktop, as if they’ve all gone away. Putting shortcuts to different apps and programs on your Desktop makes it easy to use them. So, it’s essential to get them back. Here are what you can do if the desktop icons are missing windows 10/11.
Method 1: Go to Desktop Icons Settings
Once you found all your desktop icon disappear, the first thing you should do it to check if the Show desktop icons is on. Just right-click on the desktop, then go to view and see if the Show desktop icons is on. If not, just reopen it.
Method 2: Turn On Show Desktop Icons
Step 1: Choose «Start,» then «Settings,» then «Personalization,» and finally «Themes.»
Step 2: Scroll down under Themes and click on Desktop icon settings.
Step 3: Select the icons on your Desktop, and then click Apply and OK.
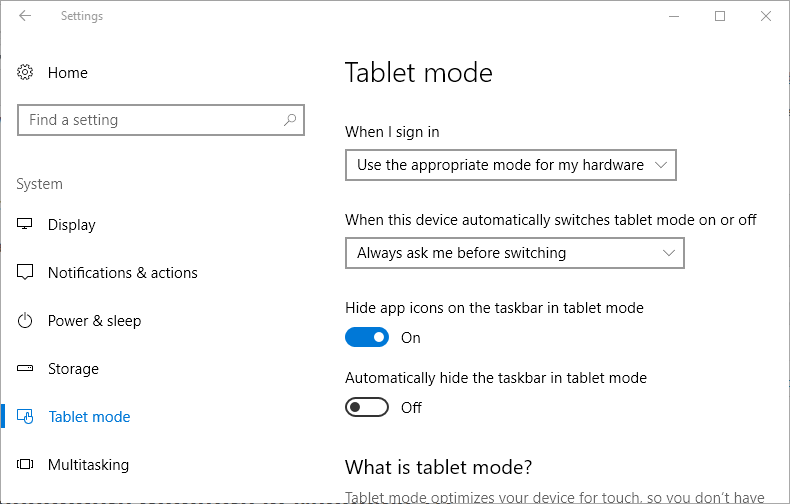
Method 3: Turn Off Tablet Mode
If you have turn on Windows tablet mode, the desktop icons might disappear suddendly too. In this situation, you just need to turn it off, and the desktop icons will pops up. Follow below steps to fix desktop icon miss error:
Step 1: Click on the Windows icon to open the start menu, then go to «Settings» in the pop-up menu.
Step 2: Then you will see many system option, just choose on the system.
Step 3: Now, switch to the table mode button with the lest side panel.
Step 4: If you get «Make Windwos more touch-friendly using your device as a tablet» option, just set this option off. Otherwise, just change the tablet settings to «when I sign in use desktop mode» and «Ask me before switching».
Don’t forget to restart your PC and check whether the desktop suddendly miss error fix.
Method 4: Run the Command Prompt
You can easily restore settings using the Command Prompt, allowing you to reach a deeper level of system configuration. Now, just follow below steps:
Step 1: Go to Windows Run by holding the Windows key and pressing the R key on your keyboard. This will open the Command Prompt quickly.
Step 2: Then you type «cmd» and hit «Enter» to open the Command Prompt. If you got any prompted, just choose «Yes» to enable command prompt to make changes on your windows.
Step 3: Now type the following commands, and press Enter between each new line of the following commands:
taskkill /F /IM explorer.exe
cd / %userprofile%\AppData\Local
attrib -h IconCache.db
del IconCache.db
start explorer.exe
Once the process done, just reset your PC to check if the desktop icon is shows up.
Method 5: Use the System File Checker
In Windows 10, the System File Checker is available by default. You can automatically fix corrupted system files by running an SFC scan, which is also called an «SFC scan.» This scan has been proven to resolve issues with missing icons in Windows 10. To run it, follow these steps:
Step 1: Click Start. In the search bar, type CMD. Then right-click CMD.exe and select the Run as Administrator.
Step 2: Click the Yes on the User Account Control (UAC) message.
Step 3: Type SFC /scannow into the quick command window and press Enter.
Step 4: Your computer will be scanned by SFC and corrupt files will be repaired once the scan is completed. Make sure you don’t close the Command Prompt or shut down your computer during this process.
After the scanning finished, remember to restart your PC.
Method 6: Update the Latest Windows Version
You may be able to restore some system issues on your device by upgrading to the latest Windows 10 release. The update fixes known bugs, brings you exciting new features, patches security holes, and much more. Moveover, update to the latest windows version have be proven by many users that it can fix the desktop missing error.
Step 1: Open the Start menu and go to «Settings». You can also press Windows +I Key board alternatively.
Step 2: Now go to «Update & Security», then go to «Check for updates»
Step 3: Click on Install button once you found any update and wait for the new version update download.
Method 7: Run the Windows Explorer Again
Step 1: Right-click the taskbar at the bottom of the screen and then choose Task Manager.
Step 2: Find Windows Explorer and click it. In the bottom right corner, click Restart.
Step 3: Select Run new task from the File menu. Then type the explorer.exe and press the OK button.
If this method don’t work, just move the next fix below.
Method 8: Turn On the Use Start Full-Screen Button
Since it’s not clear why Windows 10 desktop icons aren’t showing up on your desktop, you can try enabling and disabling the options related to your user interface and see if that fixes it.
You can make Start take up the whole screen to see everything at once. Start clicking the Start button, then go to Settings > Personalization. Choose Start, then click Use Start full screen.
Method 9: Run System Restore Point
If the issue occurred after you installed software or changed your computer configuration, you can resolve it by restoring your system to a previous point. Your desktop icons will display just as they did when your configurations were back to normal.
Step 1: Go to the taskbar next to the Windows icon, and then type «Control Panel».
Step 2: Find «Recovery» in the Control Panel, and then click «Recovery,» «Open System Restore,» and «Next.»
Step 3: Now choose the system point that you want to restore, and then click on the Next botton.
Method 10: Reset the Windows
Even though this is the least desirable option, it can certainly help when dealing with serious system problems. Resetting Windows 10 is an effective way to get a clean start and fix messy problems that would normally require hours and hours of troubleshooting.
Step 1: To turn off your PC, swipe in from the right side of the screen, tap Settings, and then tap Change PC settings.
Step 2: Tap or click Update and Recovery, then tap or click on Recovery.
Step 3: Now go to Get started under Remove everything and reinstall Windows.
Hope that this method will works on fixing desktop disappear suddently error.
Part 2: How to Recover Missing Desktop Files on Windows 11/10/8/7?
Most users habitually put files and folders they often use on the Desktop. Since Windows Desktop is just a home screen that you can use to get to anything on your PC, it’s easy to save photos, videos, documents, and other shortcuts there for quick access. But it’s possible to lose windows desktop icons missing by a system crash, or even if you delete them by accident. So, if you have the same problem as the user above, we’ll show you how to recover permanently deleted files from your Desktop in Windows 11/10/8/7 by Tenorshare 4DDiG data recovery software. 4DDiG is great recovery software that can get any lost file back in just a few minutes. The best part is you can get those files back no matter how you lost them. It only takes a few clicks.
Here are some main features of Tenorshare 4DDiG Data Recovery:
- It can recover data from your laptop or PC, internal and external drives, USB flash disks, SD cards, and other devices
- It can recover more than a thousand photos, videos, documents, and music files
- It can recover files that you accidentally deleted, formatted, lost a partition, got corrupted, the system crashed, a virus attacked, etc.
- Allow user to preview scanned out files before trying to get anything back
Free run 4DDiG and follow the steps below to retrieve the missing desktop files:
- On the home screen of 4DDiG, choose local disk to look for missing desktop files. This process can take a while to finish depend on how much space is in your industry. If it doesn’t find the files you lost, you can choose to do a deep scan.
- Once the scanning process finished, 4DDiG will show you a list of all the files when you can. You can preview these files by clicking on them or selecting them and hitting the Recover button to get them back.
- When you click «Recovery,» you’ll be asked to pick a directory where you want to find your lost files.
And that’s all, your lost desktop files will be back in a minute.
Conclusion
We hope that this guide helped you bring back your missing or gone desktop icons missing windows 10/11. You should be able to get to your most essential shortcuts and folders quickly and efficiently again.
If your system is having similar problems in the future, you can come back to this article and try some other fixes. Using Tenorshare 4DDiG data recovery software, you can restore desktop icons from any storage device on your PC or Mac. Even though many data recovery programs say they will work, Tenorshare 4DDiG beats most of them, so this software comes highly recommended.
Tenorshare 4DDiG Data Recovery
4DDiG is your second to none choice to recover all lost data on Windows/Mac computer from various loss scenarios like deletion, formatting, RAW, etc. with a higher success rate.
Free Download
Free Download
BUY NOW
BUY NOW
You power on your computer, and suddenly your desktop icons are missing? Don’t worry, on this post I will you how to fix the error desktop icons missing on Windows 10.
Nowadays computers have become essential devices for most of us, since through them you can perform multiple functions either professionally or personally, such as document management, access to the web to perform various searches, check your email or social networks. That is why its smooth operation and the absence of errors is essential for users.
Fix Desktop Icons Missing on Windows 10 Desktop
When you work with the computer, you like to have everything tidy and at hand to be able to access all those functions that you need, quickly and directly. That is why having shortcut icons is essential, as this makes your work easier.
So when the icons are not showing on your Windows 10 desktop, you lose workflow. Let’s see how to fix this.
Method #1: Disable Tablet Mode in Windows 10
Windows 10 implements new features focused on the users of touch devices, which requires more space, better visual layout, and a better structure at the design level in the system.
Just with this type of use of Windows 10 on touch devices, such as Tablets, a Tablet Mode mode exists, with which you can run the risk of icons disappearing from your desktop.
To disable it, follow these steps on Windows 10:
- Open the Windows Settings using the keyboard shortcut: Win + I
- Now, click on the menu System
- On the left side menu, click on Tablet Mode
- There disable the switch to deactivate Tablet Mode
Method #2: Disconnect Second Monitors in Windows 10
Although it is not so often that this type of situation affects the desktop icons in Windows 10, the use of two monitors can influence the icons of the desktop to disappear, but its solution is quite simple, merely disconnect the second monitor and connect again.
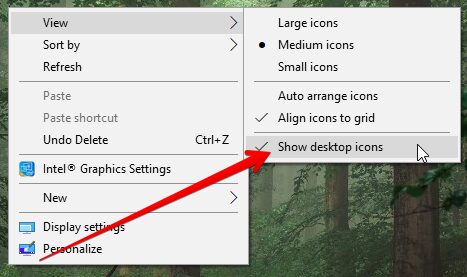
Method #3: Check That Desktop Icons Are Visible
Another simple solution that you can check that the icons are visible on the desktop.
- To do that, right-click on any blank part of the desktop
- In the menu select View and then Show desktop icons
- If this line has a verification sign, this will indicate that they are already visible or not.
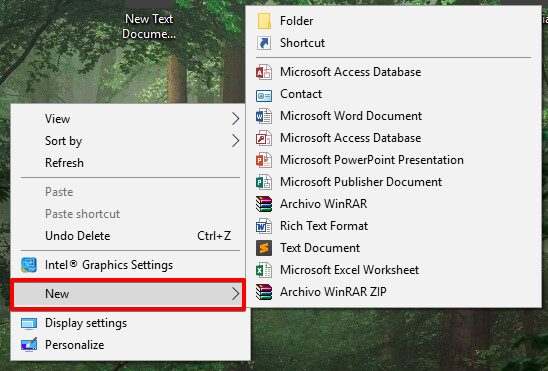
Method #4: Create New Files On The Desktop
This option allows you to check that when creating a new file, it is visible on the desktop.
For this, right-click on the desktop and select the New option and there choose the type of file to be created:
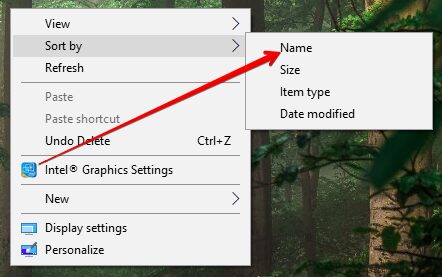
Method #5: Sort Icons By Name in Windows 10
When you use two monitors, in some situations the icons are not showing from one monitor to another, but by sorting icons by their names, you will have them active in your main desktop.
- Rightclick on any blank part of the desktop
- In the menu select the option Sort by and then on Name
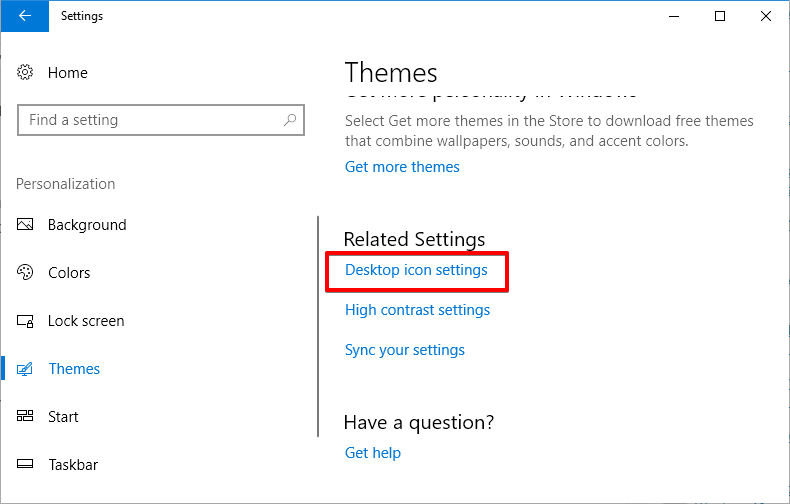
Method #6: Enable Icons Windows 10 Settings
Through the Settings, you can enable or disable the icons that must be visible on the desktop in Windows 10, so it is a good reason to verify that none of them is disabled there.
- Open the Settings using the keyboard shortcut: Win + I
- Click on the menu Personalization
- On the left side menu, click on the line Themes
- Now, on the left side, scroll down until you find the line Dekstop icon settings and click on it.

- ON the window that opens, check the boxes of the icons that are not showing on the desktop.

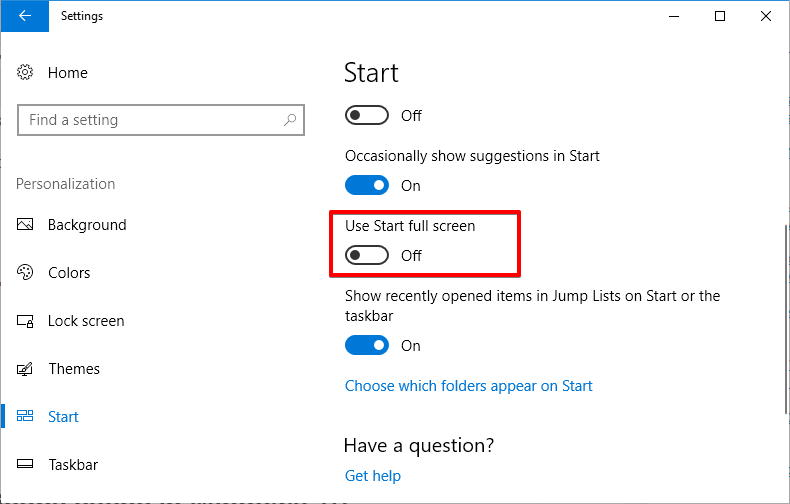
Method #7: Disable Full-screen Mode in Windows 10
This is a Windows 10 feature that allows you to use the entire screen for the system, and its use can hide the desktop icons.
To disable it, follow these simple steps:
- Open the Settings using Win + I
- Navigate to the section Personalization
- On the left side menu, click on Start
- Once there, disable the switch: Use Start fullscreen
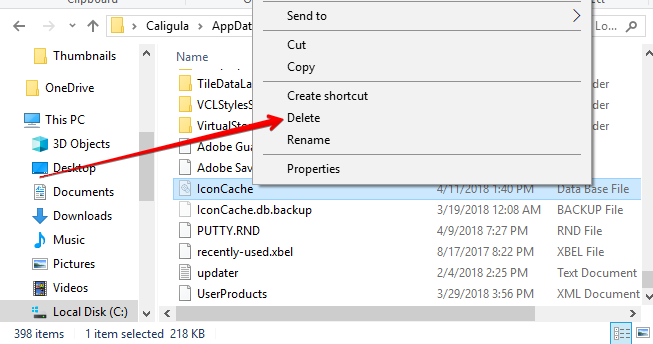
Method #8: Rebuild Icons Cache
This option allows you to rebuild the icons cache and in many cases, fix the icons not showing on the Windows 10 desktop. To do this, follow these steps:
- Open the File Explorer
- There navigate to the following path, make sure to change the USER line with your username:
C:\Users\USER\AppData\Local - There find and right-click on the file IconCache and in the menu select Delete

- Now empty the recycle bin and restart the computer
- Power on your computer and the IconCache will be rebuild.
Wrapping Up: Desktop Icons Missing on Windows 10
So far, those were the best methods that you can try to restore the icons of your Windows 10 desktop. Make sure to follow the steps carefully because you can damage your system.
Must read: How-to Fix External Hard Drive Won’t Eject on Windows 10
Do you know another way to fix this error or have a question about this tutorial? Let me know in the comments section.
Readers help support Windows Report. We may get a commission if you buy through our links.
Read our disclosure page to find out how can you help Windows Report sustain the editorial team. Read more
Today, while going through the latest updates on my primary Windows 10 laptop and my secondary Windows 8.1 laptop, I realized that there were some issues with the app icons. As you can see for yourself in the screenshot below, the thumbnails for certain apps are missing, which isn’t necessarily a big issue, but if it were to happen to even more apps, or to all of them, then we must agree that it would’ve looked kind of ugly, isn’t it so?
How to fix Windows 10 apps icons missing?
What I must say, however, is that my “old” laptop hasn’t been yet updated to the latest Windows Store look, so this could be a potential problem. Meanwhile, I scoured the forums to find some solutions and here’s what I found.
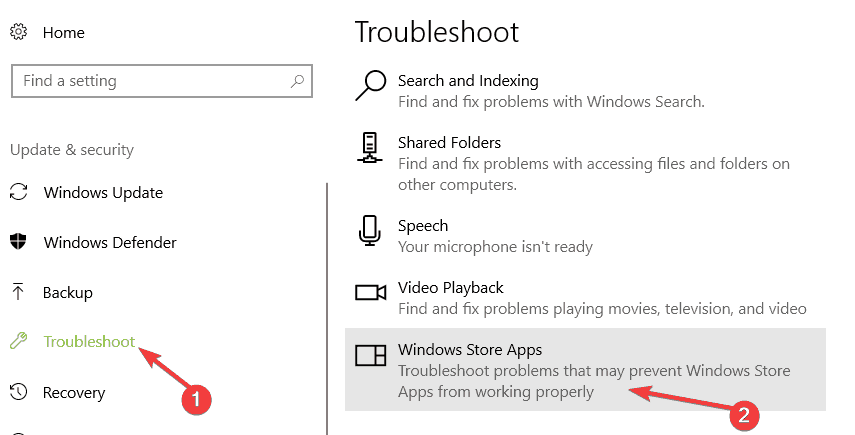
1. Run the Windows Store Apps troubleshooter
If there is something wrong with your Windows 10 Apps, the first thing you need to do is run the built-in app troubleshooter. With the help of this tool, you can quickly fix various issues affecting your apps, including app freezes, crashes or missing app icons.
In order to launch the app troubleshooter, go to Settings, click on Update & Security and then select troubleshoot. Locate the Windows Store Apps troubleshooter and run it.
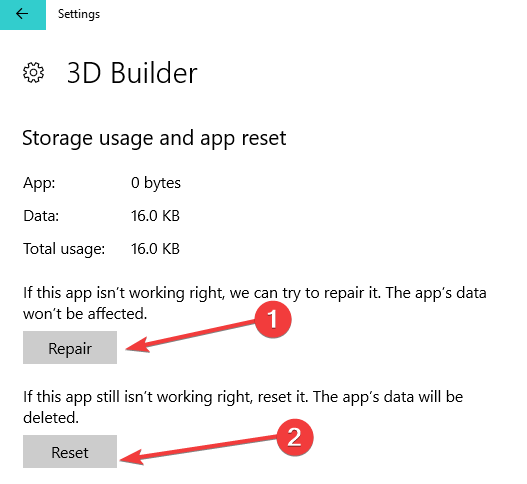
2. Repair or reset apps
Another quick solutions consists in repairing or resetting the problematic apps. This solution often works especially if only certain app icons are not showing up. Here are the steps to follow:
- Go to Settings > select Apps
- Go to Apps & Features and select the problematic app
- Select Advanced options and first try to repair the app.

- If the app icon is still missing, you can also use the reset option.

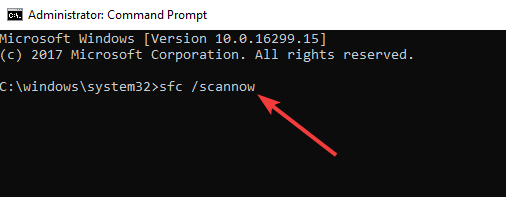
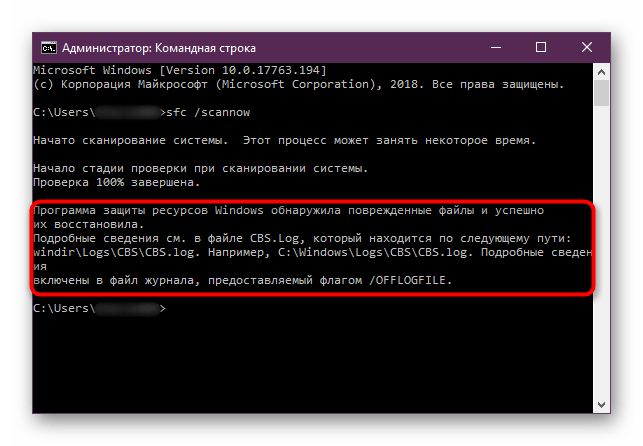
3. Run SFC scan
If the problem persists, try running a System File Checker scan. Corrupted or missing system files may also cause some app icons not to show up.
To run SFC, simply launch Command Prompt as an administrator and enter the sfc /scannow command. Hit Enter and wait for the scanning process to complete.
4. Rebuild the icon cache
If your Windows 10 icons are not showing correctly even after following the instructions listed below, try rebuilding your icon cache.
- Go to C:Users%username%AppDataLocalMicrosoftWindowsExplorer
- Delete all the icon files listed in the respective folder in order to rebuild and purge the icon cache.

- Restart your PC and check if the app icons are available.
- How to fix desktop blank icons on Windows 10/11 [Full Guide]
- What to do if desktop icons are flashing in Windows 10/11
5. Additional solutions
- Change your display resolution
- Uninstall recently installed software and updates, especially if the problem occurred shortly after you installed the latest updates.
- Uninstall the problematic apps
- Run an in-depth antivirus scan
- Create a new user account and check if the app icon problem persists
- Disable Tablet Mode
- Disconnect your second monitor if you’re using one.
Have you experienced a similar problem, by any chance? And if so, what have you done to solve it? My advice is to make sure you have deployed the latest update which brings a new and much needed visual revamp to the Windows Store, as that might prove to be quite helpful.
Radu Tyrsina
Radu Tyrsina has been a Windows fan ever since he got his first PC, a Pentium III (a monster at that time).
For most of the kids of his age, the Internet was an amazing way to play and communicate with others, but he was deeply impressed by the flow of information and how easily you can find anything on the web.
Prior to founding Windows Report, this particular curiosity about digital content enabled him to grow a number of sites that helped hundreds of millions reach faster the answer they’re looking for.
Все способы:
- Способ 1: Решение проблем с облачным хранилищем
- Вариант 1: Отключение синхронизации с аккаунтом Microsoft
- Вариант 2: Проверка хранилища OneDrive
- Вариант 3: Переустановка облака
- Способ 2: Устранение системных ошибок
- Вариант 1: Обновление версии ОС
- Вариант 2: Восстановление системных файлов
- Вариант 3: Очистка кэша значков
- Вариант 4: Настройки персонализации
- Вопросы и ответы: 3
Красные крестики на ярлыках в Windows 10 чаще всего появляются после установки или использования какого-либо облачного хранилища: Google Drive, Dropbox или Microsoft OneDrive. Они говорят о том, что данные не синхронизируются с облаком, но иногда причиной могут стать системные ошибки, для которых есть универсальные решения.
Способ 1: Решение проблем с облачным хранилищем
Самая распространенная причина появления крестиков – работа облачного хранилища. По умолчанию, в Windows 10 предустановлен OneDrive, поэтому исправлять неполадки будем на его примере. Если вы установили другое приложение, то действуйте в соответствии с его функциями и возможностями.
Вариант 1: Отключение синхронизации с аккаунтом Microsoft
В первую очередь попробуйте отключить синхронизацию данных с учетной записью Microsoft, чтобы попытаться решить проблемы. Например, в OneDrive делается это через раздел с настройками:
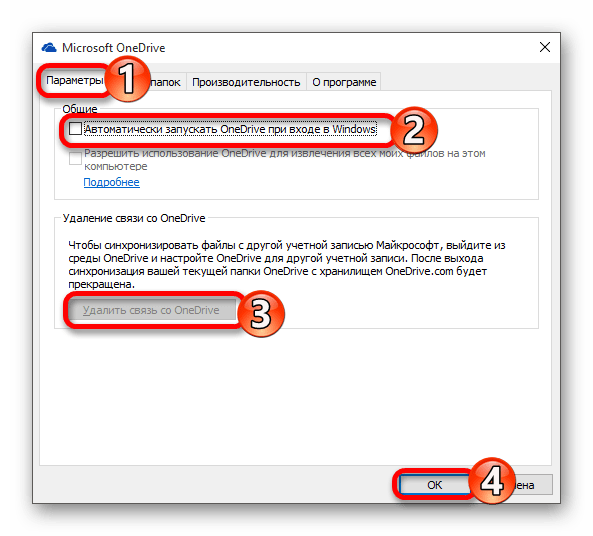
- Значок облачного хранилища, как правило, располагается в системном трее. Кликните по нему левой кнопкой мыши, затем нажмите на иконку в виде шестерни в правом верхнем углу и выберите пункт «Параметры».
- В новом окне перейдите на вкладку «Учетная запись». Щелкните по ссылке «Удалить связь с этим компьютером».
- Подтвердите действие в дополнительном окне.
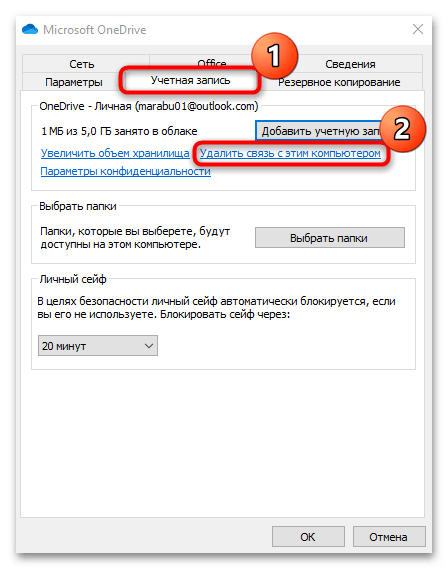
Когда учетная запись отвяжется, можно попробовать вновь синхронизировать аккаунты через эту же вкладку.
Обычно после этого пропадают красные крестики с ярлыков. То же самое придется проделать и с приложениями других облачных хранилищ. Алгоритм действий может отличаться, но в большинстве случаев настройка доступна в параметрах аккаунта.
Вариант 2: Проверка хранилища OneDrive
Если с синхронизацией все в порядке, а после выполнения предыдущего варианта снова появились красные крестики, восклицательные знаки или другие элементы, то это может значить, что место на облачном хранилище заканчивается. Попробуйте вручную выбрать папки, которые нужно загружать в облако:
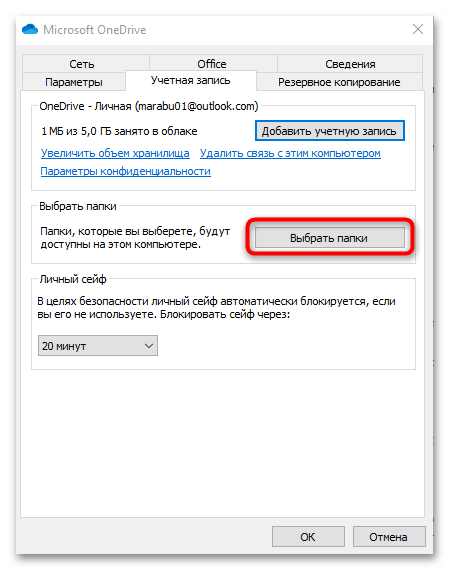
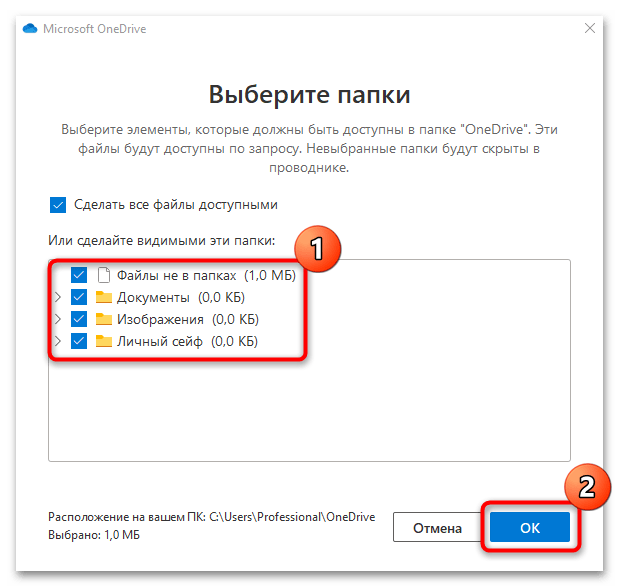
- Перейдите в «Параметры» OneDrive, затем на вкладку с учетной записью так же, как в Шагах 1 и 2 предыдущей инструкции. Кликните по кнопке «Выбрать папки».
- Отобразится окно со списком папок, которые могут загружаться в облако. Снимите галочки с тех каталогов, которые вы не хотите добавлять в OneDrive. Нажмите на кнопку «ОК».
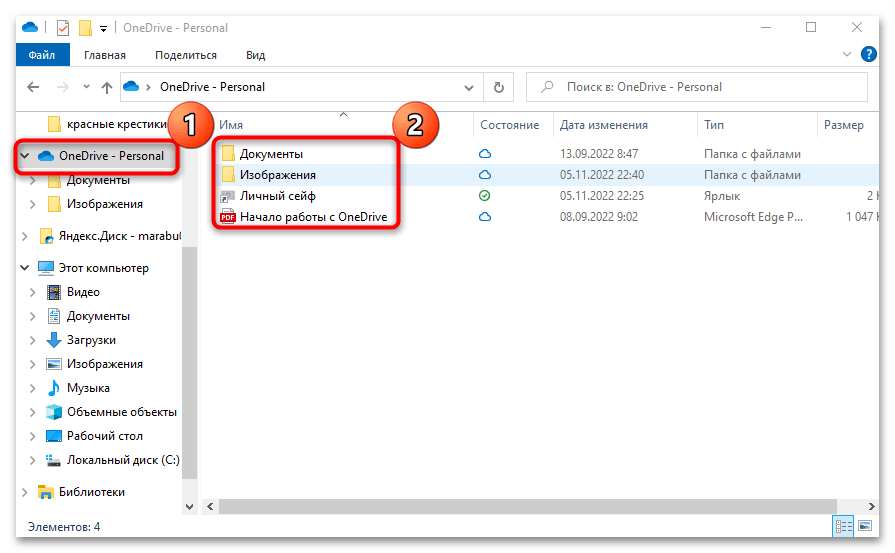
Также не забудьте почистить облачное хранилище, чтобы освободить место на нем. Для этого через «Проводник» перейдите в папку «OneDrive», откуда можно удалить лишние файлы.
Вариант 3: Переустановка облака
Если ни один способ не помог, попробуйте переустановить приложение. Иногда в его работе происходят критические ошибки, которые решаются только удалением, затем последующей инсталляцией по новой. Поскольку мы говорим о OneDrive, то для начала потребуется избавиться от него, но не в разделе с программами и компонентами, как с другим софтом, а через консоль «Командная строка» или Windows PowerShell. Об этом мы рассказывали ранее.
Подробнее: Удаление OneDrive в Windows 10
После удаления установите приложение снова, скачав его с официального сайта Microsoft. Потребуется осуществить вход в учетную запись.
Скачать Microsoft OneDrive с официального сайта
С другими облачными хранилищами дела обстоят проще: достаточно удалить приложение стандартными способами, затем так же скачать и снова установить.
Читайте также: Установка и удаление программ в Windows 10
Несмотря на то, что этот вариант занимает немало времени, он наиболее действенный. К тому же на компьютер или ноутбук будет установлена актуальная версия приложения облачного хранилища.
Если вы вообще не пользуетесь Microsoft OneDrive, то его можно вовсе отключить, деактивировав автозапуск, а также отредактировав системный реестр или параметры локальной групповой политики.
Подробнее: Отключение облачного хранилища OneDrive в Windows 10
Способ 2: Устранение системных ошибок
Иногда проблема кроется гораздо глубже – в системе. Если манипуляции с облачным хранилищем не помогли, попробуйте несколько способов, описанных ниже, которые подразумевают исправление неполадки в самой Windows 10.
Вариант 1: Обновление версии ОС
Обновление версии операционной системы зачастую решает многие системные ошибки, поскольку разработчики улучшают функционирование и повышают стабильность работы ОС. Установка апдейтов происходит через «Центр обновления Windows», а также с помощью фирменных утилит, так как это наиболее безопасный способ. Наш автор разбирал методы обновления Windows 10. Переходите по ссылке ниже, чтобы узнать, как это сделать.
Подробнее: Обновление Windows 10 до последней версии
Вариант 2: Восстановление системных файлов
Красные крестики на ярлыках в Windows 10 могут появиться из-за повреждения важных системных файлов, что вызывает ошибку в отображении значков. В Виндовс есть встроенные утилиты для проверки и восстановления данных. Они проверяют систему на наличие поврежденных файлов и восстанавливают их из собственных резервных копий. Пользователю же достаточно запустить саму процедуру и дождаться ее окончания.
Подробнее: Восстановление системных файлов в Windows 10
Вариант 3: Очистка кэша значков
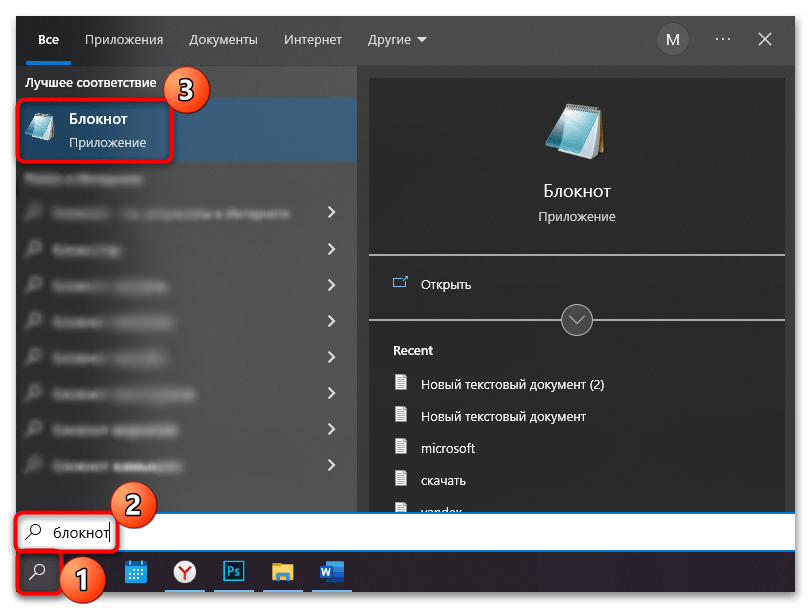
Если файлы ярлыков повреждены, попробуйте вручную очистить кеш значков. Существует несколько способов сделать, а мы рассмотрим наиболее эффективный и простой:
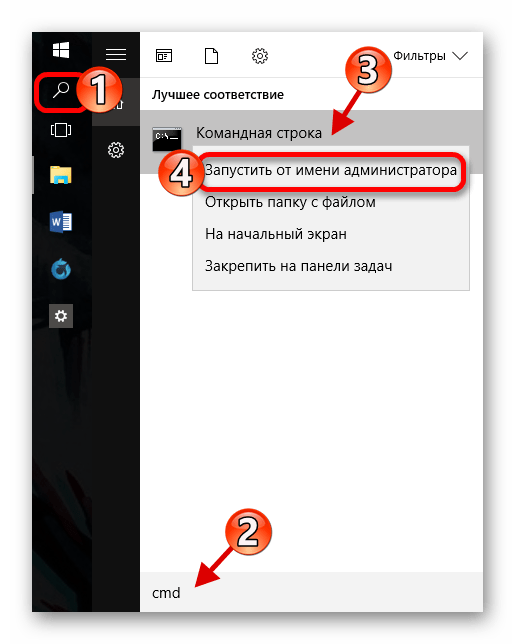
- Запустите встроенный «Блокнот», отыскав его в меню «Пуск» через строку поиска.
- Вставьте в поле следующий код:
taskkill /f /im explorer.exe
cd %userprofile%\AppData\Local\Microsoft\Windows\Explorer
attrib –h iconcache_*.db
del /f IconCache*
del /f thumbcache*
cd %userprofile%\AppData\Local\
attrib –h IconCache.db
del /f IconCache.db
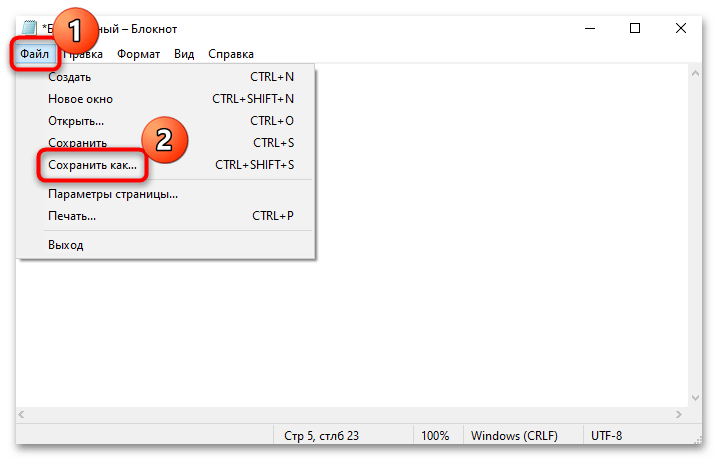
start C:\Windows\explorer.exe - Кликните по вкладке «Файл» и выберите пункт «Сохранить как».
- В открывшемся «Проводнике» укажите путь сохранения файла. В поле «Имя файла» напишите
IconFix.bat, а в «Тип файлы» из выпадающего меню выберите «Все файлы». Сохраните изменения.
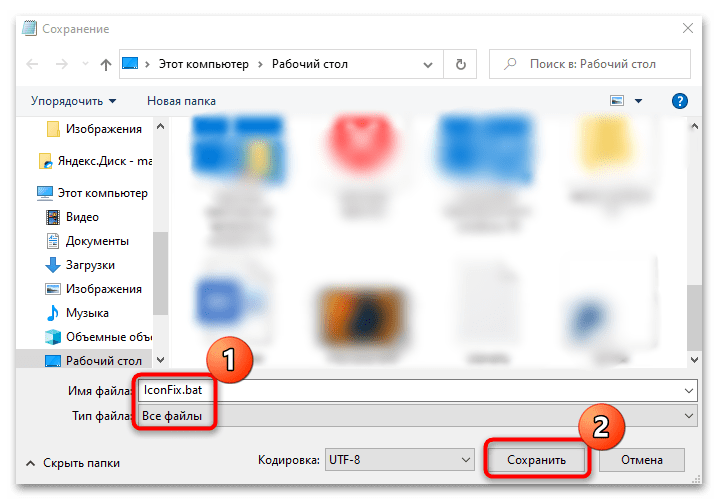
Таким образом, вами будет создан скрипт с расширением BAT. Найдите его и запустите двойным щелчком левой кнопки мыши, после чего кеш значков сбросится, а «Проводник» — перезапустится.
Следует отметить, что если вы использовали для иконок и папок сторонние значки, то после сброса вернется их первоначальный вид.
Вариант 4: Настройки персонализации
Если на иконке появляются дополнительные элементы, например крестики или зеленые галочки, то решить проблему может помочь изменение параметров значков рабочего стола:
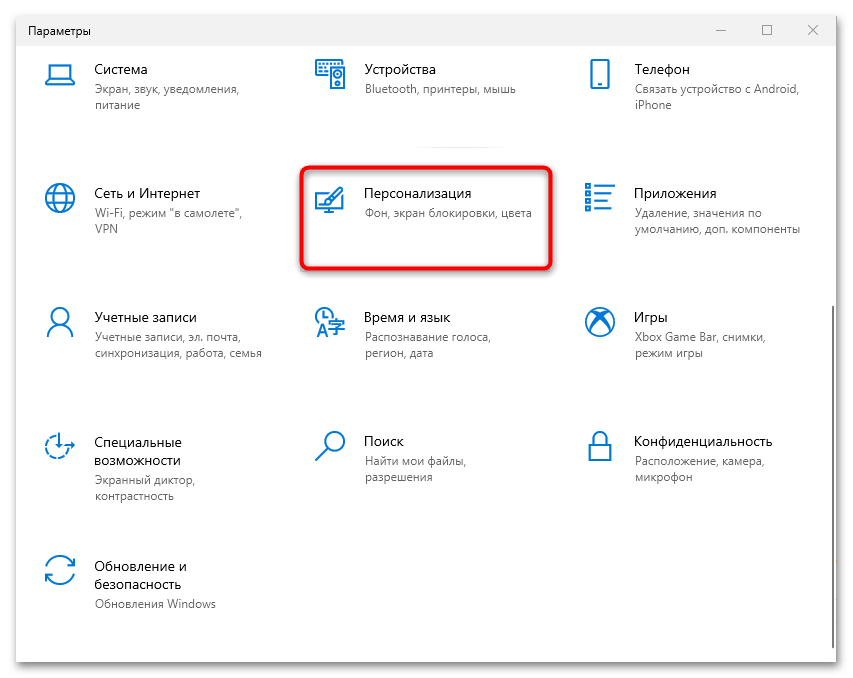
- Откройте приложение «Параметры». Для этого щелкните по иконке «Пуск» и выберите соответствующий пункт из меню.
- Перейдите в раздел «Персонализация».
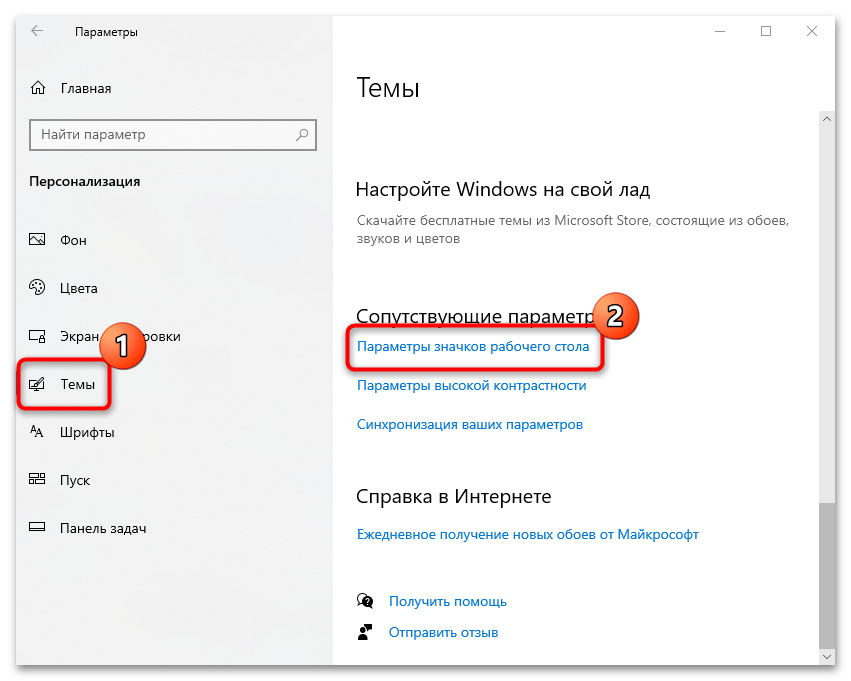
- Нажмите на вкладку «Темы», затем кликните по строке «Параметры значков рабочего стола».
- В новом окне снимите отметку у опции «Разрешить темам изменять значки на рабочем столе». Примените и сохраните настройки.
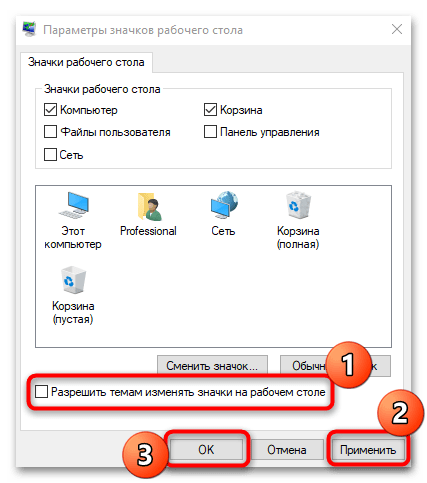
Этот вариант подойдет, если изменение в отображении значков произошло в результате смены оформления интерфейса или использования аналогичных программ для персонализации.
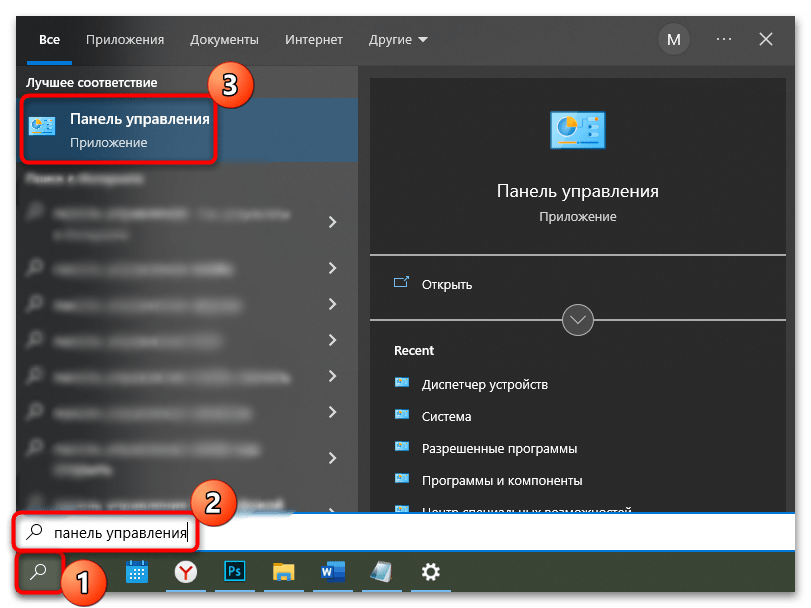
Также существует дополнительный способ отключения уведомления о синхронизации данных:
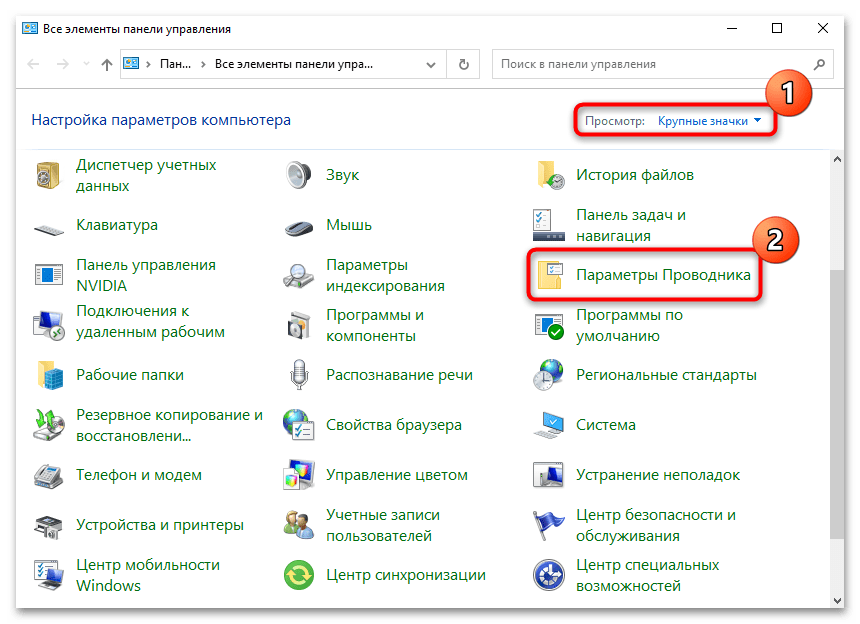
- Откройте классическую «Панель управления», используя системную поисковую строку.
- В меню «Просмотр» выберите «Крупные значки» для удобства, затем перейдите в раздел «Параметры Проводника».
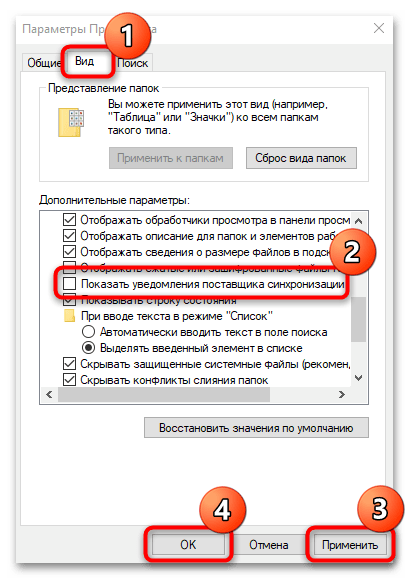
- На вкладке «Вид» в списке параметров найдите «Показать уведомления поставщика синхронизации». Снимите с пункта галочку и сохраните настройки.
Наша группа в TelegramПолезные советы и помощь
A weird thing happened last day on my Windows system. Suddenly all of the icons placed on my computer desktop were disappeared. No suspicious app was installed that could change the visibility of icons. I didn’t right-click on the desktop to hide the icons accidentally. So, what exactly happened?
Let’s Find Out!
Why My Desktop Icons Are Not Showing?
Majority of users are considering it as a bug, but it’s not. This can happen to anyone while modifying some settings unknowingly. Not many people know but Windows 10 comes with two built-in modes for user’s facilitation: Desktop & Tablet.
So, there might be a probability that you have activated the Tablet Mode which is leading to Desktop Icons Missing Error. To check whether you have accidentally enabled the Tablet Mode or not: Go to the Start menu > Settings > System > Choose Tablet Mode from the left panel & make sure that the respective mode is toggled off.
If this isn’t the case, you can try some other fixes as well to make Desktop Icons appear again!
How To Fix Desktop Icons Not Showing Issue?
Desktop Icons not showing is quite a common error in Windows 10, 8, 7 PC try some tricks & hacks to fix the issue:
METHOD 1- Run eplorer.exe
This is a temporary patch rather than a solution. Restarting Windows Explorer (explorer.exe) can help you refresh your desktop & get back your icons quickly. However, this is not a permanent fix, but you can always give it a try:
- On your desktop (no icons screen) > press CTRL + ALT + Delete key altogether to launch Task Manager.
- In Task Manager Windows, go to the Processes tab & locate Explorer.exe from the list & click on End process.
- Next, go to the File menu and click on new task (Run) option > In the next box, type explorer.exe & hit Enter.

Your Desktop icons should now pop-up back. If it doesn’t help, then it might be some random software behaving badly on your system.
METHOD 2- Maybe You’re Running A Dubious Software
Think about all the recently downloaded software, maybe a Photo Editor, Antivirus Program or any other software that might have created this absurd issue. If you locate any of the suspicious applications running on your system, uninstall it immediately & observe if this fixes the problem.
You can even try running a PC Virus Scan using a reliable utility, just to check if there’s a malware causing the issue.

METHOD 3- Update Device Drivers
You must already be familiar with the thing that every device on your system has a software driver behind it. When they aren’t optimal, you have to update them. Because a missing, damaged or outdated graphics driver can stop items from appearing properly on your system.
So, make sure every device driver is up-to-date on your PC. Basically, there are two methods to update drivers on Windows: Manually and Automatically.
How To Update Device Drivers Manually?
To update Windows 8, 8.1,10 device drivers, follow the steps below:
- Head towards Search bar and locate Device Manager.
- In Device Manager Window, start selecting each item and right-click to Update them.
- Next click on Browse my Computer for driver software option.
- Click on ‘Let me pick from a list of available drivers on my computer’ to let your system find the drivers for you.

- If Windows couldn’t detect the best drivers for you, try looking for one on the device manufacturer’s website & follow their instructions to update drivers.

Finding and updating device drivers manually can be a complicated & time-consuming task. Moreover, if by any chance the process is done incorrectly, it could lead to various system issues.
If you don’t have that significant computer skills or time, try to update your drivers using a third-party dedicated tool. For the purpose, you can use Advanced Driver Updater, which would get the job done for you in a few clicks!
How To Update Device Drivers Automatically?
To make the task of updating device drivers straightforward & easy, take the help of Advanced Driver Updater. The driver utility works efficiently to scan & fix missed, outdated, damaged & faulty drivers in just a few clicks. Features an intuitive interface, Advanced Driver Updater can be used to automatically find and install the most compatible and latest updates for your system.
How To Use Advanced Driver Updater?
Setting & using the driver updater utility is damn simple, just follow the straightforward steps below:
- Install Advanced Driver Updater.
- Once installed, click on Start Scan Now button on the main interface.
- The tool would take just a few moments to list all the faulty drivers on your PC.
- Once all the missing, damaged and incompatible drivers are categorized, click on Update All button to fix them.


All the latest drivers would be installed properly, and you can observe a noticeable performance boost on your system.
This method would surely solve your Desktop Icons not showing issue on Windows 10, 8, 7 PC. If you have already tried Advanced Driver Updater software, kindly share your experience in the comment section below!
You Might Like To Watch The Tutorial: How To Update Outdated Device Drivers