
Color is one of the critical elements when working with images and videos. Every computer monitor has a different color profile, rendering it slightly different from other displays. It’s important to make sure that the colors your monitor displays are as close to reality as possible. That’s why you should always install a color profile suited for your display. In this tutorial, I’ll explain what ICM files are, why they matter, and how to install an ICM color profile in Windows 11 or Windows 10. If you’re curious to learn more, read on:
What is a color profile?
Color profiles are not easy to define, especially for people who don’t work a lot with images and video editing or photography software. Therefore, I’ll try to summarize the best I can:
A color profile is a set of data that defines a device working with colors and how this device displays colors. The color profiles communicate the color characteristics of the device you use to the operating system. If the devices you use have correct color profiles associated with them, then you can be sure that the colors you see are as natural as possible.
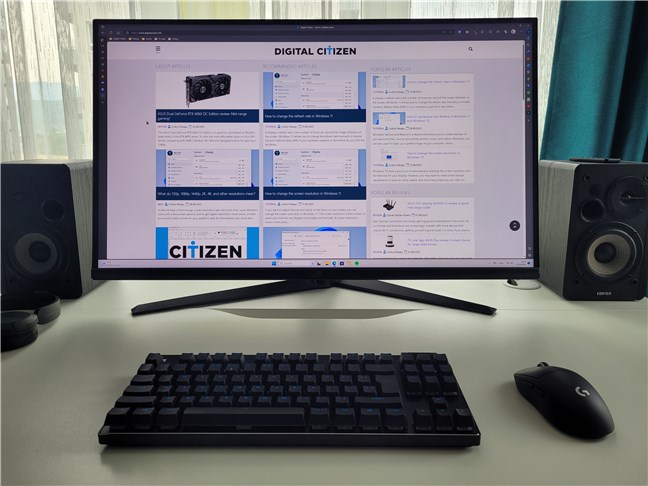
Viewing our website on an ASUS ROG monitor
Cameras, monitors, printers, and scanners are all image devices that we use every day. And because each device has its own way of managing colors, without the correct color profiles, the image you view on your monitor might look different from what you see when you print it. To decrease the occurrence of such differences and see the real colors used in an image, you need to install the color profiles for the devices that are working with colors. Printers and scanners install their color profiles together with their official drivers. That’s why the only component you need to worry about is your monitor. People rarely install drivers for them, which translates into your monitor not using the correct color profile. Therefore, you get the differences in color we mentioned earlier.
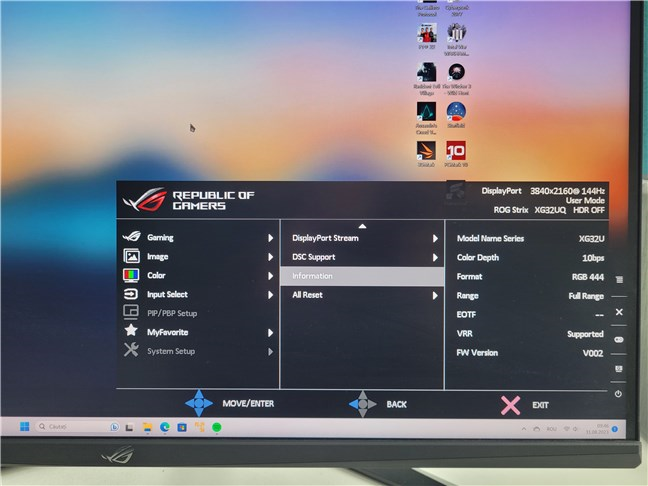
Checking a monitor for details about its model name
For example, imagine having a portrait photo of that special someone in your life. And you want to look at it on your monitor. But because you don’t have the correct color profile installed, the photo looks different from reality. For example, your girlfriend has pale skin instead of red cheeks, and her eyes are gray instead of blue. It can be even worse if the photo is black and white. A wrong color profile used by your monitor can turn the grays to blacks or vice versa. The result will likely be a picture that looks like it was scanned from a newspaper, with no fine details or smooth gradients.
Installing the correct color profile can also be useful for gamers to see the colors intended by game developers. A wrong color profile may hide your enemies in plain sight simply because they are as gray as the walls behind them.
What is an ICM file (or ICM profile)?
In Windows, color profiles are stored in files that end with the .ICM extension. When you’re installing a new color profile, or driver if you wish, for your monitor, that’s what you should have: an ICM file. Why this seemingly odd name? ICM stands for Image Color Management, which is a shorter way of saying that it is a Windows component that handles color management.

An ICM (color profile) file in Windows
Sometimes, color profiles can also be stored as ICC files (ICC stands for International Color Consortium). They’re the same as ICM files, and you can change their extension to either one. Windows 11 and Windows 10 treat ICM and ICC files the same, making no distinction between them.
Now, you have a basic idea of what color profiles and ICM files are and why they are useful. But, I’ve only scratched the surface on this subject, so if you want more detailed information on color profiles and their importance, I recommend reading Wikipedia’s Color Management article.
How to find the correct color profile for your monitor
Generally, the best location to get a color profile (assuming you don’t have a color calibrator at hand) is from the manufacturer of your monitor. Usually, these files are on a CD that came with your display or available for download on the monitor’s manufacturer support site. The monitor I use on my computer is an ASUS ROG Strix XG32UQ, so in my case, I needed to go to the ASUS support page. Here are the support pages for other brands: Acer Support, BenQ Support, Dell Support, Gigabyte Support, LG Support, MSI Support, and Samsung Support.
Another thing to remember is that if you search for “color profile” and specify your monitor model, chances are you won’t find anything useful. Color profiles are generally named as drivers by manufacturers. It’s best to search for downloads available for your monitor model and then download the driver available. I’ll use my monitor as an example. To get its driver (ICM profile), I went to the ASUS support website and typed XG32UQ (the monitor model) in the search field. The search returned only one result, so all I had to do was click on it. In other cases, your search may yield several versions of your monitor, so make sure you pick the right one (the one you have).
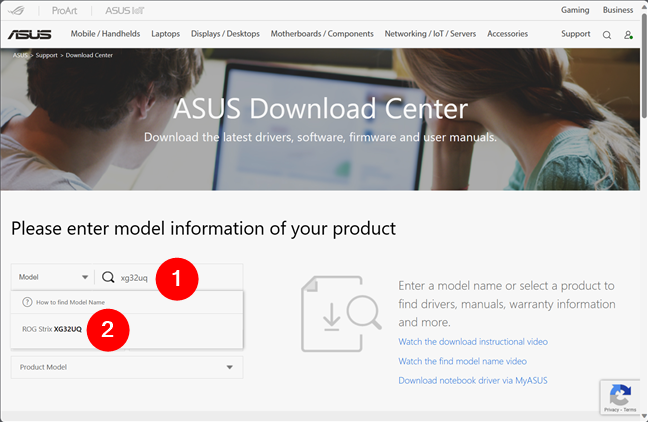
The support website of a monitor manufacturer
The previous action usually takes you to a new web page with several options, including one, if not more, download choices. For my ROG Strix XG32UQ monitor, ASUS provides drivers for Windows 11, as well as for Windows 10 64-bit and 32-bit. As I’m using Windows 11, I downloaded the driver package for this operating system.
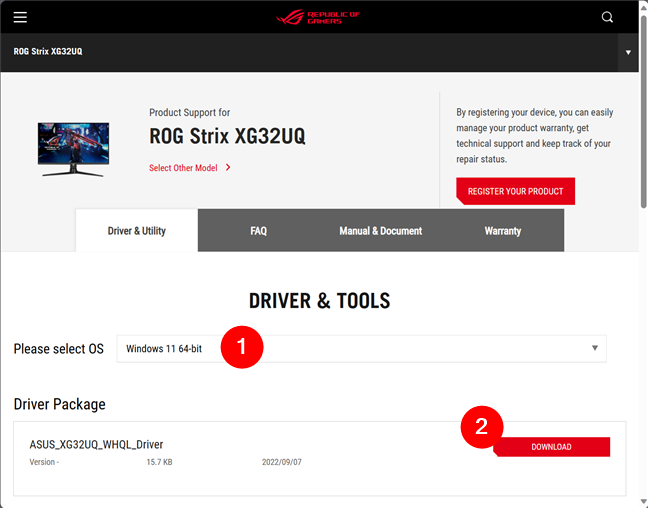
Downloading the driver package for a monitor
The drivers came as a ZIP archive, and most monitors get them like that. Still, depending on the manufacturer, you may receive a self-extracting archive (with an .EXE file extension). If you get a ZIP file, extract the files inside the archive.
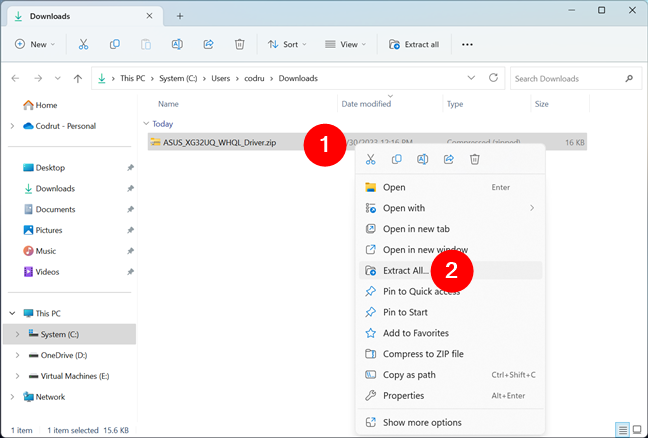
Monitor drivers are usually packaged inside ZIP archives
Look inside the extracted folder, and you should find a file with the .ICM or .ICC extension. That’s the ICC profile you’re looking for.
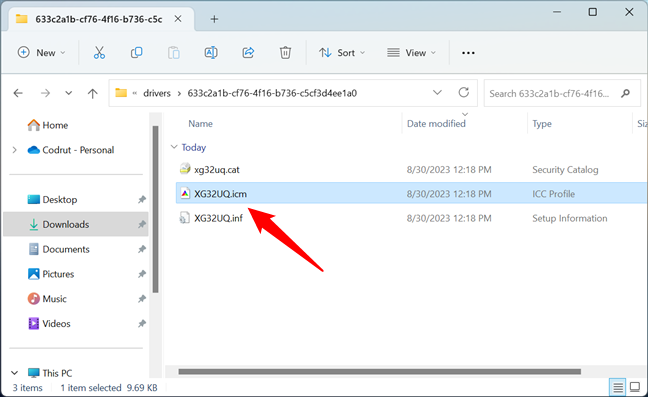
The ICM file holds the ICC profile
Once you have downloaded and extracted the driver files for your monitor, it’s time to install them. Let’s see how to do that and use the ICM profile on your computer:
How to install a color profile in Windows
In Windows, installing a color profile is easy, and the steps are identical regardless of whether you’re using Windows 11 or Windows 10. Furthermore, there are two ways to do it: one that’s really fast and another one that’s, let’s say, more traditional. Here’s how it all works, starting with the fast method:
How to install an ICM profile using the right-click menu
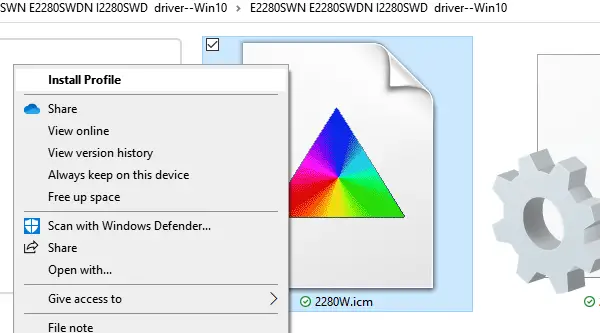
Use File Explorer to open the folder where you unpacked the monitor’s driver files. Then, right-click (or press and hold) the ICM file inside, and choose Install Profile in the context menu.
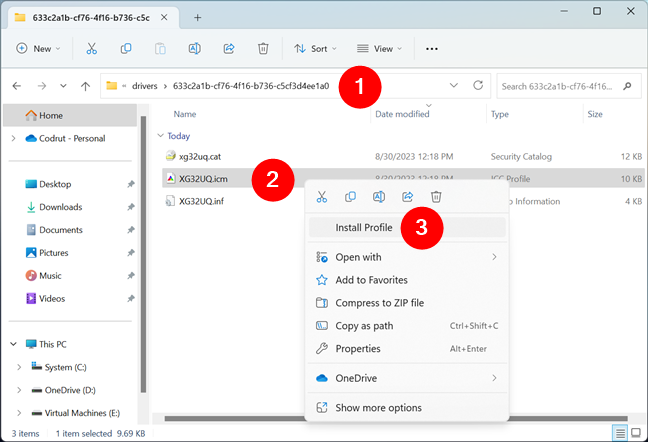
The Install Profile option from the right-click menu of an ICM file
That’s it! However, if you can’t install the color profile for your monitor this way, you can try the alternative method in the next chapter.
TIP: For the best image quality possible, you should also consider calibrating your monitor. For more details, read: How to calibrate your monitor in Windows.
How to install an ICM profile using Color Management
In either Windows 11 or Windows 10, use the search on your taskbar to enter the words “color management.” Then, in the results list, click or tap the Color Management shortcut.
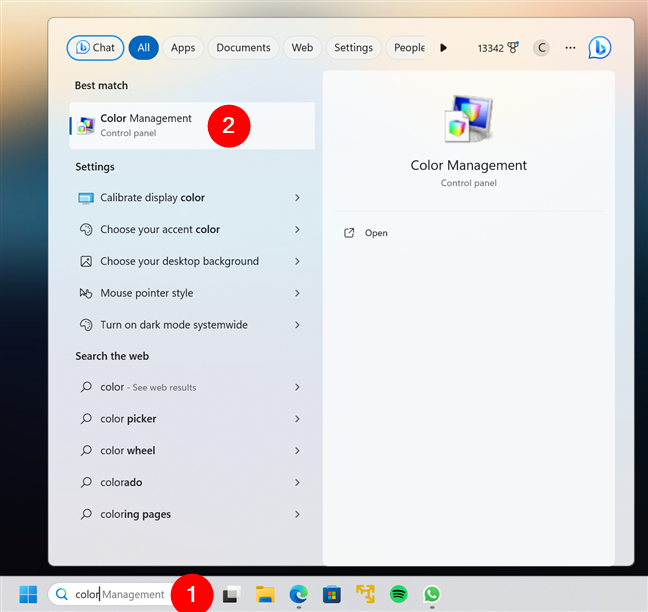
Searching for Color Management in Windows
This launches the Color Management window, which looks like this:
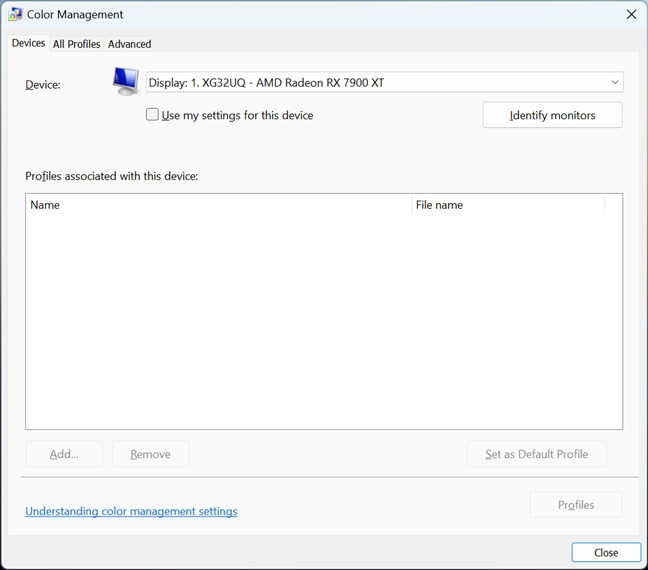
The Color Management window from Windows
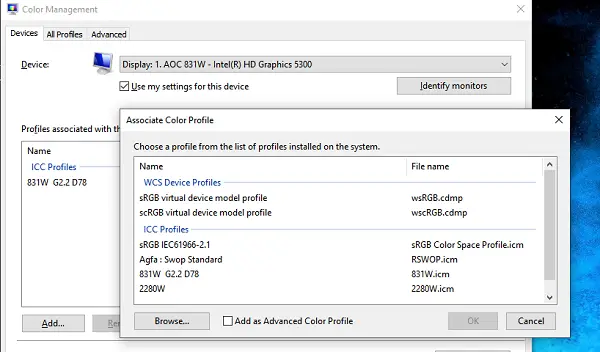
In the top area of the Color Management window, make sure that the Devices tab is selected. Then, in the Device dropdown box, you have a list of devices installed on your computer, starting with your monitor(s). If you have multiple monitors, select the one where you downloaded the drivers and ICM file(s). Note that you can use the Identify monitors button under the Device section to identify your different displays and their number: display 1, display 2, etc.
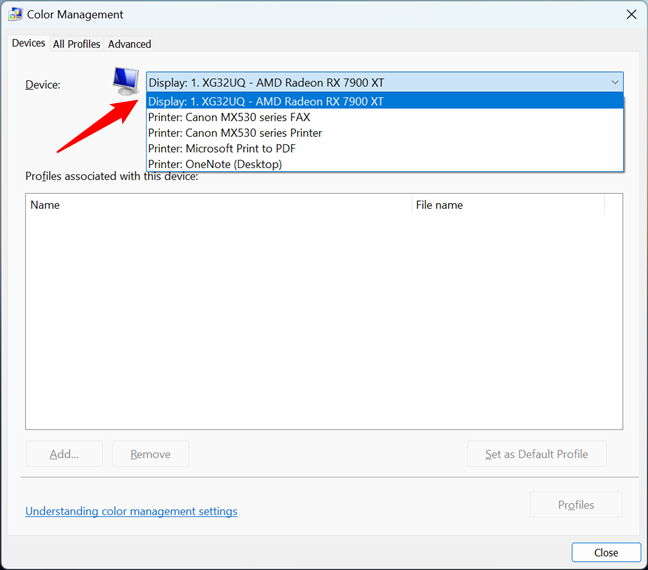
The list of devices that have color profiles in Windows
After selecting the correct display, click or tap the Add button from the bottom left corner of the window. If an ICM profile is already installed for the selected monitor, the Add button might be grayed out and disabled. If that’s the case, but you still want to replace the existing color profile with the one you’ve just downloaded, check the “Use my settings for this device” option. Then, you should be able to use the Add button.
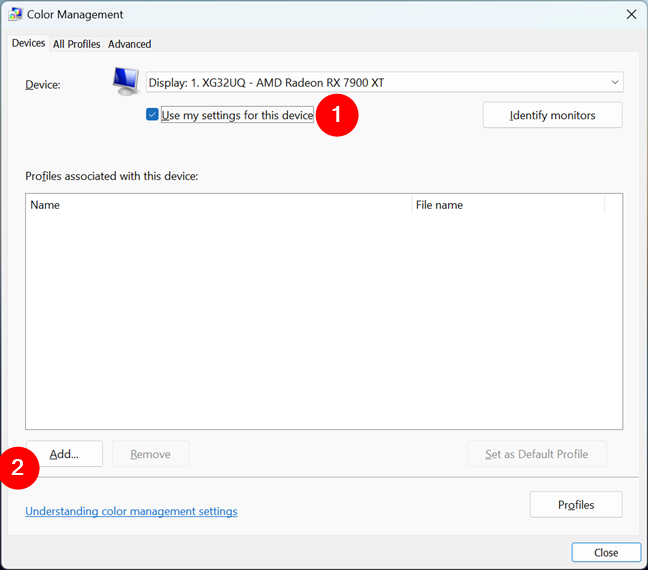
Adding a new color profile
This opens the Associate Color Profile window, where you see the list of installed color profiles. These profiles can be installed and used by other devices, such as your printer or scanner, or by image editing software, such as Adobe Photoshop. Click or tap Browse and find the location of the ICM file you want to use.
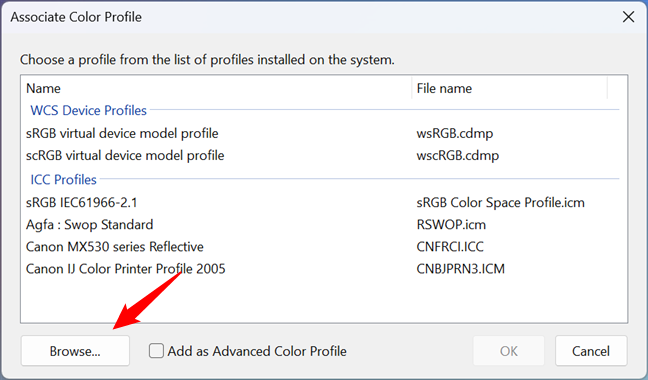
Browsing to find the ICM file that stores the color profile
Select the ICM file and click or tap Add.
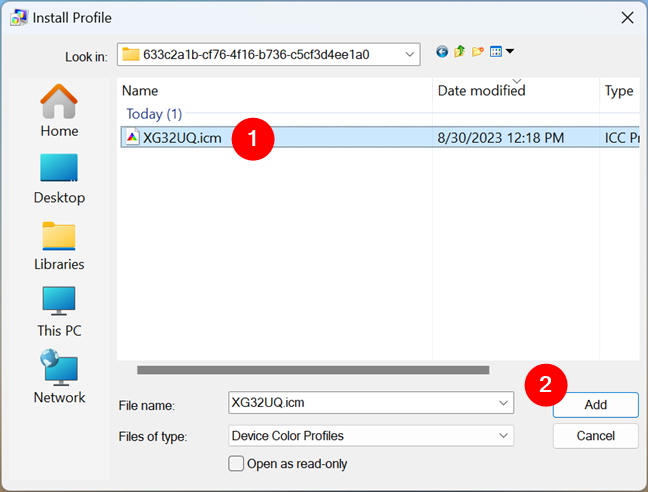
Selecting and adding a new color profile for a monitor
You may notice that the colors on your screen change as the new profile takes effect. Click or tap Close, and you are done.

New color profiles for the monitor
If you have multiple monitors, you should repeat the procedure for each monitor and make sure you download and install the color profiles specific to each.
Did you install the correct color profile ICM file for your monitor?
Some people might not have been aware of the importance of color profiles and drivers for their desktop monitors. Hopefully, this tutorial has convinced you to install the appropriate color profiles for your display(s). As you can see, the procedure is reasonably easy to follow, and it should help when working with image and video editing applications and also when gaming.
The advent of modern computing has brought forth numerous tools and applications that help users optimize their systems for the best performance, especially when it comes to color management in graphics and photography. Windows 11, the latest operating system from Microsoft, is laden with features that cater to a wide range of users, from gamers to professionals. One such feature is the capability to install and manage ICM profiles. In this guide, we’ll delve into the details of how to install an ICM (Image Color Management) profile on Windows 11, explore the importance of color management, and provide insights into ensuring your displays look optimal.
Understanding ICM Profiles
Before we dive into the installation process, it’s essential to comprehend what ICM profiles are and why they’re crucial. ICM profiles are used to ensure that the colors displayed on your screen are consistent and accurate, particularly in graphic design, photography, and video editing. They help create a standardized color environment, which is pivotal when images are viewed on different devices.
What is Windows Color System?
The Windows Color System uses ICM for color management. When an image is created on one device (like a camera or scanner) and viewed on another (like a monitor), the colors can appear differently if those devices are not calibrated to the same standard. ICM profiles help in translating the color space of one device to match the color space of another, so the images stay true to their original look.
Preparing for Installation
Before you can install an ICM profile in Windows 11, you need to prepare a few things:
-
Obtain an ICM Profile: First, you need to download a suitable ICM profile. These profiles are usually offered by monitor manufacturers or can be found on websites dedicated to color management resources. Make sure to download the profile that corresponds to your specific monitor model or the color standard you are working with.
-
File Format: Ensure that the ICM profile is saved with the correct file extension (.icm).
-
Admin Rights: Installation may require administrative privileges. Ensure you are logged in as an administrator or have the necessary permissions to perform the installation.
Steps to Install ICM Profile in Windows 11
Now that you have prepared everything, let’s move ahead with the detailed steps to install an ICM profile.
Step 1: Access the Color Management Settings
-
Open Settings:
- Click on the Start menu (Windows icon) in the taskbar.
- Select Settings from the list.
-
Navigate to System:
- In the Settings window, click on System.
- From the System menu, scroll down and choose Display.
-
Color Management:
- Scroll down to the Advanced display settings.
- Under Related settings, you’ll find the option for Color management. Click on it.
Step 2: Add the ICM Profile
-
Color Management Window:
- The Color Management window will open. Here you will see your current color profiles listed.
-
Select the Display:
- At the top, there’s a drop-down menu where you can select the display you want to manage. Make sure the correct monitor is selected.
-
Add Profile:
- Click the Add button. A new window will pop up displaying available color profiles.
-
Select the Profile:
- Browse to the location where you saved the downloaded ICM profile. Click on the desired profile to select it, then click Add again.
-
Set as Default Profile (Optional):
- Once added, you might want to set the new profile as the default. To do this, select it from the list and click on Set as Default Profile.
-
Close the Window:
- After setting the profile, simply close the Color Management window.
Step 3: Validate the Installation
-
Visual Confirmation:
- Once installed, it’s a good idea to visually check if there is a noticeable difference in color rendition. You can open images that you are familiar with to see if the colors appear more accurately.
-
Use Calibration Tools:
- For professionals, using display calibration tools like colorimeters can provide a more in-depth analysis of color accuracy and consistency.
-
Software Calibration:
- Some software applications also allow built-in calibration tools that can guide you through verifying the profile installation through simulated tests.
Step 4: Troubleshooting Common Issues
If you face any issues during the installation process, here are some common troubleshooting tips:
-
Profile Doesn’t Appear:
- Make sure you are properly navigating to the ICM file’s location. If it’s not showing up in the selections, ensure that it ends with a .icm extension.
-
No Effect on Color:
- If the colors do not appear to change after installing, revisit the Color Management settings. Ensure the profile is set as your default profile.
-
Update Graphics Drivers:
- Sometimes, outdated graphics drivers can impede performance. Ensure your graphics drivers are up to date to utilize color profiles effectively.
-
Third-Party Software Interference:
- Software like Adobe Photoshop or other graphic design tools can manipulate color profiles based on individual application settings. Check the specific application settings if issues arise.
Step 5: Maintaining and Managing ICM Profiles
-
Regular Updates:
- Monitor manufacturers sometimes release updated profiles. It’s good practice to periodically check their website for updated ICM files corresponding to your monitor.
-
Backup Profiles:
- If you manage multiple profiles, consider backing them up on external storage. This will be useful if you need to reinstall Windows or set up a new computer.
-
Monitor Calibration:
- Regularly calibrate your monitor to ensure optimal performance. Depending on usage, consider recalibrating every few months.
-
Testing with Different Applications:
- Different software may interpret colors differently. If you’re working in a graphic-heavy workflow, ensure that your color management settings are integrated across all applications you use.
Conclusion
Installing and managing ICM profiles in Windows 11 is a vital step for users striving to maintain color accuracy on their displays. Whether you’re a professional photographer, graphic designer, or simply someone who values accurate color representation, understanding how to utilize ICM profiles ensures that your work remains consistent across different devices.
Following this detailed guide should empower you to not only install ICM profiles effortlessly but also help you troubleshoot and maintain them. With the right color management practices, you can elevate your visual experiences and create stunning works that truly reflect your vision. Color accuracy can make all the difference, and with Windows 11’s robust capabilities, achieving the perfect color balance is just a few clicks away. Happy color managing!
Большинство пользователей не сталкиваются с необходимостью ручной установки цветовых профилей монитора в Windows 11/10 и используют стандартные: обычно это не несёт каких-то проблем, а изображение выглядит именно так, как предполагалось производителем мониторов.
Однако, для некоторых мониторов, особенно предполагающих работу с графикой, производители обычно поставляют подходящий цветовой профиль, который разумным будет установить и использовать в Windows после приобретения монитора или переустановки системы. О том, как это сделать и пойдет речь далее в инструкции.
Процесс установки или изменения цветового профиля
Цветовой профиль представляет собой файл .icm или .icc и обычно доступен в комплекте ПО монитора или на официальной странице поддержки конкретной модели монитора отдельно или в составе драйвера. При этом:
- Он может устанавливаться автоматически при установке драйвера монитора — здесь вопросов обычно не возникает, всё происходит автоматически. Несмотря на то, что почти все мониторы исправно работают без установки драйвера вручную, для некоторых моделей, функции и характеристики которых отличаются от стандартных, имеет смысл установить драйвер производителя.

- Может требовать ручной установки.

Далее будет рассмотрен пример именно ручной установки профиля монитора ICM (Image Color Management) или ICC (International Color Consortium).
Необходимые шаги будут следующими:
- Нажмите правой кнопкой мыши по файлу цветового профиля и выберите пункт «Установить профиль в контекстном меню». Каких-либо сообщений вы не увидите, но профиль будет добавлен в системе.

- Нажмите клавиши Win+R на клавиатуре, либо нажмите правой кнопкой мыши по кнопке «Пуск» и выберите пункт «Выполнить», введите colorcpl в окне «Выполнить» и нажмите Ok или Enter.
- В поле «Устройство» выберите нужный монитор, установите отметку «Использовать мои параметры для этого устройства, нажмите кнопку «Добавить» и выберите недавно установленный профиль в списке, нажмите «Ок». Для добавления профиля в список также можно нажать кнопку «Обзор» и выбрать файл профиля, если вы пропустили 1-й шаг.

- Убедитесь, что нужный профиль выбран и нажмите кнопку «Сделать профилем по умолчанию».


После выполнения указанных шагов (иногда только после перезагрузки) монитор должен слегка изменить цвета и начать их отображать так, как было спроектировано и настроено производителем.
Дополнительная информация
Некоторые дополнительные сведения, которые могут быть полезными в части установки цветовых профилей:
- Если вам требуется регулярно менять цветовой профиль монитора, вы можете сделать это в параметрах дисплея Windows: в списке будут отображаться профили, добавленные на 3-м шаге, между которыми вы легко сможете переключаться.

- При включенном режиме HDR, при использовании переходников для подключения монитора, выбор цветового профиля может быть недоступен, либо они могут работать не так, как ожидается.
- В некоторых случаях системные настройки Windows работают не лучшим образом в части цветовых профилей: например, некоторые сталкиваются с невозможностью смены цветового профиля в сценарии, когда к компьютеру подключены два монитора, а в параметрах дисплея установлен показ только на 2-м мониторе.
- Иногда эффективнее обратиться к ПО производителя монитора или к простым утилитам, таким как Colorprofile Keeper.
- Цветовой профиль может автоматически переключаться при запуске 3D приложений, полноэкранных игр и в других сценариях.
- Для Windows 11 Майкрософт предлагает отдельное приложение (доступно в Microsoft Store) — Windows HDR Calibration, позволяющее откалибровать работу дисплея при включенном режиме HDR.
- Некоторые программы для работы с графикой могут иметь собственные настройки отображения цветов. Например, в Adobe Photoshop и Illustrator их можно обнаружить в разделе меню «View» (Вид), пункты Proof Setup и Proof Colors.

Надеюсь, представленная информация поможет разобраться, если вы столкнулись с необходимостью установить или изменить цветовой профиль для вашего монитора. Если же остаются вопросы, вы можете задать их в комментариях.
The advent of digital technology has revolutionized the way we work with color. Whether you’re a professional photographer, graphic designer, or just someone who values accurate color representation on your monitors, understanding and utilizing color profiles is essential. In Windows 11, one of the key steps in calibrating your display is the installation of an ICM (Image Color Management) profile. This guide will walk you step-by-step through the process of installing an ICM profile in Windows 11, ensuring your colors are represented as accurately as possible.
Understanding ICM Profiles
What is an ICM Profile?
An ICM profile, which can also be known as an ICC (International Color Consortium) profile, is a set of data that characterizes a color input or output device, or a color space, according to standards promulgated by the International Color Consortium (ICC). This profile allows different devices (like cameras, monitors, and printers) to communicate color information effectively, ensuring that colors remain consistent across different media.
Why Use ICM Profiles?
Using ICM profiles is crucial for achieving accurate color representation. If you’re editing photos, designing graphics, or creating digital content, an ICM profile can help ensure that what you see on your screen closely matches how it will appear in print or on other screens. This is particularly important in industries where color accuracy is critical, such as photography, graphic design, and digital marketing.
Preparing to Install
Before diving into the installation process, you’ll need to prepare certain items and ensure you meet a few conditions.
Step 1: Obtain the ICM Profile
-
Download an ICM Profile: Depending on your monitor model, you may need to download a specific ICM profile from the manufacturer’s website. Alternatively, you can also create one using calibration equipment.
-
Save the Profile: Once you have the ICM profile, ensure that it is readily accessible; typically, ICM profiles are stored in
.icmor.iccfile formats.
Step 2: Verify Device Compatibility
Ensure your monitor supports ICM profiles. Most contemporary monitors do, but if you’re using an older model, confirm that it does by checking the product specifications.
Step 3: Backup Current Profiles
Before making changes, it’s always a good practice to back up existing color profiles. This way, you can revert back if necessary.
- Navigate to
Settings > System > Display > Advanced display settings. - Access the
Color managementoption. - In the Color Management window, make sure to note down or export any currently installed profiles.
Step-by-Step Installation Guide
Now that you’re prepared, let’s walk through the steps to install the ICM profile.
Step 1: Access Color Management
-
Open Settings: Click on the Start Menu and select Settings (the gear icon).
-
System: From the left panel, choose System.
-
Display: Scroll down and select Display.
-
Advanced Display Settings: Scroll down again and click on Advanced display settings.
-
Color Management: Look for and click on Color management at the bottom of the Advanced Display Settings screen.
Step 2: Add a New Profile
-
In the Color Management window, make sure the Use my settings for this device checkbox is selected. This allows you to modify the profiles for the current display device.
-
Select Your Device: In the Device dropdown menu, select the monitor for which you want to install the new ICM profile.
-
Add the Profile:
- Click on the Add… button.
- Browse to locate the downloaded ICM profile. Select it and click on Add.
Step 3: Set as Default Profile
-
After adding the profile, it should appear in the list of profiles associated with your display device.
-
Select the Profile: Click on the newly added profile to highlight it.
-
Set as Default Profile: Click on the Set as Default Profile button. This ensures that Windows uses this profile to display colors correctly.
Step 4: Verify the Installation
-
Close the Color Management window.
-
To verify that the profile has been installed correctly, open an image editing software that supports color profiles (like Adobe Photoshop).
-
Open an image that you are familiar with and assess whether the colors match your expectations.
Step 5: Calibration (Optional but Recommended)
While the installation of an ICM profile will enhance your color accuracy, consider performing further calibration for optimal results.
-
Use Calibration Tools: There are physical calibration devices available for purchase that can assist in creating a custom ICM profile based on the specific characteristics of your monitor.
-
Follow Software Instructions: Use the software that accompanies the calibration tools to complete the process. These programs will guide you step by step, ensuring precise color calibration.
Managing Color Profiles
Updating Profiles
As technology advances and your software requires updating, it’s essential to periodically check for updated ICM profiles for your devices. Visit the manufacturer’s website to download the latest profiles or re-calibrate your monitor as needed.
Removing Unused Profiles
Over time, you may accumulate several profiles. To ensure that your system remains clutter-free and operates efficiently, consider removing any unused profiles.
-
Return to the Color Management window.
-
Select the profile you wish to remove.
-
Click on the Remove button. Confirm any prompts regarding the removal.
Troubleshooting Installation Issues
If you encounter issues during the installation process, here are some steps to troubleshoot:
-
Check File Format: Ensure that the ICM profile is in the correct format (.icm or .icc). If the profile is corrupted or incompatible, Windows may not accept it.
-
Confirm Permissions: Make sure you have administrator permissions on your device. Some actions in Windows require elevated permissions.
-
Reboot the System: Sometimes, a simple system reboot can resolve issues and allow the new profile to be recognized.
-
Update Windows: Keeping your Windows updated can solve compatibility issues with color management and driver support.
Conclusion
Installing an ICM profile in Windows 11 is an essential step toward achieving accurate color representation on your monitor. By following this guide, you can ensure that the colors in your digital workspace closely align with your intentions, making your visual projects reflect the quality and accuracy necessary for success.
Color management can become complex, especially as you move deeper into the realm of digital media. Thus, staying informed about color profiles, calibration, and software updates is fundamental to maintaining a professional standard in your work. Whether you’re a casual user or an industry professional, mastering the art of color management will undoubtedly enhance your digital experiences and project outputs.
Navigating through various tools and settings may seem daunting at first, but with practice and attention to detail, you’ll find yourself more adept in managing your display’s color calibration. Happy color managing!
Ever wondered why an image looks different on every monitor? Why do some of the pictures taken from a phone look surprisingly better on another phone’s display? The answer is how the display has been configured to output the correct color of that picture. Imagine a configuration file that is built according to the hardware to make sure it can pick up the right color from the images and display it. This file is called a Color Profile.
In this post, I will show how you can install a color profile in Windows 11/10 using an ICC Profile by covering the following topics:
- What is a color profile?
- What are ICM and ICC Files?
- Find and download the color profile for your Monitor
- Install a color profile in Windows 11/10
Make sure to go through each of them before installing the color profile for your monitor.
1] What is a color profile?
While I have explained it in simple words above, let’s dig a little deeper. There are aspects when it comes to displaying an accurate color—Display Driver and Monitor. A combination of both defines how many colors it displays. I will keep the display driver away from here.
A color profile is like a manual that defines how a monitor can create colors, and how to use the colors. They are written per the hardware of the monitor. You can also call them Blue Prints. So when OS wants to print color on display, it needs to use this blueprint to draw accordingly.
If you don’t see the same color as you see in the real world, then the display or the monitor doesn’t have the correct color profile.
And it is not just the monitor. Printers need a color profile to print correctly; Scanners need a color profile to scan files with the same color of the document and so on.
2] What are ICM and ICC Files?
Image Color Management or ICM is the extension of the color profile for displays. When a display driver is installed, an ICM file is also installed. If the ICM file is not available, then Windows will use a general ICM file that works with most of the displays. That’s the reason why the installation of the ICM file is essential.
ICC or International Color Consortium is the same as ICM files. Windows 10 treats both of them as equals.
3] How to find and download color profiles for your Monitor?
You must find the correct ICC profile, which is specifically for your monitor. If you install an incorrect color profile, then the colors will not appear correct.
The only place you can get the right profile for your monitor is the OEM website. The ICC or ICM file is available with the driver setup.

- First, find out the exact monitor model. You should have it in your bill, or you can find it written at the back of the monitor. If you still cannot find it, open Device Manager > Monitors, and it will list all the monitors with the exact model name. Note it somewhere.
- Go to the OEM website and locate the Driver download section. It is usually available in Downloads or Support.
- When you find it, download it on the computer and extract it.
For example, LG has drivers available in its Software and Support Page. I recently bought a 24-inch LG monitor model 24MP59G. So here is how I downloaded the drivers
- Open their Software and Support Page.
- Type model no 24MP59G, and hit the Search button
- It automatically located the drivers for Windows, Mac, and if there is anything else.
- Download the file and extracted the folder. It has the driver and the ICC file inside it.
The chances are that if there is additional software available for the monitor, it will be listed here.
I downloaded the OnScreen software, which helps me split my screen into different sizes and then place the windows accordingly.
4] How to install a color profile in Windows 11/10 using ICC Profile
Installing a color profile is very close to how we install fonts in Windows 11/10.
Locate the ICC or ICM file in the folder you extracted above. Then right-click on the file and then choose the install profile from the context menu. That’s it.
The color profile is installed instantly without any additional steps. A restart of the computer may finally make it effective. When using multiple monitor setups, you need to install the color profile for individual monitors.
Install a color profile using Color Management
If for some reason, it doesn’t work, then we can use the Color Management feature in Windows 10 to install the ICC or the ICM file.
In the Start menu search box, type “Color Management.” It will display the Color management option. Click to open. Here you can manage color profiles for all the devices related to the display. It can be Fax machine or printer or display.
- Select the monitor for which you need to install the color profile. Click on the identify monitor to confirm.
- Under profiles associated with the selected display, all the color profiles will be listed. Yes it is possible to have multiple color profiles, and you can switch between them
- Check the box which says — Use my settings for this device
- It will enable the Add button. Click on it, and select the ICM or ICC file.
- Once added, it will be available as one of the profiles.
- Select it and set it as the default profile in Windows 11/10.
Having done that, the next thing you should do is calibrate your display. It is crucial, as per my experience. While setting up the monitor at home, I found the red balance of the screen was on the higher side. I had to reduce it a bit to make it look natural.
I hope this tutorial was easy to understand, and that you were able to install a color profile in Windows 11/10 using ICC Profile.