
If you’re in the middle of installing Windows 10 or 11 and you encounter the dreaded “No Drives Detected” error, don’t panic. This issue often arises due to improper physical connections or missing storage controller drivers. In this guide, we’ll walk you through the troubleshooting steps to help you resolve this issue and continue with your Windows installation.
Key Takeaways
- Check physical connections: Ensure that all cables are securely connected to your drive and motherboard.
- Download necessary drivers: Install the correct storage drivers for your Intel or AMD system during Windows installation.
- Use PowerShell for driver extraction: Properly extract and transfer drivers using PowerShell to avoid errors.
Step 1: Verify Physical Connections

Before diving into software fixes, it’s essential to ensure that all physical connections are intact. Here’s what you need to check:
- SATA or Power Cable Connections: Ensure that both the power and SATA cables are securely connected to the drive. Also, confirm that the SATA cable is firmly attached to the motherboard.
- NVMe SSD: If you’re using an NVMe SSD, make sure it’s properly seated in the motherboard.

Step 2: Install the Correct Storage Controller Drivers
If physical connections are solid and the problem persists, it’s likely that the necessary drivers are missing. Here’s how to handle that:
1. Identify the Right Driver

- Intel-based systems: You’ll need the Intel Rapid Storage Technology (IRST) driver. There are two main versions:
- One for 10th and 11th generation Intel processors.
- One for 11th to 13th generation Intel processors.

2. Download and Prepare the Driver

Download the appropriate IRST driver from Intel’s official website. Do not copy the downloaded SetupRST.exe file directly to your USB flash drive. Windows setup cannot extract the necessary files from it.
Copy the Setup File to a Temporary Folder

Copy the setup file to a temporary folder on your local disk (e.g., C:\temp).
Open PowerShell as an Administrator

To extract the driver files, open PowerShell as an administrator. Once PowerShell is open, enter the following commands:
- Change to the temporary directory:
cd C:/temp - Run the setup file to extract the drivers:
.\SetupRST.exe -extractdrivers C:\RST\

This will extract the necessary driver files into the C:\RST\ directory.
Locate the Extracted Driver File

Once extracted, locate the iaStorVD.sys file in the C:\RST\VMD directory.
3. Transfer the Driver to a USB Flash Drive

Copy the iaStorVD.sys file to a USB flash drive.
Note: Many users have reported more success by copying the entire RST Folder to a blank USB Flash drive.
Step 3: Load the Driver During Windows Installation

Now that the necessary driver is ready:
- Insert the USB flash drive into the computer where you’re installing Windows.
- During the Windows installation process, click on “Load Driver” when prompted.
- Browse to the USB drive, select the
iaStorVD.sysfile (orRSTfolder), and click “OK.” - Once the driver is loaded, your drive should be visible, allowing you to continue the Windows installation.

Step 4: Alternative Driver Installation (If Intel RST Doesn’t Work) or on AMD Hardware
If the Intel RST driver doesn’t resolve the issue or you have AMD Hardware, follow these steps to find an alternative solution:
1. Check System Information

- Open System Information and check your Baseboard Manufacturer and Baseboard Product if you’re on a desktop.
- For laptops, locate the laptop model number.
2. Download Motherboard-Specific Drivers

- Visit your motherboard or laptop manufacturer’s website and search for your specific model.
- Download any relevant SATA, RAID, or AHCI drivers listed for your system. These drivers may include NVMe RAID or SATA RAID drivers, depending on your hardware.

3. Transfer and Use Drivers

- Copy the extracted driver files to a USB flash drive.
- Restart the Windows installation and let it scan the USB drive for any applicable drivers.
Conclusion
By following these steps, you should be able to fix the “No Drives Detected” error during your Windows 10 or 11 installation. Ensuring that your physical connections are secure and that the correct drivers are installed is key to resolving this issue. If the issue persists, double-check for any system-specific drivers from your motherboard or laptop manufacturer
FAQ
How do I know which driver to download for my system?
Check your processor generation or motherboard model. For Intel systems, use the Intel Rapid Storage Technology (IRST) driver. For AMD systems, refer to your motherboard manufacturer’s website for the appropriate SATA or RAID drivers.
Can I just copy the driver setup file to a USB drive and use it during installation?
No, you need to extract the driver files from the setup file first. Windows installation cannot extract drivers directly from a .exe file.
What if the Intel RST driver doesn’t work?
If the Intel RST driver doesn’t work, you’ll need to download specific drivers from your motherboard or laptop manufacturer’s website. Look for SATA, RAID, or AHCI drivers that are meant for use during Windows setup.
Why is my NVMe SSD not detected during installation?
If an NVMe SSD isn’t detected, it could be due to missing storage controller drivers or improper physical connections. Ensure the SSD is properly seated and that you’ve loaded the correct NVMe drivers during the installation process.
Is this guide applicable to both Windows 10 and Windows 11 installations?
Yes, the steps provided in this guide apply to both Windows 10 and Windows 11 installations.
Иногда при покупке новых компьютеров на базе процессоров Intell 11 поколения пользователи сталкиваются с проблемами установки ОС Windows 10. Производителям известно об этом досадном препятствии. Совместно с Intel, мы предлагаем Вам небольшое руководство по решению проблемы.

Краткая версия
Установка новой операционной системы Windows® 10 в системе с дисками, управляемыми Intel VMD
Описание
Во время установки операционной системы Windows* накопители для назначения недоступны.
Разрешение экрана
Выполните инструкции ниже для правильного обнаружения доступных накопителей для
-
1. Загрузить Intel RST пакеты драйверов установки ОС. F6flpy-x64 (Intel VMD).zip и F6flpy-x64 (Intel Non-Intel VMD).zip, размыв обе папки отдельно до флэш-накопителя USB.
-
2. Запустите процесс установки 64-® ОС Windows® 10.
-
3. Нагрузки Teh Intel RST драйвера с шага 1.
-
4. Нажмите «Загрузить драйвер».
-
5. Нажмите Обзор.
-
6. Выберите диск USB, содержащий драйвер F6, и разберите папку, содержаную драйвер. Нажмите OK.
-
7. Выберите соответствует драйверу одной из двух папок и Нажмите Следующий для этого.
-
Только одна из двух папок будет содержать драйвер, который соответствует этой папке. Когда выбрана папка совпадения, подтвердят, что драйвер со совмеделен (iaStorVD.sys или iaStorAC.sys) будет выделен и нажмите Next.
-
Общие рекомендации по использованию папки F6: Попробуйте использовать ее в одной папке; если драйвер отсутствует, попробуйте другую папку.
-
Для мобильных платформ11-го поколения начните работать с папкой F6flpy-x64 (Intel VMD).
-
Для платформ 11-го поколения для настольных ПК начните работать с папкой F6flpy-x64 (Intel non-Intel® VMD).
-
-
8. Выберите диск для установки ОС и нажмите Next.
Дополнительная информация
Intel® RST драйвера хранения с поддержкой платформ Intel® 11-го поколения в операционной системе пока нет входящие. По этой причине во время процесса установки должен быть установлен драйвер для распознавания дисков, Intel® RST данных на затрагиваемой платформе.
Error iastora.sys is a blue screen of death error and it primarily occurs when you install a new feature update on your computer. After it appears, you will find it difficult to update your existing apps, install new updates, or sometimes even a blue screen. At times, you may receive an error message that reads – DRIVER_IRQL_NOT_LESS_OR_EQUAL (iaStorA.sys) or SYSTEM_SERVICE_EXCEPTION (iaStorA.sys).
In this quick guide, we will discuss what possibly could have triggered this issue and nine possible solutions to this BSOD error.

What causes this iaStorA.sys Error in Windows 11/10?
This error normally appears when the Intel IRST or IDE ATA/ATAPI drivers are not working or have become obsolete on your PC. In addition to these, recent third-party app installation(s), and missing/damaged system files may also result in this error code.
In order to overcome this issue, you may update all your device drivers, uninstall the problematic software, or update. Make sure to run the SFC command to repair missing and corrupted system files on your PC. If none of these fixes help and you do have a system restore point, you may revert your device back to an earlier working point. In case you haven’t created any restore point, all you can do is perform a clean installation of Windows 11/10 on your computer.
- Remove the IRST drivers
- Update the Intel Rapid Storage Technology Driver
- Uninstall buggy applications
- Disable the background Running Services
- Delete Windows.old folder
- Run sfc/scannow command
- Use System Restore Point
- Clean Install Windows 10
Here are the stepwise workarounds to resolve this blue screen error iastora.sys on Windows 11/10 PC –
If you don’t receive the login screen, it becomes really difficult to attempt the below-troubleshooting guides. Boot into your device under Safe Mode and then apply the below fixes in the same order as discussed below.
1] Remove the IRST drivers
In case, this BSOD error iastora.sys is frequently appearing and thus can’t update the Windows, the IRST driver may be the possible reason. It is thereby recommended to uninstall the related IRST drivers to solve this error. Here’s how to apply this fix –
- Right-click on the Windows icon and choose Run.
- Type devmgmt.msc then tap OK to launch Device Manager.
- Henceforth, expand IDE ATA/ATAPI controllers section by clicking on the “>” sign.
- Right-click next on each driver separately and select the Uninstall device option from the context menu.

- Repeat this process systematically until each driver under IDE is removed.
Note: There is no need to re-install the IDE ATA/ATAPI controllers again. This is because they will auto-install themselves during the next Windows 10 update.
- Once you have successfully uninstalled all the ATA/ATAPI controllers, Restart your system to save the changes made so far.
2] Update the Intel Rapid Storage Technology (IRST) drivers
If you still are getting the BSOD error iastora.sys, there may be corrupt or outdated IRST drivers. All you require is to then update this with the latest version. Here are the steps-
- Click on the Search icon and type Device Manager in the text box, and hit the well-matched option.
- Next, locate and right-click on the Intel Rapid Storage Technology (Intel RST) driver from the list.
- Again, select the Update driver option using the context menu.
- Now, press the “Search automatically for updated driver software“ button and let it download the latest version.
- Once the task is over, Reboot your PC and try updating your Windows.
3] Uninstall buggy applications
Sometimes faulty software like third-party anti-virus, or lately installed apps may also cause this error iastora.sys on your PC. If that’s the case, try uninstalling the external apps one by one and find the culprit program. I hope doing this resolves the blue screen error on your computer.
- Press Win and I hotkey together to launch Settings.
- Here, select Apps thereafter Apps & Features from the left pane.
- Switch to the corresponding right pane, scroll downward, and select the lately installed app.
- Thereupon, hit the Uninstall button followed by Uninstall again to confirm the changes.

- Once you remove the app successfully, Restart your system normally.
4] Disable the background running Services
The services running in the background may also at times cause this BSOD error iastora.sys on your PC. If that’s the case, you better disable all such services from running in the background. Here’s how to perform this task –
- Press Win & R hotkey together to launch the Run dialog.
- Type msconfig in the text area henceforth hit the OK button.
- When the System Configuration window appears, hit the Services tab.
- Move to the lower pane and mark the Hide all Microsoft Services checkbox.
- Here, click on the Disable all button then OK to confirm the changes.
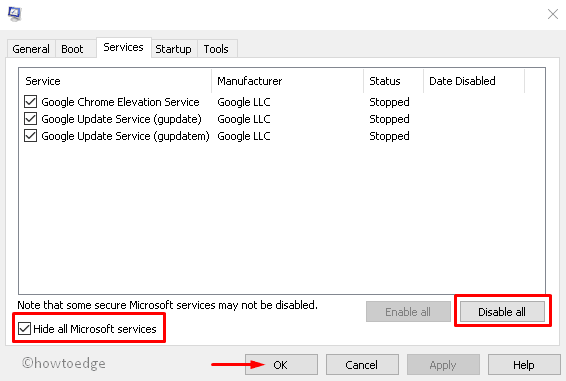
- Now go back to the System and update your Windows 10 PC.
- Once you perform the above steps, reboot your system and re-enable all the services using the above process.
5] Delete Windows.old folder
After Upgrading the OS, a new folder “Windows.old” appears by default in the root directory. This keeps the record of the previous OS files. This may arise some bugs like BSOD error iastora.sys on the Desktop. To solve this problem, you need to delete Windows.old folder by following these steps –
- Right-click on the Windows icon and select Run from the Power menu.
- When the dialog appears, type cmd in the text area and simultaneously hit Ctrl+Shift and Enter key.
- The Command Prompt will then launch having administrative privileges.
- Next, execute the following codes. Make sure to hit the Enter key at the end of each code.
attrib -r -a -s -h C:Windows.old /S /D
RD /S /Q %SystemDrive%windows.old

- After you finish the above steps, Restart your system to save the changes made so far.
6] Run SFC Utility
The System File Checker is another utility command of Windows 10 to fix various core file issues. This code identifies the corrupt system files and repairs the same. Here’s how to proceed-
- Launch the Start Menu then type Command Prompt.
- When the matching result appears, right-click on it and choose Run as administrator.
- If UAC prompts, tap Yes.
- Type sfc /scannow near the blinking cursor and then press the Enter key.

- This is a time-consuming process, so wait accordingly.
- Make sure to restart your PC once the above process completes.
7] Use System Restore Point
If you continue receiving the BSOD error iastora.sys interruption, you should better use the backup image of system files. This solution is applicable only when you have previously created a System Restore Point. Here are the steps to follow-
- Click on the Search icon and type System Restore Point. Double-click on the matching result.
- Under the System Protection window, select the System Restore button afterward Next on the succeeding page.
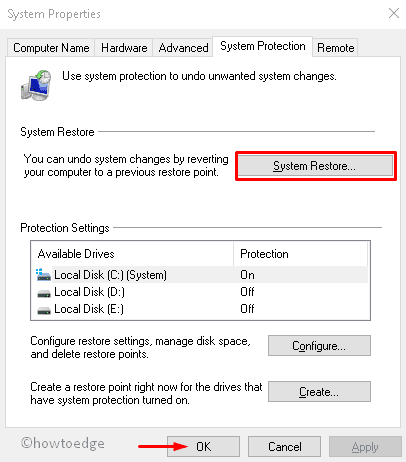
- Further, select the recently created Restore Point from the list. See the Snapshot below-
- Now click on Scan for affected programs to detect any faults in this file, followed by Next.

- Moving ahead tap Finish to confirm the changes.
- At last, Restart your system.
Most probably, you won’t see this interrupting BSOD error iastora.sys on your Windows Machine.
8] Clean install Windows 10
Even after applying all the above fixes, if the BSOD error iastora.sys still persists, you must install the latest feature update on your computer. To perform this task, you must download the Media Creation Tool or update Windows via the Installation Agent.
If you don’t have the Windows Setup file, follow these steps to get one –
- Open Microsoft Windows 10 download page.
- When the window appears, click on the Download tool now button to save the setup file.

- After you download the setup file, double-click on the same to start the installation. Next, check the “I Agree” option to accept Microsoft’s terms and conditions.
- Subsequently, enable the checkbox against Create Installation Media (USB flash drive, DVD, or ISO file) for another PC then Next to proceed.
- Now select your preferred language, architect, and edition. Henceforth, deactivate Use the recommended option for this PC option followed by the Next button.
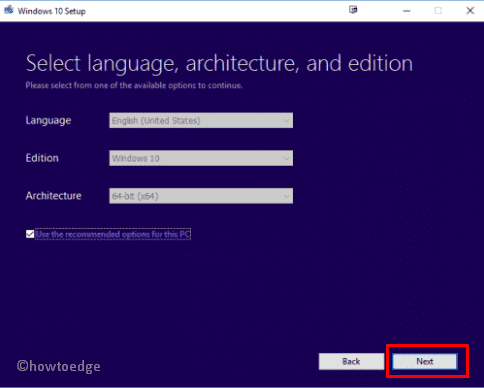
- Succeeding that choose the USB flash drive radio button then Next again.
- At last, click on the Finish button to complete the process. Once over, Reboot your PC.
What is Error iaStorA.sys?
IaStorA.sys is basically a driver file and is found under the C:\Windows\System32\drivers folder. This driver works in line with Intel Rapid Storage Technology and allows communication between your PC and hardware or other connected devices.
What does Intel Rapid Storage technology do?
Intel Rapid Storage Technology is a Windows-based application and it runs to improve the overall performance and reliability of your Windows PC. This technology is in general equipped with SATA disks for desktop, mobile, or other server platforms.
Not clear if you are using RAID or not. I am not and I still have that driver file installed. I also understand that you can’t reinstall the drivers unless Windows is working, so here’s a possible solution. Note that’s it’s only an idea and I really don’t know if it will work. SO BE WARNED and take an image of the current broken OS so at least you can go back if things get even worse using a free image backup tool. Or, maybe you could use another machine to clone the drive onto a spare one as a backup?
I also think that cekeu’s idea to boot into safe mode is a better idea if that works. Then you can reinstall the drivers within Windows.
Anyway, perhaps as a last resort, here’s my idea: MokiChU provides VMD drivers here (https://rog-forum.asus.com/t5/downloads-for-motherboards/drivers-intel-chipset-mei-vmd-6xx-7xx-8xx/t…) which contain the following files (including iaStorVD.sys):

Perhaps you could download his archive and manually place that file into the correct driver location using the command prompt in the rescue environment (or boot into a live version of Linux and do it that way if you prefer a graphical interface). If all else fails, something to consider. HOWEVER, remember that those might be more recent driver files than the ones Windows expects to find.
So, the other way (and probably the safer way) would be to do the same, but see if you can extract that file from the last drivers that you installed — maybe it was the one from your motherboard support page? I don’t know if you can extract the file out of those drivers, you’d need to investigate further with the drivers you actually used.
Once you get things working again, suggest you set up automatic OS backups. I use a free version of Macrium Reflect for that every 3 days on a schedule, but there is plenty of other free software for OS backups. I used to use Clonezilla before Macrium, although that needs to be run manually as a boot OS rather than Reflect, which does the job entirely from within Windows. Having OS backups has saved me on a few occasions, so worth looking into.
Good luck.
Z690 Hero, 12900K, BIOS 4001, MEI 2433.6.3.0, ME Firmware 16.1.35.2557, 7000X Case, RM1000x PSU, ASUS TUF OC 3090TI, 2 x 16GB Corsair RAM @ 5200MHz, Windows 11 Pro 23H2, Corsair H150i Elite AIO, 4x Corsair RGB fans, 3x M.2 NVME drives, 2x SATA SSDs, 2x SATA HDs.
The Blue Screen of Death errors have been haunting Windows 10 users for a long time. Unfortunately, they do not seem to stop anytime soon either. They are indicative of fatal system errors caused either due to software crashes or hardware failure. Lately, users have been encountering two specific kinds of BSOD bearing the error messages listed below: DRIVER_IRQL_NOT_LESS_OR_EQUAL (iaStorA.sys) or SYSTEM_SERVICE_EXCEPTION (iaStorA.sys). Both of these errors point towards a driver file related to the Intel Rapid Storage Technology (IRST) which helps to improve the performance and reliability of your device equipped with SATA Disks. We bring a helpful guide that will teach you how to fix Windows 10 blue screen iaStorA.sys BSOD error code.

Table of Contents
This Windows 10 Blue screen error code usually occurs due to:
- Issues in IRST drivers
- Unwanted processes running in the background
- Conflicting Third-party apps
- Corrupt Windows OS files
Method 1: Close All Background Services & Update Windows
The background services which are running unnecessarily might also cause this issue. Follow the given steps to disable them:
1. Hit Windows + R keys simultaneously to launch Run dialog box.
2. Type msconfig and click OK to launch System Configuration window.

3. Navigate to the Services tab and check the box titled Hide all Microsoft services

4. Now, click Disable all button and then, click on Apply > OK to save the changes.

5. Next, press Windows key and type windows update settings, then click Open.

6. Click on Check for Updates button.

7A. Click on Install Now to download the available updates. Then, restart your PC.

7B. If there is no update available, then it will show You’re up to date message.

Also Read: How to Download and Install Optional Updates in Windows 11
Method 2: Update IRST drivers
If Windows operating system is unable to find correct driver files, you will encounter the BSOD iaStorA.sys error. In this case update the drivers by downloading the required files from the official manufacturer site, as explained below:
1. Open Intel IRST webpage on your web browser.
2. Here, choose the Latest Version from the drop-down list.

3. Then, select the first driver item in the list and click the Download button which shows setuprst.exe

4. Click I accept the terms in the license agreement button to start the downloading process.

5. Once the download is completed, click setuprst.exe file to launch the installation wizard.

6. Click on Next and follow the on-screen instructions to finish installing the latest set of IRST drivers.
7. Finally, restart your PC.
Also Read: How to Fix Window 10 Laptop White Screen
Method 3: Reinstall IRST drivers
Before installing the latest version of IRST drivers, it is important to get rid of your existing ones to avoid any conflict that might arise between the two different versions. The current drivers are most probably corrupt and therefore, prompt BSOD error on your computer. This can occur due to a variety of factors, such as:
- Presence of malware and virus
- Improper installation of recent Windows update
- Bugs in the latest Windows build, etc.
Thus, to reinstall IRST drivers on your PC, follow these steps to fix iaStorA.sys BSOD error:
1. Press Windows + Q keys together and type device manager. Then, click on Open.
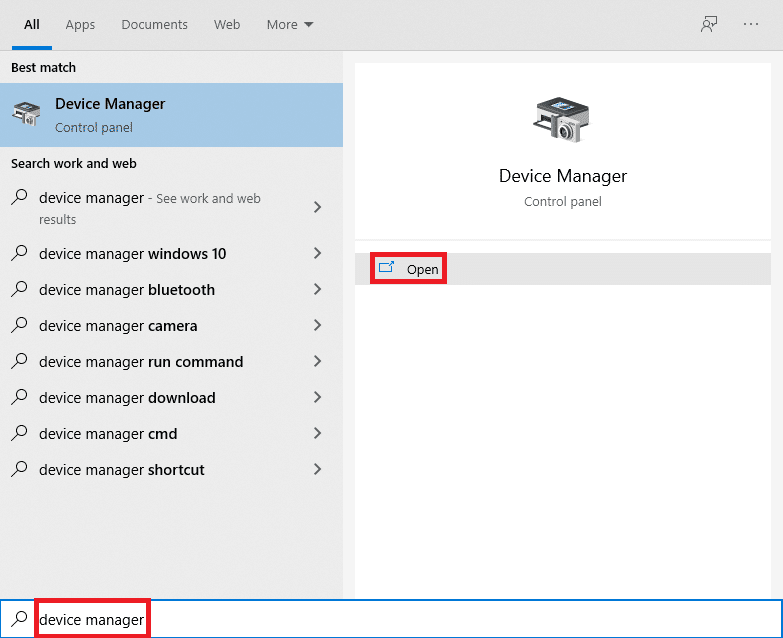
2. Double-click on IDE ATA/ATAPI controllers to expand the list, as shown.

3. Right-click your device driver (e.g. Standard SATA AHCI Controller) and choose Uninstall device from the context menu, as depicted below.

4. Uncheck the Delete the driver software for this device option and click Uninstall button.
5. If there are multiple devices listed under IDE ATA/ATAPI controllers category, repeat the same for all.
6. Finally, restart your Windows 10 PC.
7. Go to Device Manager and click the Scan for Hardware Changes icon, as depicted below.
Note: Make sure your internet connection is working properly as Windows will automatically look for drivers on the next boot and install them.

Method 4: Remove Old Windows folder
When you update Windows, there is a folder that is created automatically containing the files of the previous operating system. So, if there are any bugs in these files, it will lead to BSOD iastora.sys Windows 10 error. Follow the given steps to delete the old OS files:
1. Press the Windows key, type Command Prompt and click on Run as administrator.

2. Execute the following commands to delete windows.old folder and hit Enter after each:
attrib -r -a -s -h C:Windows.old /S /D
RD /S /Q %SystemDrive%windows.old

3. After deleting the folder, restart your PC and try again.
Also Read: How to Delete Win Setup Files in Windows 10
Method 5: Remove Conflicting Third-Party Apps
Sometimes, recently installed third-party apps might cause this iaStorA.sys Windows 10 blue screen error code. Hence, first, boot into the Safe Mode by following our guide on How to boot to Safe Mode in Windows 10. Then, follow the given steps:
1. Press Windows + I keys together to launch Settings.
2. Choose Apps from the given tiles

3. Under Apps & Features in the right pane, choose the conflict-causing third-party application and click Uninstall button to remove it.
Note: We have shown CCleaner as an example below.

4. Once you uninstall all troubling apps, restart your PC.
Method 6: Restore Windows 10 PC
If the issue persists then, try to restore your Windows 10 PC to a state with no s=issues. Use your backup image files to restore your system files to the previous one to fix iaStorA.sys BSOD error, as discussed below:
Note: This is only applicable if you have previously created System Restore Point.
1. Hit Windows + Q keys together, type system restore point, and press the Enter key.

2. Go to the System Protection tab and click the System Restore… button, as shown.

3. Click on the Next > button in the System Restore window.

4. Choose the restore point and click Scan for affected programs to detect the corrupt files in Windows system.

5. Then, click on the Next > button.
6. Finally, click on Finish to restore.

7. After restoring, restart your PC.
Also Read: Fix Windows 10 Yellow Screen of Death
Method 7: Reset Windows PC
The above fixes should have gotten rid of iaStorA.sys BSOD issue. In case, it did not, your sole option is to reset Windows or perform a clean installation altogether. Resetting is bound to solve most Windows problems as it restores all settings, system files & applications, drivers, etc. to their default state.
Note: It is advisable to backup all data since resetting the files will delete system files & folders.
1. Press Windows + I keys simultaneously to open Windows Settings.
2. Next, click the Update & Security tile.

3. Navigate to the Recovery menu in the left pane.
4. Finally, click Get started button under the Reset this PC section.

5. Choose either of the two options: Keep my files or Remove everything, preferably the former.

6. Follow the on-screen instructions to reset your computer and resolve the said error permanently.
Read our article on How to Fix Windows 10 Blue Screen Error to read other common solutions to fix such issues.
Recommended:
- How to Hide WiFi Network Name in Windows 11
- Fix Hard Drive Not Showing Up in Windows 10
- Fix Update Error 0x80888002 on Windows 11
- Fix Laptop Camera Not Detected on Windows 10
Hope this article helped you to fix BSOD Error iaStorA.sys on Windows 10. Let us know which method worked for you the best. Also, if you have any queries/suggestions regarding this article, then feel free to drop them in the comments section.