
Error iastora.sys is a blue screen of death error and it primarily occurs when you install a new feature update on your computer. After it appears, you will find it difficult to update your existing apps, install new updates, or sometimes even a blue screen. At times, you may receive an error message that reads – DRIVER_IRQL_NOT_LESS_OR_EQUAL (iaStorA.sys) or SYSTEM_SERVICE_EXCEPTION (iaStorA.sys).
In this quick guide, we will discuss what possibly could have triggered this issue and nine possible solutions to this BSOD error.

What causes this iaStorA.sys Error in Windows 11/10?
This error normally appears when the Intel IRST or IDE ATA/ATAPI drivers are not working or have become obsolete on your PC. In addition to these, recent third-party app installation(s), and missing/damaged system files may also result in this error code.
In order to overcome this issue, you may update all your device drivers, uninstall the problematic software, or update. Make sure to run the SFC command to repair missing and corrupted system files on your PC. If none of these fixes help and you do have a system restore point, you may revert your device back to an earlier working point. In case you haven’t created any restore point, all you can do is perform a clean installation of Windows 11/10 on your computer.
- Remove the IRST drivers
- Update the Intel Rapid Storage Technology Driver
- Uninstall buggy applications
- Disable the background Running Services
- Delete Windows.old folder
- Run sfc/scannow command
- Use System Restore Point
- Clean Install Windows 10
Here are the stepwise workarounds to resolve this blue screen error iastora.sys on Windows 11/10 PC –
If you don’t receive the login screen, it becomes really difficult to attempt the below-troubleshooting guides. Boot into your device under Safe Mode and then apply the below fixes in the same order as discussed below.
1] Remove the IRST drivers
In case, this BSOD error iastora.sys is frequently appearing and thus can’t update the Windows, the IRST driver may be the possible reason. It is thereby recommended to uninstall the related IRST drivers to solve this error. Here’s how to apply this fix –
- Right-click on the Windows icon and choose Run.
- Type devmgmt.msc then tap OK to launch Device Manager.
- Henceforth, expand IDE ATA/ATAPI controllers section by clicking on the “>” sign.
- Right-click next on each driver separately and select the Uninstall device option from the context menu.

- Repeat this process systematically until each driver under IDE is removed.
Note: There is no need to re-install the IDE ATA/ATAPI controllers again. This is because they will auto-install themselves during the next Windows 10 update.
- Once you have successfully uninstalled all the ATA/ATAPI controllers, Restart your system to save the changes made so far.
2] Update the Intel Rapid Storage Technology (IRST) drivers
If you still are getting the BSOD error iastora.sys, there may be corrupt or outdated IRST drivers. All you require is to then update this with the latest version. Here are the steps-
- Click on the Search icon and type Device Manager in the text box, and hit the well-matched option.
- Next, locate and right-click on the Intel Rapid Storage Technology (Intel RST) driver from the list.
- Again, select the Update driver option using the context menu.
- Now, press the “Search automatically for updated driver software“ button and let it download the latest version.
- Once the task is over, Reboot your PC and try updating your Windows.
3] Uninstall buggy applications
Sometimes faulty software like third-party anti-virus, or lately installed apps may also cause this error iastora.sys on your PC. If that’s the case, try uninstalling the external apps one by one and find the culprit program. I hope doing this resolves the blue screen error on your computer.
- Press Win and I hotkey together to launch Settings.
- Here, select Apps thereafter Apps & Features from the left pane.
- Switch to the corresponding right pane, scroll downward, and select the lately installed app.
- Thereupon, hit the Uninstall button followed by Uninstall again to confirm the changes.

- Once you remove the app successfully, Restart your system normally.
4] Disable the background running Services
The services running in the background may also at times cause this BSOD error iastora.sys on your PC. If that’s the case, you better disable all such services from running in the background. Here’s how to perform this task –
- Press Win & R hotkey together to launch the Run dialog.
- Type msconfig in the text area henceforth hit the OK button.
- When the System Configuration window appears, hit the Services tab.
- Move to the lower pane and mark the Hide all Microsoft Services checkbox.
- Here, click on the Disable all button then OK to confirm the changes.
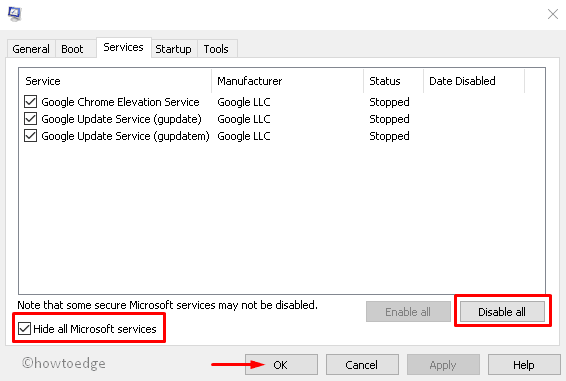
- Now go back to the System and update your Windows 10 PC.
- Once you perform the above steps, reboot your system and re-enable all the services using the above process.
5] Delete Windows.old folder
After Upgrading the OS, a new folder “Windows.old” appears by default in the root directory. This keeps the record of the previous OS files. This may arise some bugs like BSOD error iastora.sys on the Desktop. To solve this problem, you need to delete Windows.old folder by following these steps –
- Right-click on the Windows icon and select Run from the Power menu.
- When the dialog appears, type cmd in the text area and simultaneously hit Ctrl+Shift and Enter key.
- The Command Prompt will then launch having administrative privileges.
- Next, execute the following codes. Make sure to hit the Enter key at the end of each code.
attrib -r -a -s -h C:Windows.old /S /D
RD /S /Q %SystemDrive%windows.old

- After you finish the above steps, Restart your system to save the changes made so far.
6] Run SFC Utility
The System File Checker is another utility command of Windows 10 to fix various core file issues. This code identifies the corrupt system files and repairs the same. Here’s how to proceed-
- Launch the Start Menu then type Command Prompt.
- When the matching result appears, right-click on it and choose Run as administrator.
- If UAC prompts, tap Yes.
- Type sfc /scannow near the blinking cursor and then press the Enter key.

- This is a time-consuming process, so wait accordingly.
- Make sure to restart your PC once the above process completes.
7] Use System Restore Point
If you continue receiving the BSOD error iastora.sys interruption, you should better use the backup image of system files. This solution is applicable only when you have previously created a System Restore Point. Here are the steps to follow-
- Click on the Search icon and type System Restore Point. Double-click on the matching result.
- Under the System Protection window, select the System Restore button afterward Next on the succeeding page.
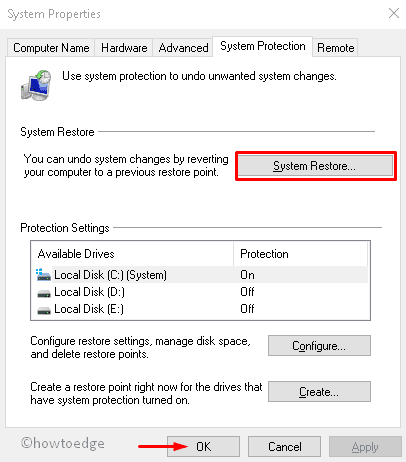
- Further, select the recently created Restore Point from the list. See the Snapshot below-
- Now click on Scan for affected programs to detect any faults in this file, followed by Next.

- Moving ahead tap Finish to confirm the changes.
- At last, Restart your system.
Most probably, you won’t see this interrupting BSOD error iastora.sys on your Windows Machine.
8] Clean install Windows 10
Even after applying all the above fixes, if the BSOD error iastora.sys still persists, you must install the latest feature update on your computer. To perform this task, you must download the Media Creation Tool or update Windows via the Installation Agent.
If you don’t have the Windows Setup file, follow these steps to get one –
- Open Microsoft Windows 10 download page.
- When the window appears, click on the Download tool now button to save the setup file.

- After you download the setup file, double-click on the same to start the installation. Next, check the “I Agree” option to accept Microsoft’s terms and conditions.
- Subsequently, enable the checkbox against Create Installation Media (USB flash drive, DVD, or ISO file) for another PC then Next to proceed.
- Now select your preferred language, architect, and edition. Henceforth, deactivate Use the recommended option for this PC option followed by the Next button.
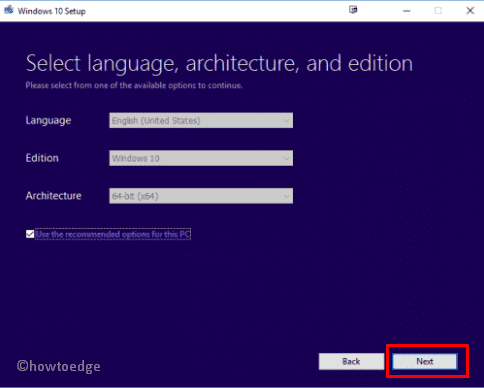
- Succeeding that choose the USB flash drive radio button then Next again.
- At last, click on the Finish button to complete the process. Once over, Reboot your PC.
What is Error iaStorA.sys?
IaStorA.sys is basically a driver file and is found under the C:\Windows\System32\drivers folder. This driver works in line with Intel Rapid Storage Technology and allows communication between your PC and hardware or other connected devices.
What does Intel Rapid Storage technology do?
Intel Rapid Storage Technology is a Windows-based application and it runs to improve the overall performance and reliability of your Windows PC. This technology is in general equipped with SATA disks for desktop, mobile, or other server platforms.
The Blue Screen of Death errors have been haunting Windows 10 users for a long time. Unfortunately, they do not seem to stop anytime soon either. They are indicative of fatal system errors caused either due to software crashes or hardware failure. Lately, users have been encountering two specific kinds of BSOD bearing the error messages listed below: DRIVER_IRQL_NOT_LESS_OR_EQUAL (iaStorA.sys) or SYSTEM_SERVICE_EXCEPTION (iaStorA.sys). Both of these errors point towards a driver file related to the Intel Rapid Storage Technology (IRST) which helps to improve the performance and reliability of your device equipped with SATA Disks. We bring a helpful guide that will teach you how to fix Windows 10 blue screen iaStorA.sys BSOD error code.

Table of Contents
This Windows 10 Blue screen error code usually occurs due to:
- Issues in IRST drivers
- Unwanted processes running in the background
- Conflicting Third-party apps
- Corrupt Windows OS files
Method 1: Close All Background Services & Update Windows
The background services which are running unnecessarily might also cause this issue. Follow the given steps to disable them:
1. Hit Windows + R keys simultaneously to launch Run dialog box.
2. Type msconfig and click OK to launch System Configuration window.

3. Navigate to the Services tab and check the box titled Hide all Microsoft services

4. Now, click Disable all button and then, click on Apply > OK to save the changes.

5. Next, press Windows key and type windows update settings, then click Open.

6. Click on Check for Updates button.

7A. Click on Install Now to download the available updates. Then, restart your PC.

7B. If there is no update available, then it will show You’re up to date message.

Also Read: How to Download and Install Optional Updates in Windows 11
Method 2: Update IRST drivers
If Windows operating system is unable to find correct driver files, you will encounter the BSOD iaStorA.sys error. In this case update the drivers by downloading the required files from the official manufacturer site, as explained below:
1. Open Intel IRST webpage on your web browser.
2. Here, choose the Latest Version from the drop-down list.

3. Then, select the first driver item in the list and click the Download button which shows setuprst.exe

4. Click I accept the terms in the license agreement button to start the downloading process.

5. Once the download is completed, click setuprst.exe file to launch the installation wizard.

6. Click on Next and follow the on-screen instructions to finish installing the latest set of IRST drivers.
7. Finally, restart your PC.
Also Read: How to Fix Window 10 Laptop White Screen
Method 3: Reinstall IRST drivers
Before installing the latest version of IRST drivers, it is important to get rid of your existing ones to avoid any conflict that might arise between the two different versions. The current drivers are most probably corrupt and therefore, prompt BSOD error on your computer. This can occur due to a variety of factors, such as:
- Presence of malware and virus
- Improper installation of recent Windows update
- Bugs in the latest Windows build, etc.
Thus, to reinstall IRST drivers on your PC, follow these steps to fix iaStorA.sys BSOD error:
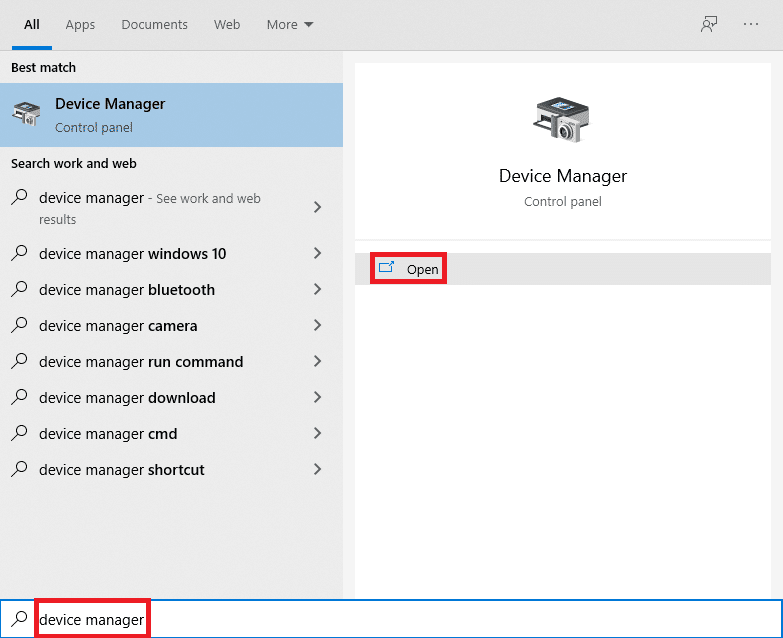
1. Press Windows + Q keys together and type device manager. Then, click on Open.
2. Double-click on IDE ATA/ATAPI controllers to expand the list, as shown.

3. Right-click your device driver (e.g. Standard SATA AHCI Controller) and choose Uninstall device from the context menu, as depicted below.

4. Uncheck the Delete the driver software for this device option and click Uninstall button.
5. If there are multiple devices listed under IDE ATA/ATAPI controllers category, repeat the same for all.
6. Finally, restart your Windows 10 PC.
7. Go to Device Manager and click the Scan for Hardware Changes icon, as depicted below.
Note: Make sure your internet connection is working properly as Windows will automatically look for drivers on the next boot and install them.

Method 4: Remove Old Windows folder
When you update Windows, there is a folder that is created automatically containing the files of the previous operating system. So, if there are any bugs in these files, it will lead to BSOD iastora.sys Windows 10 error. Follow the given steps to delete the old OS files:
1. Press the Windows key, type Command Prompt and click on Run as administrator.

2. Execute the following commands to delete windows.old folder and hit Enter after each:
attrib -r -a -s -h C:Windows.old /S /D
RD /S /Q %SystemDrive%windows.old

3. After deleting the folder, restart your PC and try again.
Also Read: How to Delete Win Setup Files in Windows 10
Method 5: Remove Conflicting Third-Party Apps
Sometimes, recently installed third-party apps might cause this iaStorA.sys Windows 10 blue screen error code. Hence, first, boot into the Safe Mode by following our guide on How to boot to Safe Mode in Windows 10. Then, follow the given steps:
1. Press Windows + I keys together to launch Settings.
2. Choose Apps from the given tiles

3. Under Apps & Features in the right pane, choose the conflict-causing third-party application and click Uninstall button to remove it.
Note: We have shown CCleaner as an example below.

4. Once you uninstall all troubling apps, restart your PC.
Method 6: Restore Windows 10 PC
If the issue persists then, try to restore your Windows 10 PC to a state with no s=issues. Use your backup image files to restore your system files to the previous one to fix iaStorA.sys BSOD error, as discussed below:
Note: This is only applicable if you have previously created System Restore Point.
1. Hit Windows + Q keys together, type system restore point, and press the Enter key.

2. Go to the System Protection tab and click the System Restore… button, as shown.

3. Click on the Next > button in the System Restore window.

4. Choose the restore point and click Scan for affected programs to detect the corrupt files in Windows system.

5. Then, click on the Next > button.
6. Finally, click on Finish to restore.

7. After restoring, restart your PC.
Also Read: Fix Windows 10 Yellow Screen of Death
Method 7: Reset Windows PC
The above fixes should have gotten rid of iaStorA.sys BSOD issue. In case, it did not, your sole option is to reset Windows or perform a clean installation altogether. Resetting is bound to solve most Windows problems as it restores all settings, system files & applications, drivers, etc. to their default state.
Note: It is advisable to backup all data since resetting the files will delete system files & folders.
1. Press Windows + I keys simultaneously to open Windows Settings.
2. Next, click the Update & Security tile.

3. Navigate to the Recovery menu in the left pane.
4. Finally, click Get started button under the Reset this PC section.

5. Choose either of the two options: Keep my files or Remove everything, preferably the former.

6. Follow the on-screen instructions to reset your computer and resolve the said error permanently.
Read our article on How to Fix Windows 10 Blue Screen Error to read other common solutions to fix such issues.
Recommended:
- How to Hide WiFi Network Name in Windows 11
- Fix Hard Drive Not Showing Up in Windows 10
- Fix Update Error 0x80888002 on Windows 11
- Fix Laptop Camera Not Detected on Windows 10
Hope this article helped you to fix BSOD Error iaStorA.sys on Windows 10. Let us know which method worked for you the best. Also, if you have any queries/suggestions regarding this article, then feel free to drop them in the comments section.
-
Home
-
News
- Top 3 Ways to Fix iaStorA.sys BSOD Windows 10
By Tina |
Last Updated
What is the error iaStorA.sys BSOD? How to address the error iaStorA.sys Windows 10? This post from MiniTool will show you the solutions. In addition, you can visit MiniTool to find more Windows solutions and tips.
What Is the Error iaStorA.sys BSOD?
When opening the computer, it is common for you to encounter the Blue Screen of Death error, such as you may encounter the CMUSBDAC.SYS error, iaStorA.sys BSOD error and so on.
In this post, we will introduce the iaStorA.sys BSOD error. In general, when you encounter the iaStorA.sys failed error, it often comes with the error code driver_irql_not_less_or_equal or KMODE_EXECEPTION_NOT_HANDLED.
The iaStorA.sys BSOD indicates that a violation occurred in iaStorA.sys, which is part of Intel Rapid Storage Technology. It’s usually an indicator that a kernel-mode driver attempted to access a pageable memory at an IRQL process that was too high.
So, in the following section, we will show you how to fix the error iaStorA.sys failed.
Top 3 Ways to Fix iaStorA.sys BSOD Windows 10
In this section, we will show you how to fix the iaStorA.sys BSOD. If you can still boot to Windows Desktop, you can directly start the following fixes. If cannot, you can go to boot your PC to Safe Mode with networking for the fix.
Way 1. Remove the IRST Drivers
Most users have complain that they have fixed the iaStorA.sys failed error by removing the IRST drivers.
So, in order to fix this problem, try this solution.
Now, here is the tutorial.
- Press Windows key and R key together to open Run dialog, then type devmgmt.msc in the box and click OK to continue.
- In the Device Manager window, expand the IDE ATA/ATAPI controllers.
- Select each item and right-click it to choose Uninstall.
- Then you can follow the on-screen instruction to continue.
Tip: You will not break any functionality even if all IDE ATA/ATAPI controllers have been uninstalled. Windows all re-install all required drivers when restarting the computer.
When all steps are finished, reboot your computer and check whether the iaStorA.sys BSOD is solved.
If this solution is not effective, try other solutions.
Way 2. Update the Intel Rapid Storage Technology Drivers
If the above solution is not effective, you can try to update the Intel Rapid Storage Technology drivers. In general, updating the Intel Rapid Storage technology drivers can help to fix the iaStorA.sys BSOD Windows 10 error.
Now, here is the tutorial.
1. To update the Intel Rapid Storage Technology drivers, you can download it from its official website.
2. Then you can click here to download the Intel Rapid Storage Technology and download the SetupRST.exe installer.
3. After that, open the Installer and follow the on-screen prompts to install the Intel Rapid Storage Technology drivers.
Once all steps are finished, reboot your computer and check whether the error iaStorA.sys Windows 10 is solved.
Way 3. Reset the Computer
If the above solution cannot fix the error iaStorA.sys failed, you can choose to reset the computer. In general, resetting the computer can effectively solve almost operating system problems.
So, in order to fix the iaStorA.sys BSOD error, you can choose to reset the computer. But please back up all important files before proceeding on resetting the computer.
Now, here is the tutorial.
- Press Windows key and I key together to open Settings.
- In the pop-up window, go to the Recovery tab.
- Then click Get started under Reset this PC.
- Next, you can follow the on-screen steps to continue. It is recommended to choose Keep my files to continue. In this way, your personal files would not be affected.
When it is finished, reboot your computer and check whether the iaStorA.sys BSOD is solved.
Tips:
If the PC cannot boot to Desktop, you can reset the PC in WinRE.
Final Words
To sum up, this post has introduced 3 ways to fix the iaStorA.sys failed error. If you have encountered the same error, try these solutions. If you have any better solution to fix this error iaStorA.sys Windows 10, you can share it on the comment zone.
About The Author
Position: Columnist
Tina is a technology enthusiast and joined MiniTool in 2018. As an editor of MiniTool, she is keeping on sharing computer tips and providing reliable solutions, especially specializing in Windows and files backup and restore. Besides, she is expanding her knowledge and skills in data recovery, disk space optimizations, etc. On her spare time, Tina likes to watch movies, go shopping or chat with friends and enjoy her life.
iaStorAC.sys BSoD Error: 6 Ways to Easily Fix It
The Blue Screen of Death (BSoD) is an ominous term for any computer user. It signifies a critical system error that the Windows operating system encounters, often resulting in a sudden system shutdown. Among the various types of BSoD errors, one specific issue that users frequently confront is the iaStorAC.sys Stop Error. This error is associated with Intel’s Rapid Storage Technology and often indicates a problem with the hardware, drivers, or storage controller.
Understanding the iaStorAC.sys BSoD error and the various methods available to fix it can save users costly repairs or data loss. In this article, we will explore the nature of this error, its causes, and six effective ways to resolve it.
Understanding iaStorAC.sys
The iaStorAC.sys file is a system driver associated with Intel’s storage technologies. It aids in managing communication between the operating system and Intel storage controllers. When an issue arises with this driver, it can lead to disk read/write failures, corruptions, and ultimately the dreaded BSoD.
As Windows tries to process operations involving data stored on your drives, any error detected in the driver can throw the system into a protective shutdown, resulting in a Blue Screen error with a related notification. While such protective measures serve to prevent further damage, they can be highly inconvenient, causing lost time and productivity.
Causes of iaStorAC.sys BSoD
Numerous factors can lead to the iaStorAC.sys error, including:
-
Outdated or Corrupted Drivers: The most common cause of this BSoD is having outdated or incompatible drivers. As systems receive updates, storage drivers may become incompatible with newer software.
-
Faulty Hardware: Bad sectors on a hard drive, problems with RAM, or issues with the motherboard can all lead to this error.
-
Software Conflicts: Sometimes, conflicts between software applications and the storage driver can cause it to crash.
-
Malware: Malware infections can corrupt system files, including drivers, leading to BSoD errors.
-
Improper Shutdowns: Unexpected shutdowns caused by power supply issues or sudden hardware failures can corrupt the
iaStorAC.sysfile. -
Bad Windows Updates: Occasionally, specific Windows updates may introduce compatibility issues or bugs that can trigger the BSoD.
6 Ways to Fix iaStorAC.sys BSoD Error
1. Update or Roll Back Drivers
Updating drivers is often a straightforward solution when dealing with BSoD errors. Here’s how to do that:
-
Updating Drivers:
- Right-click on the Start menu and select “Device Manager.”
- Locate “IDE ATA/ATAPI controllers” or “Storage Controllers.”
- Find the Intel Rapid Storage Technology driver and right-click on it.
- Select “Update Driver.”
- Choose “Search automatically for updated driver software.” Follow the prompts.
-
Rolling Back Drivers (if the problem started after a recent update):
- In Device Manager, right-click on the storage controller driver.
- Select “Properties.”
- Go to the “Driver” tab and click on “Roll Back Driver.”
2. Run the Windows Memory Diagnostic Tool
Memory issues can cause serious problems in system performance and lead to errors like BSoD. The Windows Memory Diagnostic Tool allows you to check for any RAM-related issues:
- Type “Windows Memory Diagnostic” into the Start menu.
- Choose “Restart now and check for problems.”
- The computer will restart, and the tool will run tests on your memory.
- Once completed, it will report any findings.
3. Check Disk for Errors
Issues with your hard disk drive can directly contribute to the iaStorAC.sys error. Windows has built-in tools that allow you to check your hard drive and fix errors:
- Open Command Prompt as Administrator by typing “cmd” in the Start menu search, right-clicking it, and selecting “Run as administrator.”
- Type
chkdsk /f /rand press Enter. You may need to confirm your intention to schedule the check on the next restart. - Restart your computer to allow the tool to check and fix any issues found on your hard drive.
4. Scan for Malware
Malware infections can greatly affect driver files and performance. A robust antimalware solution can protect and heal your system:
- Use an up-to-date antivirus program to perform a full system scan.
- You can also use Windows Defender or free tools like Malwarebytes for a second opinion.
- Ensure to follow up on any recommended actions, including quarantining or removing detected threats.
5. Uninstall Recent Windows Updates
If your BSoD error started appearing after a Windows update, rolling back those updates might solve the problem:
- Go to Settings > Update & Security > Windows Update.
- Click on “View update history.”
- Select “Uninstall updates” and get down to the list of recent updates.
- Identify the latest updates and uninstall them one by one until you find the offending one.
6. Restore Your System to an Earlier Point
If all else fails, using System Restore to return your computer to an earlier state can solve your problems:
- Type “System Restore” into the search bar.
- Choose “Create a restore point” and select “System Restore.”
- Follow the prompts, ensuring you choose a restore point from before the
iaStorAC.syserror began. - Complete the process, and your system will revert to its previous state.
Conclusion
Addressing the iaStorAC.sys BSoD error doesn’t have to be an ordeal. By following the above steps, most users can efficiently troubleshoot and resolve the issue without requiring significant technical expertise. Always ensure to keep your system up to date, protect it with reliable antivirus software, and regularly back up important files to prevent adversity.
Remember, if you continue to struggle with BSoD errors or if the problem appears to be hardware-related, it may be time to consult with a professional technician. Avoiding further complications in a critical system is always a priority, ensuring that your work and personal data remain secure.
Hello rx7,
Thank you for posting on the Intel® communities.
In order to better assist you, please provide the following:
1. Run the Intel® System Support Utility (Intel® SSU) to gather more details about the system.
· Download the Intel® SSU and save the application on your computer: https://downloadcenter.intel.com/download/25293/Intel-System-Support-Utility-for-Windows-
· Open the application, check the «Everything» checkbox, and click «Scan» to see the system and device information. The Intel® SSU defaults to the «Summary View» on the output screen following the scan. Click the menu where it says «Summary» to change to «Detailed View».
· To save your scan, click Next and click Save.
2. Is this issue recent? Did you notice the issue after a system update?
3. Did you get the BSOD after opening the Intel® Rapid Storage Technology (Intel® RST)?
4. Have you noticed a pattern for the BSOD?
5. What is your RAID configuration?
6. Have you updated your operating system and BIOS?
7. Have you tried reinstalling the operating system?
Regards,
Deivid A.
Intel Customer Support Technician