
What are the chances you bought a new mic to chat with your friends, but it is not working? If it is the HyperX Cloud 2 Mic, we have observed a few reports across the globe where users claim that the new mic is not working on their PC. There is no definite reason for this, but it is generally to drivers and settings on your PC. We have listed the best methods to help you fix HyperX Cloud 2 Mic Not Working On Windows 10.
Best Methods To Fix HyperX Cloud 2 Mic Not Working on Windows
The HyperX Cloud 2 Mic is a great device that thousands of users like. But sometimes, it can develop issues and stop working. We have listed the best troubleshooting methods below. You can try each one and check if the issue has been fixed. Once the mic starts working, you can ignore the remaining methods.
Method 1: Check The Mute Button And Connections
The HyperX Cloud 2 Mic has a mute button, which, if activated, will prevent your voice from being heard. Check the Mute button and disable it to converse with your friends.
Another important thing to check is the connections. Verify if the HyperX Cloud 2 Mic has been properly connected, and try changing the ports to confirm if the USB port works fine.
Also Read: Mic Not Working on Discord – Ways to Solve It
Method 2: Verify The Sound Settings
You need to set the HyperX Cloud II Mic as a default device on your PC. Here are the steps on how to do that:
Step 1: Press Win + R to open the RUN box.
Step 2: Type Control in the text space and click OK.

Step 3: In the Control Panel window, click View by and choose Large Icons.
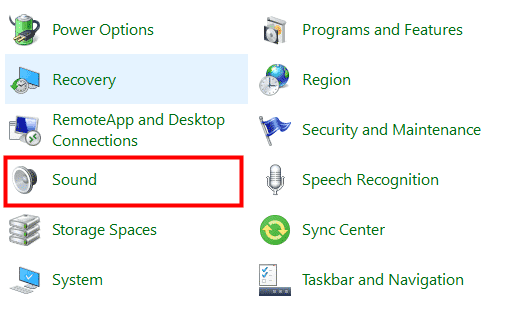
Step 4: Choose Sound from the options, and a new box will open.

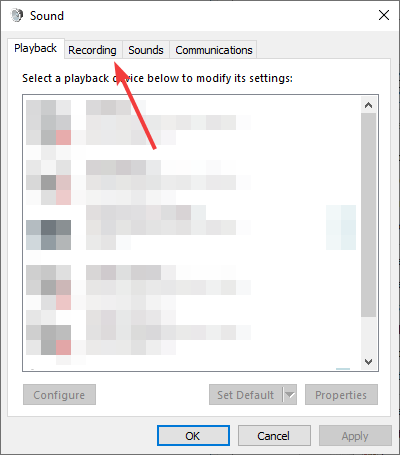
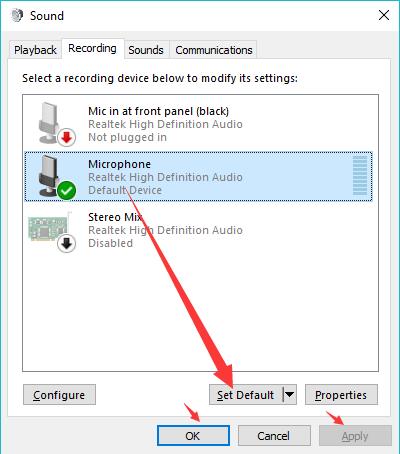
Step 5: Click on the Recording tab.
Step 6: Right-click on any space inside the box and check the box next to Show Disabled Devices.
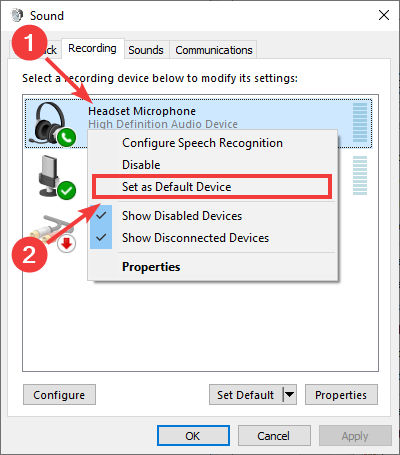
Step 7: Next, right-click the Headset Microphone option and choose Enable.
Step 8: Right-click again and choose Set as Default Device.
The HyperX Cloud 2 Mic is now set as a default device and enabled for use. If you are still facing this issue, then follow the next step.
Method 3: Update Headset Drivers
Drivers play a key role in running your PC smoothly. Hence, it is necessary to update the drivers.
There are two methods to update the drivers related to HyperX Cloud 2 Mic – OEM website and Advanced Driver Updater. We will discuss both these methods in detail.
Original Equipment Manufacturer Website
All hardware manufacturers maintain an official website where customers can get all the resources online. This includes drivers, tutorials, guides, etc. You must navigate to the official website and search for the drivers compatible with your headphone/mic.
Download and install the latest drivers, and you can fix the Microphone issues.
Advanced Driver Updater
Advanced Driver Updater is a third-party driver updater application that scans, identifies, and updates your system’s driver anomalies. If you cannot locate the official drivers of the HyperX Cloud 2 Mic, then you can use the Advanced Driver Updater app to do that. Here are the steps:
Step 1: Download and install Advanced Driver Updater on your system using the link below.
Step 2: Open the software and click the Start Scan Now button.

Step 3: A list of driver issues will be presented on your screen.

Step 4: Click the Update button next to HyperX Cloud 2 Mic and follow the steps.
Step 5: After completing the driver updation process, reboot your PC.
Method 4: Run The Audio Troubleshooter
Microsoft has provided a bunch of troubleshooters that will fix the audio issues on your system. Here are the steps to run these troubleshooters:
Step 1: Press Win + I to open the Windows Settings.
Step 2: Click on the System tab in the left window.
Step 3: Click on the Troubleshoot option on the right side.

Step 4: Next, click on Other Troubleshooters.

Step 5: Now locate Audio Troubleshooter and click RUN next to it.

Step 6: Follow the onscreen instructions to fix HyperX Cloud 2 Mic not working on Windows 10.
Also Read: Fixed – Blue Yeti Microphone Driver Not Detected Error on Windows 11/10
Method 5: Enable Microphone Access
Check if the Microphone Access is enabled for all apps on your PC. Here are the steps to do that:
Step 1: Press Win + S to open Windows Search.
Step 2: Type Microphone privacy settings and click the relevant result under Best Match.

Step 3: Ensure the toggle button next to Microphone Access is enabled in the Windows Setting box.

Step 4: Also check below if the app you are trying to use the Mic with has the toggle button turned on as well.
Check if the HyperX Cloud 2 Mic is not working on Windows 10 and if it has been fixed or not.
Method 6: Restart Windows Audio Service
The Windows Audio Service is always on by default but can be compromised due to other conflicting services. We recommend that you restart this service once.
Step 1: Press Win + R to open the RUN box.
Step 2: Type “Services.msc” and hit the ok button.

Step 3: A new window will open with a list of Services listed alphabetically.

Step 4: Locate Windows Audio and right-click to view the context menu.
Step 5: Select Restart and close the Services window.
Method 7: Reset Windows
The final step we recommend is to reset your Windows operating system. Choose to Keep files so you will not lose your precious content. Here are the steps:
Step 1: Press Win + I to open the Settings box.
Step 2: Click On the system tab in the left panel.

Step 3: Next, click on the Recovery tab in the right section.
Step 4: Finally, click the Reset PC button and choose the Keep My Files option in the next window.

Step 5: Follow the onscreen instructions to reset your PC.
Are You Able To Chat With Your Friends Using The HyperX Cloud 2 Mic?
The HyperX Cloud 2 Mic is an amazing gadget with many features. However, when this device does not work with your Windows PC for certain reasons, you can update drivers, enable the microphone, restart service, and, if nothing works, reset your PC to fix the HyperX headset mic not working issue. We hope you can troubleshoot the error using the steps listed in this post.
Also Read: How to Fix “SteelSeries Arctis 7 Mic Stops Working” Problem On Windows 11/10
In the coming sections of this article, you will learn the quick and easy solutions to resolve the HyperX Cloud 2 mic not working issue on your Windows 11/10 PC.
Sound is what makes your gaming sessions exciting. Without thrilling sounds, even the most fascinating games lose their charm. Hence, there are many gaming-focused headsets to offer you the best sound experience when playing games on your computer. HyperX Cloud 2 is one such microphone with features, such as passive noise cancellation, virtual 7.1 surround sound, and memory foam cushion, making it a popular choice among gamers across the globe. However, unfortunately, the HyperX Cloud 2 mic is not working for many users.
Are you also struggling with a similar issue? If yes, this article is going to be your favorite for the day. Here, we share the tried and tested solutions for HyperX Cloud microphone problems curated after researching the case deeply. However, before discussing the fixes, it is on point to discuss the probable culprits behind the problem you are experiencing to help you fix it better.
Why is My HyperX Cloud 2 Mic Not Working
The following factors may be a reason your HyperX Cloud headset has become dysfunctional.
- The game/app with which you are trying to use the microphone does not have permission to use the mic
- You have not enabled the headset
- The drivers for your microphone/audio are outdated
- HyperX Cloud is not set as the default microphone on your computer
- Your Windows audio service files have become corrupted
After understanding the factors that may have contributed to the HyperX Cloud 2 headset mic not working issue, we are in a position to solve this problem. Hence, let us walk you through the most suitable fixes for the microphone issue without wasting your priceless time.
Top Fixes for Windows 11/Windows 10 HyperX Cloud 2 Mic Not Working Problem
You can apply the following solutions to get rid of the HyperX Cloud 2 wireless mic not working problem on your computer.
Fix 1: Ensure your mic is connected to the computer correctly
Sometimes microphone connection problems can also cause your microphone to not work. Hence, you should check your headset’s connection before going deep into troubleshooting. If all connectors are seated correctly, you can plug the USB cable into any other USB port or use the 3.5mm audio jack in the place of the USB to connect the microphone to your computer. If this does not solve your problem, you can proceed with the following solutions.
Also Read: USB 3.0 Driver Download and Update for Windows 10, 11 PC
Fix 2: Make sure you have enabled the microphone
The HyperX Cloud 2 mic may not be working on your PC if the microphone is disabled. Hence, you can follow the below directions to enable the headset to make it work.
- Firstly, you are required to open your computer’s Control Panel. You can access the Control Panel by searching for it through the Windows search and selecting it from the search results.

- After opening the Control Panel, click on View by and select Large icons from the drop-down menu on your screen.
- The next step is to select Sound from the options available in the Control Panel menu.
- You can now choose Recording from the available options.
- Next, right-click the empty space and select the option to Show Disabled Devices.
- Right-click your microphone and choose the option allowing you to Enable it from the context menu.
- Lastly, click on the Apply and OK buttons to let the changes take effect.
Fix 3: Set HyperX Cloud 2 as your computer’s default microphone
If the headset you are currently using is not the default microphone device, you may end up with problems such as the HyperX Cloud 2 mic not working on Windows 11/10. Thus, you can follow the below steps to set the mic as your default device to fix the issue.
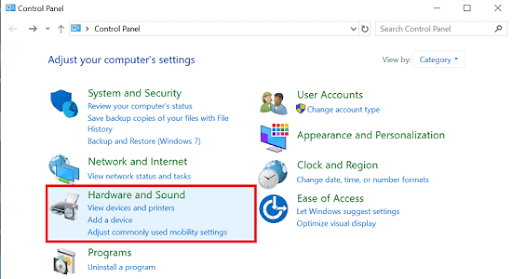
- To get started with the process of setting your HyperX Cloud 2 as the default microphone, open the Control Panel.
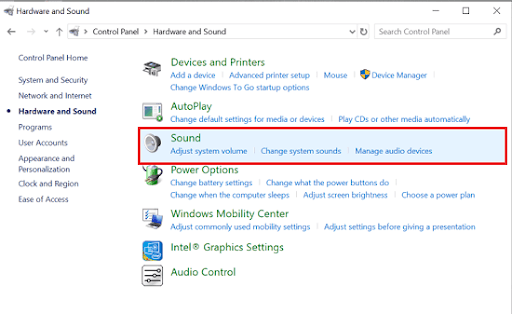
- After the Control Panel appears on your screen, choose Hardware and Sound from the available menu.
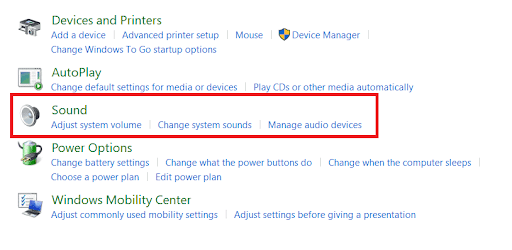
- You can now select Sound from the option available in the Hardware and Sound menu.
- Right-click on your HyperX Cloud 2 microphone and choose the Set as Default Device option from the on-screen context menu.
- Lastly, you can save the changes by clicking on the Apply and OK buttons.
Also Read: How to Fix Computer Freezes Randomly in Windows 10, 11?
Fix 4: Allows apps/games to use the microphone
The applications or games on your computer may not be allowed to access the microphone, resulting in the HyperX Cloud 2 wireless mic not working issue. Hence, you can follow the below instructions to grant the apps and games permission to use the microphone.
- Firstly, access the Windows search utility using the Windows+S hotkey.
- Secondly, input Microphone privacy settings in the on-screen search box and press Enter.
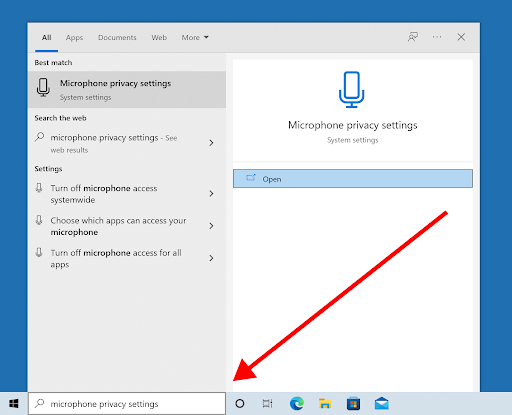
- Ensure the Microphone access for this device is On.
- Next, toggle on the option to Allow apps to access your microphone.
- You can now toggle on the apps for which you want to allow microphone access.
Fix 5: Unmute your microphone
Hearing sound from a muted microphone is practically impossible. Hence, you should ensure the microphone is not muted if the Windows 11 or Windows 10 HyperX Cloud 2 mic is not working. You can go along the following path to unmute the microphone.
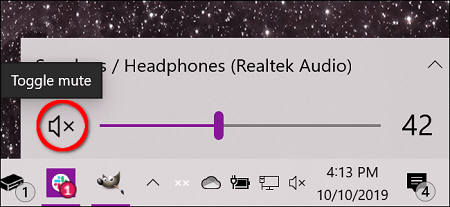
- Firstly, right-click the speaker icon on your taskbar.
- Secondly, check if the microphone’s mute toggle is on or off.
- Lastly, click on the mute toggle to turn it off to unmute your headset.
Fix 6: Reset your Windows audio service
Since corrupted Windows audio service files are another reason you may experience the HyperX Cloud 2 mic not working problem, you can reset the service to fix the issue. Here are the steps to do it.
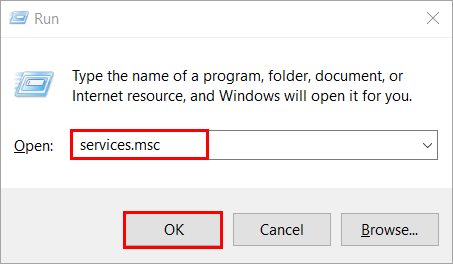
- To begin the process of resetting the Windows audio service, use the Win+R hotkey to access the Run utility.
- Secondly, input services.msc in the box on your screen and click OK.
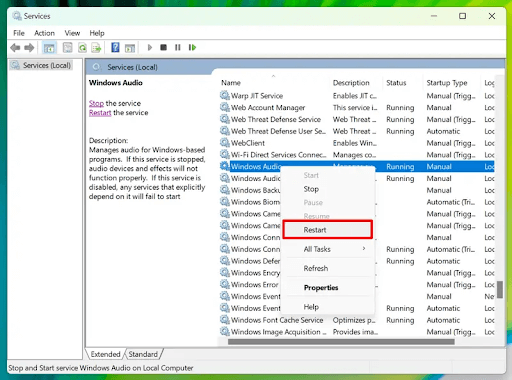
- You can now scroll down the list of services to locate the Windows Audio service.
- Check whether or not the Windows Audio service’s status is running.
- If the service is not running, right-click on it, and choose the Start option.
- If the service is running, right-click the service, and select the option to Restart it.
Also Read: No DP Signal From Your Device Monitor (Dell): FIXED
Fix 7: Use the built-in Windows troubleshooter
Windows computers come with a troubleshooting tool to fix issues, such as the HyperX Cloud 2 mic stops working on your Windows 10/11 PC. You can follow these steps to check if the troubleshooter can solve your problem.
- Firstly, right-click the speaker icon on the taskbar and select the option to Troubleshoot sound problems from options in the context menu.
- Lastly, you can follow the on-screen directions to troubleshoot the problem.
Fix 8: Update Microphone/Audio drivers with Win Riser
Outdated or corrupted drivers encourage issues like the one you are trying to fix. Moreover, out-of-date can result in many serious problems, such as system crashes. Hence, you should always have updated drivers installed on your computer to eliminate the HyperX Cloud 2 headset mic not working and other issues.
You can update drivers in two ways. Either you can update the microphone drivers manually through the Device Manager (which is a highly technical, time-consuming, and daunting process) or you can use specialized software like Win Riser to get the drivers updated automatically (the approach we recommend).
Check out the Top List of Best Free Driver Updater Software to Use
Win Riser is a renowned driver update and PC performance optimization tool with junk and invalid registry cleaning, fast detection and elimination of malware, single-click driver updates, an option to roll back to the earlier drivers to dodge update-related problems, 24*7 customer support, and many other incredible features. You can follow the below quick and simple steps to use this software.
- Firstly, click on the link below to download the Win Riser program on your computer.
- Secondly, you can follow the instructions on your screen to complete the software installation.
- You can now take a small break of two to three seconds to sit back and relax until Win Riser scans your PC thoroughly to detect outdated drivers, malware, faulty registries, and other problems.
- After Win Riser completes the scan, you can go through the results and select the Fix Issues Now option to update drivers and drive all the problems away from your computer automatically.

Wrapping Up
So, the previous section of this guide elaborated on the most effective methods to fix the HyperX Cloud 2 mic not working problem on your Windows 10/11 PC. After applying these solutions, your microphone will start working perfectly. However, if for some reason, the problem persists, you can contact the manufacturer to request a replacement (if your microphone is new and under warranty), as the headset may be faulty or broken. You can also leave a reply in the comments section if you have any doubts, questions, or suggestions about this article.
Skip to content Skip to blog sidebar
Your HyperX Cloud II headset microphone is not working properly? Don’t fret! Here is a list of effective tips that can help you fix it:
- Check the mute button on your headset
- Check your sound settings
- Check the microphone settings for your apps
1. Check the mute button on your headset
There is a mute switch on your HyperX Cloud II headset. Your microphone won’t be working properly when you accidentally turn it on. You should check it to make sure the mic isn’t turned on.
2. Check your sound settings
You should make sure your HyperX Cloud II headset mic is enabled and set to the default mic on your Windows computer.
Step 1: Press the Win and R keys on your keyboard, then enter “mmsys.cpl“.
Step 2: Select the Recording tab.
Step 3: Make sure your headset microphone is enabled (right click it and select Enable).

Step 4: Make sure your headset microphone is set to the default microphone (right click it and select Set as Default Device).
Step 5: Click OK.
See if you can use your HyperX Cloud II mic now.
3. Check the microphone settings for your apps
* This fix is for Windows 10 users only.
You should allow your apps to access your HyperX Cloud II mic, so you can use the mic on your Windows 10 computer.
Step 1: Press the Win and I keys on your keyboard.
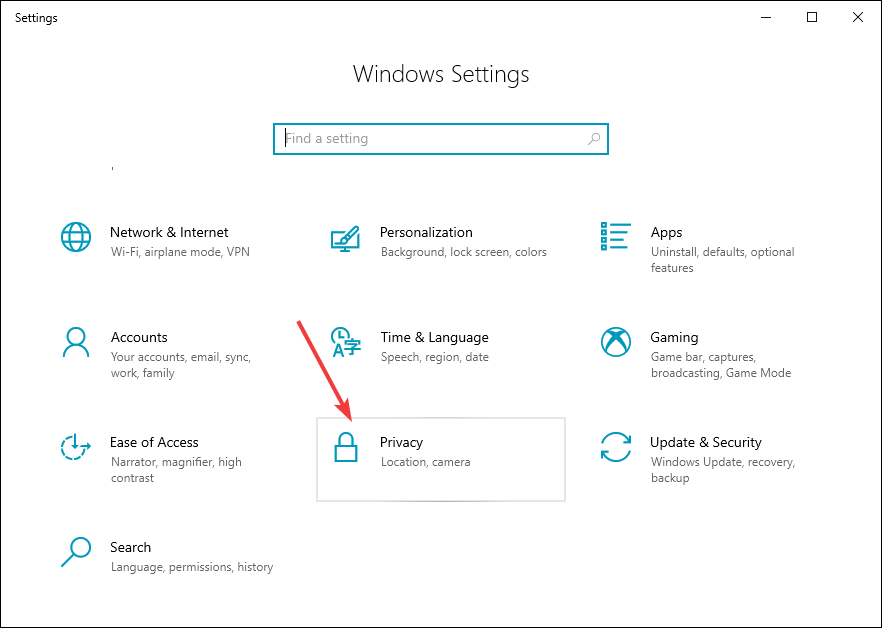
Step 2: Select Privacy.
Step 3: Select Microphone.
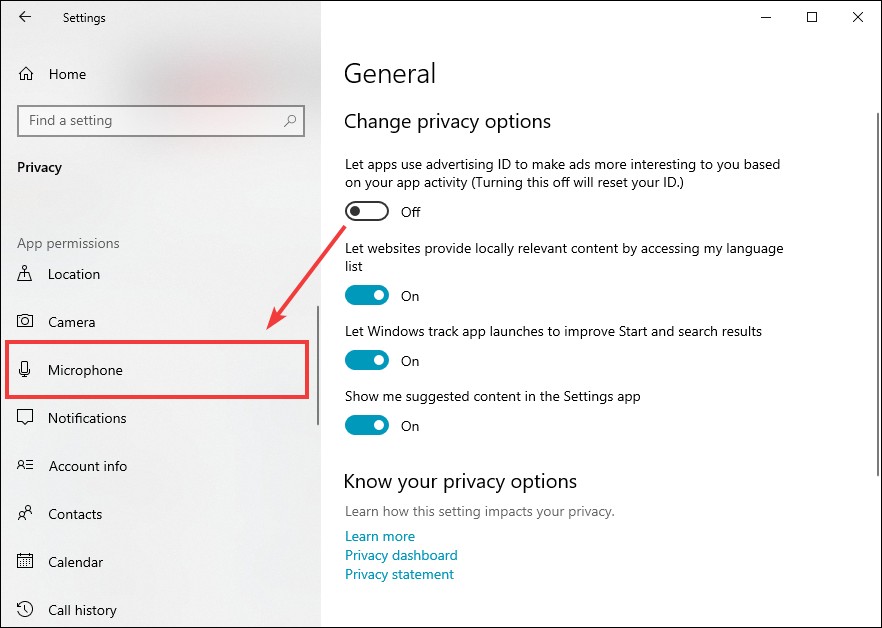
Step 4: Make sure you’ve allowed apps to access your microphone, and make sure the apps you want to use with your headset microphone have the access to it.
Now check your app and see if you can hear sound from your headset mic on the app.
Has any of the tips above helped you? Or do you know any other effective fixes? Tell us by leaving a comment below.
People prefer the work-from-home mode due to the current pandemic situation. With the convenience, it’s becoming easier to work in peace. Employees need a Computer, an Internet Connection, a Webcam, and a good pair of Headphones.
With all this gear, they can peacefully work from home. But, getting anything malfunctioning is very annoying. People will get annoyed when their headphone doesn’t work.
We’ve seen many people with HyperX cloud 2 Mic not working error. It’s a Windows 10-specific error that many of our colleagues faced. If you are facing a HyperX mic not working issue, you are in the right place.
How to Fix Print Spooler Keeps Stopping Windows 10 Error
In this post, you’ll find detailed information on the ways to fix Hyperx Microphone not working Windows 10 issue. All you have to do is follow the working methods in this post and fix the Hyperx mic not working windows 10 error.
How to Fix HyperX Cloud 2 Mic Not Working Windows 10 Issue?
When we look at technical issues like the Hyperx Cloud Alpha mic not working, the root cause is always simple. There is nothing complex in the Windows 10 OS. Every problem, except the hardware problem, has simple solutions in Windows. We are sharing a few known ways which you can follow to get rid of the HyperX Cloud 2 Microphone is not working at all. All you have to do is properly follow the methods and check whether the issue persists. If it persists, then ensure you get a brand-new Headset from HyperX or any other brand.
#1 – Restart the Computer
Most of the time, the issues with the software and the drivers cause such erroneous issues. That’s why performing a simple Windows 10 restart will help you fix the issue. If you are facing the Hyperx mic not detecting, then first restart the computer.
With the restart, your system will restart all the drivers, and if they are the problem, you will be able to use the microphone again. To restart, just go to “Start >> Power >> and Restart“. Make sure to save everything before Restarting; otherwise, you may lose the data.
Fix MFC120U.DLL Was Not Found Error | Download MFC120U.DLL Windows 10
#2 – Update Audio Driver
If your HyperX cloud 2 is functioning properly on other devices and not your computer, it’s a 100% driver issue. That’s why Updating the Audio drivers is the best thing to help you fix the Hyper mic not working windows 10 error. Here are the exact steps that’ll guide you through updating Audio drivers in Windows.
#1 – First of all, press ” Windows + X ” key combination on your keyboard. Now, click on “Device Manager“.
#2 – In the Device Manager, You’ll see a lot of drivers. Click on the ” Audio Inputs and Outputs ” section and find the Driver associated with the HyperX Cloud 2 headphones.
#3 – Right-click the corresponding driver and select the “Update Driver” option. In the Next Window, Select the ” Search Automatically for Updated Drivers ” option and let the Windows OS find the corresponding drivers.
#4 – Stay patient; the process will take a few minutes. Once the process completes, you have to restart the computer. This will fix the Hyperx headphones not showing up windows 10 error within a few minutes.
#3 – Change the Sound Settings
Windows 10 comes with the inbuilt sound settings menu. You can adjust the speaker and microphone sensitivity with the inbuilt sound settings. Let’s know the exact steps to change the sound settings and fix the issue.
#1 – First, Open the Control Panel from Start Menu.
#2 – Now, click the “Sound ” menu to open the settings options.
#3 – Switch to the “Recording” tab. Right-click any place in the window and check “Show Disabled Devices.”
#4 – Right-click the Headset Microphone and select “Enable“. Then right-click again and select “Set as Default Device“.
#5 – Then you need to click “Apply” and “OK” to save your changes.
Answering your Questions
#1 – Why is My HyperX Mic Not Working?
Due to the hardware and software issues, the HyperX Mic not working issue appears on Windows 10 OS. With the driver update or Windows update, you can fix the Hyperx Mic not working error within a few minutes.
#2 – How Do I Fix My HyperX Stinger Mic?
The HyperX stinger mic not working might be caused by hardware issues. Check if the microphone is broken from any side or not. If it’s not broken, you need to update the driver to fix the Hyperx Stinger mic not connecting error.
#3 – Why is My HyperX Mic not working with PS4?
First, check if the microphone works on the other devices. If it’s working, then check the audio connection to the PS4 device. After that, check the PS4 audio settings and enable the hyperx mic from the settings. After that, you’ll not face hyperx microphone not responding to PS4 error.
So, this is all we have about the Hyperx microphone not working with windows ten error. The error might seem complicated, but it’s not. With the simple tricks, you can easily fix hyperx mic not working problem and start using the headset again for meetings and online gaming with ease. If you have any doubts or are still facing the headset mic not working on Windows 10, then use the comment box below.
Embark on an adventurous journey with Hytale – the highly anticipated PC game of the year! Download and install Hytale for PC today and experience a world filled with infinite possibilities. With customizable characters, stunning graphics, and endless gameplay, Hytale promises to be the ultimate sandbox adventure. Don’t wait any longer – start your journey now!
For some users, you may tend to use the HyperX Cloud 2 Gaming Mic as the headset on Windows 10, while it is also your concern that when you would like to give a video call with this headset, HyperX Cloud 2 stopped working on Xbox One or PlayStation 4 Pro or on PCs. Or others feel the presence of HyperX Cloud 2 Mic quiet or out of work on Windows 10.
Many other people have also sensed the presence of the quiet or muffled HyperX Cloud 2 Mic on Windows 10. Or in some cases, you can hear from HyperX Cloud 2 mic, but it sounds bad.
Why is HyperX Cloud Mic or Cloud 2 Mic Not Working?
In much sense, HyperX Cloud II drivers can be the main reasons for the not working headset. But it is also predictable that the HyperX Cloud 2 Mic software runs improperly, thus giving rise to HyperX error as well. Furthermore, the erroneous sound settings are also to blame.
Now get ready to analyze and resolve this HyperX microphone not working on Windows 10 with the help of targeted measures.
How to Fix HyperX Cloud 2 Mic Isn’t Working Windows 10
To some extent, this HyperX Cloud 2 Mic connected but out of work on Windows 10 can be a matter of HyperX Cloud 2 drivers or application. When it comes to this HyperX microphone is not responsive on your PC, you may also need to change the headset settings to see if it is able to get rid of the static HyperX microphone.
Tips: Before you dive into HyperX Cloud 2 issue, you are supposed to do some hardware checking for Windows 10.
You need to plug out the HyperX headset and then plug it in another USB port. Then try to use it to examine whether it runs well. After that, make sure your HyperX Cloud II is using the wired 3.5mm audio jack.
1: Update HyperX Cloud 2 Mic Windows 10 Drivers
2: Set HyperX Cloud 2 Microphone as Default Device
3: Run Audio Troubleshooter on Windows 10
Solution 1: Update HyperX Cloud 2 Mic Windows 10 Drivers
In the first place, the most feasible method you can turn to is to download the up-to-date HX microphone driver for Windows 10. In a large sense, HyperX cloud 2 mic not working on games like Fortine or Overwatch won’t come to you again.
Update HyperX Cloud 2 Mic Drivers Automatically
The quickest way available is to take advantage of the driver updating tool – Driver Booster, which is capable of getting the driver you need within click with data backed up.
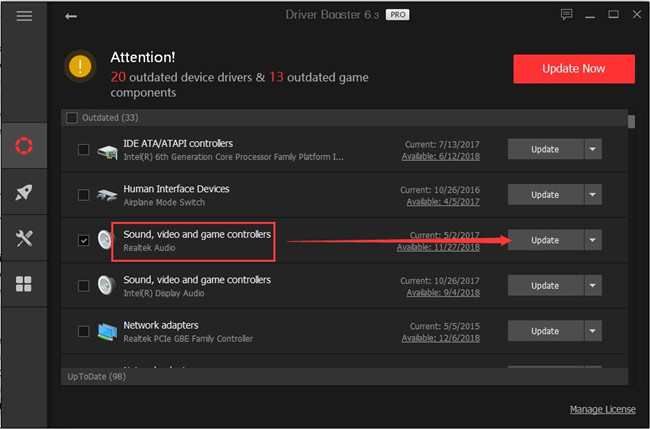
Driver Booster is a powerful drivers update software. As the toptenreviews top 1 driver update software, it can detected the most outdated and missing drivers for your computer and update them automatically. So it will be a good helper to update the HyperX Colud 2 Microphone driver.
1. Download and install Driver Booster.
2. After running Driver Booster, click Scan in Driver Booster interface to scan all the missing and outdated drivers such as graphic, audio, USB, keyboard etc.

3. Then locate Sound, video and game controllers and hit Update to update the HyperX Cloud 2 driver.
Driver Booster will install the updated HyperX microphone drivers for you automatically and safely.
And it is up to you to check whether the HyperX Cloud 2 mic has sound or not.
Update HyperX Drivers in Device Manager:
You may as well decide to update the HyperX driver in Device Manager at first to check if it can find the drivers you need.
1. Open Device Manager.
2. In Device Manager, expand Sound, video and game controllers and then right click the HyperX Cloud 2 Mic driver to Update Driver.
3. Then choose to Search automatically for updated driver software.
4. Now you can see Windows 10 Device Manager will install the updated HyperX Cloud 2 driver.
With the presence of the compatible HyperX driver, it is highly likely that HyperX Cloud 2 stopped working on Windows 10 has been resolved.
Solution 2: Set HyperX Cloud 2 Microphone as Default Device
Unwittingly, you found your HyperX device failed to work on Windows 10, besides fixing driver error, there is much need for you to change the related settings for your sound device.
It is said that it is exceedingly useful to make the HyperX microphone as default so long as you feel like to perform the headset on your PC.
1. Right click the Sound icon and then select Sounds from the option list.
2. Then in Sound window, under the Playback tab, choose the Hyper Cloud 2 Mic Microphone and then click Set Default.
3. Then hit Apply and OK to save changes.
Upon you make the microphone default, possibly you will have also solved the HyperX Cloud 2 doesn’t work on Windows 10.
Solution 3: Run Audio Troubleshooter on Windows 10
As for Windows 10 users, as long as you are plagued by any issue relevant to sound, it is your privilege to make full use of the troubleshooter for audio device to detect the sound problem.
Sometimes, this tool is capable of dealing with the HyperX microphone not working error for you.
1. Go to Start > Settings > Update & Security.
2. Then under Troubleshoot, locate Play audio and then click Run the troubleshooter.
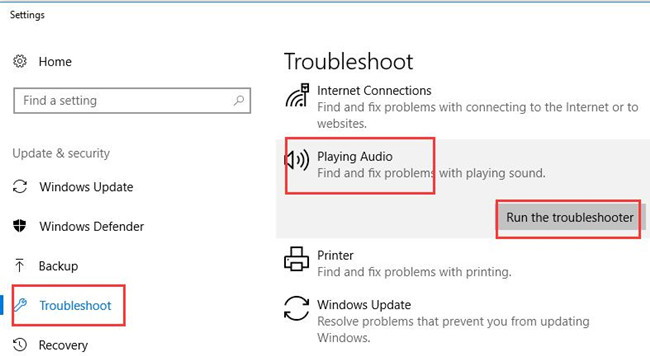
It is predicable that this audio troubleshooter can make the HyperX Cloud 2 Microphone is not working to disappear from Windows 10.
Otherwise, you may have to turn to system solving in order to remove this sound error. You can manage to reset Windows 10 for the purpose of depriving of HyperX microphone out of work.
In any way, either through HyperX Cloud 2 driver fixing or through HyperX Cloud II microphone settings adjustment, you can cope with the sound error on your own.
More Articles:
Update Realtek Audio Drivers for Windows 10
How to Update All Drivers Windows 10
Fixed: Turtle Beach PX24 Mic Not Working