
Learn how to fix hypervisor error Windows 11 with detailed troubleshooting steps. Explore causes, solutions, and tips to resolve Windows 11 BSOD hypervisor issues.
Hypervisor errors are among the most frustrating problems for Windows 11 users, often leading to the dreaded blue screen of death (BSOD). These errors are tied to virtualization technology, which is critical for running virtual machines or features like Hyper-V. In this detailed guide, discover how to fix hypervisor error Windows 11, understand its causes, and apply best practices to prevent future occurrences.
A hypervisor error in Windows 11 indicates that the system’s virtualization technology has encountered an issue, leading to system instability or crashes. Virtualization is a feature that allows multiple operating systems to run on the same hardware, often used in virtual machine software or enterprise applications.
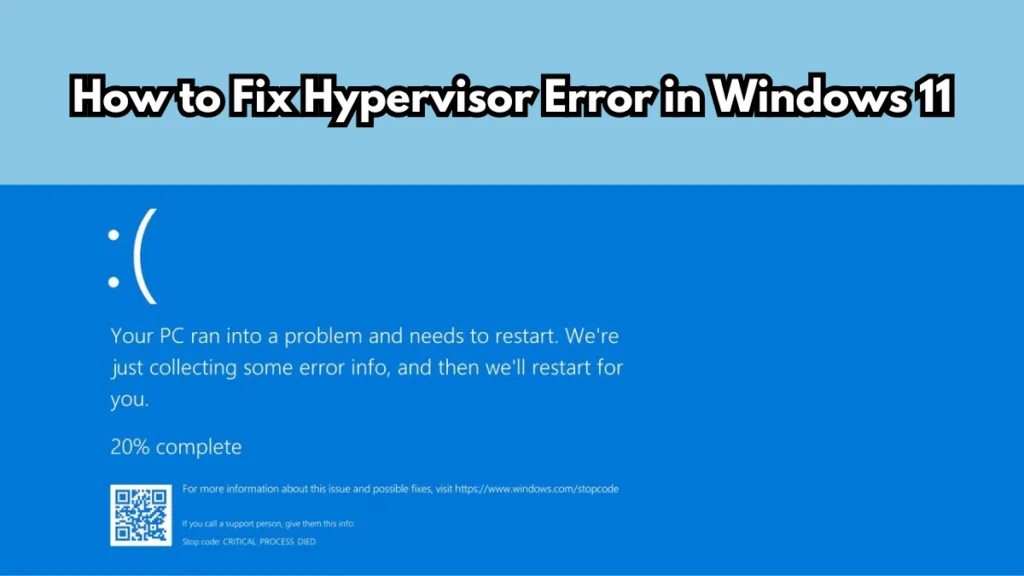
This error typically appears as a blue screen message stating, “HYPERVISOR_ERROR.” It can be caused by hardware incompatibilities, misconfigured settings, or software conflicts. Resolving this issue is crucial to maintain system stability and ensure optimal performance.
To better understand this error, you can also refer to Microsoft’s official Hyper-V Overview, which explains the role of Hyper-V and how it functions within Windows 11.
Why Does Hypervisor Error Windows 11 Occur?
Misconfigured Virtualization Technology in BIOS/UEFI: Virtualization must be enabled in the system’s BIOS or UEFI settings. If this feature is disabled or improperly configured, it can trigger errors when the hypervisor attempts to load.
Outdated or Corrupt Drivers: Drivers play a vital role in hardware-software interaction. An outdated or corrupt driver, especially for critical components like CPUs or Hyper-V, can lead to hypervisor errors in Windows 11.
Use tools like Driver Booster to update drivers and ensure smooth hardware communication.
Windows 11 Update Conflicts: While updates are essential for security and performance, they can occasionally introduce conflicts, particularly with virtualization settings or related drivers.
Incompatible Hardware: Not all hardware supports virtualization technology. Using incompatible or legacy devices with Windows 11 can result in BSOD hypervisor errors. To verify hardware compatibility with Windows 11, check the official Windows 11 specifications page.
Overclocking and System Instability: Overclocking, though beneficial for performance, can destabilize the system and interfere with the hypervisor’s functionality, causing crashes and errors.
How to Fix Hypervisor Error in Windows 11
Resolving hypervisor error Windows 11 requires a step-by-step approach. Below are comprehensive methods to troubleshoot and fix the issue.

Step 1: Enable Virtualization Technology in BIOS/UEFI
Virtualization must be enabled to allow the hypervisor to function properly.
- Restart your computer and enter the BIOS/UEFI settings (usually by pressing F2, Delete, or F12 during startup).
- Navigate to Advanced Settings or CPU Configuration.
- Enable Intel Virtualization Technology (VT-x) or AMD-V, depending on your processor.
- Save the changes and restart your computer.
Enabling virtualization ensures that the Hyper-V or other virtual machine software functions as intended. If you need detailed guidance, Microsoft offers insights in their Hyper-V Documentation.
Step 2: Update System Drivers
Outdated drivers are a common cause of hypervisor errors. Ensuring your drivers are up-to-date can resolve many issues.
- Press Win + X and select Device Manager.
- Locate critical drivers like CPU, GPU, and network adapters.
- Right-click on each driver and select Update Driver.
- Use trusted software like Driver Easy or Driver Booster for automatic updates.
Step 3: Disable Hyper-V if Not Needed
Hyper-V is Microsoft’s built-in virtualization software. If you are not using it, disabling it can sometimes resolve hypervisor-related errors.
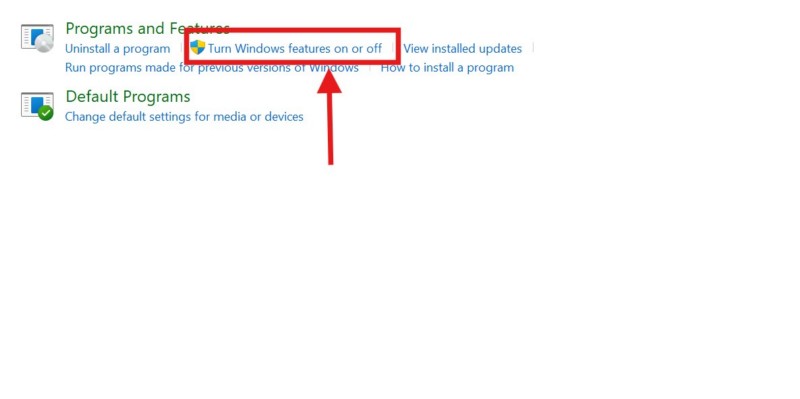
- Open the Start Menu and search for Turn Windows Features On or Off.
- Locate Hyper-V in the list and uncheck the box.
- Click OK and restart your computer.
You can also refer to the Microsoft Hyper-V Documentation for more information on how Hyper-V works and when it should be disabled.
Step 4: Address Overclocking Issues
Overclocking increases your CPU’s clock speed, but it can interfere with virtualization. Reset your system’s overclocking settings to default.
- Access BIOS/UEFI and reset the CPU frequency to its default state.
- Test system stability using tools like Prime95 or CPU-Z. These tools can help ensure that your CPU is functioning at its optimal settings, avoiding system instability.
Step 5: Check for Windows Updates
Updates often include fixes for bugs and compatibility issues.
- Open Settings > Windows Update.
- Click Check for Updates and install any available updates.
- Restart your system to apply the updates.
Keeping your system up-to-date ensures that you are not missing critical patches that can resolve virtualization or Hyper-V error Windows 11.
How to Troubleshoot Hypervisor Error Windows 11
Perform a Clean Boot
A clean boot disables non-essential startup programs, which can help identify software conflicts causing the hypervisor error.
- Press Win + R, type
msconfig, and press Enter. - Navigate to the Services tab and check Hide All Microsoft Services.
- Click Disable All, then go to the Startup tab and open Task Manager.
- Disable all startup items and restart your computer.
This method is a great way to pinpoint the exact software causing the error.
Run the Windows Memory Diagnostic Tool
Faulty memory can also lead to hypervisor errors in Windows 11. Use the built-in Windows Memory Diagnostic Tool to check for issues.
- Press Win + R, type
mdsched.exe, and hit Enter. - Select Restart now and check for problems.
- Let the diagnostic run and review the results.
Reinstall Virtual Machine Software
If you use third-party virtualization software like VMware or VirtualBox, reinstalling the application can resolve compatibility issues.
- Uninstall the current version via Control Panel > Programs and Features.
- Download the latest version of the software from the official website.
- Install it and restart your computer.
Reinstalling virtual machine software ensures that you are running the latest version with fewer bugs and improved compatibility.
Tools to Diagnose Hypervisor Errors
Using the right tools can simplify diagnosing hypervisor error Windows 11.
- HWiNFO: Monitor hardware health and ensure system compatibility. This tool helps identify potential hardware issues. Download it from HWiNFO’s official website.
- Intel Processor Diagnostic Tool: Check CPU functionality, especially virtualization support. This diagnostic tool is available on Intel’s official site.
These tools allow users to monitor system health and check if any hardware is incompatible with virtualization, which could be the root cause of the error.
Best Practices to Prevent Hypervisor Errors in Windows 11
Prevention is better than cure. Implement these practices to avoid hypervisor errors:
- Regularly Update Drivers: Use tools like Driver Easy or manually check for updates via Device Manager to avoid outdated drivers.
- Maintain BIOS/UEFI Settings: Periodically review and enable virtualization technology if required.
- Avoid Overclocking: Operate your CPU at recommended settings to ensure stability.
- Use Compatible Hardware: Verify hardware compatibility with virtualization requirements before upgrading to Windows 11.
- Install Updates Promptly: Always install Windows updates to benefit from the latest bug fixes and optimizations.
Frequently Asked Questions
What is a Hypervisor Error in Windows 11?
A hypervisor error in Windows 11 is a blue screen error caused by issues with virtualization technology. It can result from hardware incompatibility, outdated drivers, or misconfigured settings.
Why Does Windows 11 Crash with a Hypervisor Error?
Hypervisor errors occur due to misconfigured virtualization in BIOS, outdated drivers, or incompatible hardware. These issues disrupt the hypervisor’s operation, leading to crashes.
How Can I Fix Hypervisor Error Windows 11?
To fix the error, enable virtualization in BIOS, update drivers, disable Hyper-V if unused, and ensure system stability by avoiding overclocking.
What Tools Can Diagnose Hypervisor Errors?
Tools like BlueScreenView, HWiNFO, and Intel Processor Diagnostic Tool can help diagnose the underlying causes of hypervisor errors.
Final Thoughts
Fixing a hypervisor error in Windows 11 may seem challenging, but with the right approach, it can be resolved efficiently. Start by addressing the common causes, use diagnostic tools, and implement best practices to prevent future errors. By following this guide, you’ll not only fix the hypervisor error Windows 11 but also enhance your system’s overall stability.
If you’re experiencing a hypervisor error in Windows 11, follow the steps outlined in this guide and troubleshoot effectively. Don’t forget to visit Microsoft’s official support page for more assistance if needed.
Visit Our Post Page: Blog Page
При работе с Windows 11/10 некоторые пользователи могут столкнуться с синим экраном HYPERVISOR_ERROR. Чаще это происходит при использовании ПО, задействующего виртуализацию, но может происходить и без этого.
В этой инструкции подробно о возможных причинах и способах исправить ошибку HYPERVISOR ERROR.
Hyper-V и виртуализация

Синий экран HYPERVISOR_ERROR имеет отношение к работе гипервизора Hyper-V в Windows 11 и 10, использующегося для виртуальных машин Hyper-V, Песочницы и других задач, задействующих виртуализацию. При сбоях работы гипервизора вы можете столкнуться с рассматриваемой ошибкой.
Если вы не используете указанную функциональность, самым простым и с большой вероятностью работоспособным методом решения проблемы будет отключение соответствующих компонентов:
- Нажмите правой кнопкой мыши по кнопке «Пуск» и выберите пункт «Выполнить», введите appwiz.cpl и нажмите Enter.
- В меню слева выберите пункт «Включение или отключение компонентов Windows».

- Снимите отметки с компонентов Hyper-V, Песочница Windows и Платформа виртуальной машины, если они включены.

- Нажмите «Ок», дождитесь завершения выполнения операции, если появится запрос на перезагрузку — выполните её.


В случае, если компоненты Hyper-V необходимы, можно попробовать проделать то же самое, что описано выше, а после перезагрузки снова включить их — иногда это решает проблему с синим экраном.
Дополнительные варианты решения
Если действия с Hyper-V не помогли, некоторые дополнительные способы исправить ошибку, которые могут сработать:
- Если ошибка стала появляться недавно при тех же действиях, которые ранее её не вызывали, можно попробовать использовать точки восстановления системы.
- При наличии стороннего антивируса, проверьте, решит ли проблему его отключение.
- Если ошибка появляется после «Завершения работы» (использования именно этого пункта в меню) и включения компьютера, но исчезает после того как используется пункт «Перезагрузка», проверьте, решит ли проблему отключение быстрого запуска.
- Проверьте, какой модуль вызывает сбой, например, с помощью WinDbg, потенциально это может оказаться какой-то драйвер, который можно попробовать поменять на другую версию.
- Если вы используете Hyper-V, убедитесь что не отключены соответствующие службы: Гостевая вычислительная служба Hyper-V, Интерфейс гостевой службы Hyper-V, Служба Hyper-V PowerShell Direct, Служба виртуализации удаленных рабочих столов Hyper-V, Служба вычисления узлов Hyper-V, Служба завершения работы в качестве гостя (Hyper-V), Служба запросов на теневое копирование томов Hyper-V, Служба обмена данными (Hyper-V), Служба пульса (Hyper-V), Служба синхронизации времени Hyper-V, Управление виртуальными машинами Hyper-V. По умолчанию для всех этих служб, кроме последней, тип запуска — «Вручную», для последней — «Автоматически».
- Этот способ вряд ли поможет, но может иметь смысл проверить системные файлы на ошибки с помощью
sfc /scannow
Подробнее в этой инструкции.
- Если ошибка появляется только при запуске одной конкретной программы, попробуйте поискать решение именно для неё: возможно, в её работе с включенным гипервизором есть какие-то особенности, которые следует учитывать.
Надеюсь, что-то из предложенного сработает. Если же нет или решение создает дополнительные проблемы, опишите ситуацию в комментариях ниже максимально подробно, я постараюсь помочь.
Windows 11’s Hypervisor Error can be annoying and frequently occurs when attempting to execute specific apps or virtual machines. This screen will show «HYPERVISOR_ERROR» or may also showcase the error code. The error can occur due to faulty or incorrect settings, outdated drivers, or other related issues. Want a solution to Hypervisor error?
This post will walk you through four simple fixes for the Hypervisor Error. These easy-to-follow procedures will help you rapidly get your system back on track, regardless of your experience level. Now that you’re prepared to fix this hypervisor error blue screen problem and use your computer without any issues let’s start with these simple fixes.
Fix Hypervisor Error by Checking System Supports Virtualization
The Hypervisor Error can happen if your system doesn’t support virtualization or this feature isn’t enabled. Virtualization allows your computer to run virtual machines efficiently. Errors would result from the Hypervisor’s inability to operate correctly without it. This simple check often prevents the Hypervisor Error from occurring. To use this simple method, follow these steps:
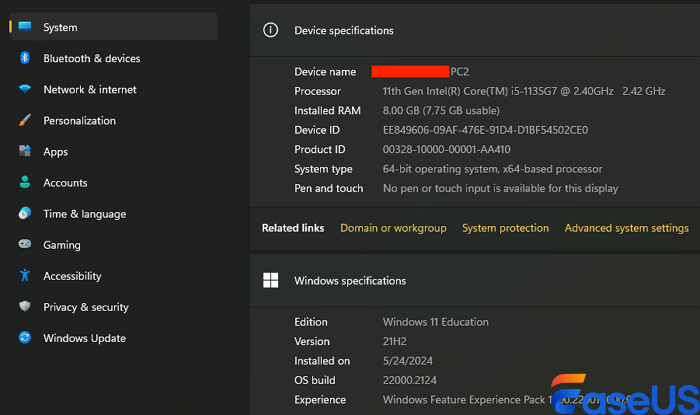
Step 1. Click «Start» and then »Settings.»
Step 2. In the Settings window, click «System,» then select «About» from the left pane.
Step 3. Under «Device specifications,» find your processor information. Copy these details and search online to see if your processor supports virtualization. Look for virtualization information on the manufacturer’s website.
Step 4. If your processor supports virtualization, ensure it’s enabled on your system. Restart your computer and press ‘F2,’ ‘F10,’ or ‘Delete’ to enter the BIOS.
Step 5. Once in the BIOS, navigate to the ‘Advanced’ tab and locate «Intel (R) Virtualization Technology.» If virtualization is disabled, select it and change the setting to «Enabled.»
Use CMD Command to Resolve Hypervisor Error in Windows 11
The Command Prompt is a helpful Windows tool that lets you resolve the Hypervisor Error caused by missing or corrupted files in the system. You can run the DISM (Deployment Imaging Servicing and Management) command, which scans and repairs the BSODs. The best part is that you can even run commands to check if the Hyper-V launches on boot or not.
The simple process to use this for fixing Hypervisor errors is:
Step 1. Open the Command Prompt with administrator rights. Type chkdsk C: /f /r /x and press «Enter.» It will scan your disk for faults, correct them, and restart your computer.
Step 2. After the disk check, open Command Prompt again. Use these commands and press «Enter»:
- DISM.exe /Online /Cleanup-image /Scanhealth
- DISM.exe /Online /Cleanup-image /Restorehealth
These commands scan and repair any issues with your system files.
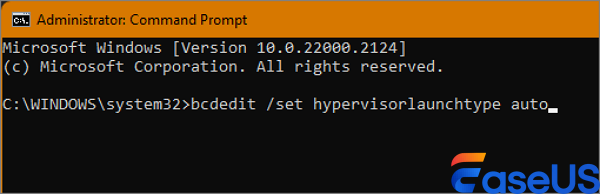
Step 3. Finally, type bcdedit /set hypervisorlaunchtype auto in the Command Prompt and press «Enter.» This ensures that the Hyper-V service starts automatically when your system boots up.
You can share this post to social media like Reddit or Twitter to help more users facing this hypervisor error:
Restart the Corresponding Service to Solve the Hypervisor Error
Corresponding services in Windows are crucial for the smooth operation of virtual machines. If these services encounter problems, they can trigger the Hypervisor Error. Restarting these services can sometimes fix issues and refresh the system. This method is an ideal spot to start because it is simple to use and doesn’t require extensive technical knowledge. For this:
Step 1. Press WIN + R on your keyboard.
Step 2. In the Run dialog, write services.msc and press «Enter.»
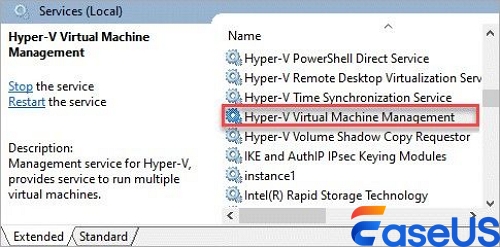
Step 3. In the Services window, scroll down and find «Hyper-V Virtual Machine Management.»
Step 4. Right-click on «Hyper-V Virtual Machine Management» and check its status. If running, select «Stop.«
Step 5. After stopping the service, right-click it again and select «Start» to restart it. This may help resolve the issue.
Update Device Driver and Windows OS to Fix Hypervisor Error
Constantly update your Windows and device drivers to keep your system running smoothly. Old drivers or Windows versions can cause issues like the Hypervisor Error. Frequent updates lower the likelihood of coming into this problem by ensuring your system is running with the newest features and bug fixes. Avoid the Hypervisor Error altogether by ensuring everything is current.
To update device drivers:
Step 1. Begin by accessing the Start menu and typing «Device Manager.»
Step 2. Click on «Device Manager» from the list. Choose the device to update.
Step 3. Right-click it and choose «Update driver.»
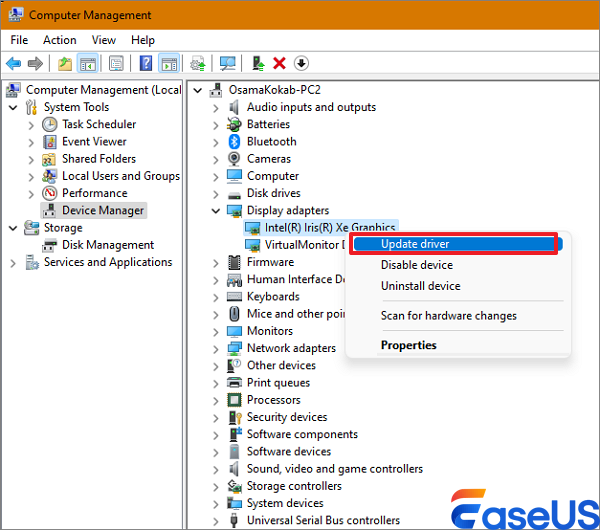
Step 4. Click «Search automatically for drivers» to let Windows install the latest driver.
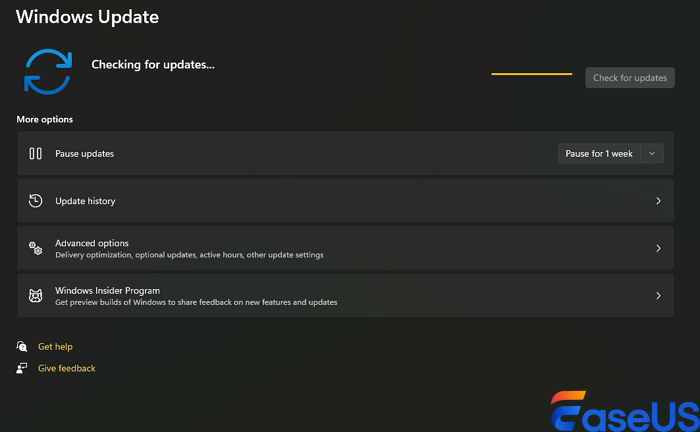
To update Windows OS:
Step 1. Click on «Start» and then select «Settings.»
Step 2. In the Settings window, click on «Update & Security.»
Step 3. Click «Windows Update» and select «Check for updates.» Windows will find updates; you can start the installation if updates are available.
Pro Tips: Recover Files and Data Lost During Hypervisor Error
Data loss and damage to essential files can be significant concerns while handling a Hypervisor Error. The EaseUS Data Recovery Wizard is a strong and trustworthy program that can aid in file recovery. It is well acknowledged for its efficacy in data recovery, receiving a rating of 4.5.
Prominent features of this data recovery software include deep scanning, file preview, and data recovery from many storage devices. It is compatible with multiple Windows versions. Its robust performance makes it a dependable choice for retrieving lost files.
Key Features:
- Recover lost files thoroughly by scanning your drive for hidden and deleted data.
- Capable of recovering various file formats, emails, documents, pictures, and videos.
- It supports SD cards, USB disks, internal hard disks, and other devices for recovering deleted files.
What Is Hypervisor Error and Its Causes
A Blue Screen of Death (BSoD) known as the Hypervisor Error appears when an issue arises with the Windows virtual machine platform. The stop code for this problem is HYPERVISOR_ERROR, and the bug check value is 0x00020001. There are various reasons why your virtual machine can fail or stop functioning. Below are some common causes:
-
🟠Outdated or incompatible device drivers: When your device drivers are old or incompatible with Windows 11, they can cause the Hypervisor to malfunction.
-
🟡Corrupted virtual machine image files: If the files that make up your virtual machine are corrupted, they can cause the Hypervisor to crash.
-
🟢Issues with Windows Sandbox or third-party virtual machine software: Problems with Windows Sandbox or other virtual machine programs can interfere with the Hypervisor, triggering the error.
Final Words
This guide discussed addressing the Hypervisor Error and recovering any lost files. We explored all the root causes and solutions, such as checking the system configurations and updating the drivers needed to halt or fix the error.
You might corrupt or lose your data when dealing with or resolving BSODs. EaseUS Data Recovery Wizard is best suited for recovering lost files in any such scenario. It provides deep scanning, has a simple interface, and works with many file types, which makes it popular. If you have ever lost your files, you should use EaseUS to recover the data safely.
FAQs
Now, here are some common questions related to this issue:
1. What is a hypervisor error?
When the program on your computer that controls virtual machines malfunctions or crashes, a hypervisor error occurs. This can lead to a Blue Screen of Death (BSoD), frequently brought on by corrupted files, out-of-date drivers, or problems with the platform utilized by virtual machines.
2. How do I fix my hypervisor?
Ensure virtualization has been turned on in your BIOS, update your device drivers and Windows operating system, and do system scans like CHKDSK to fix corrupted files and resolve a hypervisor problem. Checking system compatibility and restarting relevant services can also assist in fixing the problem.
3. How do I disable the Hyper-V error?
Go to the Control Panel and choose «Programs and Features» to turn off Hyper-V. Then select «Turn Windows features on or off,» and after that, click «Hyper-V» and «Hyper-V Platform.» Lastly, remove the «Hyper-V Hypervisor» check box.
Windows users encounter various kinds of errors on their PCs and laptops. While some errors appear in a dialog box, some of them shows up as Blue Screen of Death (BSOD) errors, completely crashing the system. The Hypervisor error on Windows 11 falls in the latter category and triggers a BSOD error on PCs and laptops, putting users in a panic-stricken state. So, what is this Hypervisor error on Windows 11 PCs and laptops? Is it a serious issue? Is it easily fixable?
To answer all the above questions and help you resolve the Hypervisor error on Windows 11 PCs and laptops, we have created this comprehensive guide. In this in-depth article, we will discuss what causes the Hypervisor error on Windows 11 and how you can resolve the underlying issues that could be triggering the same on your PC or laptop. So, check out the following sections for all the details!
What is the Hypervisor Error on Windows 11?
Now, before we proceed to our list of fixes for the Hypervisor error on Windows 11, let us provide you with a quick overview of the said error. To put it in simple words, the Hypervisor error is related to the Hyper-V feature on Windows PCs and laptops that enables Windows to run a virtual machine with the current hardware specifications. The Hyper-V technology, initially released back in 2008, can create virtual environments to let developers and advanced users test software and run other operating systems on their Windows 11 PCs and laptops.
However, much like any other technology, the Hyper-V feature comes with its flaws and limitations. Although it runs with no issues most of the time, the feature sometimes generates the Hypervisor error as a Blue Screen of Death on Windows 11 devices. The error shows up much like any other BSOD error on the Windows platform and generates the stop code HYPERVISOR_ERROR along with the error code 0x00020001.
When the Hypervisor error is generated, all the users can do is restart their Windows 11 PC or laptop, and as a result, they might lose the work that has not been saved on their devices. However, after the reboot, users can take a few steps to avoid the Hypervisor error in the future. We have discussed these methods in the following sections.
Fix Hypervisor Error on Windows 11
Now, as you are still here reading this article, we presume that you have recently encountered the Hypervisor error on your Windows 11 PC or laptop, and are looking for effective resolutions to avoid it in the future. So, to help you and all those who are willing to take the necessary actions to resolve the Hypervisor error on Windows 11, we have curated a list of suggestions and fixes.
For the following fixes and suggestions to resolve the Hypervisor error, we have also provided easy-to-follow, step-by-step guides to help you execute them on your Windows 11 PC or laptop. So, without any further ado, take a look at them right below and start trying them out on your device one by one.
1. Disable Hyper-V and Hypervisor Temporarily on Windows 11
Now, if you are not using any virtual machines on your Windows 11 PC or laptop but getting the Hypervisor error often, you might want to turn off the Hyper-V and Windows Hypervisor features on your device, at least for the time being. In case you want to run a virtual machine on your Windows computer at a later time, you can re-enable the said features using the steps mentioned in this section.
However, it is worth noting that the Hyper-V feature is only available on Windows 11 Professional and enterprise computers. So, if you are using the Windows 11 Home version on your PC or laptop, you will not find the Hyper-V feature on your device. Nonetheless, you can still use the following steps to disable the Windows Hypervisor feature on your Windows 11 PC or laptop:
1. Use Windows + S to open Windows search.
2. Locate the Control Panel and open it on your device.
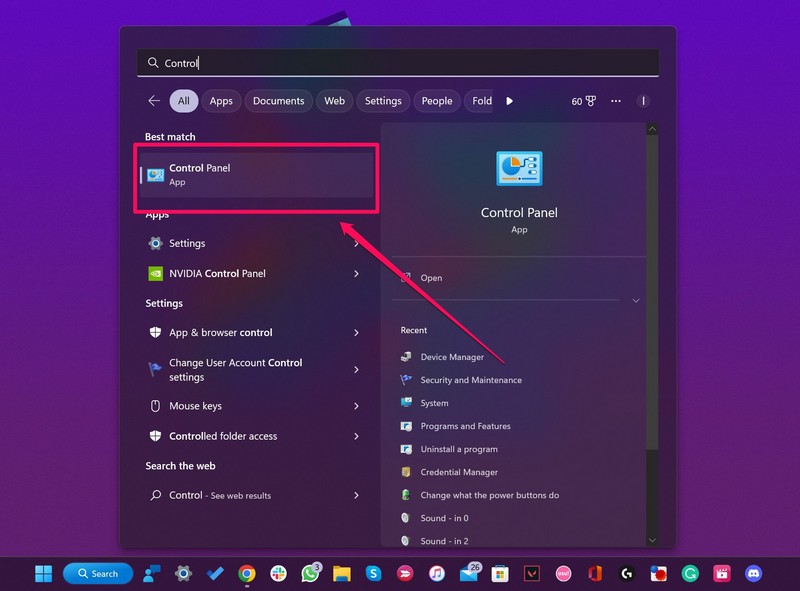
3. Click the Programs option.
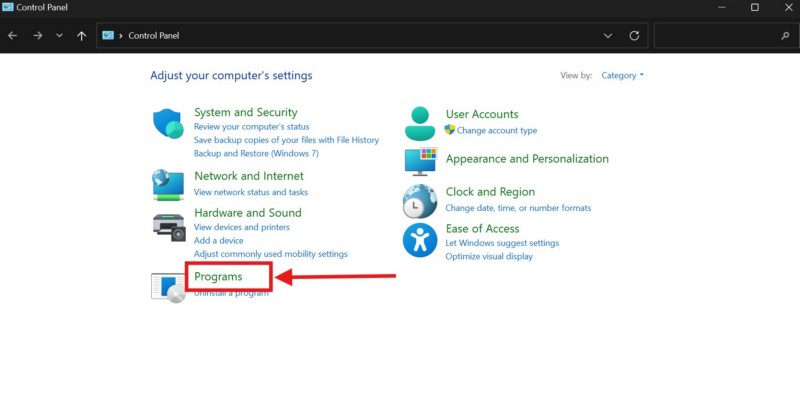
4. Next, click the Turn Windows features on or off button under the Programs and Features section.
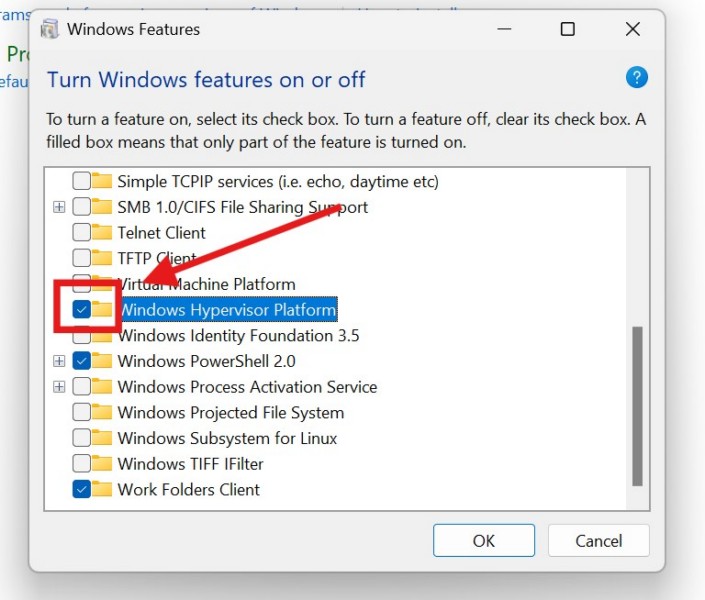
5. Within the following window, locate the Windows Hypervisor Platform option and click the checkbox next to it to uncheck the same.
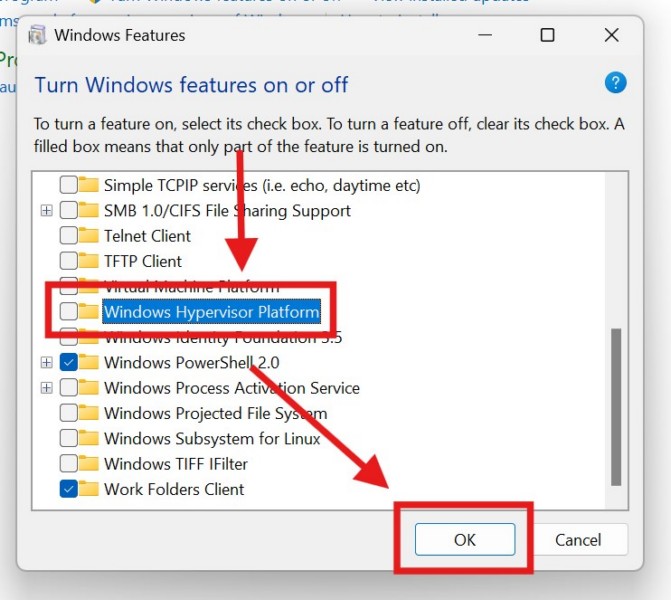
6. Then, locate the Hyper-V option, if available, and uncheck the box for it.
7. With the Windows Hypervisor Platform and Hyper-V options unchecked, click the OK button to save and close the Windows Features window.
With these changes on your Windows 11 PC or laptop, try using it as usual and check whether or not the Hypervisor error is showing up. When you want to run virtual machines on your computer again, you can follow the above steps to re-enable the Window Hypervisor Platform and Hyper-V options from the Windows Features section.
2. Stop or Restart All Hyper-V Services on Windows 11
The next thing you can do to avoid the Hypervisor error on your Windows 11 PC or laptop is to stop or restart all the Hyper-V services on your device. These services run in the background on your device and aid the Hyper-V operations when running virtual machines on Windows 11. However, if you do not use any virtual machines on your Windows 11 PC or laptop, you can simply stop these services. Otherwise, you can try restarting the services to fix any technical issues that might be causing the Hypervisor error on your device.
So, follow the steps right below to stop or restart the Hyper-V services on your Windows 11 computer:
1. Use Windows + R to open the Run tool on your PC or laptop.
2. Type in or copy-paste the following address and press Enter:
services.msc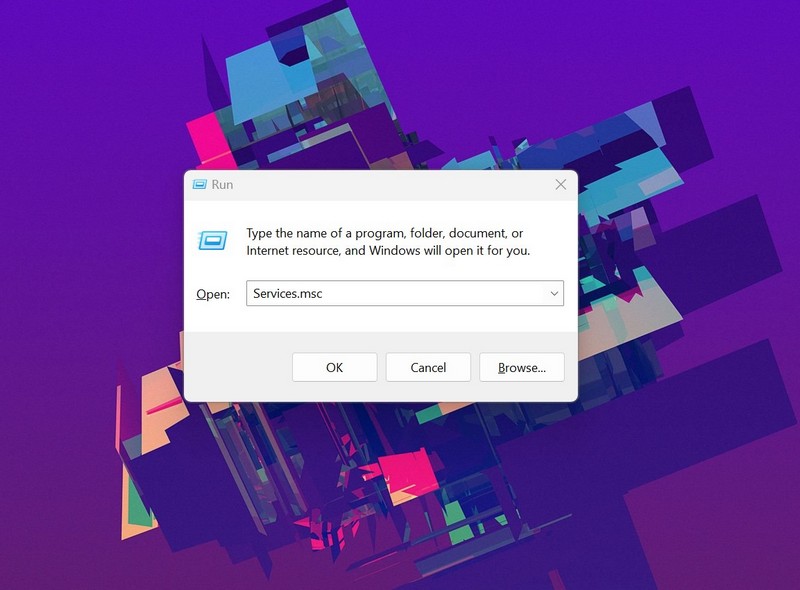
3. Within the Services window, locate all the Hyper-V services listed on the right pane. You can tap the H key on your keyboard to find all the Hyper-V services or scroll through the alphabetically-ordered list.
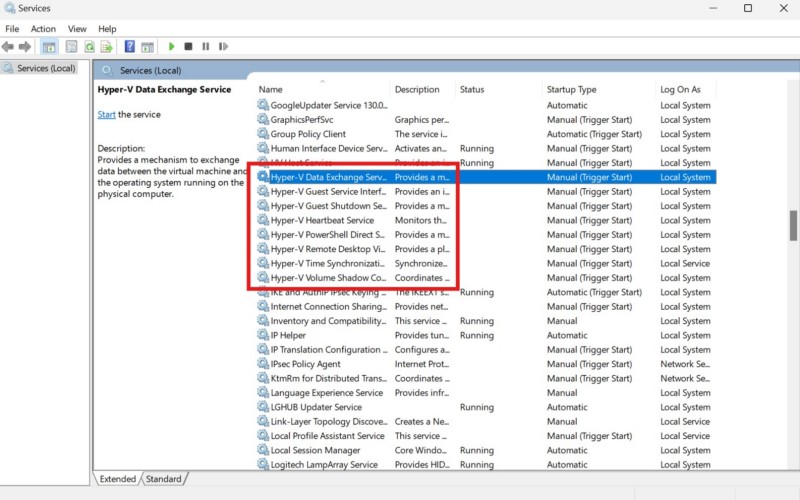
4. Now, right-click each of the Hyper-V services and click the Stop option on the context menu to stop them.
5. Once they are stopped, you can right-click on them again and hit the Start option to restart the services.
After stopping and/or restarting the Hyper-V services in the Services window on your Windows 11 PC or laptop, check whether or not you are getting the Hypervisor error on your device.
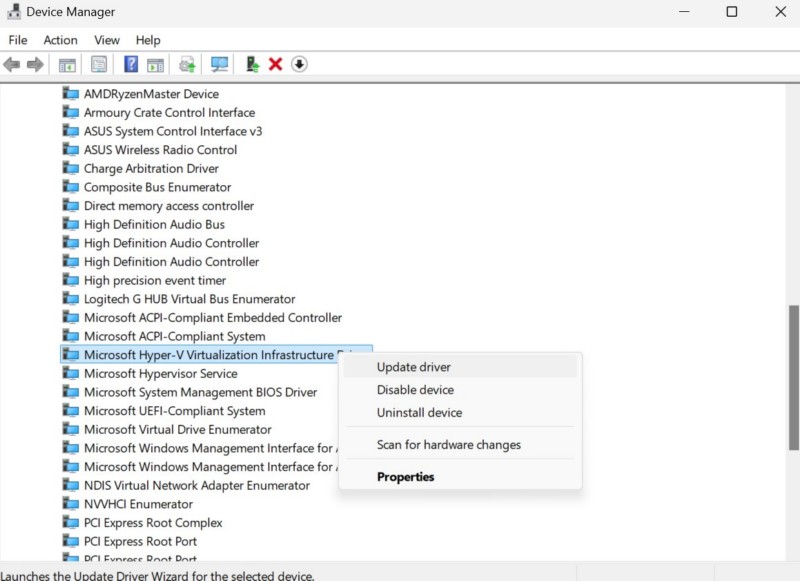
3. Update Hypervisor and Hyper-V Drivers on Windows 11
Apart from technical issues with the Hyper-V and Hypervisor features on Windows 11, the Hypervisor error can also be a result of outdated drivers on your PC or laptop. In this case, you can try updating the Hyper-V and Hypervisor drivers on your Windows 11 PC or laptop and check if that resolves the issue.
So, follow the steps right below to update the Hyper-V Virtualization Infrastructure Driver and Hypervisor Service driver on your Windows 11 device:
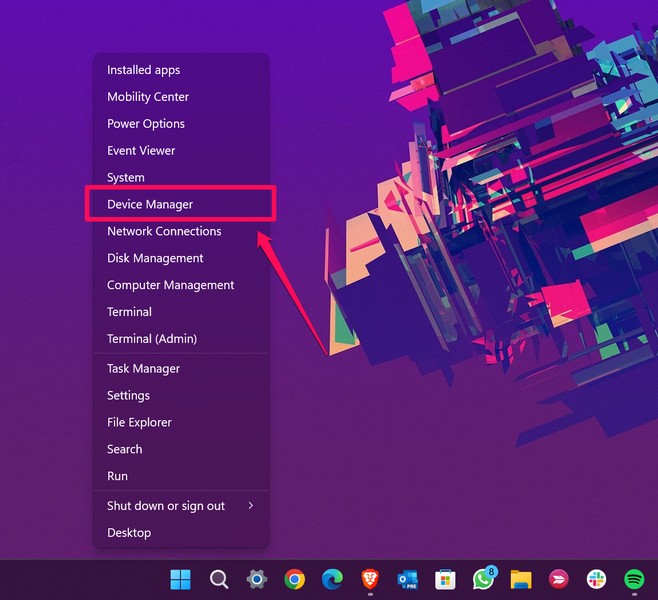
1. Use Windows + X to open the Quick Links menu or right-click on the Start button.
2. Click the Device Manager option on the list.
3. Locate the System devices option and click the arrow next to it to expand the section.
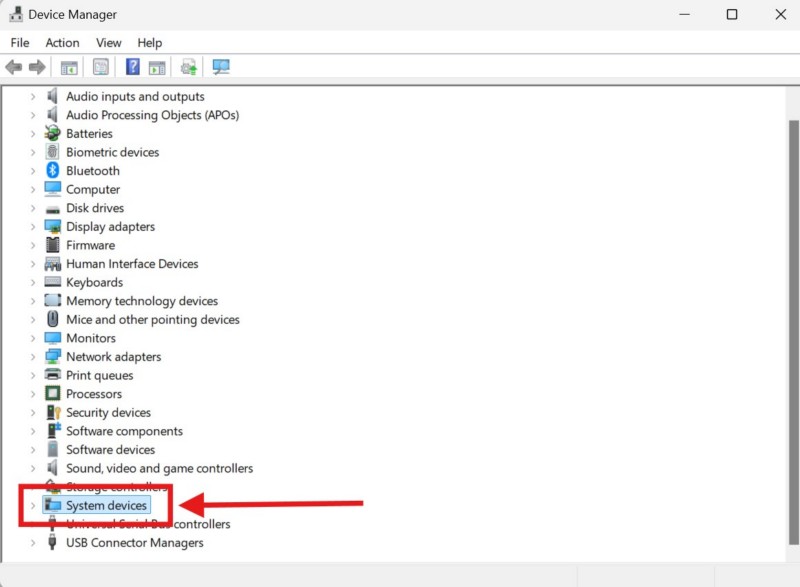
4. Here, locate the Microsoft Hyper-V Virtualization Infrastructure Driver and Microsoft Hypervisor Service. You will need to update both these drivers on your PC or laptop.
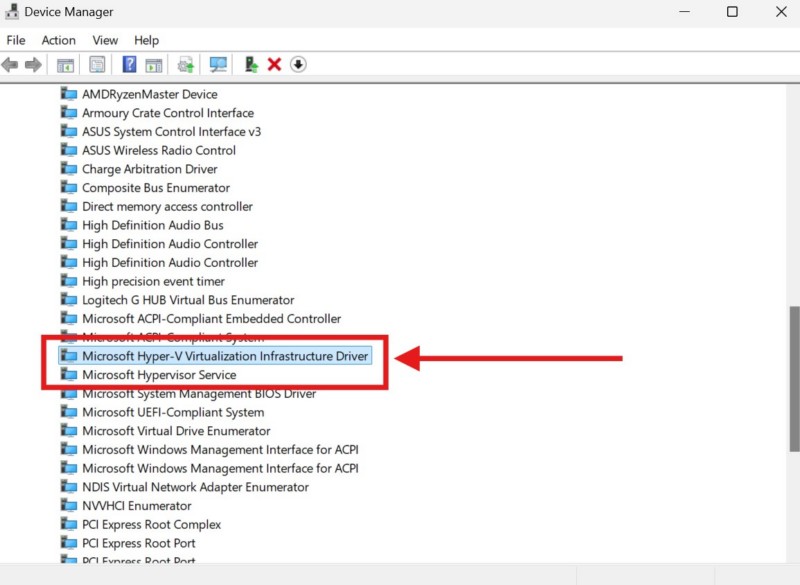
5. So, right-click on the driver you want to update and hit the Update driver option on the context menu.
6. Click the Search automatically for drivers option in the next window.
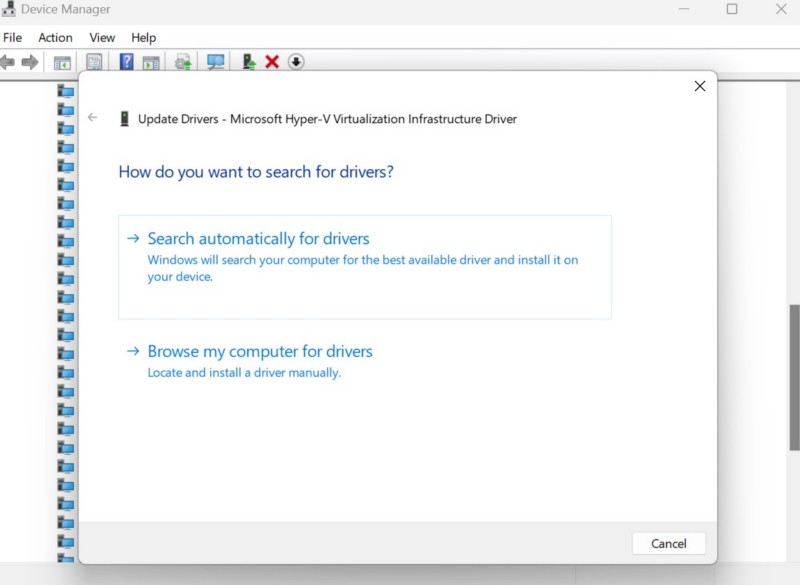
7. Wait for Windows to automatically detect and install the latest drivers for the same.
8. Once both the Hyper-V driver and Hypervisor service driver are updated, restart your Windows 11 PC or laptop.
Following reboot of your device, try running it as usual and check whether or not you are getting the Hypervisor error on Windows 11.
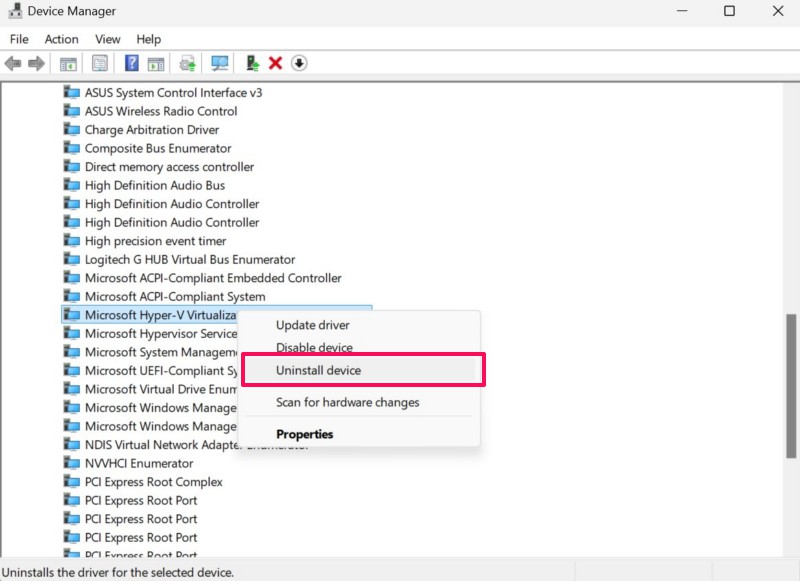
4. Reinstall Hyper-V and Hypervisor Drivers on Windows 11
If updating the Hyper-V Virtualization Infrastructure Driver and Hypervisor Service driver on your Windows 11 PC or laptop did not resolve the Hypervisor error, you can now try reinstalling both the drivers. So, follow the steps right below to reinstall the said drivers on your device:
1. Use steps 1-4 from the previous section (Fix #3) to locate the Microsoft Hyper-V Virtualization Infrastructure Driver and Microsoft Hypervisor Service driver within the Device Manager.

2. Right-click on the Microsoft Hyper-V Virtualization Infrastructure Driver option and hit the Uninstall option on the context menu.
3. Confirm your action on the following prompt.
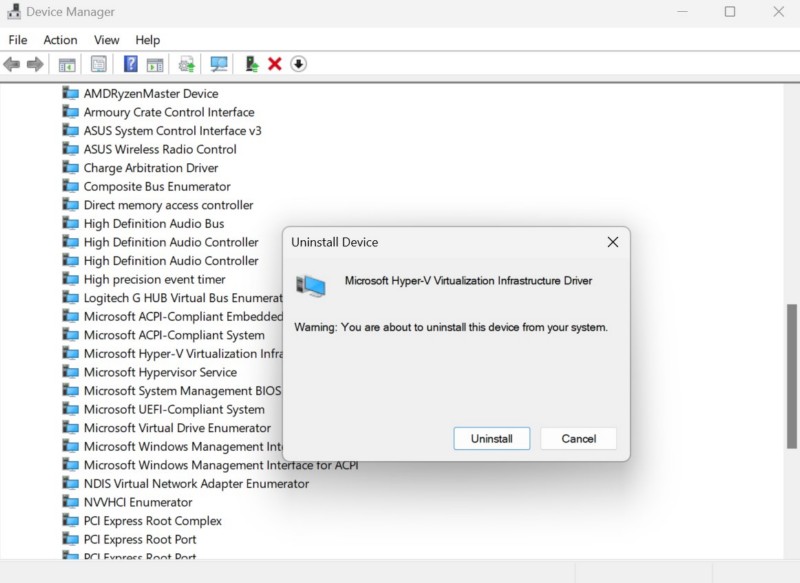
4. Do the same for the Microsoft Hypervisor Service driver.
5. After both the drivers are uninstalled, restart your Windows 11 PC or laptop.
Following the reboot, Windows will detect the hardware change in the system and automatically reinstall the missing drivers. So, after the reinstallation of the drivers, check whether or not you are getting the Hypervisor error on your device.
5. Use Windows Memory Diagnostic Tool on Windows 11
Now, the next thing you can do to resolve the Hypervisor error on your Windows 11 PC or laptop is to use the Windows Memory Diagnostic tool. You see, the Hypervisor error on Windows 11 can be a result of a memory issue, and the Windows Memory Diagnostic tool is a built-in tool that automatically detects and resolves issues within the memory system of your device. However, the tool will require you to restart your device. So, it is recommended that you save your current task or work before using the Windows Memory Diagnostic tool.
Having said that, follow the steps right below to use the Memory Diagnostic tool on Windows 11 and check if it works in resolving the Hypervisor error:
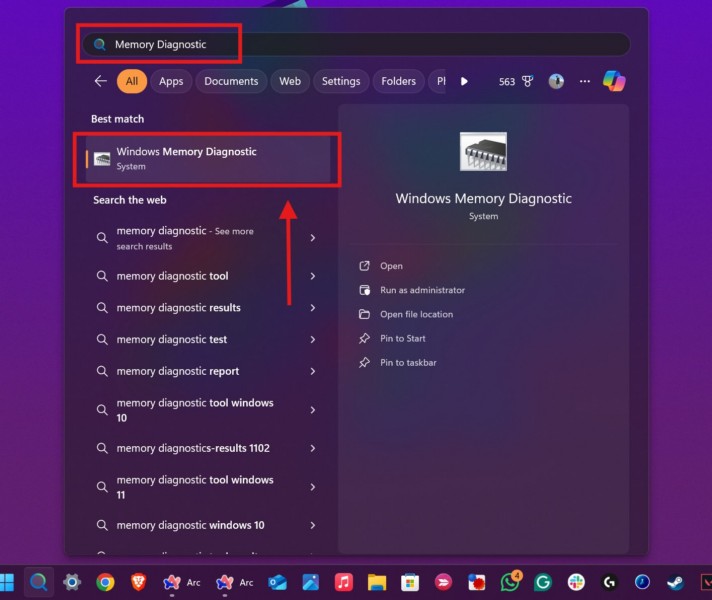
1. Use Windows + S to invoke Windows search or right-click on the Magnifier button on the Taskbar of your Windows 11 PC or laptop.
2. Type in Memory Diagnostic in the provided search box and click the Windows Memory Diagnostic on the search results page.
3. Select the Restart now and check for problems (recommended) option on the following prompt.
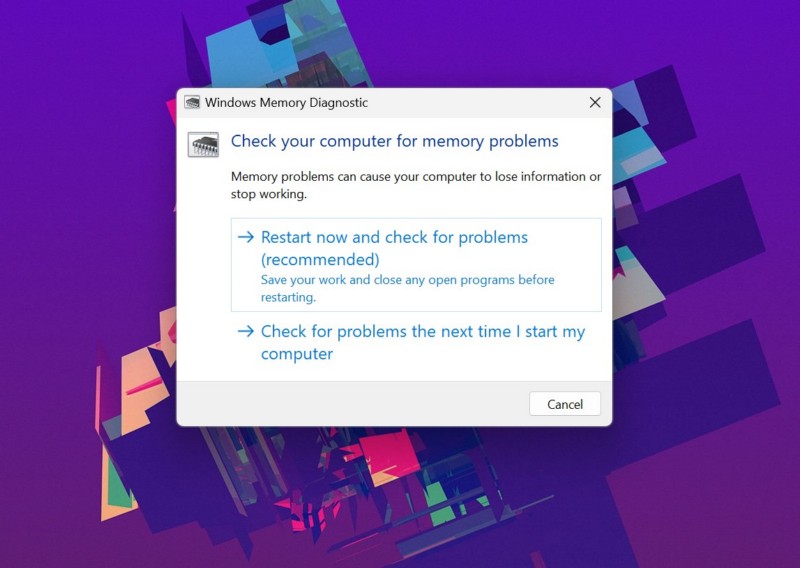
4. Wait for your Windows 11 PC or laptop to restart.
Following the restart, run your computer as usual and check whether the Hypervisor error shows up or not.
6. Uninstall Third-Party Antivirus Program on Windows 11
Now, as mentioned in a thread on the official Microsoft Support forum, certain third-party antivirus programs may cause issues with the Hypervisor feature on Windows 11, and in turn, generate the Hypervisor error. In this case, users must uninstall the third-party antivirus program on their PC or laptop and run the Hypervisor feature.
So, if you are using a third-party antivirus software such as McAfee or AVG, you can try uninstalling it on your Windows 11 PC or laptop and check if that resolves the issue. You can follow the steps right below to do so on your device:
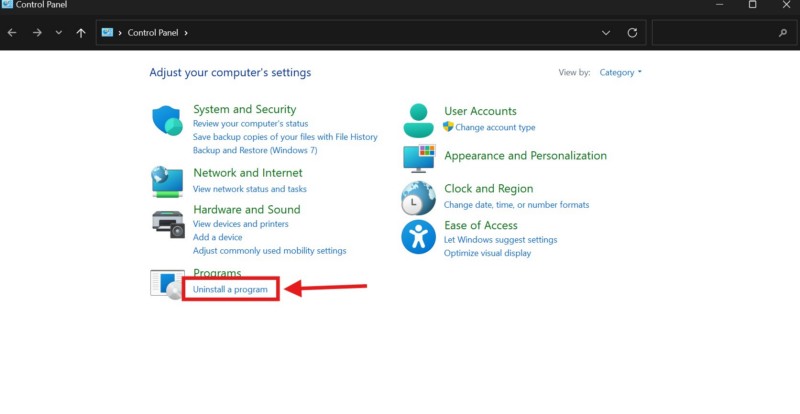
1. Use Windows + S to open Windows search.
2. Find and open the Control Panel.
3. Click the Uninstall a program button under the Programs option.
4. Locate the antivirus program on the list, left-click to select, and hit the Uninstall/Change button above.
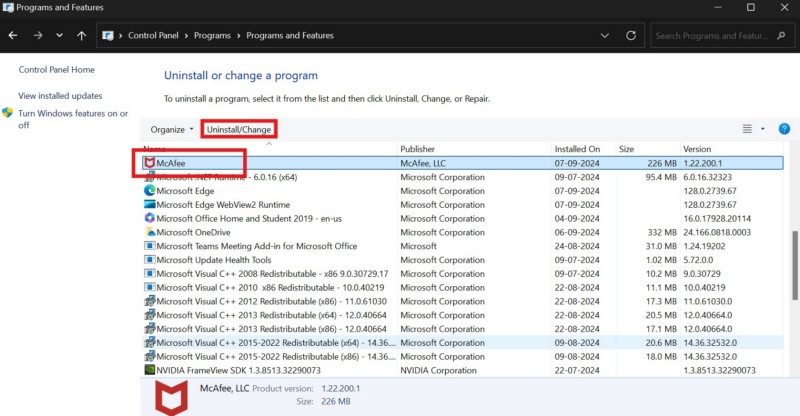
5. Follow the on-screen instructions to uninstall the program.
6. Restart your Windows 11 PC or laptop after completion.
Following the restart, check whether or not the Hypervisor error is showing up on your Windows 11 PC or laptop.
7. Run SFC Scan on Windows 11
Apart from third-party programs, driver issues, and system glitches, the Hypervisor error can also arise due to damaged or missing system files on Windows 11. In this case, you can try running the System File Checker (SFC) scan on your PC or laptop. The SFC scan is a command-line utility that check the system file directory and replaces missing or corrupted system files.
So, follow the steps right below to run the SFC scan on your Windows 11 device and check if it helps in resolving the Hypervisor error:
1. Use Windows + S to open Windows search and search for cmd.
2. Click the Run as administrator button for the Command Prompt tool on the search results page.

3. Click Yes on the following User Account Control (UAC) prompt.
4. In the elevated Command Prompt window, type in or copy-paste the following command and press Enter to run it:
sfc /scannow
5. Wait for the command to execute on your device.
6. After the completion, restart your Windows 11 PC or laptop
Following the reboot of your device, check whether the Hypervisor error is fixed or not.
8. Run DISM Scans on Windows 11
If the SFC scan did not help in resolving the Hypervisor error on your Windows 11 PC or laptop, you can try running the DISM scans. The Deployment Image Servicing and Management (DISM) scans, much like the SFC scan, are a group of command-line utilities that help in resolving issues within the disk images on Windows 11. So, there is a high chance that the DISM scans will resolve the Hypervisor error on your PC or laptop.
Follow the steps right below to run the DISM scans on your device:
1. Use steps 1-3 from the previous section (Fix #7) to open an elevated Command Prompt window on your device.
2. Within the Command Prompt window, type in or copy-paste the following commands and press Enter to run them one by one:
DISM /Online /Cleanup-Image /CheckHealthDISM /Online /Cleanup-Image /ScanHealthDISM /Online /Cleanup-Image /RestoreHealthNote: Make sure to run the above commands individually and NOT simultaneously in Command Prompt.

3. Wait for all the DISM scans to complete on your device.
4. After completion, restart your Windows 11 PC or laptop.
Following the reboot of your system, try running your device as usual and check whether you are getting the Hypervisor error or not.
9. Check for Windows Update on Windows 11
Another significant factor that can trigger the Hypervisor error on your PC or laptop is an outdated Windows version. Bugs and glitches in an outdated Windows version can cause serious system issues, including issues such as the Hypervisor error. Hence, it is always recommended to keep the Windows version up to date on your PC or laptop to avoid such issues.
So, if you have not updated your Windows 11 PC or laptop in a long time, follow the steps right below to check for the latest Windows updates and install them right away:
1. Use Windows + I to open the Windows Settings app on your device.
2. Go to the Windows Update tab on the left navigation bar.
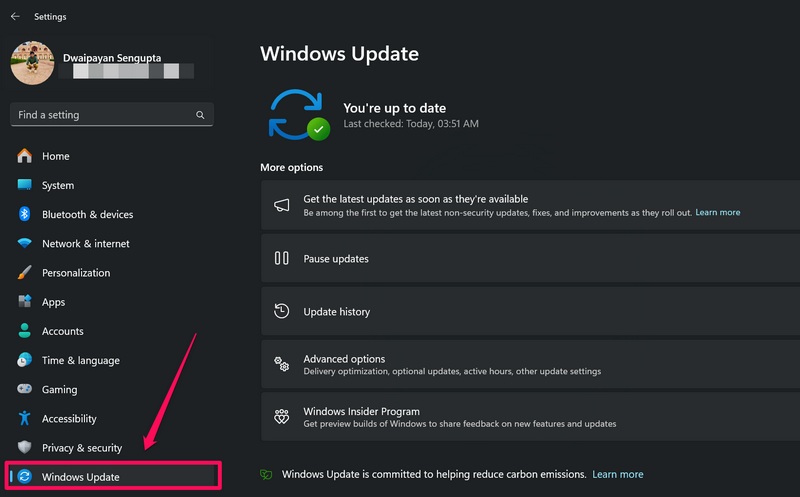
3. If you do not see any update on the right pane, click the Check for Updates button.
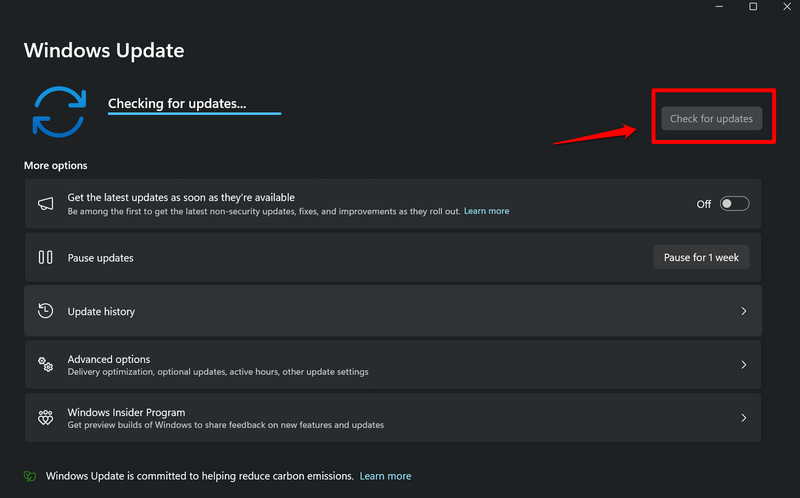
Note: Make sure your Windows 11 PC or laptop is connected to power and an active and stable internet network during this stage.
4. Once the latest Windows updates are available, they should start auto-downloading. In case they do not, click the Download and install all button above to initiate the process.
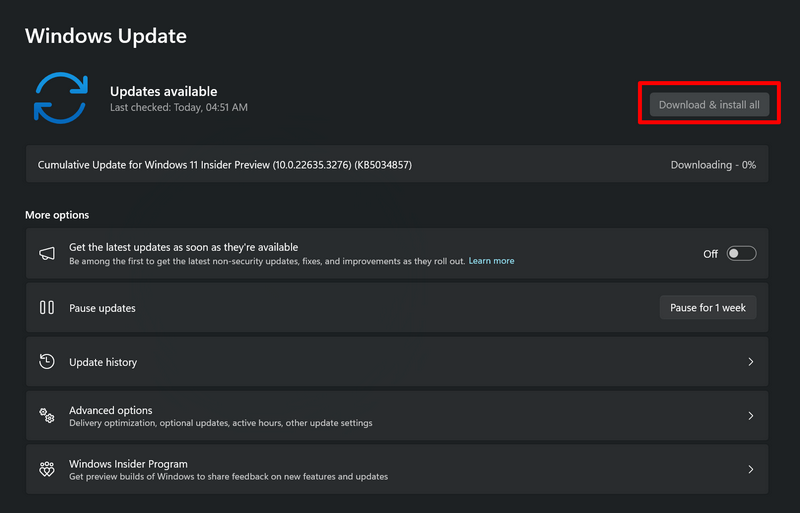
5. Wait for all the available updates to download.
6. Finally, click the Restart now button above to restart your PC or laptop and install the new updates.
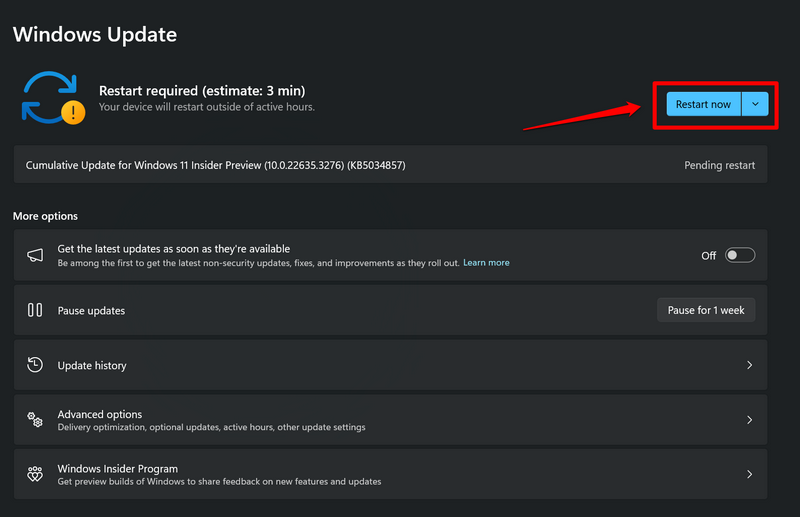
Following the reboot of your system, the Windows version should be updated on your PC or laptop. With the up-to-date Windows 11 version, try using the Hypervisor feature on your device and check whether or not you are getting the Hypervisor error.
FAQs
What is Hypervisor on Windows 11?
The Hypervisor technology on Windows 11 is a program that allows users to run multiple virtual machines on their PCs and laptops. On the Windows platform, users can use the Hyper-V software, which relies on the Hypervisor technology, to run virtual machines on their computers.
Why is there no Hyper-V on my Windows 11 PC?
The Hyper-V program, which allows users to run multiple virtual machines on their computers, comes with the Windows 11 Professional version. So, if you are using the Windows 11 Home version on your PC or laptop, you will not see the Hyper-V program on your device.
How do I stop Hyper-V from running on Windows 11?
To stop Hyper-V services on your Windows 11 PC or laptop, open the Services window and locate all the Hyper-V services. Then, right click on each of them and hit the Stop button on the context menu to stop all the Hyper-V services on your Windows 11 PC or laptop.
Wrapping Up
So, there you have it, folks! This brings us to the end of our comprehensive guide on how to fix the Hypervisor BSOD error on Windows 11 PCs and laptops. The Hypervisor error, it being a Blue Screen of Death error on Windows 11, can cause users to panic. However, the error is not that serious and a few prevention steps can help users avoid the Hypervisor error, especially if they do not often use virtual machines on their computers.
We hope this article was able to shed light on the Hypervisor error and how to fix it on Windows 11. If it did, don’t forget to let us know in the comments below. You can also subscribe to our website and YouTube channel to get updates about all our latest posts and videos. As always, thank you for sticking till the end of the article, and we will see you again in our next guide.
The Hypervisor is Microsoft’s in house technology that enables users to run virtual machines on their systems. This versatile technology is used by many application developers and advanced users to create and manage virtual machines easily. But like any other piece of code, this too has its flaws. Many users have recently reported encountering the Hypervisor error BSoD on their Windows 11 systems. Let’s look at this issue in detail.
What is the Hypervisor Error?
The Hypervisor error is a BSoD associated with Windows virtual machine platform. This error screen is generated when the Hypervisor stops working or crashes with a stop code HYPERVISOR_ERROR, having a bug check value of 0x00020001. This can happen due to outdated or incompatible device drivers, bad drive sectors, corrupted virtual machine image files, and more. It can also affect users using Windows Sandbox or any other third party virtual machine software. Let’s look at the causes behind the occurrence of this error screen in more detail.
What Causes the Hypervisor Error in Windows 11?
- Outdated device drivers/windows OS
- Bad drive sectors
- Corrupted system files
- Incorrect/conflicting settings
What are the Methods to Fix the Hypervisor Error?
Now that we know about the causes behind the Hypervisor error blue screen, let’s dive deeper and learn the methods to fix it. But before moving forward, do the following –
- Reinstall Hyper-V from Windows features.
- Update BIOS
- Run Windows Driver Verifier
Method 1: Check if Your System Supports Virtualization
This is a basic check to see if your Windows 11 system supports virtualization. This is an easy way to fix the hypervisor error BSoD in Windows 11 computers. If your system supports Hyper-V, you can check if it is enabled or not. To do this –
- Open the Settings app.
- Click on System and then About in the left pane.
- Copy the details of your processor and search for its specification on the internet to check if the manufacturer’s website lists virtualization under its specifications.
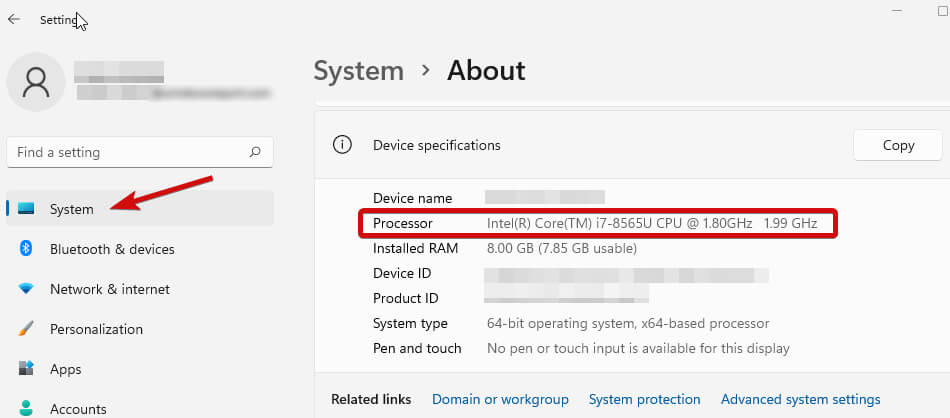
- If it does, make sure the virtualization is enabled on your system.
- If not, to enable virtualization, you need to access your system’s BIOS.
- Once inside system BIOS, go to the Advanced tab, and check the status of Intel (R) Virtualization Technology.
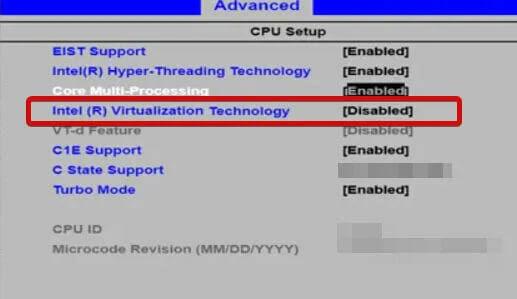
- If it is disabled, enable it.
- Save the changes and exit the BIOS.
- The above method, however, is for intel users. AMD users will find different terminologies for this method. You can refer to the motherboard’s manual to learn more.
Notes :
- BIOS key is different for each device. Check yours by looking at the boot sequence. On some computers, virtualization is in the Performance section.
- The above method, however, is for intel users. AMD users will find different terminologies for this method. You can refer to the motherboard’s manual to learn more.
Method 2: Update Device Drivers & Windows OS
This is another simple way to eliminate the Hypervisor error BSoD on your Windows 11 computer. Outdated device drivers and OS can cause the system to generate this error screen, thereby hampering your work. Simply follow the steps mentioned below to update system drivers and Windows OS.
To update device drivers –
- Press WIN + X and click on Device Manager from the list.
- Double-click on all the devices to expand them.
- Find all the entries with an exclamation mark.
- Right-click on each of them one-by-one and click on Properties.
- Under the Driver tab, click on Update driver.
To update Windows OS –
- Press WIN + I to open Settings.
- Click Update & Security.
- Click Windows Update and then Check for updates.
Method 3: Use Command Prompt (Administrator)
Sometimes, the Hypervisor blue screen error is caused due to missing or damaged system files. This can lead to several other glitches and BSODs. Users can use the following commands in elevated command prompt to deal with this issue –
Chkdsk and Deployment Imaging Servicing and Management scans check and repair the existing installed OS files along with the system files. Once inside, type chkdsk C: /f /r /x and hit Enter. Once done, restart your system and see if this resolves the issue.
After this, type the following commands and run them one by one –
- DISM.exe /Online /Cleanup-image /Scanhealth and hit Enter.
- DISM.exe /Online /Cleanup-image /Restorehealth and hit Enter.
Finally, type the following command to ensure that Hyper-V service launches when the system boots up.
- bcdedit /set hypervisorlaunchtype auto
Method 4: Restart the Corresponding Service
Sometimes, when a user tries to run a virtual machine on the computer, it fails to do so and generates the hypervisor error blue screen, which leads to system crash. This can be fixed by starting the corresponding service related to Microsoft virtual machine platform. To do so –
- Press WIN + R.
- Type services.msc and hit Enter.
- Locate Hyper-V Virtual Machine Management in the list and select it.

- Right-click on this entry and check its status. If it is running, stop it.
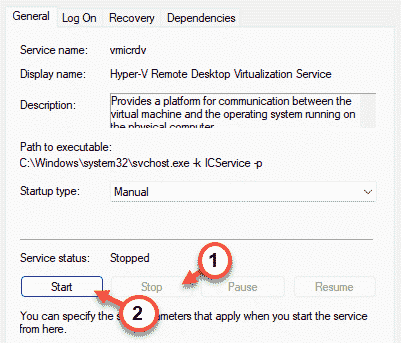
- Restart the service to see if this fixes the issue.
If you are still encountering the HYPERVISOR_ERROR BSoD, then your virtual machine image might be corrupted. In such a case, you can use an all-in-one data recovery toolkit to recover your data.
Stellar Toolkit for Data Recovery is a highly advanced data recovery software, which is used by industry experts to recover data from crashed NAS, RAID, Virtual machines, and other storage devices. This software offers a simple and clean UI, which makes it highly user friendly.
Its advanced data recovery algorithms easily help you recover data lost in numerous data loss scenarios like accidental deletion, drive crash, malware attack, and more. You can use it to recover data from your corrupted virtual machine in a couple of few easy to follow steps. To use this software –
- Download Stellar Toolkit for Data Recovery from its official website and install it.
- Launch it and select the type of data you wish to recover.
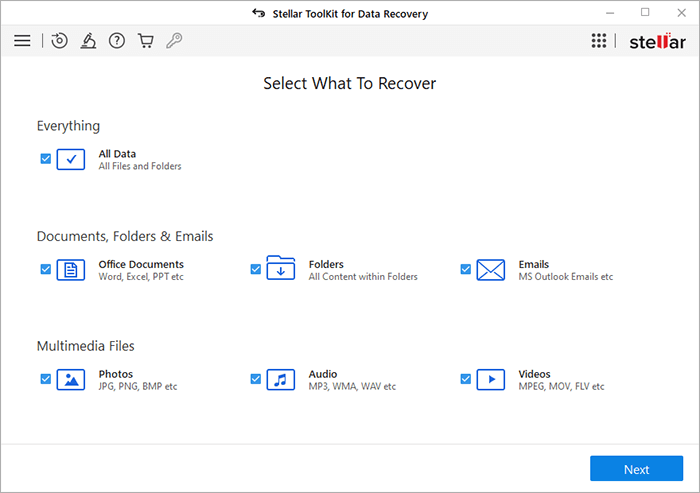
- Select the location from where you wish to recover your lost data and click Scan.
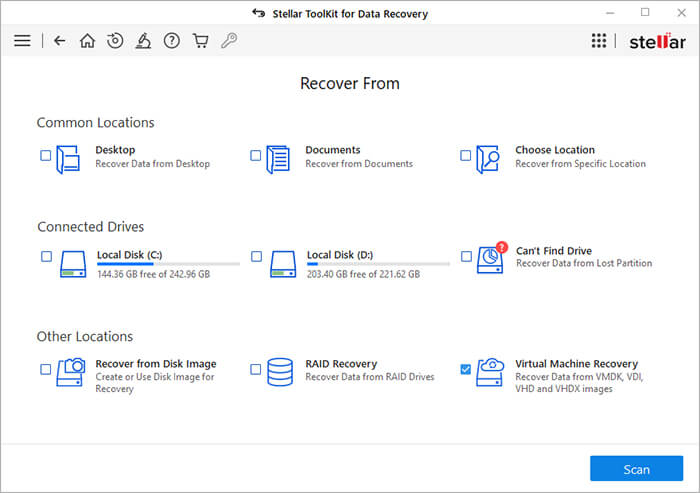
- The software will scan for lost data and display it on the screen.
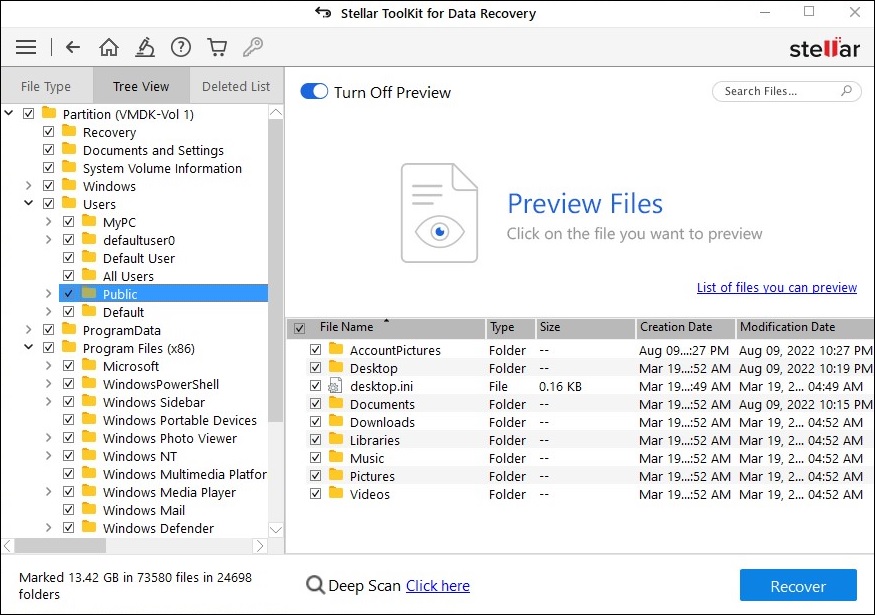
- You can preview the files to check them and if satisfied with the results, you can save them onto your desired storage media by clicking Recover.
Note – If you are unable to find the desired files, you can perform Deep scan. During this, the software performs in-depth check in each sector of the drive and previews all the data that can be recovered.
Conclusion
The Hypervisor error blue screen on Windows 11 computers is a pestering issue, which is mostly generated in the case of when a virtual machine either doesn’t start or its image get corrupted. In this article, we discussed the causes behind this error and the ways to fix this issue. We also shared an ingenious way to recover lost data from a corrupted virtual machine image. We hope you found this article helpful and recovered your VM data easily using the above mentioned methods.
Was this article helpful?
YES2
NO