
Содержание статьи:
- Создание виртуальной «Windows»
- ШАГ 1: включаем компонент Hyper-V, и запускаем диспетчер
- ШАГ 2: создание виртуальной машины (ВМ)
- ШАГ 3: установка Windows на ВМ
- ШАГ 4: использование ВМ
- Вопросы и ответы: 50
Доброго времени суток!
Оказывается в некоторых учебных заведениях еще используют Windows XP и делают на них лабораторные работы 👀. Собственно, именно по этой причине — одни знакомые попросили меня как-нибудь запустить старый софт в новой Windows 10 (11).
Как вариант решения: решил установить им виртуальную машину с Windows XP, на которой лабораторные будут «работать» (благо, что в Windows 10/11 есть встроенное средство гипервизор Hyper-V, а значит качать дополнительно ничего не нужно!). Да и пользоваться им достаточно просто… 👌
В общем, ниже покажу на пошаговом примере как можно создать себе виртуальную «Windows», и пользоваться ей, как обычной программой (запуская в окне).
Возможно, это кого-то убережет от покупки старого ноутбука/ПК для учебы (или для запуска старых игр 😉).
*
Примечание: всё, что описано ниже — можно сделать на 📌ОС Windows 10/11! Для норм. работы Hyper-V необходимо не менее 6 ГБ ОЗУ и 64-разрядный процессор (с аппаратной 📌виртуализацией // проверьте, чтобы она была у вас включена!). Вообще, ее сейчас поддерживают все современные ЦП…
*
📌Важно!
Если вам нужна виртуальная Windows XP (например), чтобы подключать к ней старые принтеры, сканеры и пр. — то рекомендую остановить свой выбор на VirtualBOX. Более подробно по этой теме тут.
*
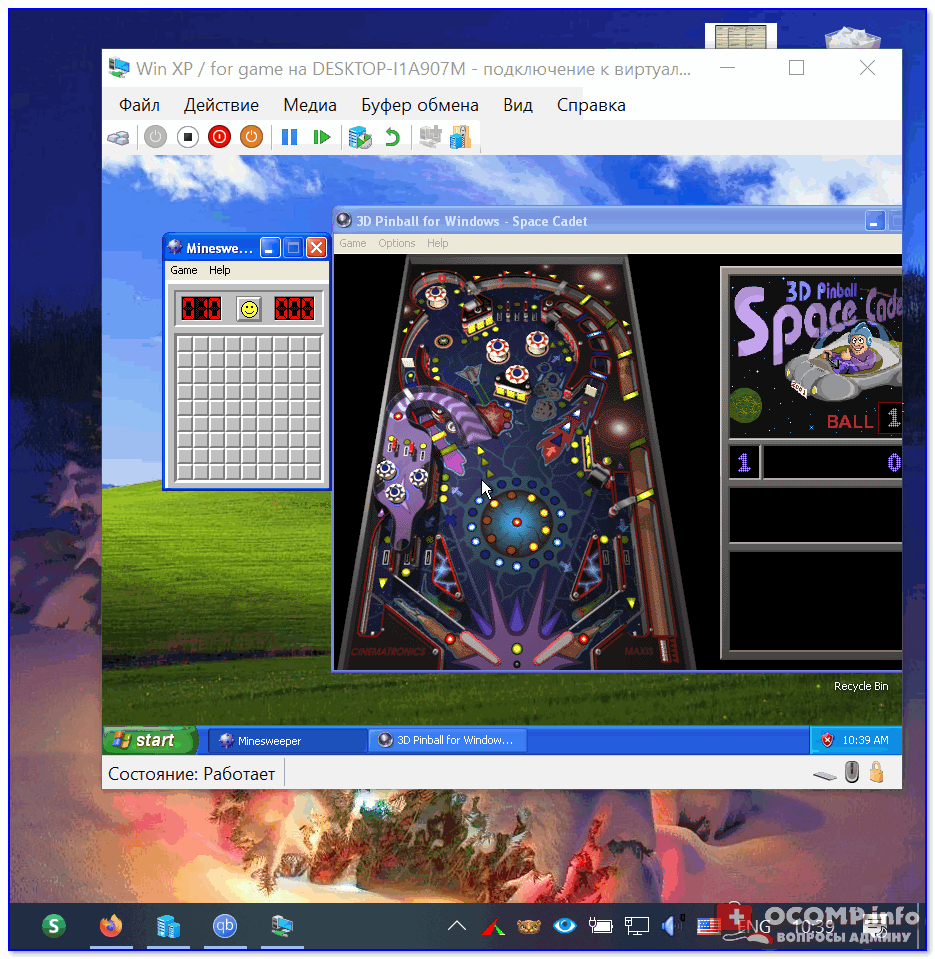
Что у нас получится в итоге — виртуальная Windows XP запущена в Windows 10 (аппаратная виртуализация в Windows 10)
*
Создание виртуальной «Windows»
ШАГ 1: включаем компонент Hyper-V, и запускаем диспетчер
Итак, сначала необходимо установить компонент Hyper-V (по умолчанию в Windows он выключен). 📌Сразу предупрежу, что в домашних версиях Windows — этот компонент установить нельзя! В этом случае вам нужно сначала перейти на Pro версию ОС // для этого, как правило, необходимо поменять ключ активации и обновить ОС).
*
Наиболее простой способ «задействовать» Hyper-V — воспользоваться вкладкой «Включение или отключение компонентов» в панели управления Windows.
*
Чтобы открыть ее — можно нажать Win+R, и воспользоваться командой optionalfeatures (либо зайти в 👉 панель управления Windows и открыть раздел «Программы», см. скрин ниже 👇).
В ней нам требуется поставить галочку напротив пункта «Hyper-V» и нажать OK.
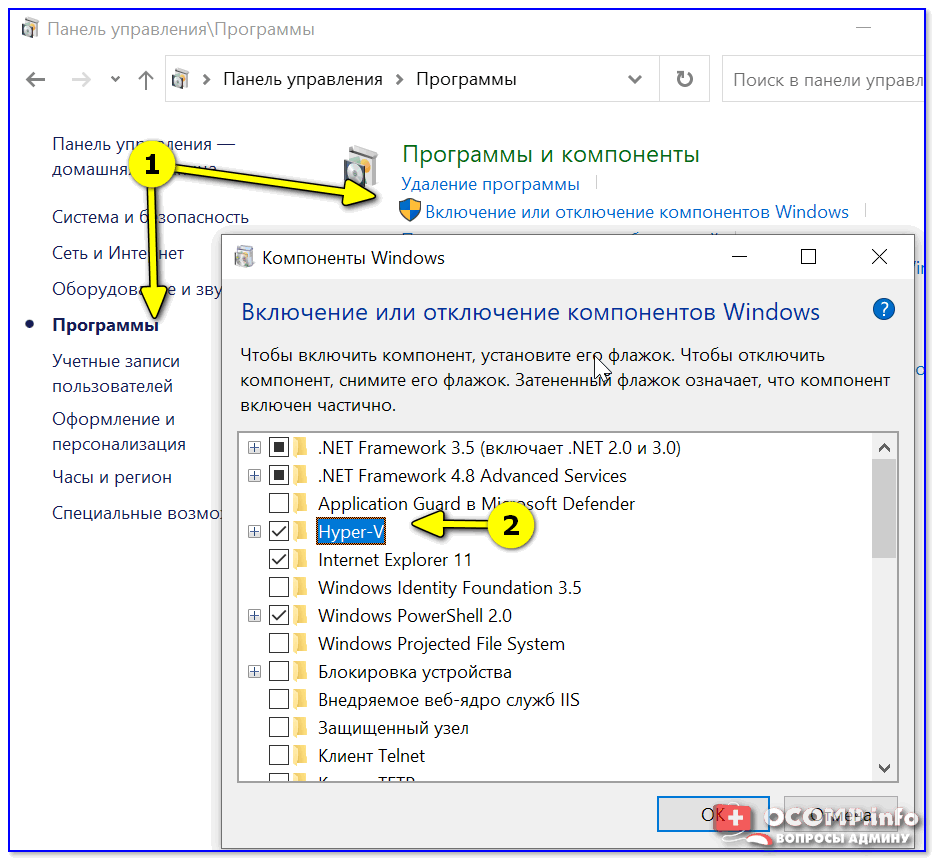
Как установить Hyper-V
Кстати, установить диспетчер Hyper-V в Windows 10/11 можно и другим способом — запустить командную строку от имени динистора и использовать команду:
DISM /Online /Enable-Feature /All /FeatureName:Microsoft-Hyper-V
Важно: обязательно согласиться на перезагрузку, выбрав вариант «Y». 👇
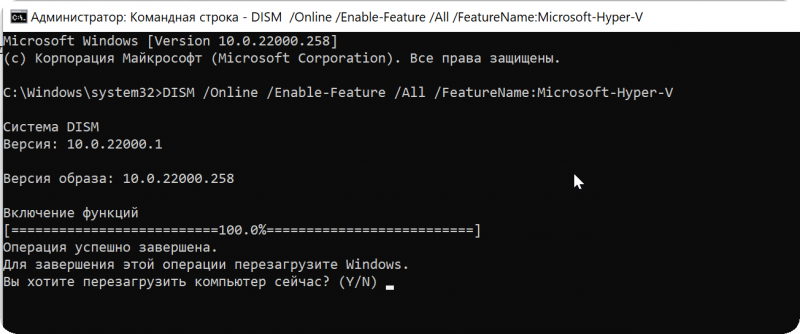
Включение Hyper-V в командной строке
Во время перезагрузки компьютера произойдет до-установка нужного нам компонента. 👌
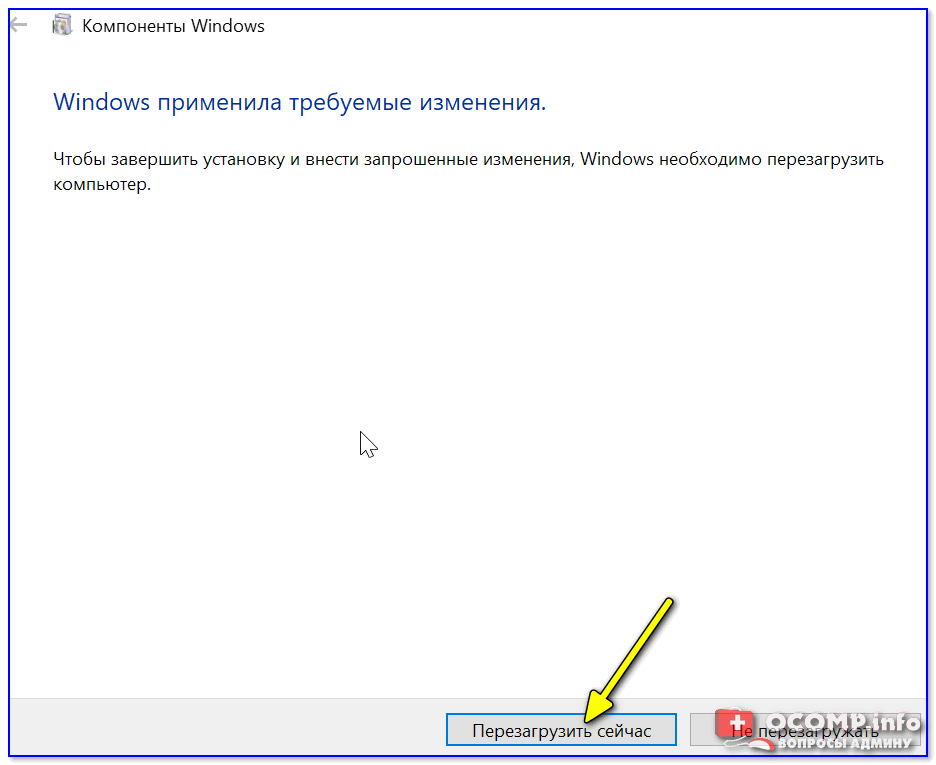
Перезагрузить сейчас
*
📌Запустить диспетчер Hyper-V (если у вас уже установлен этот компонент) достаточно просто:
- можно нажать Win+R, и использовать команду virtmgmt.msc;
- либо можно набрать в поиске «Hyper-V» и запустить «диспетчер Hyper-V». И тот, и другой вариант — должны работать! 👌
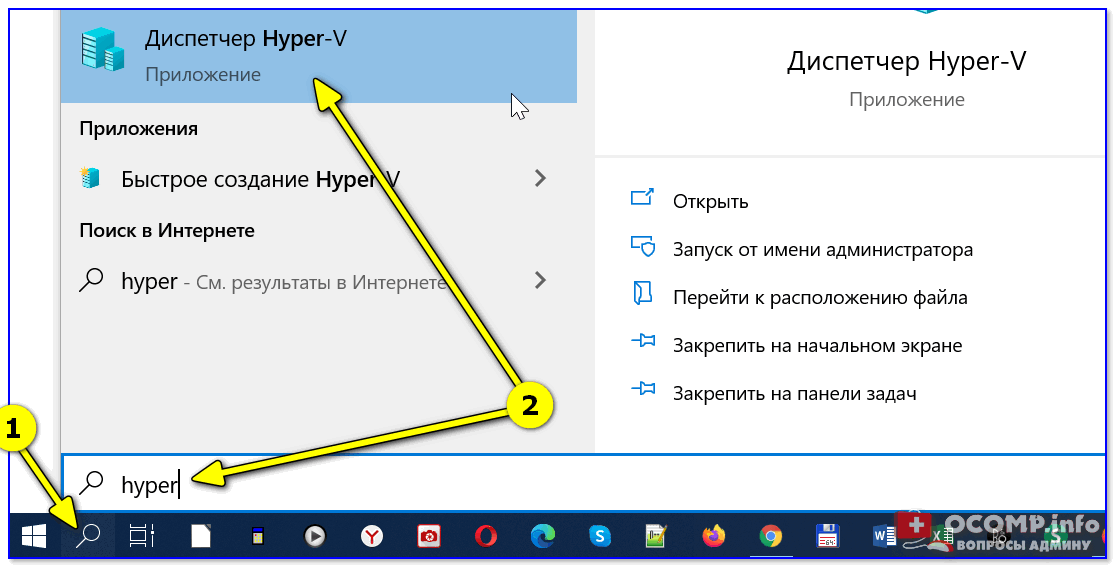
Запуск Hyper-V
*
ШАГ 2: создание виртуальной машины (ВМ)
После первого запуска диспетчера Hyper-V — у вас никаких виртуальных машин (далее просто «ВМ») быть не должно.
Чтобы создать ВМ — обратите внимание на вкладку «Действия» (в колонке справа 👇). Кликните по кнопке «Создать» как у меня на скриншоте.
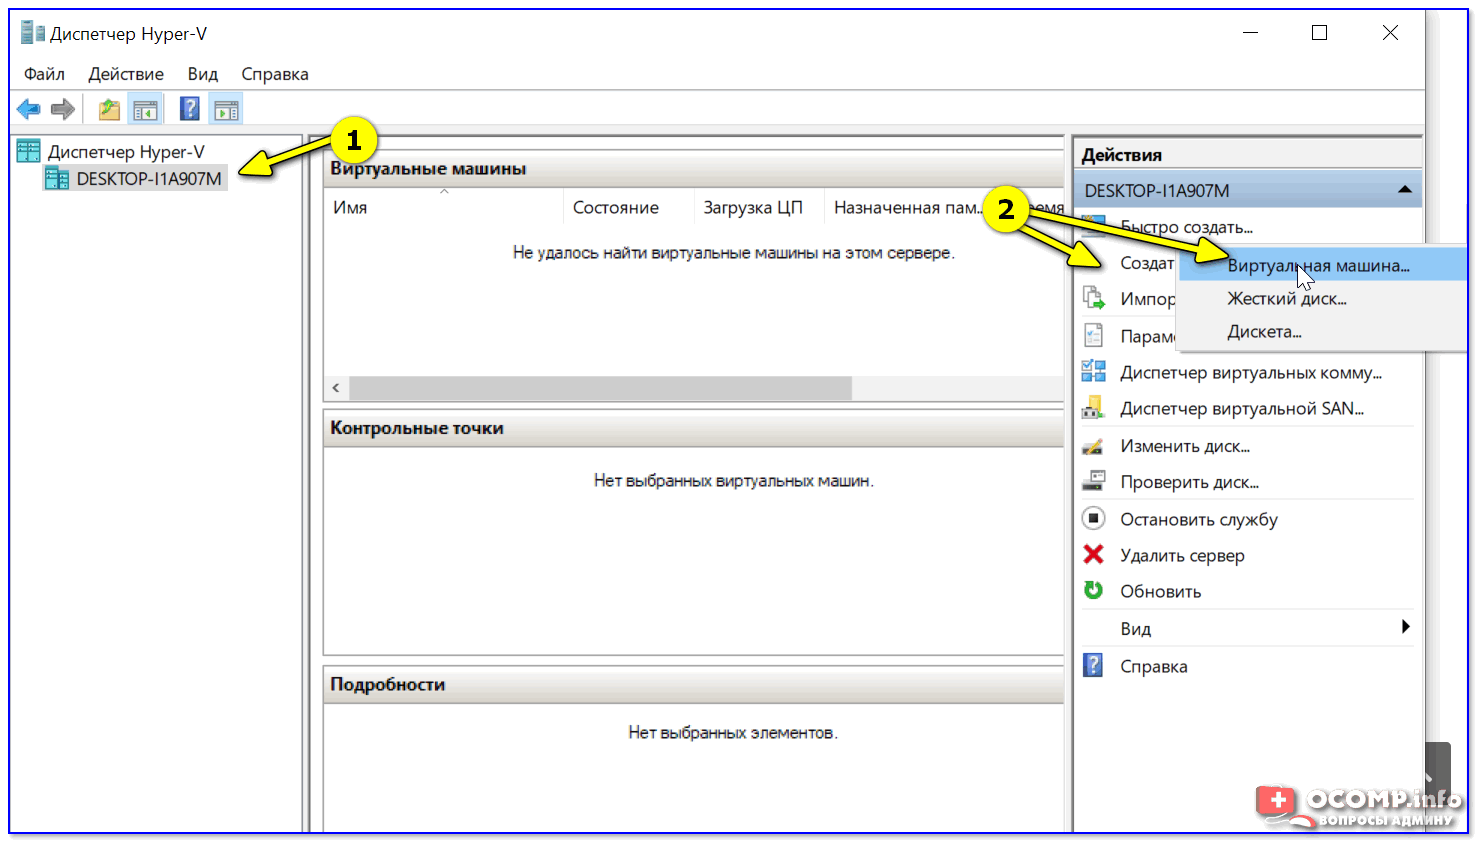
Диспетчер Hyper-V — создать
Далее необходимо придумать имя для ВМ. Можно использовать любое.
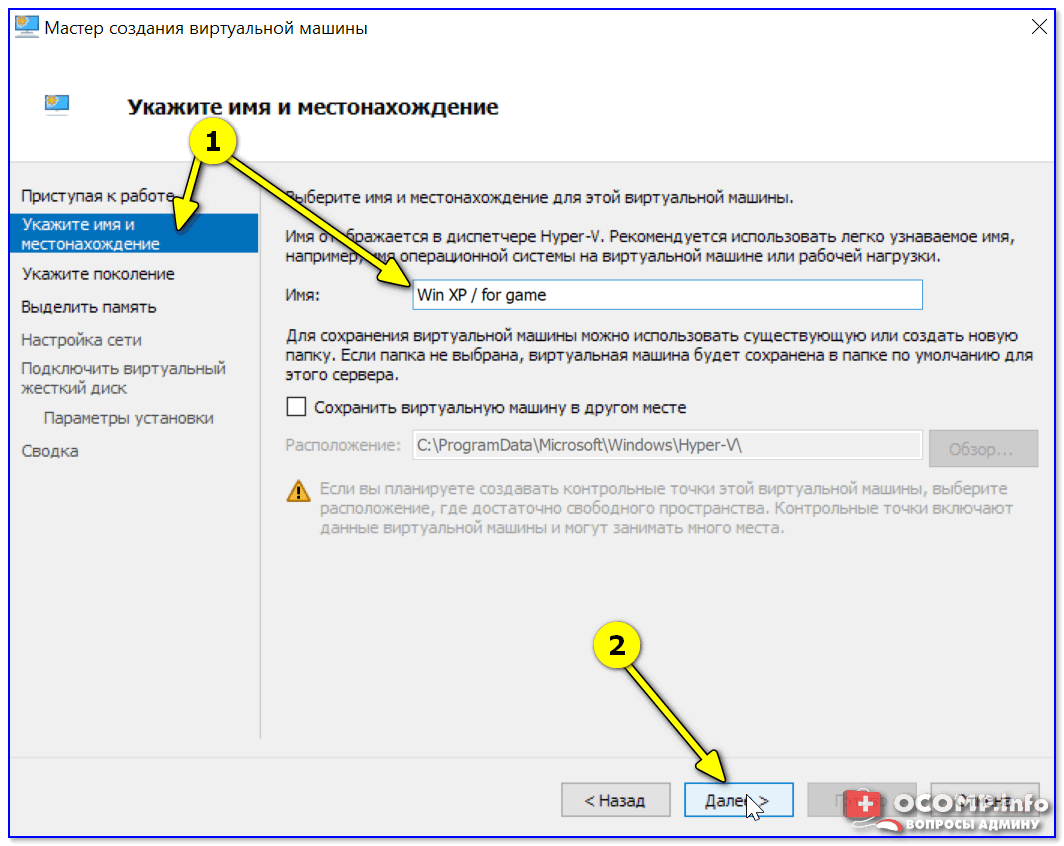
Укажите имя и местонахождение
Если вы хотите создать «виртуальную Windows XP» (т.е. старую ОС) — выбирайте первое поколение. 👇
Для «виртуальной Windows 10/11» — выбирайте второе поколение.
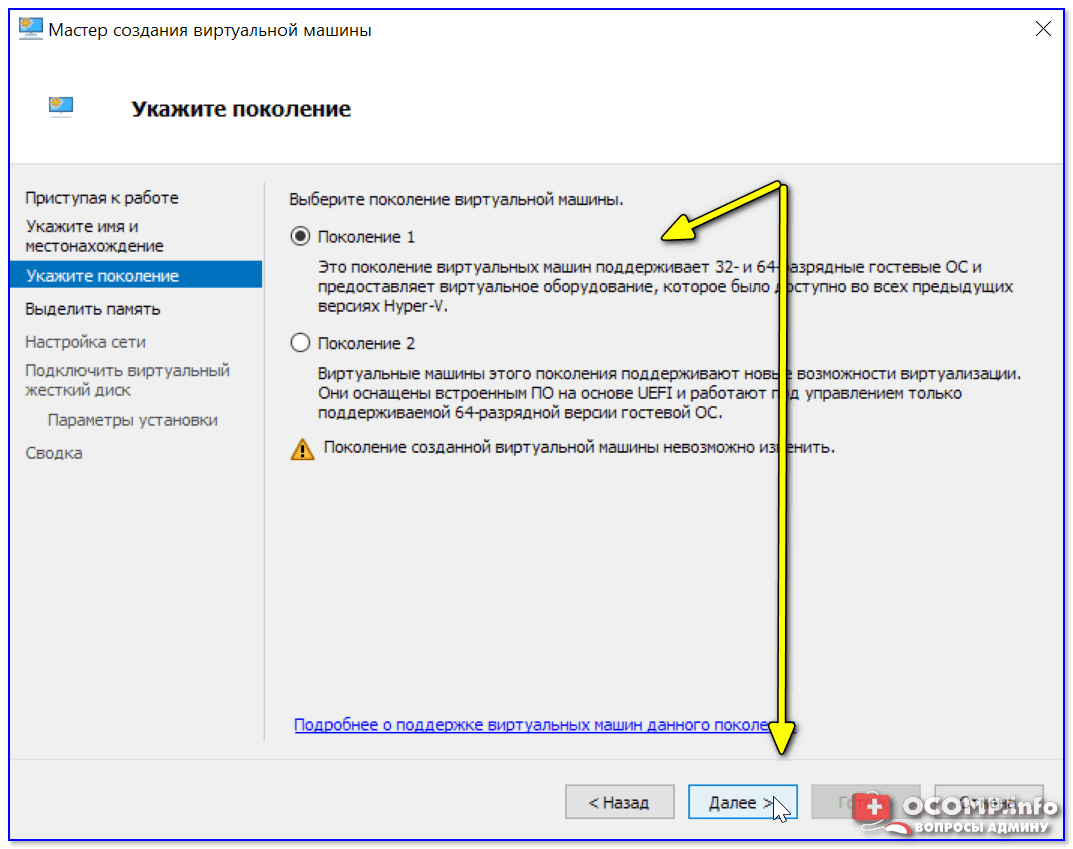
Укажите поколение
Затем необходимо указать количество выделяемой ОЗУ. Рекомендую как минимум 2000 МБ (для «виртуальной Windows 10/11» — 4000 МБ).

Выделить память
Что касается настройки сети — то ее пока что на этом этапе можно пропустить.
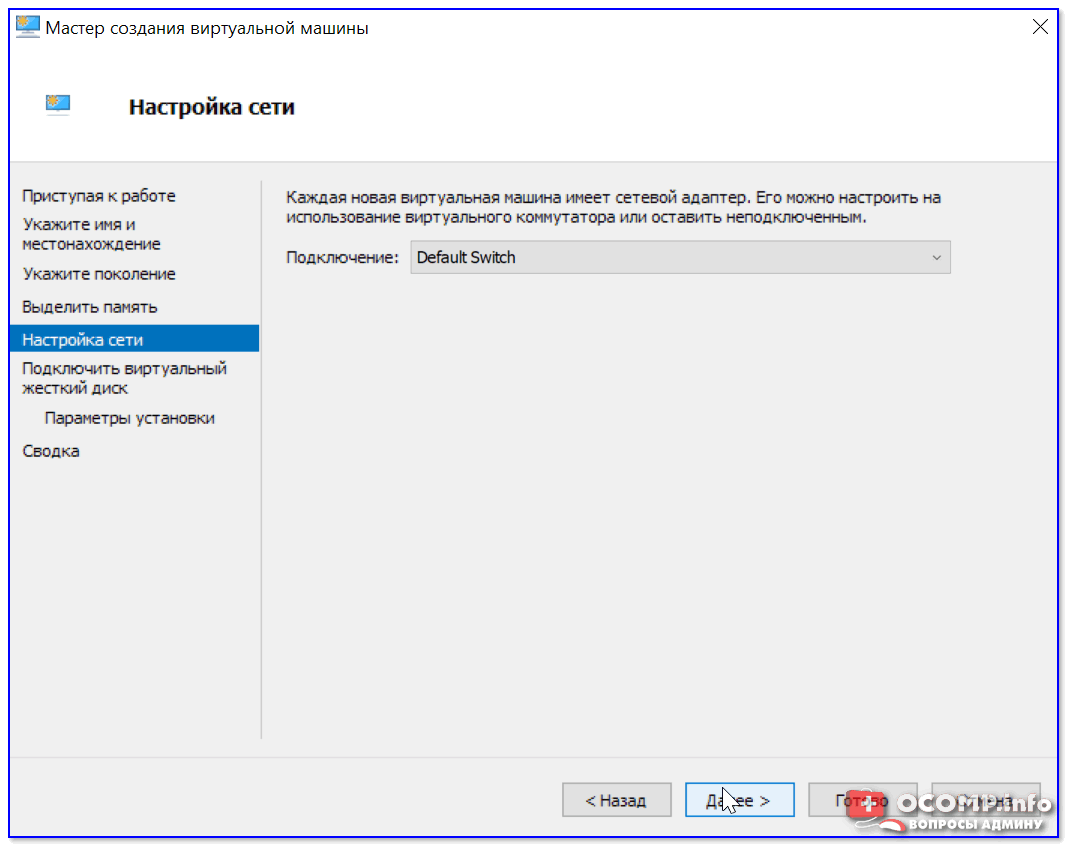
Настройка сети
Советую сразу же создать виртуальный жесткий диск (на нем будет храниться ваша виртуальная ОС, все ее файлы и т.д.). В моем примере я взял 15 ГБ (обычно требуется больше, и лучше указывать как минимум 30-45 ГБ).
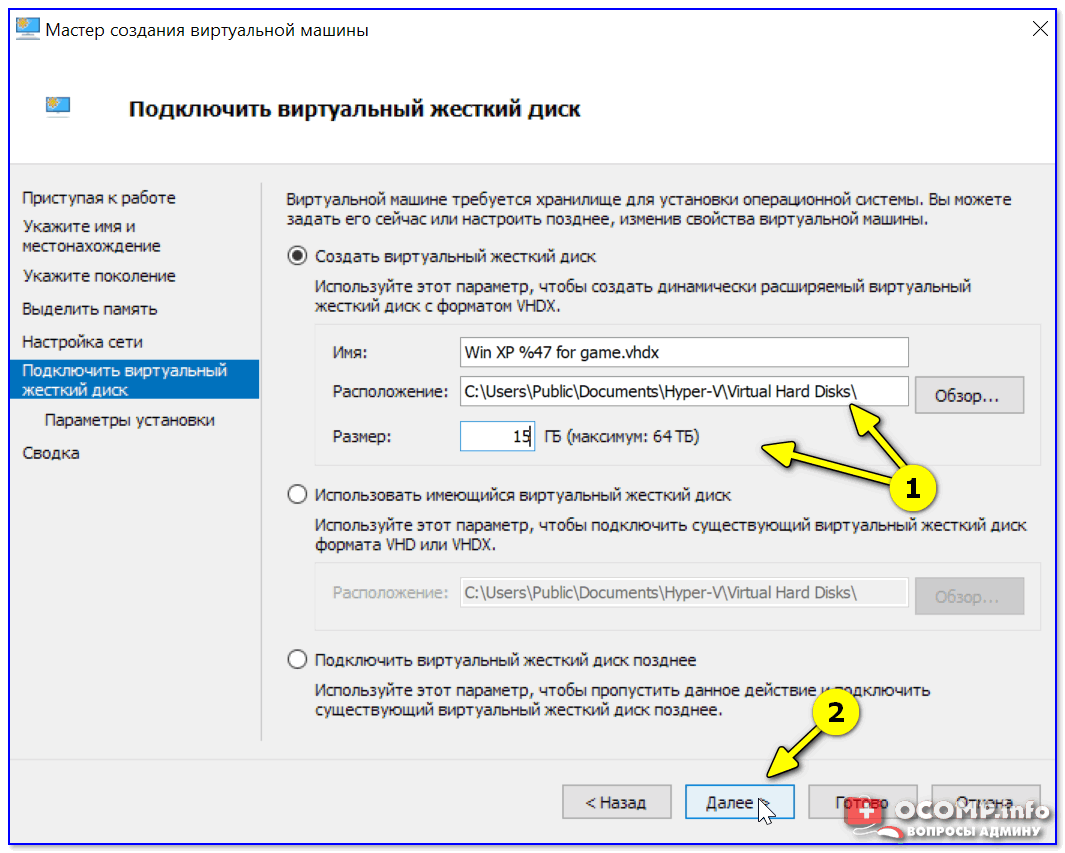
Подключить виртуальный жесткий диск
Следующий шаг важен: здесь нужно указать расположение ISO-образа с ОС Windows, которую вы хотите установить на ВМ (т.е. эта версия ОС у вас станет «виртуальной»).
В своем примере я использовал образ ISO с Windows XP.
👉 В помощь!
1) Как и где искать «редкие» файлы: программы, игры, фильмы и пр. (кроме как в Google / Яндекс)
2) Как скачать Windows 10/11 на русском языке (официальные ISO-образы)
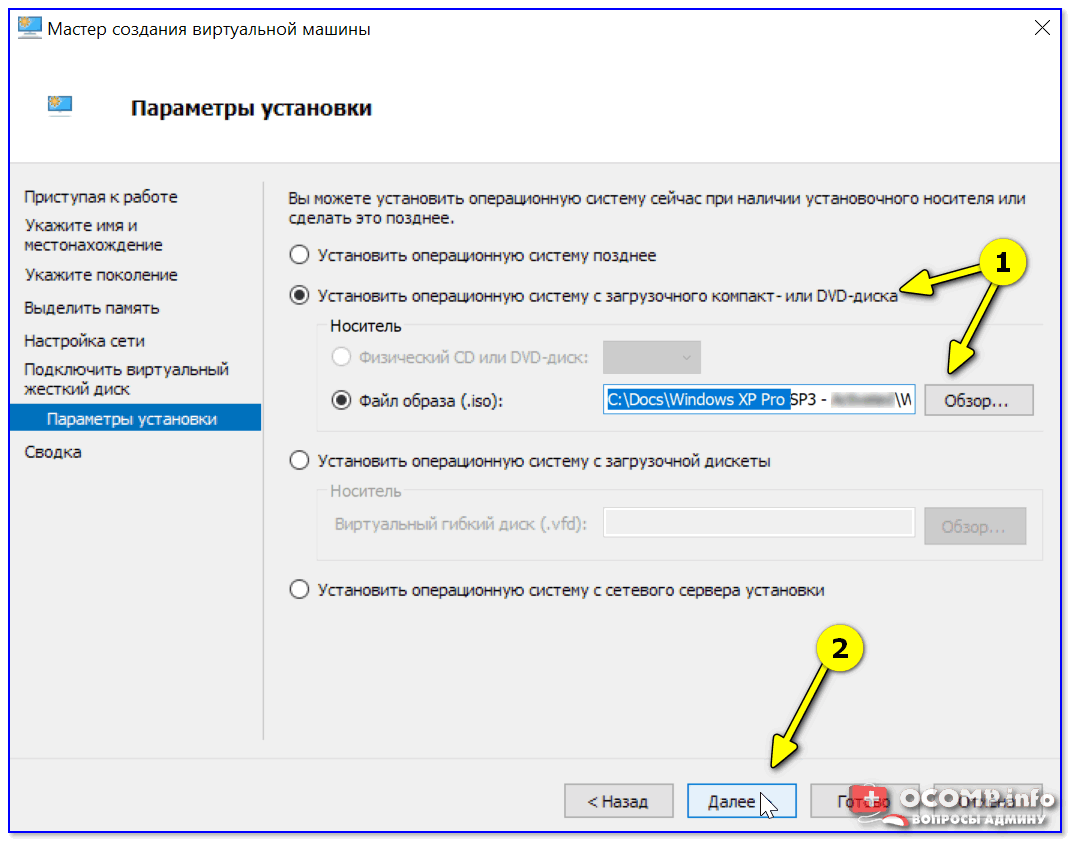
Параметры установки (выбор установочного ISO)
Ну и последний шаг — это обычная сводка, можно сразу же нажать на «Готово».
ВМ была создана! 👌
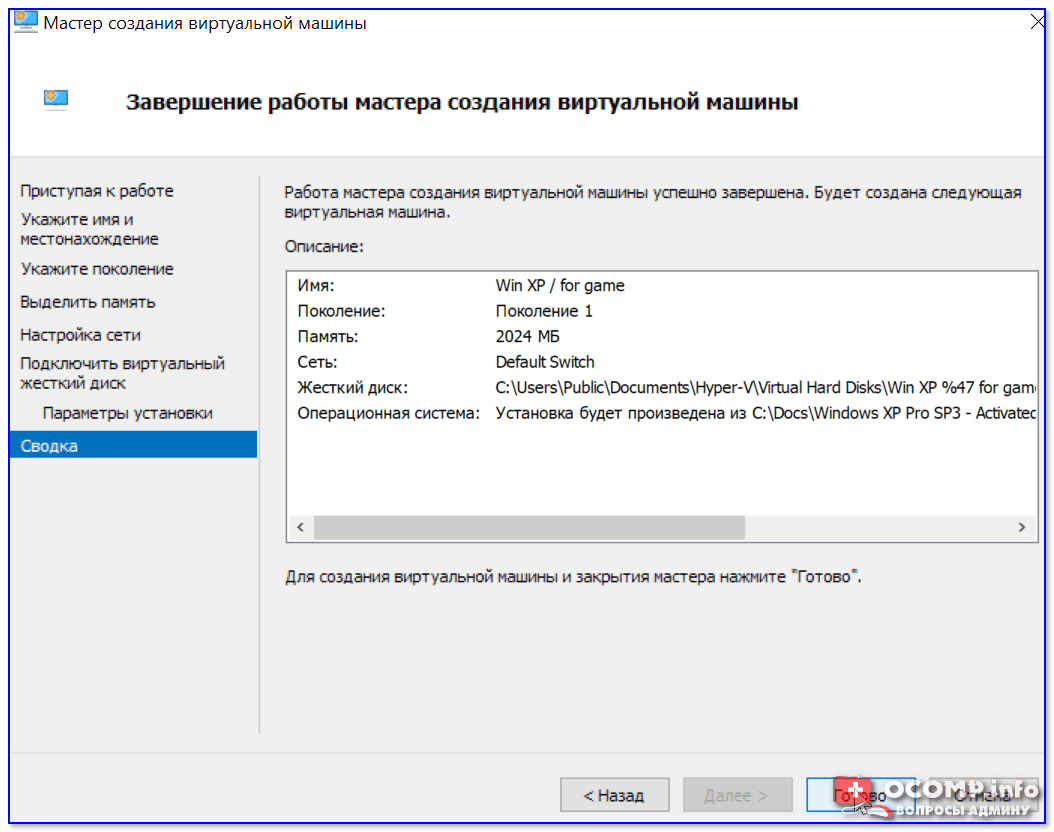
Сводка
*
ШАГ 3: установка Windows на ВМ
Теперь созданную ВМ можно запустить — для этого по ней достаточно кликнуть правой кнопкой мыши и выбрать в меню «Подключить…». 👇
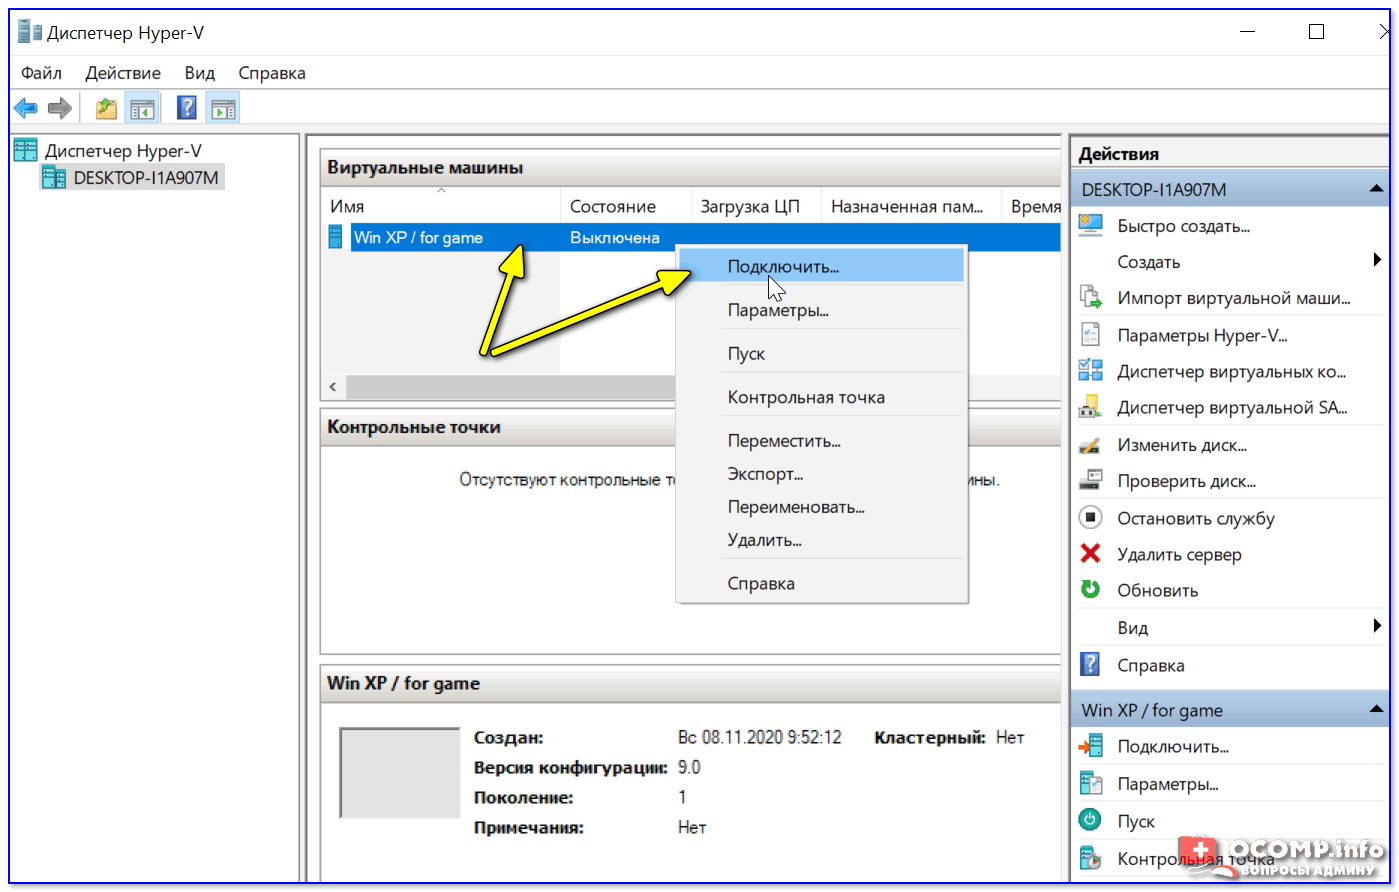
Подключить ВМ
Далее нажать по кнопке «ПУСК».
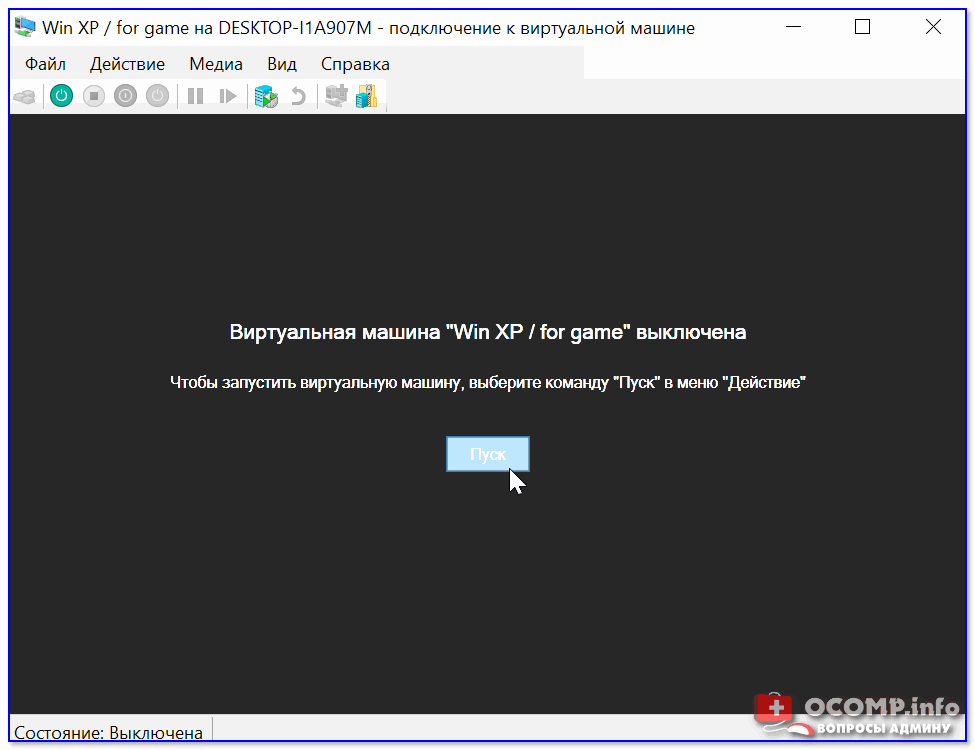
Пуск, запускаем ВМ
Т.к. в предыдущем шаге мы указали установочный образ ISO с Windows XP — ее установка на виртуальную машину начнется автоматически!

Т.к. при создании ВМ мы указали файл ISO — то установка началась автоматически
Как правило, достаточно несколько раз нажать на кнопку Enter, и дождаться окончания форматирования виртуального диска и копирования файлов.
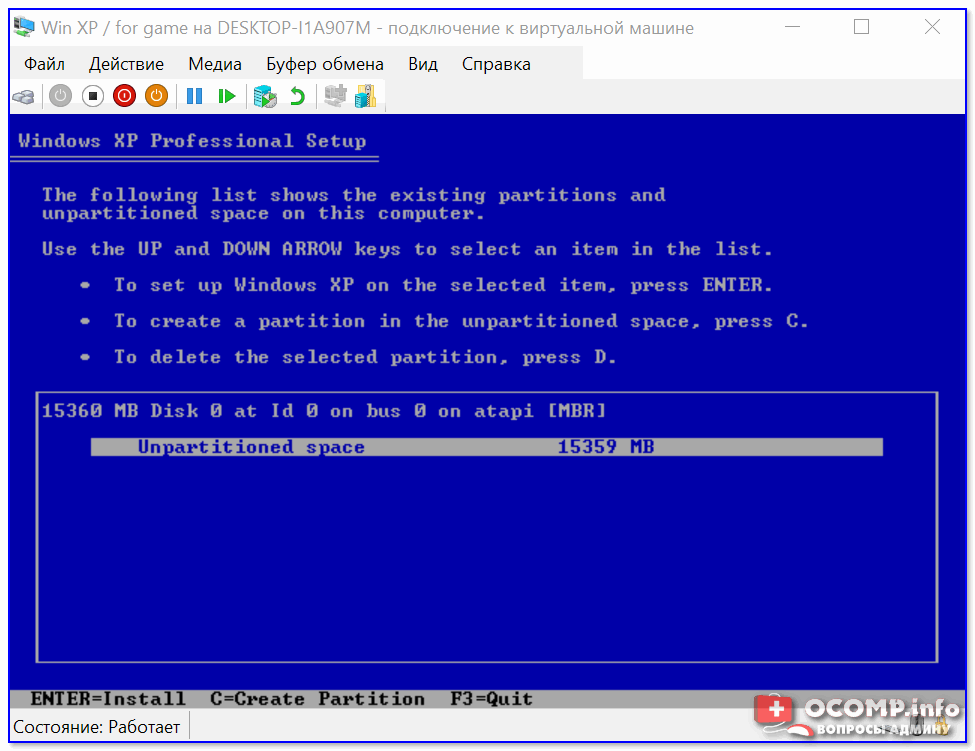
Выбор диска, форматирование, и копирование загрузочных файлов
Далее начнется весьма обыденный процесс установки ОС. Несколько раз придётся отвлечься и указать имя, часовой пояс и пр.
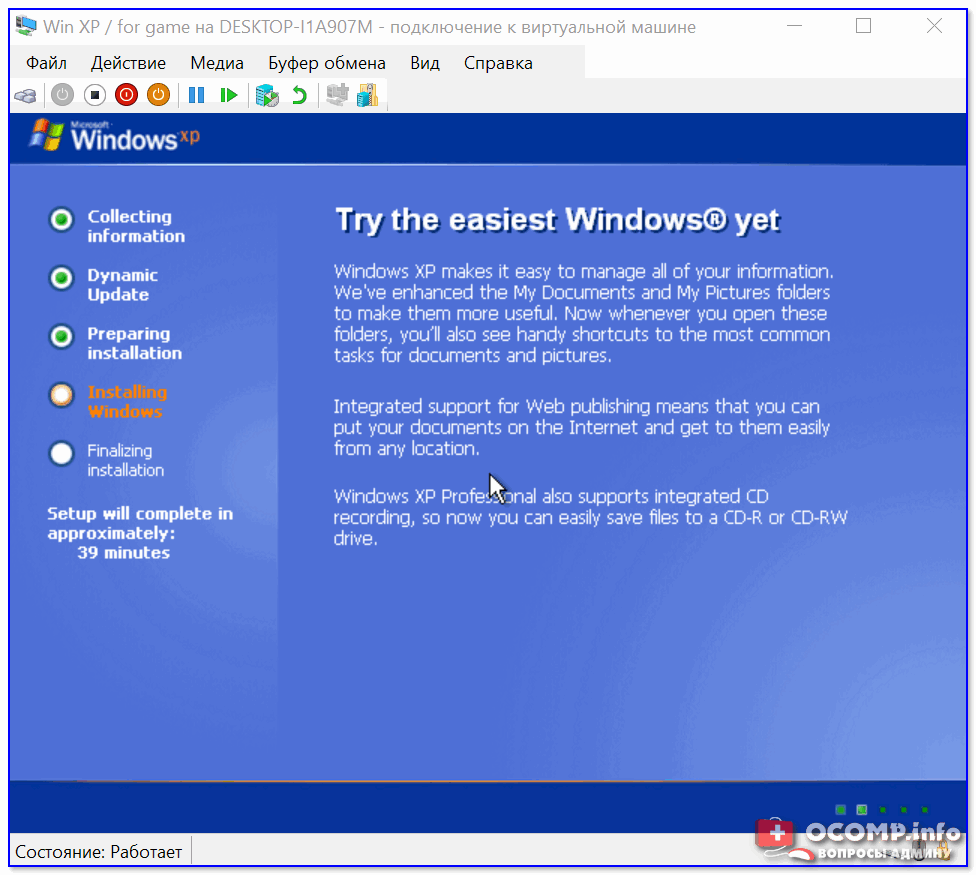
Процесс установки и копирования файлов
Через некоторое время Windows установится и произойдет первая загрузка… 👇
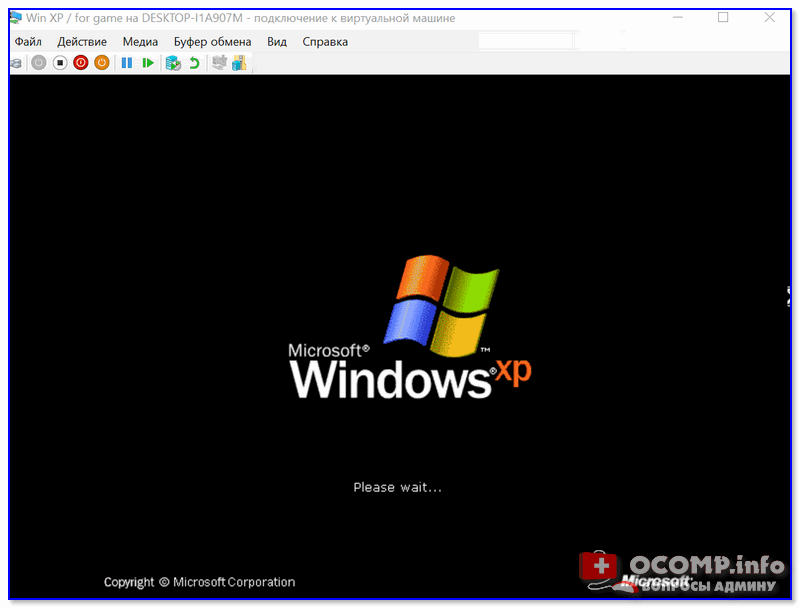
Запуск ОС
Теперь у нас есть «виртуальная Windows XP» и с ней можно полноценно работать. 👌

Виртуальная Windows XP готова к работе
*
ШАГ 4: использование ВМ
Использование ВМ крайне простое. После запуска диспетчера достаточно кликнуть по нужной ВМ правой кнопкой мыши и выбрать «Подключить» (так, как мы это делали при установки ОС в предыдущем шаге).
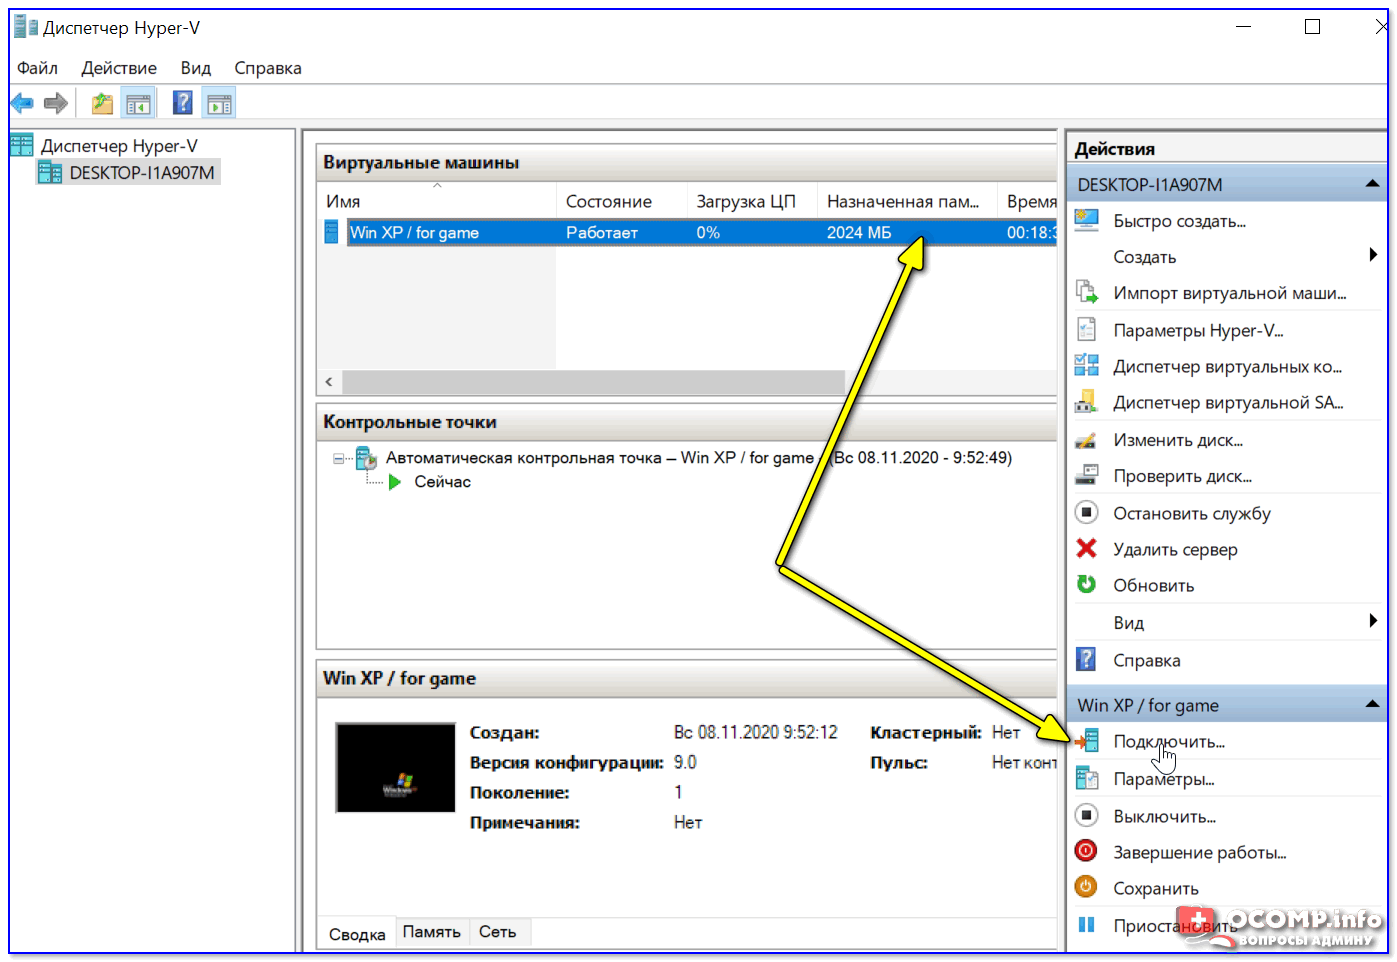
Подключаем ВМ и работаем
После, виртуальная Windows будет запущена в отдельном окне (как и др. программы), и в ней можно будет работать как в обычной системе — также доступна кнопка ПУСК, файлы на диске, игры и т.д. 👇
Можно играть
Важно: для выхода из окна приложения виртуальной машины — нажмите сочетание Ctrl+Alt+←.
*
Как скопировать файлы на диск ВМ
📌 В помощь!
Общая папка между реальной и виртуальной Windows: способы быстрой передачи файлов
*
Довольно популярный вопрос по поводу обмена файлами с виртуальной ОС (ведь через правка/копировать это делать не получается…).
Приведу наиболее простой способ: сначала нужно отключить ВМ.
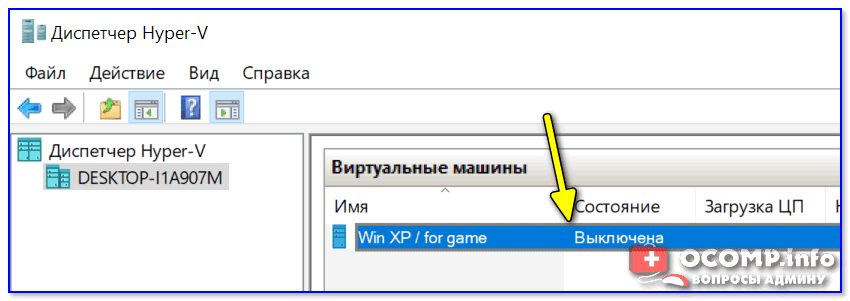
Состояние — выключена
Далее открыть 👉 управление дисками, нажать по меню «Действие / Присоединить виртуальный жесткий диск» и указать его расположение (по умолчанию: C:\Users\Public\Documents\Hyper-V\Virtual hard disks).
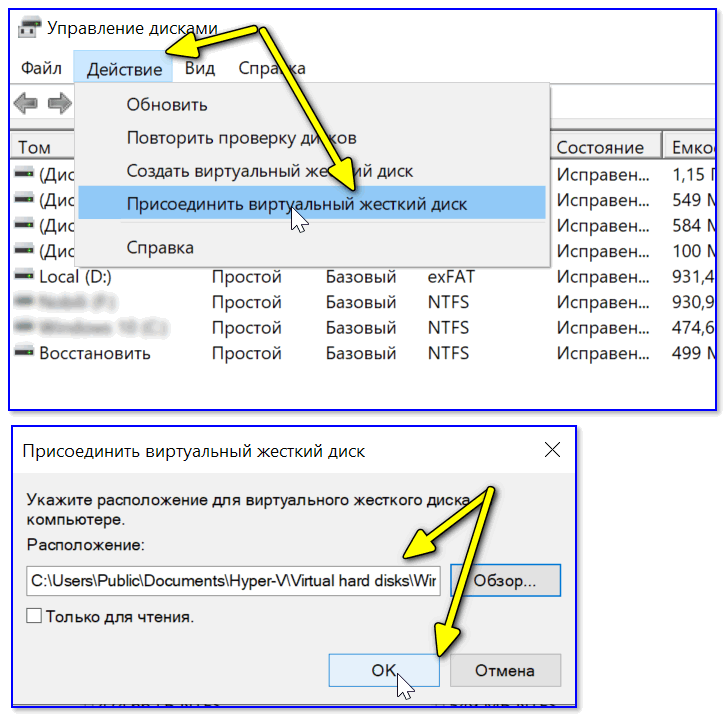
Присоединить виртуальный диск
В результате виртуальный диск (на котором установлена «виртуальная Windows») отобразиться в «Моем компьютере» и с ним можно будет работать как с обычным HDD. Т.е. скопировать и перенести на него (с него) любые файлы.
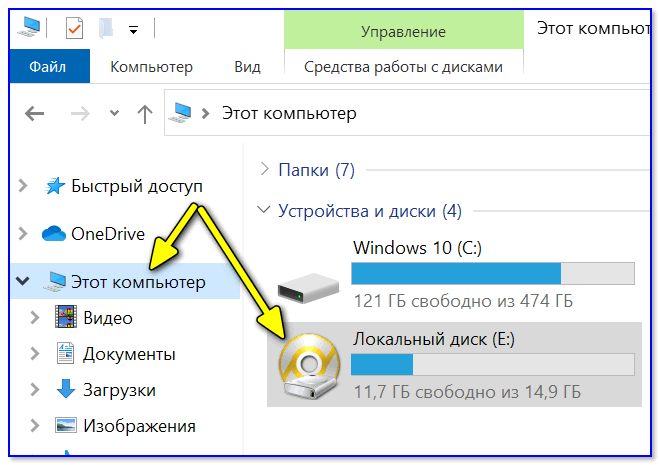
Можно работать с дисками
После обмена файлами с виртуальным диском — не забудьте его отключить: для этого в управлении дисками кликните по нему правой кнопкой мыши и выберите в меню «Отсоединить виртуальный жесткий диск».
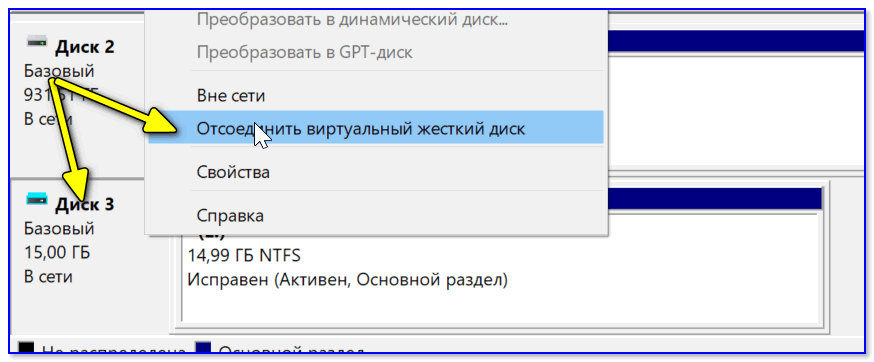
Отсоединить виртуальный диск
*
В общем-то, на этом и всё…
Компонент Hyper-V является весьма неплохой заменой отдельным программам вроде VirtualBox (о которой я рассказывал в этой заметке).
Впрочем, иногда виртуальные машины не позволяют всё же запускать определенный старый софт, и для его работы приходится ставить «реальную ОС» на реальный старый ноутбук (например).
*
Дополнения — всегда приветствуются!
Всем успехов!
👋
Первая публикация: 10.11.2020
Корректировка: 11.02.2022
9. Enable remote desktop (RDP) on Windows XP Pro
To be able to transfer files between your host and your «Windows XP Mode» virtual machine, you will need to use Windows XP Pro remote desktop.
Indeed, file transfer does not seem to work despite the installation of Hyper-V integration services on Windows XP Pro.
Additionally, you can’t use extended session mode either since it is only supported from Windows 8.1 (for guest OS).
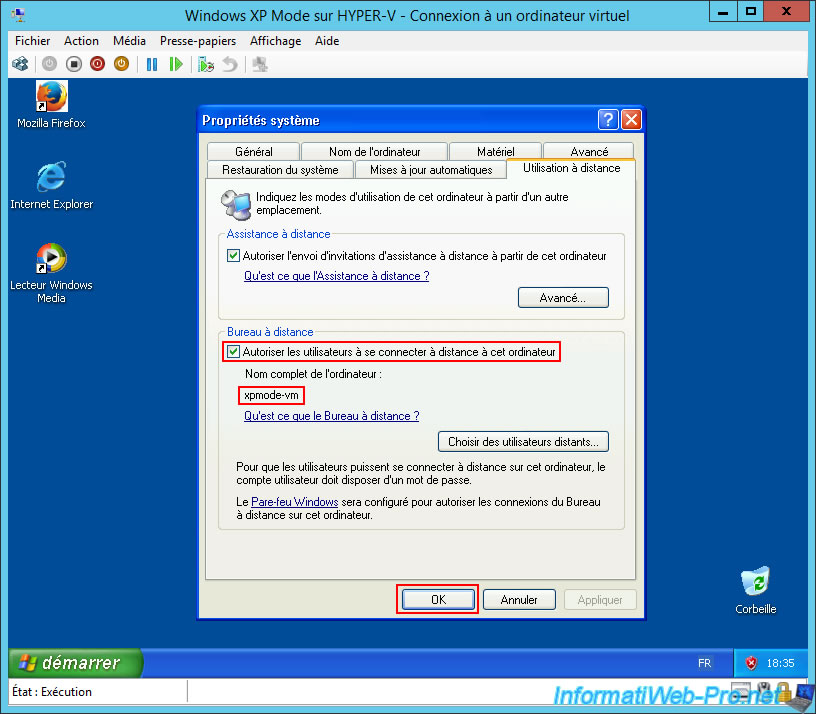
Since the Windows XP mode provided by Microsoft and imported under Hyper-V corresponds to a professional edition of Windows XP, you will be able to activate remote desktop in your virtual computer.
To enable remote desktop in Windows XP Pro, refer to our tutorial: Control a computer remotely (Win XP).
Warning : if you installed Hyper-V on Windows 10 or 11, your virtual machine is probably connected to an internal network (which is a subnet different from your physical network and where there is no Internet).
It’s therefore necessary to create a new virtual switch which will be connected to the external network (your physical network) so that you can then connect to the «Remote Desktop» server of your virtual machine from the «Remote Desktop» client of your physical PC (host PC).
To resolve this issue (on Windows 10 or 11), refer to step «4. Virtual switch created by default on Windows 10 and 11» of our tutorial on enabling the «Hyper-V» feature on Windows (client version).
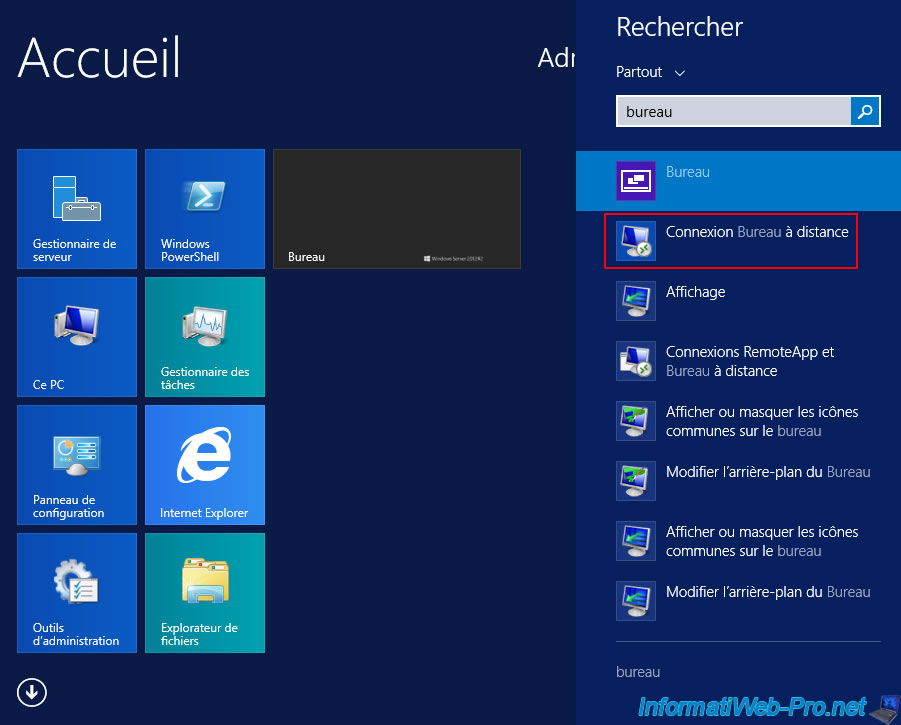
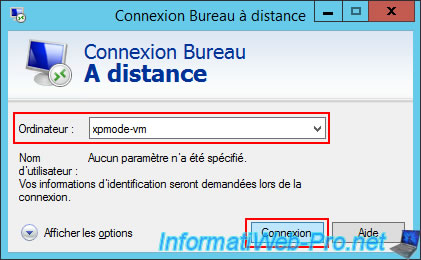
Then, launch the “Remote Desktop Connection” client present on your Hyper-V server or on any PC on your local network.
Type the computer name defined in your «Windows XP Mode» virtual computer and click: Connection.
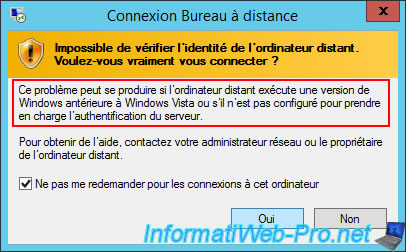
Depending on your version of Windows Server or Windows (on the client PC), you may see a warning telling you that the remote computer is using an older version of Windows.
Plain Text
The identity of the remote computer cannot be verified.
Do you want to connect anyway?

This problem can occur if the remote computer is running a version of Windows that is earlier than Windows Vista ...
Ignore this warning by checking the «Don’t ask me again for connections to this computer» box, then click «Yes».
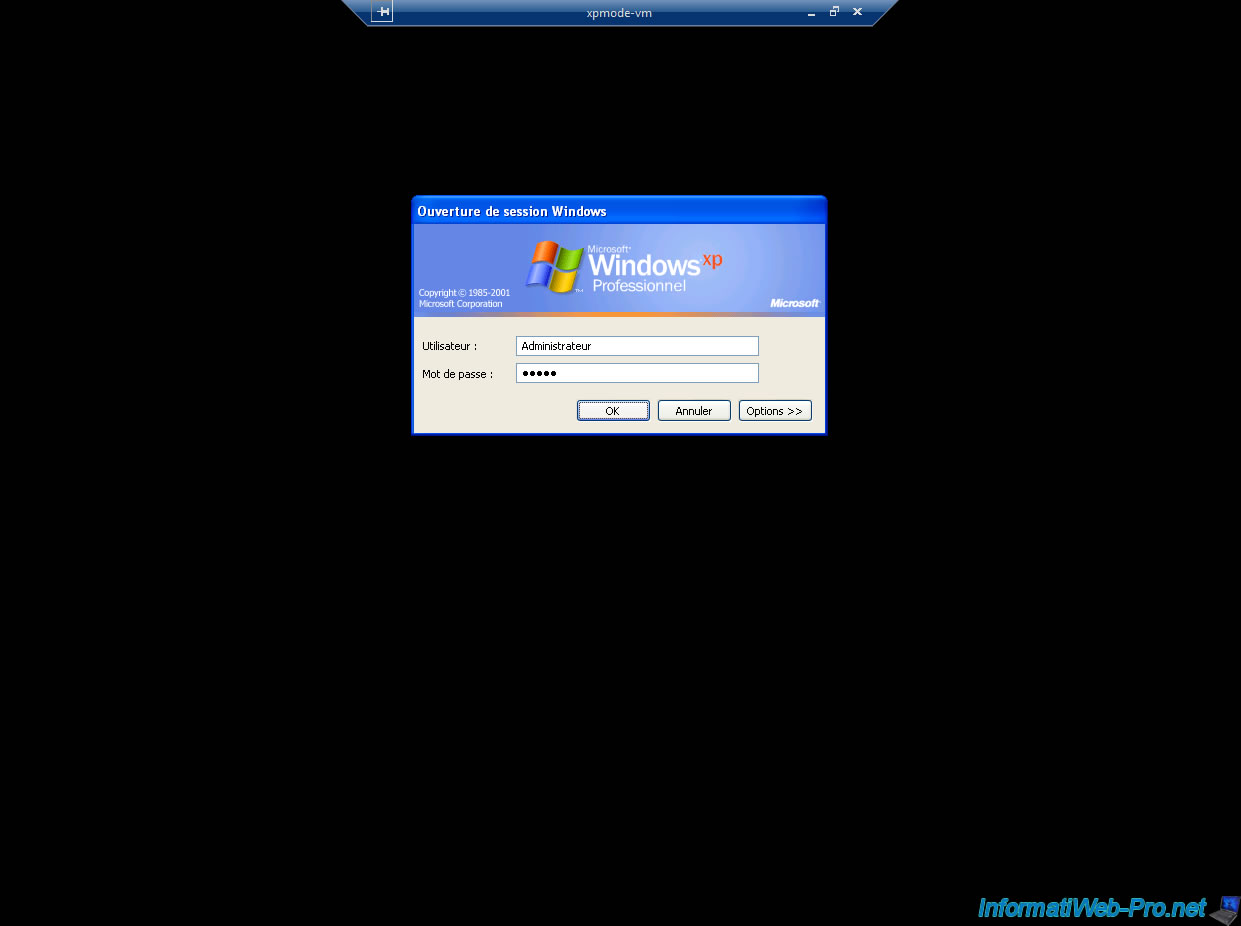
A black screen will appear for approximately 10 seconds with the blue bar at the top of the screen.
Just wait for the Windows XP Professional “Log On to Windows” window to appear.
Next, log in with an account authorized to log in via Remote Desktop on your virtual machine running Windows XP Pro.
Notes:
- by default, you can use the account you were signed in with when you enabled Remote Desktop in Windows XP Pro.
- the user account used must be protected by a password (as explained in the tutorial cited above).
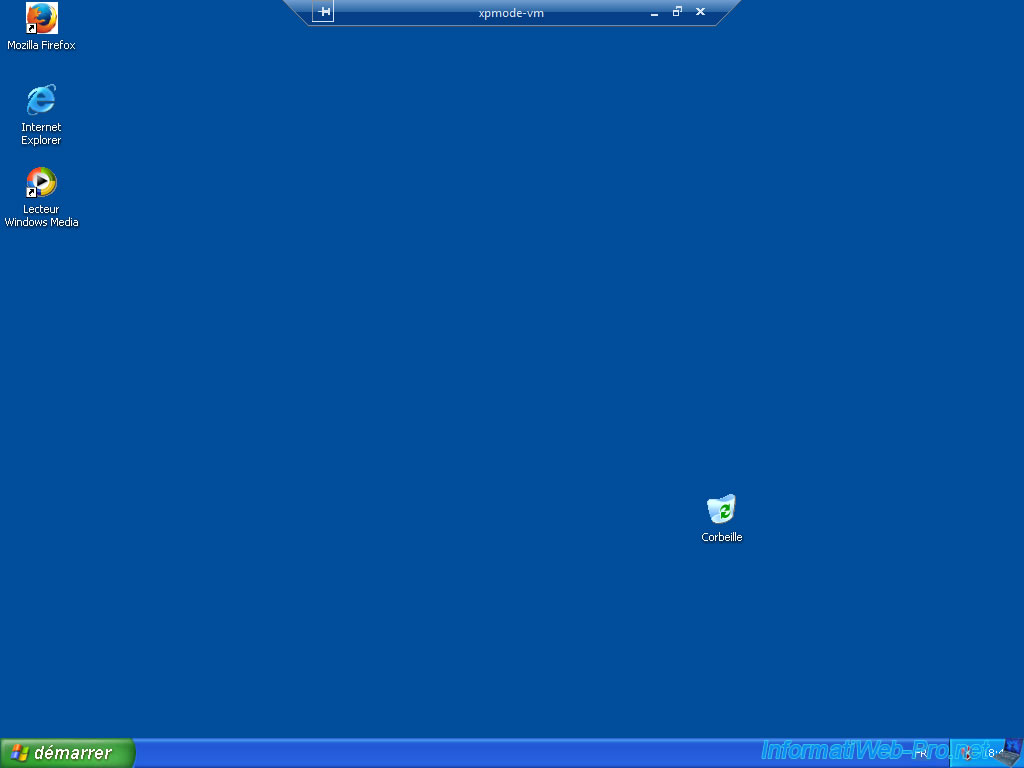
The desktop of your «Windows XP Mode» virtual machine appears via the «Remote Desktop Connection» client.
Important : copy and paste to transfer files is not supported by Windows XP Pro remote desktop server.
To transfer files between your host and your virtual machine on Windows XP Pro, you will need to use the trick described in the next step of this tutorial (and in more detail in the tutorial cited previously).
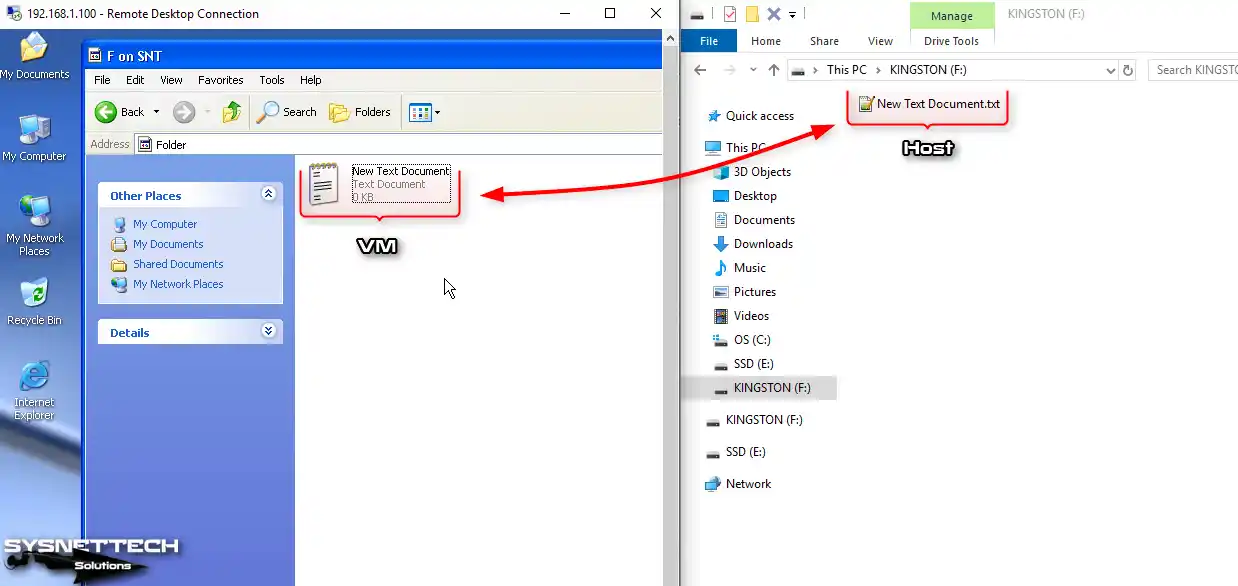
10. Transfer files via Remote Desktop between Hyper-V host and virtual machine on Windows XP Pro
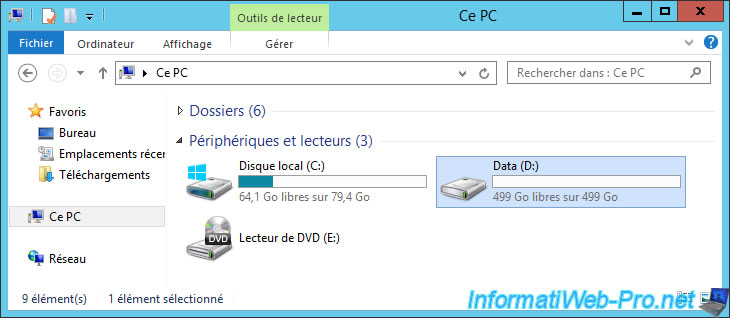
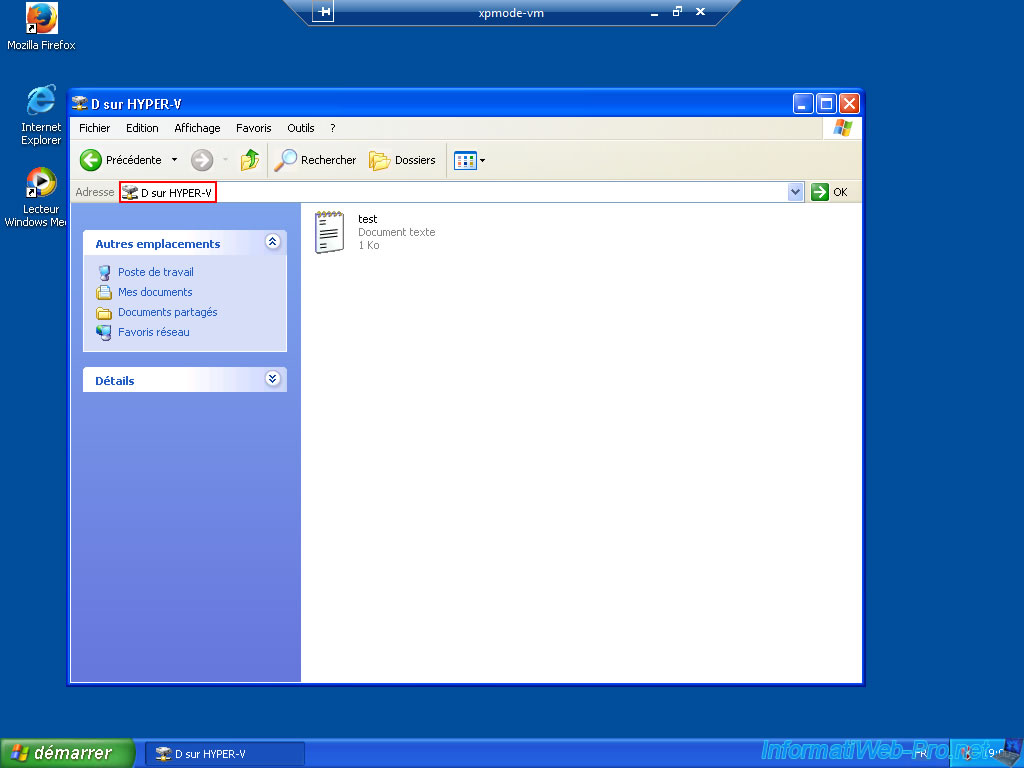
On our Hyper-V server, we have a 2nd hard drive with a partition named «Data (D:)».
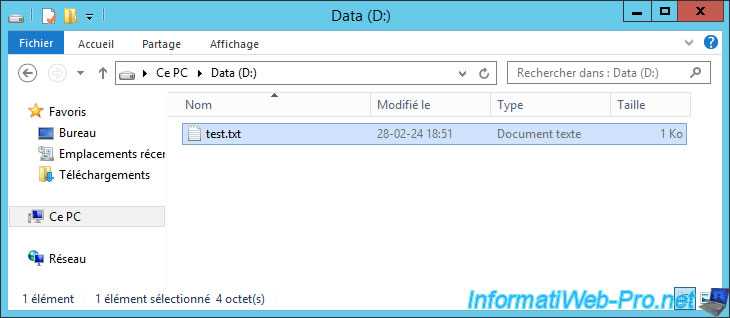
In this partition, we have created a test file.
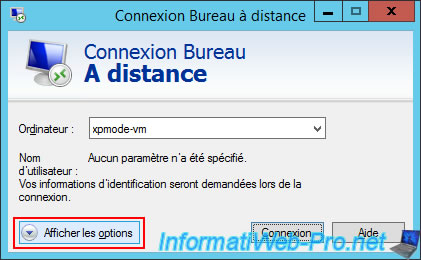
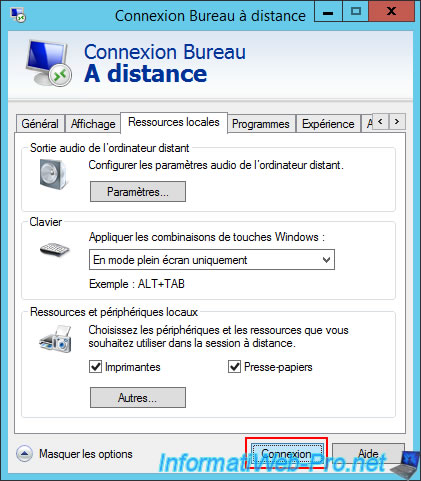
In the “Remote Desktop Connection” client, click “Show Options”.
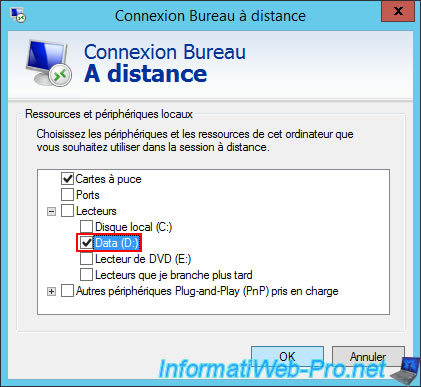
In the «Local Resources» tab, check the «Clipboard» box in the «Local devices and resources» section, then click the button: More.
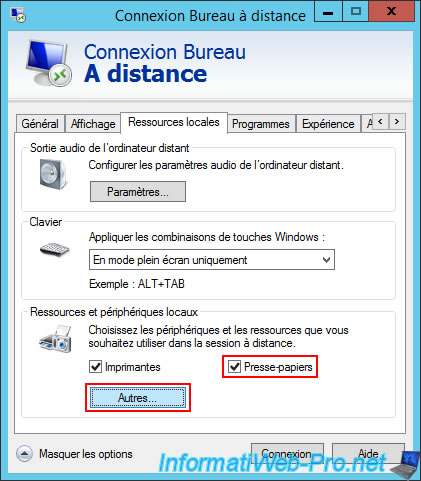
Expand the «Drives» node and check the box corresponding to the partition of your Hyper-V server (or your host PC if you are using Hyper-V on a client version of Windows), then click OK.
Now, click on the “Connect” button located at the bottom of the window.
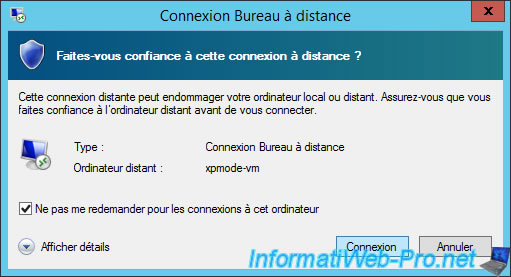
Windows (Server) tells you that this remote connection may damage your local or remote computer.
Which is normal since your Windows XP virtual machine can access a partition of your Hyper-V server (and vice versa).
Ignore this message by checking the «Don’t ask me again for connections to this computer» box, then click: Connect.
Log in with a user account authorized to connect via remote desktop to this virtual computer, and then open the Windows XP Pro desktop.
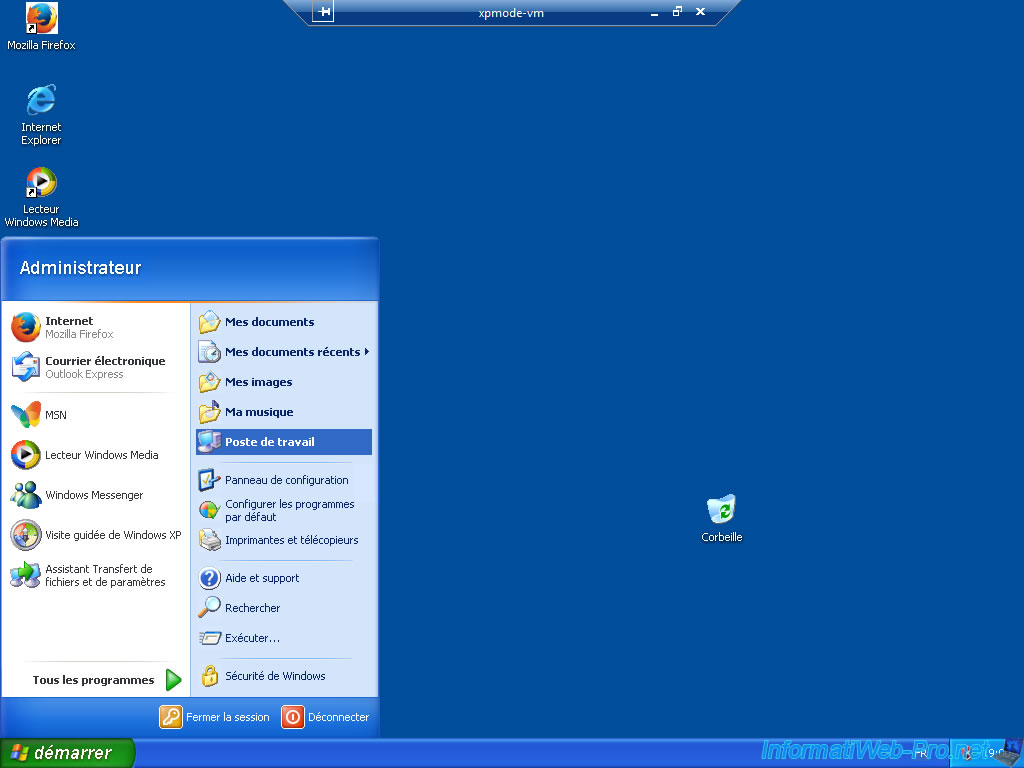
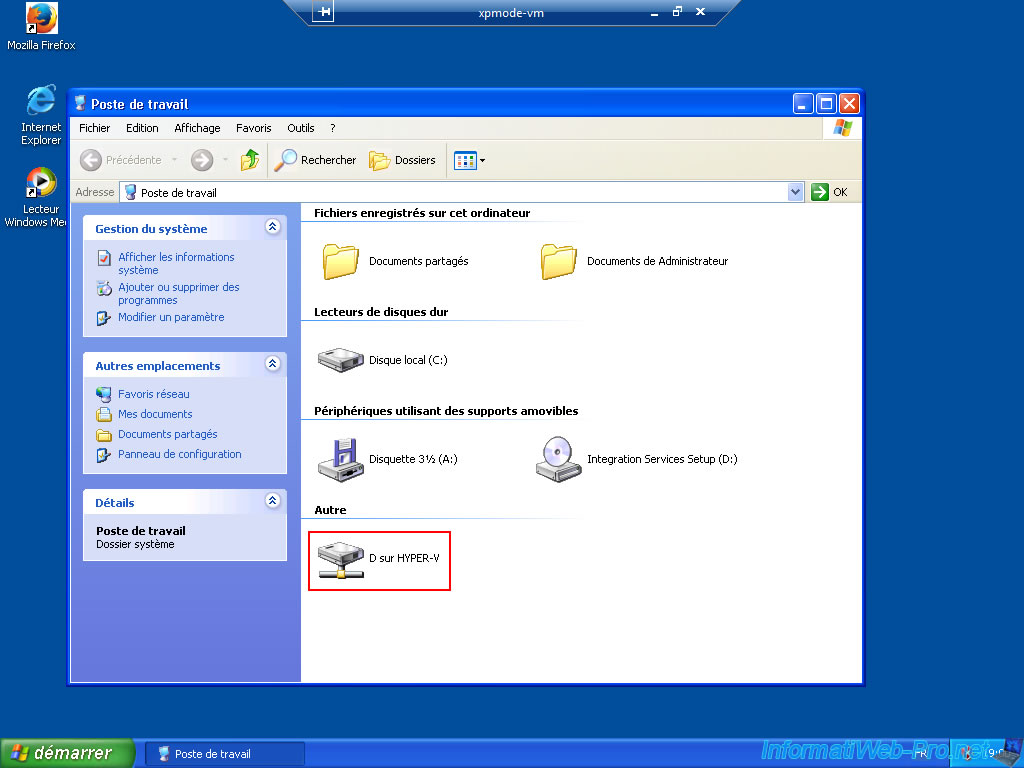
In the workstation, you will see that a new disk «D on HYPER-V» appears in an «Other» section.
Which corresponds to the partition of your Hyper-V server for which you checked the box in the “Remote Desktop Connection” client settings.
In the workstation, you will see that a new disk «D on HYPER-V» appears in an «Other» section.
Which corresponds to the partition of your Hyper-V server for which you checked the box in the “Remote Desktop Connection” client settings.
This article confidently delves into seamlessly running Windows XP on a state-of-the-art virtual machine using Microsoft Hyper-V virtualization software on the cutting-edge Windows 10 or 11 operating system.

How to Set Up Windows XP Pro x64 on Windows 10 OS using Hyper-V
After Microsoft released Windows XP on October 20, 2001, it started becoming a viral operating system among users. Since its release, it has been widely used in all workplaces and homes.
This operating system uses NT technology and micro-kernel architecture and has versions developed for various purposes. These versions are Professional, Home, Media Center (MCE), Tablet PC Edition, Starter Edition, and Home Edition (ULCPC – Ultra Low-Cost Personal Computer).
The Windows XP operating system, which has reached a large audience, is rarely used today. Since Microsoft ended support for this system on April 8, 2014, most users or institutions could not get new system updates, so they ended the use.
The XP system, which has received support for 12 years, will no longer accept new updates, as Microsoft stated in this article.
Despite the end of support for Windows XP, some system administrators may use this system for legacy applications or other scenarios in test environments. Instead of running XP on a physical PC, you can experience this system on a more powerful computer using HyperV, VMware Workstation, or VirtualBox virtualization software.
How to Create a New Virtual Machine for Windows XP OS
After successfully establishing Hyper-V on your Windows 10 system, with the assurance of virtualization support, you can effortlessly generate a new virtual PC and install either Windows or Linux operating systems in this virtual environment.
Step 1
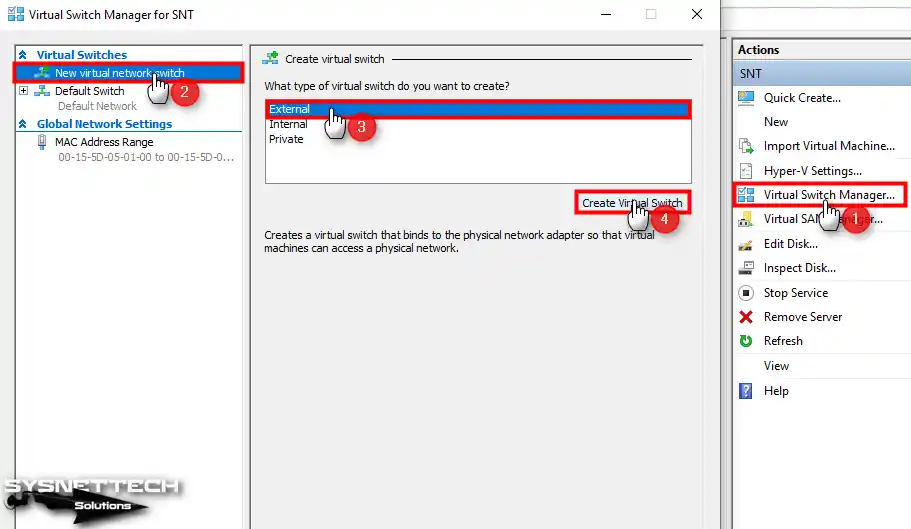
After running the Hyper-V Client software, creating a new External Switch using Virtual Switch Manager before operating system installation is recommended. Because the Default Switch, which is enabled by default by the program, uses the NAT connection to expose the VM to the host network, which can cause network problems in many cases.
To minimize network problems, you can use your host’s adapter with an External Switch, and both get an IP address from the DHCP device in your local network and connect to the guest machine via remote desktop.
Step 2
After creating the External Switch, type a name according to your desire in the Name field, and then select the network adapter you use to access the Internet on your host in the External Network setting and click OK.

Step 3
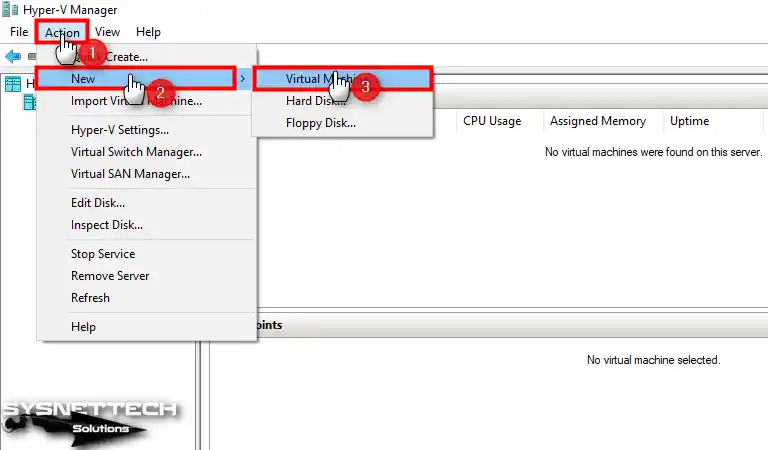
After configuring the Virtual Switch, click Action / New / Virtual Machine from the program tool menu to start the virtual machine setup wizard.
Step 4
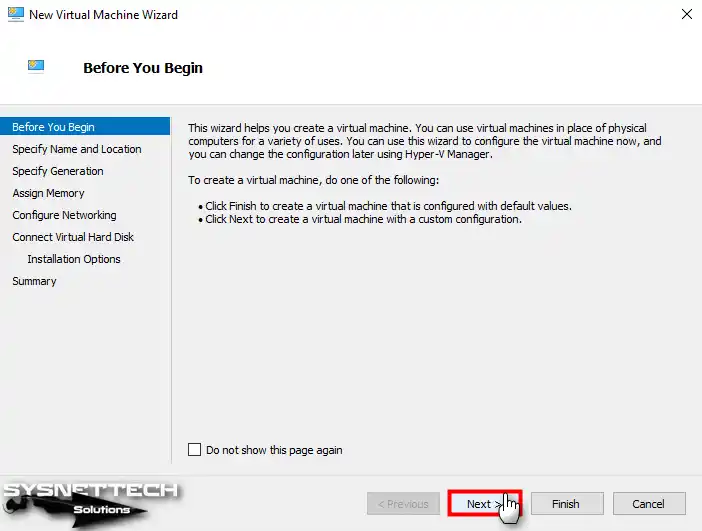
You can quickly click Finish to create a virtual computer with the settings specified by the program in the VM wizard. Alternatively, you can continue by clicking the Next button to create a manual guest machine.
If you do not want this window to appear during the next VM creation, do not show this page again, and click Next.
Step 5
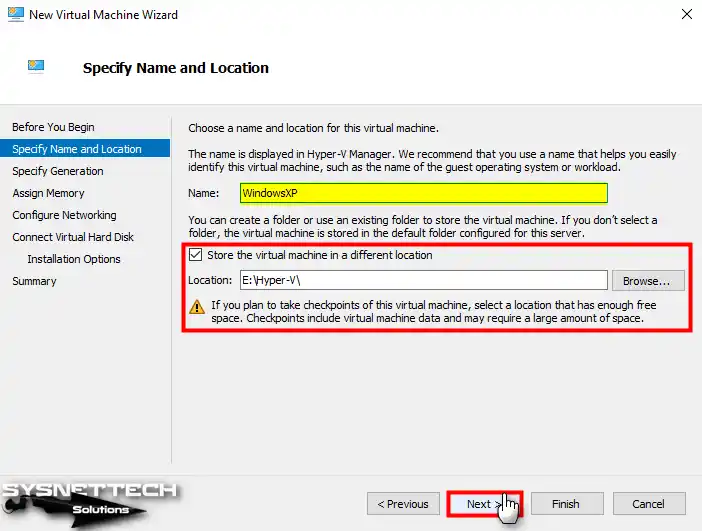
After typing the name of the operating system you will install on the guest machine, it is recommended that the installation location of the VM be configured on an external disk to fill the capacity of your host disk appropriately.
Step 6
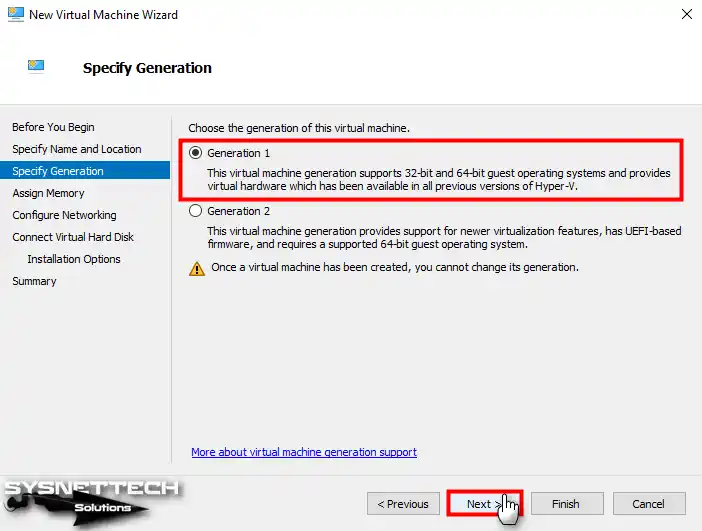
When installing one of the old Windows operating systems, you need to choose Generation. You can select Generation 2 when you try to install a UEFI-supported OS. Still, if you install Windows XP, you should choose Generation 1, which supports BIOS firmware.
Step 7
Suppose you handle multiple VMs simultaneously using Hyper-V on your Windows system. In that case, you can create more efficient RAM resource management thanks to the Dynamic Memory feature. However, you are only going to use a single virtual computer. In that case, you can disable this feature and assign a specific RAM size to the VM for more performance gains.

Step 8
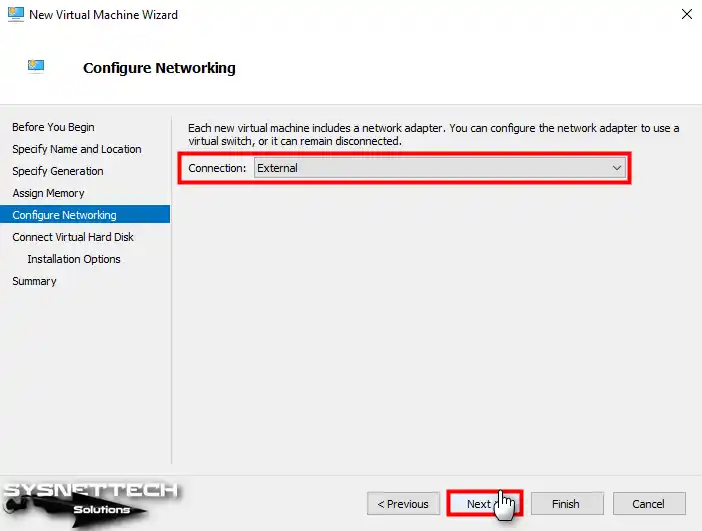
For the virtual machine’s network settings, select the External Switch you created using the Virtual Switch Manager tool.
Step 9
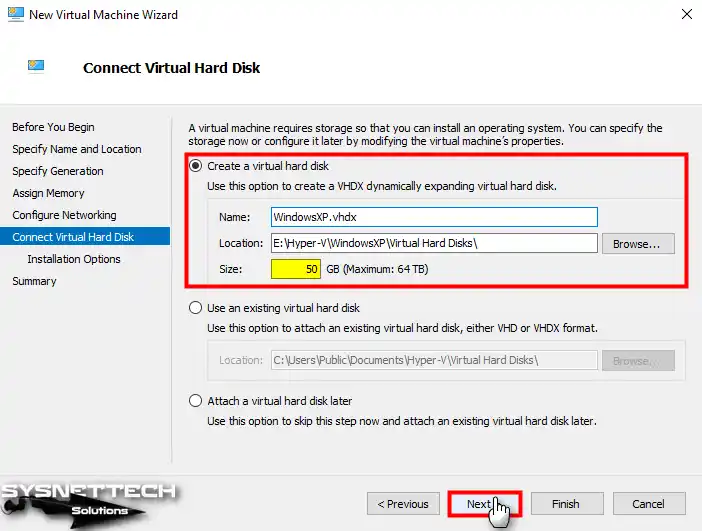
You must create a new virtual disk while preparing a new guest system. Leverage the “Use an existing virtual hard disk” option to incorporate a pre-installed virtual disk from a VM seamlessly. This straightforward approach allows you to effortlessly integrate the desired virtual disk into your virtual machine setup.
In addition, you can change the virtual disk size automatically, as determined by the program, from the Size section as you wish.
Step 10
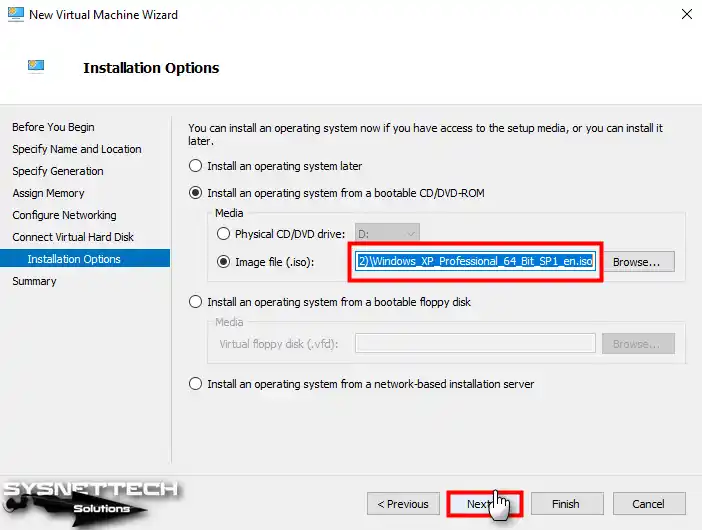
To seamlessly incorporate the Windows XP ISO file into your virtual machine, confidently opt for the “Bootable CD/DVD-ROM” option. Subsequently, select the “Image File (.iso)” format and conveniently specify the ISO file’s location by utilizing the Browse button.

Step 11
Opt for the Windows XP Professional 64 Bit SP1 ISO file you have securely downloaded to your computer by following. Assertively click on the Open button to proceed with the selection process.

Step 12
After checking the location of the Windows image file, proceed to the next step with Next.
Step 13
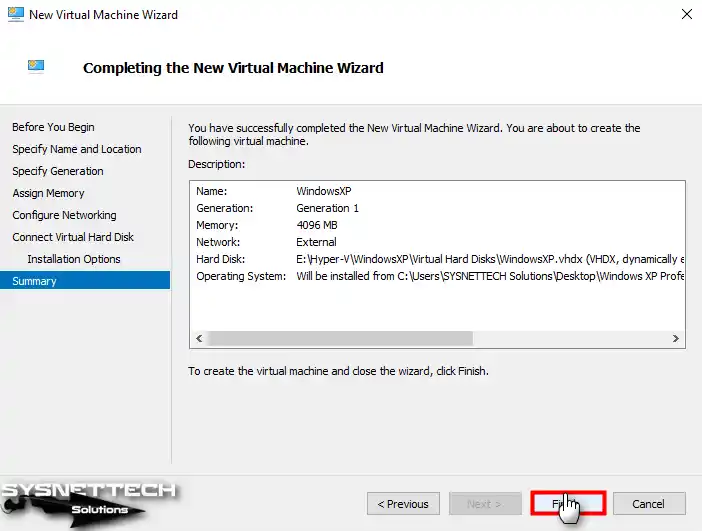
You can check the settings you have made in the Virtual PC in the Summary window. Should there be a specific setting within the virtual machine that you wish to modify, you can conveniently navigate back to the corresponding settings by confidently utilizing the Previous button. This allows you to access and adjust the desired configurations as needed effortlessly.
Step 14
After preparing the Windows XP virtual machine, open its settings and increase the number of virtual processors according to the power of your host computer’s processor hardware.

Step 15
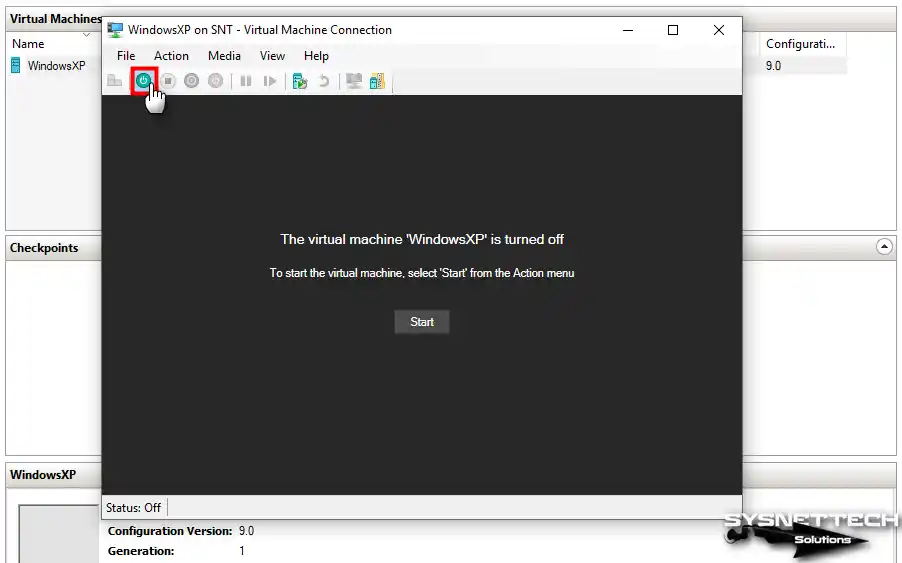
Finally, click the correct button / connect option on the virtual machine created in the Virtual Machines section, click the Start button in the window that opens as in the image below, and proceed to the Windows installation.
How to Install Windows XP
Once you have completed the necessary preparations and initiated the virtual PC for Windows XP installation via Hyper-V, you can confidently proceed with the subsequent steps, mirroring the installation process as you would on a physical computer.
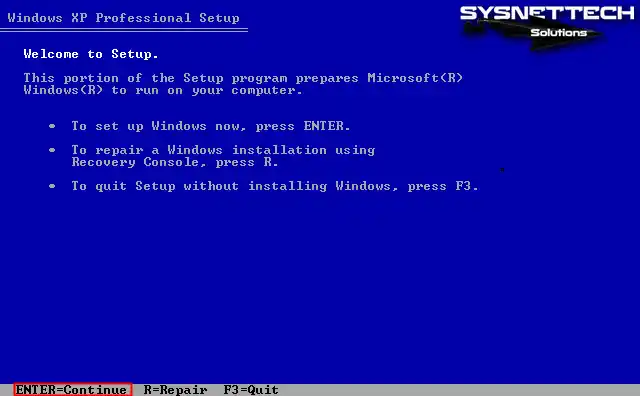
Step 1
Press Enter on the Windows XP Professional Setup screen to start the installation immediately. Use Recovery Console by pressing R to repair your system.
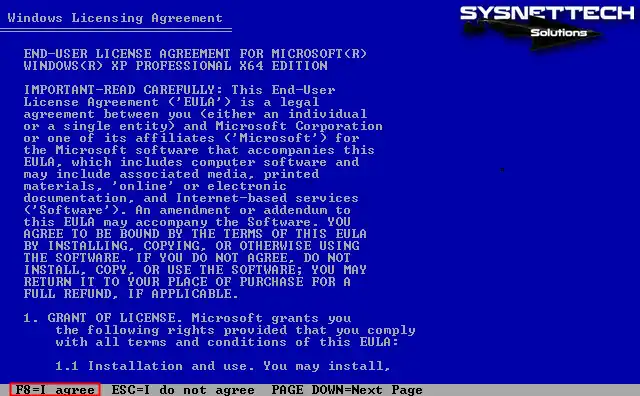
Step 2
You can scroll down the page by pressing PAGE DOWN to read the full text of the Windows XP license agreement. After reading the license terms, press F8 to accept and continue.
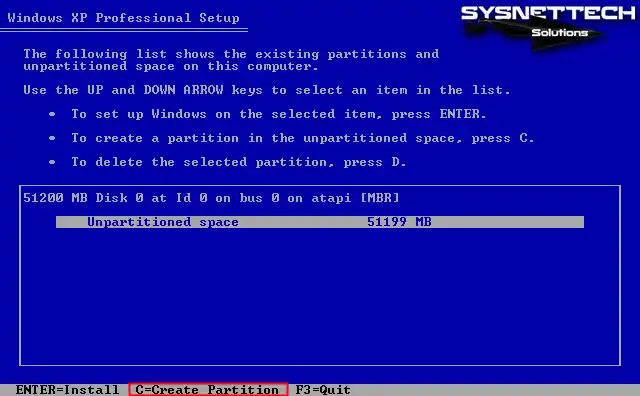
Step 3
You can see the unallocated space in the disk configuration window. Press C to create a new partition on this disk space. Or, if you want the disk to be configured automatically by the installation wizard, press Enter directly and start the installation.
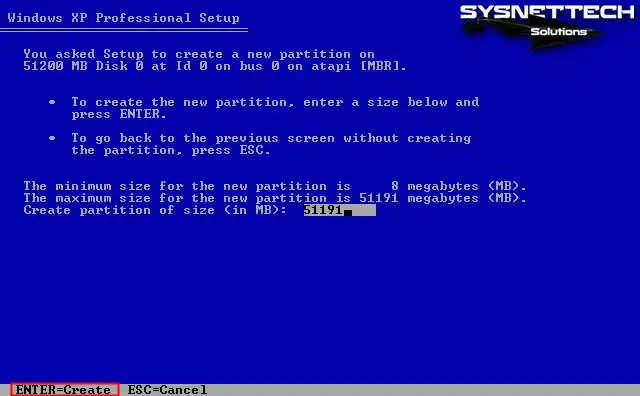
Step 4
Press Enter to accept the automatically edited disk size and use all disk space.
Step 5
After creating the C drive on the virtual HDD, press Enter to start the Windows installation.

Step 6
Before installation, format the virtual disk using the NTFS file system.
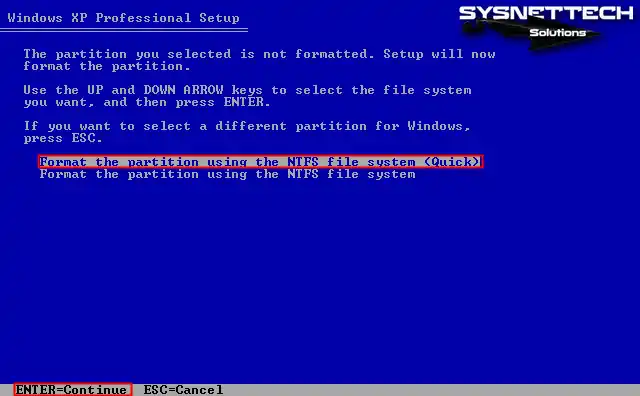
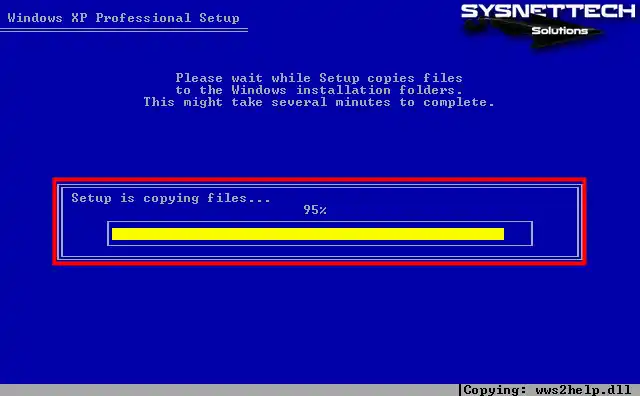
Step 7
After formatting the virtual disk, wait while the setup wizard copies the system files.
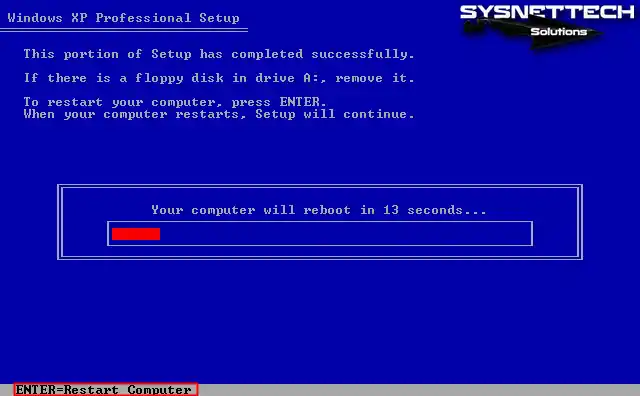
Step 8
After the first stage of Windows XP installation is completed, press Enter to reboot the guest machine.
Step 9
Wait while Microsoft Windows XP x64 Edition boots up.

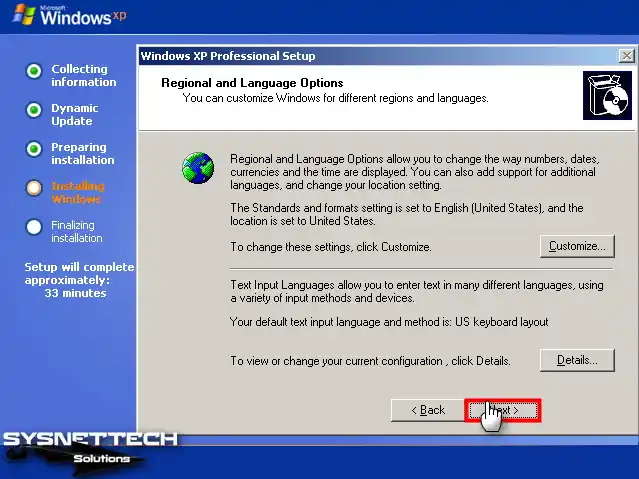
Step 10
Select your guest operating system’s display language and region setting in this window and continue.
Step 11
Type a name for the user account of your virtual system. If you are using the VM in an organization, type the company name in the relevant section and click Next.
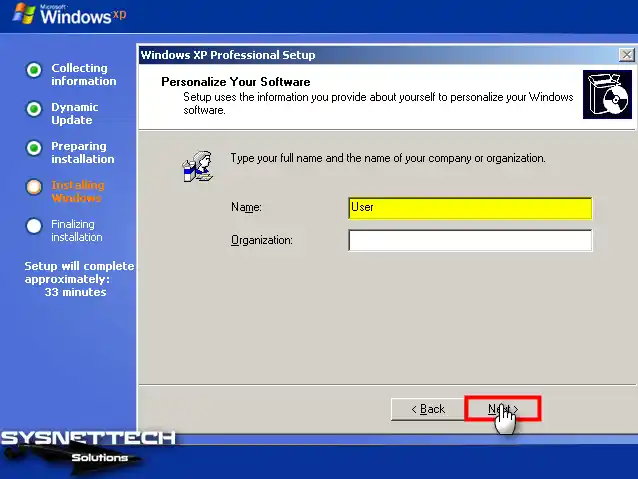
Step 12
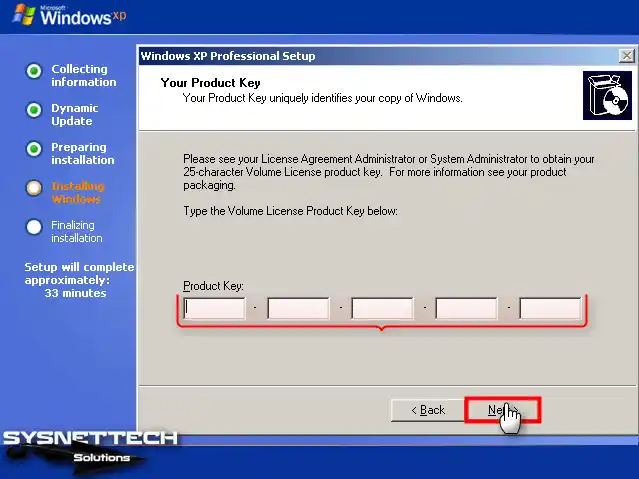
Type your 25-character Windows XP Pro product key and click Next.
Step 13
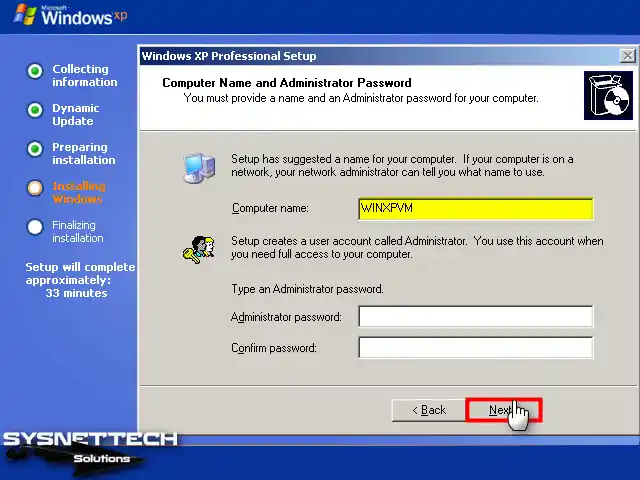
When prompted, input a different computer name that differentiates it from other virtual or physical computers in your network environment. Furthermore, if you desire to establish a password for the administrator account, securely enter your preferred new password and proceed by clicking on the Next button.
Step 14
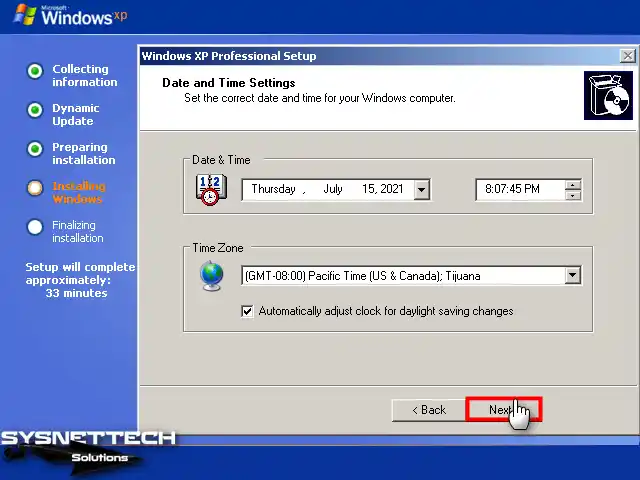
Configure your guest operating system’s date and time settings according to where you live and continue.
Step 15
The installation will continue after editing system settings such as product key, region, and language settings.
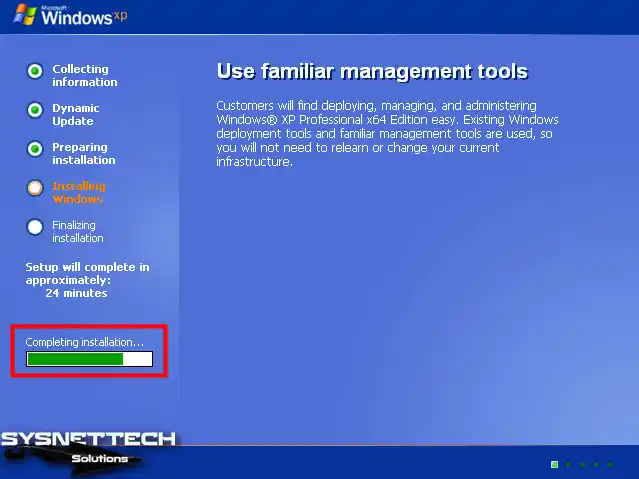
Step 16
After the setup wizard has copied the Windows XP system files, wait while the computer settings are applied.
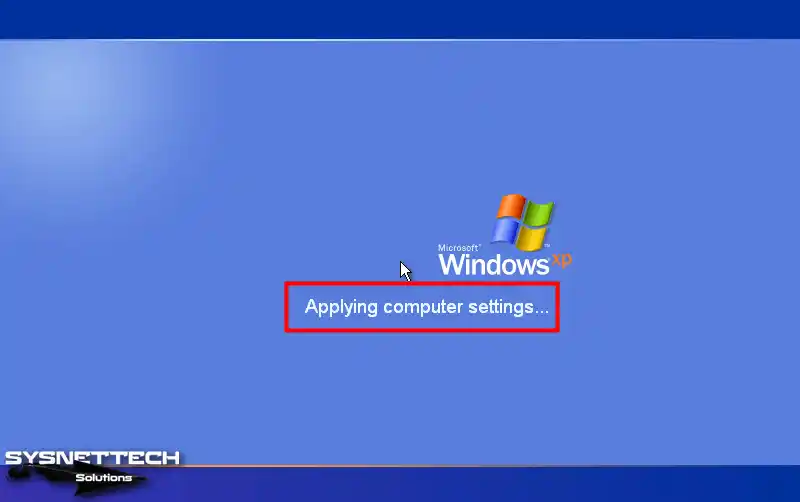
Step 17
After applying the computer settings, the Windows XP desktop will be ready.

How to Upgrade the Windows XP System SP1 to SP2
Once successfully establish Windows XP SP1 on the virtual device, you must upgrade your virtual system to Service Pack 2 (SP2) to install Integration Services. Nevertheless, if you have utilized an SP2 ISO, you can skip this stage, as it is optional.
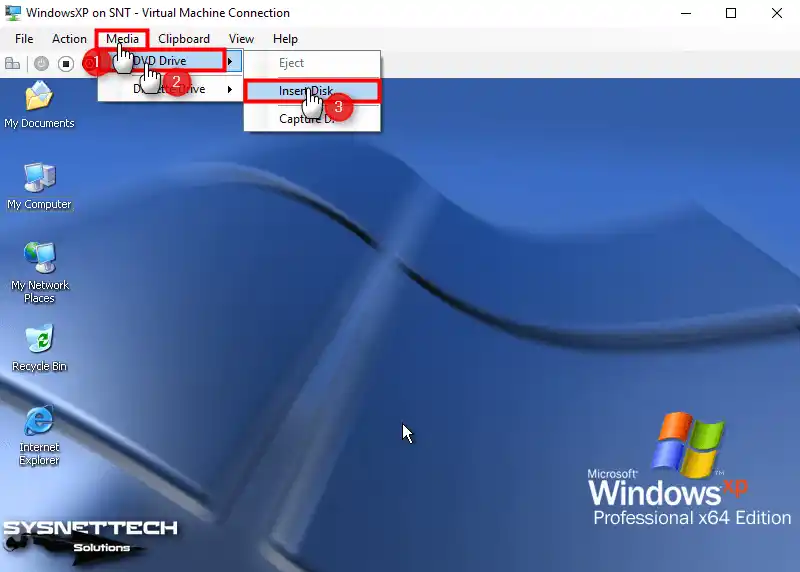
Step 1
Click Media / DVD Drive / Insert Disk in the guest machine’s tool menu to add the SP2 Upgrade ISO file.
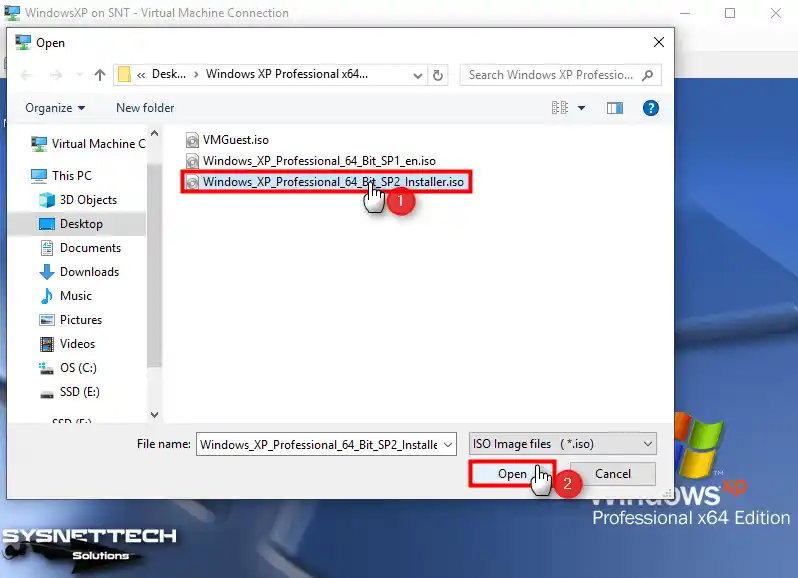
Step 2
Select the Windows XP 64 Bit SP2 Installer ISO file you downloaded to your PC and click Open.
Step 3
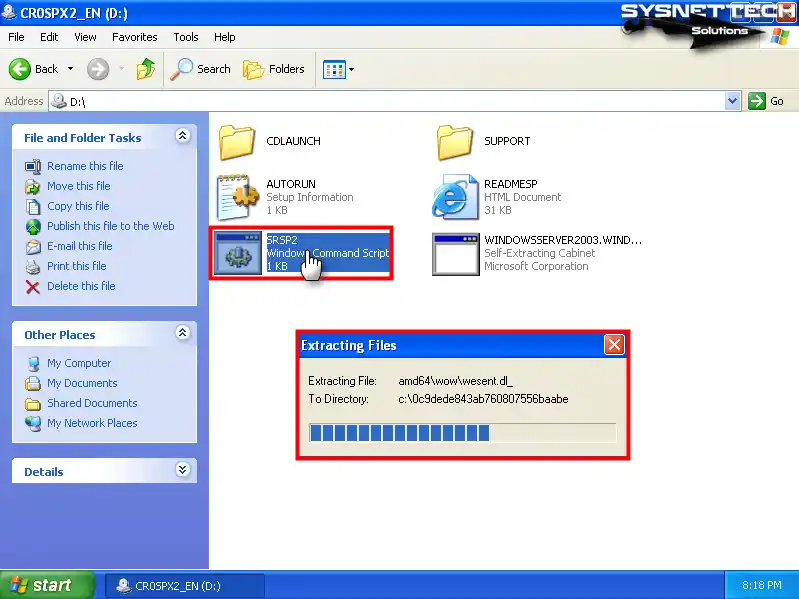
Open My Computer and right-click/open on the CD content, then double-click the SRSP2 command script to run it.
Step 4
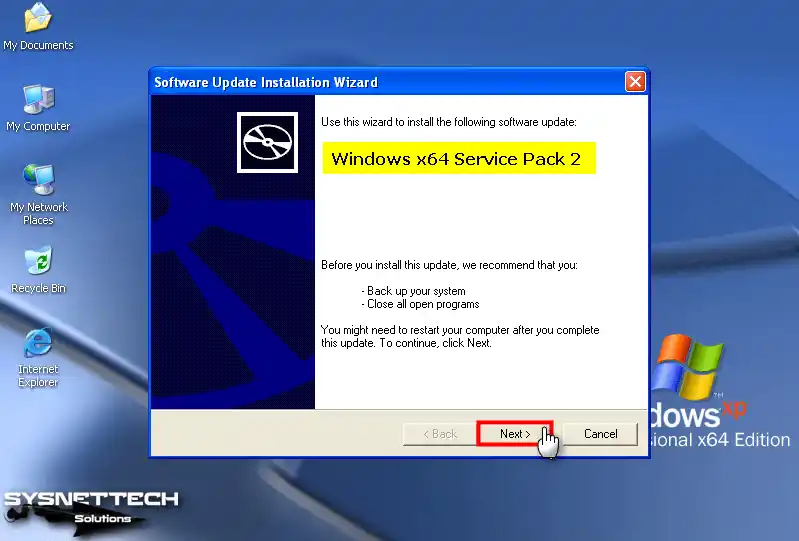
After extracting the files, click Next in the Windows x64 Service Pack 2 wizard.
Step 5
Accept the Service Pack 2 (SP2) license agreement and click Next.

Step 6
Wait while Windows XP SP1 updates to SP2.

Step 7
After the system upgrade is complete, restart your guest operating system.

Step 8
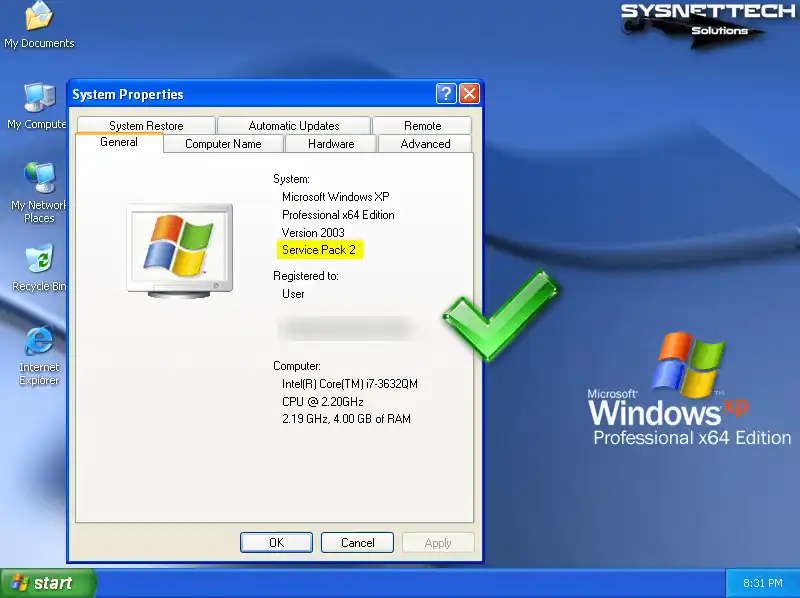
After right-clicking on My Computer, click System Properties and check that Service Pack 2 is specified in the System section.
How to Install Hyper-V Integration Services
After you upgrade your Windows XP virtual system to SP2, you must install Integration Services to update or enable the VM’s display and network adapter.
First, download the Windows XP Integration Services (VMGuest.iso) ISO file to your computer, and then follow the installation steps.
Step 1
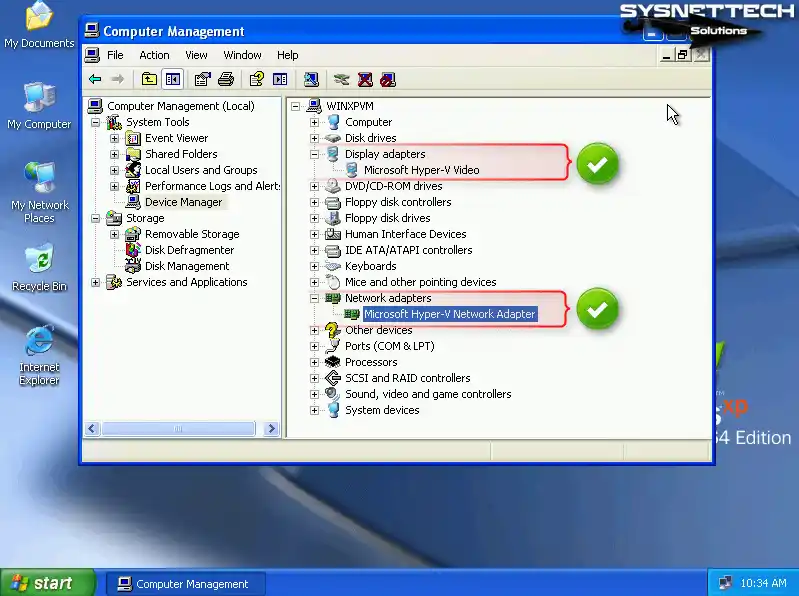
Right-click My Computer on the guest machine, then click Manage and check that the display adapter is not enabled and that the network adapter is not defined in the Device Manager interface in the Computer Management window.

Step 2
Add the Integration Services (VMGuest.iso) ISO file to the Windows XP virtual machine.

Step 3
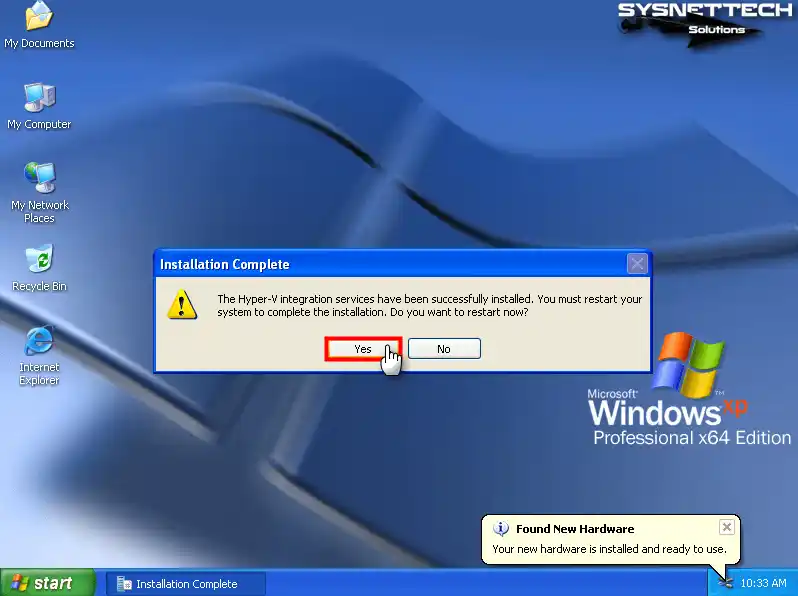
As soon as you add the VMGuest.iso file, Integration Services will be installed automatically on the virtual machine.

Step 4
After the Windows XP Integration Services installation is complete, restart your virtual system.
Step 5
Open Device Manager again and check that the display and network adapter is updated. With the Microsoft Hyper-V Network Adapter now enabled, you can seamlessly establish an Internet connection within the virtual appliance. This lets you connect and access online resources, ensuring a smooth and uninterrupted virtual experience.
How to Test Internet Connection
After enabling the Microsoft Hyper-V Network Adapter, you must check that the virtual system can access your local network and the Internet.
Step 1
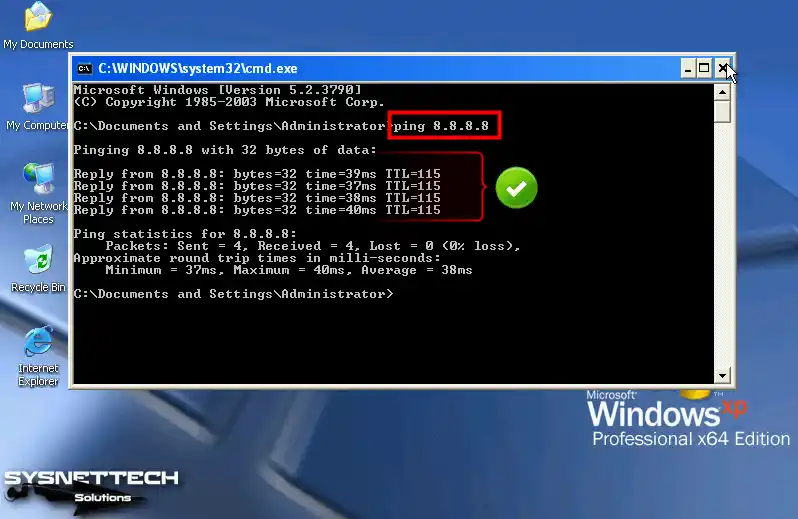
In Windows XP virtual PC, press Windows Key + R to open Run, execute the CMD command, and ping Google servers by executing the ping 8.8.8.8 command and test network connectivity.
Step 2
If the ping to the Google servers is successful, open Internet Explorer and check the connection by visiting the search engine’s homepage.

How to Use the Virtual Machine in Full Resolution with Remote Desktop Connection
Even if you install Integration Services on the XP guest machine, you may not be able to use the VM in full-screen resolution. You can connect from the host to the VM using Remote Desktop Connection to use both the screen resolution and the audio device.
Step 1
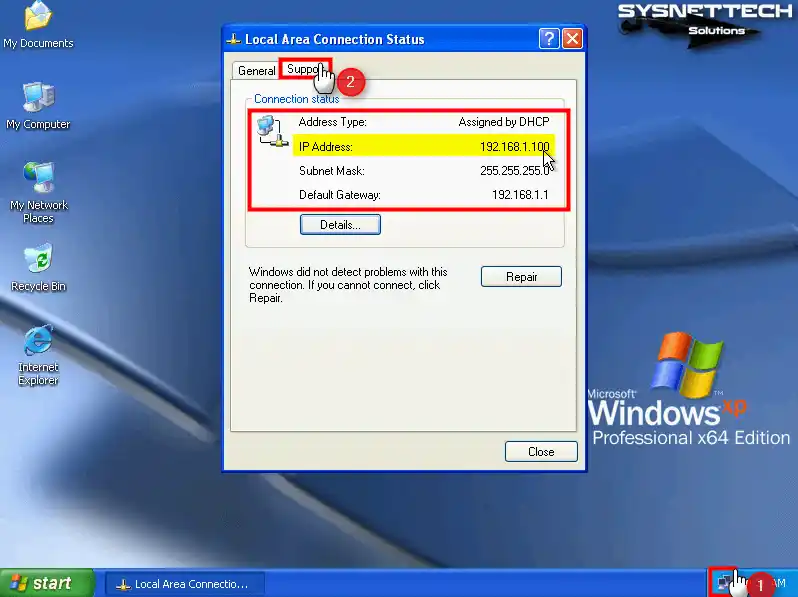
To effortlessly establish a remote desktop connection with the VM, it is crucial to acquire the IP address of the guest machine. To accomplish this, confidently double-click the network icon in the lower right corner and inspect the IP address within the Support tab of the Local Area Connection Status window. This seamless process ensures you quickly obtain the necessary information to establish a remote desktop connection.
Step 2
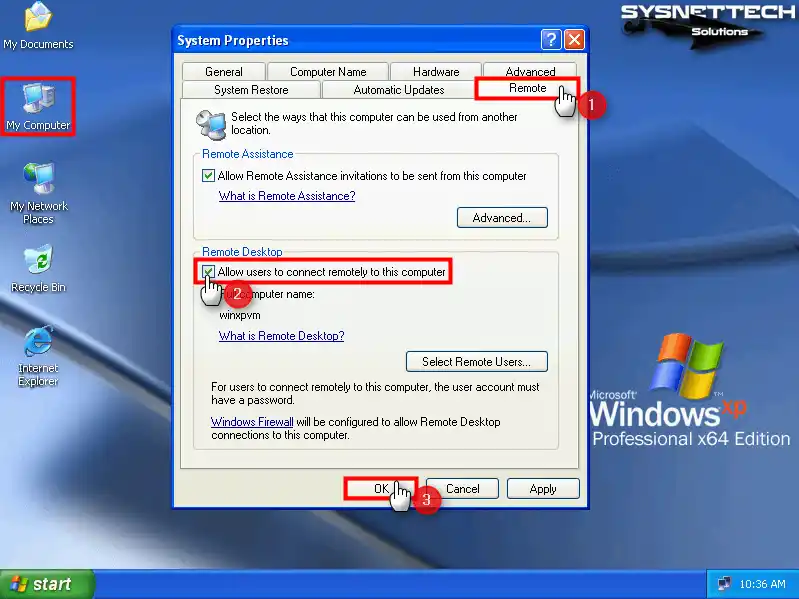
Once you know the IP address of the virtual computer, you need to allow remote desktop connections. Proceed by right-clicking “My Computer” and navigating to the System Properties. Within the System Properties window, access the Remote tab. Next, under the Remote Desktop zone, determine the “Allow users to connect remotely” option. Finally, solidify your preference by hitting the OK button.
Step 3
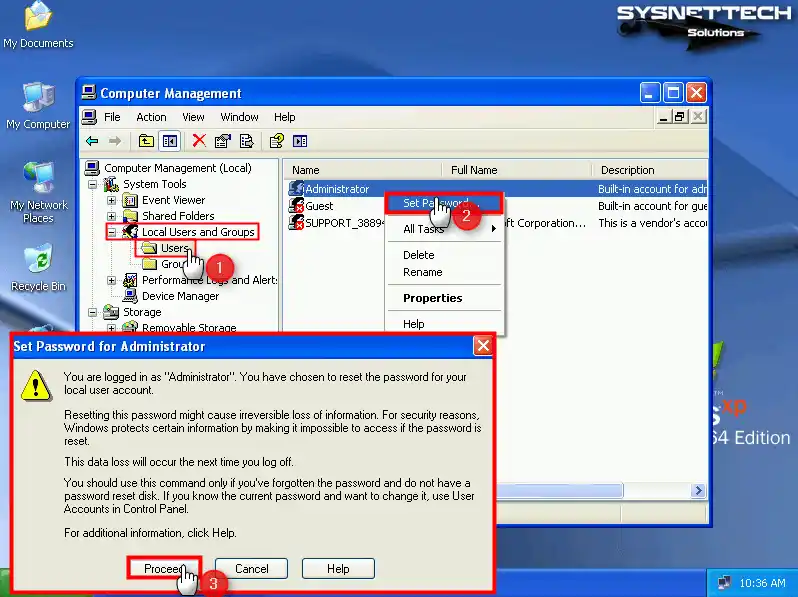
After enabling remote desktop connection in Windows XP, you must create a password for the user account, as the password will be requested when connecting from the host to the VM.
Click Users under Local Users and Groups in the Computer Management window, right-click / Set Password on the Administrator account on the right, and click the Proceed button in the open window.
Step 4
Ensure you create a memorable password for your user account, followed by a decisive click on the OK button.

Step 5
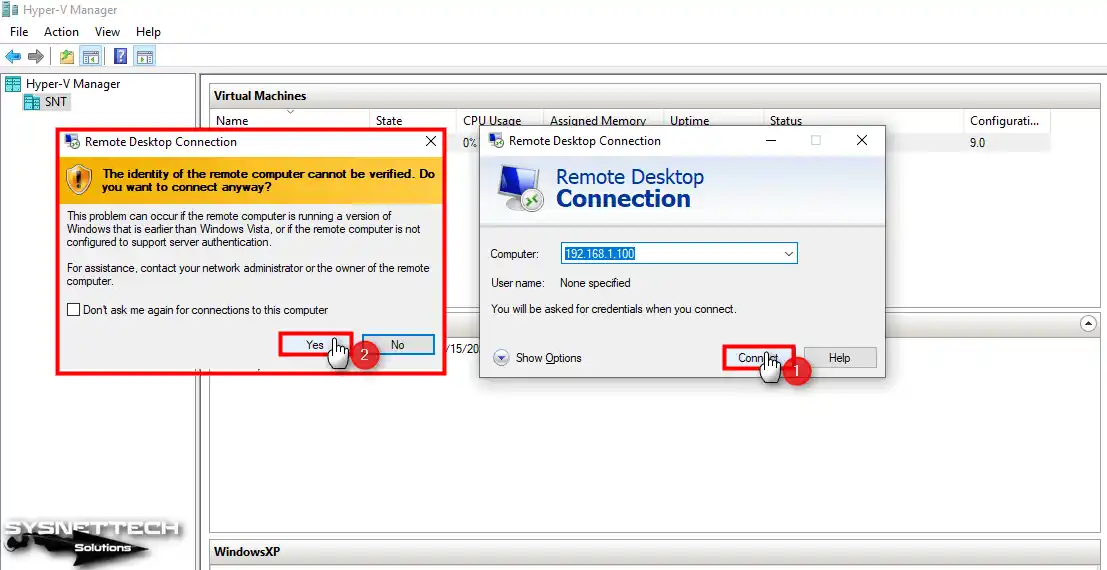
Find and run the Remote Desktop Connection tool on your host operating system.

Step 6
Type the IP address of the virtual machine in the Computer section, and after clicking Connect, click Yes to skip the certificate warning.
Step 7
After connecting to the VM, type the user credentials of the virtual system and click OK.

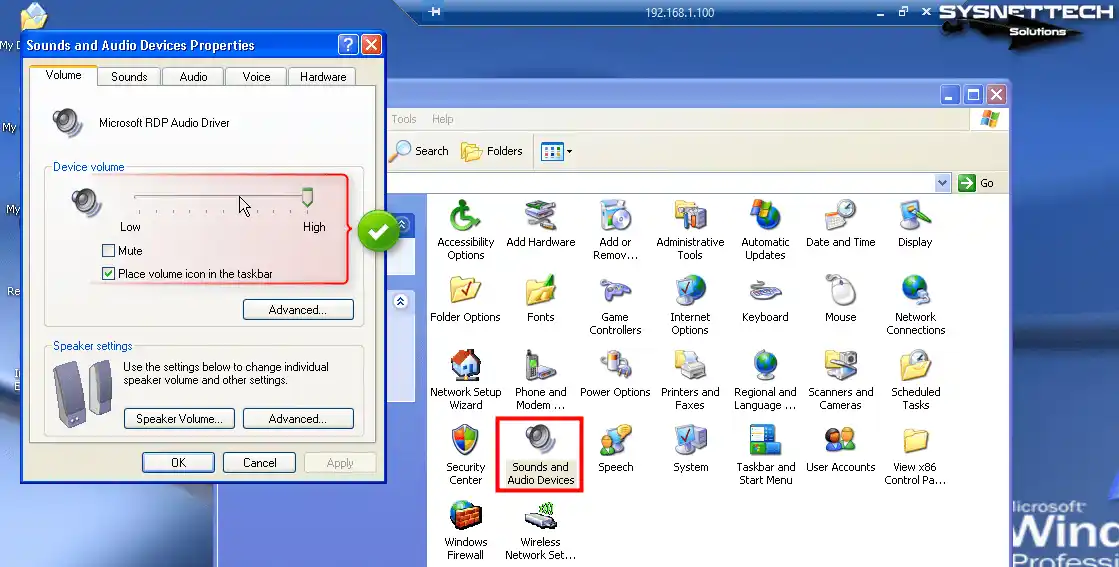
Step 8
You can now use the Windows XP virtual computer in full resolution and hear system sounds.
How to Use USB Flash Memory in Virtual Machine
For expedient file transfer between the host and the virtual machine, leveraging a USB flash drive on the remote machine is the most straightforward approach. This method allows you to efficiently share your files with the VM, enabling swift and seamless data transfer.
Step 1
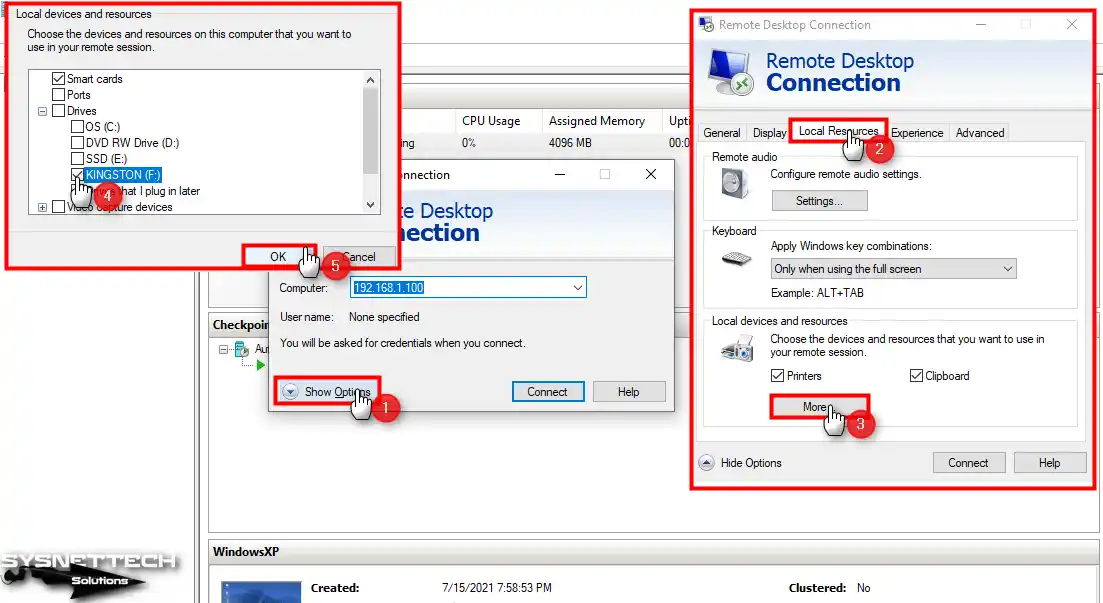
Open the remote desktop tool again. After clicking Show Options, click the Local Resources tab in the open window, then click More.
In the Local Devices and Resources list, under Drives, tick the flash memory you will use in the VM and click OK.
Step 2
When you tick the flash memory and try to connect to the VM, click Connect again in the Do you trust remote connection warning window.

Step 3
Open My Computer in the VM and check that your USB stick is active under Other.

Step 4
Enabling flash memory on the VM simplifies transferring files between the host and the virtual device. By taking advantage of this functionality, you can seamlessly and effortlessly transfer
Video
Are you still using Windows XP? If yes, there could be some security problems if it’s on a regular computer. But don’t worry! You can still use Windows XP safely by putting it in a virtual machine.
We’ll show you how to set up Windows XP in a VM using Microsoft Hyper-V software. This works on modern systems like Windows 11 or 10. Let’s begin!
Credit: Microsoft
Staying Safe with Windows XP: Using Hyper-V on Windows PC
On October 21, 2001, Microsoft came out with Windows XP, a new operating system after NT and 2000. This improved system lets you do many things at once on computers with 32-bit and 64-bit processors. Also, it has better graphics, security, and reliability, and it’s easier to use compared to the old ones.
Microsoft made two versions of XP to suit different people: Home Edition for home users and Professional Edition for businesses and pros.
XP OS has a more excellent look and is easier to use than before, which is why some folks still like using it today. But you’re still using XP on a regular computer. In that case, it might not be safe because it’s not getting security updates anymore.
To stay safe, you can use something called Hyper-V on a newer system like Windows 10. This helps you run XP safely on your computer. You can find out how to do this in a video or by following some steps we’ll explain below.
Running a Windows XP VM in Hyper-V
Adapter Configuration
- To put Hyper-V on your Windows 10 or 11 computer, first, find the “Turn Windows Features On or Off” tool using the search bar. Then, click on it. Next, pick the Hyper-V option from the list, hit OK, and wait for the necessary files to install. Finally, restart your computer.
- Once you open Hyper-V from the start menu, you’ll need to make an External Switch to connect your guest machines to your home network. This is important before you install an operating system.
- An External Switch is better because it lets your machines (VMs) get an IP address from your local network’s DHCP server, which is good for their health. If you stick with the Default Switch, your VMs might need an IP address from your local network’s IP block. You can make the External adapter by opening the Virtual Switch Manager tool in the Actions section.
- Once you’ve opened the Virtual Switch Manager, pick “External” and hit the “Create Virtual Switch” button to make the adapter. Then, choose your computer’s Ethernet or Wi-Fi adapter in the External Network settings. Click OK to close the window when you’re done.
- Once you’re done setting up the external adapter in Hyper-V, click on “Actions,” then “New,” and finally, “Virtual Machine” to begin making your guest machine.
Creating an XP Virtual Machine
- To keep making your guest computer, tap the “Next” button you see on your screen in the “Before You Begin” window.
- In the “Specify Name and Location” window, type the name of the Hyper-V operating system you want to install. Then, hit the Browse button to save a copy of the VM to an external disk. Choose where you want to keep it on your external storage device.
- When you see the “Specify Generation” window, make sure to pick the right option for your operating system. If you’re using an older system like this OS that relies on BIOS firmware, go with Generation 1. This choice guarantees that your operating system works smoothly with the VM you’re setting up.
- When you get to the Assign Memory window, give your Windows XP virtual computer enough memory based on how much RAM your computer has. Suppose you plan to run other VMs besides it in HyperV.
- In that case, you can turn on Dynamic Memory for better memory handling. But if you’re only using one guest operating system, stick with a fixed size and give it 4096 MB (4 GB) of memory.
- In the Hyper-V Network Settings window, find and choose the External adapter you made for Windows XP before.
- In the window where you connect simulated hard disks, you can decide to make the simulated hard disk 50 gigabytes or more, depending on what you need for your guest OS.
Adding XP ISO File and Installing
- In the window where you choose how to install the software, pick “Install an operating system from a bootable image file” to add the Windows XP ISO file to the VM. Then, click on the Browse button to find and add the image file you downloaded to your PC.
- Once you’ve finished setting up your XP machine, it’s essential to check the settings shown in the summary window to make sure they’re what you want. When you’re sure everything looks good, you can close the wizard and start using your VM.
- After making the virtual PC, go into its settings and increase the count of virtual CPUs to 4 or more, depending on how powerful your server is.
- To start installing, you first need to connect to your guest OS. Once you’re connected, find and click the Start button to begin the installation.
Conclusion
In summary, even though Windows XP is old, it can still be helpful. Setting it up in a virtual machine with Hyper-V lets you use it safely without risking your computer’s security. The steps in this guide are simple so that anyone can do it.
If you’re still using this OS, don’t stress! Just follow the instructions here to set up a guest machine, and you can enjoy this excellent OS without worrying about security issues.
Ever felt the need to run some old software that only works on Windows XP, but don’t want to hassle with finding an old machine? You’re in luck! Today, we’re diving into how to set up a Windows XP virtual machine on Hyper-V. By the end of this guide, you’ll have a fully functional Windows XP environment running smoothly on your modern machine. Let’s get started!
Why Use Hyper-V for Windows XP?
First things first, why Hyper-V? Well, Hyper-V is Microsoft’s native hypervisor, which means it’s built right into Windows (Pro and Enterprise editions). It’s reliable, and it integrates seamlessly with your system. Plus, it’s free, which is always a bonus.
Prerequisites: What You Need
Before we dive in, let’s make sure you have everything you need:
- A modern PC running Windows 10 Pro, Enterprise, or Education.
- Hyper-V enabled on your system (we’ll cover how to do this).
- A Windows XP installation CD or ISO file. If you don’t have one, you might need to hunt it down online.
Enabling Hyper-V
Alright, let’s enable Hyper-V. This is pretty straightforward:
- Open the Control Panel and go to Programs > Programs and Features.
- Click on Turn Windows features on or off.
- Check the box next to Hyper-V and click OK.
- Your system will need to restart. Go ahead and do that.
Once your system is back up, Hyper-V should be enabled and ready to go.
Creating a New Virtual Machine
Now, let’s create a new virtual machine. Open up Hyper-V Manager. You can find it by searching for ‘Hyper-V Manager’ in the start menu.
- In Hyper-V Manager, click on New > Virtual Machine.
- Give your VM a name. Something like ‘Windows XP VM’ works just fine.
- Choose the generation of your VM. For Windows XP, you’ll want to select Generation 1.
- Allocate memory (RAM) to your VM.Windows XP doesn’t need much, so 512 MB to 1 GB should be plenty.
- Configure networking. You can use the default switch for now.
- Create a virtual hard disk. Give it a name and set the size. 20 GB should be more than enough for Windows XP.
- Choose the installation options. Select Install an operating system from a bootable CD/DVD-ROM and point it to your Windows XP ISO file.
Click Finish, and your VM is created! But we’re not done yet.
Installing Windows XP
Now comes the fun part: installing Windows XP.In Hyper-V Manager, select your VM and click Start. This will boot up the VM using the ISO file you provided.
- Follow the on-screen instructions to install Windows XP. It’s just like installing it on a physical machine.
- When prompted for the product key, enter it. If you don’t have one, you might need to find one online.
- Complete the installation process. This might take a while, so grab a coffee or something.
Once the installation is complete, you should see the familiar Windows XP desktop. Feels like a blast from the past, right?
Configuring Your Windows XP VM
Alright, Windows XP is installed, but we need to do some configuration to make it usable. First, let’s install the Integration Services.
- In Hyper-V Manager, click on Action > Insert Integration Services Setup Disk.
- In your VM, open My Computer and run the setup from the virtual CD drive.
- Follow the prompts to install the Integration Services. This will make your VM run smoother and allow for better integration with your host machine.
Next, let’s install some essential drivers. Windows XP is old, so it doesn’t have drivers for a lot of modern hardware. You might need to find some drivers online and install them manually. This can be a bit of a hassle, but it’s worth it to get everything running smoothly.
Optimizing Performance
Now that everything is set up, let’s talk about optimizing performance. Virtual machines can be a bit slow, but there are some things you can do to speed things up:
- Allocate more resources: If your VM is running slow, try allocating more RAM or CPU cores to it.
- Use a fixed-size virtual hard disk: Fixed-size disks are faster than dynamically expanding ones.
- Disable visual effects: Windows XP has some fancy visual effects that can slow things down. Go to Display Properties > Appearance > Effects and select Adjust for best performance.
These tips should help you get the most out of your Windows XP VM.
Installing Software on Your Windows XP VM
Alright, now that your VM is up and running, it’s time to install some software. This is where things get interesting. You can install any software that runs on Windows XP. This is great for running old games or software that doesn’t work on modern systems.
To install software, simply insert the installation CD or download the installer from the internet. Run the installer just like you would on a physical machine. Easy peasy!
Troubleshooting Common Issues
Let’s face it, things don’t always go as planned. Here are some common issues you might run into and how to fix them:
- VM won’t start: Make sure Hyper-V is enabled and that your system meets the requirements.
- Windows XP installation fails: Try using a different ISO file or creating a new VM.
- VM is slow: Try allocating more resources or optimizing performance as mentioned earlier.
- Can’t install software: Make sure the software is compatible with Windows XP.
If you run into any other issues, don’t hesitate to reach out for help. There are plenty of forums and communities out there where you can find support.
Conclusion: Enjoy Your Windows XP VM!
And that’s it! You now have a fully functional Windows XP virtual machine running on Hyper-V. It’s like having a time machine on your modern PC. Enjoy running those old games and software. Just remember to keep your VM secure and up to date.
If you found this guide helpful, feel free to share it with your friends. And if you have any questions or run into any issues, leave a comment below. I’m always here to help!
FAQ
Can I use Windows XP on Hyper-V for free?
Yes, you can use Windows XP on Hyper-V for free, but you’ll need a valid Windows XP license key to activate it. If you don’t have one, you might need to purchase one or find a free alternative.
Is it safe to run Windows XP in a virtual machine?
Running Windows XP in a virtual machine is generally safe, but it’s important to keep in mind that Windows XP is no longer supported by Microsoft. This means it doesn’t receive security updates, making it vulnerable to attacks. To stay safe, make sure to keep your VM isolated from the internet and only use it for trusted software.
Can I use Hyper-V on Windows 10 Home?
Unfortunately, Hyper-V is not available on Windows 10 Home. You’ll need to upgrade to Windows 10 Pro, Enterprise, or Education to use Hyper-V.
Can I run modern software on my Windows XP VM?
While you can try to run modern software on your Windows XP VM, it’s not recommended. Windows XP is an old operating system, and it doesn’t have the features or security updates needed to run modern software safely. Stick to old software that was designed for Windows XP.