
Virtual machines can be created using Hyper-V without the use of any additional software. This feature is not available in Windows 7, and it requires Windows 8, 8.1, or 10 Professional or Enterprise editions. But for, windows 7 users can easily install hyper-v manager and manage virtual machines and servers created on a different platform. In this article, we will learn to install hyper-v manager on windows 7.
What is Hyper-V?
Microsoft Hyper-V is a virtualization solution that allows people to use several operating systems on a single computer system. It means you can create and use several virtual machines on a single host machine. Of course, the hardware requirement also has to be fulfilled. You can also read our guide on installing Hyper-v on Azure if you would like to deploy virtual servers in the cloud or provide fail over for on-prem Hyper V virtual machines.
Hyper-V Management
Creating virtual machines is straightforward, but the true challenge is managing them. One of the primary challenges with running many VMs is that it’s a real pain to manage them all. To ensure that all components of your server function in tandem, you need a management tool that gives you comprehensive information about your server environment. Before you progress further down the virtualization route, you should have a firm plan in place for management tools and procedures.
Virtual machine environments require the following elements to be managed:
- Storage – Every Virtual Machine requires Space allocation and RAM allocation to function efficiently.
- Security and Software updates – VMs are just like actual machines and require frequent security patches and software updates to keep them safe and help them run smoothly.
- Backup management is like what we do when we create a backup and restore point for our windows machine. VMs also require backups whenever there is a failure.
- System Uptime Management – When there is a cluster of VMs operating, it is essential to monitor the availability and uptime of every VM.
Management Tools
Following are the tools that help in managing Hyper-V :
- Hyper-V Manager – It is a free Windows Server tool.
- Failover Cluster Manager – Windows Server includes Failover Cluster Manager for managing Hyper-V failover clusters. Failover clustering occurs when a collection of servers work together to ensure mission-critical application availability. High availability means that if one of the servers in the cluster fails, another one takes over immediately. To handle non-cluster machines, you’ll need Hyper-V Manager.
- SCVMM (System Center Virtual Machine Manager) – SCVMM (System Center Virtual Machine Manager) must be purchased separately. Hyper-V Manager cannot handle Hyper-V hosts or Hyper-V failover clusters in bigger virtual environments. Hence this utility performs many management responsibilities. A statistics dashboard and custom templates are incorporated into the SCVMM console. It also has a “library” feature, which lets you quickly construct and configure new virtual machines. SCVMM is an improvement over the free Hyper-V Manager and the Failover Cluster Manager tools, but it lacks several advanced features included in the Hyper-V Manager.
- SCOM (System Center Operations Manager) – enables you to monitor your virtual environment with SCVMM.
- PowerShell – It is a command-line utility that allows users to access system services. When shutting down all VMs on a specific host, Windows PowerShell is frequently used to automate common and complicated processes. Use PowerShell to perform most Hyper-V Manager functions. For controlling Hyper-V hosts, PowerShell offers more flexibility and uses fewer computer resources.
Hyper-V Manager
Windows Server has a free tool called Hyper-V Manager. It can create, read, update, and remove virtual machines, performing the most fundamental VM CRUD operations. Nevertheless, it comes with considerable constraints. Hyper-V Manager does not allow VMs to be moved between hosts, and only one host can be shown at a time. The most basic tasks can be done, and the only ways to measure your accomplishment are a few measures. Additional tools are required to access advanced management features.
Installing Hyper-V Manager on Windows 7
Even though hyper-v was launched for the windows 8 version and later, you can still install hyper-v manager on windows 7 to manage virtual machines on another host.
Pre-requites
Since we are more focused on managing other virtual machines hence our requirement in terms of hardware is bare minimal, and any ordinary windows 7 machine with 4 GB ram would be sufficient. Here is the list of pre-requisite:
- Windows 7 machine
- 4 GB Ram
- Standard Hardisk/SSD (as what comes pre-configured with a new machine)
- Hosts/VMs and the windows 7 machine should be on the same domain or network.
Download and Install RSAT for Windows 7
Microsoft Remote Server Administration Tools (RSAT) allows IT admins, to remotely manage Windows Server roles and features from a PC running Windows 7 Service Pack 1 or later versions of windows.
The very first step would be to install Remote Server Administration Tools. This tool supports only windows 7 professional and ultimate edition. As Microsoft has stopped support for windows 7 you won’t find the installer on the official Microsoft site. However, you can download it from free open source sites such as filehippo. You can also download from this link which the total virus site has validated. Install the installer.
Create an Admin User on Windows 7
We have to create an admin user, which should be the same as what is on Hyper-V Host or node. To make an admin user, go to Start –> Control Panel –> Add or Remove user accounts
Add Local Admin on Hyper-V Machine
On Hyper-V machine, run command prompt and type sconfig as shown in the image.

Next select option 3: Add Local Administrator as shown in the image

Change Hyper-V Firewall settings
Open a command prompt on Hyper-V machine or node and run the following command netsh advfirewall set allprofiles state off. This will turn off the firewall of the hyper-v machine. Next, On the power shell, execute the following script
winrm set winrm/config/client `@`{TrustedHosts=`"`*`"`}
Edit Hostfiles
After we have created an admin user on a windows machine, the next step is to add the IP address of the hyper-v machine on the windows hostfile and adding the IP address of the windows 7 machine on the hyper-v node.
For Windows 7
- Click Start > All Programs > Accessories.
- Open Notepad as administrator.
- Click Continue on the Windows needs your permission window.
- When Notepad opens, click File > Open.
- In the File name field, type C:\Windows\System32\Drivers\etc\hosts.
- Open it.
- Add ipaddress <hostname of the Hyper-V node>.
- Save your changes.
On Hyper-V Host
Run the following command in cmd
runas /user:administrator "notepad "C:\Windows\System32\drivers\etc\hosts""
The above command will open host file. Add <ipaddress of windows 7> <hostname of windows 7> to the hostfile
Change DCOM settings on Windows 7
Now we will log in using the admin account created earlier. Press Windows button + R and type dcomcng command. The command will open the DCOM settings console. Expand My Computer, which you will find under component services–>computers expand the menu so that My Computer is selected under Component Services\Computers.

click on properties select COM security and select Edit Limits under Access Permissions. Allow the Remote access for ANONYMOUS LOGON

Activate RSAT Tools
After downloading and installing RSAT, the tools are not automatically available in Windows 7. Using the Control Panel, enable the tools you want to use. To make the tools available, go to Start, Control Panel, Programs and Features, and then Turn Windows features on or off.
To disable tools you do not want to use in Windows 7, open Turn Windows features on or off.

You must first enable the tools for the roles and features you wish to administer after running the installation package for RSAT in Windows 7.

Connect to Hyper-V Host/Hosts
You can browse (or provide an IP address) the list of host/hosts (provided they are in the same domain). Select Connect to Server to run a VRDP(Virtual Remote Desktop Protocol) session from the right-hand side.

We have tried to make this as simple as possible. But as the windows 7 support has been withdrawn, readers are advised to research the availability of tools and compatibility with the latest windows machines. To our best knowledge, even the existing windows 7 machine should still be compatible with the latest windows 10 hyper-v machines.
Microsoft Hyper-V Server 2012 — бесплатная операционная система с единственной ролью — сервером виртуализации. В этой ОС отсутствует GUI и все настройки выполняются через консоль. Тем не менее, существуют несколько утилит, в том числе и с графическим интерфейсом, которые помогают провести настройку сервера с бОльшим удобством. Все они будут рассмотрены по ходу действия.
Скачать Microsoft Hyper-V Server 2012 можно c сайта Microsoft. Предварительно придётся войти в Вашу учётную запись Microsoft или зарегестрироваться.
!!!ВНИМАНИЕ!!! Качайте и устанавливайте английскую версию ОС. Это поможет избежать проблем при настройке Hyper-V Server при помощи скриптов.
Системные требования.
Чтобы установить и использовать Hyper-V Server 2012, необходим компьютер, отвечающий следующим требованиям:
- x64-совместимый микропроцессор Intel или AMD;
- аппаратно обеспечиваемая виртуализация (Intel VT или AMD-V);
- поддержка аппаратного предотвращения выполнения данных (DEP) через XD-разряд Intel или NX-разряд AMD;
- 512 Mb ОЗУ или больше, рекомендуется 2 Gb;
- 32 Gb дискового пространства, рекомендуется 50 Gb.
Чтобы узнать, поддерживает ли Ваша система виртуализацию, найдите свой процессор на официальном сайте Intel или AMD.
Также Microsoft настоятельно рекомендует использовать как минимум 2 сетевых адаптера — один для управления хостовой ОС, другой — для виртуальных машин. Это решение значительно повышает уровень безопасности (подробнее (англ.)).
Установка.
Запишите скачанный образ .iso (~1.6 Gb) на диск или создайте загрузочную флешку. Выставьте в BIOS-е загрузку с нужного устройства и загрузитесь с него. Установка Microsoft Hyper-V Server 2012 тривиальна и не отличается от установки других ОС от Microsoft.
Примечания:
1) Если разбиваете дисковое пространство на 2 и более разделов, на системный выделите не менее 50 Gb.
2) Язык системы выберите английский, язык ввода и региональные настройки можно выбрать русские.
Сразу по окончанию установки Вам будет предложено задать пароль для учётной записи администратора. Постарайтесь придумать надёжный пароль — длиной не меньше 8 символов, содержащий строчные и прописные буквы, цифры, спецсимволы.
Настройка.
Перед тем, как приступить к настройке, обзаведёмся программой, призванной обеспечить процесс управления гипервизором из-под Windows7. Замечу, что Windows 7 должен быть 64-х разрядным, иначе 5nine manager не установится!
- 5nine manager for hyper-v.
5nine Manager for Hyper-V предоставляет просмотрщик гостевых подключений виртуальных машин и локальный графический интерфейс пользователя для Hyper-V Server.
После ввода административного пароля видим на экране следующую картинку:
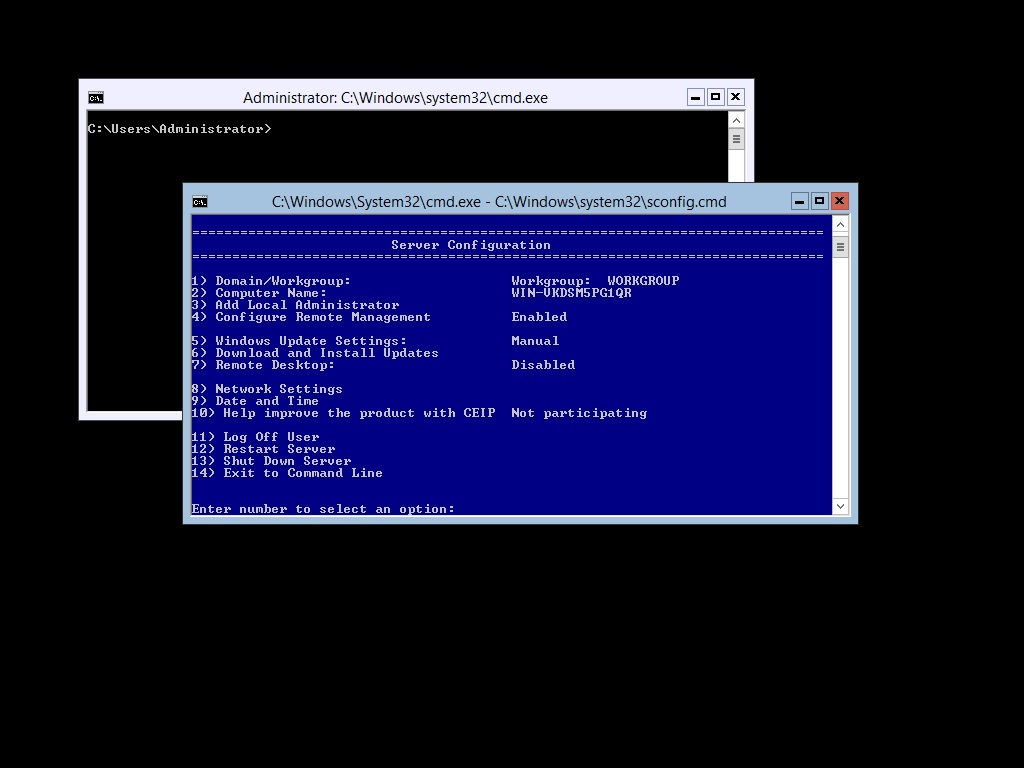
Hyper-V Server Configuration console
Отсюда будем производить большинство настроек сервера.
Примечание. Если вы случайно закрыли окно Hyper-V Server Configuration console, можно вызвать его обратно командой sconfig.
Если гипервизор заявил что не найдено активных сетевых адаптеров, то следующий шаг — установка драйвера для сетевой карты (Кстати, если у Вас несколько сетевых карт, попробуйте переткруть сетевой кабель в другую. моожет на какую-нибудь он все-таки смог установить драйвер). Если на сайте производителя материнской платы отсутствует драйвер для Windows Server 2012, попробуйте драйвер для Windows 8 x64. Установить можно двумя путями:1)Запустить Corefig -> Панель управления -> Установка драйвера; 2) Запустить Total Commander -> setup.exe из папки с драйвером.
Далее выполним следующие манипуляции на стороне сервера:
Сначала в Hyper-V Server Configuration console…
 Network Settings:
- Введите номер сетевого адаптера для настройки (Network Adapter Index number)
- Выберите 1 (настройка IP-адреса и шлюза)
- Выберите S (для статического IP)
- Введите желаемый IP для этого сервера
- Введите маску подсети (Enter — оставить по умолчанию 255.255.255.0)
- Введите адрес шлюза
- Выберите 2 (настройка серверов DNS)
- Введите адреса первичного и дополнительного DNS-сервера
- Выберите 4 для выхода в главное меню
1) Domain/Workgroup:
- Выберите 1
- Выберите W (использовать рабочую группу, а не домен)
- Введите имя рабочей группы и нажмите Enter
2) Computer Name:
- Выберите 2
- Введите имя для этого сервера Hyper-V
- Перезагрузка
9) Date and Time:
- Установите временную зону | Дату | Время
7) Configure Remote Desktop: (теперь можно будет подключаться к гипервизору через RDP)
- Выберите 7
- Выберите E (включение службы Удалённых рабочих столов)
- Выберите 2 (разрешить подключаться с любой версией клиента)
5) Windows Update Settings:
- Выберите 5
- Выберите M (ну его, это автообновление, от него одни проблемы)
4) Configure Remote Management:
- Выберите 4
- Выберите 1
- Выберите 3
- Нажмите Yes
…а затем в Hyper-V Server local command line interface:
1. Разрешим доступ к расшаренным файлам и папкам:
netsh advfirewall firewall set rule group=“File and Printer Sharing” new enable=yes
2. Разрешаем подключение по RDP (удаленный рабочий стол):
netsh advfirewall firewall set rule group=“Remote Desktop” new enable=yes
Кстати, чтобы полностью отключить фаерволл, используется команда:
netsh advfirewall set allprofiles state off
и команда для включения:
netsh advfirewall set allprofiles state on
На этом базовая настройка сервера, достаточная для создания и подключения ВМ, закончена.
Далее настраиваем клиентскую машину, с которой будет осуществляться управление виртуальными машинами. Устанавливаем 5nine Manager for Hyper-V. Встанет он только на Win 7 x64, либо на Win 8.
Когда он спросит имя пользавателя и пароль — ввести ему логин и пароль Hyper-v сервера.
Если при запуске виртуальной машины выдаст такую ошибку:
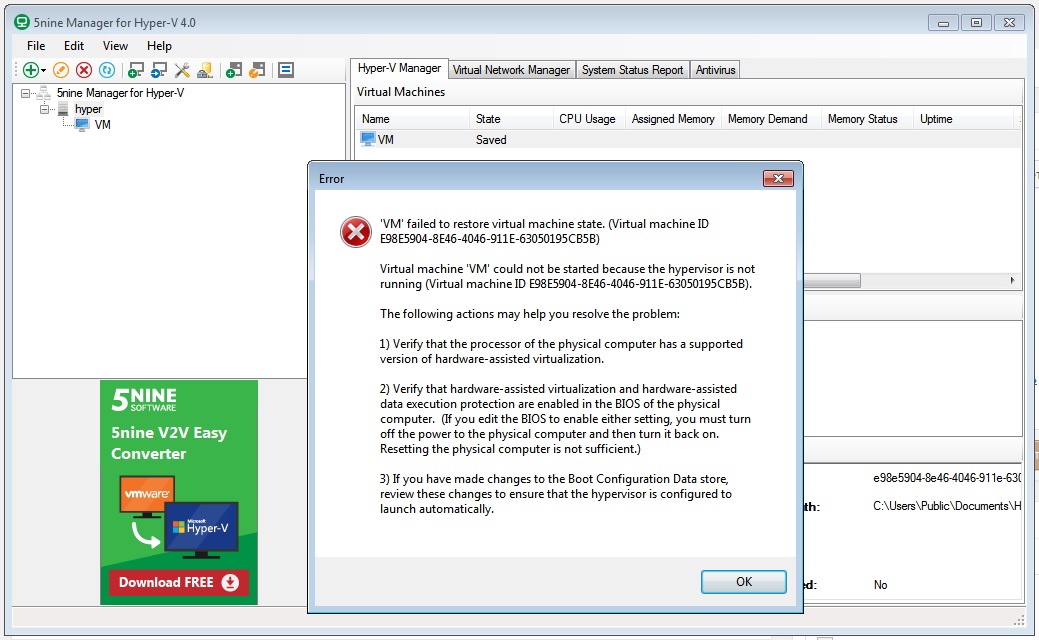
то, возможно, поможет следующее решение:
Заходим в BIOS -> Advanced -> CPU Configuration. Присваиваем опции No-Execute Memory Protection значение Disabled. Конечно у всех это выглядит по-разному, но смысл остаётся тот-же — нужно отключить защиту памяти.
Настройку Hyper-v Server 2012 для управления с Windows 8 смотрите здесь: http://sergiuz-it.blogspot.ru/2013/09/hyper-v-server-2012.html
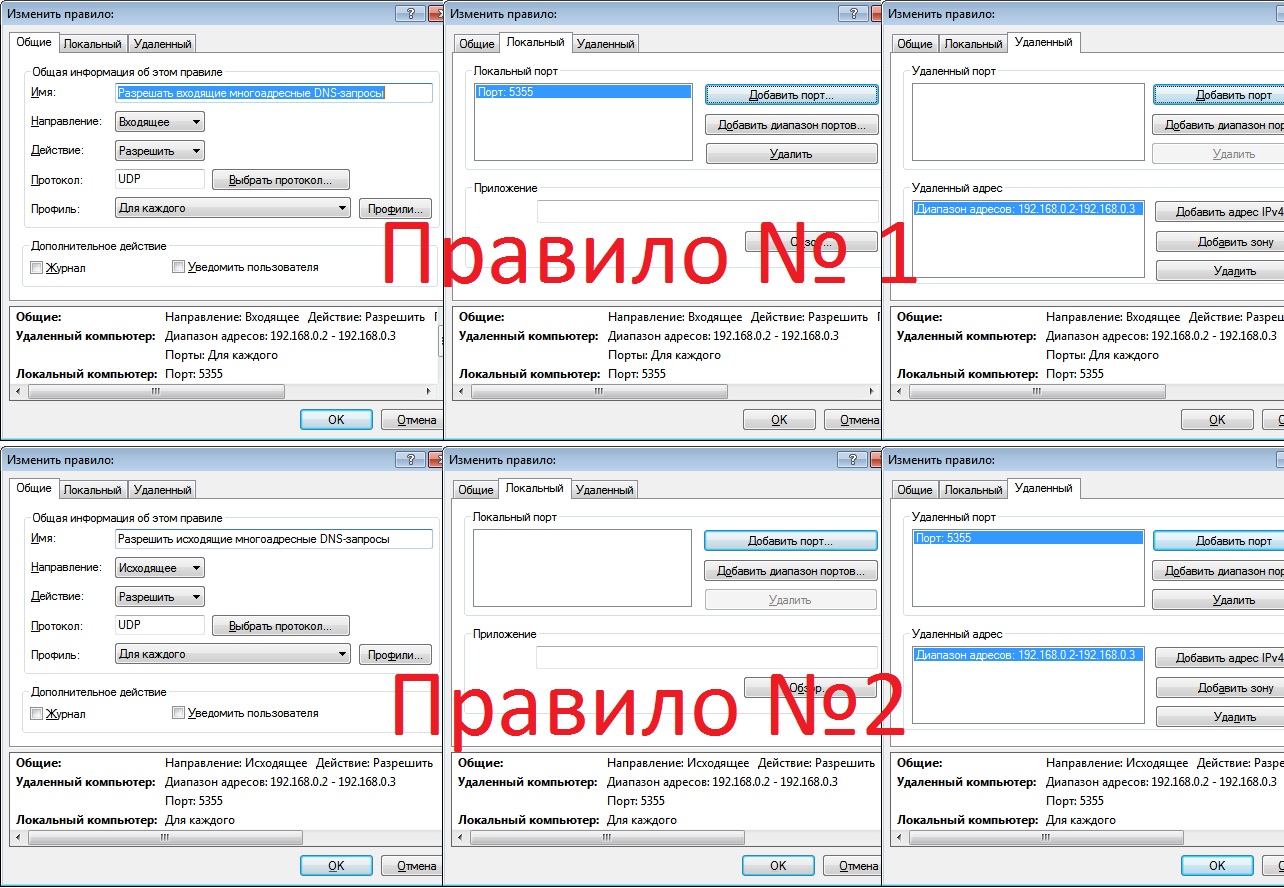
P.S.: У меня стоит Nod32 и при управлении виртуальными машинами через 5-nine hyper-v manager он начинает ругаться мол обнаружена атака сканирования портов. Чтобы этой ерунды не было, нужно добавить ещё два правила в фаервол:
Управление Hyper-V с помощью PowerShell
Самым главным недостатком программы 5nine Hyper-V manager является то что она платная. Конечно, при первой установке можно поставить триальную версию и радоваться жизни первые 30 дней, но по истечению этого времени половина полезных функций (таких как экспорт (бакап) виртуальных машин, перемещение, импорт, и многое другое) откажутся работать. Решений три:
- Купить программу (это совсем как-то по-мажорски)
- Постоянно переустанавливать её, предварительно очистив нужные ветви реестра, и получая новые ключи активации (постоянный геморрой)
- Использовать PowerShell (рекомендую)
Ознакомиться с некоторыми способами применения PowerShell Вы можете здесь.
UPDATE
Возможно вы могли заметить что в некоторых случаях сеть в Hyper-V очень медленно работает. У меня были следующие симптомы:
— при установке Bareos на виртуальную машину, бакапы шли ооооочень медленно, хотя на выделенной физической машине всё было норм.
— на виртуальной машине с Ubuntu обзор файлов в сети и использованием Samba был медленным
— VNC до виртуальной машины с линуксом на борту ооочень сильно тормозил.
Оказалось, что виной всему фича VMQ сетевых адаптеров, которая по-умолчанию включена в Hyper-V. Поддержка VMQ позволяет перенести большую часть затрат на обработку сетевых пакетов, адресованных виртуальным машинам с хостовой ОС на плечи процессора сетевого адаптера. Так вот, из-за неё всё и тормозит.
Посмотреть, статус можно командой PowerShell: Get-NetAdapterVMQ
Отключить её на всех сетевых адаптерах можно комбинацией: Get-NetAdapter|Disable-NetAdapterVMQ
Отключить её для одного конкретного адаптера можно командой Disable-NetAdapterVMQ, а после запроса Name[0] ввести имя адаптера (из столбца Name команды Get-NetAdapterVMQ).
Применяется сразу, так что можно ничего не перезагружать.
(Просмотрено 7 607 раз, 1 раз за сегодня)
Содержание статьи:
- Создание виртуальной «Windows»
- ШАГ 1: включаем компонент Hyper-V, и запускаем диспетчер
- ШАГ 2: создание виртуальной машины (ВМ)
- ШАГ 3: установка Windows на ВМ
- ШАГ 4: использование ВМ
- Вопросы и ответы: 50
Доброго времени суток!
Оказывается в некоторых учебных заведениях еще используют Windows XP и делают на них лабораторные работы 👀. Собственно, именно по этой причине — одни знакомые попросили меня как-нибудь запустить старый софт в новой Windows 10 (11).
Как вариант решения: решил установить им виртуальную машину с Windows XP, на которой лабораторные будут «работать» (благо, что в Windows 10/11 есть встроенное средство гипервизор Hyper-V, а значит качать дополнительно ничего не нужно!). Да и пользоваться им достаточно просто… 👌
В общем, ниже покажу на пошаговом примере как можно создать себе виртуальную «Windows», и пользоваться ей, как обычной программой (запуская в окне).
Возможно, это кого-то убережет от покупки старого ноутбука/ПК для учебы (или для запуска старых игр 😉).
*
Примечание: всё, что описано ниже — можно сделать на 📌ОС Windows 10/11! Для норм. работы Hyper-V необходимо не менее 6 ГБ ОЗУ и 64-разрядный процессор (с аппаратной 📌виртуализацией // проверьте, чтобы она была у вас включена!). Вообще, ее сейчас поддерживают все современные ЦП…
*
📌Важно!
Если вам нужна виртуальная Windows XP (например), чтобы подключать к ней старые принтеры, сканеры и пр. — то рекомендую остановить свой выбор на VirtualBOX. Более подробно по этой теме тут.
*
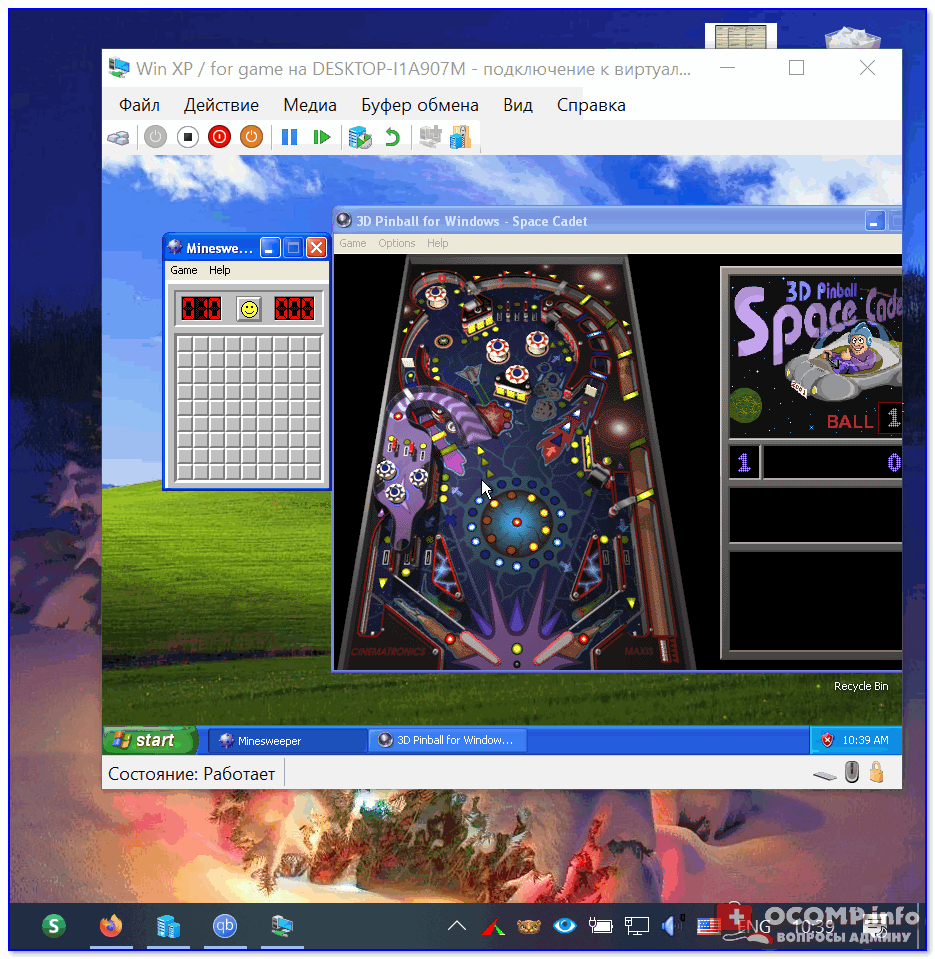
Что у нас получится в итоге — виртуальная Windows XP запущена в Windows 10 (аппаратная виртуализация в Windows 10)
*
Создание виртуальной «Windows»
ШАГ 1: включаем компонент Hyper-V, и запускаем диспетчер
Итак, сначала необходимо установить компонент Hyper-V (по умолчанию в Windows он выключен). 📌Сразу предупрежу, что в домашних версиях Windows — этот компонент установить нельзя! В этом случае вам нужно сначала перейти на Pro версию ОС // для этого, как правило, необходимо поменять ключ активации и обновить ОС).
*
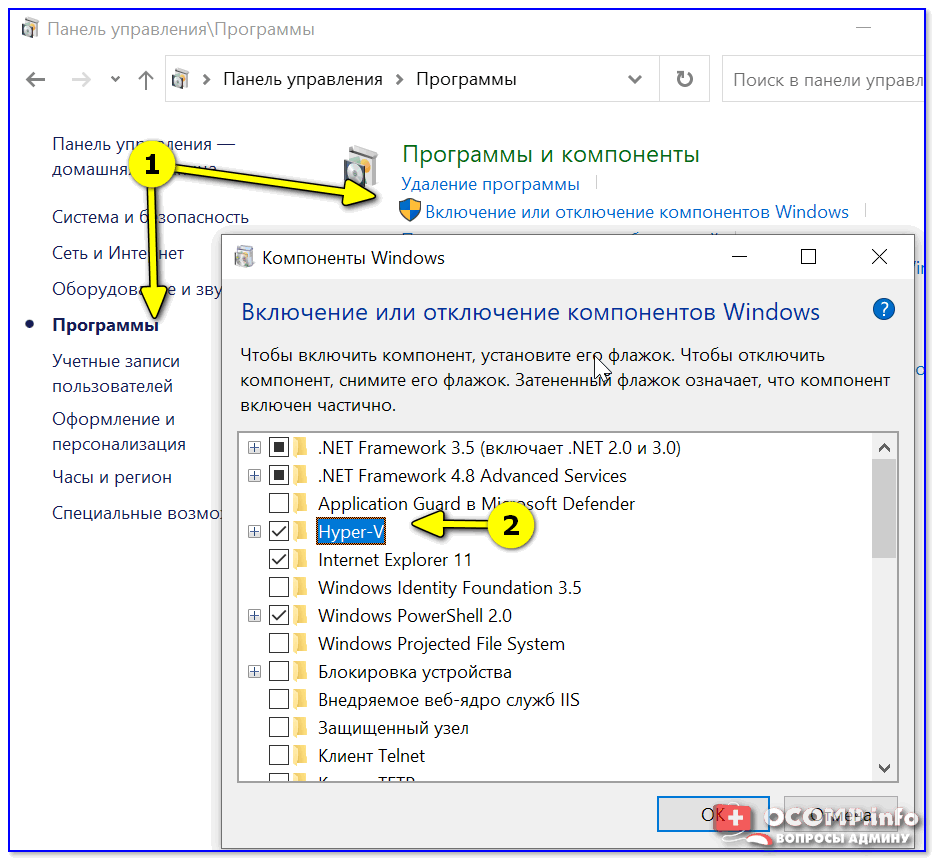
Наиболее простой способ «задействовать» Hyper-V — воспользоваться вкладкой «Включение или отключение компонентов» в панели управления Windows.
*
Чтобы открыть ее — можно нажать Win+R, и воспользоваться командой optionalfeatures (либо зайти в 👉 панель управления Windows и открыть раздел «Программы», см. скрин ниже 👇).
В ней нам требуется поставить галочку напротив пункта «Hyper-V» и нажать OK.
Как установить Hyper-V
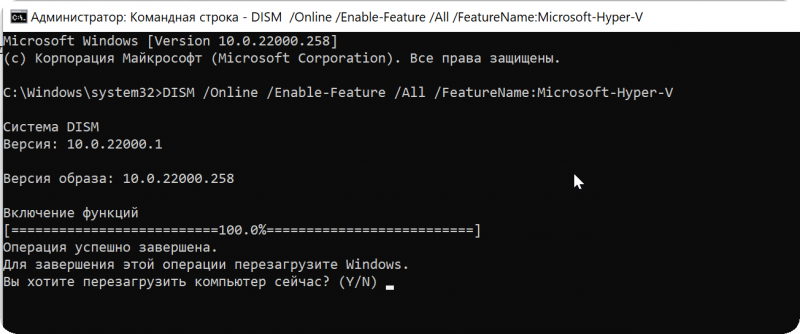
Кстати, установить диспетчер Hyper-V в Windows 10/11 можно и другим способом — запустить командную строку от имени динистора и использовать команду:
DISM /Online /Enable-Feature /All /FeatureName:Microsoft-Hyper-V
Важно: обязательно согласиться на перезагрузку, выбрав вариант «Y». 👇
Включение Hyper-V в командной строке
Во время перезагрузки компьютера произойдет до-установка нужного нам компонента. 👌
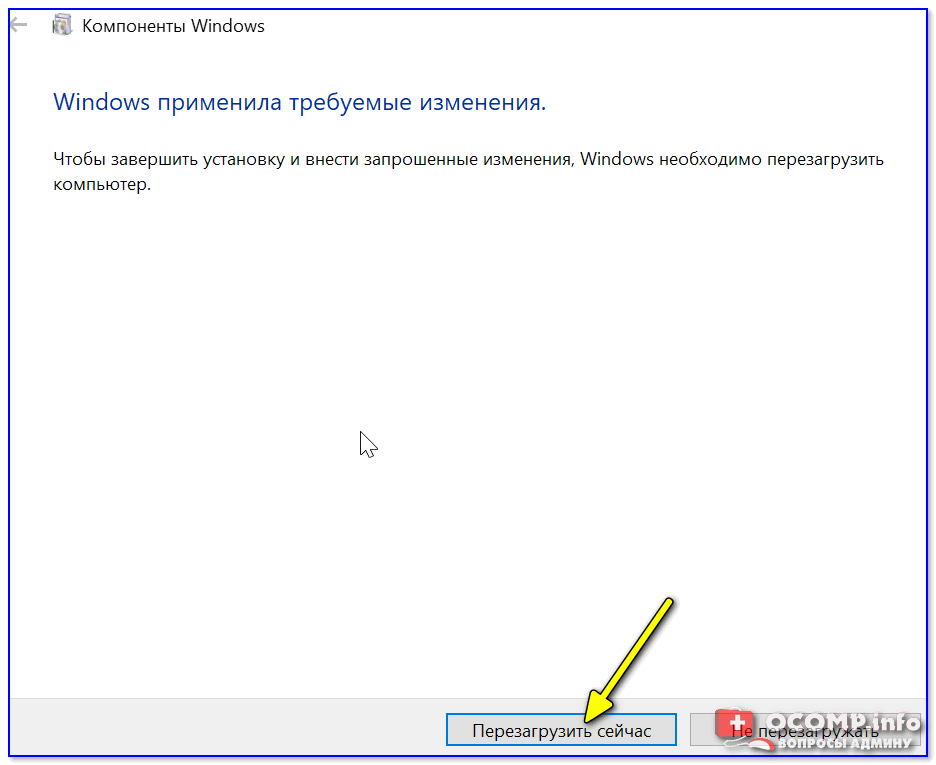
Перезагрузить сейчас
*
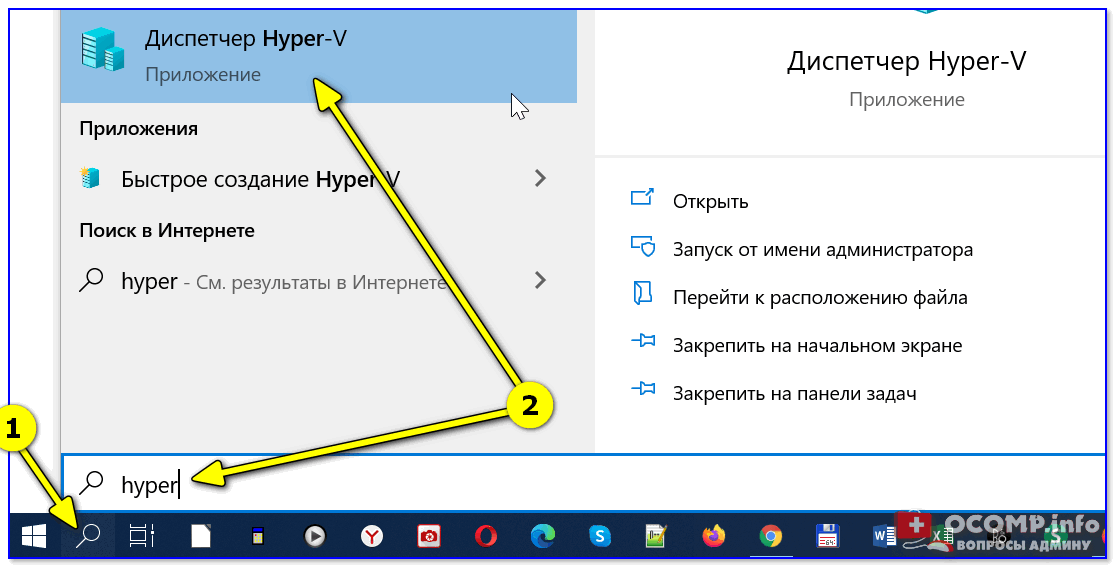
📌Запустить диспетчер Hyper-V (если у вас уже установлен этот компонент) достаточно просто:
- можно нажать Win+R, и использовать команду virtmgmt.msc;
- либо можно набрать в поиске «Hyper-V» и запустить «диспетчер Hyper-V». И тот, и другой вариант — должны работать! 👌
Запуск Hyper-V
*
ШАГ 2: создание виртуальной машины (ВМ)
После первого запуска диспетчера Hyper-V — у вас никаких виртуальных машин (далее просто «ВМ») быть не должно.
Чтобы создать ВМ — обратите внимание на вкладку «Действия» (в колонке справа 👇). Кликните по кнопке «Создать» как у меня на скриншоте.
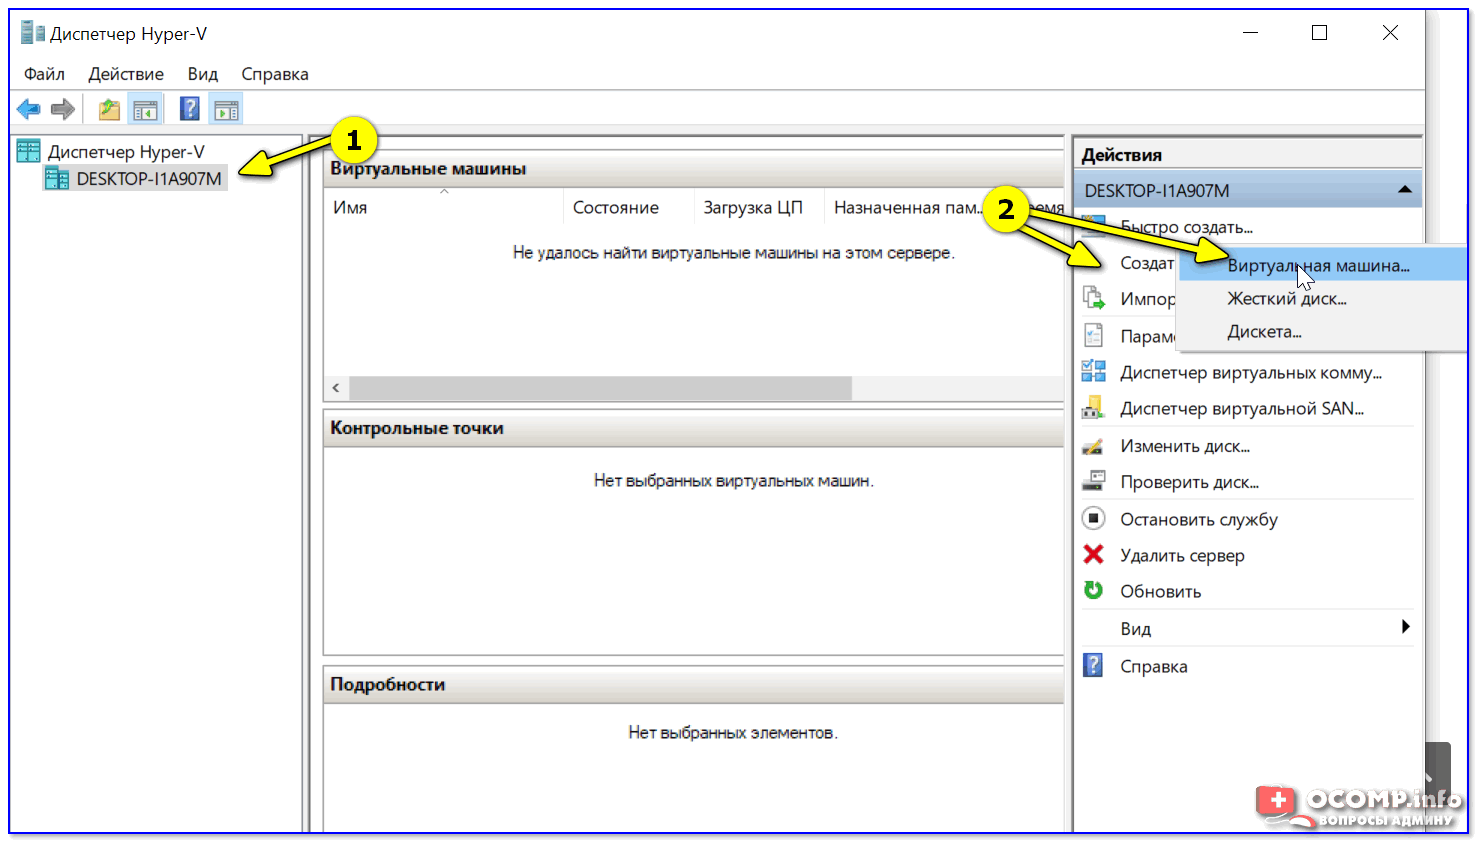
Диспетчер Hyper-V — создать
Далее необходимо придумать имя для ВМ. Можно использовать любое.
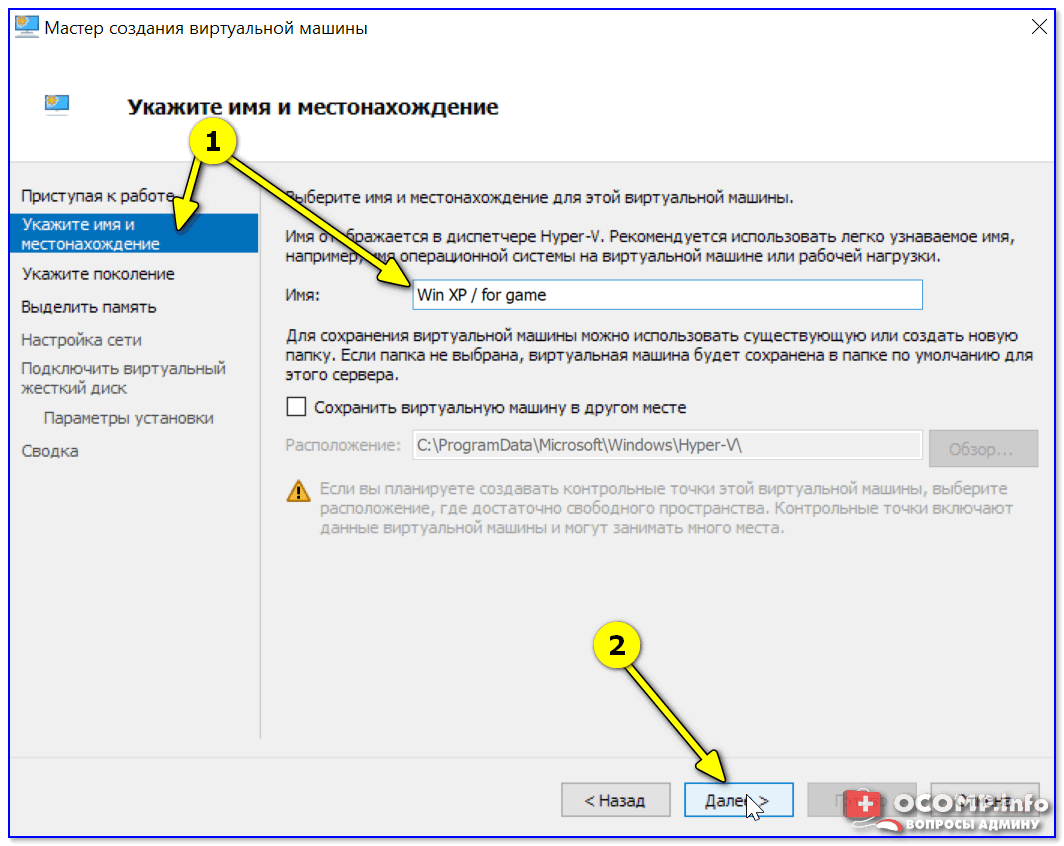
Укажите имя и местонахождение
Если вы хотите создать «виртуальную Windows XP» (т.е. старую ОС) — выбирайте первое поколение. 👇
Для «виртуальной Windows 10/11» — выбирайте второе поколение.
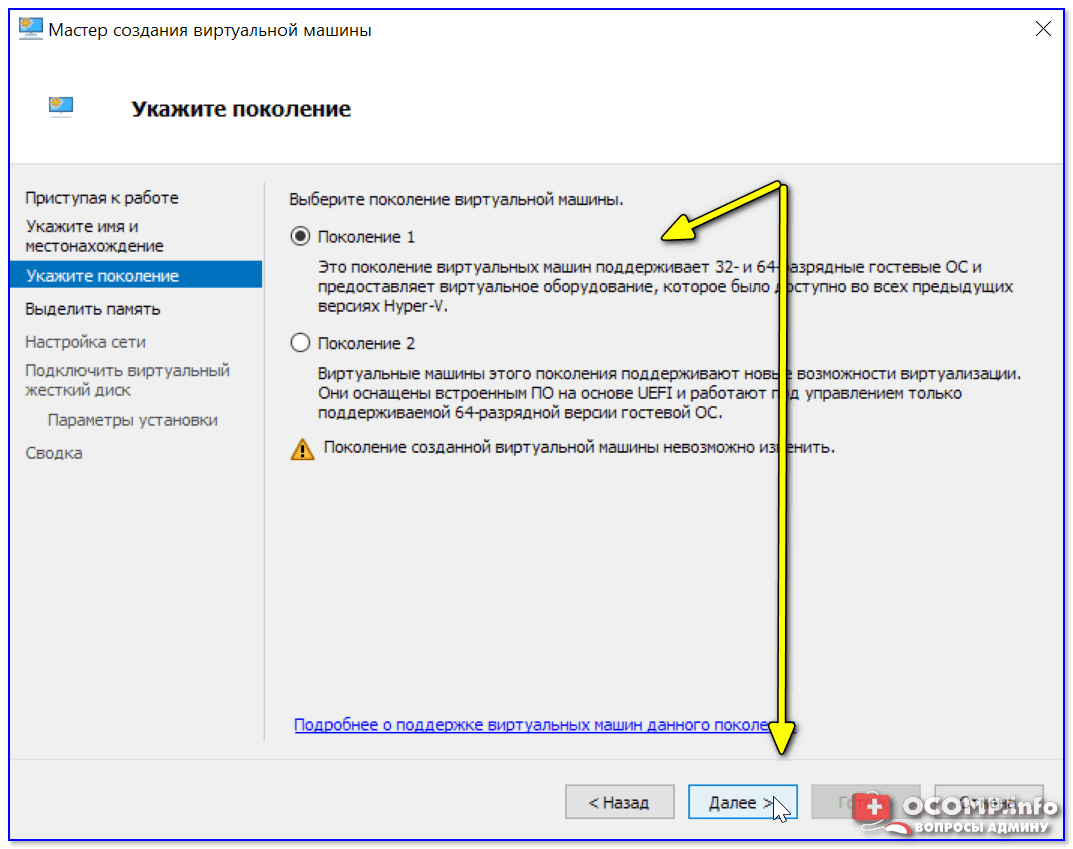
Укажите поколение
Затем необходимо указать количество выделяемой ОЗУ. Рекомендую как минимум 2000 МБ (для «виртуальной Windows 10/11» — 4000 МБ).

Выделить память
Что касается настройки сети — то ее пока что на этом этапе можно пропустить.
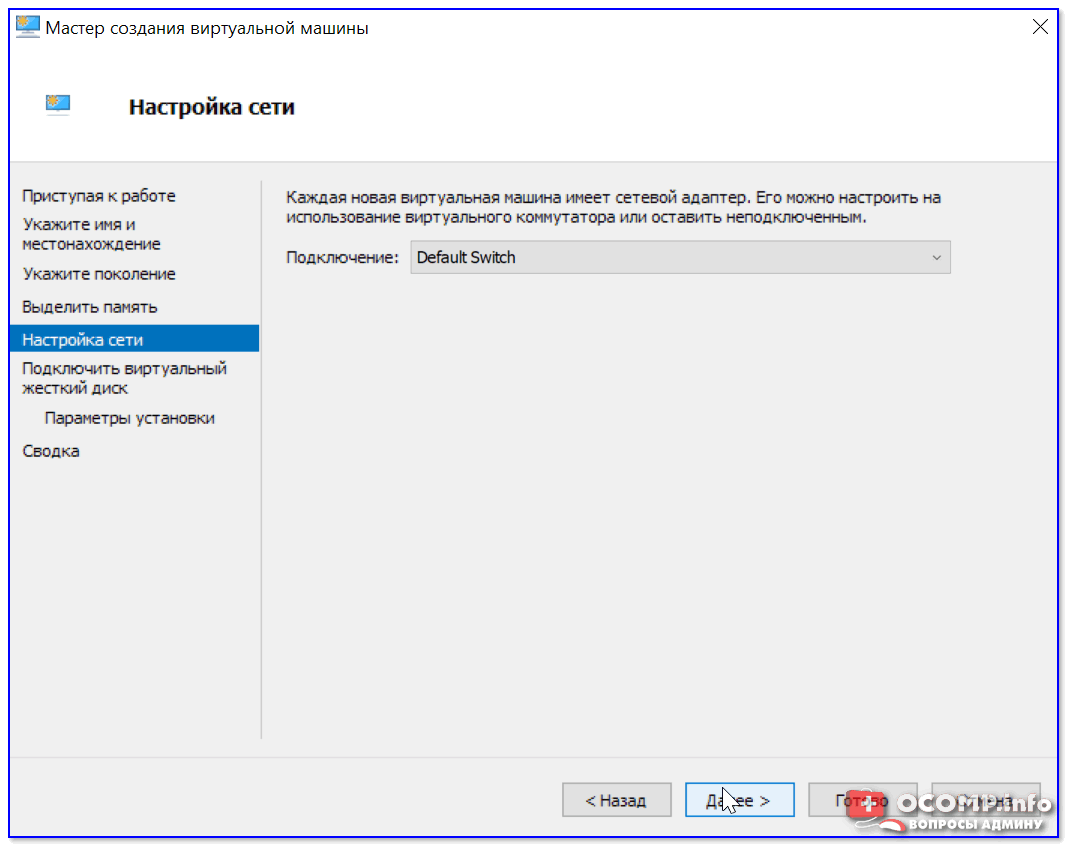
Настройка сети
Советую сразу же создать виртуальный жесткий диск (на нем будет храниться ваша виртуальная ОС, все ее файлы и т.д.). В моем примере я взял 15 ГБ (обычно требуется больше, и лучше указывать как минимум 30-45 ГБ).
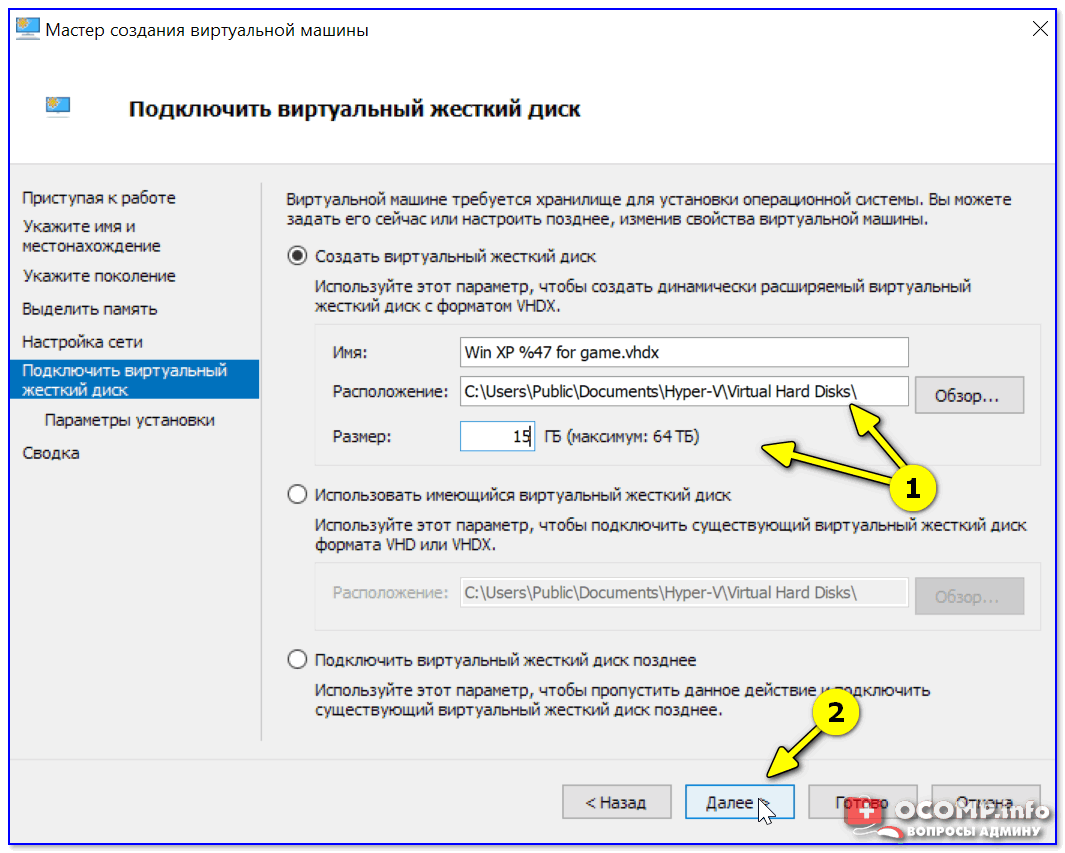
Подключить виртуальный жесткий диск
Следующий шаг важен: здесь нужно указать расположение ISO-образа с ОС Windows, которую вы хотите установить на ВМ (т.е. эта версия ОС у вас станет «виртуальной»).
В своем примере я использовал образ ISO с Windows XP.
👉 В помощь!
1) Как и где искать «редкие» файлы: программы, игры, фильмы и пр. (кроме как в Google / Яндекс)
2) Как скачать Windows 10/11 на русском языке (официальные ISO-образы)
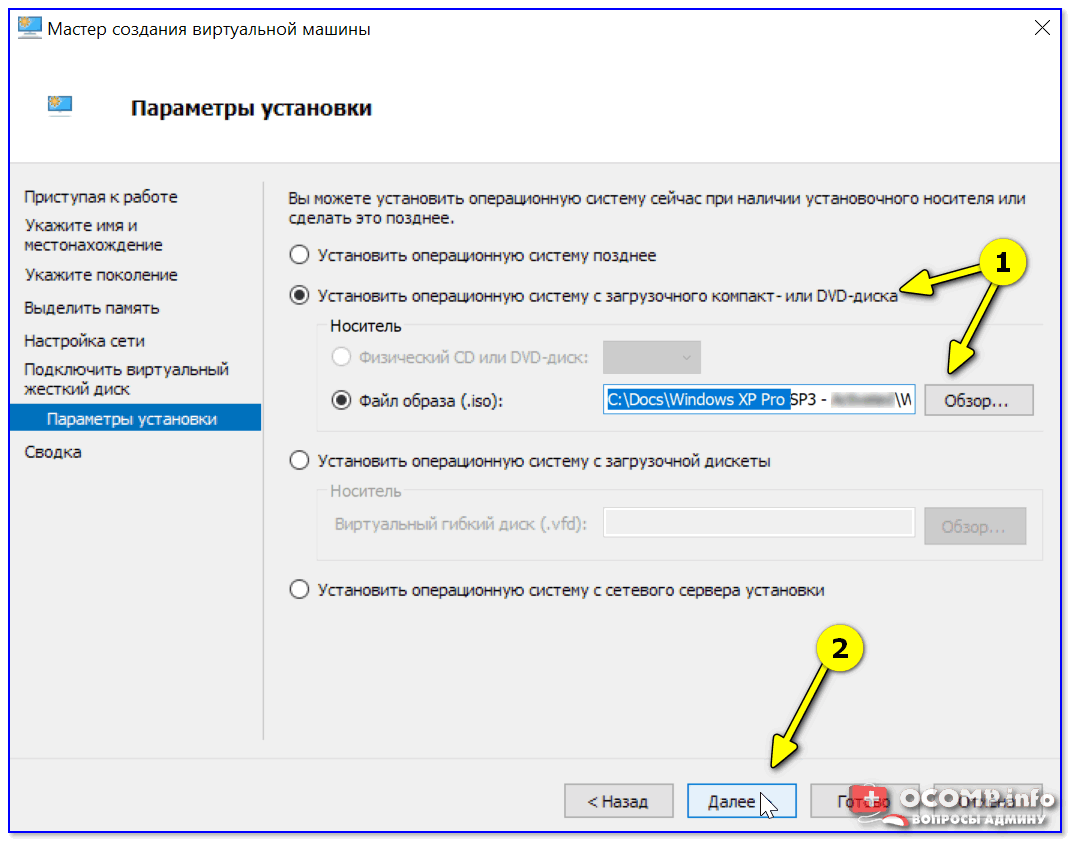
Параметры установки (выбор установочного ISO)
Ну и последний шаг — это обычная сводка, можно сразу же нажать на «Готово».
ВМ была создана! 👌
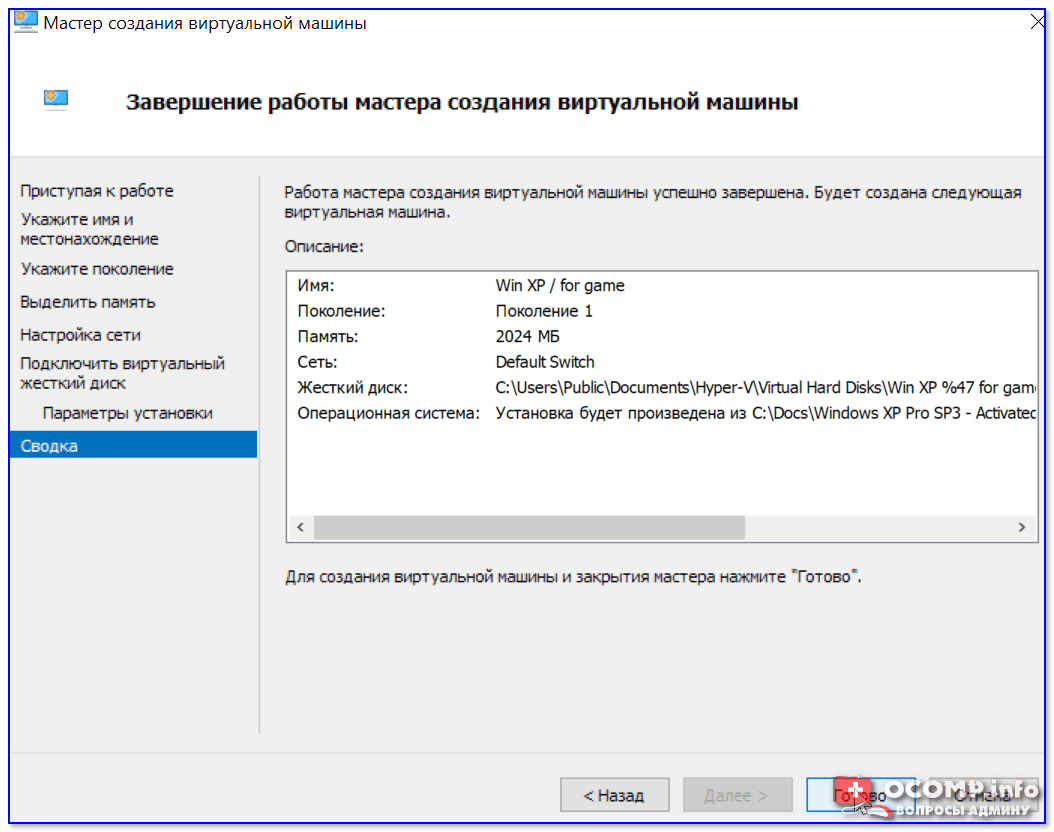
Сводка
*
ШАГ 3: установка Windows на ВМ
Теперь созданную ВМ можно запустить — для этого по ней достаточно кликнуть правой кнопкой мыши и выбрать в меню «Подключить…». 👇
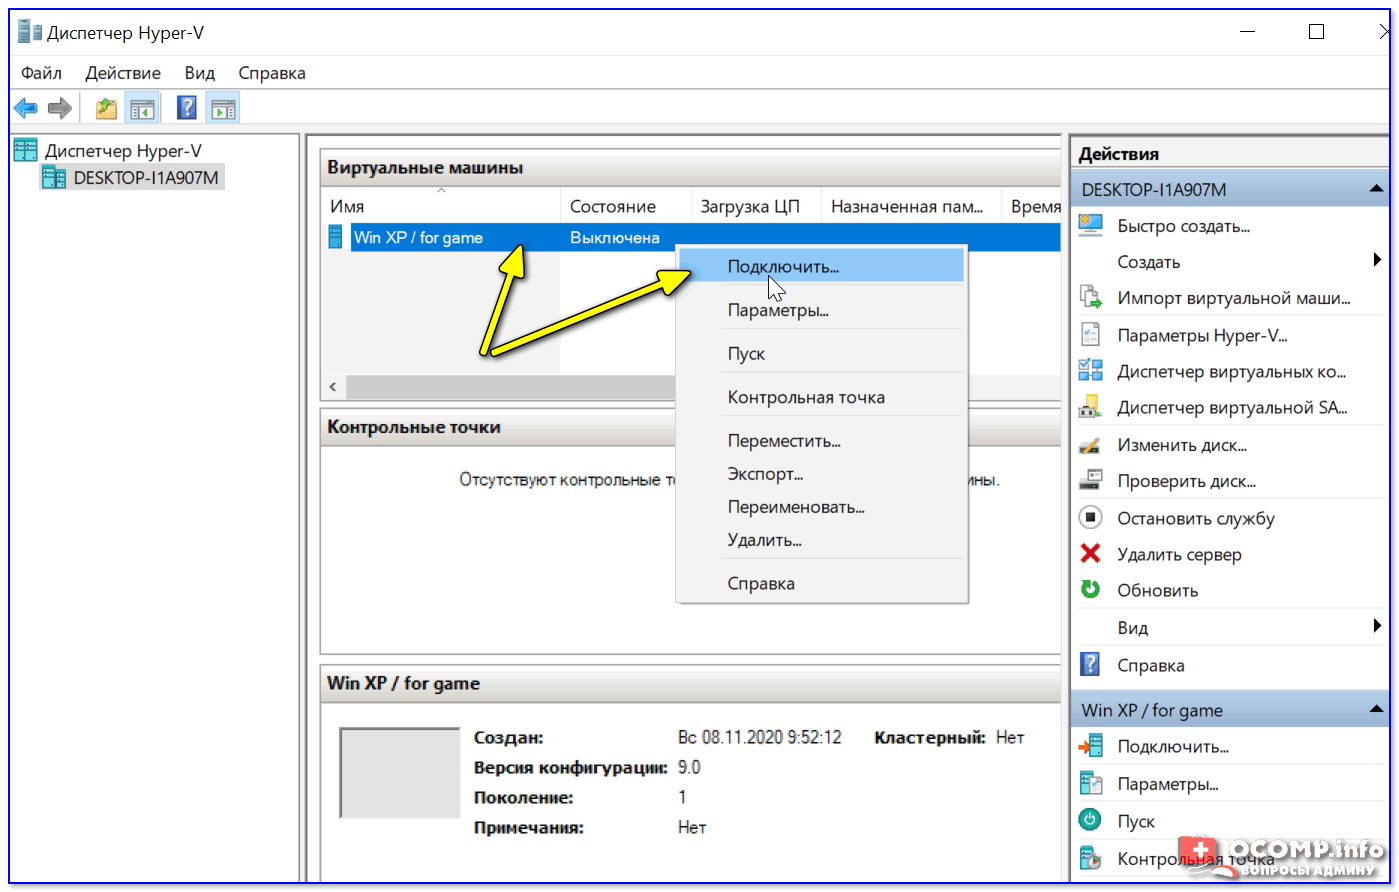
Подключить ВМ
Далее нажать по кнопке «ПУСК».
Пуск, запускаем ВМ
Т.к. в предыдущем шаге мы указали установочный образ ISO с Windows XP — ее установка на виртуальную машину начнется автоматически!

Т.к. при создании ВМ мы указали файл ISO — то установка началась автоматически
Как правило, достаточно несколько раз нажать на кнопку Enter, и дождаться окончания форматирования виртуального диска и копирования файлов.
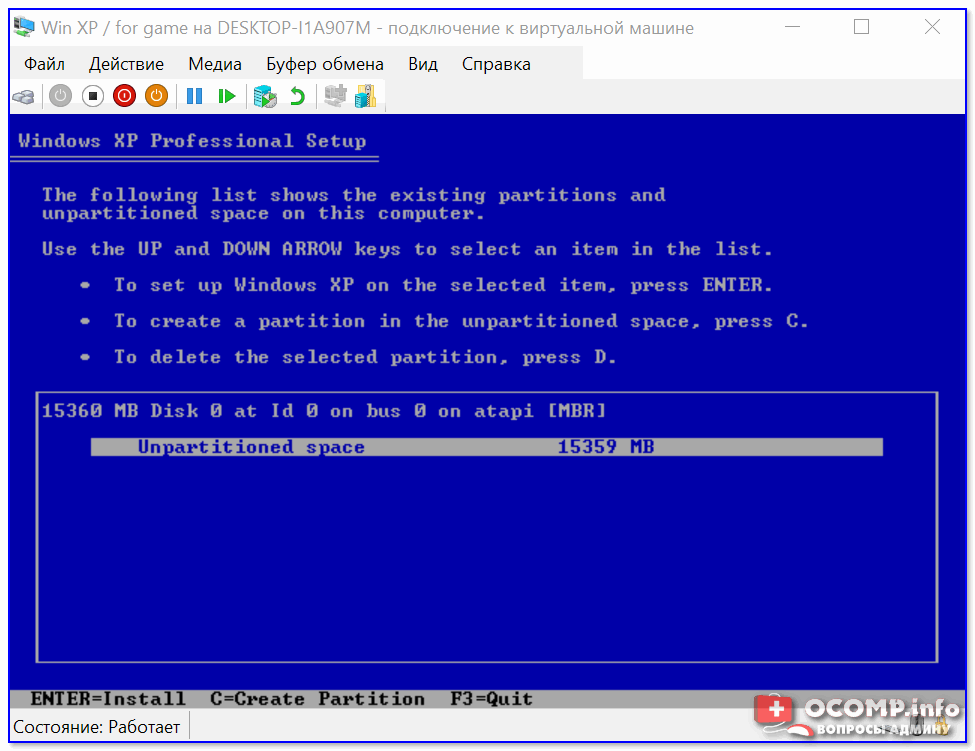
Выбор диска, форматирование, и копирование загрузочных файлов
Далее начнется весьма обыденный процесс установки ОС. Несколько раз придётся отвлечься и указать имя, часовой пояс и пр.
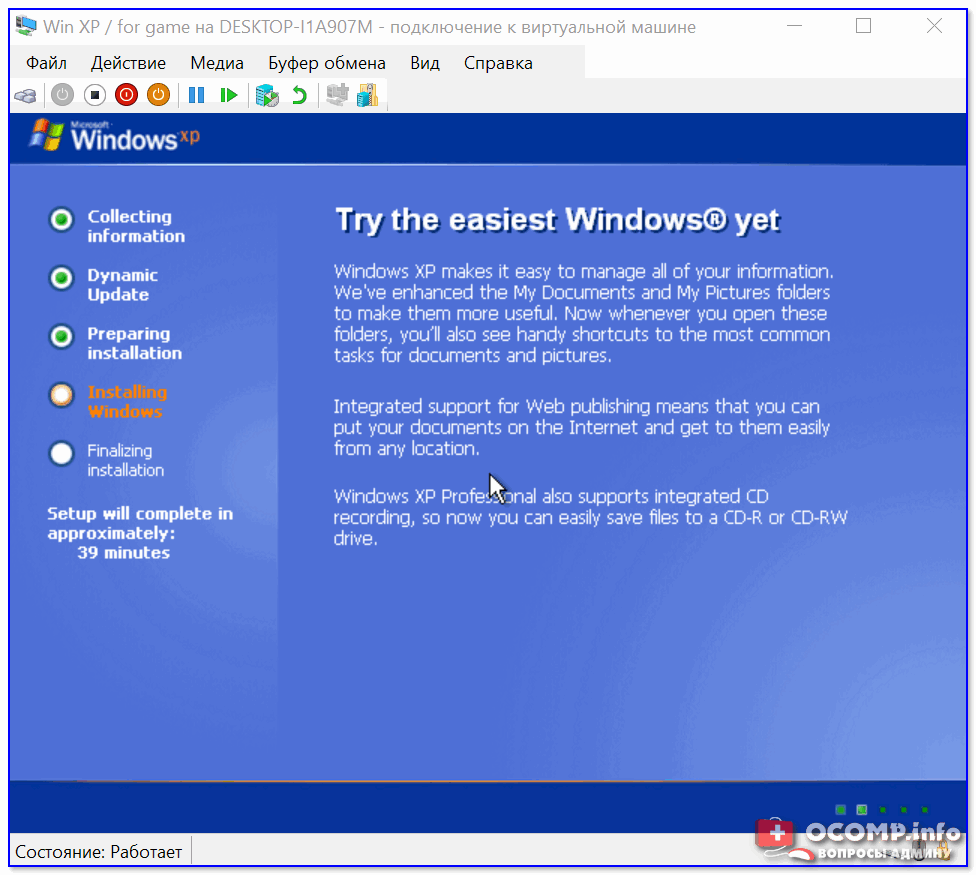
Процесс установки и копирования файлов
Через некоторое время Windows установится и произойдет первая загрузка… 👇
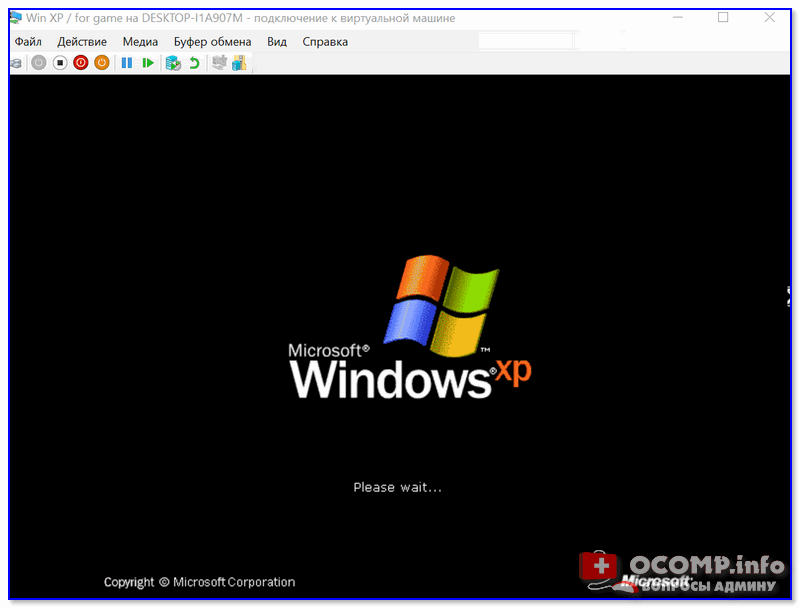
Запуск ОС
Теперь у нас есть «виртуальная Windows XP» и с ней можно полноценно работать. 👌

Виртуальная Windows XP готова к работе
*
ШАГ 4: использование ВМ
Использование ВМ крайне простое. После запуска диспетчера достаточно кликнуть по нужной ВМ правой кнопкой мыши и выбрать «Подключить» (так, как мы это делали при установки ОС в предыдущем шаге).
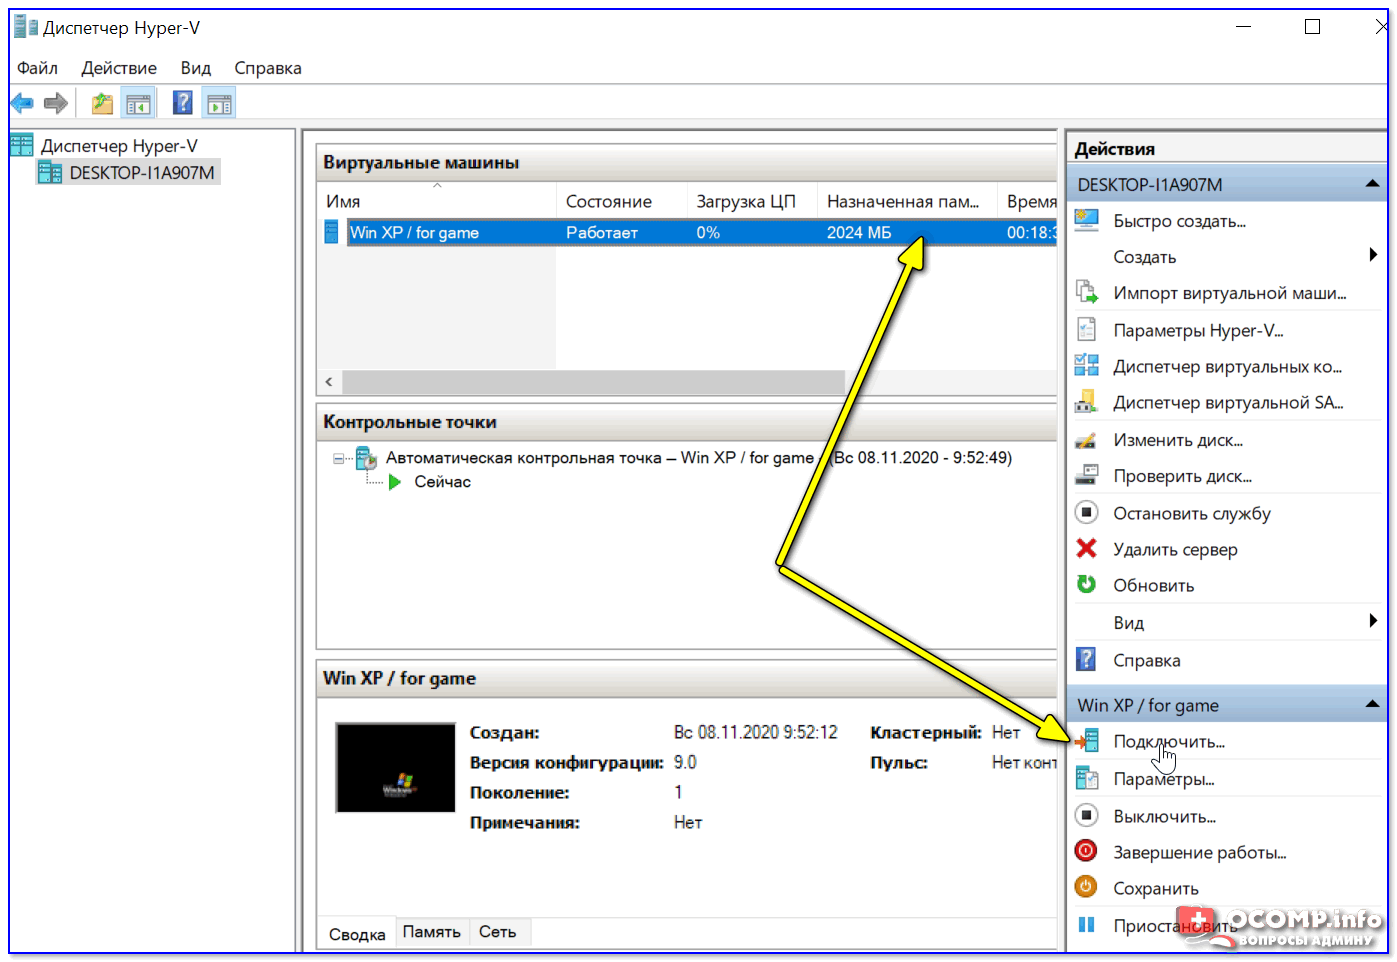
Подключаем ВМ и работаем
После, виртуальная Windows будет запущена в отдельном окне (как и др. программы), и в ней можно будет работать как в обычной системе — также доступна кнопка ПУСК, файлы на диске, игры и т.д. 👇
Можно играть
Важно: для выхода из окна приложения виртуальной машины — нажмите сочетание Ctrl+Alt+←.
*
Как скопировать файлы на диск ВМ
📌 В помощь!
Общая папка между реальной и виртуальной Windows: способы быстрой передачи файлов
*
Довольно популярный вопрос по поводу обмена файлами с виртуальной ОС (ведь через правка/копировать это делать не получается…).
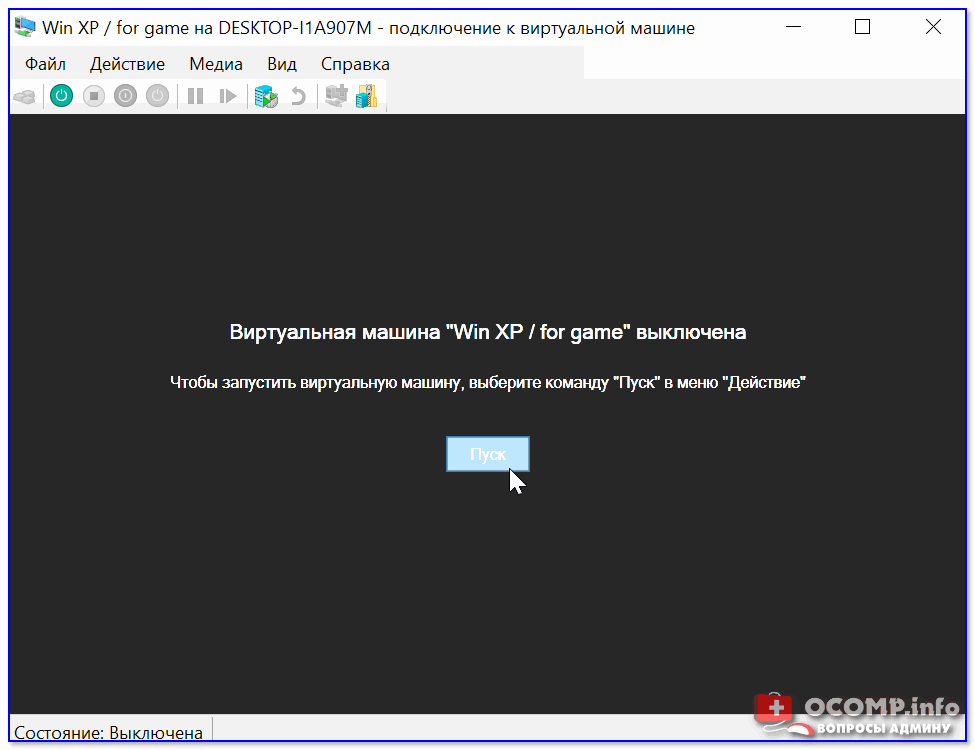
Приведу наиболее простой способ: сначала нужно отключить ВМ.
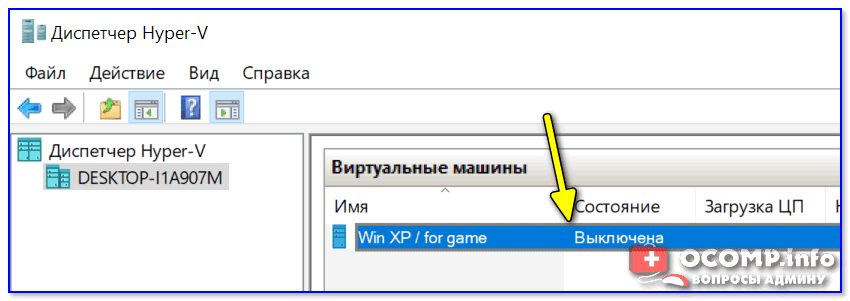
Состояние — выключена
Далее открыть 👉 управление дисками, нажать по меню «Действие / Присоединить виртуальный жесткий диск» и указать его расположение (по умолчанию: C:\Users\Public\Documents\Hyper-V\Virtual hard disks).
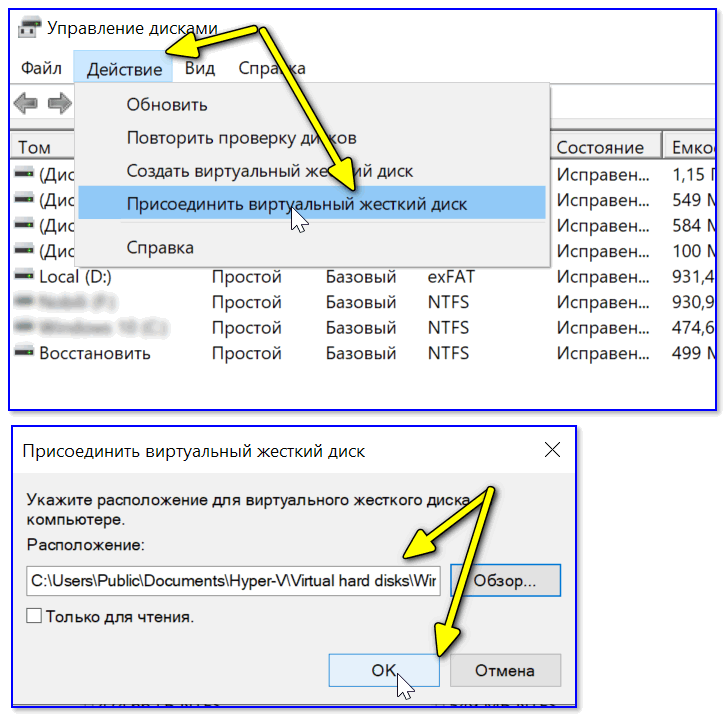
Присоединить виртуальный диск
В результате виртуальный диск (на котором установлена «виртуальная Windows») отобразиться в «Моем компьютере» и с ним можно будет работать как с обычным HDD. Т.е. скопировать и перенести на него (с него) любые файлы.
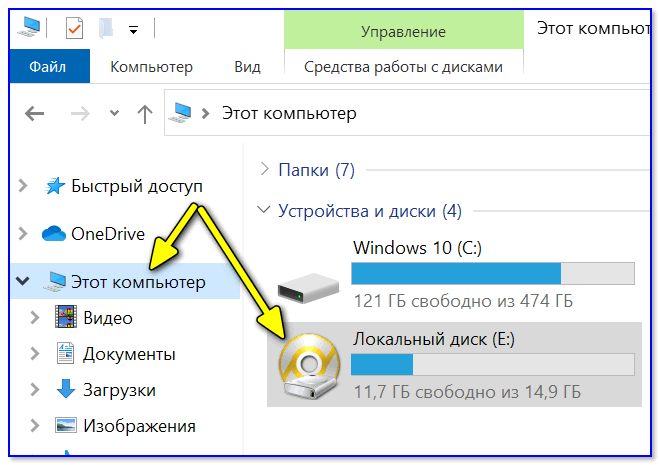
Можно работать с дисками
После обмена файлами с виртуальным диском — не забудьте его отключить: для этого в управлении дисками кликните по нему правой кнопкой мыши и выберите в меню «Отсоединить виртуальный жесткий диск».
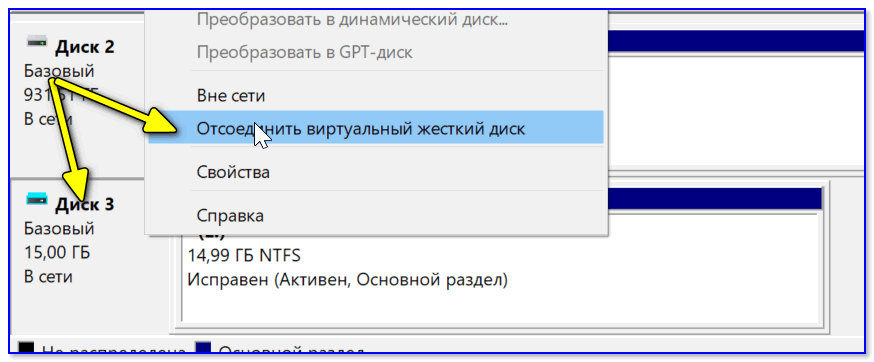
Отсоединить виртуальный диск
*
В общем-то, на этом и всё…
Компонент Hyper-V является весьма неплохой заменой отдельным программам вроде VirtualBox (о которой я рассказывал в этой заметке).
Впрочем, иногда виртуальные машины не позволяют всё же запускать определенный старый софт, и для его работы приходится ставить «реальную ОС» на реальный старый ноутбук (например).
*
Дополнения — всегда приветствуются!
Всем успехов!
👋
Первая публикация: 10.11.2020
Корректировка: 11.02.2022
As of Windows Server 2016, the Hyper-V Integration Services installation disk is no longer available.
Indeed, these Hyper-V integration services are now integrated by default in recent versions of Windows (Windows 10 and later) and are then updated automatically via Windows Update.
However, Microsoft provides update KB3071740 for Windows 7, 8 and 8.1 which allows you to manually install these Hyper-V integration services on these older versions of Windows.
Source : Integration components available for virtual machines not connected to Windows Update.
- Find out the version of Hyper-V integration services installed
- Download KB3071740 update (Hyper-V Integration Services) on Windows 8.1
- Install KB3071740 update (Hyper-V Integration Services) on Windows 8.1
- Download and install KB3071740 update (Hyper-V Integration Services) on Windows 8
- Download and install KB3071740 update (Hyper-V Integration Services) on Windows 7
1. Find out the version of Hyper-V integration services installed
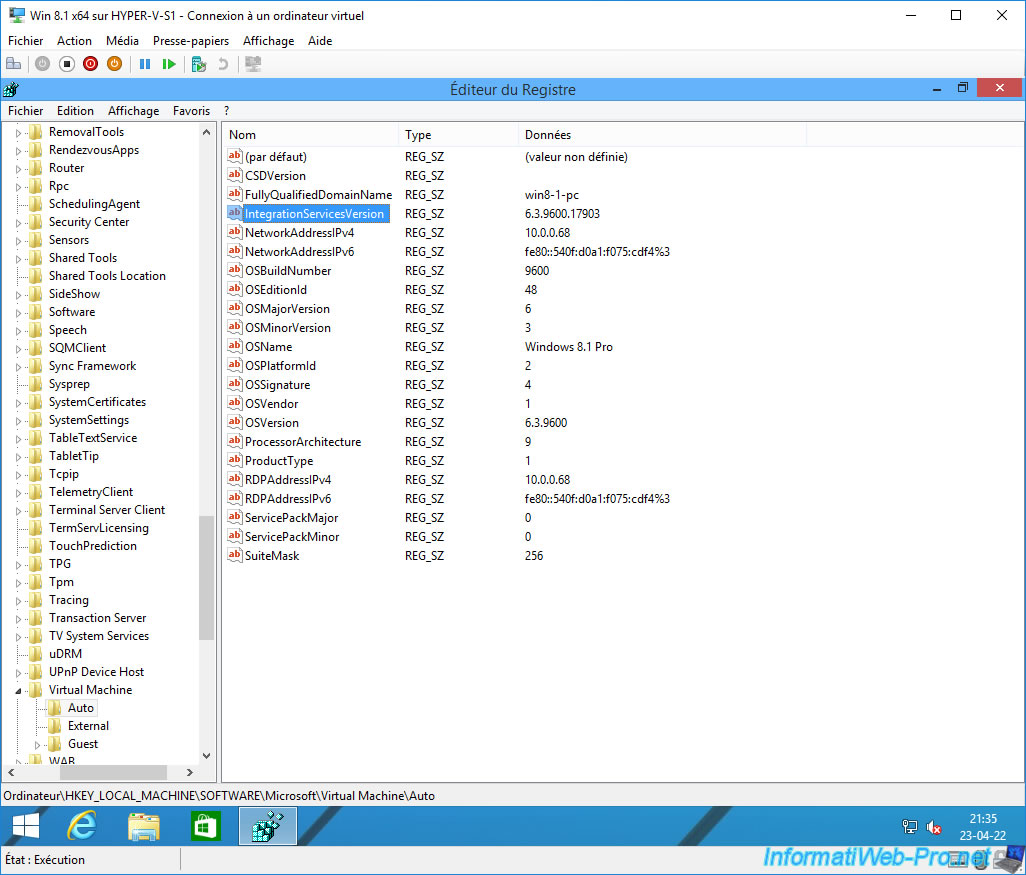
To find out the version of Hyper-V Integration Services currently installed in a virtual machine, open the Windows Registry Editor.
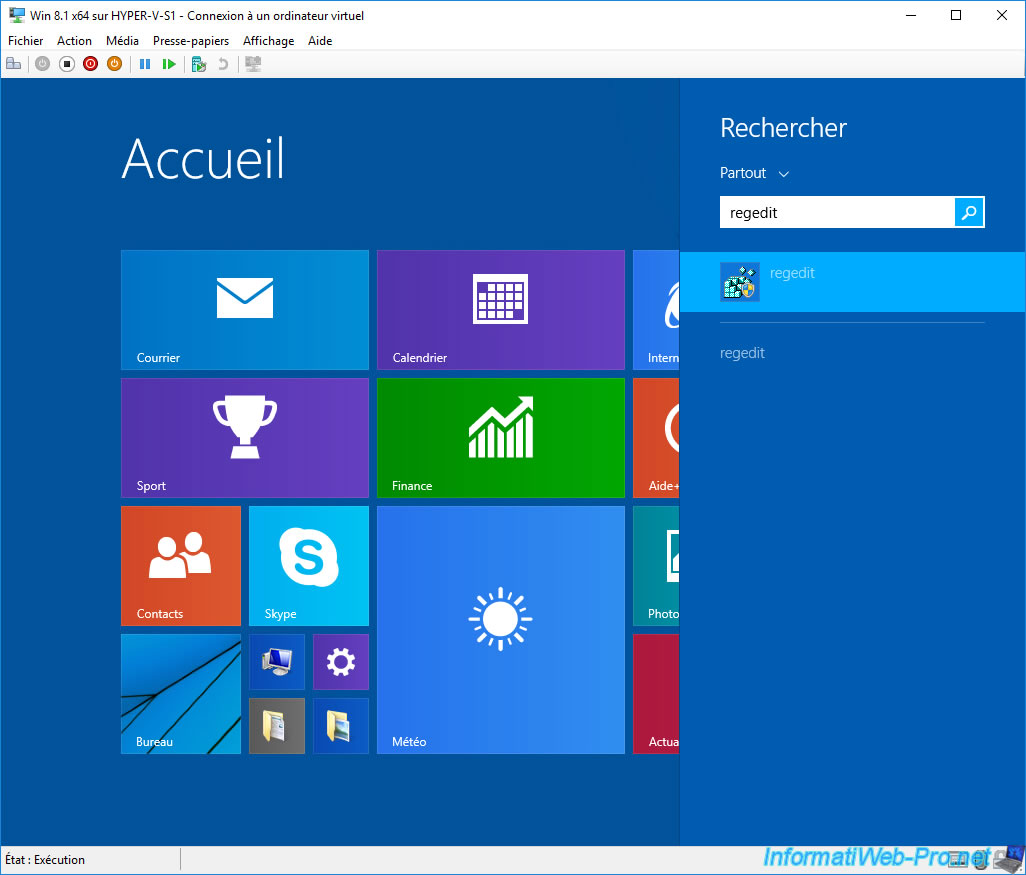
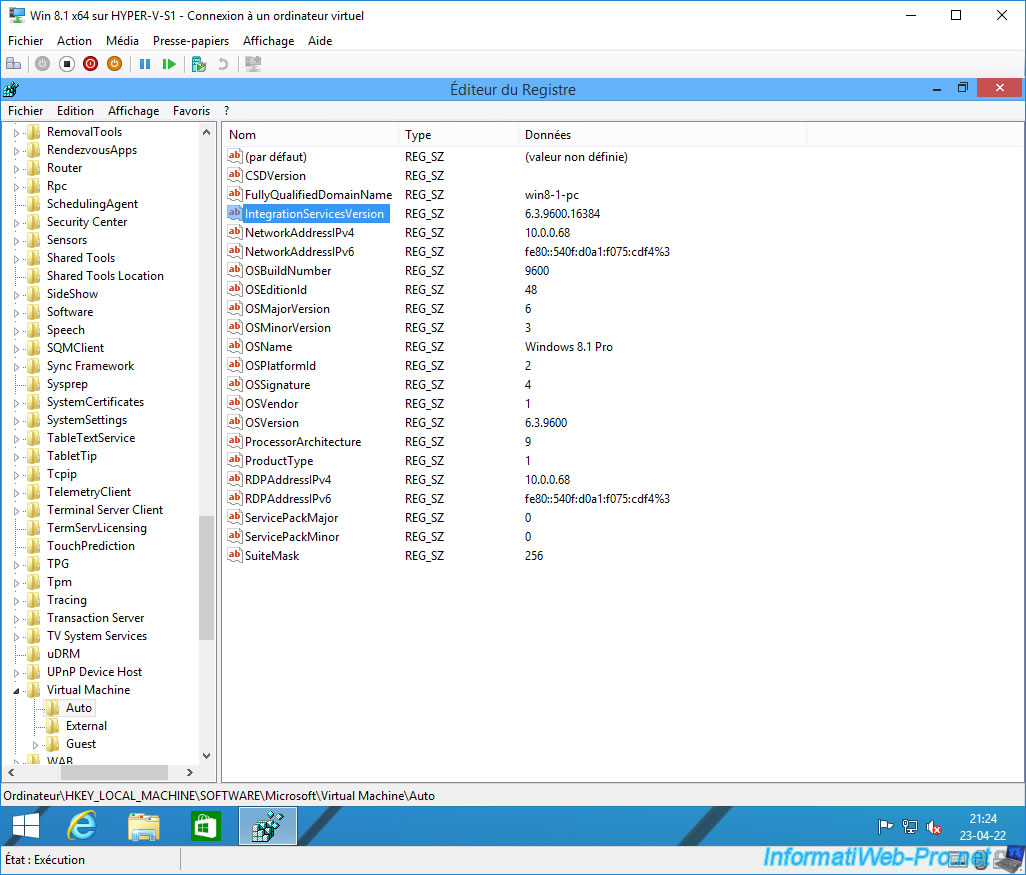
In the registry editor that appears, go to the «HKEY_LOCAL_MACHINE\SOFTWARE\Microsoft\Virtual Machine\Auto» registry key.
In this registry key, you will find an «IntegrationServicesVersion» data which corresponds to the version of the Hyper-V integration services installed.
2. Download KB3071740 update (Hyper-V Integration Services) on Windows 8.1
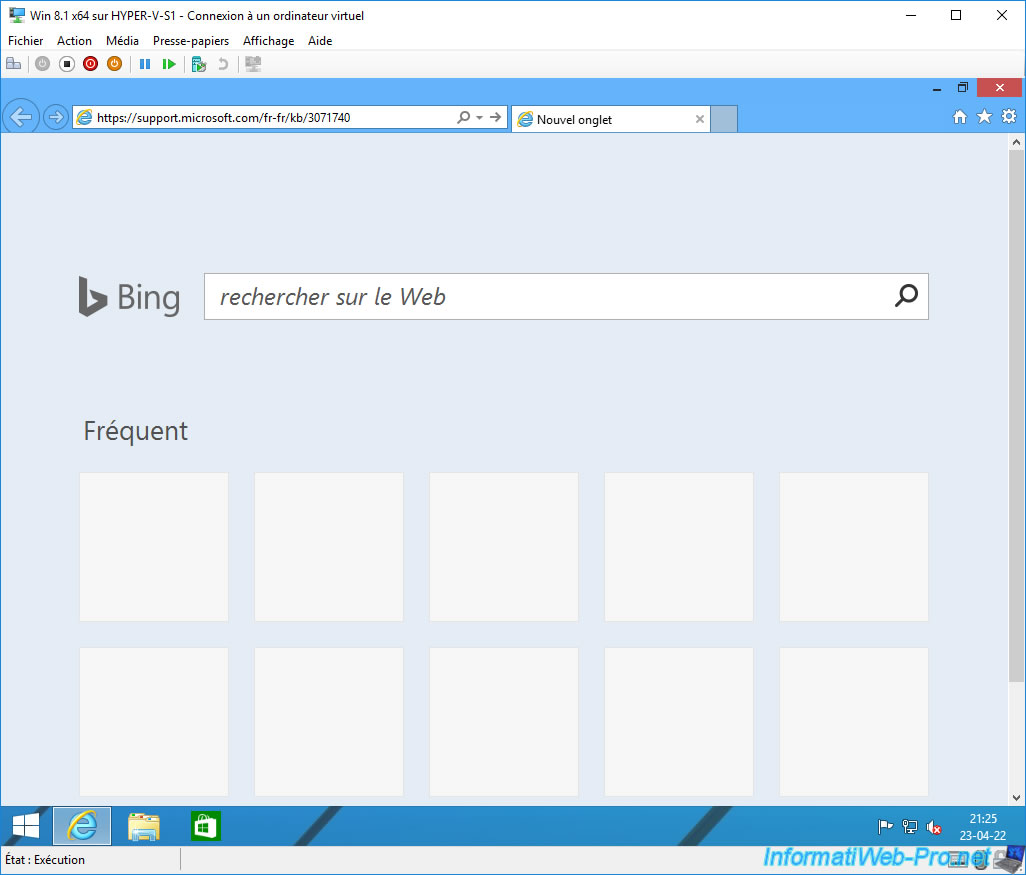
To download KB3071740 update (corresponding to Hyper-V Integration Services), go to «https://support.microsoft.com/en-us/kb/3071740».
Important : we recommend that you download the update from your Hyper-V server and then transfer it via an SMB share (for example) to avoid problems accessing the Microsoft site.
In our case, we used Windows 8.1 as the guest operating system, because this version of Windows is still supported by Microsoft’s site even though Windows 8.1 is not yet updated.
Indeed, as you will see later in this tutorial, if you are using Windows 7 or 8 and it’s not up to date, you will see that the Microsoft site will be strangely inaccessible.
The «Hyper-V integration components update for Windows virtual machines …» page appears.
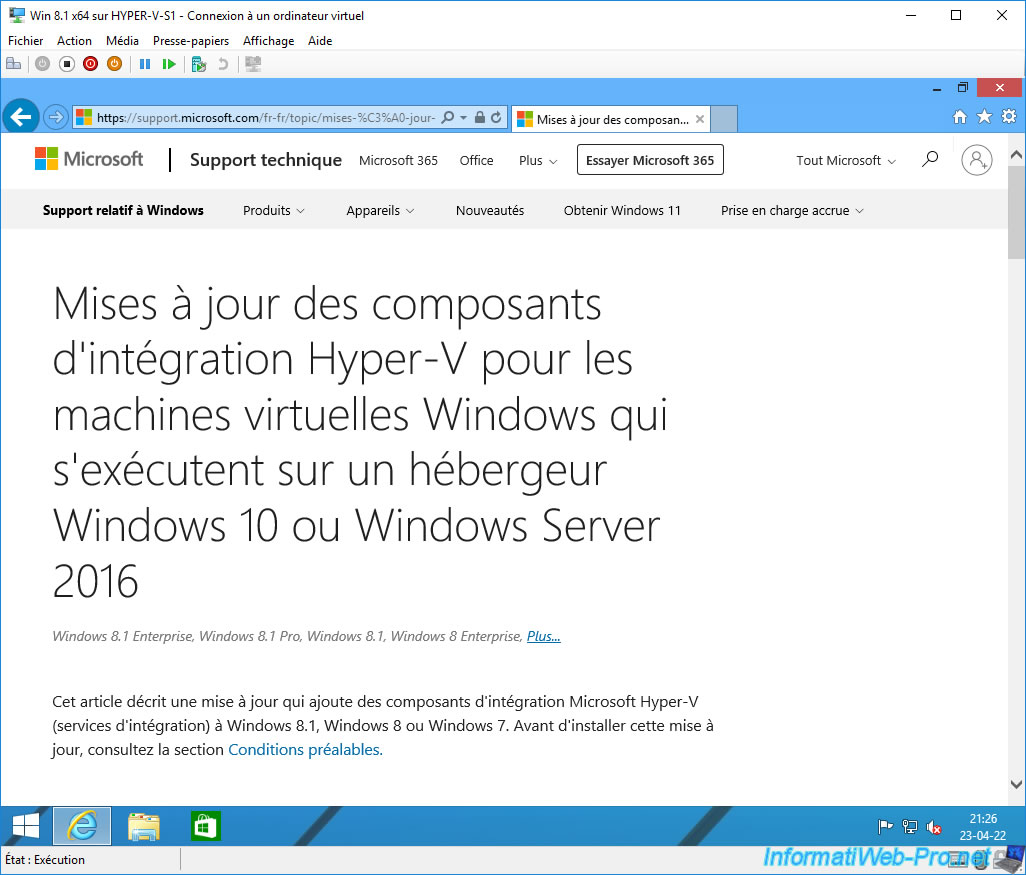
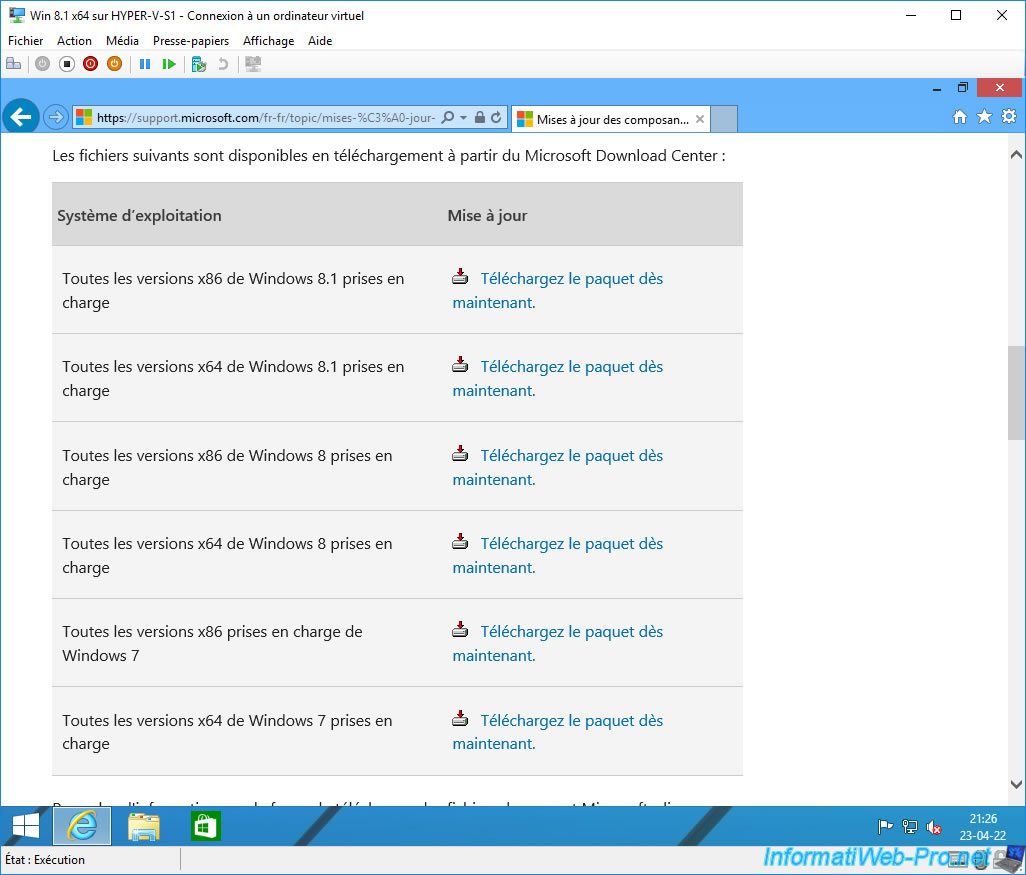
On this page you will find a table with the download links for this update for Windows 7, 8 and 8.1 (both 32-bit (x86) and 64-bit (x64)).
In our case, we choose the «All supported x64-based versions of Windows 8.1» download.
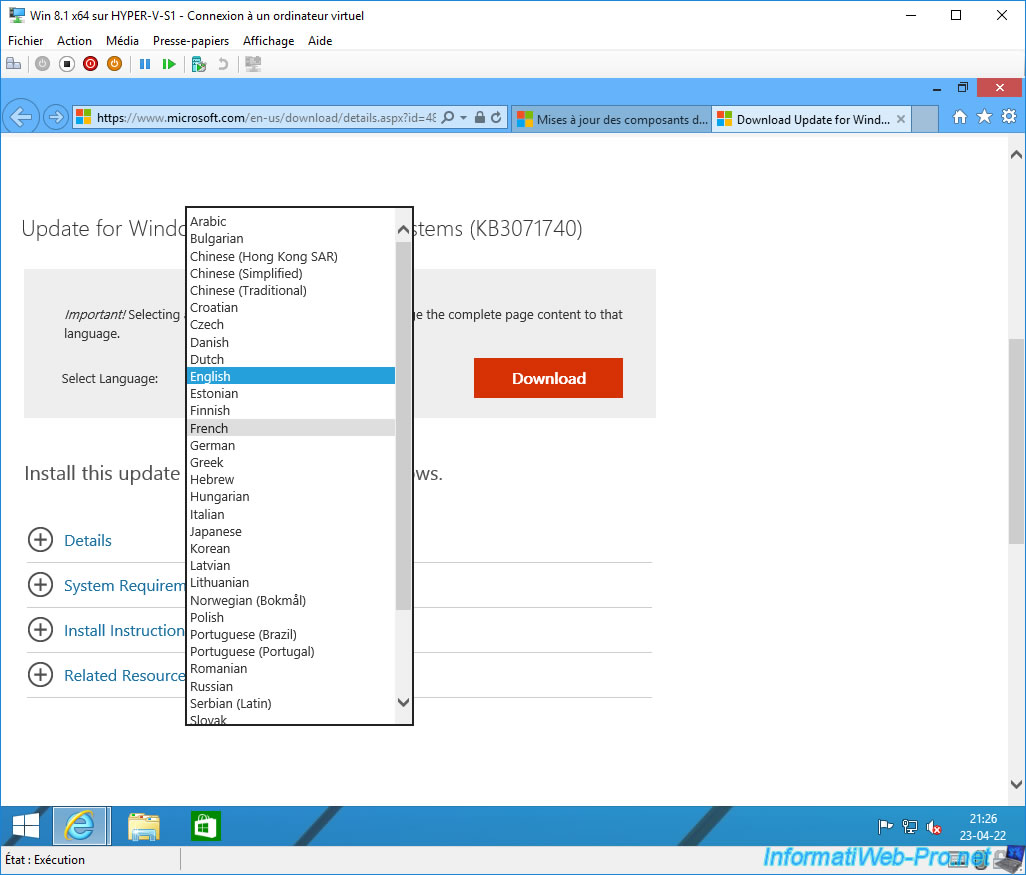
By default, you will be redirected to the English version of the download page for this update «KB3071740».

If you want to download the update in another language, select the desired language from the list and wait for the page to refresh.
Once the page refreshes, click the download button.
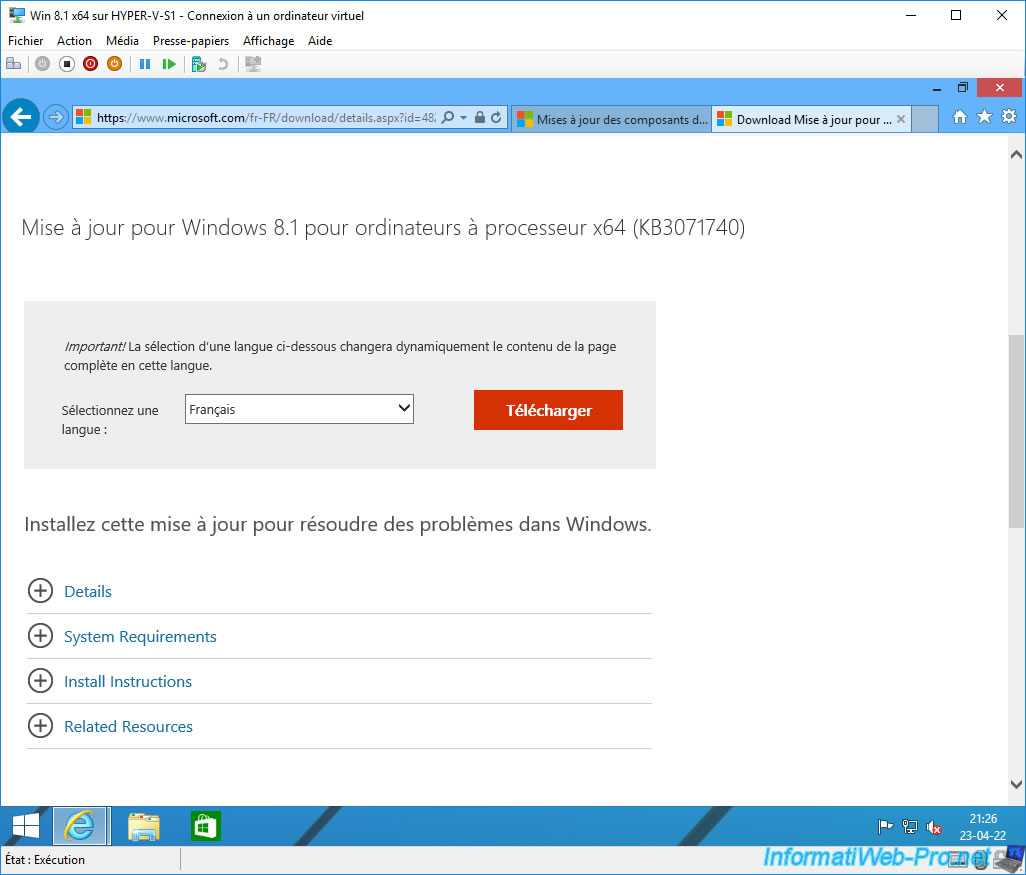
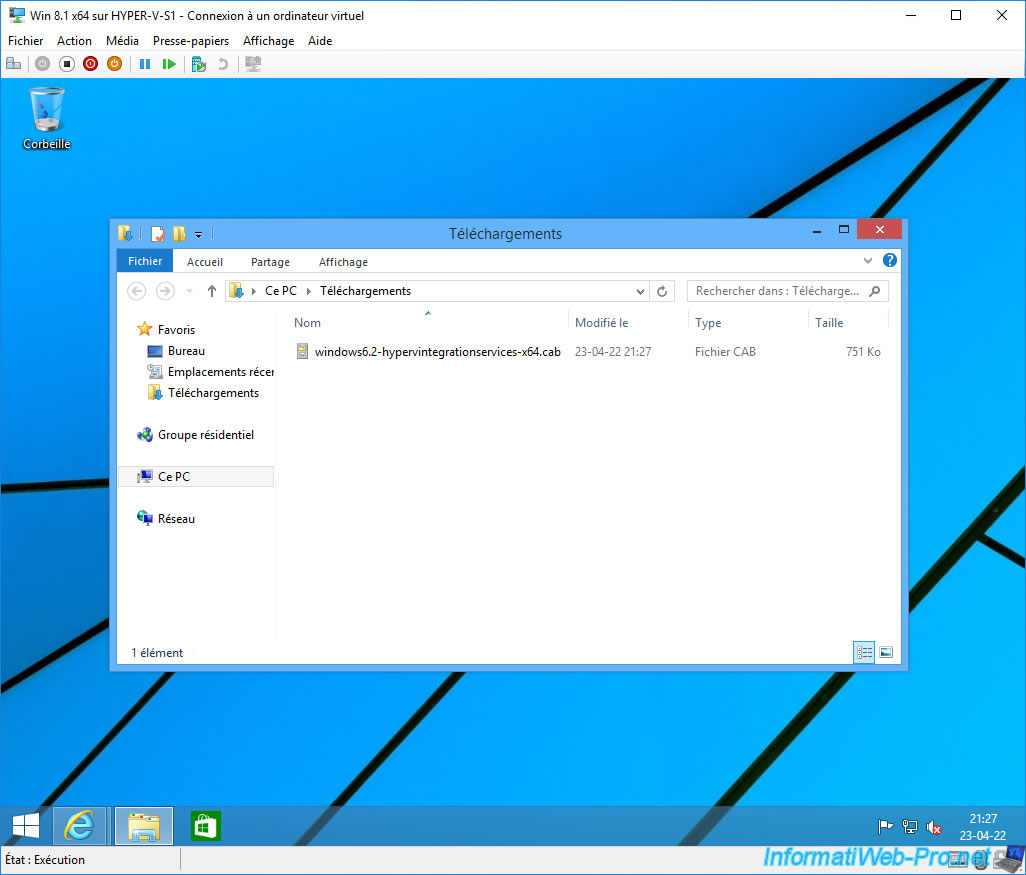
In the case of Windows 8.1 x64, the file to download will be : windows6.2-hypervintegrationservices-x64.cab.
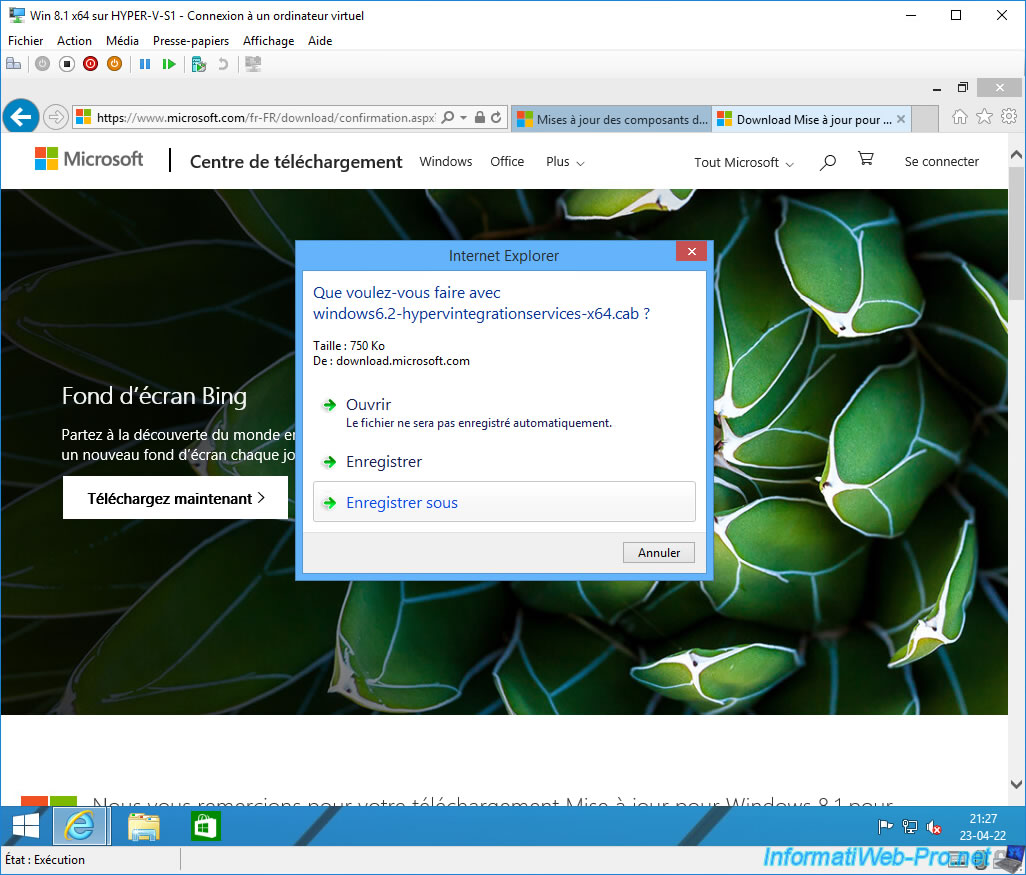
The CAB file has been downloaded.
3. Install KB3071740 update (Hyper-V Integration Services) on Windows 8.1
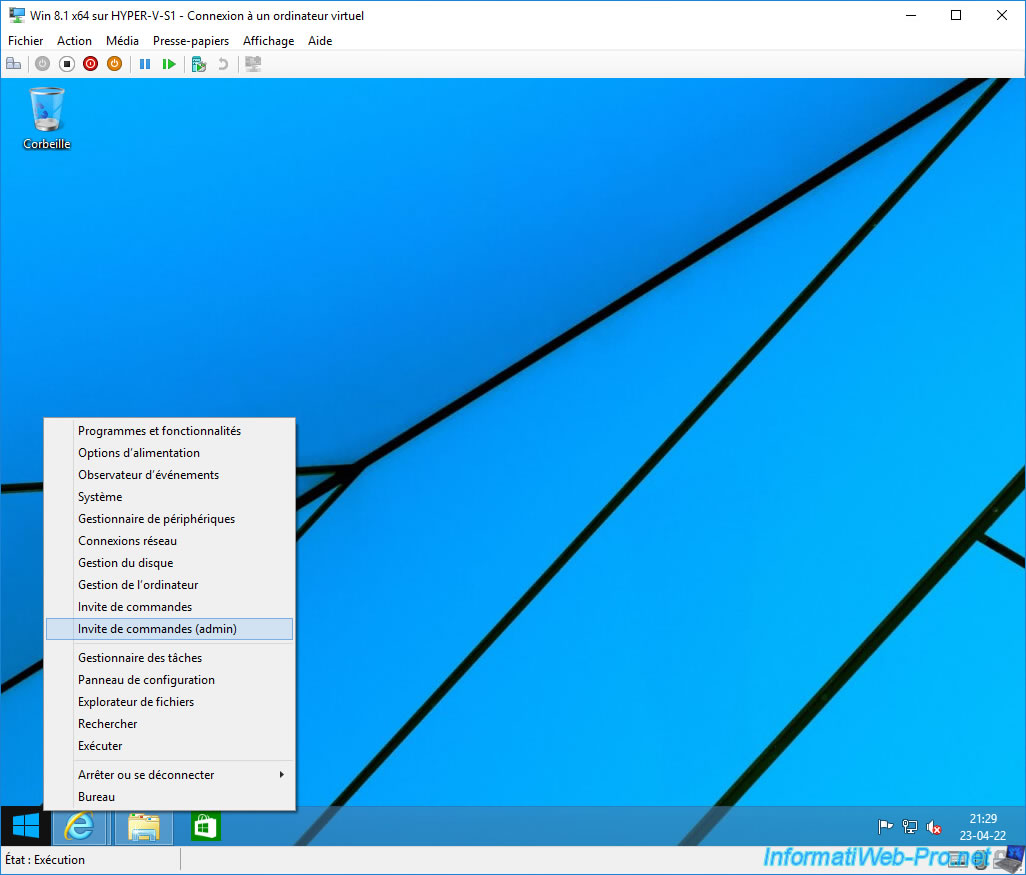
To install this update downloaded in «.cab» format (and not in «.msu» format), you just need to open a powershell command prompt as an administrator.
Or right click «Command Prompt (admin)» on Windows 8.1 «Start» button.
Type «powershell» (if you opened a «cmd» command prompt instead of powershell).
Batch
powershell
Then, use the command :
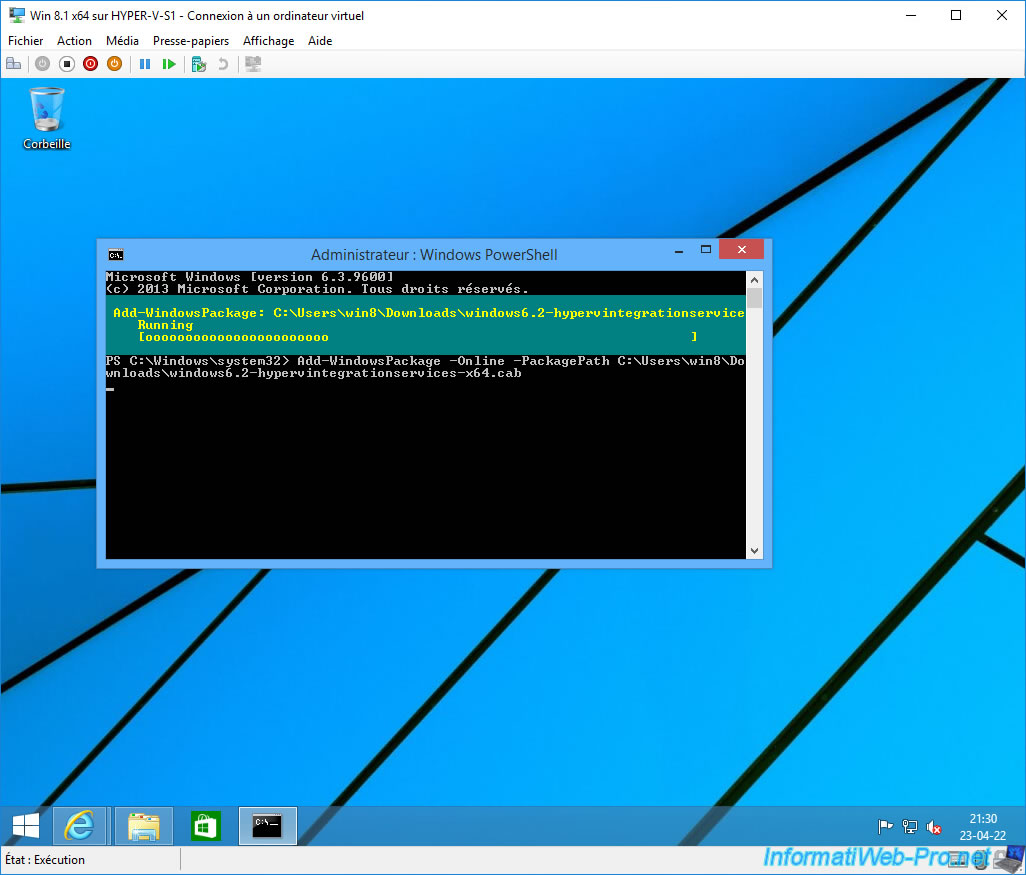
PowerShell
Add-WindowsPackage -Online -PackagePath C:\Users\win8\Downloads\windows6.2-hypervintegrationservices-x64.cab
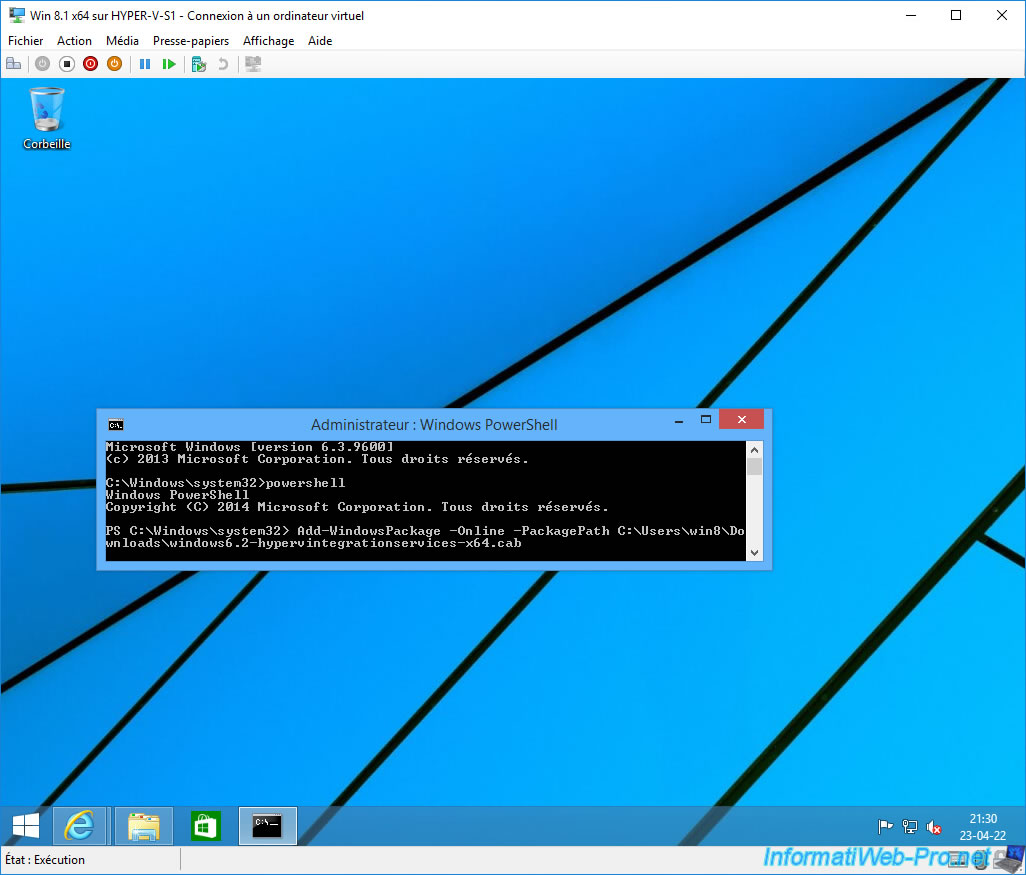
Wait while installing this Windows package.
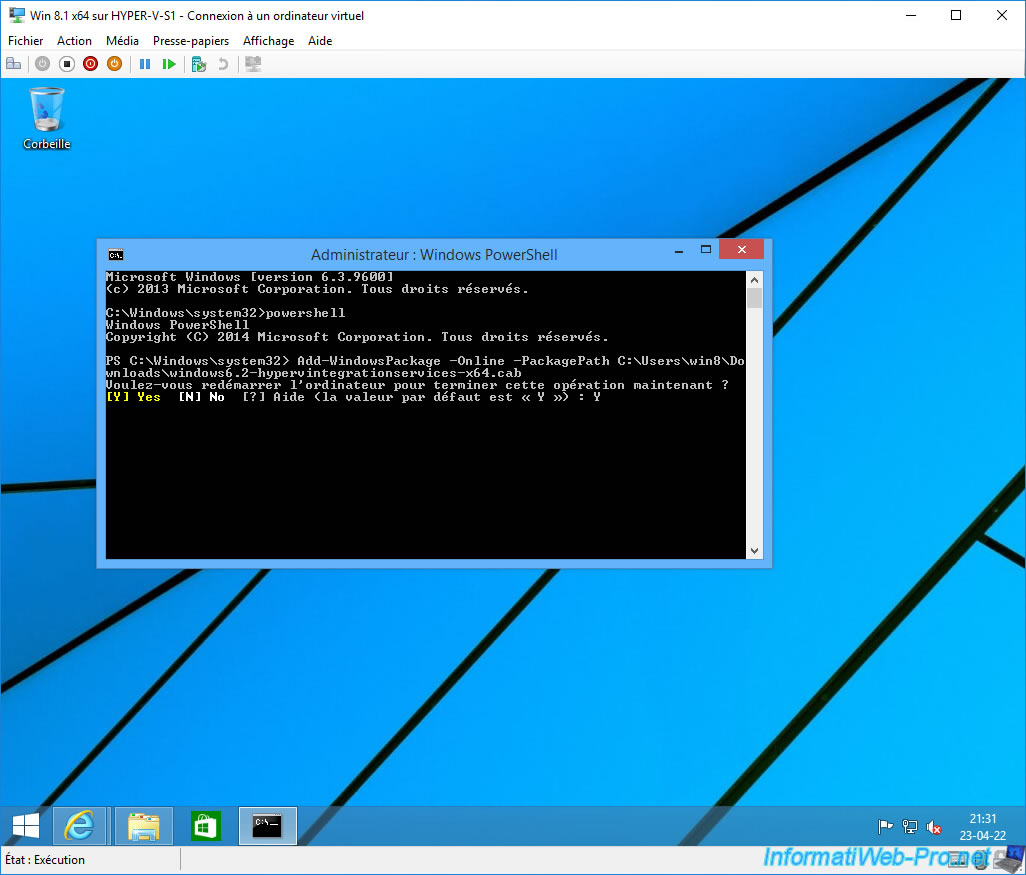
Once this update is installed, you will need to restart your virtual machine.
To do this, type «Y».
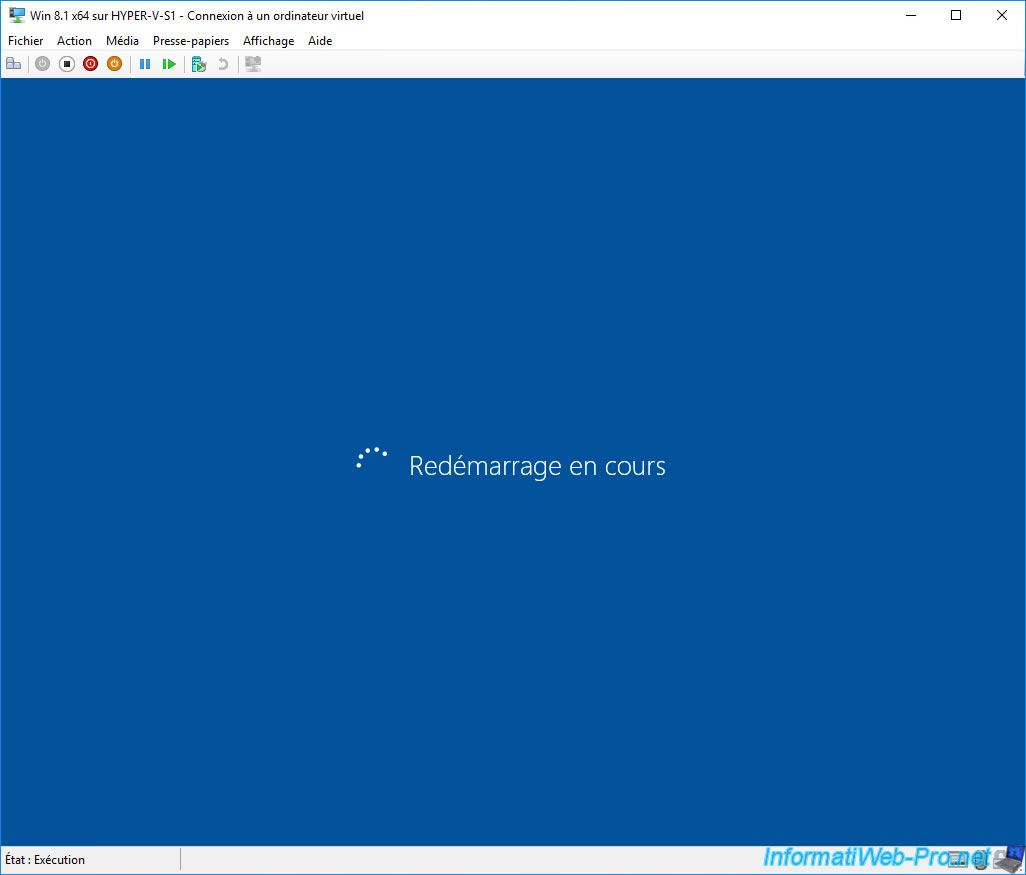
The virtual machine restarts.
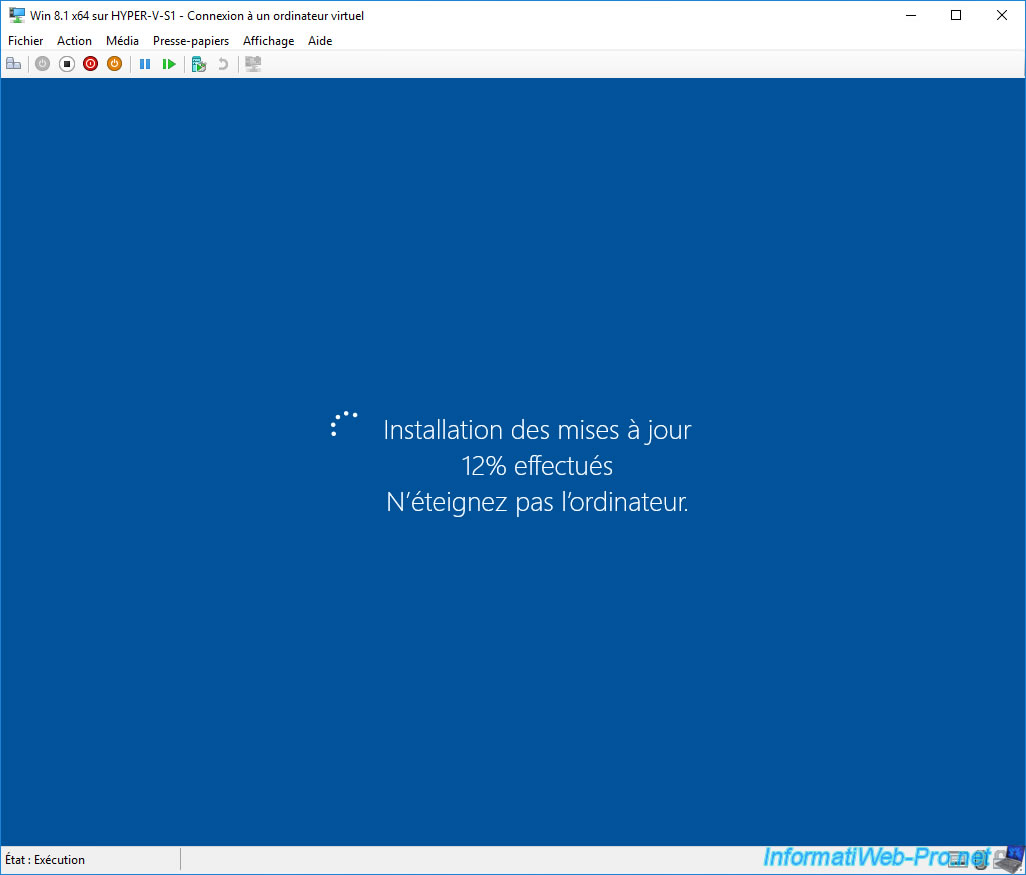
During the restart, you will see the «Installing updates» message appear.
Hyper-V Integration Services have been installed.
To verify that these Hyper-V integration services have been installed (or updated), return to the «HKEY_LOCAL_MACHINE\SOFTWARE\Microsoft\Virtual Machine\Auto» registry key.
As you can see, the value of the «IntegrationServicesVersion» data has changed.
In our case, the version changed from «6.3.9600.16384» to «6.3.9600.17903».
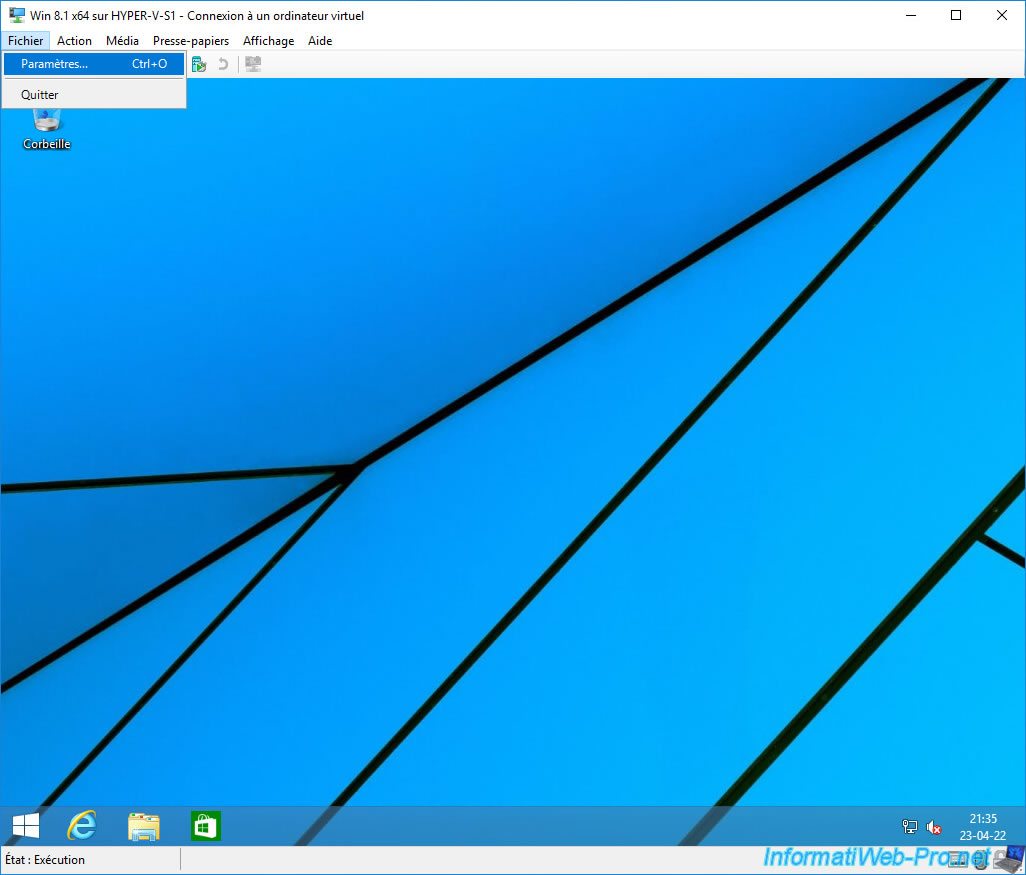
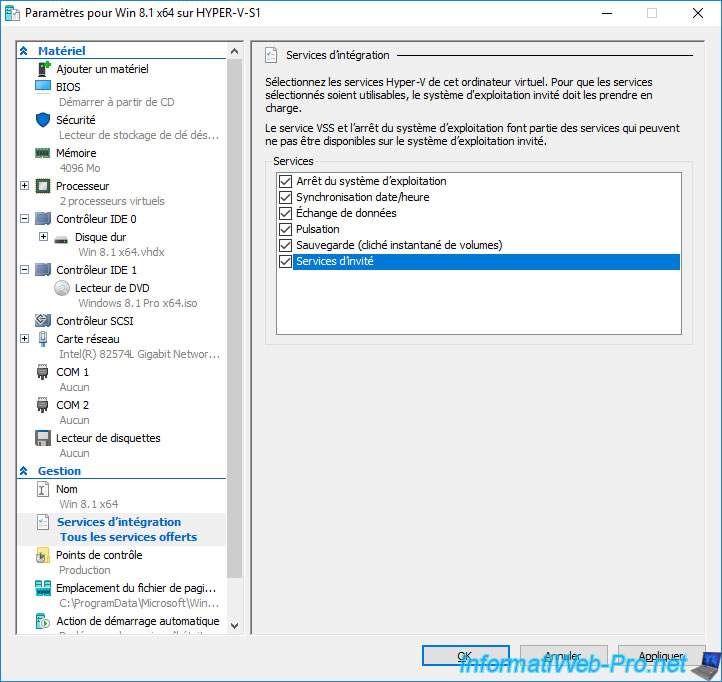
To benefit from all Hyper-V integration services, go to the «File -> Settings» menu of your virtual machine.
As you can see in the «Integration Services» section of your virtual machine settings, by default these are all enabled except one.
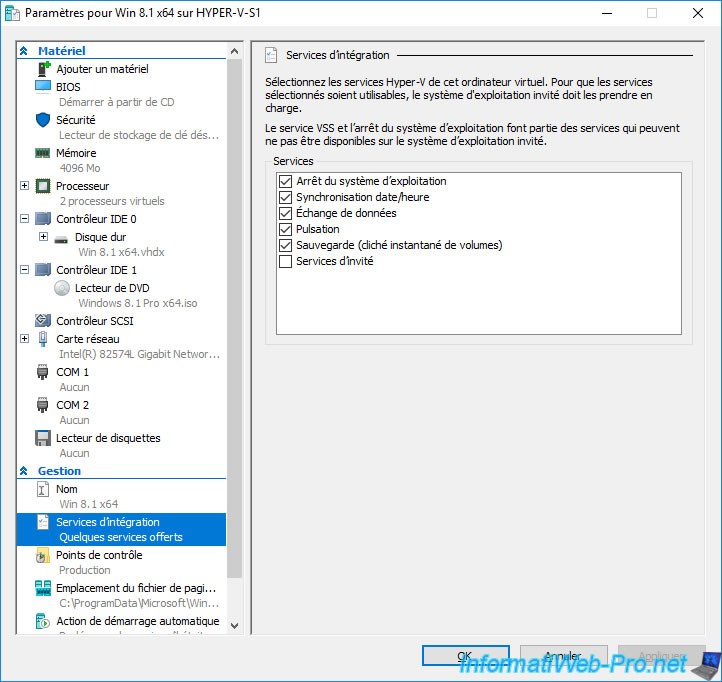
To benefit from all integration services, also check the «Guest services» box.
In this article, we will examine how to set up Windows 7 on a new virtual machine using Microsoft’s Hyper-V virtualization software on the Windows 10 64-bit operating system.
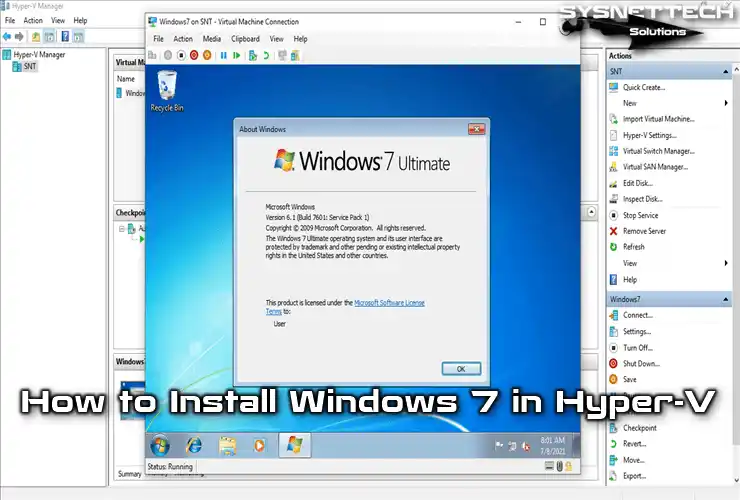
How to Install Windows 7 on a Virtual Machine using Hyper-V
Windows 7 was released on October 22, 2009, for both personal and business computers, following the development of Microsoft’s previous system, Windows Vista.
Microsoft’s Windows 7 system is the most popular operating system in the world, which maximizes the user experience and supports installation on almost any computer.
Compared to previous XP and Vista versions of Windows, Windows 7 provides a lot of conveniences for users to create network connections. It also supports better power saving of host computers and provides convenience for users to create interactive content, such as video and music.
Although this beautiful operating system of Microsoft was terminated on January 14, 2020, many people or institutions still use it today. Microsoft has officially notified users that the system may be vulnerable to security vulnerabilities as it ended support.
While it is better to install and experience Windows 7 on a physical computer, it may be safer to install and run it on virtual machines.
Therefore, you can protect your host computer from system vulnerabilities by running Windows 7 in a VM and activating Hyper-V, the free virtualization software built into Windows 10.
How to Create a New VM for Windows 7
After installing Hyper-V on your host computer, you must first create a virtual computer for the Windows 7 operating system and then configure its settings correctly for installation performance.
Step 1
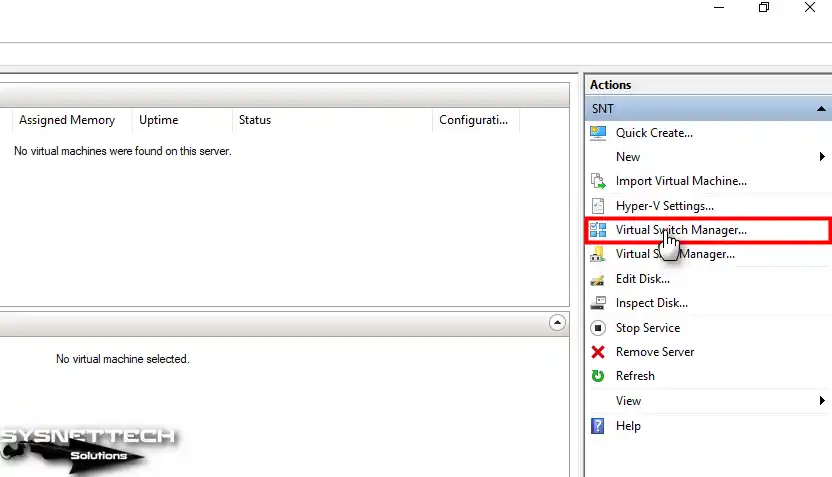
First of all, before creating a VM with Hyper-V, it is recommended that an external switch be made using the Virtual Switch Manager tool. Because VMs use the Default Switch, which uses a NAT connection by default, this adapter can often cause problems for VMs in accessing the local network and the Internet.
Click Virtual Switch Manager in the Actions section on the right side of the Hyper-V program.
Step 2
Select New Virtual Network Switch / External on Virtual Switch Manager, and then click the Create Virtual Switch button.
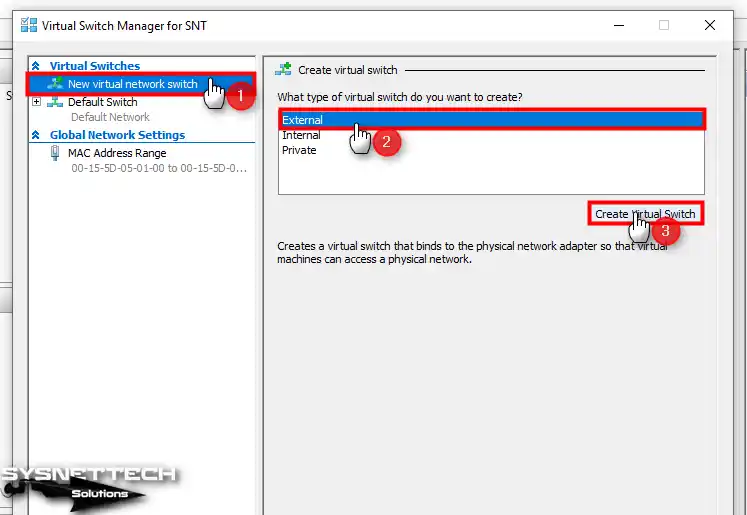
Step 3
After creating the External Switch, type a name for your external network in the Name field and configure the External Network setting as your host’s network adapter connecting to the Internet.
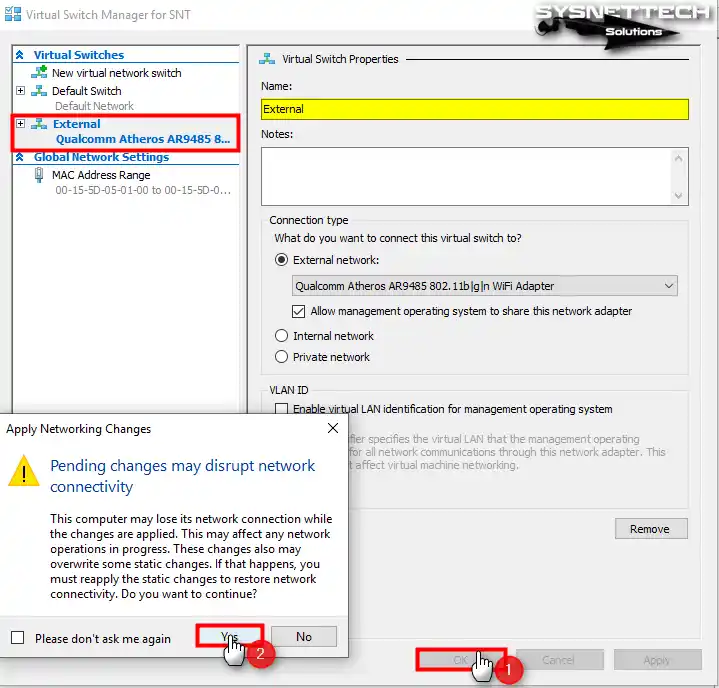
Step 4
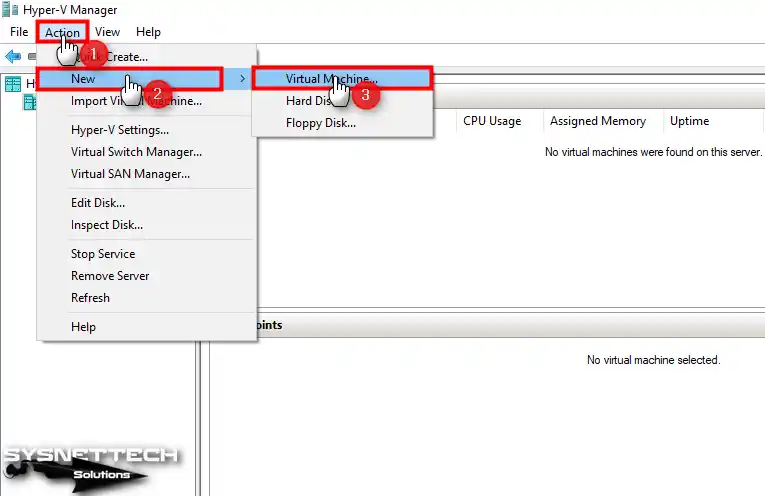
Click Action / New / Virtual Machine from the tool menu to start the virtual machine creation wizard.
Step 5
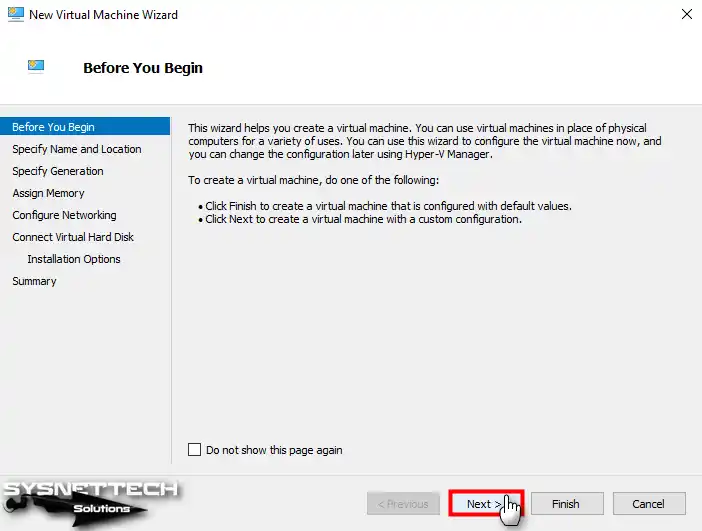
In the Before You Begin window, you are presented with two installation options. First, if you click Finish directly here, a virtual machine will be created automatically. Second, the Next option is provided to make the VM manually and better configure its settings.
Since it would be more convenient to manually configure some critical settings of the virtual computer, such as Generation type, click Next to continue.
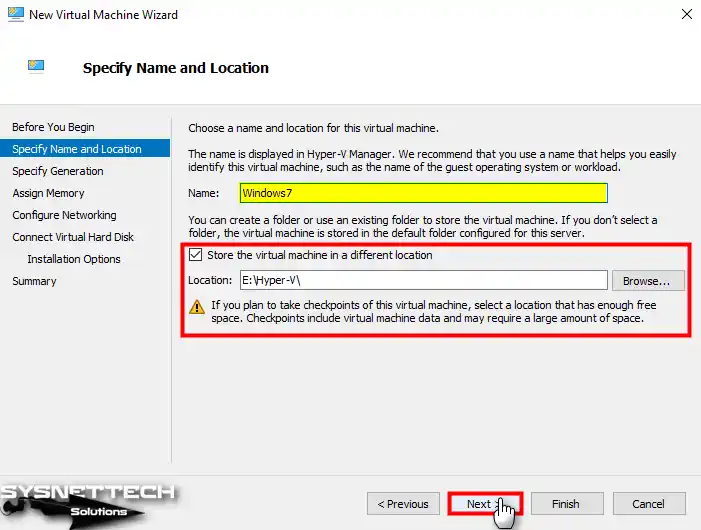
Step 6
Write down the name of the virtual operating system that you will install on your host. You may also want to back up the VM to an external disk so as not to overfill the capacity of your host disk. Therefore, in Location, you can specify the location where the VM will be stored.
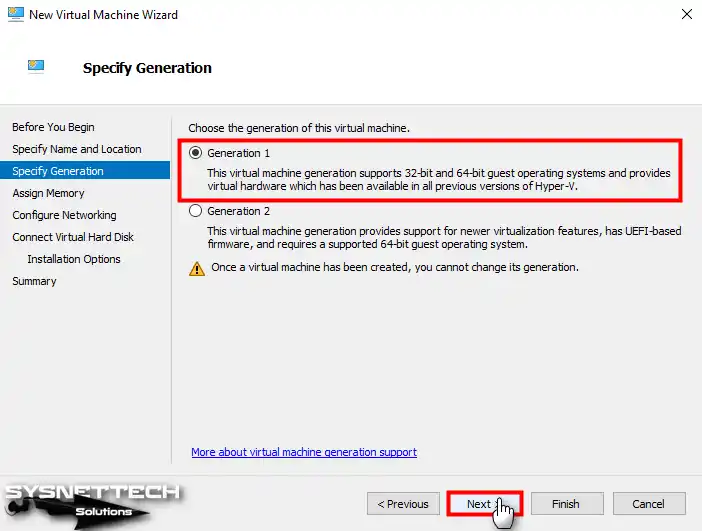
Step 7
When you set the Generation type of the guest operating system to 1, you will have enabled BIOS firmware that supports older systems. If you are going to install a newer operating system, such as Windows 10, you can allow UEFI firmware by selecting Generation 2.
Step 8
You may need to configure the virtual memory size for the VM according to the hardware capabilities of your host computer. Also, if you are going to run multiple VMs simultaneously on your host, you can enable Dynamic Memory to create better RAM allocation between VMs. Thus, more memory will be allocated by the hypervisor to the virtual PC that needs more memory.
If you are going to run a single virtual PC on your host, you do not need to enable this feature, and configuring a fixed RAM size will be better for performance. Therefore, type a suitable memory size according to your host RAM capacity and click Next.

Step 9
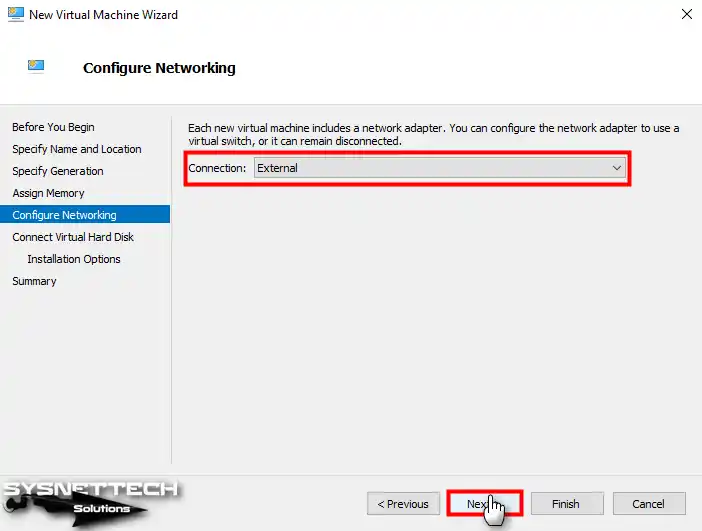
Select the External Switch you created for the network adapter of the Windows 7 virtual machine and continue.
Step 10
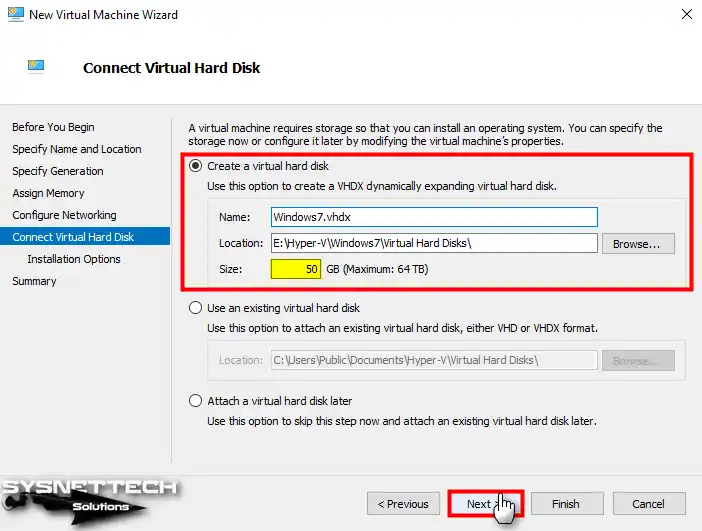
In the Virtual HDD configuration window, you can see that the disk size of 127 GB is configured by default. Configure the size of the virtual disk to 50 GB or higher, depending on what you do on the VM.
Step 11
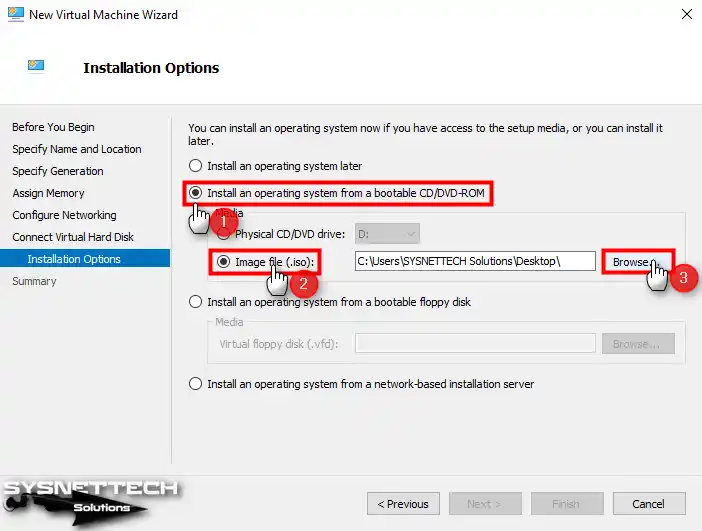
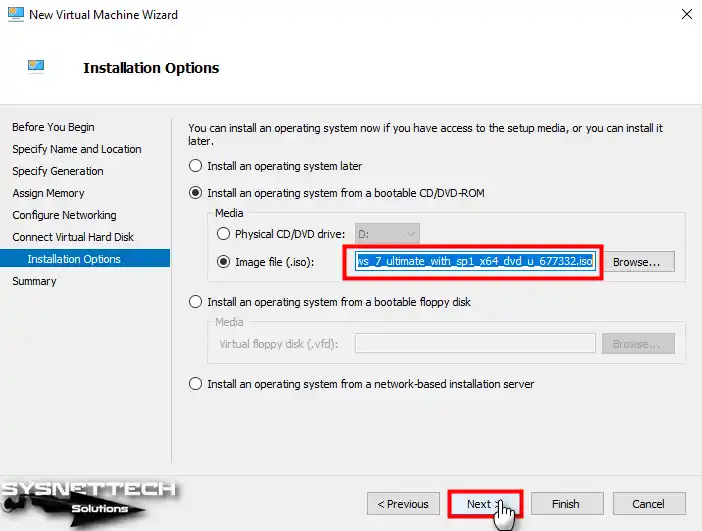
To install the ISO file on the VM in the installation options window, first, enable the Install an operating system from a bootable CD/DVD-ROM option, then the Image File option, and finally, click the Browse button to specify the location of the file to add a Windows 7 ISO file to the VM.
Step 12
Select and add an image file you downloaded before or the ISO file you downloaded to your computer from the.
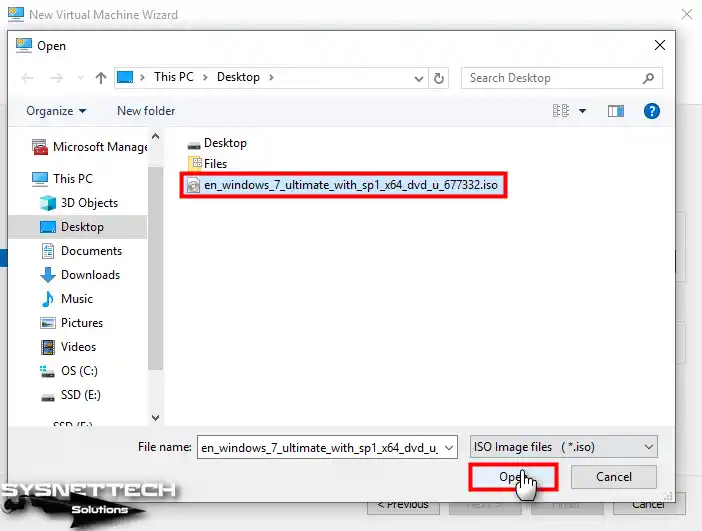
Step 13
After adding the Microsoft Windows 7 Ultimate SP1 x64 ISO file to the VM, click Next.
Step 14
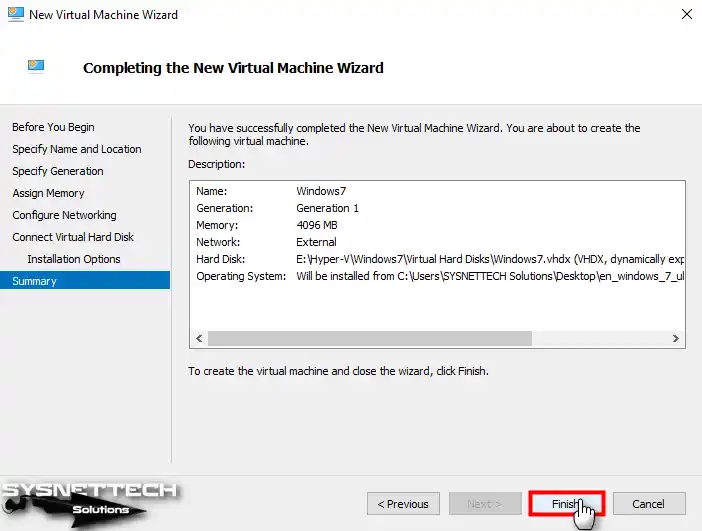
You can see the changes you have made on the virtual computer in the Summary window, which is the final stage. If there is a setting you want to change in the VM, you can go back to the previous settings or close the window.
Step 15
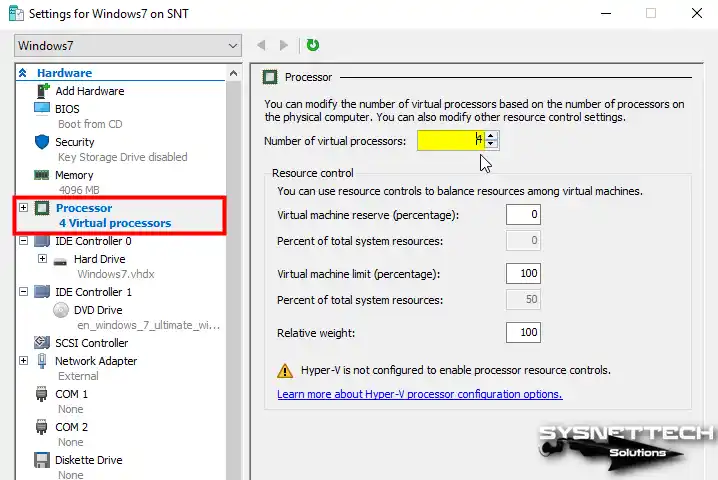
After preparing the VM, open its settings and configure the number of virtual processors according to the power of your host CPU.
Step 16
Connect to the Windows 7 virtual computer with the right button / Connect and then click the Start button to launch the system setup.
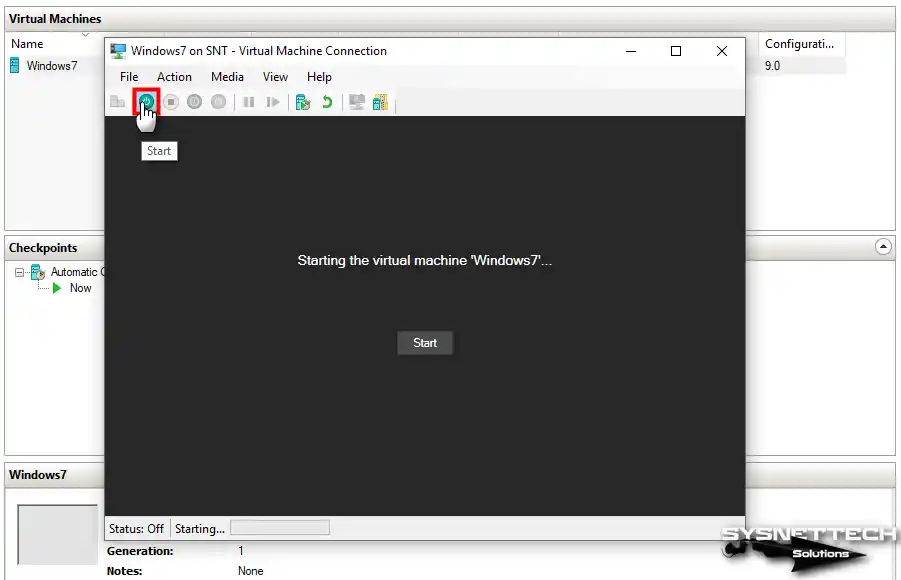
How to Install Windows 7
Installing Windows 7 with Hyper-V is similar to installing on a physical computer in the real world. Therefore, you can also perform the operations after this step on a physical computer.
Step 1
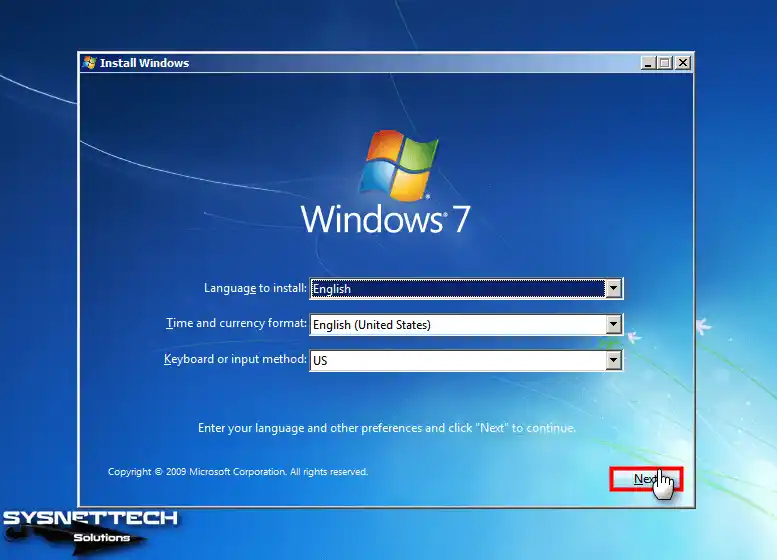
After running the virtual PC, you will see it boot with the ISO image. When the Windows 7 setup screen opens, select your system display language, keyboard layout, and time zone, and click Next.
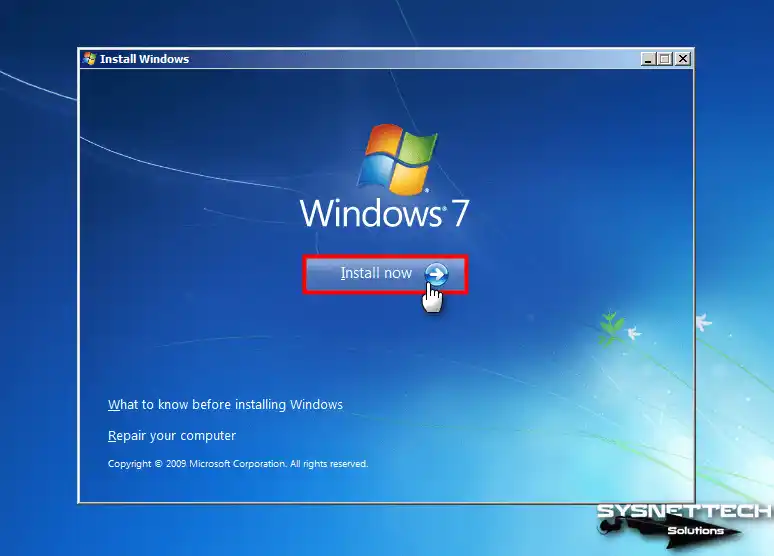
Step 2
On this screen, you can get more information about the installation, repair your system, or start the Windows installation by clicking Install Now.
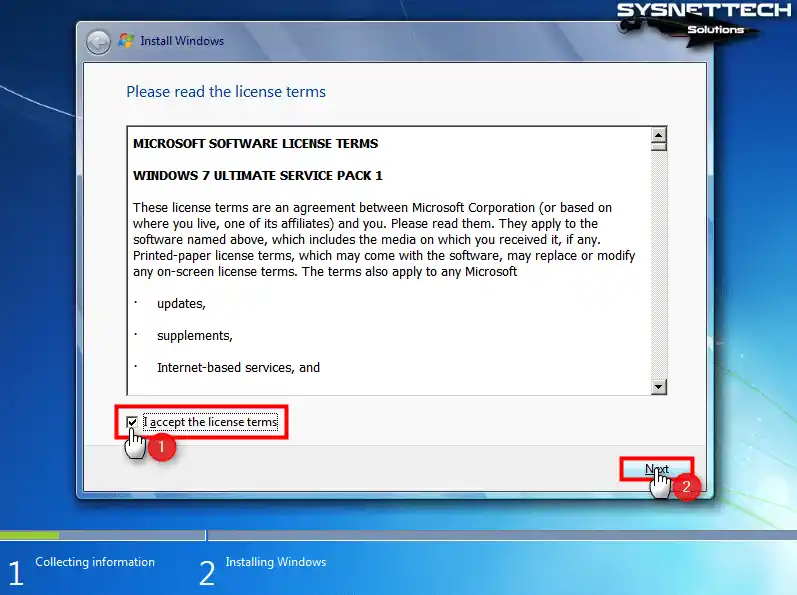
Step 3
Confirm the license agreement of the Microsoft Windows 7 Ultimate Service Pack 1 operating system and click Next.
Step 4
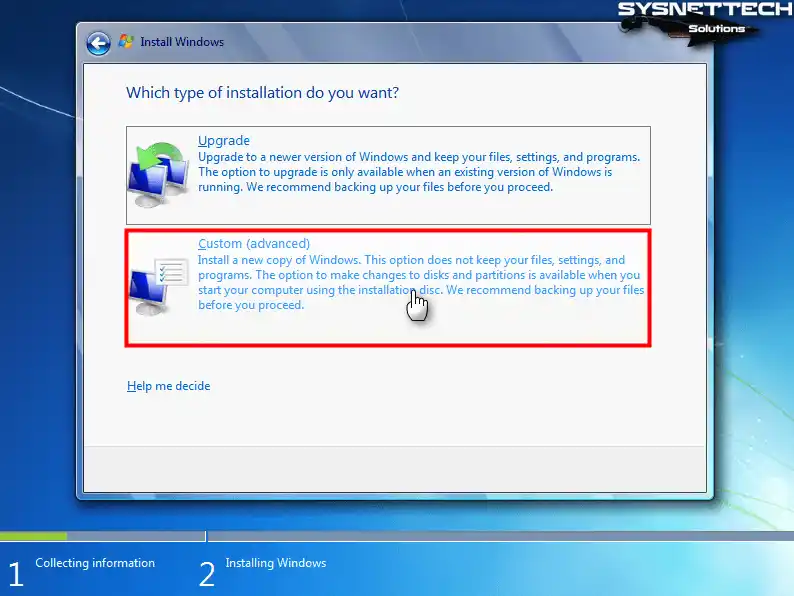
An older version of Windows must be installed on the VM before you can upgrade to a newer version. To install Windows 7 from scratch, click Custom (Advanced), and continue.
Step 5
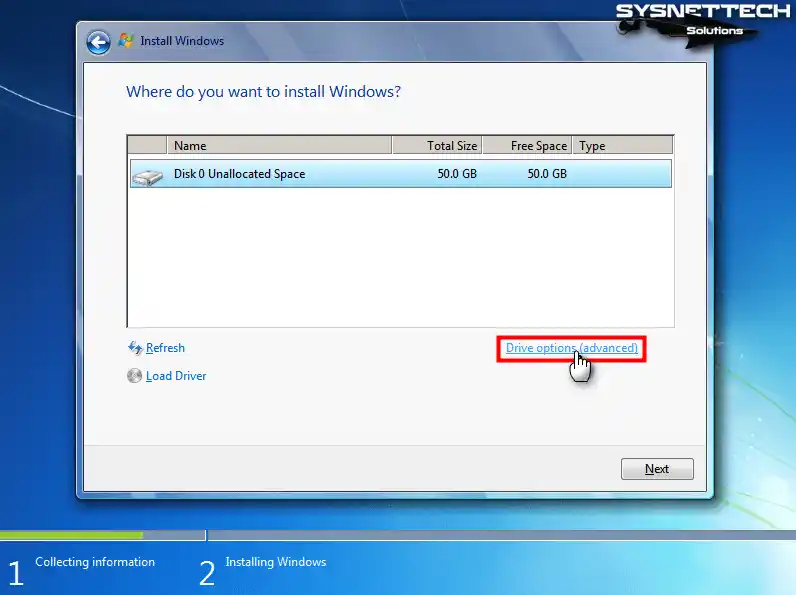
Click Drive Options to create a new partition on the virtual disk.
Step 6
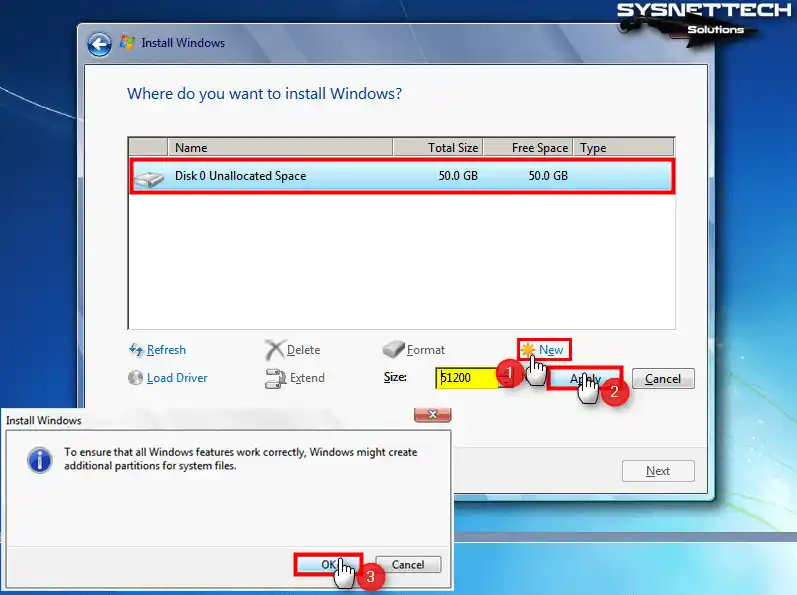
Select Disk 0 Unallocated Space and click New, then click Apply to confirm the automatically allocated disk space.
Step 7
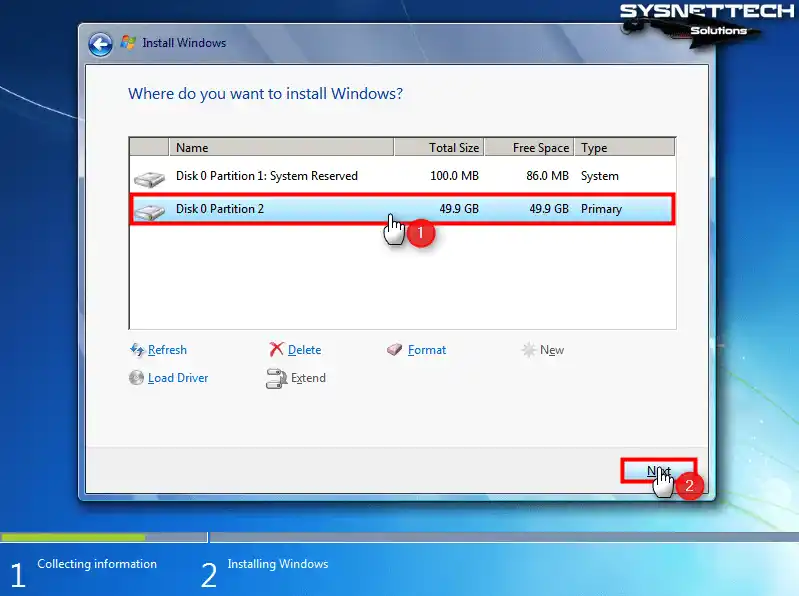
Select Disk 0 Partition 2, where you will install Windows, and click Next.
Step 8
Wait while the setup wizard expands the Windows system files.
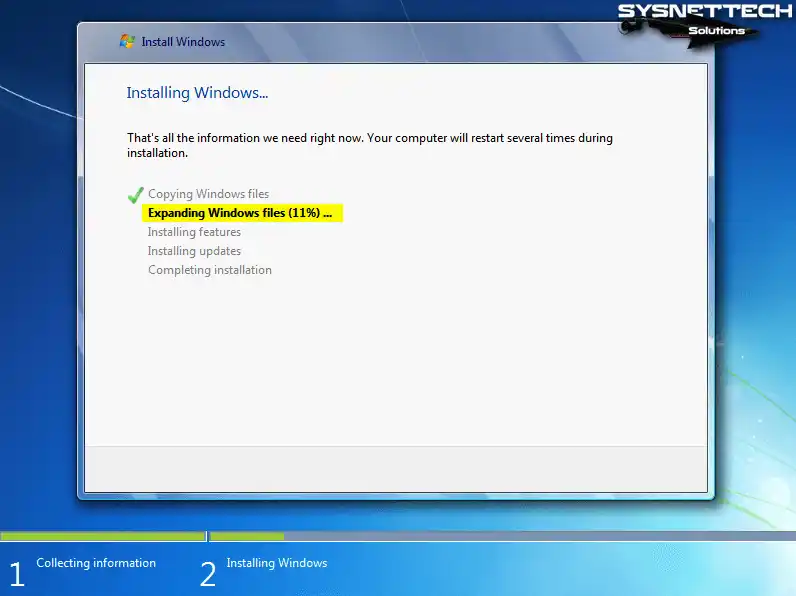
Step 9
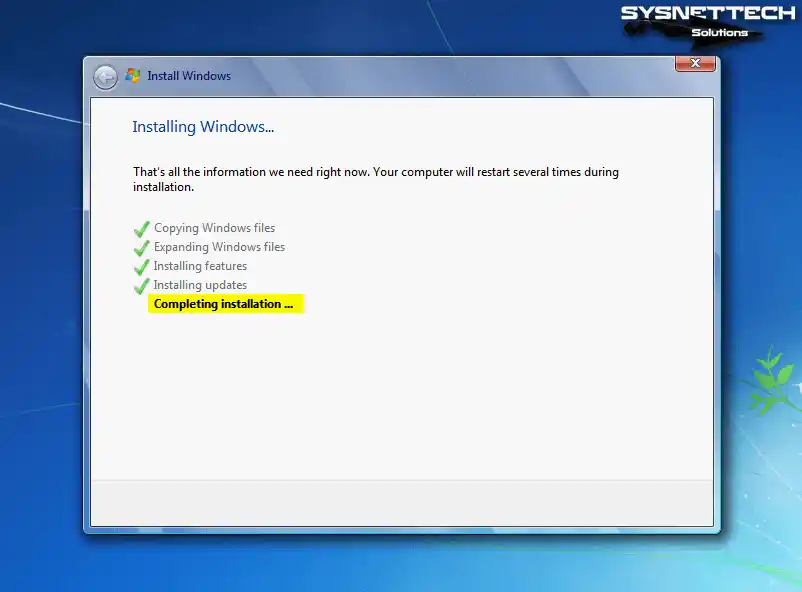
After the Windows 7 system files are copied, restart your guest system.

Step 10
After your guest operating system restarts, the installation will continue for a while.
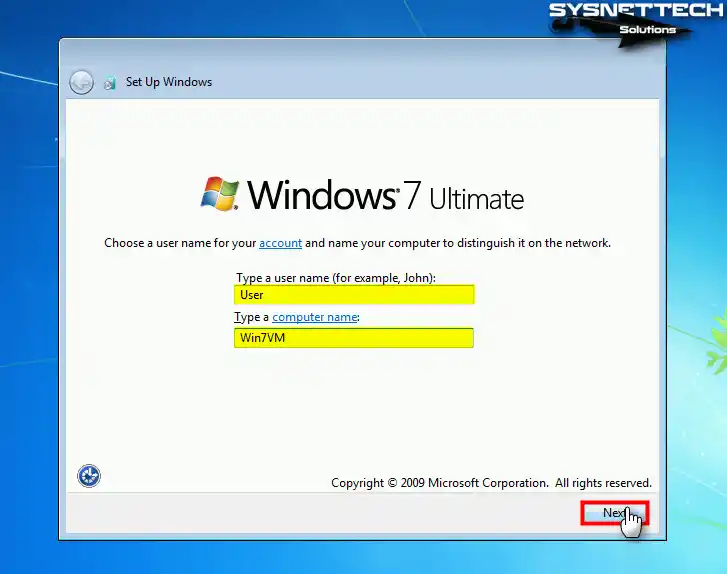
Step 11
When your virtual PC restarts again, this time, type your user and computer name to be different from other PCs in your network.
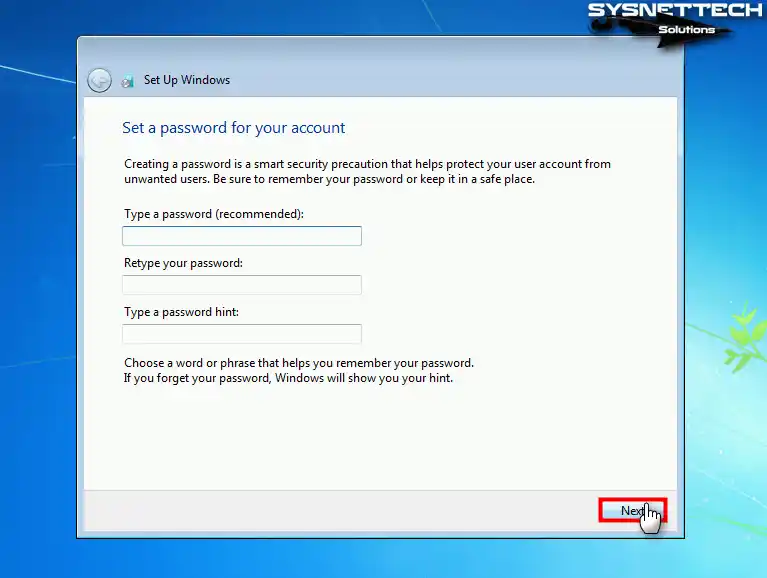
Step 12
If you want to protect your virtual machine from unwanted users, create a memorable password for your user account.
Step 13
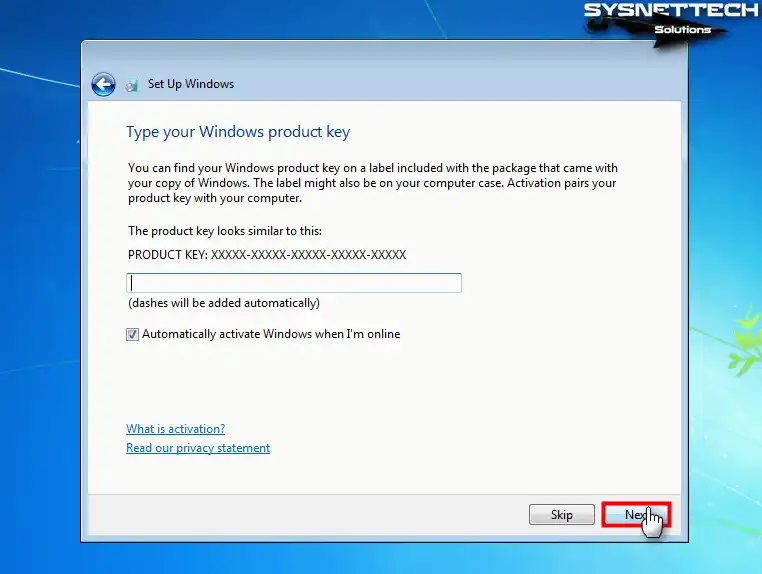
Type your Windows 7 product key, and if you want Windows to be activated automatically when you are online, select the relevant option and click Next.
Step 14
If you want to enable the update service so that Windows can protect your computer, select Use Recommended Settings.

Step 15
Configure the time zone of your guest operating system according to the country you live in and click Next.

Step 16
Configure the current location where you will use your virtual computer at home, work, or public.

Step 17
After installing Windows 7 on your virtual machine, you can find out the system version by executing the winver command in the Run window.

How to Test Internet Connection
You can access your local network and the Internet using both the External Switch and the Default Switch adapter in the VM. Because the Default Switch uses NAT, it will not have an IP address from the range of IP addresses used in your local network.
When you use an External Switch, your virtual machine will receive an IP address from the DHCP server that automatically distributes IP addresses on your physical network.
Step 1
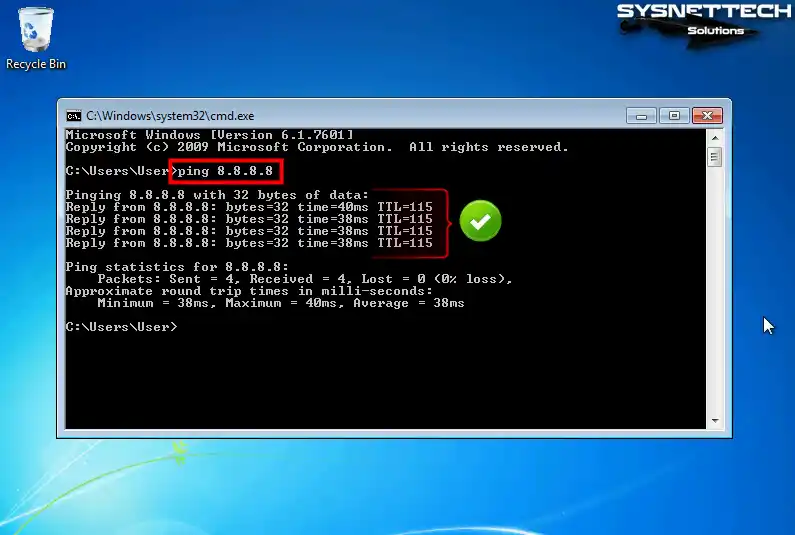
To check if your virtual system can access the Internet, ping the Google servers by executing the ping 8.8.8.8 command at the CMD prompt.
Step 2
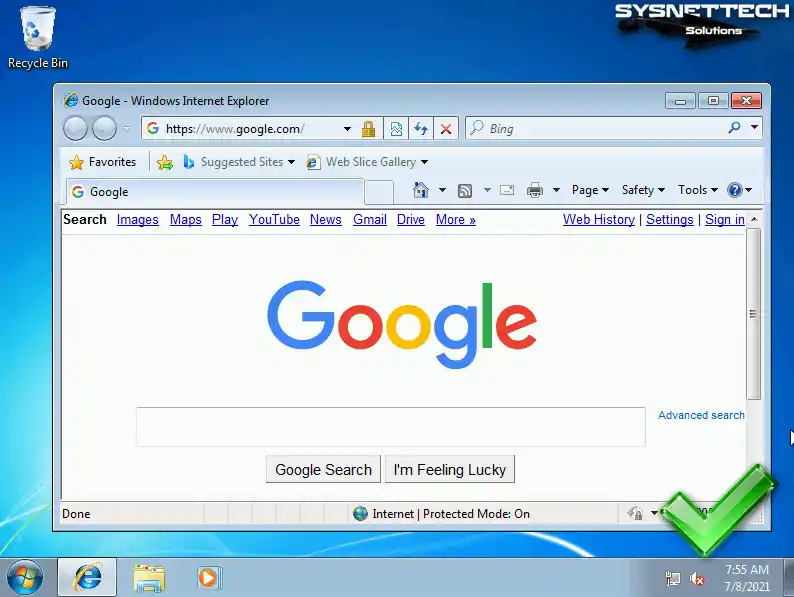
If you can ping Google servers, check that you can access the homepage via Internet Explorer.
How to Use VM in Full-Screen Resolution using Remote Desktop Connection
When you install older distributions of Windows with Hyper-V, you may not be able to use the full-screen resolution, and you may not be able to hear system sounds. This is because Enhanced Session is not supported on older systems.
Even if you enable Guest Services in the VM’s settings, the advanced session feature is not active. To solve this problem, you can use the VM in full-screen resolution and hear system sounds by using Remote Desktop Connection on the host.
Step 1
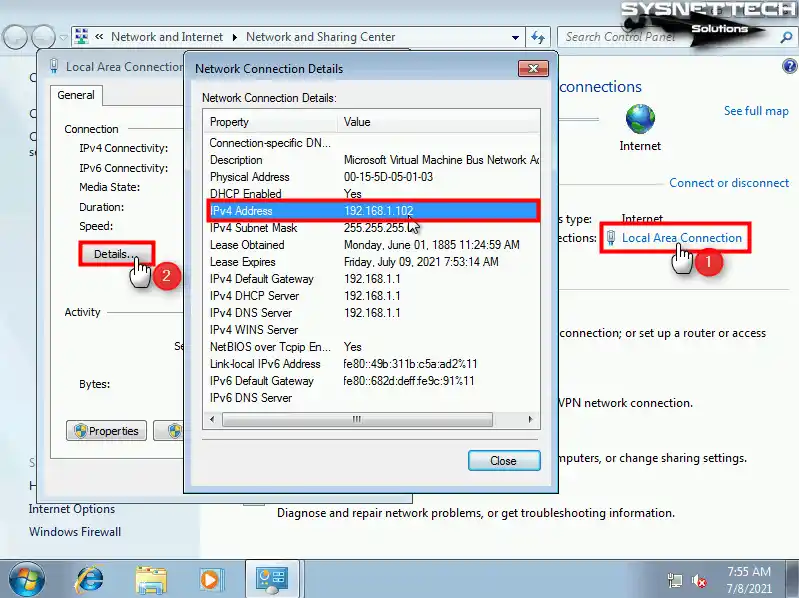
In order to use the remote desktop tool, you need to check the IP address that the virtual machine gets from the DHCP server.
Right-click on the network connection in the right corner of the taskbar, open Network and Sharing Center, and click on Local Area Connection, then click Details in the window that opens, and check the IP address in the IPv4 Address section of the Network Connections Details.
Step 2
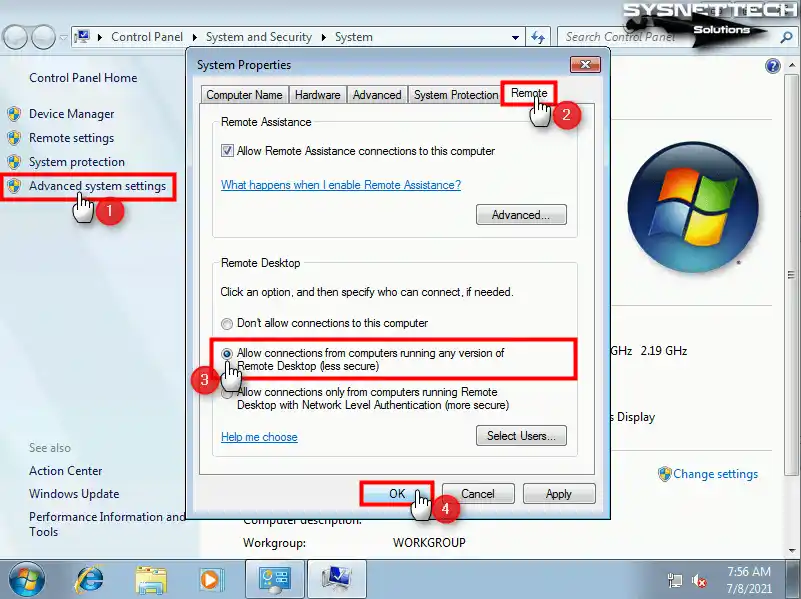
Once you know the IP address, you need to configure the permissions on the VM for the remote desktop connection. Right-click on my computer, click Properties, and click Advanced System Settings in the system properties window, and then select “Allow connections from computers running any version of Remote Desktop (less secure)” on the Remote tab and click OK.
Step 3
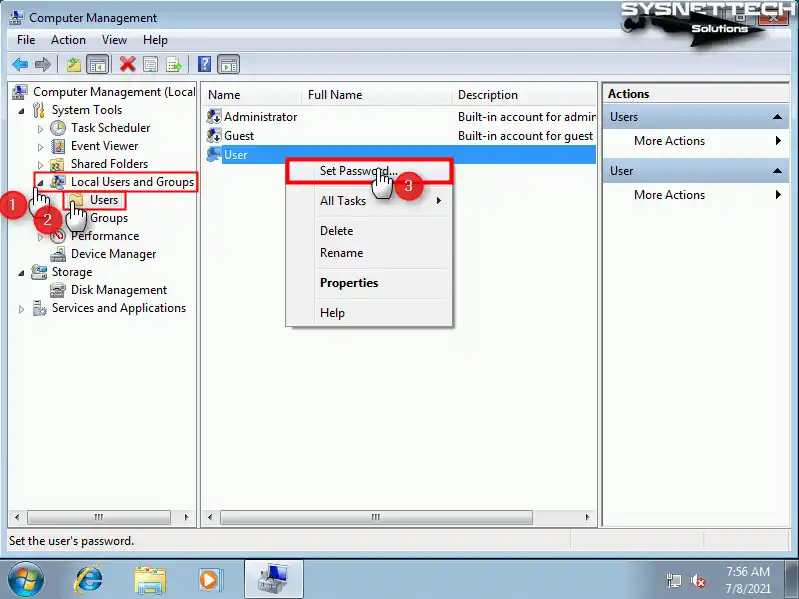
Finally, to create a password for the user account so that you can establish a remote desktop connection to the virtual machine, right-click on My Computer and click Manage from the pop-up options.
Click Local Users and Groups / Users in the Computer Management window, right-click on User from the user accounts listed on the right, and click Set Password.
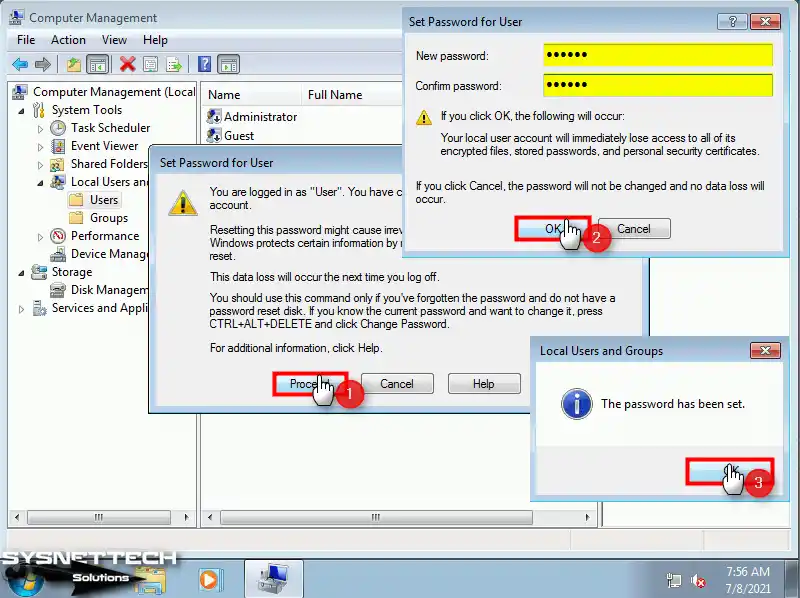
Step 4
After clicking the Proceed button in the window that opens, create a new password for your user account in the Set Password for User window and click OK.
Step 5
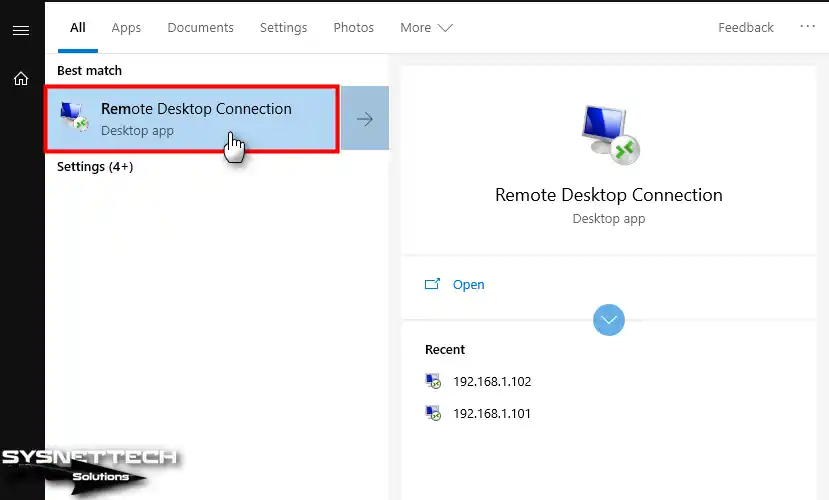
Start the Remote Desktop Connection tool on your host operating system.
Step 6
Type the IP address of the guest operating system and click Connect.

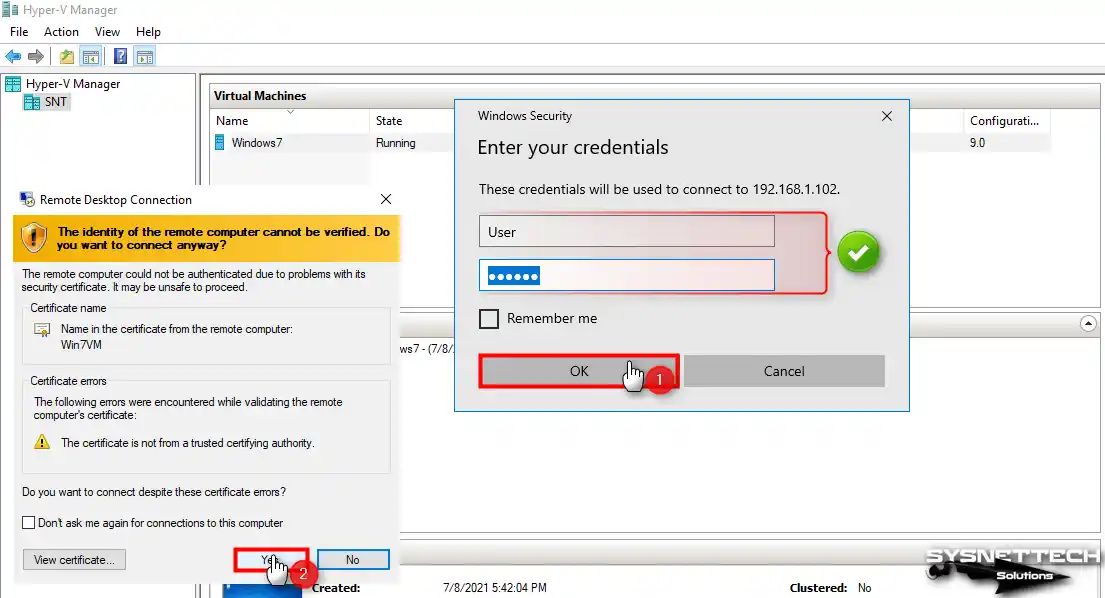
Step 7
Type the guest system’s credentials and click OK, then click Yes in the warning window reporting the certificate error.
Step 8
After establishing a remote desktop connection to the virtual computer, you can see that the audio device is operational and the screen resolution is used in full-screen mode.

How to Use USB Flash Memory in a Virtual Machine
The simplest way to transfer files between a virtual machine running in Hyper-V and the host is to use a USB flash drive. Because in some host systems, establishing a network connection and sharing folders can be difficult.
Step 1
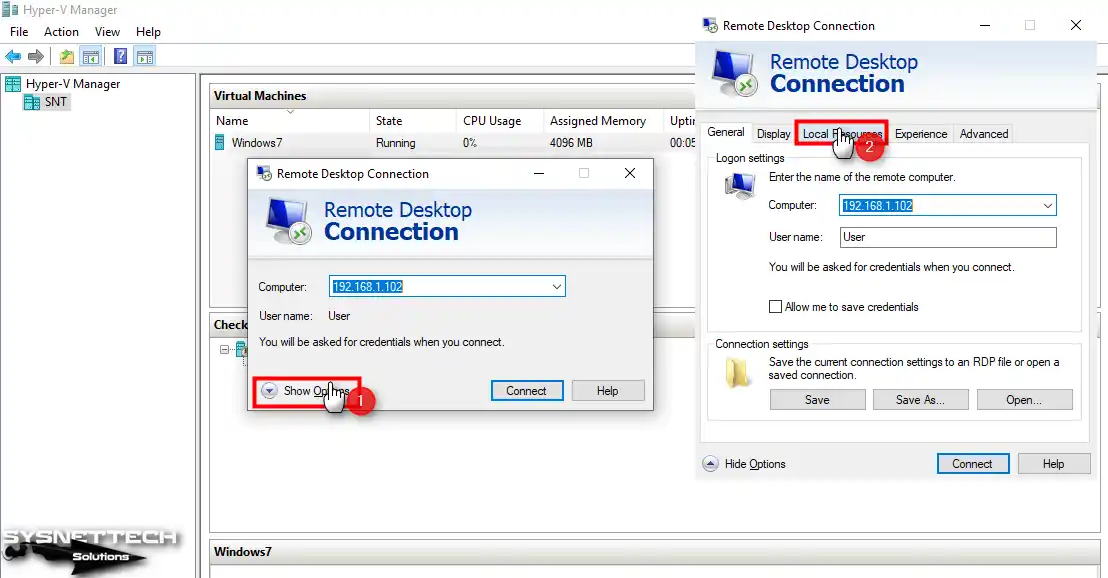
Open Remote Desktop Connection again on your host, and this time click Show Options and then click the Local Resources tab in advanced settings.
Step 2
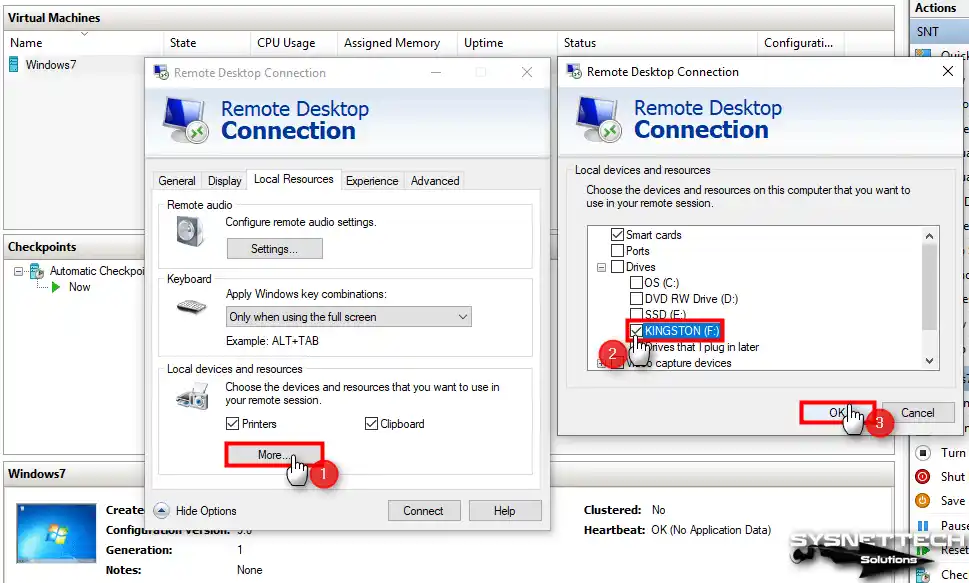
After clicking More in local resources, tick your flash memory from the devices under Local Devices and Resources / Drives and click OK.
Step 3
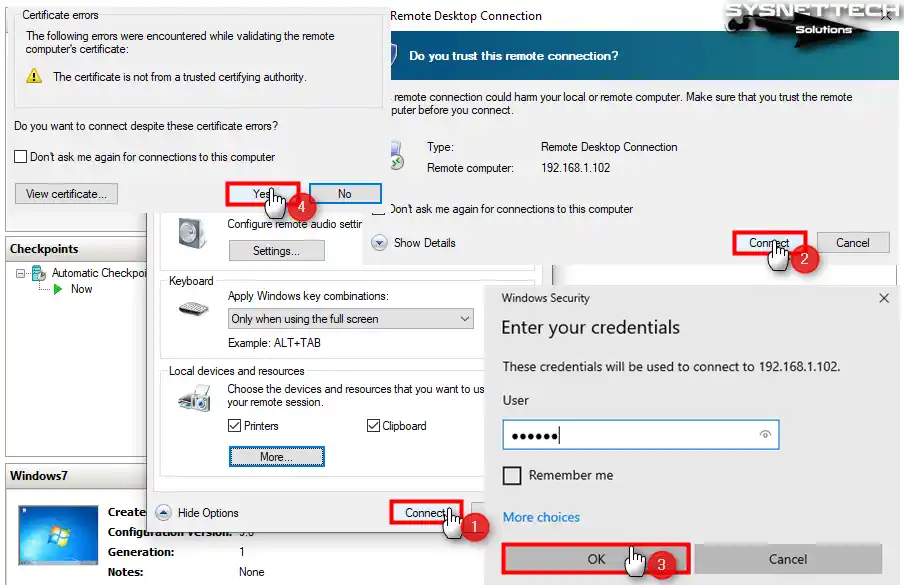
Click Connect after selecting the USB stick, and click Connect again in the trust remote connection window. Re-enter the Guest OS’s credentials and connect to the VM after confirming the certificate error.
Step 4
After opening My Computer on the guest system, check that the flash memory is visible in Other.
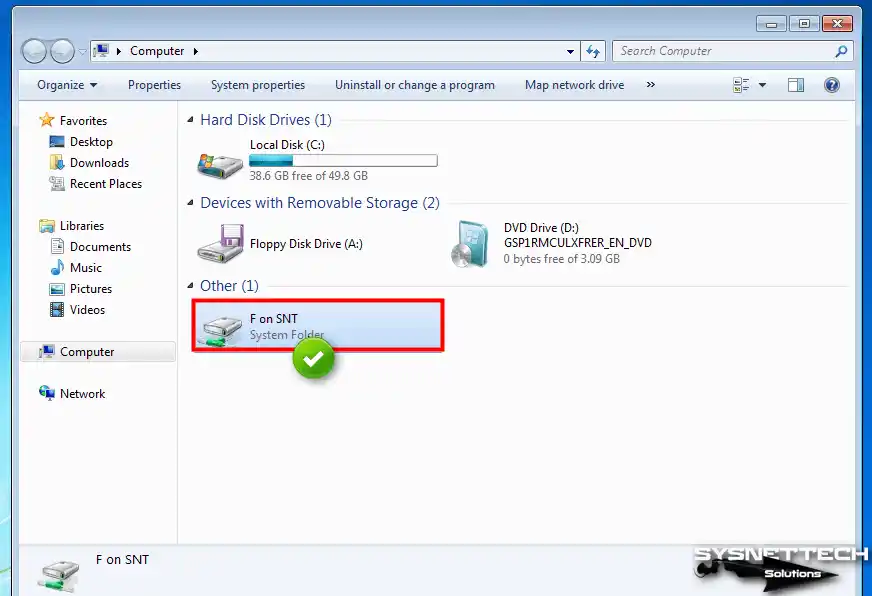
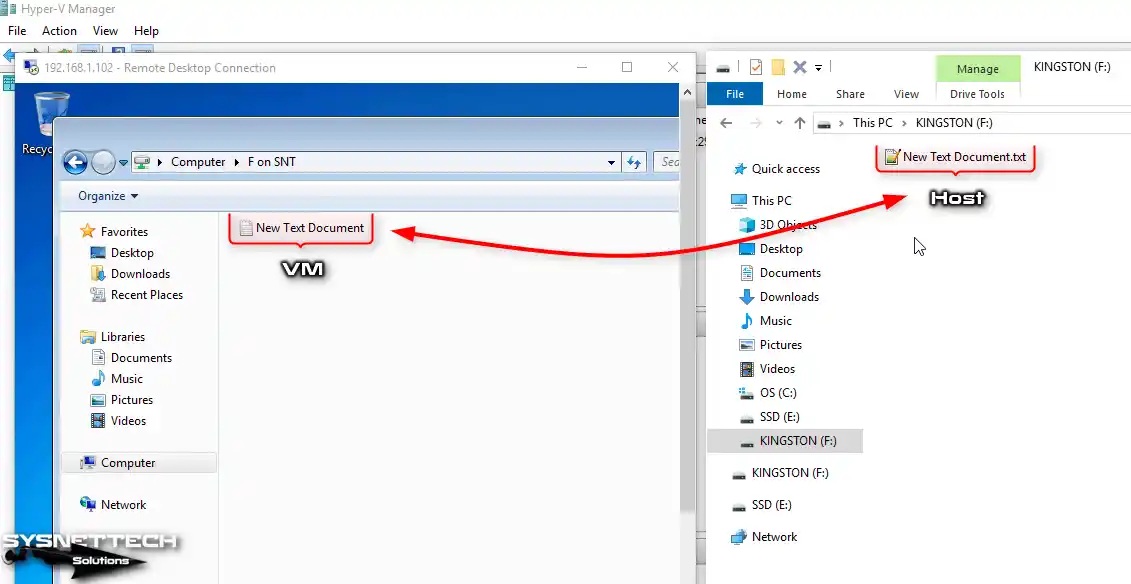
Step 5
As soon as you create a file or folder in the USB memory inserted in your host, you can see that the files are created on the remote desktop connection.
Video