
,
This guide contains instructions on how you can share files, folders, drives, printers or other devices in Hyper-V virtualization platform.
«Hyper-V» it’s a virtualization technology developed by Microsoft that allows users to create and run virtual machines (VMs) on Windows 10/11 Pro versions and Server Editions, and in a previous tutorial we show how your can setup a Hyper-V virtual machine in Windows 11/10.
However, when using virtual machines in Hyper-V, you may need to transfer files between the host and the virtual machine, or you may want to use a USB device or disk attached to the Hyper-V host in the Hyper guest machine -V. For example, you may need to copy files between the Hyper-V host and the guest virtual machine, or you may need to print to your printer from the virtual machine.
How to Share Folders, Printers or other Devices in Hyper-V?
To share files and printers from the Hyper-V host machine to the virtual machine, you can use one of the following two (2) methods:
- Enhanced Session Mode
- Windows File & Printer Sharing
Method 1. Share Files and Devices using Enhanced Session Mode.
The first and most easiest method to share the resources of Hyper-V host machine to the guest virtual machine, is by using Enhanced Session Mode.
Enhanced session mode lets Hyper-V to connect to virtual machines using the Remote Desktop Protocol (RDP), allowing you to transfer files between the host and the virtual machine and to share the connected devices (such as USB printers, drives, microphone or speakers) of the host machine to the virtual machine.
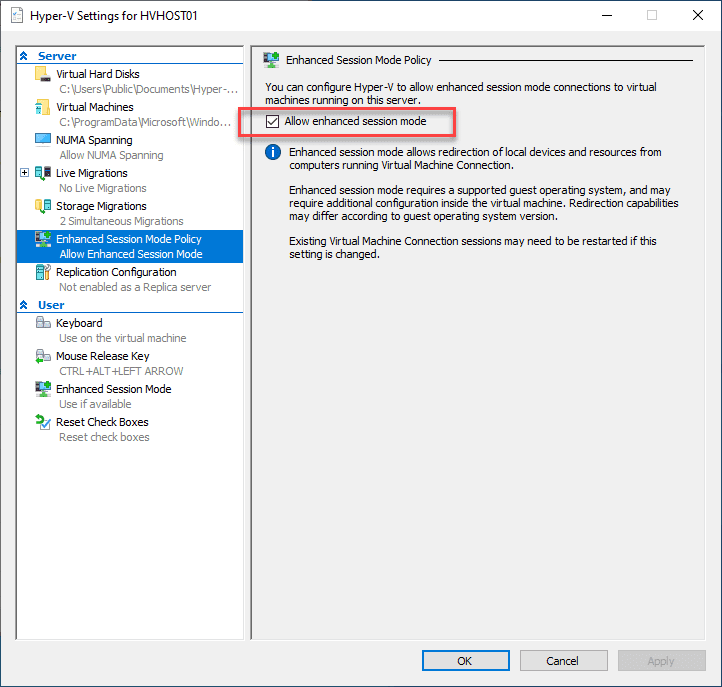
Step 1. Turn On ‘Enhanced Session Mode’ in Hyper-V Settings.*
* Note: In Windows 10/11 the Hyper-V Enhanced Session Mode is already enabled by default, but ensure that is enabled.
1. Power Off the virtual machine.
2. Open the Hyper-V settings.

3. Under Server: select Enhanced Session Mode Policy and then enable the Allow enhanced session mode* option on the right. Click Apply. *
* Note: If this option is already checked, continue below.

4. Under User: Select Enhanced Session Mode and then enable the Use enhanced session mode option.* When done, click Apply > OK.
* Note: If this option is already checked, continue to next step.

Step 2. Share Local Resources on Hyper-V Virtual Machine’s Session Settings.
After enabling the «Enhanced session mode», proceed and choose which resources of the host machine will be available on the virtual machine. To do that:
1. Right-click on the VM machine and click Start.

2. Wait a few seconds for the VM to start. Then right-click again on the VM machine and select Edit Session Settings.*
* Note: If the «Edit Session Settings» option isn’t available in «right-click» menu, that means that the VM it is not fully launched yet. At such a case, wait a few more seconds and «right-click» again.

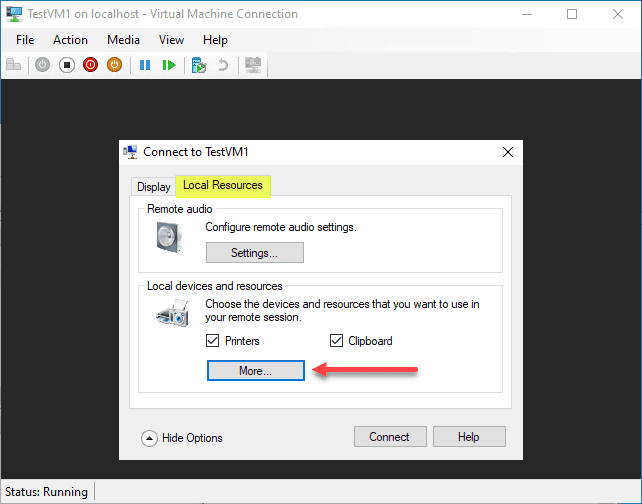
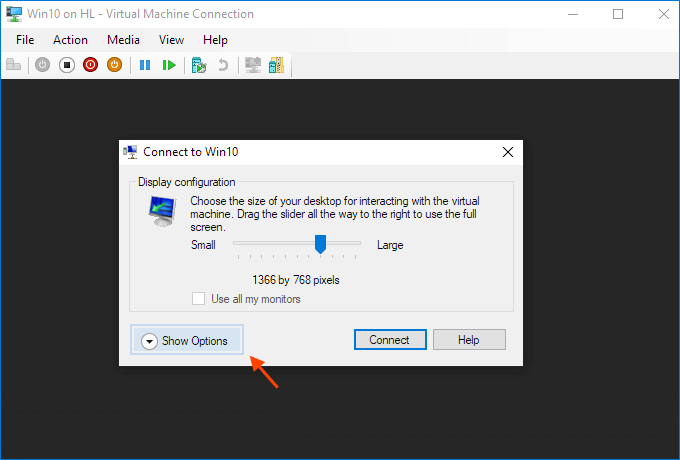
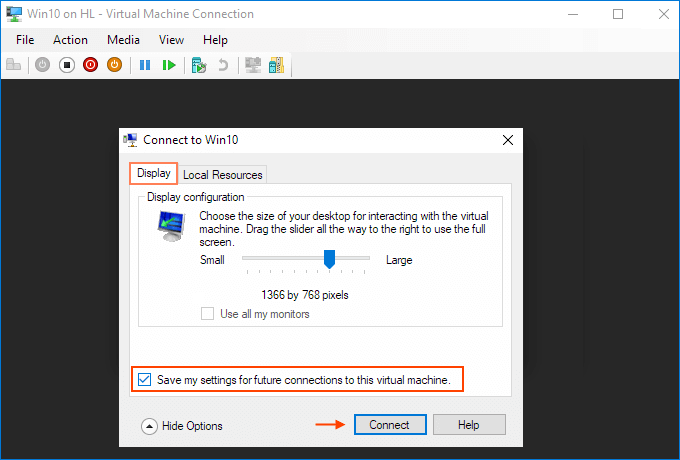
3. In the ‘Display Configuration’ dialog that appears, click Show Options.

4. Check the option to Save my settings for future connections to this virtual machine and then select the Local Resources tab.

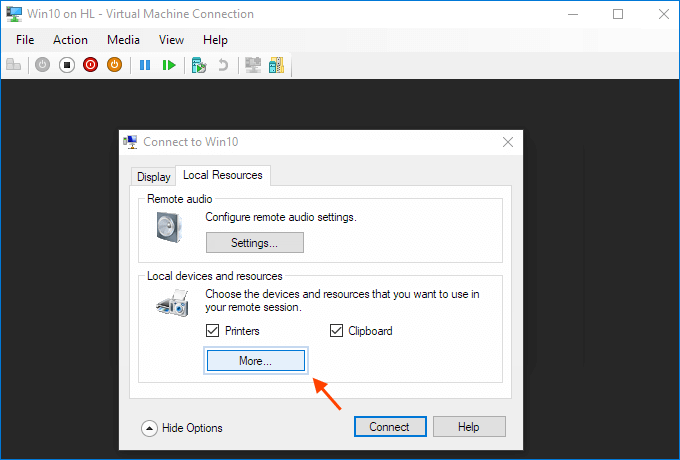
5. In Local Resources, ensure that Printers and Clipboard options are checked and then click More.

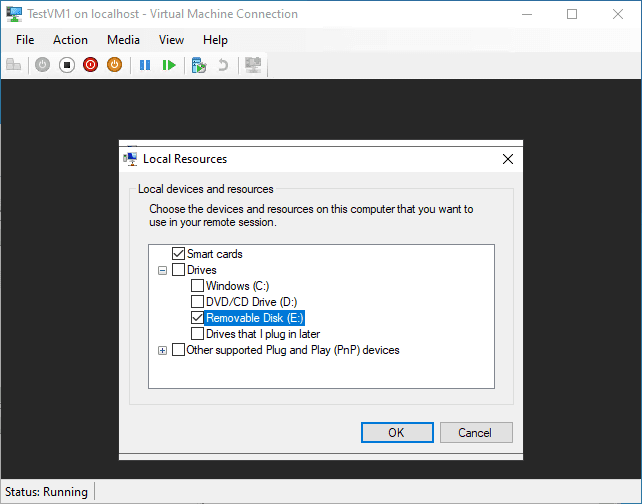
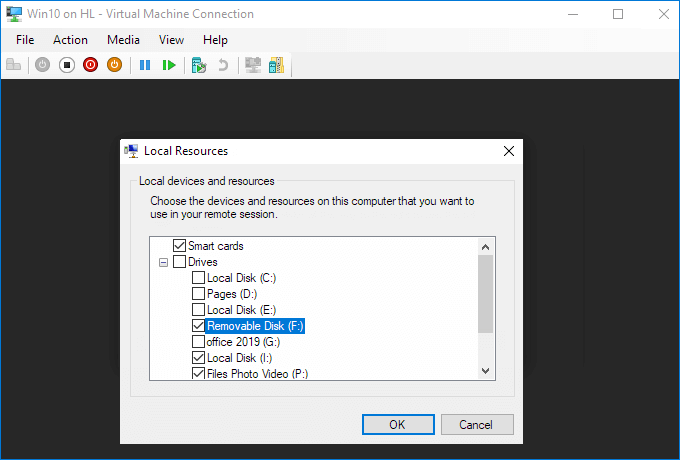
6. At Local Devices and resources dialog, check the Local Disk (C:) and any other drives or USB devices that you want to access inside the VM, like ‘Drives that you plug in later’ or/and ‘Other Supported Plug and Play (PNP) devices’. When done, click OK.

7. Now, click Connect to connect to the virtual machine.

8. After performing the above steps, you will be able to transfer files between the Hyper-V host and the guest virtual machine, either by drag n drop or using the file explorer. Additionally, you will be able to use any USB drives or other USB devices connected to the host machine, such as printers, microphone, speakers, etc.

Method 2. Share Folders & Printers in Hyper-V via Windows File Sharing.
In case you don’t want to use Hyper-V Enhanced Session Mode, to share resources between the host and the virtual machine, then you can use the Windows file sharing feature to share a folder or the printer on the host machine with the virtual machine. To do that:*
* Note: This method is recommended when you don’t want to share the whole disk (C:) on the virtual machine.
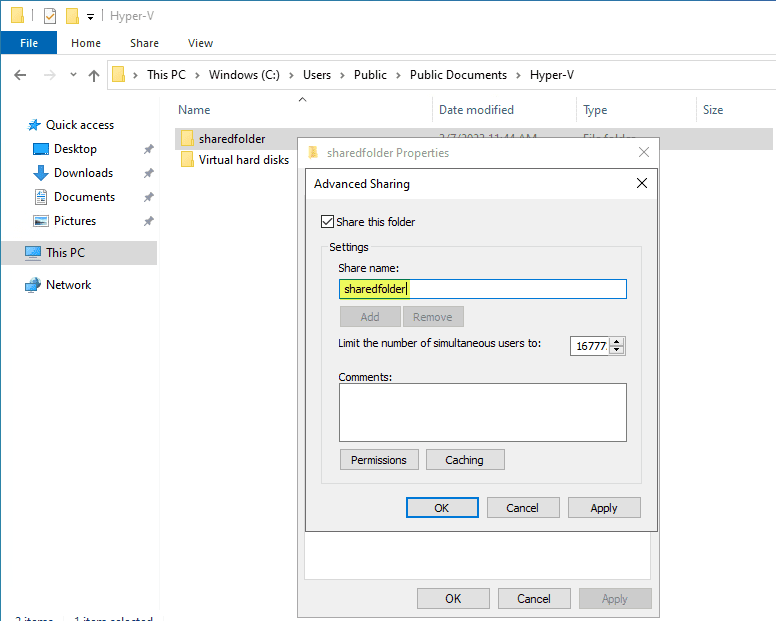
Step 1. Share a Folder on the Hyper-V Host machine.
1. In File Explorer: Right-click on the folder that you want to share with the virtual machine and select Give Access to > Specific people.

2. Click the drop-down menu, select Everyone and then click Add.

3. Then change the Permission Level to Read/Write and click Share.

4. Now notice or copy in notepad the first part of the shared folder path which includes the name of the computer. (e.g.»\\DESKTOP10″ in this example) and click Done.

5. Proceed to next step if you want to share the printer to, or skip to step-3 to learn how to access the shared folder on the virtual machine.
Step 2. Share a Printer on Hyper-V Host machine.
To share a printer connected to the Hyper-V host machine with the virtual machine:
1. Go to Start > Settings > Devices > Printers & Scanners if you own Windows 10, or to Start > Settings > Bluetooth & devices > Printers & Scanners if you own Windows 11.

2. Click on the Printer that you want to share with the virtual machine and click Manage and then Printer Properties if you own Windows 10, or Printer Properties if you own Windows 11.

3. Now select the Sharing tab, check the Share this printer box, change if you want the printer’s share name and click OK.

4. Continue to next step to learn, ho to connect to the shared printer from the VM machine.
Step 3. Access Shared Folder & Printer from the Hyper-V Virtual Machine.
After sharing the folder(s) and/or the Printer:
1. Double-click on the virtual machine in Hyper-V manager and click Start to connect to it.
2. After entering in Windows, press the Windows + R keys to open the Run dialog box.
3. in Open box, type the path of the host computer as you noticed it at step-1 above. (e.g. «\\DESKTOP10» in this example ), and press Enter (OK).

3. Now in «Enter Network Credentials» window, type the username and the password of your user account on the host machine, check the Remember my credentials box and click OK.*
* Note: If you login to Windows without a password on the host machine, then specify one, restart your PC and try again to connect

4. Now you should see the shared folder and the shared printer of the host machine.

5. To be able to use the shared printer, proceed and install it’s driver on the virtual machine. To do that, right-click on the printer and click Connect.

6a. Then, make the shared folder always available in file explorer, by right-clicking on it and choosing Map network drive.

6b. At the next screen, assign a Drive letter for the the network folder and click Finish.

That’s it! Which method worked for you?
Let me know if this guide has helped you by leaving your comment about your experience. Please like and share this guide to help others.
If this article was useful for you, please consider supporting us by making a donation. Even $1 can a make a huge difference for us in our effort to continue to help others while keeping this site free:
- Author
- Recent Posts
Konstantinos is the founder and administrator of Wintips.org. Since 1995 he works and provides IT support as a computer and network expert to individuals and large companies. He is specialized in solving problems related to Windows or other Microsoft products (Windows Server, Office, Microsoft 365, etc.).
Skip to content
Beginners’ Guide for Microsoft Hyper-V: Shared Folders in Hyper-V – Part 64
Sharing resources between a Hyper-V host and guest virtual machines is crucial for several reasons. Unlike a physical machine, you can’t just physically plug a removable drive into a Hyper-V virtual machine. However, Hyper-V has many modern capabilities, allowing you to create shared resources between the Hyper-V host and guest virtual machines.
Sharing resources between your Hyper-V host and a Hyper-V guest virtual machine may be needed for a number of use cases.
Protect Your Data with BDRSuite
First, it facilitates the seamless transfer of files and data between the host and its virtualized environments, which is essential for operational efficiency. Whether it’s moving configuration files, logs, or application data, shared resources eliminate the need for cumbersome external transfers or redundant storage additions. Additionally, sharing resources can streamline collaboration between multiple virtual machines running on the same host, allowing them to access common data sets or tools. This capability also helps conserve storage and reduces the administrative overhead associated with managing separate storage allocations for each VM, thereby simplifying the overall management of the virtual environment.
Let’s look at shared folders in Hyper-V for beginners and see how this can be accomplished.
Table of Contents
- Sharing resources between Hyper-V host and guest
- Methods to create a shared folder : Hyper-V configuration
- Use a Traditional Network share
- Use a passthrough disk
- Use enhanced session mode
- Shared Folder Hyper-V FAQs
- Wrapping up

Sharing resources between Hyper-V host and guest
Shared folders are resources that can be accessed by multiple computers on a computer network. A shared resource in Hyper-V refers to resources that are shared between multiple clients from the Hyper-V host. In this case, we are referring to resources shared between the Hyper-V host and guest virtual machines running on the host. This capability allows files to easily be shared and accessed by both the host and guest operating system.
Why would you want to share resources such as a shared folder in Hyper-V? There may be several reasons to share resources in this way. However, the following are possible reasons you would share resources between your Hyper-V host and guest virtual machines.
- You may want to transfer files between your Hyper-V host and guest virtual machines
- You may want to transfer files between multiple virtual machines running on the same Hyper-V host
- You may want to prevent adding additional virtual storage to the virtual machine to simply have availability to files
Methods to create a shared folder : Hyper-V configuration
There are several methods that can be used for a shared folder Hyper-V configuration. These include the following:
- Use a traditional network share
- Use a passthrough disk
- Use enhanced session mode
Let’s look at each of the methods to share files between the Hyper-V host and guest virtual machines. Each of the methods have different configurations that may lend themselves to one use case over another or may work for some situations over others.
Use a Traditional Network share
One of the obvious ways for a shared folder Hyper-V configuration is using a traditional network share. With a traditional network share, you can share files from your Hyper-V host with guest virtual machines. It means you would need to create a file share on your Hyper-V host or another file server, and then you would connect to the shared folder in your Hyper-V guest virtual machine.
Create a shared folder on your Hyper-V server
Use a passthrough disk
A Hyper-V passthrough disk allows Hyper-V guest virtual machines to access physical disks attached to your Hyper-V host, such as an external USB drive. It is a convenient way to present hardware storage devices to virtual machines, allowing them to access physical attached storage.
Once you attach your physical storage to your Hyper-V server, you will need to set the disk to an Offline state. Once the disk is unused on the Hyper-V host, you can pass the disk through to a Hyper-V guest virtual machine.
Launch Hyper-V Manager
- Select your VM
- Click on the “Settings” option
- In the left pane, select the “Add Hardware” option
- In the right pane, select the SCSI Controller > Hard Disk > Add

Adding a passthrough disk to your Hyper-V virtual machine
Use enhanced session mode
Enhanced session mode with Hyper-V provides a great way to share resources with guest virtual machines. With the enhanced session mode, you can share resources with your client you are connecting from, which can be your Hyper-V host, or another management workstation.
Enhanced session mode is based on RDP technology which allows sharing locally attached resources with your guest virtual machines. First you need to enable enhanced session mode on your Hyper-V host.
Turning on Enhanced Session Mode on a Hyper-V host
Next, you can use VMConnect.exe and redirect local devices, including USB storage devices, to your Hyper-V virtual machine.
Local resource options when connecting to a Hyper-V virtual machine
Select the resource attached to your Hyper-V host you want to redirect to your virtual machine.
Redirect local storage to your Hyper-V virtual machine
Shared Folder Hyper-V FAQs
Can I access a shared folder in Hyper-V from a remote computer?
Shared folders can be utilized as long as the host is setup for remote access to the shared folder, permissions are configured correctly, and any firewall restrictions are configured for the remote access from a client to access the Hyper-V host.
How can I troubleshoot issues with accessing a shared folder in Hyper-V?
Problems accessing shared folders in Hyper-V generally come down to improperly configured permissions, or issues with the Windows Firewall configuration that may be filtering ports required for network connectivity. For enhanced session mode to work, it needs to be enabled on the Hyper-V host configuration. For pass-through disks, ensure the disk is not claimed by the Hyper-V host.
What methods can you use to share folders or other resources in Hyper-V?
You can use a traditional shared network folder, pass-through disks, or enhanced session mode to share resources between your Hyper-V host or another client computer with guest Hyper-V virtual machines.
Wrapping up
Hyper-V is a powerful virtualization platform that provides many ways to share resources between the host and guest virtual machines. We have discussed a few of those ways in this post, including setting up a traditional file share, using a pass-through disk, and taking advantage of enhanced session mode. By taking advantage of these means to share resources, Hyper-V admins can share files effectively between host and guests and eliminate the need to add additional virtual infrastructure to guest operating systems simply to share files and other resources.
Read More:
Beginners’ Guide for Microsoft Hyper-V: Hyper-V vs VirtualBox Virtualization – Part 63
Hyper-V Mastery: A Step-by-Step Guide for Beginners to Elevate Your IT Skills and Boost Your Career
Follow our Twitter and Facebook feeds for new releases, updates, insightful posts and more.
Try BDRSuite for Free!
Schedule a live demo with one of our product experts
Start your full-featured 30-day free trial
Explore detailed pricing, editions & features
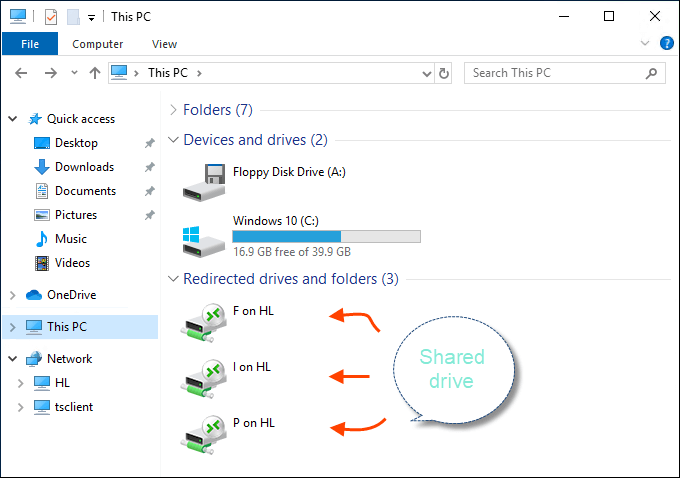
Shared folders and drives are useful for file exchanges between different machines. This article provides information about sharing files, folders, and drives between the host and Hyper-V virtual machines. With these following methods, you can easily copy and paste files from the host operating system to the guest operating system and vice versa.
- Method 1: Share drives using Virtual Machine Connection
- Method 2: Share files, folders, or drives over the network
Method 1: Share drives using Virtual Machine Connection
A virtual machine connection (VMConnect) allows you to use your computer’s local resources in a virtual machine. Enhanced session mode allows files to be transferred between virtual machines through clipboard copy and paste operations. In order to successfully share files, you need to do the following:
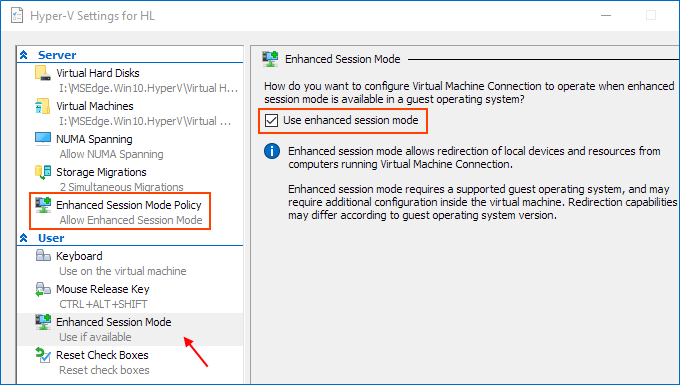
1. Ensure that Enhanced session mode settings are enabled on the Hyper-V host.
Start Hyper-V Manager, and in the Actions section, select “Hyper-V Settings“.
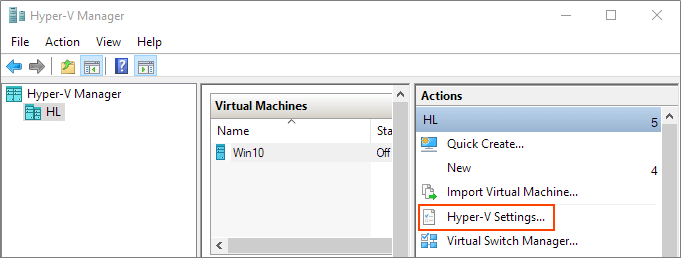
Make sure that enhanced session mode is allowed in the Server section. Then, make sure that the enhanced session mode is available in the User section.
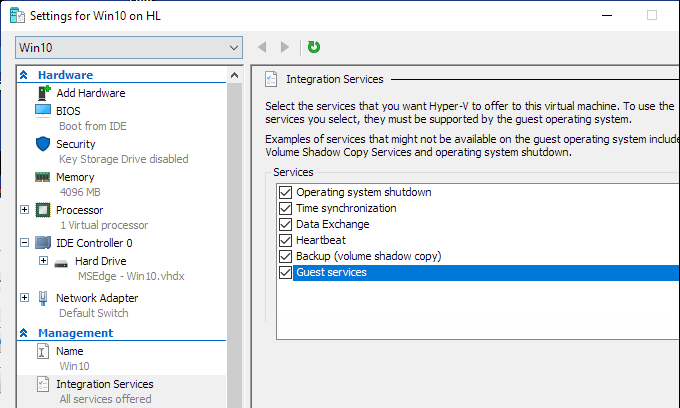
2. Enable Hyper-V Guest Services for your virtual machine
Right-click on Virtual Machine > Settings. Select the Integration Services in the left-lower coner of the menu. Check Guest Service and click OK.
Steps to share devices with Hyper-v virtual machine:
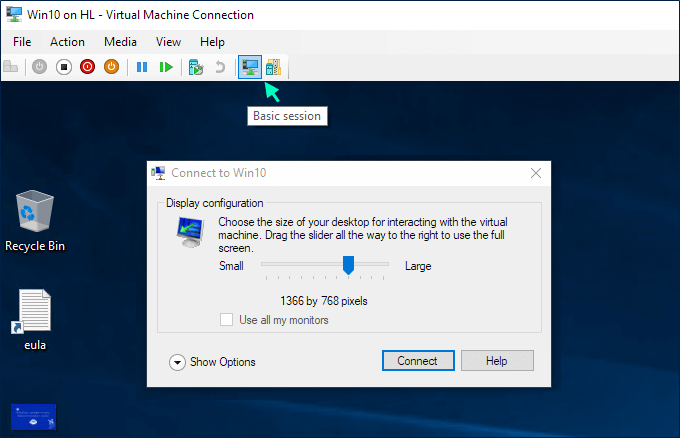
Step 1: Start a virtual machine and click Show Options in the pop-up windows.
Step 2: View local resources. Then, select the “More…” menu.
Step 3: From there, you can choose which devices to share. Removable drives are especially useful for file sharing.
Step 4: Choose to Save my settings for future connections to this virtual machine.
Step 5: Click Connect. Drive sharing is now complete, and you will see the shared drive in this PC>Network Locations section of Windows Explorer after using the enhanced session mode to sigh to the VM. You should now be able to copy files from a physical machine and paste them into a virtual machine, and vice versa.
How can I check if you are running in enhanced session mode
You can check your connection type using the Enhanced Session Mode icon at the top of the Virtual Machine Connect tool (VMConnect). This button also allows you to switch between basic and enhanced session modes.
Method 2: Share files, folders, or drives over the network
In Windows OS, files and folders can be shared across the network, allowing desktops and laptops to access information without physically accessing the computer. For example, users may share an entire document or video folder, and anyone else with access can open these files, edit and save them – even remove them if permissions permit.
Open File Explorer, select a folder, select the Share tab. Then, in the Share with section, select Specific people.

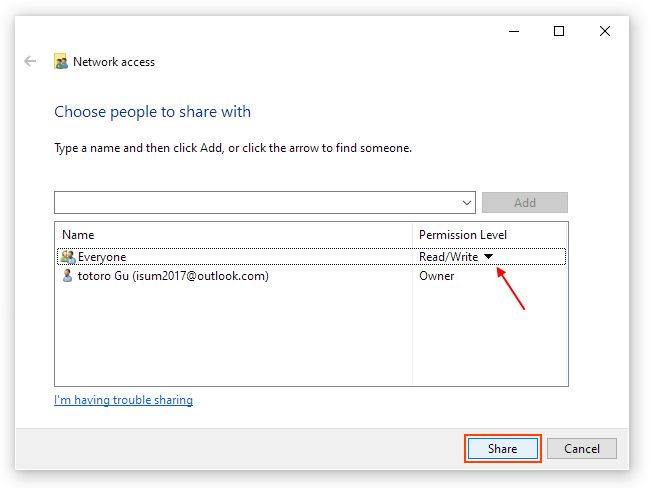
Select the users or groups you want to share with. Here we select Everyone and click Add.
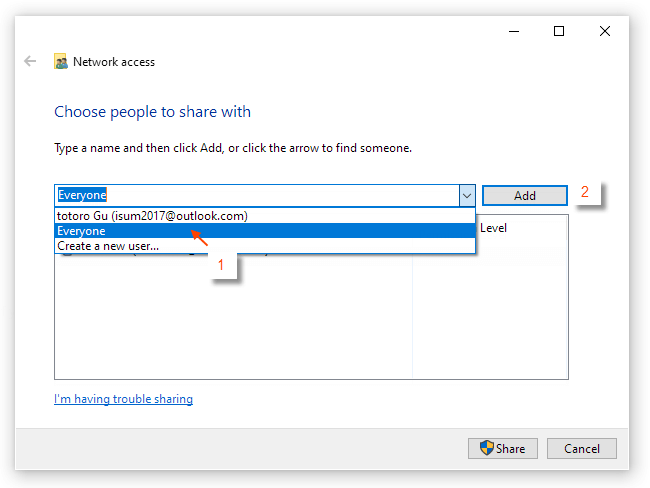
Configure the permission level. Windows computers provide two basic privilege levels for sharing files:
- Read: The recipient can open the file and view its contents but cannot change the file without making a separate copy.
- Read/Write: The recipient can both view and change the file contents and save (overwrite) the file at its current location.
Here we choose to read/write. After that, click the “Share” button.
Next, click Done. Your folder is shared.
Note: To share filing over the network, you need to turn on the network discovery and file sharing for your host and the guest operating systems. You can enable them from the Advanced Sharing Settings page or the Network window.
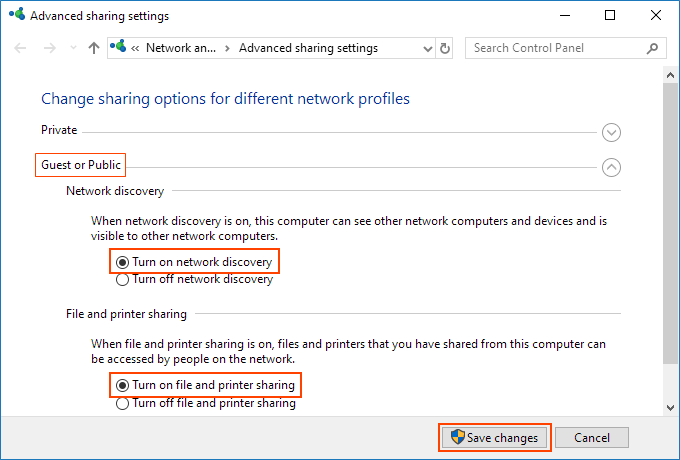
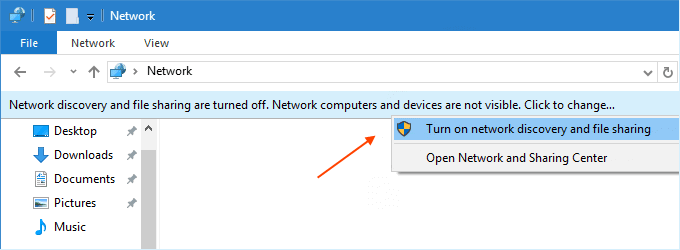
In the virtual machine, open the File Explorer, go to the Network, and you will see an error message (“Network Discovery is off…”), you need to turn on Network Discovery to view the devices that share files on the network. To turn it on, click “Network discovery is turned off…” and select Turn on network discovery and file sharing.
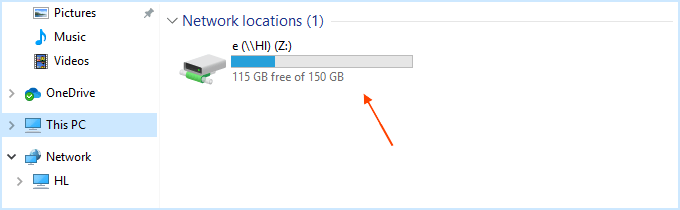
Drive sharing is now complete, and you can view shared drives in the “This PC” > “Network Locations” section of Windows Explorer. Now you should be able to easily transfer files between the two systems.
Hyper-V является популярным решением для виртуализации. После включения функции Hyper-V на операционной системе Windows эта машина станет хостом. IT-администраторы могут создавать VM на хосте через Hyper-V Manager.
Иногда требуется передача данных между хостом и гостем. В этом посте вам будут предложены 3 полезных метода для быстрой передачи файлов. Также, если вы хотели бы передать файлы другими способами, вы можете следовать другому посту, чтобы скопировать файл с хоста на гость или между VM.
P.S. Если вы хотите защитить данные ВМ, существуют 4 способа резервного копирования ВМ Hyper-V.
Метод 1. Скопируйте файл с хоста Hyper-V на гостевой с помощью Enhanced Session Mode
Для использования Enhanced Session Mode на хосте Hyper-V должна быть включена соответствующая конфигурация.
Преимущества включения Enhanced Session Mode:
-
Общий доступ к буферу обмена с хостом Windows
-
Доступ к ресурсам на локальном жестком диске хоста Windows на ВМ
-
Настройка коэффициента разрешения окна ВМ
Enhanced Session Mode автоматически включается в Windows 10 и Windows 8.1, но в других операционных системах его необходимо включить вручную.
Как включить Enhanced Session Mode?
Enhanced Session Mode должен быть включен через Hyper-V Manager
1. Откройте Hyper-V Manager > щелкните правой кнопкой мыши на хосте Hyper-V > выберите Hyper-V Settings
2. Во вкладке Server, выберите Enhanced Session Mode Policy > поставьте галочку у Allow enhanced session mode
3. Во вкладке User, выберите Enhanced Session Mode > отметьте Allow enhanced session mode > нажмите OK
4. Щелкните правой кнопкой мыши на госте на хосте > выберите Настройки > выберите Integration Services > отметьте Guest services > нажмите OK
5. Щелкните правой кнопкой мыши на гостя > выберите Connect
6. Появится всплывающее окно, позволяющее вам изменить конфигурацию отображения > выберите Show Options
7. Проверьте Save my settings для будущих подключений к этой виртуальной машине
8. Разверните Local Resources > разверните More > Выберите диск, который вы хотите использовать на виртуальной машине > нажмите OK
Теперь вы можете открыть File Explorer на хосте, чтобы скопировать файлы на ВМ.
Метод 2. Передавайте файлы с хоста на гостевой компьютер через общую папку
Вы можете создать общую папку на локальном хосте, а затем отобразить ее на виртуальной машине для передачи файлов с локального хоста на виртуальную машину.
1. Создайте папку на хосте
2. Щелкните правой кнопкой мыши папку > выберите Properties
3. Выберите Sharing в верхней части > нажмите Advanced Sharing
4. Проверьте Share this folder > нажмите Permissions
5. Отметьте галочками поля под Allow, чтобы предоставить разрешения для всех > Нажмите ОК
6. Подключитесь к VM, на которую вы хотите передать файл > щелкните правой кнопкой мыши This PC > выберите Map network drive
7. Выберите букву диска > добавьте директорию папки > нажмите ОК
Теперь вы можете открыть Проводник файлов на VM, и увидите, что общая папка была добавлена, поэтому вы можете перейти на хост, чтобы скопировать файл на VM через общую папку.
Метод 3. Передавайте файлы с хоста на гостевой с помощью PowerShell
PowerShell может помочь вам передавать файлы с помощью команды. Прежде чем вы сможете использовать команду, вам нужно включить Guest Services на VM. Шаги можно найти в методе 1.
Copy-VMFile «Тестовая VM» -SourcePath «D:Test.txt» -DestinationPath «C:TempTest.txt» -CreateFullPath -FileSource Host
Резервное копирование виртуальной машины Hyper-V с помощью Vinchin Backup & Recovery
Безопасность данных важна в производственной среде и большинство компаний будут защищать данные VM, создавая резервную копию.
Vinchin Backup & Recovery помогла тысячам компаний построить высокоэффективную систему восстановления после катастроф для виртуальной среды и получила восторженные отзывы за простоту операций и мощную производительность.

Agentless Backup поддерживается в Vinchin Backup & Recovery. Это означает, что вам просто нужно добавить хост Hyper-V в систему резервного копирования, а затем вы можете выбрать виртуальные машины для резервного копирования. По сравнению с традиционным резервным копированием с агентом, Vinchin Backup & Recovery помогает вам сэкономить много времени.
Гранулярное восстановление облегчит извлечение выбранных файлов из резервной копии VM, после чего вы можете передать файлы на другую машину.
Будет легко начать использовать эту программу, потому что есть удобная веб-консоль, которая позволит вам легко завершить каждый шаг с помощью мастеров.
Вы можете воспользоваться 60-дневной полнофункциональной бесплатной пробной версией чтобы узнать насколько удобным и мощным является Vinchin Backup & Recovery. Просто нажмите кнопку, чтобы получить пакет установки.
Заключение
Иногда администраторам IT требуется копировать файлы из хоста в гостевую в среде Hyper-V и в этом посте представлены 3 метода для выполнения этого.
Включение режима Enhanced Session Mode отобразит диски VM на хостах, создание общедоступной папки обеспечит связь между хостом и гостем, а команда PowerShell позволит напрямую передавать файлы от хоста к гостю.
Данные безопасности важны. Вы можете использовать Vinchin Backup & Recovery для простой защиты среды Hyper-V. Не пропустите бесплатный пробный период.
Introduction
Sharing files between a Windows host and Ubuntu virtual machine (VM) can be essential when you need to transfer data or collaborate between different environments. While the Hyper-V virtualization platform makes it easy to create Ubuntu VMs on a Windows host, the process of sharing files between the two systems can be a bit more complex. This is because Windows and Ubuntu use different file systems and protocols to access shared resources.
In this blog post, we will walk you through the steps required to share files between a Hyper-V Windows host and Ubuntu VM using the Common Internet File System (CIFS) protocol. This method allows you to mount a Windows shared folder on Ubuntu, giving you access to files on the Windows host as if they were on the Ubuntu machine itself. We will also cover the process of setting up a new Windows local user for authentication, creating a shared folder, and enabling network settings in Hyper-V. By the end of this guide, you will have a fully functional file sharing system that works seamlessly between Windows and Ubuntu.
1. Create a new Windows local user for sharing and authentication
To access a Windows shared folder from Ubuntu, you need to provide valid credentials for a user account that has permissions to access the shared folder. For security reasons, it’s not recommended to use your Windows user account for this purpose, as it could potentially expose your system to security risks. Instead, it’s best to create a new local user account that’s dedicated solely to file sharing.
Step-by-step guide for creating a new user in Windows
1. Press “Windows Key + R” on your keyboard to open the Run dialog box.
2. Type “netplwiz” in the box and click on “OK.”
3. In the User Accounts window that appears, click on the “Add” button.

4. Select “Sign in without a Microsoft account (not recommended)” at the bottom of the screen.
5. Click on “Local account” and then click on “Next.”
6. Enter a username and password for the new user and then click on “Next.”
7. You can choose whether to set a password hint for the new user account or not. Click on “Next” to proceed.
8. Click on “Finish” to complete the process.

I have created a user called “shareuser” with password as 123456. But please always use stronger password. Mine is just a test environment.
2. Create a Windows folder and enable sharing
In this step, we will create a new folder in Windows and enable sharing so that it can be accessed from our Ubuntu VM.
1. Open File Explorer and navigate to the location where you want to create a new folder.
2. Right-click on the empty space and select “New” > “Folder”.
3. Name the folder and press “Enter” on your keyboard.
4. Right-click on the newly created folder and select “Properties”.
5. In the Properties window, click on the “Sharing” tab.
6. Click on the “Share” button.
7. In the “Choose People to Share With” window, enter the name of the user you created earlier (e.g. “shareuser”).

8. Click on “Add” and then click on the “Share” button.
9. The folder should now be shared with the user you specified.

Note: If you don’t see the “Sharing” tab in the folder properties window, you may need to enable file and printer sharing in Windows by going to “Control Panel” > “Network and Sharing Center” > “Change advanced sharing settings” and selecting “Turn on file and printer sharing”. And I will be replacing the hostname “WAHAB” with an IP address in later stages.
Once you have shared the folder with the user, you can access it from your Ubuntu VM using the SMB protocol.
3. Enable default or external type network for VMs in Hyper-V
By default, the virtual machines are connected to the “Default Switch”. To communicate between the host and guest VM, you need to either use this default switch or external type virtual switch. If Private network type switch are used the Windows host will not be able to communicate or transfer files with guest VMs.
1. Open the Hyper-V Manager on the Windows host machine.
2. Select the virtual machine you want to connect to the network.
3. In the right-hand pane, click on “Settings”.
4. Click on “Network Adapter” and select “Virtual Switch” as the connection type.
5. Select either the “Default Switch” or an “External” virtual switch that you have previously created.
6. Click “OK” to save changes.
7. Start the virtual machine.

4. Find the private IP of Windows HyperV host
The private IP of the Windows host is needed to establish a connection between the Windows host and the Ubuntu VM. In order for the Ubuntu VM to access files on the Windows host, it needs to know the private IP address of the host so that it can connect to it over the network
1. Open the Command Prompt on the Windows host machine by pressing the Windows key + R and then typing “cmd” in the Run dialog box.
2. In the Command Prompt, type “ipconfig” and press Enter.
3. Look for the IPv4 Address entry. The number listed next to this entry is the private IP address of the Windows host.
Note: The private IP address is usually in the format of “192.168.x.x” or “172.x.x.x”.

5. Check folder shared is accessible using smbclient from Ubuntu VM
smbclient is a command-line tool used to connect to Windows and Samba file servers. It allows us to browse and manipulate files and directories on remote servers using the Server Message Block (SMB) protocol.
In this step, we will use smbclient to verify if the shared folder is accessible from the Ubuntu VM.
Step-by-step guide for checking if the share is accessible using smbclient:
1. Open the terminal on Ubuntu VM.
2. Install smbclient if it’s not installed using the following command:
sudo apt-get install smbclient
3. Connect to the shared folder using the following command:
smbclient -U shareuser //172.30.96.1/FolderToShare
Note: Replace “shareuser” with the username of the Windows local user you created and “FolderToShare” with the name of the shared folder you created
4. Enter the password for the Windows local user when prompted.
5. If the connection is successful, you should see a prompt like this:

6. Mount the Windows share using cifs
CIFS (Common Internet File System) is a network protocol that allows Linux systems to access and share files and directories with Windows operating systems. It is needed to mount the Windows share on the Ubuntu VM so that the Ubuntu user can access the shared files and directories.
Here are the step-by-step instructions for mounting the Windows share using cifs:
Create a directory where you want to mount the Windows share. For example, let’s create a directory called “windows_share” under the home directory:
mkdir ~/windows_share
Install the cifs-utils package if it’s not already installed on the Ubuntu VM:
sudo apt-get update
sudo apt-get install cifs-utils
Create a file and add the Windows user credentials in it.
nano /home/wahab/.smbcredentials

username=shareuser
password=123456
Replace “shareuser” with the username you created for file sharing on your Windows host.
Replace “123456” with the password you set for the user.
Open the “/etc/fstab” file using a text editor with root privileges, such as nano:
sudo nano /etc/fstab
Add the following line at the end of the file:
//172.30.96.1/FolderToShare /home/wahab/windows_share cifs credentials=/home/wahab/.smbcredentials,uid=wahab,gid=wahab 0 0
Replace “172.30.96.1” with your Windows host IP address.
Replace “FolderToShare” with the name of the shared folder on your Windows host.
“/home/wahab/windows_share” will be the folder you mounting your Windows share. So you may choose different one as per your need.
The “uid” and “gid” options set the ownership of the mounted directory to the Ubuntu user “wahab”, replace them with yours.
The “0 0” options indicate that the filesystem should be dumped and checked by default.
Save and close the file.

Here’s how to mount and unmount the Windows share as the Ubuntu user “wahab”:
To mount the share:
sudo mount ~/windows_share
Check if the Windows share is mounted by running a “df -h” command

To unmount the share:
sudo umount ~/windows_share
In conclusion, sharing files between a Windows host and Ubuntu VM can be accomplished through the use of the Common Internet File System (CIFS) protocol. The process involves creating a new Windows local user for sharing and authentication, creating a Windows folder and enabling sharing, and configuring the network settings in Hyper-V. Once these steps are completed, you can easily access the shared folder from your Ubuntu VM as if it were on the local machine. It’s important to ensure that you follow security best practices by using a dedicated user account for file sharing and setting a strong password. With these steps, you can establish a seamless and secure file sharing system between Windows and Ubuntu.