
Возникла необходимость удаленного управления сервером с запущенной ролью Hyper-V с компьютера под управлением Window 10 (личный ноутбук), который не состоит в домене. Чтобы такая схема заработала, нужно выполнить следующие настройки на стороне сервер-гипервизора и клиента.
- Настройка сервера Hyper-V
- Настройка клиента Windows 10 для подключения к серверу Hyper-V
- Удаленное подключение из Windows 10 к Hyper-V
Содержание:
Настройка сервера Hyper-V
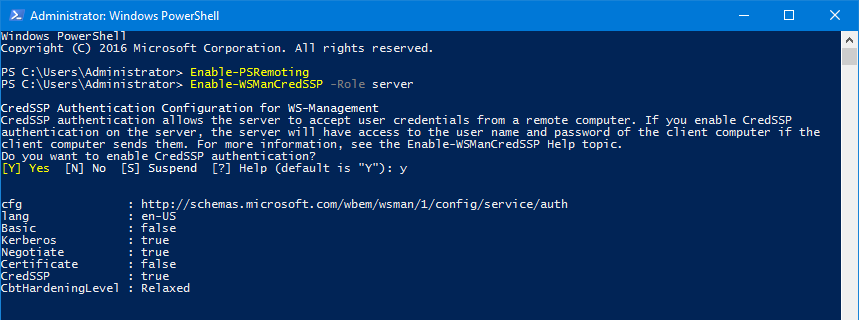
На сервере Hyper-V (Windows Server 2016) нужно включить удаленное управление PowerShell Remoting и открыть соответствующие порты на файерволе. Включаем службу WinRM командой
Enable-PSRemoting
Теперь нужно разрешить подключение со всех клиентов (из публичных сетей в той же самой локальной подсети) и разрешить передавать и получать CredSSP:
Enable-PSRemoting -SkipNetworkProfileCheck -Force
Enable-WSManCredSSP -Role Server
Включим правило межсетевого экрана WinRM-HTTP-In-TCP-Public.
Set-NetFirewallRule -Name "WinRM-HTTP-In-TCP-Public" -RemoteAddress Any
Проверьте удаленную доступность порта WinRM (TCP 5985) на сервере
Test-NetConnection -ComputerName target_name -Port 5985
Настройка клиента Windows 10 для подключения к серверу Hyper-V
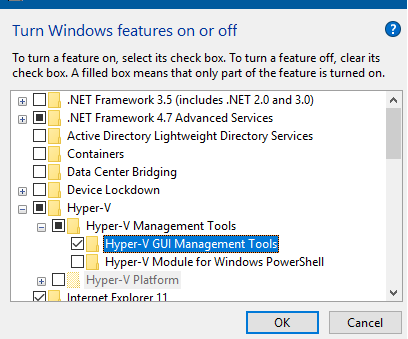
В первую очередь на компьютере с Windows 10 нужно установить консоль управления Hyper-V. Для этого в панели управления в разделе программ нужно нажать кнопку Turn windows features on or off и в разделе Hyper-V-> Hyper-V Management Tools -> выбрать Hyper-V GUI Management Tools.
Проверьте, что тип сетевого подключения у вас установлен на Private.
Откройте консоль PowerShell с правами администратора и выполните следующие команды:
Enable-PSRemoting
Set-Item WSMan:\localhost\Client\TrustedHosts -Value "Hyper-V-FQDN"
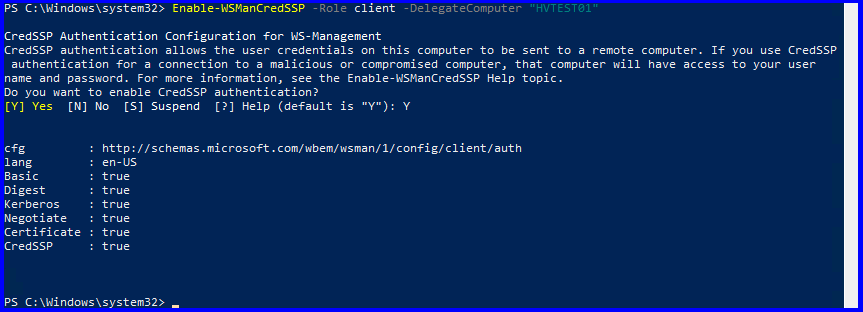
Enable-WSManCredSSP -Role client -DelegateComputer "Hyper-V-FQDN"

Тем самым мы добавили наш сервер в список доверенных и разрешили аутентификацию CredSSP.
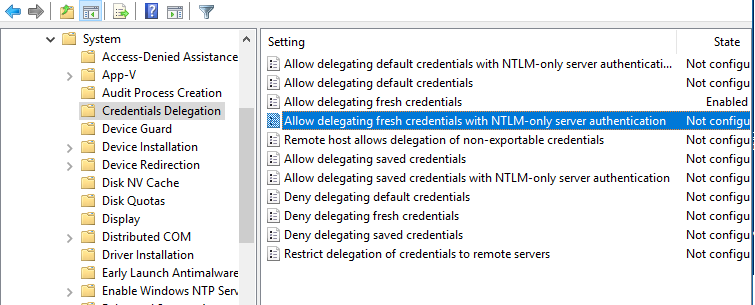
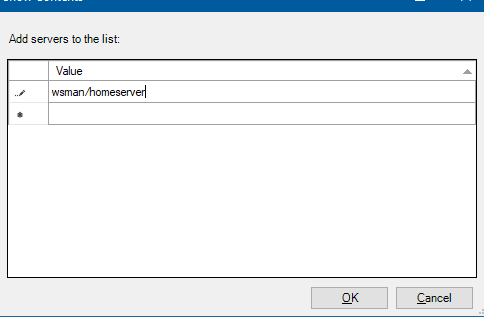
Теперь в редакторе локальной групповой политики (gpedit) нужно включить NTLM аутентификацию на недоменных компьютерах. Перейдите в раздел Computer Configuration > Administrative Template > System > Credentials Delegation и включите политику Allow delegating fresh credentials with NTLM-only server authentication, добавьте в нее строку wsman/Hyper-V-FQDN.
Удаленное подключение из Windows 10 к Hyper-V
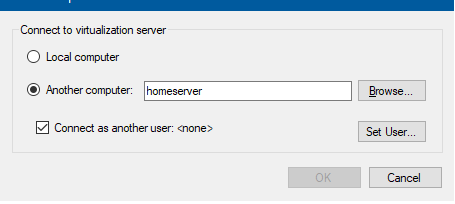
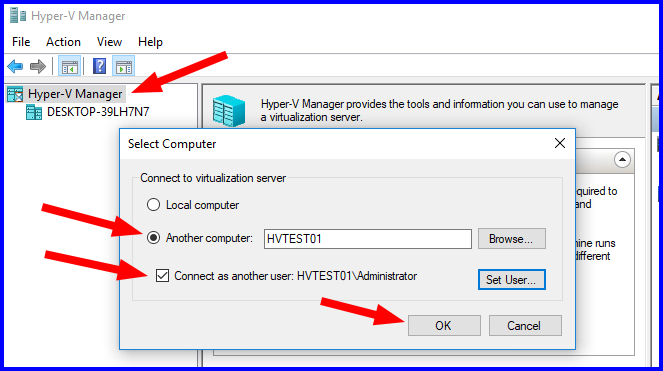
На компьютере Windows 10 откройте консоль Hyper-V Manager, щелкните ПКМ по “Hyper-V Manager” и выберите Connect to Server… Введите имя сервера и отметьте галку Connect as another user и укажите имя пользователя с правами на сервере Hyper-V.
После этого, консоль должна отобразить список ВМ, запущенных на хосте Hyper-V.
Обновлено:
Опубликовано:
В более поздних версиях Windows для управления виртуальными машинами Hyper-V консоль должна быть установлена на компьютер, входящий в состав доменной инфраструктуры. Однако, существуют определенные манипуляции, которые позволят обойтись обычным компьютеров в рабочей группе, не подключенным к контроллеру домена.
Подготовка
Прежде, чем начать, необходимо убедиться в наличие на компьютере самой консоли. Для этого загрузите средства удаленного администрирования сервера (RSAT) для Windows 7, Windows 8.1 или Windows 10. Оно представляет из себя обновление системы, которое мы просто устанавливаем.
В Windows 11 RSAT устанавливается в дополнительных компонентах и не требует ничего дополнительно скачивать.
После этого открываем Программы и компоненты — кликаем по Включение или отключение компонентов Windows — в открывшемся окне раскрываем Средства удаленного администрирования сервера — Средства администрирования ролей — ставим галочку на Средства Hyper-V:

Кликаем по OK. После установки в Панели управления — Администрирование появится консоль Диспетчер Hyper-V.
Настройка
Настройка выполняется на клиентском компьютере с установленной консолью.
1. Файл hosts
Запускаем блокнот от имени администратора и открываем файл C:\Windows\System32\drivers\etc\hosts, где C:\ — имя диска с Windows.
Добавляем строку:
192.168.1.30 VH01
* где 192.168.1.30 — IP-адрес сервера; VH01 — имя сервера Hyper-V.
2. WINRM
Открываем PowerShell от администратора и вводим:
Enable-PSRemoting
* на все запросы отвечаем A.
Теперь открываем командную строку от имени администратора и вводим:
cmdkey /add:VH01 /user:Administrator /pass:Password
* где VH01 — имя нашего сервера; Administrator — имя административной учетной записи на сервере; Password — пароль от учетной записи.
Вводим:
winrm set winrm/config/client @{TrustedHosts=»VH01″}
3. Службы компонентов
Открываем службы компонентов — для этого вводим команду dcomcnfg. В открывшемся окне раскрываем Службы компонентов — Компьютеры — кликаем правой кнопкой по Мой компьютер и выбираем Свойства:
На вкладке Безопасность COM в разделе «Права доступа» кликаем по Изменить ограничения:
Для группы АНОНИМНЫЙ ВХОД проверяем, что разрешены Локальный и Удаленный доступы:
OK.
Готово. Пробуем открыть Диспетчер Hyper-V и подключиться к нашему гипервизору.
Ошибка CredSSP при подключении к виртуальной машине
Если на одной из систем нет обновлений (устаревшая система), мы можем получить ошибку при подключении к виртуальной машине, связанной с CredSSP-шифрованием.
Для решения проблемы лучше всего установить обновления. Но если такой возможности нет или нужно быстро получить доступ, на компьютере, с которого запускаем консоль Hyper-V открываем командную строку от администратора и вводим команду:
REG ADD HKLM\Software\Microsoft\Windows\CurrentVersion\Policies\System\CredSSP\Parameters\ /v AllowEncryptionOracle /t REG_DWORD /d 2
Подготовка
Ссылки по теме:
- Установка Hyper-V в Windows 10
- Удаленное управление Hyper-V из Windows 10 без домена
Системные требования
- Windows 10 Корпоративная, Pro или для образовательных учреждений
- 64-разрядный процессор с поддержкой преобразования адресов второго уровня (SLAT).
- Поддержка расширения режима мониторинга виртуальной машины (технология VT-c на компьютерах с процессорами Intel).
- Не менее 4 ГБ оперативной памяти.
Определение редакции Windows
cscript C:\Windows\System32\slmgr.vbs /dli
Установка Hyper-V
Enable-WindowsOptionalFeature -Online -FeatureName Microsoft-Hyper-V -All
Настройка удаленного доступа на стороне сервера Hyper-V
Enable-PSRemoting
Enable-PSRemoting -SkipNetworkProfileCheck -Force
Enable-WSManCredSSP -Role Server
Set-NetFirewallRule -Name "WinRM-HTTP-In-TCP" -RemoteAddress Any -Profile Public
Test-NetConnection -ComputerName target_name -Port 5985
Настройка удаленного доступа на стороне клиента Hyper-V
Установка средств управления Hyper-V
Hyper-V-> Hyper-V Management Tools -> выбрать Hyper-V GUI Management Tools
Test-NetConnection -ComputerName "Hyper-V-FQDN" -Port 5985
Enable-PSRemoting
Set-Item WSMan:\localhost\Client\TrustedHosts -Value "Hyper-V-FQDN"
Enable-WSManCredSSP -Role client -DelegateComputer "Hyper-V-FQDN"
Откройте редактор объекта групповой политики gpedit
Конфигурация компьютера / Административные шаблоны / Система / Передача учетных данных / Разрешить передачу новых учетных данных с проверкой подлинности сервера «только NTLM»
Необходимо включить и добавить в список сервера Hyper-V
wsman/<имя или адрес сервера>
Заметки (разобрать)
New-LocalUser -Name sysop
# список фич
Get-WindowsOptionalFeature -Online
Enable-WindowsOptionalFeature -Online -FeatureName "Hearts" -All
PS C:\> Enable-PSRemoting
Служба WinRM была обновлена для приема запросов.
Тип службы WinRM успешно изменен.
Служба WinRM запущена.

Set-WSManQuickConfig : <f:WSManFault xmlns:f="http://schemas.microsoft.com/wbem/wsman/1/wsmanfault" Code="2150859113" Machine="localhost"><f:Mess
age><f:ProviderFault provider="Config provider" path="%systemroot%\system32\WsmSvc.dll"><f:WSManFault xmlns:f="http://schemas.microsoft.com/wbem/
wsman/1/wsmanfault" Code="2150859113" Machine="COMP4"><f:Message>Исключение брандмауэра WinRM не будет работать, поскольку одно из сетевых подклю
чений, установленных для этого компьютера, является общим. Измените тип сетевого подключения либо на доменное, либо на частное и повторите попытк
у. </f:Message></f:WSManFault></f:ProviderFault></f:Message></f:WSManFault>
строка:116 знак:17
+                 Set-WSManQuickConfig -force
+                 ~~~~~~~~~~~~~~~~~~~~~~~~~~~
    + CategoryInfo          : InvalidOperation: (:) [Set-WSManQuickConfig], InvalidOperationException
    + FullyQualifiedErrorId : WsManError,Microsoft.WSMan.Management.SetWSManQuickConfigCommand
Время на прочтение1 мин
Количество просмотров2.9K
Итак, возникла ситуация использовать HYPER-V сервер без ввода самого в домен, как известно (перерыв кучу интернета) этого сделать невозможно, не используя домен, ну или как то коряво, что то устанавливать что – то правитьзаходить под др. пользователем и прочее, предлагаю следующий вариант, опробаванный мной и удачно реализованый!
Итак:
Что нам потребуется:
1. Windows Server 2008 или Windows 7 + RRAS (как устанавливать компонент администрирования HYPER-V сервера, я рассказывать не буду)
2. Встроенная в систему утилита runas
Поехали:
1. Создадим текстовый файл START_HYPER-V.bat
В нем пропишем следующие строки:
cd %ProgramFiles%\Hyper-V\

runas /profile /env /user:master "mmc virtmgmt.msc"
сохраняем…
2. Далее создадим на локальной машине такого же пользователя с таким же паролем, как и на HYPER-V сервере которым собираемся управлять (у нас он называется master). Получается, что у нас на HYPER-V сервере есть пользователь с логином master и на локальной машине такой же пользователь с таким же паролем.
3. Запускаем наш созданный START_HYPER-V.bat
4. Вводим пароль пользователя master
5. Наслаждаемся полученной картиной…
ЗЫ. Добавив к параметрам запуска ключ /savecred нам потребуется ввести пароль master всего один раз, и последующие запуски будут автоматически использовать наш введенный пароль.
In this post, my goal is to provide the steps one must take in a typical non-domain environment to set up Hyper-V Server 2016 or 2019 host and remotely manage it via Hyper-V Manager from a Windows 10 PC. I will split this post into three sections; what to do on the Hyper-V Server host, the Windows 10 PC, and some troubleshooting steps.
When you aren’t using Hyper-V Server in a domain in which you have group policies in place to take care of the automatic configuration of systems for seamless remote manageability, there are quite a few steps one must take on both the Hyper-V Server host and the Windows 10 PC from which you are trying to manage the host.
Most of the information out there, even as recent as September 2020, regarding managing Hyper-V remotely in a workgroup or non-domain environment, results in one of these two outcomes: not enough information, therefore leaving you still unable to connect properly to your Hyper-V host, or incorrect or too much information, leaving your systems vulnerable and insecure, possibly still unable to connect to the Hyper-V host.
Hyper-V Server 2016 or 2019 Host
All steps in this section are to be done on your Hyper-V Server host server. In this example, I am starting from a fresh install of Hyper-V Server 2016 that is fully patched and up-to-date.
- Install Hyper-V Server 201x
- Go through the typical install dance:
- Set a password at first boot.
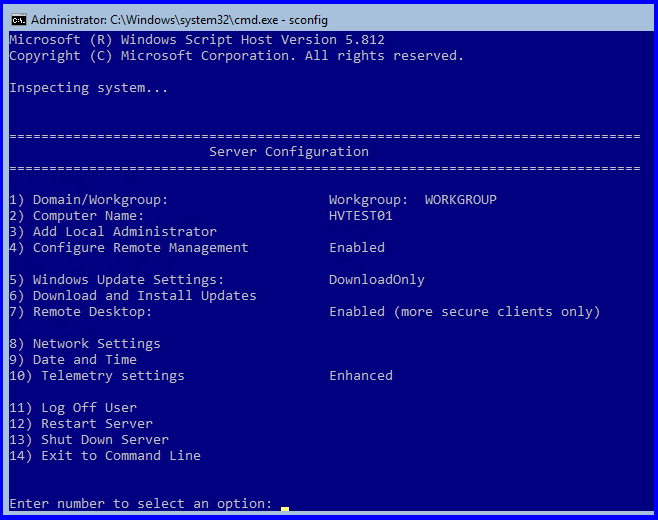
- Change the computer name in
sconfig(option 2). - Verify Remote Management is Enabled (option 4).
- Enable Remote Desktop (option 7).

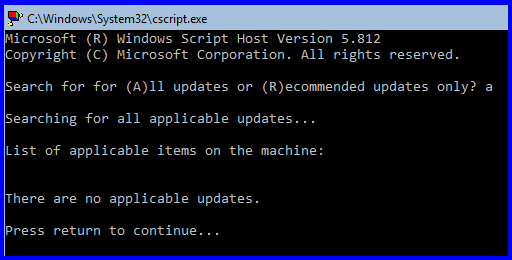
- Run Windows Update and make sure your server is 100% up-to-date. (option 6, then (A)ll updates)
- This is the most important step, because depending on which patch level Hyper-V Server 2016 is on, versus the patch level of your Windows 10 PC, you WILL get errors and will not be able to remotely connect via Hyper-V Manager.

- This is the most important step, because depending on which patch level Hyper-V Server 2016 is on, versus the patch level of your Windows 10 PC, you WILL get errors and will not be able to remotely connect via Hyper-V Manager.
- Enable PSRemoting:
- Enter the following command in an elevated PowerShell window:
Enable-PSRemoting
- Enter the following command in an elevated PowerShell window:
- Allow remote access on public zones and enable firewall rules for CredSSP and WinRM:
- Enter the following command in an elevated PowerShell window, then enter Y when prompted:
Enable-WSManCredSSP -Role server
- Enter the following command in an elevated PowerShell window, then enter Y when prompted:

Windows 10 PC
All steps in this section are to be done on your Windows 10 PC. At the time of this article’s creation, I used a fresh installed of Windows 10 Pro 1803 fully patched and up to date as of the end of July 2018. I know, scary! (but working)
- Run Windows Update:
- This is very important, and depending on which patch level your Windows 10 PC and Hyper-V Server 2016 or 2019 host is on, you WILL get errors and will not be able to remotely manage your Hyper-V host:

- This is very important, and depending on which patch level your Windows 10 PC and Hyper-V Server 2016 or 2019 host is on, you WILL get errors and will not be able to remotely manage your Hyper-V host:
- Install the Hyper-V Management Tools:
- Open up an elevated PowerShell window (Run as Administrator)
- Enter the following command, which installs the Hyper-V Management tools, then enter Y to reboot:
Enable-WindowsOptionalFeature -Online -FeatureName Microsoft-Hyper-V-Tools-All -All
- Set the network connection category to private:
- Enter the following command in an elevated PowerShell window:
Set-NetConnectionProfile -InterfaceAlias Ethernet -NetworkCategory Private- You may need to change “Ethernet” (InterfaceAlias) to match the name of your network connection(s).
- You can use Get-NetConnectionProfile to list your connections and their categories.
- Enter the following command in an elevated PowerShell window:
- Add the Hyper-V Server host to the local “hosts” file:
- Enter the following command, which appends the host name of the Hyper-V host and it’s IP address to the local hosts file:
Add-Content -Path C:\Windows\System32\drivers\etc\hosts -Value "`n172.30.32.151`tHVTEST01"- The `n is new line
- The `t is horizontal tab character
- Replace HVTEST01 and 172.30.32.151 with the host name and IP address of your Hyper-V Server host.
- Enter the following command, which appends the host name of the Hyper-V host and it’s IP address to the local hosts file:
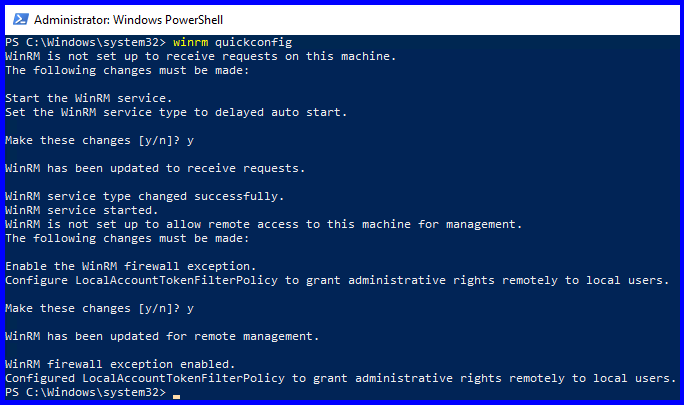
- Configure Remote Management Service:
- Enter the following in an elevated PowerShell window, and enter Y when prompted:
winrm quickconfig
- Enter the following in an elevated PowerShell window, and enter Y when prompted:
- Add the Hyper-V Server host to the trusted hosts of the Win10 PC:
- Enter the following command in an elevated PowerShell window, and enter Y when prompted:
Set-Item WSMan:\localhost\Client\TrustedHosts -Value "HVTEST01"
- Enter the following command in an elevated PowerShell window, and enter Y when prompted:
- Allow the Win10 PC credentials to be delegated to the Hyper-V Server host:
- Enter the following command in an elevated PowerShell window, enter Y when prompted:
Enable-WSManCredSSP -Role client -DelegateComputer "HVTEST01"
- Enter the following command in an elevated PowerShell window, enter Y when prompted:
- Allow delegating fresh credentials with NTLM-only server authentication:
- Enter the following commands in an elevated PowerShell window:
New-Item -Path "HKLM:\SOFTWARE\Policies\Microsoft\Windows\" -Name 'CredentialsDelegation'
New-ItemProperty -Path "HKLM:\SOFTWARE\Policies\Microsoft\Windows\CredentialsDelegation\" -Name 'AllowFreshCredentialsWhenNTLMOnly' -PropertyType DWord -Value "00000001"
New-ItemProperty -Path "HKLM:\SOFTWARE\Policies\Microsoft\Windows\CredentialsDelegation\" -Name 'ConcatenateDefaults_AllowFreshNTLMOnly' -PropertyType DWord -Value "00000001"
New-Item -Path "HKLM:\SOFTWARE\Policies\Microsoft\Windows\CredentialsDelegation\" -Name 'AllowFreshCredentialsWhenNTLMOnly'
New-ItemProperty -Path "HKLM:\SOFTWARE\Policies\Microsoft\Windows\CredentialsDelegation\AllowFreshCredentialsWhenNTLMOnly\" -Name '1' -Value "wsman/HVTEST01"
- Or, configure the following local group policy (does the same as above):

- Change “HVTEST01” to match the name of your Hyper-V host in either of the above steps.
- Enter the following commands in an elevated PowerShell window:
- Open up Hyper-V Manager:
- Right-Click on “Hyper-V Manager”, and select “Connect to server…”.
- Select “Another computer” and type the name of your Hyper-V Server host.
- Check “Connect as another user”, then use the local admin account of the Hyper-V Host. Check “Remember me”. Use HOSTNAME\Administrator

- Success!
- It should now connect successfully, allowing you to mange your Hyper-V Server host, set-up, and configure VMs:

- It should now connect successfully, allowing you to mange your Hyper-V Server host, set-up, and configure VMs:


Troubleshooting
The operation is not supported
You get an error when trying to connect to the Hyper-V host (pictured below):
“An error occurred while attempting to connect to server <serverName>. Check that the Virtual Machine Management service is running and that you are authorized to connect to the server.
The operation is not supported.“
The Fix
The most likely resolution to this issue is to make sure all systems involved are up to date. This error may be related to this error:
https://timothygruber.com/hyper-v-2/remotely-managing-hyper-v-server-in-a-workgroup-or-non-domain/#An_authentication_error_has_occurred_CredSSP_encryption8230
An error occurred while attempting to connect; WinRM, TrustedHosts, operation failed…
If you see the following error (pictured below):
“An error occurred while attempting to connect to server “<serverName>”. Check that the Virtual Machine Management service is running and that you are authorized to connect to the server.
The operation on computer ‘<serverName>’ failed: The WinRM client cannot process the request. If the authentication scheme is different from Kerberos, or if the client computer is not joined to a domain, then HTTPS transport must be used or the destination machine must be added to the TrustedHosts configuration setting. Use winrm.cmd to configure TrustedHosts. Note that computers in the TrustedHosts list might not be authenticated. You can get more information about that by running the following command: winrm help config.“
It means you are unable to connect to the Hyper-V Server host, and the most likely causes are that the remote server is not in the TrustedHosts and WinRM isn’t configured properly (obviously, there’s more to it than that). Hyper-V Server has the “Virtual Machine Management” service running by default, so we know it’s not that, but you can verify this by running the following command on your Hyper-V host:
Get-Service vmms
The Fix
The best way to resolve this error is to verify all the above steps have been completed.
An authentication error has occurred. CredSSP encryption…
If you see the following error (pictured below):
“An authentication error has occurred.
The function requested is not supportedRemote computer: <computerName>
This could be due to CredSSP encryption oracle remediation.
For more information, see https://go.microsoft.com/fwlink/?linkid=866660“

This error is most likely being produced due to a recent update in March 2018 to either your Hyper-V Server host or the PC in which you are trying to connect from.
The fix
To fix this error, you must make sure all systems involved are updated. This means your Hyper-V host, the VM you’re trying to access, and the PC you are trying to connect from.
Click the link below for more information from Microsoft:
https://portal.msrc.microsoft.com/en-us/security-guidance/advisory/CVE-2018-0886
References
Remotely Manage Hyper-V Hosts via Microsoft Docs:
https://docs.microsoft.com/en-us/windows-server/virtualization/hyper-v/manage/remotely-manage-hyper-v-hosts#manage-hyper-v-hosts-remotely