
Виртуальный адаптер Ethernet Hyper-V — это важнейший компонент виртуальной сети для виртуальных машин Hyper-V. Он предоставляет программную конструкцию, необходимую для создания виртуальной сети виртуальных машин и других виртуальных ресурсов в вашей инфраструктуре Hyper-V. Рассмотрим виртуальный Ethernet-адаптер Hyper-V для новичков, что это такое и как его использовать. Кроме того, мы увидим, как его настроить.
Что такое виртуальная сеть Microsoft Hyper-V?
Вы можете задаться вопросом о назначении виртуальных сетей в виртуализированных средах, таких как Hyper-V. Виртуальные сети позволяют создавать виртуальные сети для решения основных технических и бизнес-задач и позволяют виртуальным ресурсам взаимодействовать с внешним миром. Например, вы можете подключить виртуальные машины к виртуальным коммутаторам с помощью виртуальных адаптеров Ethernet. Они позволяют виртуальным ресурсам Hyper-V взаимодействовать независимо от подключения к физической сети.
Виртуальная сеть в кластере Hyper-V позволяет создавать виртуальные машины, не привязанные к конкретному физическому оборудованию, что упрощает перемещение рабочих нагрузок между хостами и масштабирование среды по мере необходимости. Эта гибкость необходима для гибкости, масштабируемости и мобильности критически важных для бизнеса виртуальных машин.
Что такое виртуальный адаптер Ethernet?
Виртуальный сетевой адаптер — это программная конструкция, которую вы подключаете к виртуальным машинам Hyper-V. Они позволяют виртуальным машинам взаимодействовать друг с другом и с физическими устройствами, подключенными к сети. Виртуальные сетевые адаптеры также позволяют виртуальным машинам взаимодействовать с другими машинами в физической сети.
Зачем использовать виртуальный адаптер Ethernet?
Адаптеры Virtual Ethernet в Hype-V необходимы для того, чтобы виртуальные машины Hyper-V имели сетевое подключение к ресурсам как внутри среды Hyper-V, так и за пределами среды виртуализации. Это также позволяет администраторам подключать виртуальные машины к логическим сегментам сети, включая VLAN, для связи с соответствующими сегментами сети для интеграции существующих сервисов и сетей.
Как настроить виртуальный адаптер Ethernet в Hyper-V
Давайте рассмотрим шаги, необходимые для добавления и настройки виртуального адаптера Ethernet Hyper-V на ваши виртуальные машины Hyper-V, и посмотрим, как это достигается. Он включает в себя три этапа процесса:
- Создание виртуального коммутатора
- Создание виртуального адаптера Ethernet
- Настройка дополнительных параметров виртуального адаптера Ethernet
- Создание виртуального коммутатора
Первым шагом в настройке виртуального адаптера Ethernet является создание виртуального коммутатора. Виртуальный коммутатор — это логический коммутатор, соединяющий виртуальные машины с физическим сетевым адаптером или другими виртуальными машинами. Чтобы создать виртуальный коммутатор в Hyper-V, выполните следующие действия:
- Запустите диспетчер Hyper-V.
- Щелкните свой хост Hyper-V.
- Нажмите Диспетчер виртуальных коммутаторов.
Выберите тип подключения:
- Внешний — подключает виртуальные машины к физической сети, к которой подключен хост Hyper-V, и обеспечивает внешний обмен данными.
- Внутренний — подключает виртуальные машины к сети, которая доступна только виртуальным машинам, работающим на хосте.
- Частный — подключает виртуальные машины к сети, которая доступна только виртуальным машинам, подключенным к частному коммутатору.
- Назовите виртуальный коммутатор
- Для внешних коммутаторов вам нужно будет выбрать, какой физический адаптер будет использоваться
- Хост Hyper-V для подключения к физической сети
- Нажмите «ОК», чтобы создать виртуальный коммутатор.
Создайте виртуальный адаптер Ethernet
После создания виртуального коммутатора вы можете создать виртуальный адаптер Ethernet для подключения виртуальной машины к коммутатору. Добавление виртуального адаптера Ethernet к виртуальному коммутатору Hyper-V включает следующие шаги:
- Запустите диспетчер Hyper-V.
- Выберите настройки вашей виртуальной машины Hyper-V.
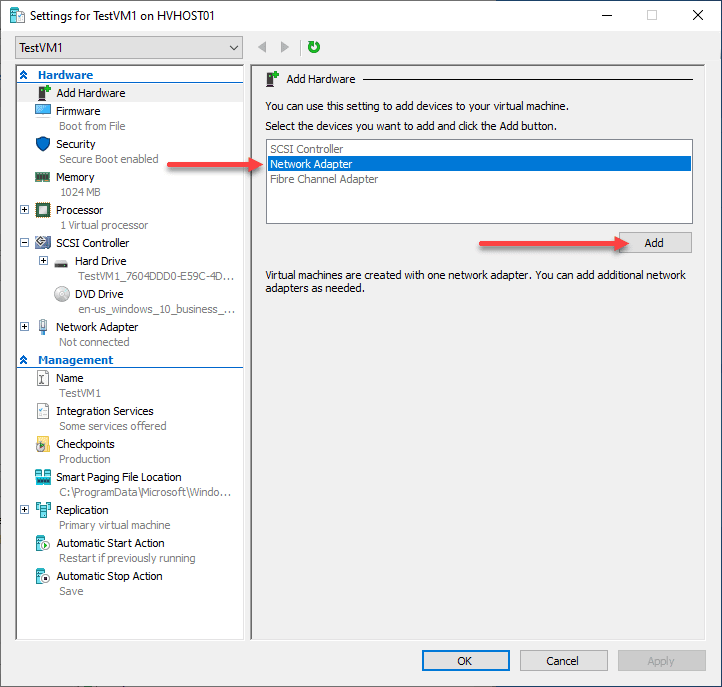
- Нажмите, чтобы добавить оборудование
- Выберите сетевой адаптер
- Нажмите Добавить
- Добавление нового виртуального адаптера Ethernet в виртуальную машину Hyper-V.
- Выберите виртуальный коммутатор, к которому вы хотите подключить новый виртуальный адаптер Ethernet.
- Нажмите «ОК», чтобы добавить виртуальный адаптер Ethernet.
Настройка виртуального адаптера Ethernet
После создания виртуального адаптера Ethernet необходимо правильно его настроить. Чтобы настроить виртуальный адаптер Ethernet в Hyper-V, выполните следующие действия:
- Запустите диспетчер Hyper-V.
- Выберите настройки вашей виртуальной машины Hyper-V (щелкните виртуальную машину правой кнопкой мыши).
- Нажмите на виртуальный адаптер Ethernet на левой панели.
- Выберите вкладку «Дополнительные функции».
Просмотр расширенных функций виртуального адаптера Ethernet на виртуальной машине Hyper-V
- Выберите любые дополнительные настройки для виртуального адаптера Ethernet — к ним относятся MAD-адрес, защита DHCP, защита маршрутизатора, защищенная сеть, зеркалирование портов и т. д.
- Нажмите ОК, чтобы сохранить изменения.
Вы также можете настроить виртуальный адаптер Ethernet изнутри виртуальной машины, как если бы вы настраивали физический сетевой адаптер.
Часто задаваемые вопросы по виртуальному адаптеру Ethernet
Что такое виртуальный адаптер Ethernet?
Это программный сетевой интерфейс, который позволяет виртуальным машинам, работающим на хосте Hyper-V, подключаться к сети. Он обеспечивает связь между виртуальными машинами, работающими на одном и том же хосте или на разных хостах.
Как создать виртуальный адаптер Ethernet в Hyper-V?
Сначала создайте виртуальный коммутатор Hyper-V. После этого вы можете создать виртуальный адаптер Ethernet, подключающий виртуальную машину к виртуальному коммутатору. Наконец, при необходимости настройте виртуальный адаптер Ethernet с расширенной конфигурацией.
Каковы преимущества использования виртуального адаптера Ethernet?
Во-первых, это позволяет виртуальным ресурсам взаимодействовать с физической сетью. Кроме того, виртуальные сети позволяют создавать виртуальные машины, не привязанные к конкретному физическому оборудованию, что упрощает перемещение рабочих нагрузок между хостами и масштабирование среды по мере необходимости.
Зачем вам использовать VLAN с виртуальными адаптерами Ethernet Hyper-V?
VLAN позволяют администраторам сегментировать сети на логические сегменты. Большинство организаций используют несколько VLAN для сегментации широковещательных доменов и повышения безопасности. Он обеспечивает логическое и безопасное разделение рабочих нагрузок.
Подведение итогов
Виртуальный коммутатор Hyper-V и виртуальный адаптер Ethernet являются важными компонентами вашей инфраструктуры виртуализации Hyper-V, позволяющими подключать критически важные для бизнеса рабочие нагрузки Hyper-V к физической сети. Это также позволяет виртуальным машинам взаимодействовать между собой. В конфигурации кластера Hyper-V виртуальные сети позволяют виртуальным машинам быть мобильными и переключаться между хостами Hyper-V.
Для новичков очень важно понимать основные концепции виртуальных сетей Hyper-V, включая виртуальный адаптер Ethernet.
Внимание! Данная статья не является официальной документацией.Использование информации необходимо выполнять с осторожностью, используя для этого тестовую среду.
Если у вас есть вопросы о построении современных систем резервного копирования, репликации, синхронизации данных и защиты от программ вымогателей обратитесь в нашу компанию для получения консультации о современных технологиях резервного копирования и восстановления данных. Наша компания имеет более чем 20-летний опыт в этой области. |
Десять лучших практик Vembu
Hyper-V is a powerful virtualization platform that enables users to create and manage virtual machines. It also provides a wide range of features, such as network virtualization, live migration, and the ability to use virtual Ethernet adapters.
Virtual Ethernet adapters are an important part of the Hyper-V platform. They allow for the creation of multiple networks within the same physical server by using a single physical network adapter. This eliminates the need for multiple physical network adapters, which can be costly and difficult to manage. The virtual Ethernet adapter can also be used to connect several VMs or servers together without having to utilize a dedicated LAN connection.
Using Hyper-V’s Virtual Switch Manager, users are able to quickly create and configure their own virtual switches that contain one or more virtual Ethernet adapters. They can then assign IP addresses and other networking configurations to each adapter in order to create separate networks within the server or connect it with other devices on the LAN. This makes it easy for administrators to set up complex networking environments in a short amount of time without having any specialized knowledge about networking technologies.
In addition, Hyper-V supports various types of advanced networking features such as Quality of Service (QoS), port mirroring, traffic shaping, bandwidth Reservations, etc., all of which can be enabled on the virtual switch level with ease.
Overall, Hyper-V’s Virtual Ethernet Adapter feature helps users save time and money by simplifying their network setup process while providing them with more control over their network environment. It also allows them to easily create multiple isolated networks within one physical server alongside other existing networks on their LAN connection.
The Benefits of Using Hyper-V Virtual Ethernet Adapter
A Hyper-V virtual Ethernet adapter provides a virtualized version of a physical network adapter, allowing you to connect your physical server with other servers, VMs, or any other networking devices over a LAN connection. This is especially useful in cloud computing environments where multiple virtual machines may be running on the same physical server. With a Hyper-V virtual Ethernet adapter, each VM can be connected to the LAN independently, allowing for greater flexibility and scalability. Additionally, using a virtual Ethernet adapter can help reduce costs by eliminating the need for additional hardware such as additional network cards for each VM.
Source: youtube.com
Enabling Hyper-V Virtual Ethernet Adapter
To enable the Hyper-V Virtual Ethernet Adapter, you will first need to open the Hyper-V Manager. Once you’ve done this, select the Virtual Switch Manager from the Actions menu on the right side of the screen. From there, click on ‘Create Virtual Switch’ and then select ‘External’ as your switch type. Once you have done this, it will prompt you to choose a physical network adapter from which to create a virtual switch. Select one and click OK to finish creating your virtual switch. Afterward, go back to your virtual machine settings and enable the Hyper-V Virtual Ethernet Adapter by selecting it from the list of available network adapters. Finally, select your new virtual switch and hit OK to apply the changes.
The Use of a Virtual Ethernet Adapter
A virtual Ethernet adapter is a type of network adapter that allows multiple logical partitions within the same physical server to communicate with each other without having to use an actual physical Ethernet adapter. By creating virtual Ethernet adapters, it allows network traffic to be exchanged between client logical partitions without requiring additional hardware resources. This is especially useful for cloud-based applications where hardware resources may be limited or expensive. Additionally, virtual Ethernet adapters can reduce the complexity and cost associated with managing multiple physical network adapters in an enterprise environment.
The IP Address of Hyper-V Virtual Ethernet Adapter
The IP address of the Hyper-V Virtual Ethernet Adapter is determined by the host system IP address. When the Hyper-V Default Switch is enabled it will randomly assign an IP address from the range of 192.168.0.0 to 192.168.255.255 to the virtual network adapter of each virtual machine connected to it. Therefore, the exact IP address of your Hyper-V Virtual Ethernet Adapter will depend on what IP address was randomly assigned to it by the Hyper-V Default Switch.
Source: serverfault.com
Do I Need an Ethernet Adapter?
An Ethernet adapter is not absolutely necessary, but it can be useful in certain situations. If you use your computer to access the internet wirelessly, an Ethernet adapter can be a helpful backup option if your wireless connection fails or is too slow. It can also provide faster speeds than Wi-Fi connections, which is especially helpful if you frequently stream movies or download large files. Additionally, it can be beneficial for troubleshooting network issues, since connecting via Ethernet allows you to bypass any router or Wi-Fi connection problems. All in all, having an Ethernet adapter on hand is a great way to ensure that you always have a reliable connection to the internet.
The Benefits of Virtual Ethernet
Virtual Ethernet is a technology that allows multiple logical partitions to communicate over a single physical connection. It does this by creating virtual Ethernet adapters on each logical partition. These virtual adapters are connected to virtual LANs, allowing the logical partitions to share data with each other without having to assign physical hardware to each partition. This makes it easier for organizations to manage their IT infrastructure and save on hardware costs. Virtual Ethernet is also a great way to help secure networks, as it prevents malicious traffic from crossing between different logical partitions.
Source: shauncassells.wordpress.com
Conclusion
In conclusion, Hyper-V is a powerful virtualization technology that allows you to create and manage multiple virtual machines on a single physical server. It provides features such as Virtual Switches, Virtual Ethernet adapters, and the Hyper-V Default Switch to allow seamless communication between virtual machines and external networks. With these features, Hyper-V can provide a secure and flexible solution for businesses of all sizes.
Skip to content
Beginners’ Guide for Microsoft Hyper-V: What is Virtual Ethernet Adapter: Part 69
The Hyper-V virtual Ethernet adapter is a critical component of your virtual networking for Hyper-V virtual machines. It provides the software construct needed for the virtual networking of VMs and other virtual resources in your Hyper-V infrastructure. Let’s consider Hyper-V virtual Ethernet adapter for beginners, what it is, and how it is used. In addition, we will see how to set one up.
What is virtual networking?
You may wonder about the purpose of virtual networking in virtualized environments such as Hyper-V. Virtual networking allows you to create virtual networks to help solve core technical and business challenges and allow virtual resources to interface with the outside world. For example, you can connect virtual machines to virtual switches using virtual Ethernet adapters. These allow Hyper-V virtual resources to communicate regardless of connectivity to the physical network.
Protect Your Data with BDRSuite
Virtual networking in a Hyper-V cluster allows creating VMs not tied to specific physical hardware, making it easier to move workloads between hosts and scale your environment as needed. This flexibility is essential for business-critical virtual machines’ agility, scalability, and mobility.
What is a Virtual Ethernet Adapter?
The virtual network adapter is a software-based construct you connect to your Hyper-V virtual machines. These allow VMs to communicate with one another and with physical devices connected to the network. The virtual network adapters also allow VMs to communicate with other machines on the physical network.
Why use a Virtual Ethernet Adapter?
Virtual Ethernet adapters in Hype-V are essential to allowing Hyper-V virtual machines to have network connectivity to resources both within the Hyper-V environment and those outside the virtualization environment. It also allows admins to connect virtual machines to logical network segments, including VLANs, to communicate with relevant network segments to integrate existing services and networks.

How to Set Up a Virtual Ethernet Adapter in Hyper-V
Let’s look at the steps required to add and configure a Hyper-V virtual Ethernet adapter to your Hyper-V virtual machines and see how this is accomplished. It includes three steps in the process:
- Creating a virtual switch
- Creating a virtual Ethernet adapter
- Configuring the virtual Ethernet adapter advanced options
Creating a virtual switch
The first step in setting up a virtual Ethernet adapter is to create a virtual switch. A virtual switch is a logical switch connecting virtual machines to a physical network adapter or other virtual machines. To create a virtual switch in Hyper-V, use the following steps:
- Launch Hyper-V Manager
- Click your Hyper-V host
- Click Virtual Switch Manager
- Choose the switch type:
- External – Connects the virtual machines to the physical network the Hyper-V host is connected to and allows external communication
- Internal – Connects virtual machines to a network that is only accessible to virtual machines running on the host
- Private – Connects VMs to a network that is only accessible to virtual machines connected to the private switch
- Name the virtual switch
- For External switches, you will need to choose which physical adapter will be used on the
- Hyper-V host to connect to the physical network
- Click OK to create the virtual switch

Create a Virtual Ethernet Adapter
Once you have created a virtual switch, you can create a virtual Ethernet adapter to connect a virtual machine to the switch. Adding a virtual Ethernet adapter to a Hyper-V virtual switch includes the following steps:
- Launch Hyper-V Manager
- Select the Settings of your Hyper-V VM
- Click to Add Hardware
- Choose Network Adapter
- Click Add
- Adding a new virtual Ethernet adapter to a Hyper-V virtual machine
- Choose the virtual switch you want to connect the new virtual Ethernet adapter to
Click OK to add the virtual Ethernet adapter
Configure the Virtual Ethernet Adapter
Once you have created the virtual Ethernet adapter, you must configure it properly. To configure a virtual Ethernet adapter in Hyper-V, use the following steps:
- Launch Hyper-V Manager
- Choose the settings for your Hyper-V virtual machine (right-click the VM)
- Click on the virtual Ethernet adapter in the left pane
- Choose the Advanced Features tab
- Choose any additional settings for the virtual Ethernet adapter – these include MAD address, DHCP guard, Router guard, Protected network, Port mirroring, etc
- Click OK to save the changes
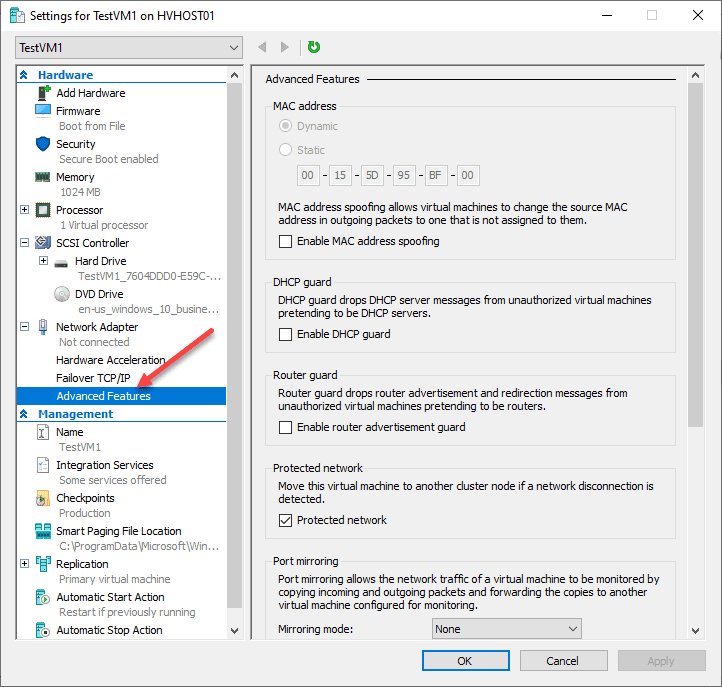
Viewing the advanced features of a virtual Ethernet Adapter on a Hyper-V virtual machine
You can also configure the virtual Ethernet adapter from within the virtual machine, as you would configure a physical network adapter.
Virtual Ethernet Adapter FAQs
What is a virtual Ethernet adapter?
It is a software-based network interface that allows VMs running on a Hyper-V host to connect to a network. It enables the communication between virtual machines running on the same host or on different hosts.
How do I create a virtual Ethernet adapter in Hyper-V?
First, create a Hyper-V virtual switch. After that, you can create a virtual Ethernet adapter connecting a virtual machine to the virtual switch. Finally, configure the virtual Ethernet adapter with advanced configuration as needed.
What are the benefits of using a virtual Ethernet adapter?
First, it allows virtual resources to communicate with the physical network. Additionally, virtual networking allows you to create virtual machines not tied to specific physical hardware, making it easier to move workloads between hosts and scale your environment as needed.
Why would you use VLANs with Hyper-V virtual Ethernet adapters?
VLANs allow admins to segment networks into logical segments. Most organizations will run multiple VLANs for segmenting broadcast domains and increasing security. It provides logical and security-based separation for workloads.
Wrapping up
The Hyper-V virtual switch and virtual Ethernet adapter are important components in your Hyper-V virtualization infrastructure, allowing you to connect your Hyper-V business-critical workloads to the physical network. It also allows VMs to communicate among themselves. In the Hyper-V cluster configuration, virtual networks enable VMs to be mobile and shift between Hyper-V hosts. For beginners, it is critical to understand the core concepts of Hyper-V virtual networking, including the virtual Ethernet adapter.
Read More:
Beginners’ Guide for Microsoft Hyper-V: Know about Hyper-V Licensing options: Part 68
Follow our Twitter and Facebook feeds for new releases, updates, insightful posts and more.
Try BDRSuite for Free!
Schedule a live demo with one of our product experts
Start your full-featured 30-day free trial
Explore detailed pricing, editions & features
The previous blog post covered how to create a Hyper-V virtual machine (VM). However, creating a Hyper-V VM is merely the first step of building a large-scale virtual environment; thereafter, you have to ensure that VMs that are running on a Hyper-V host are able to communicate with one another. For this purpose, you need to have knowledge on Hyper-V network adapters, the technology behind Hyper-V networking, as well as how Hyper-V networking can be configured.
About Hyper-V Networking
A virtual network adapter (also known as virtual NIC) can be regarded as a virtualized version of a physical network adapter. It is used in Hyper-V environments to connect a physical server with other servers, VMs, or any other networking devices over a LAN connection. In short, vNIC enables and manages all network communications.
Each VM has one or more vNICs, which provide connection to a single subnet. However, you can assign additional IP addresses to that NIC in order to gain access to multiple subnets.
When you install the Hyper-V role on your computer and start creating new VMs, you need to be aware of the networking configurations that are present by default.
- Earlier Windows versions (before Windows 10) had no virtual switches. However, when you enable Hyper-V on Windows 10, you can use a Default Switch for seamless networking, as it provides access to the host’s network.
- Hyper-V virtual network adapters enable communications between VMs through a virtual switch. However, newly created VMs do not have any virtual switches assigned to them. Each new VM has a network adapter, which can be configured by assigning a single virtual switch, or you can leave it disconnected. Thus, to enable network connectivity, you need to create a virtual switch and configure a virtual network adapter.
There are three virtual switches that provide different levels of network connectivity:
- An external virtual switch can connect to the physical network adapter, which allows VMs to access a physical network. An external virtual switch enables communications between VMs on the same physical computer, VMs and the physical computer, as well as enables VMs to access physical network.
- An internal virtual switch enables communications between the VMs running on the same Hyper-V server, as well as between those VMs and the management OS. However, this type of switch does not provide access to a physical network.
- A private virtual switch only ensures connectivity between the VMs that run on the same Hyper-V host. This type of network provides an isolated mode of network connectivity.
Another point worth mentioning is VLAN tagging, which is a method of assigning a specific tag (VLAN ID) to each packet running on the network. VLAN tagging simplifies the process of identifying which information packet belongs to a particular VLAN. As a result, this method allows you to isolate network traffic, and ensures that network communications are performed without disruption.
Virtual network adapters in Hyper-V can be of two types:
- Legacy network adapters emulate a physical network adapter and only work with Generation 1 VMs. This type of network adapter is used for unenlightened guest VMs that do not support Hyper-V Integration Services or Linux Integration Services. Up to 4 legacy vNiCs can be deployed on a single VM. Moreover, a legacy network adapter is applied for enabling communication between guest OSes that are not supported by Hyper-V. Legacy vNiCs can perform a network-based installation of the guest OSes.
- Synthetic network adapters are used for enlightened guest VMs that provide support for Hyper-V Integration Services or Linux Integration Services. Up to 8 synthetic vNICs can be deployed on a single VM. They generally provide better performance than legacy vNICs. In this case, network connectivity is enabled by VMBus, which provides and controls communication between separate partitions. Furthermore, with this type of a network adapter, you are able to use VLAN tagging.
How to Set Up Virtual Network Adapter in Hyper-V Manager
There are two ways through which you can enable and configure a Hyper-V network adapter: in Hyper-V Manager by using graphical user interface (GUI), or in PowerShell by running PowerShell scripts. We will discuss them both in detail. Now, let’s start with the former method:
- Open Hyper-V Manager.
- Find the VM for which you want to add a Hyper-V network adapter and right-click the VM name. Select Settings.
- The new menu will open, providing information about the VM settings. In the Hardware Section, select Add Hardware to see the list of devices that you can add to your VM.In our case, we are only interested in two options: Network Adapter and Legacy Network Adapter (which is only available for Generation 1 VMs). Select the network adapter that you need and click Add.

- You will be redirected to the Network Adapter section where you can configure a new Hyper-V network adapter by choosing a virtual switch to connect to, by enabling VLAN identification and specifying VLAN ID, and by specifying the maximum and minimum amount of bandwidth usage.You are also able to remove the Hyper-V network adapter by clicking Remove.

- Click Apply to save changes.


Moreover, in Hyper-V Manager, you can modify hardware acceleration settings and enable more advanced features.
- Double-click Network Adapter under the Hardware section. Select Hardware Acceleration. Here, you can enable Virtual Machine Queue (VMQ) and IPsec task offloading, as well as specify the maximum number of Offloaded SA (security associations).Hyper-V Virtual Machine Queue is a hardware virtualization technology that ensures direct network data transfer to the VM shared memory. IPsec is the security protocol used for encrypting network data exchange.With IPsec task offloading enabled, you can offload IPsec-related tasks to a network adapter so as not to overuse hardware resources.

- Click Apply to save changes.
- Then, select Advanced Features to set up the advanced features on the virtual network adapter. They include MAC address, DHCP guard, Router guard, Protected network, Port mirroring, and NIC teaming. Each feature is accompanied by a short description of how it can be used. Read them and decide which features should be enabled.
- Check the required boxes and click Apply to save changes.

Managing Hyper-V Network Adapters with PowerShell
As can be seen, configuration options in Hyper-V Manager are quite limited. Moreover, by using the GUI you are only able to set up Hyper-V network adapters for guest VMs, and not for the management OS. For this reason, PowerShell can be used to provide more advanced functionality and multiple configuration options. Let’s look at how Hyper-V network adapters can be managed in PowerShell.
Create Hyper-V network adapters
Note that in order for the PowerShell cmdlets to work, you need to run PowerShell in administrator mode. To do this, type PowerShell in a search bar, right-click the PowerShell icon, and select Run as Administrator.
Insert the Add-VMNetworkAdapter cmdlet to add a new virtual network adapter to a Hyper-V VM. Below is an example of how you can use this cmdlet:
Add-VMNetworkAdapter -VMName DemoVM -SwitchName DemoVSwitch –Name ‘Demo Network Adapter’
The following example demonstrates how you can add a second virtual network adapter in the management OS:
Add-VMNetworkAdapter -ManagementOS -Name ‘Second Network Adapter’
Connect or disconnect Hyper-V network adapters
The Connect-VMNetworkAdapter cmdlet allows you to connect a virtual network adapter to a virtual switch of your choice. The example below demonstrates how you can add one virtual switch (Default switch) to two VMs (DemoVM and New Virtual Machine) at the same time. Ensure that neither of the VMs is in a running state.
Connect-VMNetworkAdapter -VMName DemoVM, ‘New Virtual Machine’ -SwitchName ‘Default Switch’
To disconnect Hyper-V network adapter from a virtual switch or Ethernet resource pool, the Disconnect-VMNetworkAdapter cmdlet can be used. The following script allows you to disconnect all network adapters from a single VM named DemoVM:
Disconnect-VMNetworkAdapter -VMName DemoVM
This PowerShell script can be used to disconnect all virtual network adapters that are connected to a virtual switch Default Switch in all VMs in Hyper-V environment.
Get-VMNetworkAdapter -VMName *| Where-Object {$_.SwitchName -eq 'Default Switch'} | Disconnect-VMNetworkAdapter
With PowerShell, you can be even more precise in your configurations. If you want to disconnect all network adapters that are connected to a particular virtual switch (Default Switch) that are running on a certain VM (DemoVM), use the cmdlet below:
Get-VMNetworkAdapter -VMName DemoVM | Where-Object {$_.SwitchName -eq 'Default Switch'} | Disconnect-VMNetworkAdapter
Get Hyper-V network adapters
These PowerShell scripts can be used to access information about the virtual network adapters that are present on a particular VM, on the management OS, or on all VMs as well as the management OS running in the virtual environment. All of the cmdlets are presented below:
- For a single VM:
Get-VMNetworkAdapter –VMName DemoVM
- For the management OS:
Get-VMNetworkAdapter -ManagementOS
- For all VMs in Hyper-V environment, including the management OS:
Get-VMNetworkAdapter -All
If the final script is properly implemented, you will see the following screen containing information about your Hyper-V network adapters:

Remove Hyper-V network adapters
This cmdlet is used to remove one or more virtual network adapters from a VM, as well as from the management OS.
In the next example, the network adapter NewNetworkAdapter is removed from a VM named DemoVM:
Remove-VMNetworkAdapter -VMName DemoVM -VMNetworkAdapterName NewNetworkAdapter
The example below shows how you can remove the network adapter Secondary from the management OS:
Remove-VMNetworkAdapter -ManagementOs -Name Secondary
Rename Hyper-V network adapters
You can also rename a Hyper-V network adapter of a particular VM or on the management OS:
Rename-VMNetworkAdapter -VMName DemoVM -NewName ‘Network Adapter 2019’
In Hyper-V Manager you can verify that all network adapters of a VM named DemoVM have been successfully renamed.
To give a new name to a network adapter (Network Adapter 2019) of a particular VM (DemoVM), run the following script:
Rename-VMNetworkAdapter -VMName DemoVM -Name ‘Network Adapter 2019’ -NewName ‘Hyper-V network adapter’
The next cmdlet can help you to rename a network adapter of the management OS.
Rename-VMNetworkAdapter -ManagementOs -Name Adapter -NewName ‘Communications Channel’
Set Hyper-V network adapters
This section lists various cmdlets, which can be used for configuring the features of the Hyper-V network adapter in a Hyper-V VM or the management OS. Exploring all configuration options to their full extent can take a lot of time. Therefore, we will only discuss a few features that can be enabled through PowerShell.
For example, you can enable DHCP Guard by running the script below. DHCP Guard is used for protecting the system against unauthorized access from the side of the guest OS.
Set-VMNetworkAdapter -VMName DemoVM -DhcpGuard On
Additionally, you can enable Port Mirroring, which allows you to copy the network packets of one virtual network adapter and send them to another one. There are two mirroring modes: Source and Destination. By selecting Source mode, we agree that the network traffic of this particular network adapter will be copied and sent to the monitoring VM. The network adapter of that VM will be assigned a Destination mirroring mode. Note that each Source network adapter should be assigned a Destination network adapter in order for this feature to work.
To enable Port Mirroring in a Source mode, run the following script:
Set-VMNetworkAdapter -VMName DemoVM –Name ‘Hyper-V network adapter’-PortMirroring Source
This cmdlet will enable the Port Mirroring feature on the VM named DemoVM, and will assign its virtual network adapter the role of a source.
In the following example, the virtual network adapter named Monitoring is configured as the destination point for port mirroring. As a result, a VM named DemoVM (‘Source’) will monitor all network traffic of the VM named ‘New Virtual Machine’ (Destination).
Set-VMNetworkAdapter -VMName ‘New Virtual Machine’-Name Monitoring -PortMirroring Destination
The following cmdlet can be used to enable VLAN identification as well as to assign a specific VLAN ID:
Set-VMNetworkAdapterVlan -VMName DemoVM -VMNetworkAdapterName ‘Hyper-V network adapter’ -Access -VlanId 20
In this case, VLAN tagging will be enabled on a particular Hyper-V network adapter (Hyper-V network adapter) that is connected to a certain VM (DemoVM).
Or, if you want to disable VLAN tagging, type this cmdlet:
Set-VMNetworkAdapterVlan -VMName DemoVM -VMNetworkAdapterName ‘Hyper-V network adapter’ -Untagged
The main advantage of the PowerShell cmdlets is that you can arrange them in any way you want, and create comprehensive scripts. With their help, you can considerably optimize the process of managing and configuring your Hyper-V environment.
How to Protect Hyper-V Environment with NAKIVO Backup & Replication
NAKIVO Backup & Replication is a reliable and cost-effective solution which can provide 24/7 protection of your virtual environment, while ensuring that your most sensitive data and mission-critical applications can be rapidly recovered, even in a case of disaster. NAKIVO Backup & Replication includes a comprehensive set of tools, which enable fast and efficient backup, replication, and system recovery.
With this solution, you can significantly improve the performance of your backup and replication jobs, particularly by optimizing network operations within your infrastructure. For this purpose, NAKIVO Backup & Replication provides the following features:
- Network acceleration applies traffic reduction and data compression tools, which allow you to significantly decrease the amount of data transferred over the WAN. Such results are achieved by the use of two Transporters, which are installed at both sites (source and target). The Transporter in the source site compresses VM data before it is sent over the network, whereas the Transporter in the target site decompresses the received data. As a result, the speed of VM backup and replication jobs can be considerably increased and the network load can be reduced.
- Advanced bandwidth throttling allows you to set data transfer speed limits so as to define how much bandwidth can be used by particular data protection jobs. For this purpose, you need to create global or per-job rules that would control how much bandwidth is consumed during backup operations. These rules can be applied to different data protection jobs and on different schedules. With this feature, you can ensure that your networks are not be overloaded, even during business hours.
- Network Mapping and Re-IP are used in replication, failover, and site recovery jobs when the source site and the target site are connected to different networks and have different IP addresses. To avoid any issues during disaster recovery, you need to create network mapping and Re-IP rules. These rules ensure that source virtual networks can be mapped to appropriate target virtual networks, while source IP addresses can be mapped to target IP addresses during a DR event. These features allow you to efficiently optimize and automate the process of network configuration.
В данной инструкции мы рассмотрим варианты настройки сетей Hyper-V, расскажем для чего служат каждый тип виртуального коммутатора и базовую настройку каждого из них.
Используются 2 виртуальные машины на ОС Windows Server 2019. Для выполнения действий ниже необходимо иметь процессор с поддержкой аппаратной виртуализации, а также в настройках BIOS/UEFI включить виртуализацию. Также необходимо установить Hyper-V.
Для того, чтобы создать виртуальное сетевое устройство необходимо зайти в Диспетчер Hyper-V → Диспетчер виртуальных коммутаторов. На выбор Hyper-V предлагает 3 типа коммутаторов: внешний, внутренний и частный. Разберемся для чего нужен каждый из них.
Настройка внешней сети
Если вам необходимо, чтобы ваша виртуальная машина была доступна в вашей локальной сети и могла выходить в интернет, то выберите тип внешний.
Для этого в диспетчере виртуальных коммутаторов выберете внешний коммутатор, нажмите создать виртуальный коммутатор присвойте ему имя, а затем подключите его к вашей виртуальной машине.

Рисунок 1 — Диспетчер виртуальных коммутаторов
Для этого зайдите в параметры виртуальной машины, выберите слева пункт Установка оборудования, затем в списке справа сетевой адаптер → добавить.

Рисунок 2 — Параметры сетевого адаптера
Далее перейдите в пункт слева сетевой адаптер и в списке виртуальный коммутатор выберете ваш новый виртуальный коммутатор. Теперь он должен появиться внутри ВМ.
Принцип работы с ним практически не отличается от работы с сетевым адаптером на обычном компьютере. В настройках сети вам необходимо будет прописать IP вашего сетевого шлюза (роутера/свича) и назначить IP машины.
Для этого нужно открыть выполнить ввести и открыть ncpa.cpl на виртуальной машине, нажать ПКМ на сетевой адаптер vEthernet (в случае, если на вашей ВМ установлен только один виртуальный сетевой адаптер, то в оснастке он будет единственным), зайти в Свойства → IP версии 4 → Свойства и прописываем IP-адрес, маску подсети и адрес сетевого шлюза.
Далее на ВМ включите сетевое обнаружение. Зайдите в Панель управления → Центр управления сетями и общим доступом → Изменить дополнительные параметры общего доступа и в каждом профиле сети включите сетевое обнаружение.

Рисунок 3 — Настройка общего доступа
Затем попробуйте запустить ping до машины по этому внешнему адресу. Если ВМ пингуется, значит она доступна для других устройств в локальной сети.
Настройка внутренней сети
Если вы хотите настроить доступ с вашей хост-машины и между виртуальными машинами, то выбирайте тип внутренний.
В данном случае сетевой шлюз указывать не нужно; только прописать IP-адрес и маску подсети и включить сетевое обнаружение на ВМ.
Также после того, как вы создали внутренний коммутатор, на хост-машине зайдите в выполнить (Win+R) → введите ncpa.cpl → Enter. Там вы обнаружите Hyper-V Virtual Ethernet Adatpter, зайдите в свойства этого устройства и также пропишите IP-адрес и маску подсети в свойствах IPv4 в свойствах адаптера, чтобы хост-машина смогла взаимодействовать с ВМ по внутренней сети.
Обратите внимание! Для того, чтобы виртуальные машины и хост-машина смогли общаться между собой по внутреннему виртуальному коммутатору, необходимо, чтобы они были в одной подсети.
Например:
Вы назначили ВМ1 IP-адрес 187.255.1.1 и маску подсети 255.255.255.0
Значит, у ВМ2 и хост-машины должен быть IP-адрес в диапазоне 187.255.1.2-254 и такая же маска подсети.
Проверяем работу внутренней сети так же через PING.

Рисунок 4 — Скриншот с хост-машины
Настройка частной сети
Если вам нужна сетевая коммуникация только между ВМ, то выберите частную сеть.
Частная сеть практически ничем не отличается от внутренней; только тем, что хост-машина не может подключаться к виртуальным машинам.
Действия для настройки частной сети идентичны таковым при внутренней, с тем отличием, что виртуальный сетевой адаптер не появится на хост-машине, и вам нужно будет только прописать сетевые конфигурации ВМ в ncpa.cpl.
Что такое Default Switch?
Этот тип виртуального коммутатора создаётся гипервизором автоматически и использует технологию NAT для выхода в интернет.
Подходит только в тех случаях, когда на ВМ вам нужен только выход в интернет.
IP-адрес назначается автоматически и динамически, что значит, что он будет постоянно меняться, а hostname не успевать обновляться, поэтому не подходит для настройки сетевого взаимодействия между виртуальными машинами и устройствами в локальной сети.