
Время на прочтение7 мин
Количество просмотров31K

Если вы отвечаете за управление Hyper-V в своей организации, то вам необходимо знать о преимуществах и недостатках шести лучших инструментов управления Hyper-V.
Hyper-V Manager — это инструмент Microsoft, поставляемый в комплекте с ролью Hyper-V. Его можно использовать для управления виртуальными машинами (virtual machine, VM), работающими на локальных или удалённых хостах Hyper-V.
▍ Плюсы Hyper-V Manager
- Он доступен бесплатно и поставляется в составе инструментов Microsoft для управления Hyper-V для Windows Server и Windows 10/11.
- Поскольку это встроенный инструмент, он стабилен и имеет хорошую производительность.
- Он позволяет создавать локальные и удалённые VM, чекпоинты VM, VHD, виртуальные коммутаторы и репликацию, а также управлять ими; по сути, это все функции, которые поддерживает Hyper-V.
- Можно выполнять аутентификацию при помощи учётных данных, отличающихся от локального аккаунта, для подключения к удалённому хосту Hyper-V, используя DNS-имя или IP-адрес хоста.
- Можно экспортировать и импортировать VM, и эта возможность применима как простой способ резервного копирования VM.
▍ Минусы Hyper-V Manager
Hyper-V Manager — отличный инструмент для небольших окружений виртуализации, однако он имеет и недостатки:
- Удаление VM в Hyper-V Manager на самом деле не удаляет соответствующие файлы виртуальных жёстких дисков (VHD), поэтому подчищать их администратору приходится вручную.
- Системе не хватает расширенных функций, например, возможности создания кластеров Hyper-V и автоматического создания VM. Хотя она способна распознавать хосты-кластеры, для кластерных VM не поддерживаются некоторые операции (например, изменение VHD).
- Система поддерживает только хосты Hyper-V; то есть управление хостами VMware ESXi или Citrix XenServer невозможно. Следовательно, её нельзя использовать в гетерогенных окружениях виртуализации.
PowerShell
PowerShell — отличный инструмент управления Hyper-V для администраторов, привыкших работать с командной строкой и скриптами. PowerShell remoting упрощает администраторам удалённое управление несколькими хостами Hyper-V и автоматизацию рабочих процессов при помощи скриптов. PowerShell Direct (PowerShell, запущенный внутри виртуальной машины из хоста Hyper-V) существенно расширяет возможности, позволяя управлять гостевыми VM под Windows без предварительного конфигурирования сети.

Запуск интерактивной сессии PowerShell remoting с сервером Hyper-V
▍ Плюсы PowerShell
Использование PowerShell для управления Hyper-V имеет следующие преимущества:
- PowerShell бесплатен, поставляется в комплекте с Windows и полностью интегрирован с Hyper-V и Windows.
- Поскольку PowerShell также является скриптовым языком, по сути, можно автоматизировать любую задачу управления, не поддерживаемую GUI-инструментами.
- Поддержка кроссплатформенности CLI упрощает администраторам удалённую работу с хостами Hyper-V, запущенными на гостевых VM без Windows (например, с Linux).
- Инструменты командной строки обычно быстры, менее подвержены багам и сбоям по сравнению с GUI-инструментами.
▍ Минусы PowerShell
Как и у любого инструмента, у PowerShell есть свои недостатки. Давайте рассмотрим минусы использования PowerShell в качестве инструмента управления Hyper-V.
- Поскольку это инструмент командной строки, его будет сложно осваивать администраторам, привыкшим к GUI-инструментам.
- PowerShell remoting требует ручного конфигурирования хостов и VM Hyper-V.
- PowerShell Direct работает только с гостевыми VM, на которых запущены Windows 10 и Windows Server 2016 (или выше) на хостах Hyper-V.
Windows Admin Center
Windows Admin Center — это свободный браузерный инструмент, который можно скачать из Microsoft Evaluation Center. Можно установить его или на Windows-сервер, или на присоединённом к домену компьютеру с Windows 10/11. Если инструмент установлен на сервере, он работает в качестве шлюза, позволяя нескольким администраторам вашей организации управлять хостами Hyper-V и другими устройствами, не увеличивая стоимость лицензирования.

Windows Admin Center
▍ Плюсы Windows Admin Center
- Это интегрированный набор инструментов для управления хостами Hyper-V, кластерами Hyper-V, Azure Stack HCI, Windows-серверами, рабочими станциями Windows и Azure VM.
- Он позволяет нескольким администраторам организации удобно управлять хостами Hyper-V через веб-браузер.
- Он использует внутренние технологии Windows (PowerShell, WMI и WMF) и не требует никакой установки агентов на хостах.
- Можно конфигурировать его так, чтобы он безопасным образом управлял хостами из любой точки мира через Интернет.
- Поддерживает современные способы аутентификации и управление доступом на основе ролей, давая вам детальный контроль за тем, кто к чему имеет доступ.
- Также он позволяет использовать расширения, добавляющие функции и возможности.
▍ Минусы Windows Admin Center
На мой взгляд, недостатков у использования Windows Admin Center в качестве инструмента управления Hyper-V нет. Однако существуют некоторые проблемы, которые иногда сложно устранять, в частности, в окружениях рабочих групп без Active Directory. Если вы считаете, что Windows Admin Center имеет недостатки, напишите об этом в комментариях.
System Center Virtual Machine Manager
System Center — это коммерческий пакет Microsoft для управления дата-центрами, содержащий инструмент управления Hyper-V под названием Virtual Machine Manager (VMM), также иногда называемый System Center Virtual Machine Manager (SCVMM). VMM не распространяется как отдельный продукт. Он также может использоваться и для управления Hyper-V, однако в первую очередь рассчитан на использование в гетерогенных системах, состоящих из разных типов гипервизоров, таких как Microsoft Hyper-V, VMware ESXi и Citrix XenServer.

System Center Virtual Machine Manager 2022
▍ Плюсы SCVMM
SCVMM обладает следующими достоинствами:
- Предоставляет все основные и расширенные функции для управления хостами и кластерами Hyper-V в одной плоскости управления. Он может работать не только с Hyper-V, но и эффективно управлять гипервизорами ESXI и XenServer.
- Его интегрированная конверсия physical-to-virtual (P2V) позволяет с лёгкостью виртуализовать физические серверы или машины.
- Позволяет осуществлять быстрое развёртывание и миграцию при помощи шаблонов VM. Администраторы могут создавать и разворачивать VM серийно, что просто необходимо, если вам нужно управлять множеством VM.
- Предоставляет возможность централированного мониторинга и отчётности, что обеспечивает администраторам подробную информацию обо всей инфраструктуре серверов дата-центра.
▍ Минусы SCVMM
С точки зрения малых и средних организаций инструмент имеет следующие недостатки:
- Покупка всего пакета System Center может оказаться слишком дорогой для вашей организации, если он нужен вам только для управления Hyper-V.
- Запуск SCVMM имеет высокие аппаратные и программные требования.
- Из-за сложности продукта администраторам нужно вкладывать больше времени в обучение для использования инструмента.
- SCVMM требует установки агента на каждый хост, которым нужно управлять.
ProHVM компании Probus IT
ProHVM — коммерческий инструмент управления Hyper-V, позволяющий администрировать любую версию Hyper-V, работающую на Windows Server, Server Core, Windows 10/11 или на bare-metal-сервере Hyper-V. Для каждого хоста Hyper-V, которым нужно управлять, требуется приобретение лицензии Professional, а лицензия Technician позволяет одному пользователю управлять неограниченным количеством хостов Hyper-V. Версия ProHVM Standard полностью бесплатна для личного и коммерческого использования.

ProHVM
▍ Плюсы ProHVM
- Поддержка управления хостами Hyper-V в разных доменах и рабочих группах с использованием разных наборов учётных данных.
- Версия Standard бесплатна для коммерческого использования с ограниченным набором функций. Кроме того, коммерческая версия выгоднее, чем у многих других инструментов управления Hyper-V.
- Инструмент позволяет управлять файлами и папками на удалённых хостах.
- Включает в себя cVM — превосходную альтернативу VMConnect.exe или RDP-клиенту. В cVM можно использовать параметры для создания горячих клавиш или скриптов логина для удобного подключения к VM.
- Поддерживает расширенные возможности, например, экспорт и импорт VM, миграцию накопителей, поддержку кластеров, живую миграцию и Hyper-V Replica.
▍ Минусы ProHVM
- Это традиционное десктопное приложение, требующее установки на рабочую станцию каждого администратора. Отсутствует опция централизованной установки и поддержка веб-браузера.
- При использовании стороннего продукта могут возникать сомнения в надёжности, безопасности и поддержке.
Igiko Management Tools
Igiko Management Tools — ещё одно коммерческое веб-приложение, которое можно использовать для удалённого управления хостами и VM Hyper-V, а также их мониторинга. Можно установить его на машину с Windows, а затем использовать веб-браузер для удалённого управления хостами Hyper-V, то есть его можно запускать под Windows, Linux или macOS.

Igiko Management Tools
▍ Плюсы Igiko Management Tools
- Этот легковесный браузерный инструмент предоставляет нескольким администраторам доступ для удалённого управления хостами и VM Hyper-V без необходимости установки на каждой рабочей станции.
- Он имеет возможность подключения гостевых VM в RDP-консоли на основе HTML5 при помощи веб-браузера.
- Он позволяет переносить файлы между локальными и удалёнными хостами.
- Встроенный удалённый шлюз позволяет подключать хосты и VM Hyper-V из любой точки мира через Интернет, а затем управлять ими. Защищённый веб-тоннель даже не требует статического IP-адреса или DNS.
- Он предоставляет живой контроль за хостами и гостевыми VM Hyper-V, передавая информацию о таких параметрах, как потребление ресурсов ЦП, памяти, аптайме и версии ОС.
- Он имеет модель аутентификации с подходом claims-based для пользователей и групп Windows.
- Возможна установка прав на хосты и VM Hyper-V отдельным пользователям или группам.
▍ Минусы Igiko Management Tools
- Первоначальное подключение к удалённым хостам и VM может быть сложным, а ошибки иногда трудно устранять.
- RDP-консоль на основе HTML5 в прошлом имела баги и иногда у неё возникают проблемы с масштабированием экрана.
- Многие функции инструмента доступны и в Hyper-V Manager.
Заключение
Выбор наиболее подходящего для вашей организации инструмента управления Hyper-V сильно зависит от размеров сети и, разумеется, от бюджета. На мой взгляд, если вы работаете в небольшой организации с десятками хостов Hyper-V, то для ваших потребностей хорошо подойдёт Hyper-V Manager (возможно, в сочетании с Failover Cluster Manager). Если вам не нравится Hyper-V Manager, то стоит попробовать ProHVM — превосходную стороннюю альтернативу, имеющую отличное соотношение цены и возможностей.
Если вы работаете в организации средних размеров, имеющей сотни хостов Hyper-V, то эффективно управлять ими вам поможет Windows Admin Center, не требующий трат на лицензирование.
Провайдеры Managed Service Provider (MSP) и крупные организации часто лицензируют System Center, поэтому логичным выбором для их корпоративных сетей является VMM.
RUVDS | Community в telegram и уютный чат

Платформа виртуализации Hyper-V доступна не только в Windows Server, но и в десктопных редакциях Windows 10 и 11. С помощью встроенного гипервизора Hyper-V пользователи могут создавать и запускать виртуальные машины. В этой статье мы рассмотрим, как включить компоненты Hyper-V в Windows 10 и 11.
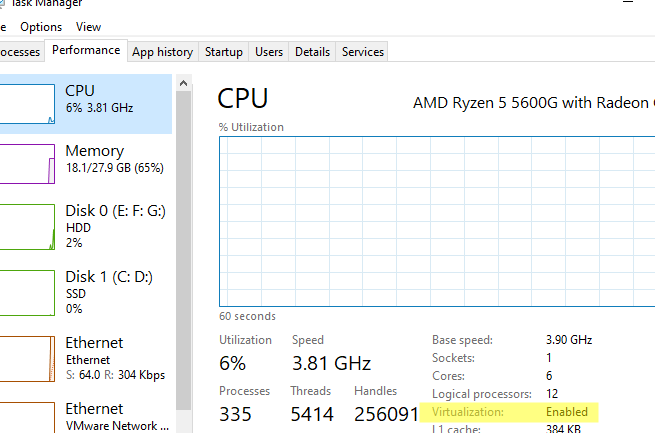
Компоненты роли виртуализации Hyper-V можно установить в Pro и Enterprise редакциях Windows 10 и 11. Сначала, нужно проверить, поддерживает ли ваш компьютер виртуализацию Hyper-V. Откройте командную строку с правами администратор и выполните:
systeminfo
Промотайте в конец вывода и проверьте, что включены следующие компоненты в разделе Hyper-V Requirements:
VM Monitor Mode Extensions: Yes
Virtualization Enabled In Firmware: Yes
Second Level Address Translation: Yes
Data Execution Prevention Available: Yes

Если здесь указано Virtualization Enabled in Firmware: No, попробуйте включить аппаратную поддержку виртуализации в настройках BIOS/UEFI компьютера (может называться Intel VT-X или AMD-V).
Также проверить совместимость вашего процессора можно на вкладке CPU в диспетчере задач Windows. Здесь должно быть указано
Virtualization: Enabled
.
Если тут указано
A hypervisor has been detected. Features required for Hyper-V will not be displayed
, значит компоненты Hyper-V уже установлены.
Включить роль Hyper-V в Windows 10 и 11 можно через панель управления компонентами Windows Features. Выполните команду
optionalfeatures
и выберите для установки компоненты Hyper-V Platform и Management Tools.
Также вы можете включить компоненты Hyper-V в Windows из командной строки. С помощью PowerShell команды:
Enable-WindowsOptionalFeature -Online -FeatureName Microsoft-Hyper-V -All
Или с помощью DISM:
dism.exe /Online /Enable-Feature:Microsoft-Hyper-V-All

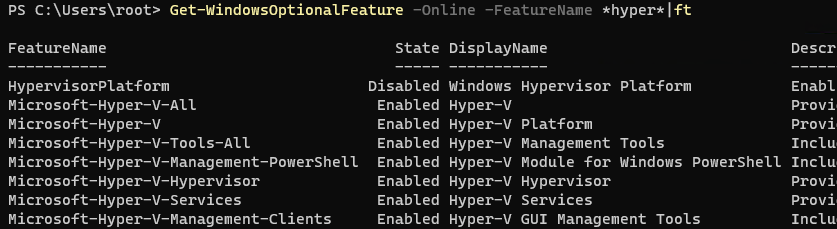
После завершения установки компонентов перезагрузите компьютер. Проверьте, что компоненты гипервизора установлены:
Get-WindowsOptionalFeature -Online -FeatureName *hyper*|ft
Включите автоматический запуск Hyper-V при загрузке:
bcdedit /set HypervisorLaunchType auto
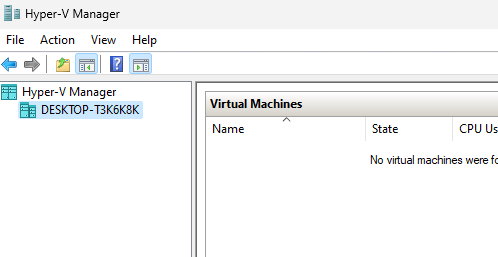
Для управления Hyper-V и виртуальными машинами используется графическая консоль Hyper-V Manager (
virtmgmt.msc
). Запустите ее и можете начать создавать виртуальные машины.
Также для управления гипервизором и ВМ можно использовать командлеты PowerShell из встроенного модуля Hyper-V.
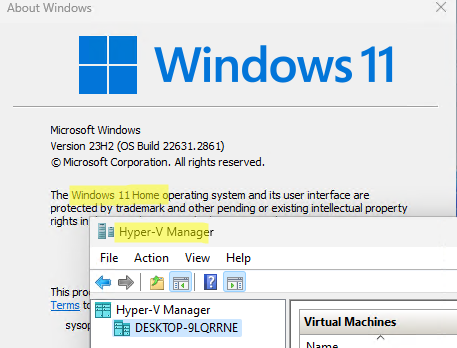
Компонент виртуализации Hyper-V отсутствует в домашних (Home) редакциях Windows 10 и 11. Однако есть небольшой трюк, который позволяет установить роль Hyper-V из зранилища компонентов WinSxS даже в Home редакции Windows.
Создайте на рабочем столе файл enable-hyperv.bat с кодом
pushd "%~dp0"
dir /b %SystemRoot%\servicing\Packages\*Hyper-V*.mum >hyper-v.txt
for /f %%i in ('findstr /i . hyper-v.txt 2^>nul') do dism /online /norestart /add-package:"%SystemRoot%\servicing\Packages\%%i"
del hyper-v.txt
 Dism /online /enable-feature /featurename:Microsoft-Hyper-V -All /LimitAccess /ALL
pause
Запустите BAT файл с правами администратора.
После завершения установки компонентов, перезагрузите компьютер. Проверьте, что виртуализация Hyper-V теперь доступна в вашей Home редакции Windows.
Windows 10 is a powerful operating system that allows users to run multiple operating systems simultaneously on a single computer through virtualization. With the help of Hyper-V, a built-in Windows feature, you can create and manage virtual machines (VMs) effortlessly. In this article, we will discuss the process to install and enable Hyper-V on Windows 10.
Hyper-V and virtual machines on Windows 10
Hyper-V is a virtualization technology developed by Microsoft. Each virtual machine on Windows 10 operates in its own isolated space, which means you can run different operating systems side-by-side without affecting your primary system’s stability. It’s like having multiple different computers all in one.
Here are a few reasons you should enable Hyper-V on Windows 10.
- Isolation: Each virtual machine on Windows 10 is completely isolated from your main operating system, which means if something goes wrong inside the virtual machine, it doesn’t affect your host system.
- Testing environments: Hyper-V is perfect for testing applications on different operating systems or configurations without the need for multiple physical devices.
- Resource management: You have control over how much computing power, memory, and storage each virtual machine uses, allowing for efficient resource management.
- Snapshot feature: Hyper-V allows you to take snapshots of your virtual machines at any point. This lets you save the current state and revert back to it if needed, which is a lifesaver when testing software.
System requirements for Hyper-V
Before you enable Hyper-V on Windows 10, make sure your computer meets the following system requirements:
- 64-bit Processor with Second Level Address Translation (SLAT) — This helps with the performance of your virtual machine on Windows 10.
- CPU that supports VM Monitor Mode Extensions
- Minimum of 4 GB RAM — The more memory you have, the better performance you’ll get, especially if you plan to run multiple virtual machines.
- BIOS-level Hardware Virtualization support
- Windows 10 Enterprise, Pro or Education edition — Hyper-V is not available on Home edition.
How to turn on hardware virtualization
To enable virtualization in Windows 10, you must take several steps. First, you must know how to turn on hardware virtualization in BIOS settings. From there, you can use PowerShell, DISM, or the Settings app to turn on Hyper-V.
How to enable virtualization in BIOS settings
The exact steps for how to enable virtualization in BIOS can vary depending on your computer’s motherboard manufacturer and BIOS version, but here’s a general guide:
- Enter the BIOS setup:
- Restart your computer.
- During the boot process, press a key to enter the BIOS setup. This key varies but is often one of the following: Del, F2, F10, Esc or F12. The correct key should be displayed during boot (e.g., “Press [Key] to enter setup”).
- Navigate to the Virtualization Settings:
- Once in the BIOS setup, look for a section related to CPU Configuration, Advanced or Security settings. The exact name can vary.
- Within this section, search for options related to virtualization. Common names include:
- Virtualization Technology (VT-x)
- Intel Virtualization Technology
- AMD-V (for AMD processors)
- SVM Mode (for AMD processors)
- Enable virtualization:
- Select the virtualization option and change the setting to Enabled.
- If you see options like VT-d or IOMMU, enabling them can also improve performance for virtual machines but is not strictly necessary for Hyper-V.
- Save and exit:
- Follow the instructions within your BIOS to Save and Exit. This is often done by pressing the F10 key, but ensure to follow the prompts on your screen.
- Your computer will reboot with the changes applied.
Enable Hyper-V using PowerShell
To enable Hyper-V using PowerShell, you need to run PowerShell as an Administrator and execute specific commands. This process will allow you to install the Hyper-V feature on your Windows system, assuming your computer meets the necessary hardware requirements and you have virtualization enabled in the BIOS/UEFI settings. Here’s how to do it:
- Open PowerShell as an Administrator:
- Right-click the Start button or press Windows + X and select “Windows PowerShell (Admin)” or “Command Prompt (Admin)” if PowerShell isn’t available. On Windows 11, you might see “Terminal (Admin)” instead.
- If you’re prompted by the User Account Control (UAC) dialog, click “Yes” to allow the app to make changes to your device.
- Check if Hyper-V can be installed:
- Before installing Hyper-V, it’s a good idea to check if your system supports it. Execute the following command: Systeminfo
- Look under the “Hyper-V Requirements” section to see if all the requirements are met. If they are, you can proceed with the installation.
- Install Hyper-V:
- To install Hyper-V, use the following command: Enable-WindowsOptionalFeature -Online -FeatureName Microsoft-Hyper-V -All
- Restart your computer:
- After the installation process completes, you need to restart your computer for the changes to take effect. You can do this immediately by using the following command: Restart-Computer
After your computer restarts, Hyper-V will be enabled and you can start creating and managing your virtual machine on Windows 10. You can access the Hyper-V Manager from the Start menu to begin working with virtual machines.
Enable Hyper-V with DISM
DISM is a command-line tool that can be used to service and prepare Windows images, including those used for Windows PE, Windows Recovery Environment (Windows RE) and Windows Setup. It can also be used to enable Windows features while the operating system is running.
Here’s how to enable Hyper-V using DISM:
- Open Command Prompt as Administrator:
- Right-click the Start button or press Windows + X, then select “Command Prompt (Admin)” or “Windows Terminal (Admin)” if Command Prompt isn’t directly listed. On Windows 11, you’re more likely to find “Windows Terminal (Admin)”.
- If prompted by the User Account Control (UAC) dialog, click “Yes” to allow the app to make changes to your PC.
- Enable Hyper-V using DISM:
- Type the following command into the Command Prompt and press Enter: DISM /Online /Enable-Feature /All /FeatureName:Microsoft-Hyper-V
- Restart your computer:
- After the command completes, you’ll likely need to restart your computer for the changes to take effect. The command prompt might prompt you to do this or you can manually restart your computer.
Enable Hyper-V through Settings
If you prefer a more user-friendly approach, you can enable virtualization on Windows 10 through the Settings app. This method provides a graphical user interface (GUI) for users who prefer not to use the command line. To do this, follow these steps:
- Open the Settings app:
- Press Windows + I to open the Settings app, or click on the Start menu and then click on the gear/settings icon.
- Access the Windows Features:
- For Windows 10: Navigate to “Apps” > “Optional Features” > “More Windows features” at the bottom of the page.
- For Windows 11: Navigate to “Apps” > “Optional Features” > “More Windows features” at the bottom of the “Related settings” section.
- Enable Hyper-V:
- In the “Windows Features” window that opens, scroll down to find “Hyper-V” and check the box next to it.
- Make sure both “Hyper-V Management Tools” and “Hyper-V Platform” are selected. The management tools include the Hyper-V Manager, which is a GUI tool for managing a Hyper-V virtual machine on Windows 10, and the platform provides the necessary services and management for virtual machines.
- Click “OK” to begin the installation process. Windows will apply the changes, which may take a few minutes.
- Restart your computer:
- After the installation is complete, you will likely be prompted to restart your computer. Make sure to save any open work and then restart your computer to complete the installation process.
Enhance your IT management with NinjaOne. From enabling Hyper-V to managing virtual environments, NinjaOne makes it easy.
→ Watch a demo
Secure your VM infrastructure with NinjaOne
Learn how to simplify device management with NinjaOne RMM. With NinjaOne, you can easily enable Hyper-V on Windows 10 across all of your virtual machines, monitor their performance, and ensure the security of your VM infrastructure from one place. Take control of your virtualized environment and experience hassle-free VM management. Contact us for a free trial.
Here, in this article, we will present you 5 ways to Open Hyper V Manager in Windows 10 or 11. Accessing this Administrative Tool could be tricky, especially when you are using a new system.
Following a few simple steps can help you find Hyper-V Manager in times of emergency or just in case some VM needs extra attention easily. Different versions of Windows have different methodology and techniques for accessing VM, here we will focus only on Windows 10 version. List of ways to Open Hyper V Manager in Windows 11 or 10 –
1: Using Cortana
2: Access via Control Panel
3: Through Run Command
4: From Command Prompt
5: Via Windows PowerShell
Methods to Open Hyper V Manager in Windows 11 and 10
Before exploring the ways to open Hyper V Manager in Windows 11 or 10, the first thing is to ensure that its feature is successfully installed on your PC.
Step-1: Press Windows logo key and when the Start Menu shows up, type Windows features. Once the result displays the option ”Turn Windows features on or off”, hit Enter.
Step-2: In the Windows Features box, locate Hyper-V.
Step-3: Select Hyper-V checkbox and click OK to install its feature. Now, proceed towards various ways to open Hyper V Manager in Windows 10.
Way-1: Using Cortana
I. Open Start Menu and type hyper.
II. Cortana will immediately display Hyper V Manager as the Best match, click on it.
Way-2: Accessing via Control Panel
i. First of all, Open Control Panel using any of your preferred procedures.
Tip: Read Display Control Panel on Power User Menu Instead Settings Windows 10.
ii. Once inside Control Panel, make the icons into small view. Navigate to Administrative Tools and click on it.
iii. In the Administrative Tools window within the right side pane, locate Hyper-V Manager and double click on it.
Way-3: Through Run Command
A. Get access to Run Dialog Box by together hitting ‘Windows + R’ hotkeys or right-click Start icon and select Run.
B. Now, type or copy-paste Virtmgmt.msc and click OK.
Way-4: From Command Prompt
# Go to Cortana text box, type cmd, and press Enter.
# Once the black window appears on the PC screen, type virtmgmt.msc and hit Enter.
Way-5: Via Windows PowerShell
• Perform a right-click on Start icon to launch Power user menu. In addition, you can also access the menu by pressing Windows + X.
• From the list, find Windows PowerShell and click on it.
• Now, on the blue window, simply copy-paste or type the command virtmgmt.msc. Finally, to open Hyper V Manager, press Enter.
These are the few basic and simple methods to Open Hyper V Manager in Windows 11 or 10. Hopefully, with these techniques, you will not face any more difficulties in accessing the tool.
Microsoft provides a wide variety of tools for managing Hyper-V environment: System Center Virtual Machine Manager (SCVMM), PowerShell, Server Configuration tool, etc. However, Hyper-V Manager stands out among them due to its simplicity and user-friendly interface. In this blog post, we will discuss how to install and configure Hyper-V Manager and how it can improve the Hyper-V management process.
Microsoft Hyper-V Manager is an administrative tool which can be used for creating, modifying, and removing virtual machines (VMs) and hosts running in a Hyper-V virtual environment. Hyper-V Manager was first released by Microsoft along with Widows Server 2008 and since then it has been available as part of Windows OS, meaning that it doesn’t require any additional licensing.
System requirements
Before installing Hyper-V Manager, make sure that your computer meets the hardware requirements to host Hyper-V. Even though the management tool doesn’t have any particular hardware requirements, Hyper-V Manager should be deployed on the same Hyper-V host version to use the full feature set available for this particular operating system (OS) version. See the full list of supported combinations of Hyper-V Manager and Hyper-V host versions here.
Features
To understand what makes Hyper-V Manager unique and how it can best be used, let’s look at all of its features.
- Hyper-V Manager interacts with each Hyper-V host and VM individually, which has been proven to be unfeasible when managing large Hyper-V environments with multiple VMs running at the same time.
- You can manage only two infrastructure components with Hyper-V Manager: Hyper-V hosts and VMs, including their checkpoints, virtual switches, and virtual hard disks.
- SCVMM allows you to set up templates on the basis of which VMs can be automatically created, whereas VM creation in Hyper-V Manager is a completely manual process.
- Hyper-V Manager uses native Windows Management Instrumentation (WMI) for event detection and delivery. Thus, any change taking place in a Hyper-V host or a VM is almost immediately identified and reflected in a graphical user interface (GUI).
- Hyper-V Manager can be used to manage a small number of Hyper-V hosts both locally and remotely.
- Due to its intuitive and simple GUI, Hyper-V Manager is considered a useful management tool for beginners who don’t have a technical background but want to start working with a Hyper-V environment.
- It is a great management tool for small and medium-sized businesses whose virtualization demands can be satisfied even with the limited feature set of Hyper-V Manager.
Interface overview
In the left pane, you can see the name of a Hyper-V host. In the right pane, you can see the menu enlisting all the configuration options available for a Hyper-V host as well as VM. Three sub-panes in the center (Virtual Machines, Checkpoints, and Details) contain the main information about the VMs running on a host.

The Virtual Machines section lists all VMs, their name, state, CPU usage, assigned memory, uptime, status, and configuration version. To add or remove one of the columns, right-click any column and select which ones should be displayed or hidden.

In the Checkpoints section below, you can see how many checkpoints this particular VM has and when they were created. The last section provides the primary details about a Hyper-V VM, including the general summary, memory size, and networking configurations.
How to Install Hyper-V Manager on Windows
Hyper-V Manager is automatically installed when you enable the Hyper-V role on your computer. Another option is to enable only Hyper-V management tools, which is mostly applied on computers that don’t meet Hyper-V system requirements. The process of Hyper-V installation may also vary depending on the OS installed on your computer. Below, we will provide guidelines on how to install Hyper-V Management Tools, including Hyper-V Manager, on Windows and Windows Server.
- Open Control Panel.
- Click Programs and Features.
- Click Turn Windows features on or off.
- Expand the Hyper-V section.
- Check the Hyper-V Management Tools box to install Hyper-V Manager (If you want to enable the Hyper-V role as well, select Hyper-V Platform).

- Click OK. This action should start the installation operation.
- Click Restart Now to implement all required changes or click Don’t Restart to postpone the restart of your computer.

Install Hyper-V Manager on Windows Server
- Open Server Manager.
- Click Manage.
- Select Add Roles and Features to open Add Roles and Features Wizard.
- Click Features.
- Expand Remote Server Administration Tools and then Role administration tools.
- Check the Hyper-V management tools box.

- Confirm the changes.

Install Hyper-V Manager with PowerShell
At the same time, you can use PowerShell cmdlets to make the process of Hyper-V installation even easier.
To enable Hyper-V Management Tools on Windows, open PowerShell as Administrator and run the following command.
Enable-WindowsOptionalFeature -Online -FeatureName Microsoft-Hyper-V -All
The process will start automatically. Don’t forget to reboot after the operation is complete.
To enable Hyper-V Management Tools on Windows Server, you should also open a PowerShell console as Administrator and run the following command:
Add-WindowsFeature rsat-Hyper-V-tools
After the installation, a system reboot is required to adopt all changes.
Operations Available in Hyper-V Manager
Some of our previous blog posts have covered how to manage a Hyper-V environment, including how to create and configure VMs, virtual switches, network adapters, and checkpoints, using Hyper-V Manager. In this blog post, we will discuss possible operations and tasks which can be performed in Hyper-V Manager.
For that purpose, open Hyper-V Manager and look at the right pane of the management console. Here, you can see a list of the actions which can be applied to a Hyper-V host and a particular VM running on that host.
Now, let’s discuss which options are available for you to manage Hyper-V hosts:
- Quick Create is a Hyper-V installation wizard used for making the process of VM creation easy and simple. You can select an OS, a VM name, and a virtual switch to ensure communication with other VMs. Due to the small number of configuration options, you can quickly create a Hyper-V VM in just a few clicks.
- New allows you to create a Virtual Machine, Hard Disk, or Floppy Disk. If you choose to create a VM or a virtual hard disk, the corresponding wizard should open, providing you with a set of configuration options. As for the virtual floppy disk, after selecting this option, you will be asked to type the file name of a new floppy disk and specify the location where it will be stored.
- Import Virtual Machine. The Import Virtual Machine Wizard will open, which can be used to import a VM from a set of configuration files to a local server.
- Hyper-V Settings. By clicking Hyper-V Settings, you will get access to the settings for a Hyper-V host. Here, you can specify the default folder for storing virtual hard disk files and VM configuration files; enable spanning NUMA nodes so as to run more VMs at the same time; specify the number of simultaneous storage migrations; allow enhanced session mode. Moreover, Hyper-V Manager allows you to configure user management options including which key combinations should be applied when running VMConnect, the key combination to enable mouse release, the use of enhanced session mode, and the option to reset all check boxes that have already been checked in Hyper-V Manager.


- Virtual Switch Manager can be used to create a virtual switch (external, internal, or private), set up or remove existing virtual switches, and configure media access control (MAC) addresses.


- Virtual SAN Manager allows you to create a new virtual Fibre Channel storage area network (SAN) and set up World Wide Port Name (WWPN) addresses to ensure smooth live migrations without the loss of connectivity to Fibre Channel storage.


- Edit Disk opens the wizard which allows you to edit a virtual hard disk. For that purpose, specify the location of the required disk file. Depending on your disk type, the options for editing may vary. Generally, they include: Compact, Convert, or Expand.


- Inspect Disk allows you to see the properties of a virtual hard disk, including its format, type, location, file name, current file size, and maximum disk size.


- Stop Service can be used to stop the VM Management service and its dependent services. If you stop the service, you will no longer be able to manage the virtualization environment.
- Remove Server allows you to remove a Hyper-V host from the list of servers.
- Refresh reloads the list of VMs and their checkpoints.
- View enables you to customize the console window by either adding or removing the items.
- Help opens the window where you can find information about Hyper-V configuration by typing your request in a search bar.


Another set of actions are used to manage Hyper-V VMs. Available operations may vary depending on the VM state (Running, Paused, Off). Let’s discuss them in detail:
- Connect launches the Virtual Machine Connection application and allows you to connect to a Hyper-V host from Hyper-V Manager.
- Settings opens the VM setting user interface.


Here, you are provided with a number of options, such as adding hardware devices (e.g., SCSI Controller, Network Adapter, Fibre Channel Adapter) to your VM; defining the boot order; configuring security options (Secure Boot, Encryption Support, Security Policy); specifying the memory metrics of a selected VM. Moreover, you can modify the CPU settings, including resource control, processor compatibility, and NUMA topology; add hard drives, CD/DVD drives, or shared drives to the SCSI controller or remove the SCSI controller from the VM; configure the network adapter settings.
In the Management section, you can change the VM name; enable or disable Hyper-V Integration Services on a selected VM; modify the configurations for checkpoints; specify the location for storing the Smart Paging Files of this VM; set up Automatic Start Action and Automatic Action.
- Start button starts a selected VM.
- Turn Off allows to turn off the selected VMs.
- Shut Down is used to shut down the OS within a selected VM of your choice.
- Save stops a VM and saves it in a given state. During this, the VM CPU resources and memory can be freely used by other VMs.
- Pause stops a VM and saves it in a given state. However, during this, only the VM CPU resources can be used by other VMs.
- Resume enables you to unpause a VM and resume all operations.
- Reset initiates a system restart process without waiting for a VM to save the progress and gracefully close applications.
- Checkpoint creates a checkpoint of a selected VM.
- Revert allows you to revert a VM to its previous checkpoint.
- Move opens the wizard in which you can configure how the virtual hard disks attached to a particular VM will be moved. Here, you can choose the move type and move options and specify a new location for VM files.

- Export opens the menu in which you can specify an export location where a VM, including its virtual hard disk files, VM configuration files, and checkpoints, will be stored.


- Rename helps to rename a VM.
- Help is also used for finding information about Hyper-V configuration by typing your request in the search bar.
Even though in Hyper-V Manager you can only manage one VM at a time, it provides a wide set of actions and features as well as a simple and intuitive GUI, which makes the management process a pleasant experience.
Conclusion
Hyper-V Manager is a Microsoft application that is usually installed when the Hyper-V Role is enabled on Windows OS. Despite having not enough functionality to serve large virtual environments, Hyper-V Manager has attracted a great number of followers because it is user-friendly, intuitive, and license-free. Hyper-V Manager has proven to be an efficient management console which allows you to create, modify, and delete VMs locally or remotely when necessary.
Hyper-V Manager is a tool used for building Hyper-V environments but its functionality is not advanced enough to ensure total protection of your infrastructure. For that purpose, the right data protection solution, which can save you time, effort, and money, should be used instead. NAKIVO Backup & Replication is a reliable and efficient solution which ensures fast and successful system recovery and allows to achieve even the most demanding RTO and RPO requirements.